Irresistible Cherry Chocolate Dip for Effortless Indulgence

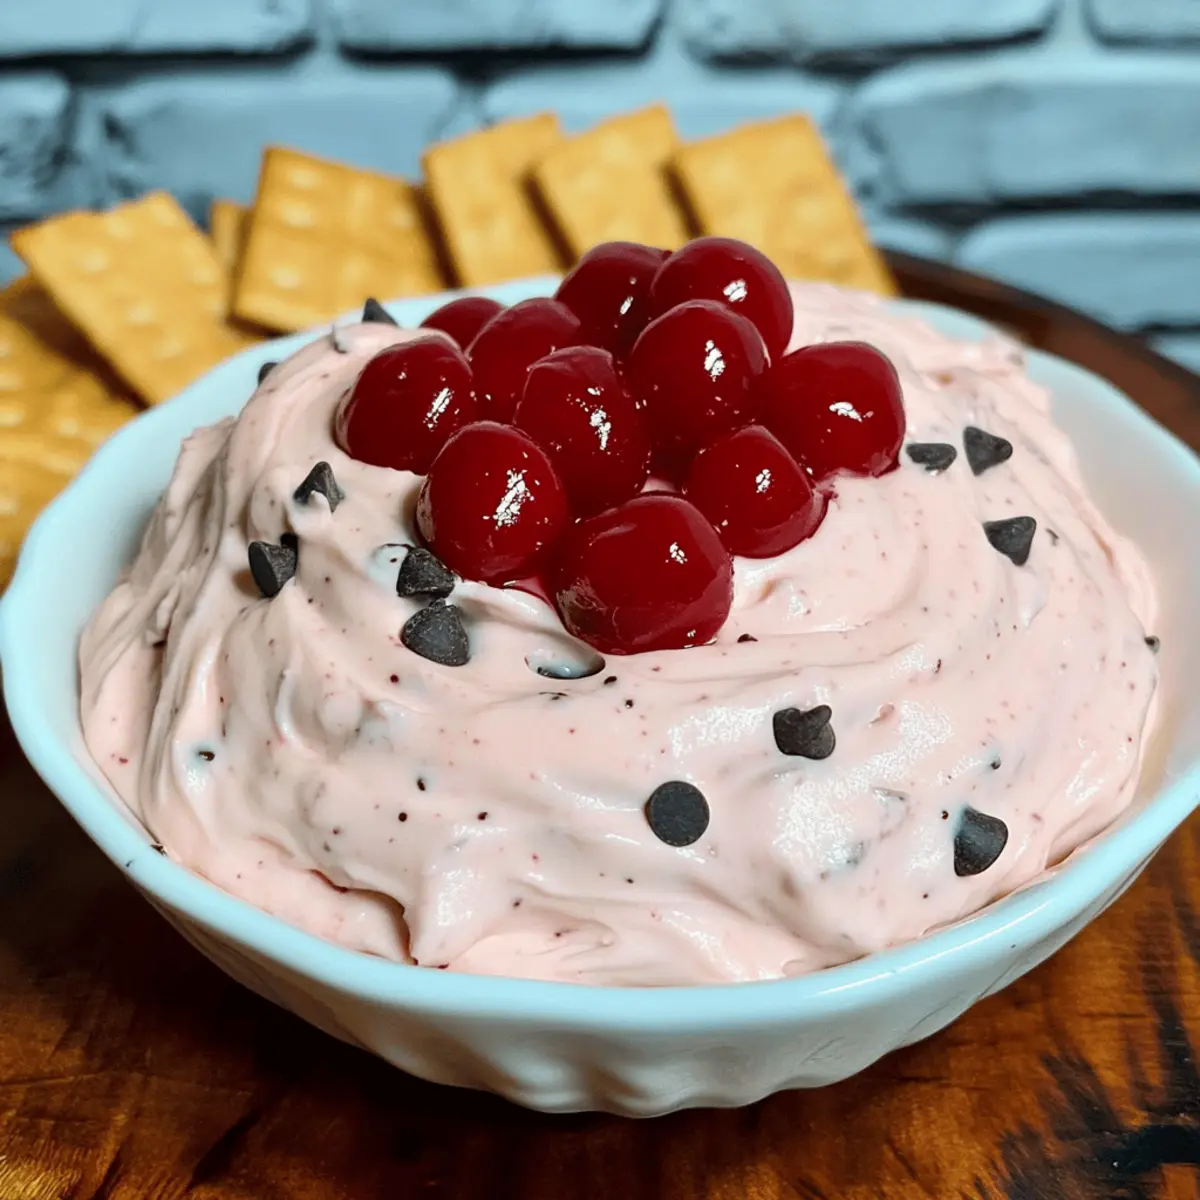
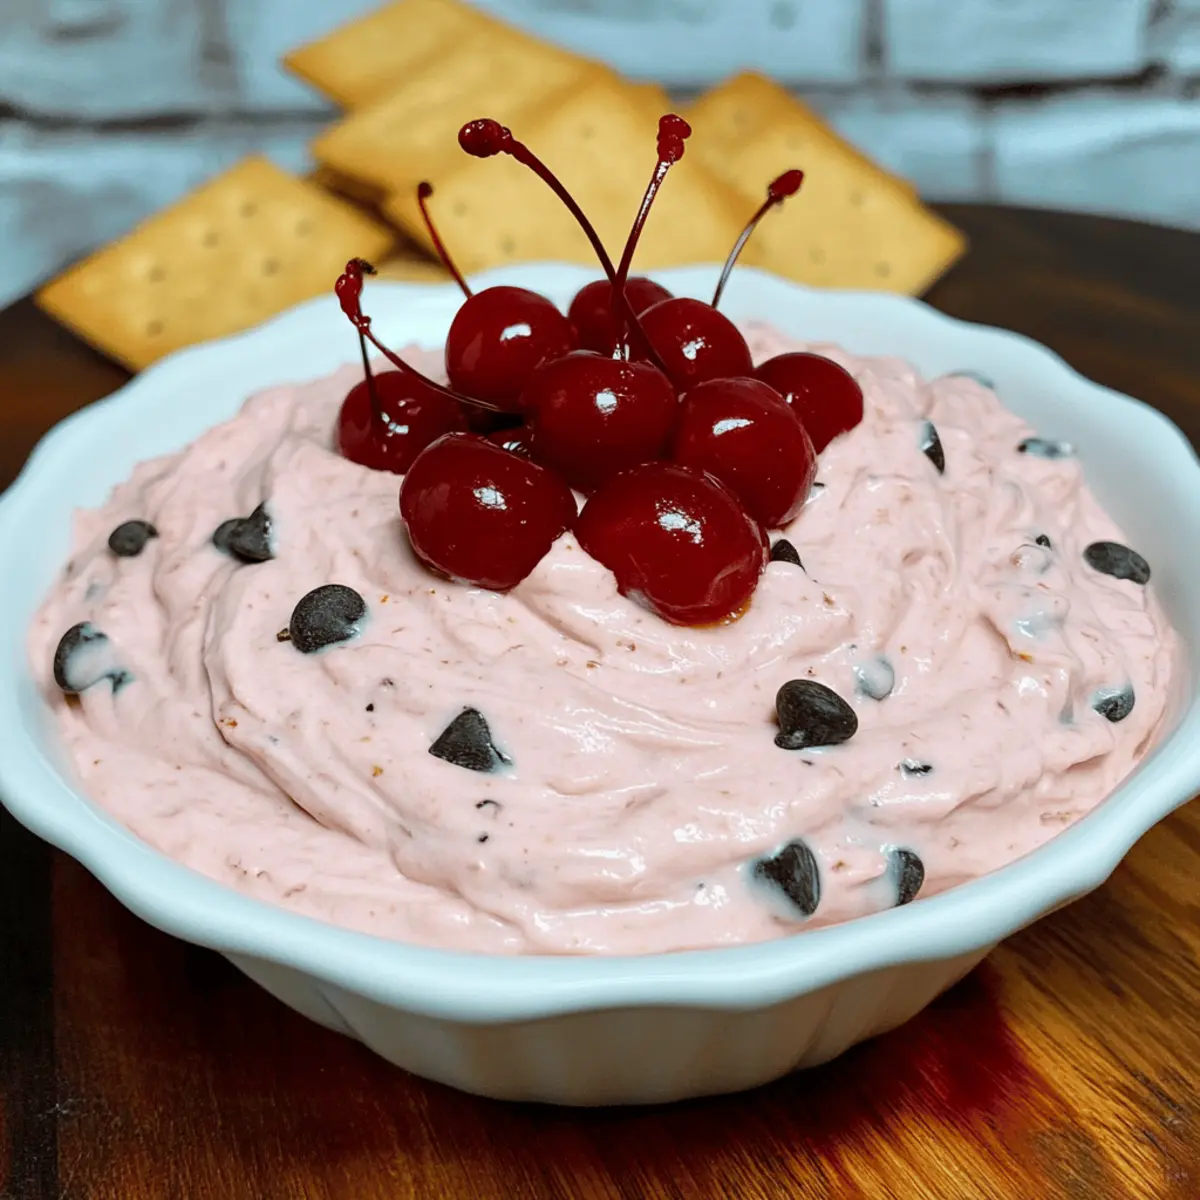
“Can you believe how easy it is to whip up a dessert that feels indulgent yet takes just 15 minutes?” That’s exactly how I felt when I first made this Cherry Chocolate Dip, a creamy, no-bake treat that perfectly marries the sweetness of maraschino cherries with the rich depth of chocolate. Whether you’re hosting a gathering or just treating yourself on a quiet evening, this dip ticks all the right boxes. It’s not only quick to prepare but also a crowd-pleaser, sure to ignite smiles and spark conversations. You can even customize it with fresh cherries or different chocolates to match your cravings. Ready to take your snacking to the next level? Let’s dive into this delectable blend of flavors and fun!

Why is Cherry Chocolate Dip a Must-Try?

Easily Prepared: Whipping up this dip only takes 15 minutes, making it perfect for last-minute gatherings.
Irresistible Flavor Combination: Enjoy the delightful pairing of cherry sweetness with luxurious chocolate.
Versatile Delight: Customize with fresh cherries, dark chocolate, or even a dash of hazelnut extract to fit your mood.
Perfect for Any Occasion: Whether it’s a casual snack or a festive party, this dip brings joy to any setting.
No-Bake Convenience: Experience indulgence without turning on the oven, freeing up more time for fun!

Get ready to impress your guests or treat yourself to a delightfully sweet experience! For more easy dessert ideas, check out these Coffee Chocolate Truffles and Coconut Chocolate Rolls.

Cherry Chocolate Dip Ingredients

• Prepare to indulge with these must-have ingredients!

For the Dip

  • Cream Cheese – Provides creaminess and a rich texture; make sure it’s softened for smooth blending.
  • Powdered Sugar – Adds sweetness while stabilizing the dip; opt for sifted for a lump-free finish.
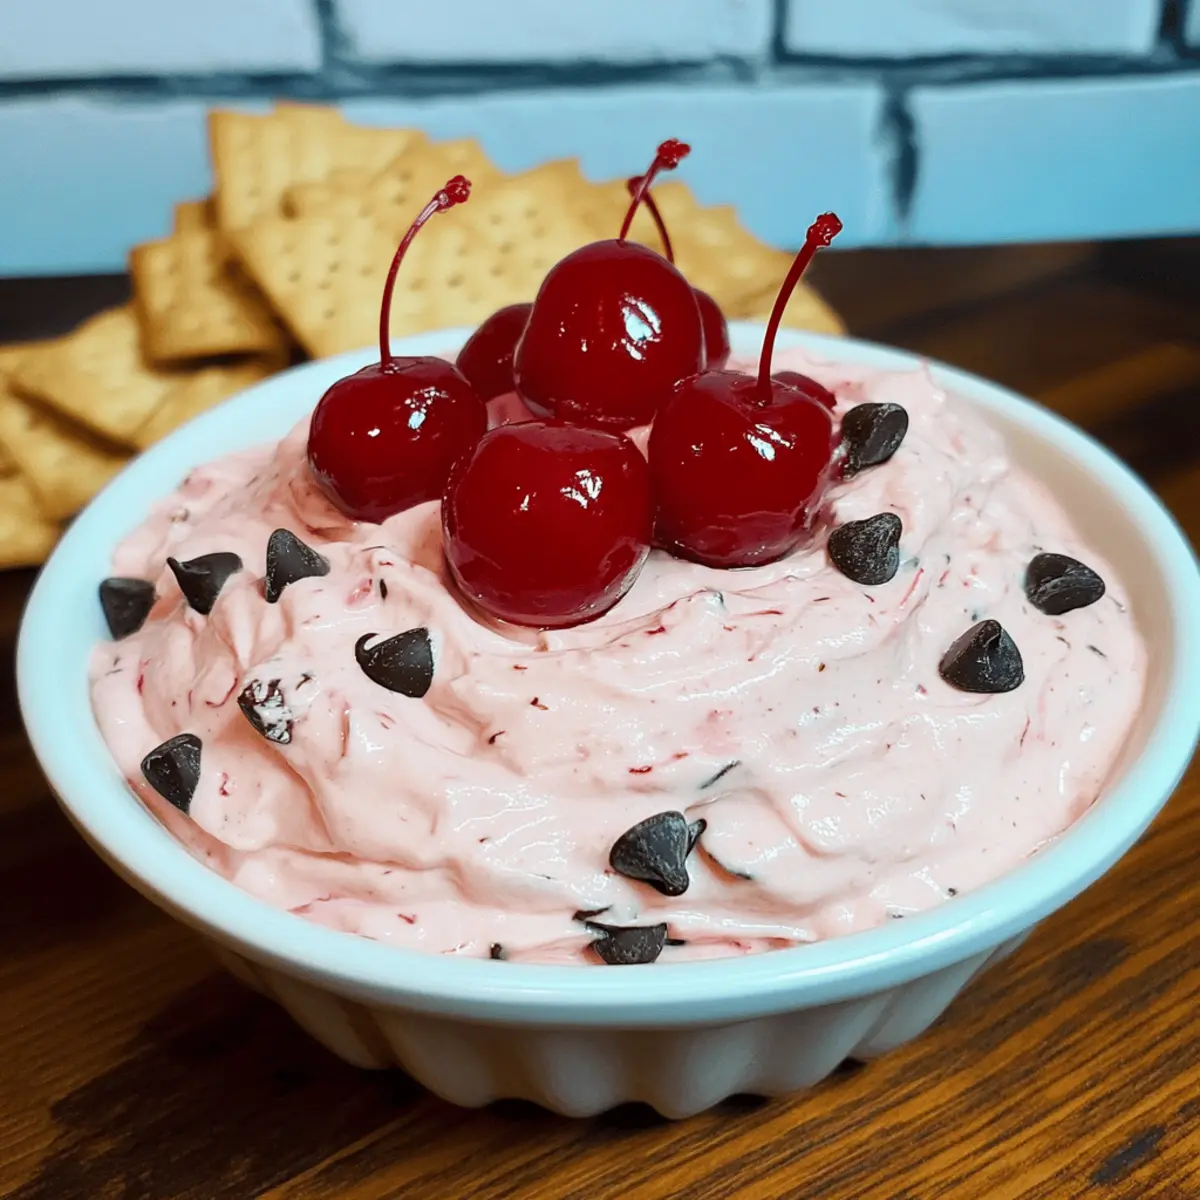
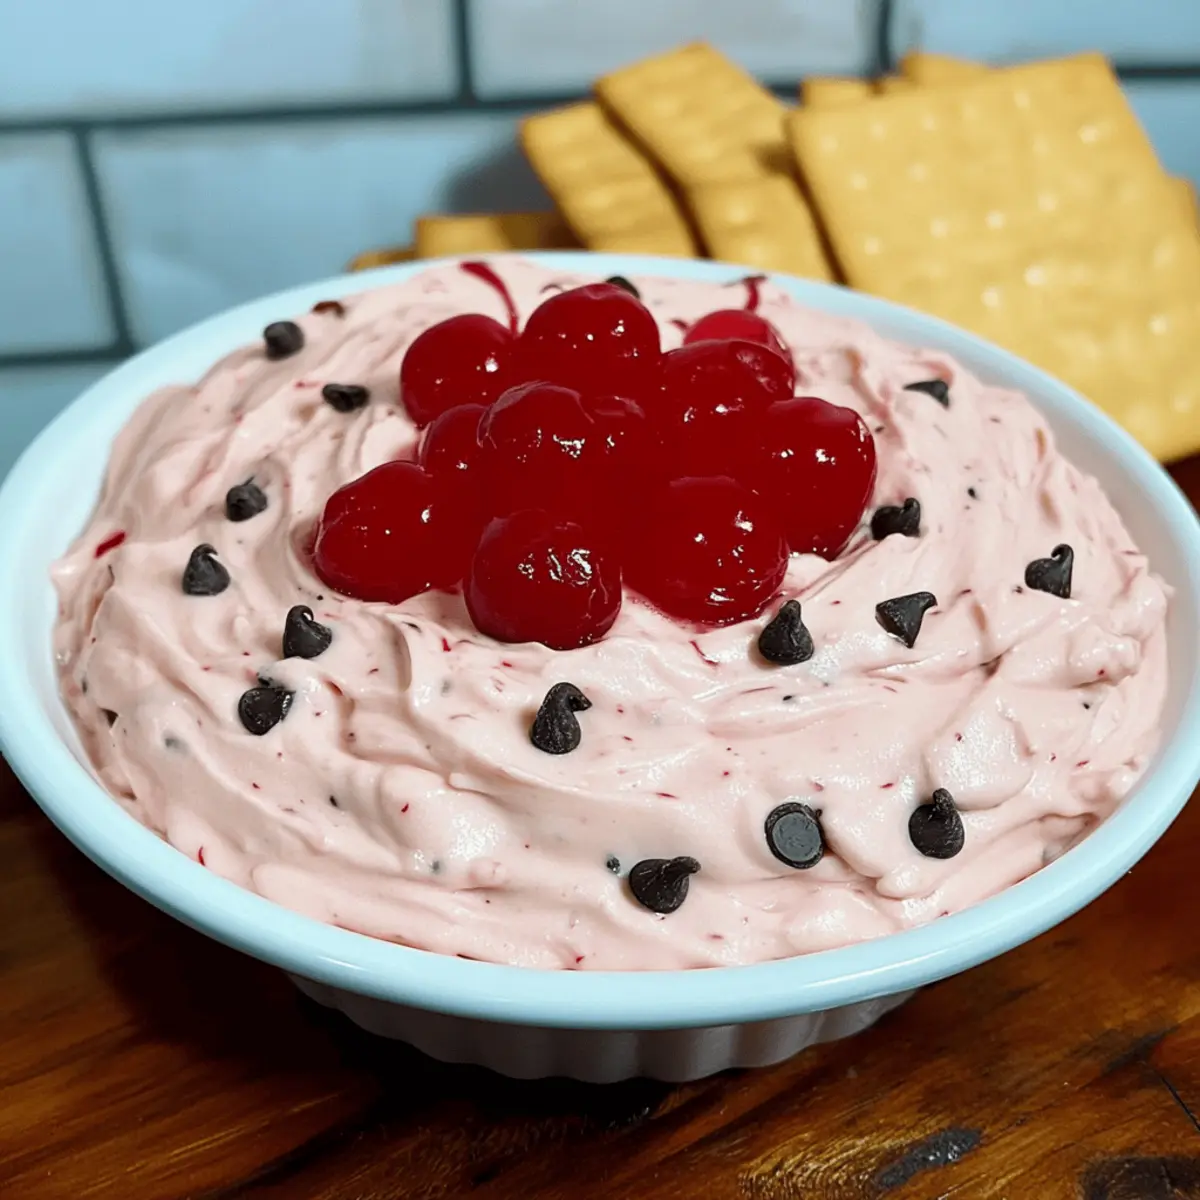
  • Maraschino Cherries – Offers vibrant color and sweetness; reserve the juice for added cherry flavor.
  • Cool Whip – Contributes lightness, making your dip airy and fluffy; store in the freezer until ready to use.
  • Vanilla Extract – Enhances the overall flavor, complementing the cherries and chocolate; never skip this delicious addition!
  • Almond Extract – Adds a subtle nutty undertone; adjust or omit based on your personal preference.
  • Mini Chocolate Chips – Sprinkle in chocolatey goodness throughout the dip, heightening its appeal and richness.

With these ingredients for the Cherry Chocolate Dip, your dessert will surely be a hit!

Step‑by‑Step Instructions for Cherry Chocolate Dip

Step 1: Beat the Cream Cheese
In a mixing bowl, combine softened cream cheese and use a hand mixer to beat until the mixture is smooth and creamy, about 2-3 minutes. Scrape down the sides to ensure no lumps remain, creating a velvety base for your Cherry Chocolate Dip. This step is essential for a luscious texture.

Step 2: Add Sweetness and Flavor
Gradually add in the powdered sugar along with the vanilla and almond extracts. Mix the ingredients together on low speed until they’re fully incorporated, about 1-2 minutes, creating a sweet and fragrant mixture. This will enhance the flavor profiles of the Cherry Chocolate Dip.

Step 3: Infuse Cherry Flavor
Pour in 2 tablespoons of the reserved cherry juice from the maraschino cherries and stir gently to combine. This infusion brings a delightful cherry essence to the dip while maintaining its creamy mixture. The color will become slightly pink, adding a lovely visual appeal as you prepare your Cherry Chocolate Dip.

Step 4: Fold in the Cool Whip
Gently fold in the Cool Whip using a rubber spatula until the mixture is light and fluffy, roughly 1-2 minutes. Be careful not to deflate the airy texture of the Cool Whip, as this will ensure the Cherry Chocolate Dip has a beautiful, creamy consistency that’s perfect for dipping.

Step 5: Incorporate Cherries and Chocolate Chips
Carefully mix in the chopped maraschino cherries and mini chocolate chips until evenly distributed throughout the dip, ensuring every bite contains delicious bursts of flavor. This step adds a rich, sweet dimension to your Cherry Chocolate Dip, making it irresistible.

Step 6: Chill for Best Flavor
Transfer the whipped Cherry Chocolate Dip to a serving bowl, smoothing the top with a spatula. Cover with plastic wrap and chill in the refrigerator for at least 30 minutes. Allowing it to sit will enhance the flavors, creating a deliciously satisfying dip that’s ready to impress your guests.

Storage Tips for Cherry Chocolate Dip

  • Fridge: Store the Cherry Chocolate Dip in an airtight container for up to 3 days. Make sure it’s well-sealed to keep it fresh and prevent it from absorbing any odors.
  • Freezer: For longer preservation, you can freeze the dip for up to 2 months. Store it in a freezer-safe container, and when ready to enjoy, thaw it in the fridge overnight before serving.
  • Stirring Before Serving: If you notice any separation after storing, gently stir the dip to reincorporate the ingredients before enjoying it again. This will help restore its delightful texture.
  • Make-Ahead Tips: You can prepare this dip up to 24 hours in advance. Chilling enhances the flavors, making it an excellent choice for parties or gatherings!

Make Ahead Options

This Cherry Chocolate Dip is a fantastic choice for busy home cooks looking to simplify meal prep! You can prepare the entire dip up to 24 hours in advance, allowing the flavors to meld beautifully. Simply follow the recipe up until chilling it in the refrigerator, ensuring you cover the bowl tightly with plastic wrap to prevent any drying out. When you’re ready to serve, you’ll just need to give it a gentle stir, as it may separate slightly during storage. Rest assured, your Cherry Chocolate Dip will be just as delicious, delightfully creamy, and ready to impress your guests with minimal last-minute hassle!

What to Serve with Cherry Chocolate Dip

Indulge in the perfect pairing possibilities that elevate your Cherry Chocolate Dip into a delightful spread for any occasion.

  • Graham Crackers: These crunchy, sweet companions provide a satisfying contrast to the creamy dip and are easily dunked for a fun treat.
  • Fresh Strawberries: Their juicy sweetness complements the chocolatey richness of the dip, bringing a burst of freshness with each bite.
  • Vanilla Wafers: Soft and sweet, these cookies add a nostalgic touch that harmonizes beautifully with the dip’s rich flavors.
  • Apple Slices: Crisp and tart, apple slices create a balanced flavor duo with the dip, perfect for those seeking a healthier option.
  • Pretzel Crisps: The salty crunch of pretzel crisps enhances the sweetness of the Cherry Chocolate Dip, providing a delightful contrast.
  • Mini Pudding Cups: Layer your dip with layers of chocolate or vanilla pudding for an enchanting dessert that’s pleasing to the eyes and the palate.
  • Chocolate Milkshake: Pair with a thick milkshake for a decadently indulgent treat, perfect for satisfying those sweet cravings.

Cherry Chocolate Dip Variations & Substitutions

Unlock your creativity and give this delightful Cherry Chocolate Dip your own personal touch!

  • Fresh Cherries: Replace maraschino cherries with fresh cherries for a natural flavor. Just remember to pit and chop them before mixing. Their juicy, sweet bite offers a delightful twist!

  • Dark Chocolate: Swap semi-sweet chocolate chips for dark chocolate chips to elevate the richness. This variation deepens the chocolate flavor, creating a more indulgent experience.

  • Nutty Crunch: Add chopped nuts like pecans or walnuts for a textural surprise. This not only adds crunch but also a lovely nutty flavor that complements the cherries beautifully.

  • Hazelnut Extract: Incorporate hazelnut extract instead of almond for a unique depth of flavor. The nutty essence pairs wonderfully with the chocolate and cherries, bringing a surprising twist to the dip.

  • Greek Yogurt: For a healthier option, replace part of the cream cheese with Greek yogurt for added tanginess and a creamy texture. This substitution cuts calories while maintaining that beloved creaminess.

  • Spicy Kick: For those who love heat, add a dash of cayenne pepper or chili powder to the mix. This unexpected zing will add a thrilling flavor contrast to the sweetness of the dip.

  • Fruit Spreads: Mix in a spoonful of cherry preserves or any fruit spread of your choice. This will enhance the cherry flavor and add an interesting layer of sweetness that everyone will love.

Crafting your version of this dip is as thrilling as the journey to find your favorite flavors! And if you’re in the mood for more delightful desserts, don’t miss out on making these scrumptious Nutty Chocolate Date bites or indulging in Coconut Chocolate Rolls.

Expert Tips for Cherry Chocolate Dip

  • Soften Cream Cheese: Make sure your cream cheese is at room temperature. This step prevents lumps and ensures a smooth, creamy dip.

  • Drain Cherries Well: Excess moisture from maraschino cherries can make your dip runny. Always drain and pat them dry before adding.

  • Cool Whip Technique: Gently fold in the Cool Whip rather than stirring vigorously to maintain its light and fluffy consistency in the Cherry Chocolate Dip.

  • Chill to Enhance Flavor: Refrigerate the dip for at least 30 minutes. Chilling allows the flavors to meld beautifully, enhancing the overall taste.

  • Customizable Ingredients: Feel free to experiment with using fresh cherries, dark chocolate, or different extracts to create a version of the Cherry Chocolate Dip that matches your taste preferences.

Cherry Chocolate Dip Recipe FAQs

What type of cherries should I use for the Cherry Chocolate Dip?
I recommend using maraschino cherries for their sweetness and vibrant color, which work beautifully in this dip. If you want a fresher taste, you can opt for fresh cherries, but be sure to add a tablespoon of cherry preserves for additional sweetness and color.

How should I store leftovers of Cherry Chocolate Dip?
Store your Cherry Chocolate Dip in an airtight container in the fridge for up to 3 days. It’s essential to seal the container well to keep the dip fresh and prevent any strange odors from affecting its flavor.

Can I freeze Cherry Chocolate Dip?
Absolutely! You can freeze the Cherry Chocolate Dip for up to 2 months. Make sure to place it in a freezer-safe container. When you’re ready to enjoy it again, thaw it in the fridge overnight and give it a gentle stir to bring back its creamy texture.

What can I do if my dip is too runny?
If your Cherry Chocolate Dip turns out too runny, the most likely culprit is excess moisture from the cherries. To fix this, you can add a bit more powdered sugar or even a small amount of cream cheese to help thicken it up. Just fold in the additional ingredients gently until the desired consistency is achieved.

Is this recipe suitable for those with allergies?
The Cherry Chocolate Dip contains dairy and may not be suitable for those with lactose intolerance or dairy allergies. For a dairy-free version, you can substitute the cream cheese with a dairy-free cream cheese alternative and use coconut whipped cream instead of Cool Whip. Always check labels for any other allergens.

How long before serving should I chill the Cherry Chocolate Dip?
I suggest chilling the dip for at least 30 minutes before serving. This allows the flavors to meld beautifully, giving you a more robust taste experience. If you can chill it longer, like up to a couple of hours, the flavors will deepen even further!

Cherry Chocolate Dip

Irresistible Cherry Chocolate Dip for Effortless Indulgence

This Cherry Chocolate Dip is a creamy, no-bake treat, ready in just 15 minutes for a delightful dessert experience.
Prep Time 15 minutes
Chill Time 30 minutes
Total Time 45 minutes
Servings: 8 servings
Course: Dessert
Cuisine: American
Calories: 180

Ingredients
  

For the Dip
  • 8 oz Cream Cheese Softened for smooth blending
  • 1 cup Powdered Sugar Sifted for a lump-free finish
  • 1 cup Maraschino Cherries Reserve the juice for added flavor
  • 1 8 oz Cool Whip Store in freezer until ready to use
  • 1 tsp Vanilla Extract Enhances overall flavor
  • 0.5 tsp Almond Extract Adjust or omit based on preference
  • 0.5 cup Mini Chocolate Chips Sprinkle in for added richness

Equipment

  • mixing bowl
  • hand mixer
  • rubber spatula
  • airtight container

Method
 

Preparation Steps
  1. In a mixing bowl, combine softened cream cheese and use a hand mixer to beat until smooth and creamy, about 2-3 minutes.
  2. Gradually add the powdered sugar along with vanilla and almond extracts. Mix on low speed for 1-2 minutes.
  3. Pour in 2 tablespoons of reserved cherry juice and stir gently to combine, until the dip adopts a pink hue.
  4. Gently fold in the Cool Whip using a rubber spatula until light and fluffy, about 1-2 minutes.
  5. Mix in the chopped maraschino cherries and mini chocolate chips until evenly distributed.
  6. Transfer the dip to a serving bowl, cover with plastic wrap, and chill in the refrigerator for at least 30 minutes.

Notes

Ensure all ingredients, especially cream cheese and Cool Whip, are at the right temperature for the best texture. The dip can be prepared up to 24 hours in advance for enhanced flavor.

Apple Crumble Chia Pudding: Your Cozy Fall Delight!

As the cool breeze ushers in the vibrant colors of fall, my kitchen fills with the warming aroma of spiced apples sizzling on the stove. This time of year, there’s nothing quite like curling up with a cozy breakfast, and my Apple Crumble Chia Pudding is the perfect solution for a hearty morning meal. Packed with fiber and fully vegan, this recipe not only simplifies your morning routine but also delights your taste buds with creamy chia seeds and a crunchy crumble topping. Whether you’re meal prepping for the week or seeking a comforting treat, this dish is a nourishing nod to autumn’s bounty. Ready to dive into a breakfast that tastes like apple pie but is effortlessly healthy? Let’s get cooking!

Why is this Apple Crumble Chia Pudding special?

Versatile and Creative: This recipe allows endless personalization—swap in your favorite fruits or nut alternatives to make it truly yours.
Irresistible Flavor: Warm, spiced apples combine with a creamy chia base, creating a taste sensation that perfectly encapsulates the essence of fall.
Meal Prep Friendly: Whip it up in advance and enjoy a healthy breakfast for days, making mornings a breeze!
Fiber-Packed Goodness: Loaded with fiber thanks to chia seeds and apples, it’ll keep you fuller for longer, making it a nutritious choice for everyone.
A Crowd-Pleaser: Whether served at brunch or as a cozy family breakfast, this dish is sure to impress, reminiscent of an indulgent apple pie! For other comforting dishes, check out the Rustic Apple Walnut or Apple Pie recipes.

Apple Crumble Chia Pudding Ingredients

• Get ready to create a cozy delight!

For the Chia Pudding Base

  • Chia Seeds – Provides soluble fiber and a unique texture; substitute with blended chia seeds for a smoother consistency.
  • Miso Paste – Adds depth and balances sweetness; can be omitted or replaced with extra salt.
  • Medjool Dates – Acts as a natural sweetener; dried apricots or other dried fruits are viable substitutes.
  • Spices (Cinnamon and Cardamom) – Contributes warming flavors synonymous with fall; apple pie spice mix can be used as a substitute.
  • Soy Milk – Used for added protein; oat milk or any favorite plant-based milk works too.
  • Yogurt (Soy) – Adds creaminess and tang; feel free to swap in any preferred yogurt variety.

For the Topping

  • Oats – Provides texture; use gluten-free oats for a GF variation, or replace with additional nuts if preferred.
  • Walnuts – Adds crunch and healthy fats; pecans or almonds can be alternatives or omit for a nut-free option.

For the Layering

  • Apples – Adds sweetness and texture; fresh bananas can substitute for stewed apples if you’re short on time.
  • Apple Butter – Enhances apple flavor concentration; if unavailable, 1/4 cup of sautéed apples can be blended as a substitute.

With these delightful ingredients in hand, you’re ready to savor the flavors of fall with the irresistible apple crumble chia pudding!

Step‑by‑Step Instructions for Apple Crumble Chia Pudding

Step 1: Blend the Base
In a blender, combine the yogurt, apple butter, Medjool dates, miso paste, vanilla, cinnamon, cardamom, and soy milk. Blend until the mixture is completely smooth, with a velvety texture. This creamy base forms the foundation of your luscious Apple Crumble Chia Pudding, so take a minute to ensure no lumps remain.

Step 2: Combine Chia Seeds
Pour the blended mixture into a medium bowl and stir in the chia seeds with a whisk. Allow this blend to sit for 5 minutes, during which the chia seeds will swell and thicken the mixture. After 5 minutes, whisk again to break up any clumps forming, ensuring an even, pudding-like consistency.

Step 3: Prepare the Crumble
For the crumble topping, add oats, walnuts, Medjool dates, and a pinch of salt to a food processor. Pulse the ingredients together until they reach a crumbly texture, resembling coarse breadcrumbs. This crunchy layer adds delightful contrast to the silky chia pudding and enhances the overall flavor of your Apple Crumble Chia Pudding.

Step 4: Sauté the Apples
In a skillet over medium-low heat, sauté the diced apples with a splash of maple syrup and a dash of cinnamon until they soften and become fragrant, about 5-7 minutes. Stir occasionally to evenly coat the apples in the spices and syrup, filling your kitchen with the warm scents of fall essential for this recipe.

Step 5: Layer the Pudding
In small jars or bowls, start layering your Apple Crumble Chia Pudding: first spoon in a layer of the chia pudding base, followed by a layer of the sautéed apples, and then sprinkle the crumble on top. Repeat the layers until you fill the jars, leaving a little room at the top for drizzles of extra apple butter or maple syrup if desired.

Step 6: Store and Enjoy
Seal your jars or bowls with lids and refrigerate for up to 3-4 days to allow the flavors to meld together beautifully. This makes your Apple Crumble Chia Pudding not only a delicious breakfast option but also a make-ahead treat that’s ready to grab and go throughout the week!

What to Serve with Apple Crumble Chia Pudding

Imagine a cozy morning transformed into a delightful spread that perfectly complements your creamy, fiber-packed pudding!

  • Cinnamon Apple Slices: Fresh apple slices dusted with cinnamon bring a crisp texture and enhance the warm apple flavors in the pudding.
  • Oatmeal Pancakes: Soft, fluffy pancakes make the perfect vessel for layering flavors, creating a delicious stack that integrates beautifully with the pudding.
  • Coconut Yogurt Parfait: Silky coconut yogurt adds a tangy touch and a luscious creaminess, contrasting wonderfully with the apple crumble chia pudding.
  • Maple Almond Milk: A glass of lightly sweetened almond milk offers a smooth sip that balances the dish’s rich textures and flavors.
  • Spiced Nut Granola: Crunchy, spiced granola on the side introduces additional crunch and nutty flavors that enhance the delightful crumble topping.
  • Warm Chai Tea: This comforting drink infuses cozy spices, echoing the pudding’s flavor profile while providing a soothing beverage option to start your day.
  • Vegan Scones: Light and flaky scones with a touch of cinnamon make a delightful pairing, perfect for those who crave a sweet complement alongside their pudding.

How to Store and Freeze Apple Crumble Chia Pudding

Fridge: Store your Apple Crumble Chia Pudding in airtight containers for up to 3-4 days, ensuring freshness while allowing the flavors to meld harmoniously.

Freezer: For longer storage, freeze the layers separately—chia pudding, sautéed apples, and crumble topping can be frozen for up to 2 months. Thaw in the fridge overnight before serving.

Reheating: If desired, gently reheat the apples on the stovetop and give the pudding a good stir before serving. Enjoy it warm or cold for a delightful experience!

Meal Prep-Friendly: This pudding is ideal for meal prepping; assemble your jars ahead of time for quick grab-and-go breakfasts throughout the week.

Make Ahead Options

These Apple Crumble Chia Puddings are perfect for busy home cooks looking to simplify their mornings! You can prepare the chia pudding mixture and layer it with the sautéed apples up to 3 days in advance. To do this, follow the first four steps of the recipe, then store the layered jars in the refrigerator to maintain freshness. To ensure the quality, cover them tightly with lids and avoid adding the crumble topping until just before serving. When you’re ready to enjoy, simply sprinkle the crumble on top and, if desired, drizzle with extra maple syrup or apple butter for that delicious finishing touch. This way, you can have a hearty, nutritious breakfast that’s just as delightful as when freshly made!

Expert Tips for Apple Crumble Chia Pudding

  • Perfect Blending: Use an immersion blender in a tall jar for easy mixing of the chia pudding base; fewer dishes to clean up later!
  • Clump-Free Consistency: Prevent clumping of chia seeds by whisking the mixture twice during the setting process— your Apple Crumble Chia Pudding will turn out creamy and smooth.
  • Adjustable Thickness: Feel free to adjust the liquid levels based on your desired pudding thickness; use more or less milk for a thicker or thinner consistency.
  • Quick Sautéing: To save time, sauté the apples in batches and chill them in the fridge to make layering even faster on busy mornings!
  • Flavor Enhancements: Add a pinch of nutmeg or ginger to the spice mix for a little extra warmth, creating an irresistible flavor profile in your pudding.
  • Creative Substitutions: Don’t hesitate to swap in your favorite fruits or nuts for the topping; it’s all about making the Apple Crumble Chia Pudding truly your own!

Apple Crumble Chia Pudding Variations & Substitutions

Feel free to add your personal touch to this recipe and explore delightful alternatives that amplify the cozy flavors!

  • Dairy-Free: Use coconut yogurt instead of soy yogurt for a tropical twist and a creamier texture.

  • Nut-Free: Replace walnuts with pumpkin seeds for a crunchy, nut-free alternative that still packs a nutritious punch. They add a nice bite without any nut concerns.

  • Fruit Forward: Experiment by layering with ripe pears or seasonal berries instead of apples to change the flavor profile while still celebrating fall’s harvest.

  • Extra Sweetness: For a sweeter pudding, replace some Medjool dates with maple syrup or agave nectar, adjusting to your taste preference.

  • Spice It Up: Add a touch of ginger or nutmeg alongside the cinnamon to deepen the warm flavor base in a way that feels extra comforting.

  • Protein Boost: Stir in some vegan protein powder into the chia base to make this pudding an even heartier breakfast choice, especially for post-workout recovery.

  • Texture Twist: Mix in a little ground flaxseed with the chia seeds for added texture and nutritional benefits, enhancing both crunch and healthiness.

Stay inspired in the kitchen, and for more delicious apple-infused ideas, check out our comforting Crisp Cabbage Apple or warm Caramel Milk Pudding recipes!

Apple Crumble Chia Pudding Recipe FAQs

How do I choose ripe apples for this recipe?
Absolutely! When selecting apples, look for firm apples without any dark spots or blemishes. Varieties like Honeycrisp or Fuji are excellent for their sweetness and texture. If you can give them a light squeeze and they feel firm and crisp, you’re in great shape!

What’s the best way to store Apple Crumble Chia Pudding?
Very good question! Store your Apple Crumble Chia Pudding in airtight containers in the refrigerator for up to 3-4 days. This keeps the flavors fresh while allowing the creamy chia base to mix beautifully with the stewed apples.

Can I freeze Apple Crumble Chia Pudding?
Absolutely! To freeze, it’s best to separate the layers; freeze the chia pudding, sautéed apples, and crumble topping in individual containers for up to 2 months. To enjoy, simply thaw overnight in the fridge and give the pudding a good stir before serving.

What should I do if my chia seeds clump together?
To avoid clumping, make sure to whisk the chia seeds into the blended mixture well. After 5 minutes, give it another whisk to break up any clumps. If clumps still form, you can gently blend the pudding again for a smooth consistency.

Is this recipe suitable for people with nut allergies?
Certainly! If you or someone you’re serving has a nut allergy, simply omit the walnuts from the crumble. You can replace them with additional oats or seeds, which will still give you a delightful crunch without the worry.

How can I adjust this recipe for a gluten-free diet?
Very easily! Just be sure to use gluten-free oats in the crumble topping, and check the labels on your yogurt and milk to ensure they are gluten-free as well. This way, everyone can enjoy the comfort of Apple Crumble Chia Pudding!

Apple Crumble Chia Pudding

Apple Crumble Chia Pudding

Apple Crumble Chia Pudding is a tasty fall breakfast that blends creamy chia seeds with spiced apples and a crunchy crumble for a healthy, vegan option.
Prep Time 15 minutes
Cook Time 20 minutes
Sitting Time 5 minutes
Total Time 40 minutes
Servings: 4 servings
Course: Breakfast
Cuisine: Vegan
Calories: 250

Ingredients
  

Chia Pudding Base
  • 1/2 cup Chia Seeds Provides soluble fiber
  • 1 tbsp Miso Paste Can be omitted
  • 3 pcs Medjool Dates Natural sweetener
  • 1 tsp Cinnamon Contributes warming flavors
  • 1 tsp Cardamom Contributes warming flavors
  • 1 cup Soy Milk Used for added protein
  • 1/2 cup Soy Yogurt Adds creaminess and tang
Topping
  • 1 cup Oats Provides texture
  • 1/2 cup Walnuts Adds crunch and healthy fats
Layering
  • 2 cups Apples Adds sweetness and texture
  • 1/4 cup Apple Butter Enhances apple flavor

Equipment

  • Blender
  • Medium bowl
  • Skillet
  • Food Processor

Method
 

Making the Pudding
  1. In a blender, combine the yogurt, apple butter, Medjool dates, miso paste, vanilla, cinnamon, cardamom, and soy milk. Blend until the mixture is completely smooth.
  2. Pour the blended mixture into a medium bowl and stir in the chia seeds with a whisk. Allow sitting for 5 minutes.
  3. Whisk again to break up any clumps forming.
Making the Topping
  1. Add oats, walnuts, Medjool dates, and a pinch of salt to a food processor. Pulse until crumbly.
Sautéing Apples
  1. Sauté diced apples with maple syrup and cinnamon in a skillet over medium-low heat until soft.
Layering the Pudding
  1. In jars, layer the chia pudding base, sautéed apples, and crumble topping.
  2. Repeat layers until jars are filled, leaving room for drizzles.
Storage Instructions
  1. Seal jars and refrigerate for up to 3-4 days.

Notes

Use an immersion blender for easy mixing and adjust milk for desired pudding thickness.

Delicious Homemade Cadbury Creme Bites for Sweet Celebrations

I once overheard my friend rave about the joys of indulging in homemade candy, which sparked a delightful challenge in my kitchen: creating my version of the beloved Cadbury Creme Eggs. That’s how these irresistible Homemade Cadbury Creme Bites were born! With a rich, creamy filling sandwiched between two layers of silky milk chocolate, they turn out to be surprisingly easy to prepare and a hit at gatherings. Not only do these bites make for the perfect Easter treat, but they’re also easy to transport, ensuring you can share a taste of love wherever you go. Whether you’re crafting them for a festive celebration or simply treating yourself, they’re bound to create sweet moments. Curious about how to whip up these delightful bites in your kitchen? Let’s dive in!

Why Make Cadbury Creme Bites?

Irresistible flavor: Each bite delivers a deliciously rich combination of creamy filling and smooth chocolate, reminiscent of your favorite Easter treat.

Effortless preparation: You don’t need to be a master chef; this recipe is simple and achievable, ensuring success for everyone.

Versatile gift option: Perfect for spring celebrations or as a sweet surprise for loved ones, these bites make for a delightful homemade gift!

Transport-friendly: Easy to store in mini cupcake liners, they are perfect for picnics or potlucks without compromising on taste.

For more fun candy creations, check out Grandmas Homemade Bites or explore Free Energy Bites for some guilt-free indulgence.

Crowd-pleaser: Anyone will love these bites—perfect for satisfying sweet cravings and impressing guests alike!

Cadbury Creme Bites Ingredients

For the Chocolate Coating
Milk Chocolate – Use high-quality baking chocolate for a rich flavor and smooth texture.

For the Cream Filling
Light Corn Syrup – Adds essential sweetness and helps create a luscious filling consistency.
Butter (Softened) – Contributes to the creamy richness; ensure it’s at room temperature for easy mixing.
Vanilla Extract – Enhances the overall flavor; opt for pure vanilla for the best results.
Powdered Sugar – Sweetens the filling and helps achieve the right texture.
Salt – A pinch balances sweetness and elevates the flavor profile.
Milk – Adjusts the consistency of the filling for a creamy texture.
Gel Food Coloring (Orange and Yellow) – Adds vibrant color to the yolk-like center; use sparingly for striking effects.

Note: These Homemade Cadbury Creme Bites are sure to become a cherished addition to your Easter celebrations and sweet treats arsenal!

Step‑by‑Step Instructions for Homemade Cadbury Creme Bites

Step 1: Prepare Baking Cups
Begin by lining 48 mini muffin cups with parchment paper liners. This step ensures that your Homemade Cadbury Creme Bites are easy to remove once they’re set. Make sure the liners are securely placed, as they will help hold the chocolate and filling perfectly in place during assembly.

Step 2: Melt Chocolate
In a microwave-safe bowl, place half of the milk chocolate and melt it in the microwave. Heat at 50% power in 30-second increments, stirring in between until the chocolate is smooth and fully melted. Be careful not to overheat; you want a glossy consistency that will coat the bottoms of the cups beautifully.

Step 3: Fill Bases
Using a small piping bag or spoon, pipe or pour a layer of the melted chocolate into each lined cup, covering the base thoroughly. Tap the tray gently on the countertop to smooth the chocolate and remove any air bubbles. Allow this base layer to sit at room temperature until it begins to set, about 10-15 minutes.

Step 4: Make Filling
In a mixing bowl, combine softened butter and light corn syrup. Mix them together until smooth, then gradually add powdered sugar, milk, vanilla extract, and a pinch of salt. Beat the mixture until you achieve a stiff yet creamy consistency, perfect for the filling of your Cadbury Creme Bites.

Step 5: Color the Filling
Divide the filling into two portions. Tint one portion with orange gel food coloring to achieve a vibrant yolk-like shade, and keep the other part white. Use small piping bags equipped with different tips for precise application, ensuring a beautiful presentation for your bites.

Step 6: Fill Chocolate Layer
Once the chocolate base is fully set, take the white filling and pipe it generously into each chocolate-lined cup, leaving a small well in the center. Follow this by adding a small dab of the orange filling to mimic the yolk. This layering creates the delightful look reminiscent of classic Cadbury Creme Eggs.

Step 7: Top with Chocolate
Melt the remaining milk chocolate in the microwave, following the same heating method as before. Once smooth, pipe this melted chocolate over the filled cups to cover them completely. Tap the tray again on the surface to smooth the tops for a professional finish on your Homemade Cadbury Creme Bites.

Step 8: Chill
Transfer the filled and topped chocolate bites to the refrigerator and allow them to chill for about 30 minutes, or until the chocolate is fully set. This chilling process ensures that your bites hold their shape and provides that delightful melt-in-your-mouth texture when you take a bite.

Expert Tips for Cadbury Creme Bites

  • Quality Ingredients: Choose high-quality chocolate and pure vanilla extract for richer flavors in your Cadbury Creme Bites; good ingredients make a big difference!

  • Piping Precision: Cut your piping bags to a moderate size. A too-large opening can lead to messy filling, while a too-small one can make it harder to fill.

  • Chill Properly: Allow adequate chilling time for your chocolate base and bites. Insufficient chilling may cause the filling to ooze out when you bite into them.

  • Avoid Overheating: When melting chocolate, microwave in small increments to avoid burning. Stirring frequently helps achieve a smooth consistency.

  • Add Variety: Experiment with flavors in your filling! A dash of almond or orange extract can provide a delightful twist to the traditional taste of Cadbury Creme Bites.

Make Ahead Options

These Homemade Cadbury Creme Bites are a fantastic option for meal prep, allowing you to enjoy the sweet delight without the last-minute rush! You can prepare the chocolate bases and filling up to 24 hours in advance. Simply pipe a layer of melted chocolate into the liners and refrigerate until firm. Prepare the filling and tint it as described—store it in airtight containers in the refrigerator to keep it fresh. When you’re ready to finish, just fill each chocolate layer with the filling and top with melted chocolate before chilling again. This way, your treats will be just as delicious and ready to impress at a moment’s notice!

How to Store and Freeze Cadbury Creme Bites

Room Temperature: Store Cadbury Creme Bites in an airtight container at room temperature for up to 3 days. This keeps them fresh without losing their delightful texture.

Fridge: If you prefer a chilled treat, refrigerate the bites in an airtight container for up to 2 weeks. This not only maintains their freshness but also enhances the creamy filling’s flavor.

Freezer: For longer storage, freeze the bites for up to 2 months. Place them in a single layer on a baking sheet until firm, then transfer to an airtight container, separating layers with parchment paper.

Reheating: When ready to enjoy, thaw the Cadbury Creme Bites in the fridge overnight. Enjoy at room temperature for the best melt-in-your-mouth experience!

What to Serve with Homemade Cadbury Creme Bites?

Indulging in these sweet delights creates an exciting opportunity to build a delightful meal around them!

  • Fluffy Pancakes: These light and airy pancakes make for a fantastic breakfast companion, balancing the rich sweetness of the bites while adding a comforting warmth.

  • Fresh Fruit Salad: A medley of vibrant, juicy fruits offers a refreshing contrast to the chocolatey richness, creating a perfect palate cleanser between bites.

  • Whipped Cream: Light and airy, a dollop of homemade whipped cream echoes the creamy filling while introducing a luscious texture that enhances each mouthful.

  • Mint Tea: The soothing herbal notes of mint tea provide a refreshing palate cleanser that complements the chocolate without overwhelming your taste buds.

  • Nutty Biscotti: Crunchy almond biscotti offers a delightful textural contrast, allowing you to enjoy the sweet bites alongside a satisfying crunch.

  • Sparkling Lemonade: Bright, bubbly lemonade invigorates the senses with its zesty, citrus flavors, making it a perfect partner for these decadent treats.

  • Chocolate-Covered Strawberries: Reinforcing the chocolate theme, these treats provide an elegant touch and a burst of freshness, perfect for an unexpected twist to your dessert table.

  • Easter Sugar Cookies: Deliciously sweet and festive, these cookies not only match the holiday spirit but also create a delightful variety of textures and flavors together with the bites.

  • Vanilla Ice Cream: A scoop of creamy vanilla ice cream gives a delightful contrast, melting smoothly alongside each bite and enhancing the flavor experience.

  • Coffee or Espresso: A rich cup of coffee balances the sweetness, offering a cozy vibe that rounds out the indulgence beautifully.

Cadbury Creme Bites Variations & Substitutions

Feel free to put your unique spin on these delightful treats for an even more personalized experience!

  • Chocolate Variants: Use dark or white chocolate for a different flavor profile and exciting new taste.

  • Flavor Enhancements: Infuse the filling with almond or orange extract for a delightful twist. It adds a fresh, surprising flavor that will intrigue your taste buds.

  • Coloring Alternatives: Get creative with various shades of food coloring to celebrate other holidays or themes. Imagine pastel colors for spring or vibrant hues for festive gatherings!

  • Nutty Crunch: Stir in some finely chopped nuts or crispy rice cereal into the chocolate coating for added texture.
    The extra crunch will beautifully contrast the velvety smooth filling.

  • Vegan Option: Substitute dairy chocolate with a high-quality vegan chocolate and use coconut cream in place of butter for a creamy filling. Deliciously dairy-free without losing any charm!

  • Reduced Sugar: Use sugar alternatives like stevia or erythritol in the filling to create a lower-sugar version without sacrificing the sweet experience.

  • Spicy Surprise: Add a pinch of cayenne pepper to the filling for a surprising kick. Just a dash creates an unexpected juxtaposition with the sweetness.

For more fun candy creations, check out Grandmas Homemade Bites or explore Free Energy Bites for some guilt-free indulgence!

Cadbury Creme Bites Recipe FAQs

How do I select the right chocolate for my Cadbury Creme Bites?
Absolutely! Choosing high-quality milk chocolate is key to a luscious, creamy flavor. Look for chocolates labeled as “baking chocolate” in your grocery store, as they generally have a higher cocoa content and better taste compared to regular candy bars. I often recommend brands that have a nice sheen and are smooth when melted.

What’s the best way to store Cadbury Creme Bites?
You can store your Cadbury Creme Bites in an airtight container at room temperature for up to 3 days. If you prefer them chilled, just pop them in the fridge where they can last up to 2 weeks. I find that refrigerating enhances the flavors beautifully! Just remember, when storing, to keep them away from strong-smelling foods, as chocolate can absorb odors.

Can I freeze Cadbury Creme Bites, and how do I do it properly?
Yes! You can freeze them for up to 2 months. To freeze, place the bites in a single layer on a baking sheet, allowing them to firm up initially in the freezer for about an hour. Then, transfer the bites to an airtight container, using parchment paper between layers to prevent sticking. When it’s time to enjoy, thaw them in the fridge overnight for the best texture experience!

What should I do if my chocolate doesn’t set properly?
Very! If your chocolate base doesn’t set, it may be because it was either not cooled sufficiently or was overheated while melting. Make sure to let the melted chocolate cool slightly before pouring it into the liners, then give it enough time at room temperature to firm up before adding the filling. If necessary, you can always pop them in the refrigerator to help with the setting.

Are these bites safe for kids and those with allergies?
These Homemade Cadbury Creme Bites contain common allergens like milk and butter, so if allergies are a concern, be sure to substitute with dairy alternatives as needed. For kids, just keep an eye on their portion sizes, as these bites are quite rich. I often make mini versions so they can indulge without overindulging!

Cadbury Creme Bites

Delicious Homemade Cadbury Creme Bites for Sweet Celebrations

Indulge in homemade Cadbury Creme Bites, a delightful treat perfect for celebrations and a hit at gatherings.
Prep Time 30 minutes
Cook Time 15 minutes
Chilling Time 30 minutes
Total Time 1 hour 15 minutes
Servings: 48 bites
Course: Dessert
Cuisine: American
Calories: 200

Ingredients
  

For the Chocolate Coating
  • 12 oz Milk Chocolate Use high-quality baking chocolate for a rich flavor.
For the Cream Filling
  • 1 cup Light Corn Syrup Adds essential sweetness.
  • 4 tbsp Butter (Softened) Ensure it's at room temperature.
  • 1 tsp Vanilla Extract Opt for pure vanilla for best results.
  • 2 cups Powdered Sugar Sweetens the filling.
  • 1 pinch Salt Balances sweetness.
  • 2 tbsp Milk Adjusts the consistency.
  • 1 few drops Gel Food Coloring (Orange and Yellow) Adds vibrant color to the yolk-like center.

Equipment

  • microwave-safe bowl
  • mixing bowl
  • Piping bags
  • Mini muffin cups

Method
 

Step-by-Step Instructions
  1. Begin by lining 48 mini muffin cups with parchment paper liners.
  2. In a microwave-safe bowl, place half of the milk chocolate and melt it at 50% power in 30-second increments until smooth.
  3. Use a small piping bag or spoon to pipe a layer of melted chocolate into each lined cup and tap to smooth.
  4. In a mixing bowl, combine softened butter and light corn syrup until smooth, then add powdered sugar, milk, vanilla extract, and salt.
  5. Divide the filling and tint one portion with orange gel food coloring.
  6. Pipe the white filling into the cups, leaving a well in the center, and add a dab of orange filling.
  7. Melt the remaining chocolate and pipe it over the filled cups to cover them fully.
  8. Transfer the bites to the refrigerator and chill for about 30 minutes.

Notes

These Homemade Cadbury Creme Bites are sure to become a cherished addition to your Easter celebrations and sweet treats arsenal!

Hearty Yukon Gold Potato and Ham Soup for Cozy Nights

As I stirred the bubbling pot on my stovetop, the rich aroma of Yukon Gold Potato and Ham Soup filled my kitchen, instantly bringing back memories of family gatherings and cozy dinners. There’s something magical about a warm bowl of soup on a chilly day; it’s the ultimate comfort food, effortlessly satisfying both the body and soul. This creamy soup is not only a delightful meal to whip up after a hectic day, but it’s also incredibly flexible—you can easily substitute different types of potatoes or skip the ham if you need to. Plus, it’s a recipe that tastes even better the next day, making it perfect for meal prep and hungry families. So, are you ready to dive into a bowl of nostalgia where every spoonful is a warm hug? Let’s get cooking!

Why is Yukon Gold Potato Soup a Must-Try?

Comforting warmth: This Yukon Gold Potato and Ham Soup wraps you in a cozy embrace, ideal for chilly evenings.
Flexible ingredients: It allows you to substitute ingredients based on what you have at home, whether you want to swap ham for chicken or choose different potato varieties.
Family-friendly: A hit with both kids and adults, this soup encourages conversations around the dinner table.
Easy preparation: It’s straightforward to whip up, making weeknight meals a breeze.
Meal prep friendly: This soup only gets better with time, making it perfect for leftovers or batch cooking. Serve it with some warm baguette or a side of Savory Onion Potato Pancakes for a complete meal that’s sure to satisfy everyone’s cravings!

Yukon Gold Potato and Ham Soup Ingredients

For the Soup

  • Yukon Gold Potatoes – They provide a creamy texture that’s perfect for this soup; substituting with Russets makes it even creamier.
  • Diced Ham – Adds savory flavor and protein; leftover ham works wonders, or use chicken stock for a ham-free version.
  • Chicken Broth – The soul of this soup, adding depth and flavor; choose low-sodium for control over salt levels.
  • Carrots – Sweetness and color; they balance the savory notes beautifully.
  • Onion – Offers foundational flavor and aroma, essential for a hearty soup.
  • Celery – Adds crunch and enhances the overall flavor profile; don’t skimp on it!
  • Garlic – A must for a burst of flavor; fresh garlic is best but garlic powder can work in a pinch.

For Thickening

  • Butter – Essential for creating a roux; it adds richness and helps thicken the soup.
  • Flour – Used with butter to thicken the soup; ensure you cook it lightly to avoid a raw taste.
  • Milk – Introduces creaminess; warm it before adding for the best results.
  • Cheddar Cheese – Brings a rich, cheesy flavor; feel free to adjust based on your preference or skip for a lighter option.

For Seasoning

  • Salt – Essential for enhancing the soup’s flavors; adjust to taste.
  • Pepper – Adds a touch of heat; freshly cracked is always better.
  • Parsley – Freshness and color; a lovely pop on top!
  • Thyme – Earthy notes that pair perfectly with the ham and potatoes; dried thyme works if fresh isn’t available.

This Yukon Gold Potato and Ham Soup recipe is flexible, allowing you to adjust and make it your own while still maintaining that comforting essence everyone loves!

Step‑by‑Step Instructions for Yukon Gold Potato and Ham Soup

Step 1: Heat the Base
In a large pot, heat 2 tablespoons of olive oil over medium-high heat until shimmering. Add diced carrots, chopped onion, and sliced celery, sautéing for 4-5 minutes or until the onions become translucent and fragrant. This creates a savory foundation for your Yukon Gold Potato and Ham Soup, filling your kitchen with warmth.

Step 2: Add Garlic and Seasonings
Stir in minced garlic along with salt, pepper, and thyme. Cook for an additional minute, allowing the garlic to release its aromatic qualities. The mixture should be fragrant and slightly softened, preparing the flavor base for your comforting soup.

Step 3: Pour in the Broth
Slowly pour in 6 cups of chicken broth while scraping the bottom of the pot to release any tasty bits stuck from sautéing. Then, add diced ham and cubed Yukon Gold potatoes to the pot. Bring the mixture to a simmer over medium heat, covering and reducing the heat. Cook for about 10 minutes until the potatoes are fork-tender.

Step 4: Create the Roux
In a separate saucepan, melt 4 tablespoons of butter over low heat. Once melted, whisk in 1/3 cup of flour, cooking for 1-2 minutes to form a roux. Gradually whisk in 2 cups of warm milk, heating it gently until the mixture thickens to a creamy consistency. This roux will add richness to your Yukon Gold Potato and Ham Soup.

Step 5: Combine and Finish
Stir the roux mixture into the pot of soup, combining thoroughly for a velvety texture. Next, add 1-2 cups of shredded cheddar cheese, mixing until the cheese melts completely. The soup should now have a rich, creamy consistency with a perfect balance of flavors.

Step 6: Serve and Garnish
Ladle the piping hot Yukon Gold Potato and Ham Soup into bowls and garnish with extra shredded cheese and freshly chopped parsley if desired. Serve immediately with warm, crusty bread or your favorite biscuits, and enjoy the cozy comforts of this hearty dish!

Variations & Substitutions for Yukon Gold Potato and Ham Soup

Feel free to get creative with this Yukon Gold Potato and Ham Soup, tailoring it to your taste preferences and pantry staples!

  • Dairy-Free: Substitute milk with almond or oat milk and skip the cheese for a lighter soup that still delivers creaminess.
    You won’t even miss the dairy; it’s all about how you blend those flavors together!

  • Extra Veggies: Add in fresh or frozen corn, peas, or green beans for delightful bursts of color and texture.
    This makes the soup not only heartier but also visually appealing—perfect for family dinners!

  • Spicy Kick: Toss in a pinch of red pepper flakes or a drizzle of sriracha for a lively heat that will warm you from the inside out.
    Just imagine that little extra zing as you take your first spoonful!

  • Herb Variations: Swap thyme for fresh dill or rosemary to give the soup a unique aromatic touch.
    Fresh herbs elevate any dish, transforming your comfort soup into something extraordinary.

  • Meat Swap: Use shredded rotisserie chicken or even turkey instead of ham for a lighter yet satisfying alternative.
    This is a great way to use up leftovers while still enjoying a filling meal.

  • Make it Chunky: For a heartier texture, reduce the number of potatoes or include larger potato chunks.
    This way, each bite feels substantial, reminding you of hearty family gatherings.

  • Vegetarian Option: Omit the ham and replace chicken broth with vegetable broth; add more herbs for enhanced flavor.
    Even meat lovers will appreciate this deliciously comforting version!

Transform your Yukon Gold Potato and Ham Soup with these ideas, and don’t forget to serve it alongside some Savory Chicken and Cheesy Potato Drumsticks for a meal that embraces every bit of comfort food goodness.

What to Serve with Creamy Yukon Gold Potato and Ham Soup

Experience the cozy comfort of a warm meal with delightful pairings that enhance your soul-nourishing soup.

  • Crusty French Bread: Perfect for dipping, its chewy exterior and soft interior soak up the creamy soup beautifully.
  • Flaky Buttermilk Biscuits: Light and buttery, these biscuits add a satisfying crunch, perfectly complementing the soup’s rich texture.
  • Mixed Green Salad: A refreshing side with vinaigrette balances the creaminess of the Yukon Gold Potato and Ham Soup, keeping the meal light and vibrant.
  • Garlic Breadsticks: Crispy and fragrant, they offer delightful bites that elevate each spoonful of soup, combining flavors beautifully.
  • Steamed Veggies: Brightly colored veggies like broccoli or green beans add freshness and texture, making for a well-rounded meal.
  • Savory Onion Potato Pancakes: Their crispy exterior adds a lovely contrast, pairing well with the creamy richness of the soup.
  • Herbed Cheese Platter: Serve with tangy cheese, olives, and crackers for a delightful starter that whets the appetite before the hearty soup.
  • Chardonnay or Lager: A chilled glass of white wine or a light beer offers a crisp contrast to the soothing warmth of the soup.

Expert Tips for Yukon Gold Potato and Ham Soup

  • Timing is Key: Take your time while cooking; rushing can lead to undercooked potatoes, compromising the soup’s texture.
  • Warm Milk Gradually: Always warm your milk before adding it to the roux to prevent curdling, ensuring a smooth, creamy Yukon Gold Potato and Ham Soup.
  • Cook Your Roux: Remember to cook your roux for 1-2 minutes to eliminate any raw flour taste, adding a lovely depth to your soup.
  • Use a Ham Bone: If using a ham bone, let it simmer in the broth for extra flavor; this adds a rich, savory depth to the soup.
  • Peeling Potatoes: Peel the Yukon Gold potatoes for a smoother texture in your soup—this small step makes a big difference!
  • Play with Seasonings: Feel free to add herbs like rosemary or smoked paprika for a twist, personalizing your Yukon Gold Potato and Ham Soup to your taste!

Storage Tips for Yukon Gold Potato and Ham Soup

Fridge: Store leftovers in an airtight container for up to 4 days. Refrigeration helps the flavors meld together beautifully, offering an even tastier Yukon Gold Potato and Ham Soup.

Freezer: Portion the soup into freezer-safe containers and freeze for up to 3 months. This way, you can easily enjoy a hearty meal anytime!

Reheating: To reheat, warm on the stovetop over medium-low heat, stirring occasionally. If the soup is too thick, add a splash of chicken broth or milk for a creamier consistency. You can also microwave individual servings, making it convenient for quick meals.

Make Ahead Options

These Yukon Gold Potato and Ham Soup is an excellent choice for meal prep enthusiasts! You can chop your vegetables and dice the ham up to 24 hours in advance, storing them in the refrigerator to save precious time during your busy weeknight cooking. For even better flavor, you can prepare the entire soup base, refrigerate it for up to 3 days, and then proceed with adding the roux and cheese just before serving. This method ensures your soup maintains its creamy texture and rich flavor. Simply reheat the soup on the stovetop over low heat, adding a splash of milk or broth if needed, and stir in the cheese until melted for that cozy, comforting taste everyone loves!

Yukon Gold Potato and Ham Soup Recipe FAQs

What type of potatoes should I use for Yukon Gold Potato and Ham Soup?
Absolutely, Yukon Gold potatoes are recommended for their creamy texture and ability to hold shape in soups. However, you can also use Russet potatoes for a creamier consistency. Just be cautious to avoid waxy potatoes like red or new potatoes, as they can create a less desirable texture.

How should I store leftovers of Yukon Gold Potato and Ham Soup?
Store your delicious Yukon Gold Potato and Ham Soup in an airtight container in the refrigerator for up to 4 days. As the flavors meld, the soup may taste even better on the second day! If you’d like to keep it longer, portion it out into freezer-safe containers for up to 3 months.

Can I freeze Yukon Gold Potato and Ham Soup?
Yes, you can freeze the soup! Cool it completely, then ladle it into freezer-safe containers, leaving a little space for expansion. To thaw, place it in the refrigerator overnight, and when ready to enjoy, reheat gently on the stovetop or in the microwave—just add a splash of broth or milk if it’s too thick.

What if my soup is too thick after reheating?
Very! If your Yukon Gold Potato and Ham Soup has thickened too much upon reheating, stir in a splash of chicken broth or warm milk until you reach your desired consistency. This not only helps with texture but keeps the soup creamy and delicious!

Are there any dietary considerations for Yukon Gold Potato and Ham Soup?
Certainly! If you have dietary restrictions or allergies, you can make a ham-free version by substituting the diced ham with extra vegetables or chicken stock. Additionally, if you’re managing lactose intolerance, opt for lactose-free milk and cheese or skip the dairy altogether, ensuring everyone at the table can enjoy this cozy soup!

What should I do if the soup has a raw flour taste?
If your Yukon Gold Potato and Ham Soup doesn’t taste as rich as you expected, it could be due to the roux not being cooked long enough. Ensure to cook the roux (butter and flour mix) for 1-2 minutes to eliminate any raw flour flavor, leaving you with a smooth and flavorful soup. Enjoy experimenting until you find that perfect balance!

Yukon Gold Potato and Ham Soup

Hearty Yukon Gold Potato and Ham Soup for Cozy Nights

This Yukon Gold Potato and Ham Soup is the ultimate comfort food, perfect for chilly nights with its rich flavors.
Prep Time 15 minutes
Cook Time 30 minutes
Total Time 45 minutes
Servings: 6 bowls
Course: Dinner
Cuisine: American
Calories: 350

Ingredients
  

For the Soup
  • 2 tablespoons Olive Oil
  • 4 cups Diced Yukon Gold Potatoes
  • 2 cups Diced Ham or use chicken stock for a ham-free version
  • 6 cups Chicken Broth choose low-sodium
  • 2 cups Carrots diced
  • 1 large Onion chopped
  • 1 cup Celery chopped
  • 3 cloves Garlic minced
For Thickening
  • 4 tablespoons Butter for the roux
  • 1/3 cup Flour for thickening
  • 2 cups Milk warm before adding
  • 1-2 cups Shredded Cheddar Cheese optional
For Seasoning
  • to taste Salt
  • to taste Pepper freshly cracked
  • 1/4 cup Parsley freshly chopped
  • 1 teaspoon Thyme dried or fresh

Equipment

  • Large pot
  • Saucepan
  • whisk

Method
 

Step-by-Step Instructions
  1. In a large pot, heat olive oil over medium-high heat until shimmering. Add diced carrots, chopped onion, and sliced celery, sautéing for 4-5 minutes until translucent.
  2. Stir in minced garlic along with salt, pepper, and thyme. Cook for an additional minute until fragrant.
  3. Slowly pour in chicken broth while scraping the bottom of the pot. Add diced ham and cubed Yukon Gold potatoes. Bring to a simmer and cover, cooking for about 10 minutes until fork-tender.
  4. In a separate saucepan, melt butter over low heat. Whisk in flour to form a roux. Gradually whisk in warm milk, heating until the mixture thickens.
  5. Stir the roux mixture into the pot of soup, adding shredded cheese and mixing until melted.
  6. Ladle hot soup into bowls and garnish with extra cheese and parsley. Serve immediately with bread.

Notes

Soups often taste better the next day, making this recipe great for leftovers and meal prep.

S’mores Cupcakes: Indulge in Nostalgic Campfire Bliss

As I sunk my teeth into another indulgent bite of these S’mores Cupcakes, I was hit by a wave of nostalgia—those warm summer nights spent around the campfire, roasting marshmallows to golden perfection. With a buttery graham cracker base, rich chocolate cake, and a cloud of toasted marshmallow frosting, this recipe will swiftly become your go-to indulgent dessert. These cupcakes aren’t just a treat; they’re a delightful comfort food that combines crunchy, gooey, and creamy textures, making them perfect for gatherings or simply satisfying a sweet craving. Plus, they’re easy to whip up, letting you bring a little fond memory of bonfire delights right to your kitchen. Curious how to recreate this nostalgic treat in cupcake form? Let’s dive into the recipe!

Why Are These S’mores Cupcakes Special?

Nostalgic Flavors: Each bite transports you back to cozy campfire nights, blending delicious childhood memories with an indulgent treat.
Simple to Create: Even novice bakers can master this recipe quickly, ensuring a hassle-free baking experience without sacrificing flavor.
Impressive Presentation: The toasted marshmallow frosting is not only delicious but visually stunning, making them perfect for any celebration.
Versatile Variations: Try different fillings like caramel or peanut butter for a unique twist; the possibilities are endless!
Crowd-Pleaser: These cupcakes are sure to be a hit at picnics, birthdays, or cozy gatherings—everyone loves a taste of s’mores! Want to conquer the art of making ganache? Check out our guide to flawless ganache for more tips!

S’mores Cupcakes Ingredients

For the Graham Cracker Crust
Graham cracker crumbs – Provides the classic base flavor and crunchy texture; feel free to use gluten-free graham cracker crumbs for a gluten-free version.
Melted butter – Binds the crust together; although coconut oil can be used for a vegan option, no direct substitutions are recommended.
Sugar – Sweetens the cupcake base and the graham cracker crust; using brown sugar adds a deeper flavor.

For the Cupcake Batter
All-purpose flour – Provides structure and stability; substitute with a 1:1 gluten-free flour blend for a gluten-free version.
Unsweetened cocoa powder – Imparts rich chocolate flavor; consider Dutch-process cocoa for a smoother taste.
Espresso powder – Enhances the chocolate flavor; can be omitted if unavailable.
Baking powder & baking soda – Essential leavening agents for a light texture.
Eggs – Bind ingredients and provide structure to the cupcakes.
Brown sugar – Adds moisture and a rich caramel-like flavor; can be substituted with coconut sugar for a lower glycemic index.
Neutral oil – Adds moisture; grapeseed oil was used in this recipe, but canola or vegetable oil are good alternatives.
Vanilla extract – Infuses warmth and adds depth of flavor to the mixture.
Buttermilk – Keeps the cupcake moist and tender; milk mixed with vinegar or lemon juice can work as a substitute.

For the Ganache Filling
Chocolate bars – Rich center filling; dark or milk chocolate can be interchanged based on personal preference.
Heavy cream – Used to create a smooth ganache; ensure it’s heated properly for best results.

For the Marshmallow Frosting
Egg whites – Create a light, fluffy texture for the frosting.
Corn syrup – Helps with the texture of the frosting; can be swapped with agave syrup in a pinch.
Cream of tartar – Stabilizes whipped egg whites; it’s fine to omit if not available, but the frosting may not hold as well.

Remember, these S’mores Cupcakes will not only delight your taste buds, but they will also revive fond memories of summer campfires every time you take a bite! Enjoy your baking!

Step‑by‑Step Instructions for S’mores Cupcakes

Step 1: Prepare the Muffin Pan
Start by preheating your oven to 350°F (177°C). While the oven warms up, line a standard muffin tin with cupcake liners, readying them for the graham cracker crust. This is where the nostalgic flavors of your S’mores Cupcakes will begin, setting the stage for your delicious creation.

Step 2: Make the Graham Cracker Crust
In a mixing bowl, combine the graham cracker crumbs, sugar, melted butter, and a pinch of salt. Mix until the texture resembles wet sand, then press this mixture into the bottom of each cupcake liner. Bake for about 5-6 minutes, or until the crust is slightly browned and holds together; this will provide a firm base for your cupcakes.

Step 3: Prepare the Cupcake Batter
In a separate bowl, sift together the all-purpose flour, cocoa powder, baking powder, baking soda, and espresso powder. In another bowl, whisk together the eggs, brown sugar, neutral oil, vanilla extract, and buttermilk until smooth. Gradually mix the dry ingredients into the wet, stirring gently until just combined—be careful not to overmix for fluffy S’mores Cupcakes!

Step 4: Bake Cupcakes
Using a scoop, fill each lined muffin cup about two-thirds full with the batter, making sure not to disturb the graham cracker crust below. Place the muffin tin in the preheated oven and bake for 16-18 minutes, or until a toothpick inserted into the center comes out clean. Once baked, remove the tin and let the cupcakes cool completely on a wire rack.

Step 5: Make Ganache Filling
While your cupcakes are cooling, heat the heavy cream in a small saucepan over medium heat until it just begins to simmer. Pour the hot cream over chopped chocolate bars in a bowl, letting it sit for a minute. Stir until the mixture is smooth and glossy, then refrigerate for about 30 minutes to allow it to firm up, creating a luscious ganache for filling.

Step 6: Make Marshmallow Frosting
To prepare the fluffy marshmallow frosting, combine the egg whites, sugar, and corn syrup in a heatproof bowl over a double boiler. Stir continuously until the sugar dissolves, around 4-5 minutes. Remove from heat and whip the mixture with an electric mixer until it becomes fluffy and glossy, achieving a beautiful marshmallow-like texture for topping your S’mores Cupcakes.

Step 7: Assemble Cupcakes
Once cooled, use a small knife or cupcake corer to remove the center of each cupcake, creating space for the ganache filling. Spoon in the chilled ganache and replace the tops gently. Next, pipe a generous swirl of the marshmallow frosting on top of each cupcake, creating fluffy peaks like toasted marshmallows.

Step 8: Toast the Frosting
Using a kitchen torch, carefully toast the marshmallow frosting until it’s golden brown and slightly melted—watch closely to avoid burning! For an extra touch, drizzle any remaining ganache over the top and sprinkle with additional crushed graham cracker crumbs for that delightful S’mores Cupcakes experience, reminiscent of campfire nights!

How to Store and Freeze S’mores Cupcakes

Airtight Container: Store your S’mores Cupcakes in an airtight container at room temperature for up to 3 days. This keeps their delightful textures intact and prevents them from drying out.

Refrigeration: If you want to extend their life, you can refrigerate cupcakes for up to a week. Just ensure they’re covered to avoid absorbing any other flavors lingering in your fridge.

Freezing: For longer storage, place cooled cupcakes (without frosting) in a freezer-safe container. They can be frozen for up to 3 months; just allow them to thaw at room temperature before frosting.

Reheating: To enjoy that fresh-baked warmth, briefly microwave frozen cupcakes for about 15-20 seconds. Add a dollop of freshly whipped marshmallow frosting, and it’ll be like their first day out of the oven!

S’mores Cupcakes: Flavorful Variations

Feel free to get creative and personalize your S’mores Cupcakes with these delightful twists that promise to elevate your baking experience!

  • Dairy-Free: Substitute heavy cream and butter with coconut cream and coconut oil for a rich, dairy-free twist.
  • Gluten-Free: Use gluten-free graham cracker crumbs and a 1:1 gluten-free flour blend to enjoy this recipe without the gluten.
  • Nutty Flavor: Enhance the cupcake batter by adding finely chopped nuts, such as walnuts or pistachios, for a satisfying crunch.
  • Caramel Drizzle: Layer caramel sauce inside the cupcakes for a sweet surprise that complements the chocolate and marshmallow perfectly.
  • Spiced Addition: Infuse warm spices like cinnamon or nutmeg in your graham cracker crust for an added dimension of flavor; these hints will warm your heart with every bite.
  • Peppermint Twist: For a festive touch, add a drop of mint extract to the batter or use peppermint-flavored chocolate bars for the ganache filling.
  • Heated Up: Add a pinch of cayenne pepper or finely chopped jalapeños to the batter to create an unexpected spicy profile that contrasts beautifully with the sweetness.
  • Alternative Frosting: Swap marshmallow frosting with a rich chocolate ganache or a light cream cheese frosting for a unique treat experience.

Embrace your creativity and make these cupcakes uniquely yours—each variation promises a deliciously fun experience! Don’t forget to explore our guide on baking perfect cupcakes to master the art of baking consistency.

Make Ahead Options

These S’mores Cupcakes are perfect for busy home cooks looking to save time during the week! You can make the graham cracker crust and bake the cupcakes up to 24 hours in advance; simply refrigerate them in an airtight container to maintain their moisture and softness. The fluffy marshmallow frosting can also be prepared a day ahead; just store it in the refrigerator and re-whip before piping it onto the cupcakes. Once assembled, the cupcakes can be stored at room temperature for up to 3 days. When ready to serve, toast the frosting just before enjoying to achieve that delightful golden-brown finish. This way, you’ll have scrumptious S’mores Cupcakes ready to impress with minimal last-minute effort!

What to Serve with S’mores Cupcakes

Elevate your dessert experience by pairing these S’mores Cupcakes with delightful sides that complement their nostalgic flavors.

  • Vanilla Ice Cream: The creamy, cool scoop contrasts beautifully with the rich chocolate and warm graham cracker textures, making every bite an indulgence.

  • Fruit Salad: A vibrant mix of seasonal fruits adds a refreshing contrast, balancing the sweetness of the cupcakes with bright and juicy flavors.

  • Chocolate Milkshake: For true chocolate lovers, a thick milkshake amplifies the rich chocolate notes in the cupcakes, creating a nostalgic diner-style treat.

  • Toasted Marshmallows: Toast some extra marshmallows on skewers for a fun, interactive dessert experience that echoes the classic campfire vibe.

  • Coffee or Espresso: The robust flavors of a freshly brewed cup enhance the chocolate, making each bite of your S’mores Cupcakes more decadent and satisfying.

  • Peanut Butter Cream: A smooth dollop of peanut butter cream on the side blends perfectly, adding a nutty richness that pairs wonderfully with the cupcake’s sweetness.

  • Cold Brewed Iced Coffee: For a refreshing twist, sip on some cold brew; its smooth, rich taste accentuates the cupcakes’ indulgent elements.

  • Chocolate Ganache Dip: Serve some extra ganache in a small bowl for dipping—the ultimate chocolate experience for those who want more indulgence.

Expert Tips for S’mores Cupcakes

  • Room Temperature Egg Whites: Ensuring your egg whites are at room temperature guarantees a fluffier marshmallow frosting, enhancing the overall texture of the S’mores Cupcakes.

  • Don’t Overmix: Mixing the batter too much can lead to dense cupcakes. Gently fold until just combined to keep them light and airy.

  • Timed Ganache Cooling: Allowing the ganache to chill adequately makes it easier to fill your cupcakes. Aim for a thicker consistency to avoid overflow.

  • Watch the Flame: When toasting the marshmallow frosting, use a low flame and move the torch constantly to prevent burning. A light golden color is perfect!

  • Custom Fillings: Feel free to play with ganache fillings by trying flavored chocolate bars. This could offer a fun twist and add richness to your S’mores Cupcakes.

S’mores Cupcakes Recipe FAQs

How do I pick the right graham crackers for the crust?
When choosing graham crackers, look for ones that are fresh without any dark spots or breaks. If you’re opting for a gluten-free version, many brands offer gluten-free graham cracker crumbs that retain the classic flavor and texture. You can also make your own crumbs from gluten-free cookies for added variety!

What’s the best way to store S’mores Cupcakes?
Absolutely! Store your S’mores Cupcakes in an airtight container at room temperature for up to 3 days. If you need to keep them longer, they can be refrigerated for up to a week, just make sure they are covered to prevent them from absorbing any unwanted flavors from your fridge.

Can I freeze S’mores Cupcakes?
Yes, you can freeze them! First, ensure the cupcakes are completely cooled. Place them without frosting in a freezer-safe container, separated by parchment paper. They will stay delightful for up to 3 months. When ready to enjoy, simply let them thaw at room temperature, and then frost them for that fresh taste!

What if my marshmallow frosting doesn’t get fluffy enough?
If your marshmallow frosting isn’t achieving the desired fluffiness, make sure your egg whites are at room temperature before whipping. Also, check that you’re whipping for long enough—aim for at least 5-7 minutes until it’s light and glossy. Adding a pinch of cream of tartar can also help stabilize the egg whites if you didn’t omit it!

Are there any dietary considerations for this recipe?
Very! This recipe can be adapted for various dietary needs. For a gluten-free version, simply swap in a 1:1 gluten-free flour blend and use gluten-free graham cracker crumbs. To make it vegan, use coconut oil instead of butter, and replace eggs with a flaxseed meal or aquafaba-based substitute. Always double-check chocolate bars as some may contain dairy!

How can I make sure my cupcakes are not too dry?
To keep your S’mores Cupcakes moist, always measure your flour using the scoop-and-level method—too much flour can lead to dryness. Additionally, using buttermilk helps maintain moisture. Be sure to monitor the baking time closely; pulling them out as soon as a toothpick comes out clean will prevent overbaking!

S’mores Cupcakes

S’mores Cupcakes: Indulge in Nostalgic Campfire Bliss

Delight in these S’mores Cupcakes, a nostalgic dessert that perfectly blends crunchy graham cracker, rich chocolate, and fluffy marshmallow frosting.
Prep Time 30 minutes
Cook Time 20 minutes
Cooling Time 30 minutes
Total Time 1 hour 20 minutes
Servings: 12 cupcakes
Course: Dessert
Cuisine: American
Calories: 250

Ingredients
  

Graham Cracker Crust
  • 1 cup Graham cracker crumbs gluten-free option available
  • 5 tablespoons Melted butter coconut oil can be used for vegan
  • 1/4 cup Sugar using brown sugar adds flavor
Cupcake Batter
  • 1 cup All-purpose flour can substitute with gluten-free blend
  • 1/2 cup Unsweetened cocoa powder or Dutch-process cocoa
  • 1 teaspoon Espresso powder optional
  • 1 teaspoon Baking powder
  • 1 teaspoon Baking soda
  • 2 Eggs
  • 3/4 cup Brown sugar or coconut sugar for lower glycemic
  • 1/2 cup Neutral oil grapeseed oil recommended
  • 1 teaspoon Vanilla extract
  • 1/2 cup Buttermilk milk with vinegar or lemon juice works
Ganache Filling
  • 8 ounces Chocolate bars dark or milk chocolate
  • 1/2 cup Heavy cream
Marshmallow Frosting
  • 2 Egg whites
  • 1/4 cup Corn syrup can use agave syrup
  • 1/4 teaspoon Cream of tartar optional

Equipment

  • muffin tin
  • mixing bowls
  • electric mixer
  • Double boiler
  • Kitchen torch

Method
 

Preparation
  1. Preheat oven to 350°F (177°C) and line a muffin tin with cupcake liners.
  2. In a bowl, mix graham cracker crumbs, sugar, melted butter, and salt until wet sand texture. Press into cupcake liners.
  3. Bake crust for 5-6 minutes until slightly browned.
  4. Sift flour, cocoa powder, baking powder, baking soda, and espresso powder in one bowl.
  5. In another bowl, whisk eggs, brown sugar, oil, vanilla, and buttermilk until smooth. Combine with dry ingredients, mixing gently.
  6. Fill each cupcake liner 2/3 full with batter and bake for 16-18 minutes until a toothpick comes out clean.
  7. Allow cupcakes to cool completely on a wire rack.
Filling and Frosting
  1. Heat heavy cream in a saucepan until simmering, pour over chocolate and stir until smooth. Refrigerate to firm up.
  2. For frosting, combine egg whites, sugar, and corn syrup over a double boiler. Stir until sugar dissolves and then whip until fluffy.
  3. Remove centers of cupcakes, fill with ganache, and top with marshmallow frosting. Toast frosting with kitchen torch until golden.

Notes

For the best results, ensure egg whites are at room temperature before whipping. Store in an airtight container for up to 3 days.

Thanksgiving Crunchwrap: Relish Your Leftovers in Style

As I scoured my kitchen post-Thanksgiving, I couldn’t help but feel a pang of uncertainty about what to do with the towering pile of leftovers. Enter the Thanksgiving Crunchwrap—a clever solution that turns your uneaten turkey, stuffing, and mashed potatoes into a crunchy, flavor-packed masterpiece. This delightful wrap not only showcases the mouthwatering essence of your holiday feast but also offers an easy, no-fuss way to savor every last bite without being stuck with the same old sandwich routine. With its crispy exterior and melty, savory filling, it’s perfect for a quick lunch or dinner, making it a true crowd-pleaser. Ready to elevate your leftovers into something extraordinary? Let’s dive into this fun and delicious recipe!

Why Make a Thanksgiving Crunchwrap?

Creative use of leftovers: This recipe transforms your uneaten turkey and sides into a delightful wrap that reinvents holiday favorites.

Crispy Texture: Enjoy a satisfyingly crunchy exterior while reveling in a warm, melty filling that’s bursting with flavor.

Quick and Easy: Perfect for busy days, this simple wrap comes together in just a few minutes, making it a great choice for lunch or dinner.

Customizable: Adjust the ingredients based on what you have on hand. Try adding sautéed veggies or different sauces for a personalized twist!

Crowd-Pleaser: This Thanksgiving Crunchwrap is a fun way to get everyone excited about leftovers. Serve with a side of homemade gravy for an unbeatable meal experience!

Thanksgiving Crunchwrap Ingredients

For the Wrap
Large Flour Tortillas – The sturdy base that holds all the delicious fillings together; you can swap for whole wheat or gluten-free tortillas if needed.
Leftover Mashed Potatoes – Provides a creamy texture and bulk; sweet potatoes or cauliflower mash are great alternatives.
Leftover Green Beans – Adds a nutritious, crunchy element; feel free to use other green veggies like broccoli instead.
Shredded Leftover Turkey – The star protein that delivers that festive flavor; chicken or ham can also work just as well.
Leftover Cranberry Sauce – Offers a tangy sweetness to balance the flavors; any fruit preserves or chutney can be substituted.
Leftover Stuffing – Contributes herby flavors and heartiness; any savory bread mixture will do the trick.
Shredded White Cheddar – Adds a decadent cheesy component; consider Monterey Jack or mozzarella for a different flavor profile.
Gravy (warmed, for serving) – Enhances moisture and flavor when drizzled on your wrap; broth or plant-based options can be used if gravy isn’t available.

Optional Add-Ins
Sautéed Onions or Peppers – These can provide extra flavor and texture; feel free to sprinkle in your favorites for a personalized touch.
Jalapeños or Chili Flakes – Add some heat if you like it spicy; these will bring a fun kick to your Thanksgiving Crunchwrap.
Alternative Sauces – Swap out gravy for ranch, BBQ, or even a drizzle of hot sauce for a unique twist on flavors.

Step‑by‑Step Instructions for Thanksgiving Crunchwrap

Step 1: Prepare Your Workspace
Begin by gathering all your leftover ingredients and equipment, including a large skillet, spatula, and a clean cutting board. Make sure your leftover mashed potatoes, turkey, and other components are all accessible and at room temperature. This will make the assembly process quick and efficient, setting the stage for your delicious Thanksgiving Crunchwrap.

Step 2: Assemble the Wrap
Lay a large flour tortilla flat on your cutting board. Start by spooning a layer of mashed potatoes in the center, followed by green beans, shredded turkey, cranberry sauce, stuffing, and a sprinkle of shredded white cheddar. Be mindful not to overfill; you want to ensure everything is contained within the tortilla’s edges for easy folding.

Step 3: Fold the Tortilla
Gently fold the edges of the tortilla towards the center to create a secure wrap. Start by bringing the left edge over, followed by the right edge, then the top and bottom edges to seal in the flavorful ingredients. Press down gently to secure the shape of your Thanksgiving Crunchwrap, making sure it’s tightly wrapped but not too bursting.

Step 4: Heat the Skillet
Preheat your skillet over medium heat for about 2 minutes. This step is crucial for achieving a crispy exterior on your Thanksgiving Crunchwrap. Once hot, carefully place the wrapped tortilla seam-side down in the skillet. Cook for approximately 3-4 minutes, or until the bottom is golden brown and crunchy, monitoring closely to avoid burning.

Step 5: Flip and Finish Cooking
Using a spatula, carefully flip the Thanksgiving Crunchwrap to the other side. Cook for an additional 3-4 minutes until that side is also golden brown and the cheese is melted. You’ll know it’s ready when you hear that satisfying sizzle and see a crisp outer layer—this is what makes the wrap so delicious!

Step 6: Serve with Gravy
Once both sides of the Thanksgiving Crunchwrap are cooked to golden perfection, remove it from the skillet and place it on a cutting board. Allow it to cool for a minute before slicing it in half. Serve warm with a side of warmed gravy for dipping, enhancing the flavors of your delightful creation!

What to Serve with Thanksgiving Crunchwrap

To complement the flavors of your crunchy masterpiece, consider these delightful pairings that will elevate your meal to new heights.

  • Homemade Gravy: Serve a side of warm, rich gravy for dipping, enhancing the flavors of your wrap and adding moisture.

  • Fresh Garden Salad: A crisp salad with mixed greens and a tangy vinaigrette adds a refreshing contrast to the warm crunchwrap. This pairing keeps your meal light and balanced.

  • Roasted Brussels Sprouts: The crunchy, caramelized edges of roasted Brussels sprouts bring a delightful texture and earthy flavor that perfectly complements the savory wrap.

  • Sweet Potato Fries: Crispy sweet potato fries add a hint of sweetness while keeping with the Thanksgiving theme, making for a fun and satisfying addition.

  • Apple Pie: For dessert, a slice of warm apple pie with a scoop of vanilla ice cream creates a nostalgic finish to your holiday-inspired meal.

  • Sparkling Cider: A glass of sparkling cider ties the meal together beautifully, offering a bubbly sweetness that pairs well with the flavors of the crunchwrap.

Whether you’re aiming for a fresh salad, a comforting side, or a sweet treat, these pairings will make your Thanksgiving Crunchwrap celebration feel complete and satisfying.

Make Ahead Options

These Thanksgiving Crunchwraps are a fantastic choice for meal prep! You can assemble the wraps up to 24 hours in advance by prepping all the fillings and layering them in the tortillas, then covering them tightly in plastic wrap or an airtight container to prevent them from drying out. For best results, store them in the refrigerator and keep the gravy separate until you’re ready to serve. When it’s time to enjoy your delicious wraps, simply heat a skillet over medium heat and cook the assembled crunchwraps for 3-4 minutes per side or until golden brown. With this make-ahead method, you’ll have a comforting and flavorful meal ready to serve with minimal effort!

Expert Tips for the Best Thanksgiving Crunchwrap

  • Preheat the Skillet: Make sure your skillet is hot before adding the wrap to achieve that perfect crispy texture without burning.

  • Don’t Overfill: Avoid the temptation to add too many fillings; this can lead to tearing. Remember, less is more for a secure wrap.

  • Customize Freely: Feel free to swap in different veggies or proteins—make the Thanksgiving Crunchwrap your own with what you have available!

  • Grilling Time: Ensure you give each side enough cooking time for a golden-brown finish. A little patience goes a long way in achieving that crunch!

  • Serve Fresh: For the best flavor and texture, enjoy the wrap right after cooking. Leftovers can be stored but won’t retain that delightful crispiness.

Thanksgiving Crunchwrap Variations

Feel free to adjust this recipe and make the Thanksgiving Crunchwrap your own with these delightful twists and substitutions!

  • Vegetarian Delight: Replace turkey with extra veggies like sautéed mushrooms or roasted butternut squash for a hearty, meat-free option.

  • Spicy Kick: Add sliced jalapeños or a sprinkle of chili flakes to boost the heat level for those who love a little spice in their life.

  • Cheesy Goodness: Swap the white cheddar for pepper jack cheese to introduce a zesty twist that enhances your crunchy wrap experience.

  • BBQ Flavor: Drizzle some BBQ sauce rather than gravy for a smoky flavor that brings a fun twist to your Thanksgiving leftovers.

  • Creamy Alternative: Use creamy ranch dressing instead of cranberry sauce for a tangy base that pairs wonderfully with the other fillings.

  • Crunchy Texture: Toss in some crushed tortilla chips or fried onions for an extra layer of crunch that contrasts beautifully with the softness of the other ingredients.

  • Sweet Swaps: Try using peach preserves or spiced apple butter in place of cranberry sauce for a sweet and fruity flavor explosion.

  • Wrap Varieties: Experiment with different types of tortillas—sundried tomato wraps or spinach tortillas can add a lovely color and flavor to your Thanksgiving Crunchwrap.

These suggestions can take your wrap to new heights, ensuring each bite remains as exciting as the last, so don’t hesitate to play around! Keep it easy and flavorful, and maybe enjoy it with a side of homemade gravy!

How to Store and Freeze Thanksgiving Crunchwrap

Fridge: Store leftover Thanksgiving Crunchwraps in an airtight container for up to 3 days. This helps maintain their texture and flavor for quick snacking later.

Freezer: For longer storage, wrap the crunchwraps individually in plastic wrap and then place them in a freezer-safe bag. They’ll keep well for up to 2 months.

Reheating: To enjoy, thaw in the fridge overnight, then reheat on a skillet over medium heat for about 4-5 minutes per side until crispy and heated through.

Wrap Carefully: If freezing, ensure each wrap is tightly sealed to prevent freezer burn and preserve the delightful flavors of your Thanksgiving Crunchwrap.

Thanksgiving Crunchwrap Recipe FAQs

How do I select the right tortillas for my Thanksgiving Crunchwrap?
Absolutely! Look for large flour tortillas that are pliable and free of tears. If you’re gluten-free or prefer a healthier option, whole wheat or gluten-free tortillas work wonderfully as substitutes. Ensure they are fresh to prevent breakage while wrapping.

What is the best way to store leftover Thanksgiving Crunchwraps?
You can store leftover Thanksgiving Crunchwraps in an airtight container in the fridge for up to 3 days. Make sure they’re completely cooled before sealing to avoid condensation, which can make them soggy. For best results, reheat them on a skillet to maintain their crispy texture.

Can I freeze Thanksgiving Crunchwraps?
Absolutely! To freeze, wrap each crunchwrap tightly in plastic wrap and then place them in a freezer-safe bag. They can be stored for up to 2 months. When you’re ready to enjoy, thaw them in the fridge overnight and reheat on a skillet over medium heat for 4-5 minutes per side until they’re crispy.

What should I do if my crunchwraps aren’t getting crispy?
Very! If your crunchwraps aren’t crispy enough, ensure your skillet is adequately preheated before cooking. Cook them on medium heat for the suggested time, flipping only once for even browning. If the filling is cold, you can also cover the skillet briefly to help heat the insides faster without compromising the crispy exterior.

Are there any dietary considerations I should keep in mind with this recipe?
Of course! If you have allergies, you can easily customize the ingredients. For instance, substitute dairy cheese with plant-based cheese for a vegan option, or swap out turkey for a vegetarian protein like quinoa. Always check food labels where necessary, especially with sauces or pre-made ingredients.

What if I don’t have all the leftover ingredients?
Don’t fret! This Thanksgiving Crunchwrap is super customizable! You can easily swap fillings based on what you have—like using leftover vegetables, different proteins, or even varieties of sauce. The more, the merrier when experimenting with flavors, so let your creativity shine!

Thanksgiving Crunchwrap

Thanksgiving Crunchwrap: Relish Your Leftovers in Style

Transform your Thanksgiving leftovers into a crunchy, flavorful wrap with this Thanksgiving Crunchwrap recipe.
Prep Time 10 minutes
Cook Time 10 minutes
Total Time 20 minutes
Servings: 2 wraps
Course: Lunch
Cuisine: American
Calories: 450

Ingredients
  

For the Wrap
  • 2 large Flour Tortillas can swap for whole wheat or gluten-free
  • 1 cup Leftover Mashed Potatoes sweet potatoes or cauliflower mash are great alternatives
  • 1 cup Leftover Green Beans feel free to use other green veggies like broccoli
  • 1 cup Shredded Leftover Turkey can substitute chicken or ham
  • 1/4 cup Leftover Cranberry Sauce any fruit preserves or chutney can be used
  • 1/2 cup Leftover Stuffing any savory bread mixture will do
  • 1 cup Shredded White Cheddar consider Monterey Jack or mozzarella
  • Gravy (warmed, for serving) broth or plant-based options can be used if no gravy
Optional Add-Ins
  • Sautéed Onions or Peppers add extra flavor and texture
  • Jalapeños or Chili Flakes for some heat
  • Alternative Sauces like ranch or BBQ for a unique twist

Equipment

  • large skillet
  • spatula
  • Cutting Board

Method
 

Step‑by‑Step Instructions for Thanksgiving Crunchwrap
  1. Prepare Your Workspace: Gather all leftover ingredients and equipment, ensuring they are at room temperature.
  2. Assemble the Wrap: Lay tortilla flat, add mashed potatoes, green beans, turkey, cranberry sauce, stuffing, and cheddar.
  3. Fold the Tortilla: Gently fold edges towards the center to seal in the ingredients.
  4. Heat the Skillet: Preheat skillet over medium heat and cook wrapped tortilla seam-side down for 3-4 minutes.
  5. Flip and Finish Cooking: Carefully flip the wrap and cook for another 3-4 minutes until golden brown.
  6. Serve with Gravy: Allow to cool slightly, slice in half, and serve warm with gravy for dipping.

Notes

Store leftovers in an airtight container for up to 3 days. For freezing, wrap individually and store in a freezer-safe bag for up to 2 months. To reheat, thaw overnight in the fridge and cook in a skillet until crispy.

Thanksgiving Crunchwrap: Relish Your Leftovers in Style

As I scoured my kitchen post-Thanksgiving, I couldn’t help but feel a pang of uncertainty about what to do with the towering pile of leftovers. Enter the Thanksgiving Crunchwrap—a clever solution that turns your uneaten turkey, stuffing, and mashed potatoes into a crunchy, flavor-packed masterpiece. This delightful wrap not only showcases the mouthwatering essence of your holiday feast but also offers an easy, no-fuss way to savor every last bite without being stuck with the same old sandwich routine. With its crispy exterior and melty, savory filling, it’s perfect for a quick lunch or dinner, making it a true crowd-pleaser. Ready to elevate your leftovers into something extraordinary? Let’s dive into this fun and delicious recipe!

Why Make a Thanksgiving Crunchwrap?

Creative use of leftovers: This recipe transforms your uneaten turkey and sides into a delightful wrap that reinvents holiday favorites.

Crispy Texture: Enjoy a satisfyingly crunchy exterior while reveling in a warm, melty filling that’s bursting with flavor.

Quick and Easy: Perfect for busy days, this simple wrap comes together in just a few minutes, making it a great choice for lunch or dinner.

Customizable: Adjust the ingredients based on what you have on hand. Try adding sautéed veggies or different sauces for a personalized twist!

Crowd-Pleaser: This Thanksgiving Crunchwrap is a fun way to get everyone excited about leftovers. Serve with a side of homemade gravy for an unbeatable meal experience!

Thanksgiving Crunchwrap Ingredients

For the Wrap
Large Flour Tortillas – The sturdy base that holds all the delicious fillings together; you can swap for whole wheat or gluten-free tortillas if needed.
Leftover Mashed Potatoes – Provides a creamy texture and bulk; sweet potatoes or cauliflower mash are great alternatives.
Leftover Green Beans – Adds a nutritious, crunchy element; feel free to use other green veggies like broccoli instead.
Shredded Leftover Turkey – The star protein that delivers that festive flavor; chicken or ham can also work just as well.
Leftover Cranberry Sauce – Offers a tangy sweetness to balance the flavors; any fruit preserves or chutney can be substituted.
Leftover Stuffing – Contributes herby flavors and heartiness; any savory bread mixture will do the trick.
Shredded White Cheddar – Adds a decadent cheesy component; consider Monterey Jack or mozzarella for a different flavor profile.
Gravy (warmed, for serving) – Enhances moisture and flavor when drizzled on your wrap; broth or plant-based options can be used if gravy isn’t available.

Optional Add-Ins
Sautéed Onions or Peppers – These can provide extra flavor and texture; feel free to sprinkle in your favorites for a personalized touch.
Jalapeños or Chili Flakes – Add some heat if you like it spicy; these will bring a fun kick to your Thanksgiving Crunchwrap.
Alternative Sauces – Swap out gravy for ranch, BBQ, or even a drizzle of hot sauce for a unique twist on flavors.

Step‑by‑Step Instructions for Thanksgiving Crunchwrap

Step 1: Prepare Your Workspace
Begin by gathering all your leftover ingredients and equipment, including a large skillet, spatula, and a clean cutting board. Make sure your leftover mashed potatoes, turkey, and other components are all accessible and at room temperature. This will make the assembly process quick and efficient, setting the stage for your delicious Thanksgiving Crunchwrap.

Step 2: Assemble the Wrap
Lay a large flour tortilla flat on your cutting board. Start by spooning a layer of mashed potatoes in the center, followed by green beans, shredded turkey, cranberry sauce, stuffing, and a sprinkle of shredded white cheddar. Be mindful not to overfill; you want to ensure everything is contained within the tortilla’s edges for easy folding.

Step 3: Fold the Tortilla
Gently fold the edges of the tortilla towards the center to create a secure wrap. Start by bringing the left edge over, followed by the right edge, then the top and bottom edges to seal in the flavorful ingredients. Press down gently to secure the shape of your Thanksgiving Crunchwrap, making sure it’s tightly wrapped but not too bursting.

Step 4: Heat the Skillet
Preheat your skillet over medium heat for about 2 minutes. This step is crucial for achieving a crispy exterior on your Thanksgiving Crunchwrap. Once hot, carefully place the wrapped tortilla seam-side down in the skillet. Cook for approximately 3-4 minutes, or until the bottom is golden brown and crunchy, monitoring closely to avoid burning.

Step 5: Flip and Finish Cooking
Using a spatula, carefully flip the Thanksgiving Crunchwrap to the other side. Cook for an additional 3-4 minutes until that side is also golden brown and the cheese is melted. You’ll know it’s ready when you hear that satisfying sizzle and see a crisp outer layer—this is what makes the wrap so delicious!

Step 6: Serve with Gravy
Once both sides of the Thanksgiving Crunchwrap are cooked to golden perfection, remove it from the skillet and place it on a cutting board. Allow it to cool for a minute before slicing it in half. Serve warm with a side of warmed gravy for dipping, enhancing the flavors of your delightful creation!

What to Serve with Thanksgiving Crunchwrap

To complement the flavors of your crunchy masterpiece, consider these delightful pairings that will elevate your meal to new heights.

  • Homemade Gravy: Serve a side of warm, rich gravy for dipping, enhancing the flavors of your wrap and adding moisture.

  • Fresh Garden Salad: A crisp salad with mixed greens and a tangy vinaigrette adds a refreshing contrast to the warm crunchwrap. This pairing keeps your meal light and balanced.

  • Roasted Brussels Sprouts: The crunchy, caramelized edges of roasted Brussels sprouts bring a delightful texture and earthy flavor that perfectly complements the savory wrap.

  • Sweet Potato Fries: Crispy sweet potato fries add a hint of sweetness while keeping with the Thanksgiving theme, making for a fun and satisfying addition.

  • Apple Pie: For dessert, a slice of warm apple pie with a scoop of vanilla ice cream creates a nostalgic finish to your holiday-inspired meal.

  • Sparkling Cider: A glass of sparkling cider ties the meal together beautifully, offering a bubbly sweetness that pairs well with the flavors of the crunchwrap.

Whether you’re aiming for a fresh salad, a comforting side, or a sweet treat, these pairings will make your Thanksgiving Crunchwrap celebration feel complete and satisfying.

How to Store and Freeze Thanksgiving Crunchwrap

Fridge: Store leftover Thanksgiving Crunchwraps in an airtight container for up to 3 days. This helps maintain their texture and flavor for quick snacking later.

Freezer: For longer storage, wrap the crunchwraps individually in plastic wrap and then place them in a freezer-safe bag. They’ll keep well for up to 2 months.

Reheating: To enjoy, thaw in the fridge overnight, then reheat on a skillet over medium heat for about 4-5 minutes per side until crispy and heated through.

Wrap Carefully: If freezing, ensure each wrap is tightly sealed to prevent freezer burn and preserve the delightful flavors of your Thanksgiving Crunchwrap.

Make Ahead Options

These Thanksgiving Crunchwraps are a fantastic choice for meal prep! You can assemble the wraps up to 24 hours in advance by prepping all the fillings and layering them in the tortillas, then covering them tightly in plastic wrap or an airtight container to prevent them from drying out. For best results, store them in the refrigerator and keep the gravy separate until you’re ready to serve. When it’s time to enjoy your delicious wraps, simply heat a skillet over medium heat and cook the assembled crunchwraps for 3-4 minutes per side or until golden brown. With this make-ahead method, you’ll have a comforting and flavorful meal ready to serve with minimal effort!

Expert Tips for the Best Thanksgiving Crunchwrap

  • Preheat the Skillet: Make sure your skillet is hot before adding the wrap to achieve that perfect crispy texture without burning.

  • Don’t Overfill: Avoid the temptation to add too many fillings; this can lead to tearing. Remember, less is more for a secure wrap.

  • Customize Freely: Feel free to swap in different veggies or proteins—make the Thanksgiving Crunchwrap your own with what you have available!

  • Grilling Time: Ensure you give each side enough cooking time for a golden-brown finish. A little patience goes a long way in achieving that crunch!

  • Serve Fresh: For the best flavor and texture, enjoy the wrap right after cooking. Leftovers can be stored but won’t retain that delightful crispiness.

Thanksgiving Crunchwrap Variations

Feel free to adjust this recipe and make the Thanksgiving Crunchwrap your own with these delightful twists and substitutions!

  • Vegetarian Delight: Replace turkey with extra veggies like sautéed mushrooms or roasted butternut squash for a hearty, meat-free option.

  • Spicy Kick: Add sliced jalapeños or a sprinkle of chili flakes to boost the heat level for those who love a little spice in their life.

  • Cheesy Goodness: Swap the white cheddar for pepper jack cheese to introduce a zesty twist that enhances your crunchy wrap experience.

  • BBQ Flavor: Drizzle some BBQ sauce rather than gravy for a smoky flavor that brings a fun twist to your Thanksgiving leftovers.

  • Creamy Alternative: Use creamy ranch dressing instead of cranberry sauce for a tangy base that pairs wonderfully with the other fillings.

  • Crunchy Texture: Toss in some crushed tortilla chips or fried onions for an extra layer of crunch that contrasts beautifully with the softness of the other ingredients.

  • Sweet Swaps: Try using peach preserves or spiced apple butter in place of cranberry sauce for a sweet and fruity flavor explosion.

  • Wrap Varieties: Experiment with different types of tortillas—sundried tomato wraps or spinach tortillas can add a lovely color and flavor to your Thanksgiving Crunchwrap.

These suggestions can take your wrap to new heights, ensuring each bite remains as exciting as the last, so don’t hesitate to play around! Keep it easy and flavorful, and maybe enjoy it with a side of homemade gravy!

Thanksgiving Crunchwrap Recipe FAQs

How do I select the right tortillas for my Thanksgiving Crunchwrap?
Absolutely! Look for large flour tortillas that are pliable and free of tears. If you’re gluten-free or prefer a healthier option, whole wheat or gluten-free tortillas work wonderfully as substitutes. Ensure they are fresh to prevent breakage while wrapping.

What is the best way to store leftover Thanksgiving Crunchwraps?
You can store leftover Thanksgiving Crunchwraps in an airtight container in the fridge for up to 3 days. Make sure they’re completely cooled before sealing to avoid condensation, which can make them soggy. For best results, reheat them on a skillet to maintain their crispy texture.

Can I freeze Thanksgiving Crunchwraps?
Absolutely! To freeze, wrap each crunchwrap tightly in plastic wrap and then place them in a freezer-safe bag. They can be stored for up to 2 months. When you’re ready to enjoy, thaw them in the fridge overnight and reheat on a skillet over medium heat for 4-5 minutes per side until they’re crispy.

What should I do if my crunchwraps aren’t getting crispy?
Very! If your crunchwraps aren’t crispy enough, ensure your skillet is adequately preheated before cooking. Cook them on medium heat for the suggested time, flipping only once for even browning. If the filling is cold, you can also cover the skillet briefly to help heat the insides faster without compromising the crispy exterior.

Are there any dietary considerations I should keep in mind with this recipe?
Of course! If you have allergies, you can easily customize the ingredients. For instance, substitute dairy cheese with plant-based cheese for a vegan option, or swap out turkey for a vegetarian protein like quinoa. Always check food labels where necessary, especially with sauces or pre-made ingredients.

What if I don’t have all the leftover ingredients?
Don’t fret! This Thanksgiving Crunchwrap is super customizable! You can easily swap fillings based on what you have—like using leftover vegetables, different proteins, or even varieties of sauce. The more, the merrier when experimenting with flavors, so let your creativity shine!

Thanksgiving Crunchwrap

Thanksgiving Crunchwrap: Relish Your Leftovers in Style

Transform your Thanksgiving leftovers into a delicious Crunchwrap with turkey, stuffing, and more!
Prep Time 10 minutes
Cook Time 8 minutes
Total Time 18 minutes
Servings: 2 wraps
Course: Lunch
Cuisine: American
Calories: 500

Ingredients
  

For the Wrap
  • 2 large Flour Tortillas or whole wheat/gluten-free
  • 1 cup Leftover Mashed Potatoes sweet potatoes or cauliflower mash also work
  • 1 cup Leftover Green Beans or other green veggies like broccoli
  • 1 cup Shredded Leftover Turkey substitutes: chicken or ham
  • 1/4 cup Leftover Cranberry Sauce any fruit preserves or chutney works
  • 1 cup Leftover Stuffing any savory bread mixture
  • 1/2 cup Shredded White Cheddar or Monterey Jack, mozzarella
  • 1/4 cup Gravy warmed, for serving
Optional Add-Ins
  • 1/4 cup Sautéed Onions or Peppers for extra flavor
  • 1 to taste Jalapeños or Chili Flakes for spiciness
  • 1 Alternative Sauces like ranch, BBQ, hot sauce

Equipment

  • large skillet
  • spatula
  • Cutting Board

Method
 

Step-by-Step Instructions
  1. Prepare Your Workspace: Gather all your leftover ingredients and equipment.
  2. Assemble the Wrap: Lay a tortilla flat and add layers of mashed potatoes, green beans, turkey, cranberry sauce, stuffing, and cheese.
  3. Fold the Tortilla: Securely fold the edges towards the center.
  4. Heat the Skillet: Preheat your skillet over medium heat for about 2 minutes.
  5. Flip and Finish Cooking: Cook the wrapped tortilla for 3-4 minutes on each side until golden brown.
  6. Serve with Gravy: Slice in half and enjoy with warmed gravy for dipping.

Notes

Customize ingredients based on what you have. Store leftovers in an airtight container for up to 3 days.

Savor Meatballs in Pumpkin Sage Sauce for Cozy Nights

As the days grow shorter and the air turns crisp, there’s nothing quite like conjuring up the warmth of home through food. Enter my Juicy Turkey Meatballs in Pumpkin Sage Sauce—a dish that perfectly captures the essence of fall comfort food. These tender meatballs, infused with aromatic sage and enveloped in a creamy pumpkin sauce, not only make for a delightful family dinner but also bring a cozy, nostalgic feel to your kitchen. It’s a quick recipe that’s packed with flavor, making it a beloved choice for those busy weeknights when you crave something nourishing yet indulgent. Curious about how a simple ingredient like pumpkin can elevate your traditional meatball experience? Let’s dive in!

Why Choose Meatballs in Pumpkin Sage Sauce?

Comforting Warmth: This recipe embodies the essence of fall with cozy, familiar flavors that make any meal feel special.

Easy Preparation: With simple instructions, even beginner cooks can whip up these delicious meatballs in no time.

Versatile Pairing: Serve these meatballs with your favorite pasta, gnocchi, or alongside sautéed greens for a balanced and satisfying dinner.

Nutrient-Rich Ingredients: Packed with wholesome ingredients like turkey and pumpkin, they offer a nourishing twist on classic comfort food.

Make-Ahead Convenience: Prepare ahead of time and store them in the fridge or freeze uncooked for quick meals on busy days.

Feel free to complement this dish with a hearty side like Homemade French Sauce for a delightful touch!

Meatballs in Pumpkin Sage Sauce Ingredients

Tip: Gather these ingredients for ultimate comfort in your fall dinners!

For the Meatballs

  • Ground Turkey – The main protein that keeps these meatballs juicy and tender.
  • Fresh Breadcrumbs – Provides structure; panko works well if you need a substitute.
  • Milk – Soaks the breadcrumbs for extra moisture in each meatball.
  • Onion (finely minced) – Infuses aromatic flavor and gentle sweetness.
  • Garlic (minced) – Adds a savory depth that enhances the overall taste.
  • Fresh Sage – The star herb for a distinctly autumnal aroma that elevates your dish.
  • Italian Seasoning – Brings a delightful herbaceous flavor for a well-rounded profile.
  • Parmesan Cheese – Offers richness and umami goodness for those delicious bites.
  • Eggs – Binds the mixture, ensuring the meatballs hold together perfectly.

For the Pumpkin Sage Sauce

  • Canned Pumpkin Puree – The creamy base for the sauce, enhancing each bite with seasonal goodness.
  • Cream – Adds luxurious richness; consider using half-and-half for a lighter option.
  • Salt and Pepper – Essential seasonings that elevate and balance the flavors.

Encourage your family to gather around the table, savoring these meatballs in pumpkin sage sauce as you share stories and laughter, embodying the warmth of the season.

Step‑by‑Step Instructions for Juicy Turkey Meatballs in Creamy Pumpkin Sage Sauce

Step 1: Prepare Meatball Mixture
In a large mixing bowl, combine the ground turkey, fresh breadcrumbs soaked in milk, minced onion, minced garlic, chopped fresh sage, Italian seasoning, grated Parmesan cheese, and eggs. Use your hands to gently mix the ingredients until just combined, being careful not to overwork the mixture. This will ensure your meatballs remain tender and juicy.

Step 2: Shape Meatballs
With clean hands, scoop out portions of the meatball mixture and roll them into balls about 1 to 1.5 inches in diameter. Aim for uniform sizes to ensure even cooking. Place the formed meatballs on a tray or plate as you work. Once all the meatballs are shaped, they’re ready for cooking and will be enveloped in the creamy pumpkin sage sauce soon.

Step 3: Pan-Fry Meatballs
In a large skillet, heat a few tablespoons of oil over medium heat until shimmering. Carefully add the meatballs to the hot skillet, making sure not to overcrowd the pan. Cook for about 5-7 minutes, turning occasionally until they are golden brown on all sides. Once nicely seared, transfer the meatballs to a plate and set aside while you prepare the sauce.

Step 4: Make Pumpkin Sauce
In the same skillet, reduce the heat to medium-low and add the canned pumpkin puree. Stir in the cream, salt, and pepper, blending everything until smooth. Allow the sauce to simmer for 3-5 minutes, letting the flavors meld together and the sauce thickens slightly. Your pumpkin sage sauce should be creamy and inviting, ready to embrace those delicious meatballs.

Step 5: Combine
Gently add the browned meatballs back into the skillet with the pumpkin sauce. Stir carefully to coat each meatball in the rich sauce. Simmer on low heat for an additional 5-10 minutes, ensuring the meatballs are heated through and infused with the warm, comforting flavors of the pumpkin sage sauce. Serve warm and enjoy this cozy dish!

Make Ahead Options

These meatballs in pumpkin sage sauce are perfect for meal prep, allowing you to save time on busy weeknights. You can prepare the meatball mixture up to 24 hours in advance—just mix everything together and then refrigerate it until you’re ready to cook. For an even quicker option, shape the meatballs and freeze them uncooked for up to 3 months; simply cook them from frozen, adjusting the cooking time slightly. When you’re ready to serve, pan-fry the meatballs and make the sauce just before combining them. This way, you’ll enjoy restaurant-quality flavor with minimal effort while keeping the meatballs juicy and the sauce creamy!

How to Store and Freeze Meatballs in Pumpkin Sage Sauce

Fridge: Store any leftover meatballs in a sealed container for up to 3 days. To keep the meatballs and sauce from drying out, ensure they’re fully covered.

Freezer: Uncooked meatballs can be frozen for up to 3 months. Arrange them on a baking sheet, freeze until firm, then transfer to an airtight container.

Reheating: To reheat, warm the meatballs gently in the pumpkin sage sauce over low heat for about 10-15 minutes, until heated through and steaming.

Make-Ahead Tips: Prepare the meatballs in advance and store in the fridge; simply reheat for an easy, comforting meal any night of the week. Enjoy the delicious meatballs in pumpkin sage sauce without the fuss!

Meatballs in Pumpkin Sage Sauce Variations

Feel free to make this comforting recipe your own and savor different flavors that bring a new twist to every bite!

  • Beef Swap: Use ground beef instead of turkey for a richer flavor and more savory depth in every mouthful.

  • Gluten-Free: Substitute regular breadcrumbs with gluten-free panko or crushed gluten-free crackers to cater to dietary needs.

  • Spicy Kick: Add a pinch of red pepper flakes to the pumpkin sauce for a delightful heat that complements the creamy texture well.

  • Vegan Delight: Swap the turkey for lentils or chickpeas, mix in some flaxseed meal for binding, and use coconut cream for the sauce.

  • Flavor Boost: Incorporate finely diced bell peppers or mushrooms into the meatball mixture for extra flavors and a secret veggie-packed punch.

  • Creamy Dream: Consider swapping heavy cream in the sauce with cashew cream for a vegan option that’s still luscious and satisfying.

  • Herbal Twist: Try adding fresh thyme or rosemary alongside sage for a more layered herb profile that brings an aromatic experience.

  • Alternative Sauce: Make the sauce with roasted butternut squash or sweet potato puree instead of pumpkin for a different seasonal flavor.

These variations invite you to explore new culinary horizons while keeping the comforting essence of meatballs in pumpkin sage sauce alive. And if you’re in the mood for complementary dishes, don’t forget to try them with some Homemade French Sauce or pair with Hearty Spaghetti with Homemade Meatballs for a full circle of comfort food bliss!

What to Serve with Juicy Turkey Meatballs in Creamy Pumpkin Sage Sauce

As the tantalizing aromas of pumpkin and sage fill your kitchen, consider these delightful sides that will elevate your meal.

  • Creamy Polenta: This soft, comforting dish complements the richness of the sauce perfectly and adds a wonderful texture contrast.
  • Sautéed Greens: A vibrant mix of spinach or kale provides a fresh, slightly bitter note that balances the creaminess of the meatballs beautifully.
  • Garlic Bread: Crispy, buttery slices are ideal for dipping into the creamy sauce, making every bite a heavenly experience. Share warm slices with family and savor each flavorful moment together.
  • Roasted Brussels Sprouts: Their slightly charred and nutty flavor enhances the dish, adding a lovely crunch alongside the tender meatballs.
  • Gnocchi: These little dumplings will soak up the pumpkin sage sauce nicely, creating a heartwarming, satisfying dish that everyone will love.
  • Side Salad with Pears: A fresh salad featuring mixed greens, sliced pears, and a tangy vinaigrette brings brightness to your plate and an excellent textural contrast.
  • Wine Pairing: A medium-bodied Chardonnay will harmonize with the dish’s flavors, enriching the comforting experience of your meal.

Let these pairings transform your juicy turkey meatballs in creamy pumpkin sage sauce into a memorable feast that warms the heart!

Expert Tips for Meatballs in Pumpkin Sage Sauce

  • Gentle Mixing: Use a light touch when combining ingredients to keep the meatballs tender. Overworking them can lead to a dense outcome.

  • Pan-Fry for Flavor: Opt to pan-fry instead of baking to achieve a beautiful golden crust that enhances the overall experience of the meatballs in pumpkin sage sauce.

  • Chill Before Cooking: Allow the meatball mixture to chill in the fridge for about 30 minutes before cooking. This helps firm up the mixture, making shaping easier.

  • Avoid Overcooking: Keep an eye on the cooking time for the meatballs; overcooking can dry them out. Aim for a perfectly moist and succulent bite.

  • Batch Cooking: Consider using separate pans to expedite the cooking process. This way, you can prepare more meatballs in less time, perfect for busy weeknights!

Meatballs in Pumpkin Sage Sauce Recipe FAQs

How do I choose the best turkey for my meatballs?
Absolutely! When selecting ground turkey, look for a mix labeled as “lean” or “extra lean.” Opt for ground turkey thigh if you want juicy meatballs, as it has more fat content, which contributes to moisture. Freshness is key; ensure the meat is pink without any dark spots or off-putting odors.

How should I store leftover meatballs in pumpkin sage sauce?
You can store leftover meatballs in a sealed container in the fridge for up to 3 days. To maintain freshness, make sure they’re fully covered in sauce to prevent them from drying out. Just reheat gently when you’re ready to enjoy them again!

Can I freeze uncooked meatballs?
Definitely! Freezing uncooked meatballs is a fantastic way to have a quick meal ready. Form the meatballs and place them on a baking sheet in a single layer. Freeze until firm, then transfer them to an airtight container or freezer bag. They can be stored for up to 3 months. When ready to cook, you can bake or pan-fry them directly from frozen; just adjust the cooking time accordingly.

What should I do if my meatballs are too dense?
If you find your meatballs turn out dense, it’s often due to over-mixing the ingredients. In the future, try to mix just until combined, and perhaps add an extra splash of milk to the mixture for moisture. Chilling the mixture before cooking can also help maintain tenderness.

Are there any allergens I should consider?
Yes, it’s important to consider dietary preferences and allergies. The recipe contains eggs and dairy (milk and Parmesan cheese), so if you have individuals with these allergies, you can substitute the eggs with a flaxseed mixture (1 tablespoon ground flaxseed + 3 tablespoons water) and use nut or soy milk along with a dairy-free cheese alternative. Always check labels for allergens in store-bought items like breadcrumbs and seasonings.

Meatballs in Pumpkin Sage Sauce

Savor Meatballs in Pumpkin Sage Sauce for Cozy Nights

Juicy turkey meatballs enveloped in creamy pumpkin sage sauce make a perfect fall comfort food.
Prep Time 15 minutes
Cook Time 30 minutes
Total Time 45 minutes
Servings: 4 meatballs
Course: Dinner
Cuisine: American
Calories: 320

Ingredients
  

For the Meatballs
  • 1 pound Ground Turkey The main protein that keeps these meatballs juicy and tender.
  • 1 cup Fresh Breadcrumbs Panko works well as a substitute.
  • 1/2 cup Milk Soaks the breadcrumbs for extra moisture.
  • 1 small Onion (finely minced) Infuses aromatic flavor.
  • 2 cloves Garlic (minced) Adds savory depth.
  • 1 tablespoon Fresh Sage The star herb for a distinctly autumnal aroma.
  • 1 teaspoon Italian Seasoning Brings a delightful herbaceous flavor.
  • 1/2 cup Parmesan Cheese Offers richness and umami.
  • 1 large Eggs Binds the mixture.
For the Pumpkin Sage Sauce
  • 1 cup Canned Pumpkin Puree The creamy base for the sauce.
  • 1/2 cup Cream Adds luxurious richness.
  • 1 teaspoon Salt Essential seasoning.
  • 1/2 teaspoon Pepper Balances flavors.

Equipment

  • mixing bowl
  • Skillet
  • Tray

Method
 

Preparation Steps
  1. In a large mixing bowl, combine the ground turkey, fresh breadcrumbs soaked in milk, minced onion, minced garlic, chopped fresh sage, Italian seasoning, grated Parmesan cheese, and eggs. Mix gently until just combined.
  2. Scoop out portions of the mixture and roll into balls about 1 to 1.5 inches in diameter. Place formed meatballs on a tray.
  3. In a large skillet, heat oil over medium heat. Add meatballs and cook for about 5-7 minutes, turning occasionally until golden brown. Transfer meatballs to a plate.
  4. In the same skillet, reduce heat and add the canned pumpkin puree. Stir in the cream, salt, and pepper, blending until smooth. Simmer for 3-5 minutes.
  5. Gently add the browned meatballs back into the skillet with the pumpkin sauce. Simmer on low heat for an additional 5-10 minutes.

Notes

Allow meatball mixture to chill before cooking for easier shaping.

Zesty Skirt Steak Marinade for Flavorful Grilling Nights

As I stood over the grill, the sun dipping low in the sky, the mouthwatering aroma of my famous Zesty Skirt Steak Marinade filled the air. This marinade, brimming with vibrant orange juice and a medley of savory spices, can elevate any gathering, transforming a simple meal into a culinary celebration. Not only does it tenderize the skirt steak beautifully, it adds a delightful citrusy sweetness that pairs perfectly with tacos or grilled veggies. With just a few minutes of prep, I can enjoy a flavorful dish that’s ideal for those busy weeknights or relaxed weekend cookouts. Are you ready to make your next meal truly unforgettable? Let’s dive into the delicious details!

Why Choose This Marinade Recipe?

Easy Preparation: This zesty marinade requires only a few basic ingredients that you might already have in your pantry.

Tenderizing Magic: The combination of orange juice and vinegar works wonders to break down the meat fibers, ensuring every bite of skirt steak is tender and juicy.

Flavor Explosion: The delightful mix of citrusy sweetness and savory spices transforms everyday grilling into something extraordinary.

Versatile Uses: Enjoy this marinade not only for skirt steak but also try it with chicken, pork, or fish for a tantalizing twist! Pair it with some cilantro lime rice or vibrant grilled vegetables for a complete meal.

Crowd-Catching Appeal: Impress friends and family with flavors reminiscent of restaurant-quality dishes—perfect for all occasions!

Quick and Convenient: Marinating can happen in as little as two hours, making it a time-saving option for busy nights.

Unleash the flavor of your next cookout with this go-to zesty marinade!

Zesty Skirt Steak Marinade Ingredients

For the Marinade

  • Orange Juice – Freshly squeezed brings the most vibrant flavor for that perfect citrusy kick.
  • Lime Juice – Brightens up the marinade, enhancing the overall citrus profile.
  • Olive Oil – Helps tenderize the meat while ensuring an even flavor coat.
  • Soy Sauce – Adds a deep umami richness; use low-sodium for a healthier option.
  • Worcestershire Sauce – Provides a savory depth that complements the citrus beautifully.
  • Apple Cider Vinegar – Works hand in hand with the juices to tenderize the skirt steak.
  • Garlic – Minced or crushed, it infuses the marinade with aromatic goodness.
  • Red Pepper Flakes – Offers a gentle heat; adjust according to your spice preference.
  • Ground Cumin – Adds warm, earthy notes, enhancing the flavor of the marinade.

Unleash your culinary skills with this simple yet delicious Zesty Skirt Steak Marinade, perfect for transforming your grilling game!

Step‑by‑Step Instructions for Zesty Skirt Steak Marinade

Step 1: Prepare the Marinade
In a medium bowl, whisk together the freshly squeezed orange juice, lime juice, olive oil, soy sauce, Worcestershire sauce, and apple cider vinegar until well mixed. Add minced garlic, red pepper flakes, and ground cumin, blending everything into a harmonious marinade. The vivid orange color will indicate the vibrant citrus flavor you can expect in your Zesty Skirt Steak Marinade.

Step 2: Marinate the Steak
Place the skirt steak flat in a large baking dish or a gallon-sized zip-top bag to ensure it soaks up the marinade effectively. Pour the zesty marinade over the steak, making sure to turn it to coat all sides thoroughly. The meat should look glistening with the marinade, indicating it’s ready for the refrigerator.

Step 3: Refrigerate
Cover the baking dish or seal the zip-top bag, ensuring no air is trapped inside. Refrigerate for at least 2 hours, but no more than 6 hours to avoid a mushy texture. It’s best to give it a gentle flip halfway through to ensure the marinade envelops every inch of the skirt steak for maximum flavor.

Step 4: Prepare for Cooking
Once marinated, remove the skirt steak from the refrigerator and discard the excess marinade. Pat the meat dry with paper towels, which enhances searing by removing moisture. Season both sides generously with salt and black pepper, creating a flavorful crust for your Zesty Skirt Steak when grilled.

Step 5: Preheat the Grill
While the steak rests for a few minutes, preheat your grill to high heat, around 450°F to 500°F. If using a cast-iron skillet, heat it over high heat with a touch of oil until shimmering. Having the grill hot ensures that your skirt steak sears perfectly, locking in the juices and flavor.

Step 6: Cook the Steak
Place the skirt steak on the hot grill or skillet, cooking for about 3-4 minutes on each side for medium-rare. Look for a nicely charred exterior, and use a meat thermometer for an internal temperature of 130°F for that perfect doneness. Adjust the timing based on the steak’s thickness and your desired level of doneness.

Step 7: Rest and Slice
After grilling, remove the steak and let it rest for about 5 minutes on a cutting board. This allows the juices to redistribute throughout the meat, ensuring tenderness. When ready, slice the steak thinly against the grain to maximize tenderness, preparing it for serving in tacos or with your favorite sides.

Make Ahead Options

These Zesty Skirt Steak Marinade preparations are perfect for busy home cooks looking to save time! You can whisk together the marinade ingredients up to 24 hours in advance and store it in an airtight container in the refrigerator. Additionally, the skirt steak can be marinated for up to 6 hours before grilling; simply prepare it the night before and let it soak overnight for maximum flavor. To maintain quality, pat the steak dry before cooking to ensure a beautiful sear. When you’re ready to grill, just preheat your grill, cook the marinated steak as directed, and enjoy a delicious meal with minimal last-minute effort!

Zesty Skirt Steak Marinade Variations

Feel free to personalize your zesty skirt steak marinade for a unique culinary experience that excites your taste buds!

  • Citrus Twist: Swap orange juice for freshly squeezed grapefruit juice for a tangy alternative that brightens the flavor profile. This citrus change will give the marinade an elegant twist that’s both refreshing and vibrant.

  • Herb-Infused: Add fresh herbs like thyme or rosemary for an aromatic flair. The earthy notes enhance the overall depth, creating a beautiful harmony with the citrus flavors.

  • Spicy Kick: Incorporate jalapeño slices or use hot red pepper flakes for an extra layer of heat. Adjust to your spice preference to take the marinade from mild to fiery in a heartbeat!

  • Mango Madness: Blend in pureed mango for a sweet fruitiness that compliments the citrus notes. Its tropical essence will make your steak the star of any gathering!

  • Asian Fusion: Use rice vinegar instead of apple cider vinegar and add sesame oil for an Asian-inspired flavor. Consider serving with a side of cilantro lime rice to elevate your meal.

  • Sweet and Savory: Drizzle in a bit of honey or maple syrup to balance the acidity with a touch of sweetness. This adds a fun twist, perfect for those who love that sweet-savory combination.

  • Smoky Flavor: Introduce a few drops of liquid smoke to impart a rich, smoky essence that makes your steak taste like it’s been grilled over an open flame. It’ll transport your taste buds to the great outdoors!

  • Lemon Zest: Replace some of the lime juice with lemon juice to create a bright, zingy alternative that’s loaded with zest—perfect for those who adore a citrus explosion in every bite!

By embracing these variations, you’ll create a marinated steak that’s truly your own, bringing personal flair to each delightful meal!

Expert Tips for Zesty Skirt Steak Marinade

  • Timing is Key: Avoid marinating the steak for more than 8 hours; excessive time can lead to a mushy texture due to the acidic marinade.

  • Bring to Room Temp: Always let the steak sit at room temperature for about 30 minutes before grilling. This ensures even cooking and a beautiful sear.

  • Dry and Season: Pat the skirt steak dry with paper towels before grilling to enhance the searing process. Season generously with salt and pepper for a better crust.

  • Check Doneness Accurately: Use an instant-read meat thermometer for the most precise results; aim for an internal temperature of 130°F for medium-rare.

  • Slice Against the Grain: When ready to serve, slice the steak thinly against the grain for maximum tenderness. This technique enhances the overall enjoyment of your zesty skirt steak marinade.

What to Serve with Zesty Skirt Steak Marinade

Elevate your grilling experience with these delightful pairings that balance flavors and textures for a truly memorable meal.

  • Cilantro Lime Rice: This dish brings a refreshing zest that complements the citrus notes of the marinade, making it a perfect base for your steak. Pairing it with the skirt steak creates a harmonious blend of flavors that transports you straight to a sunny patio.

  • Grilled Vegetables: Charred asparagus, bell peppers, and zucchini add a colorful and nutritious element to your plate. Their smoky flavor beautifully contrasts with the bright marinade, making each bite a medley of goodness.

  • Creamy Avocado Dip: Whipped avocado with lime juice and garlic offers a silky texture that cools the palate. It’s a delightful addition that enhances the dish’s overall experience while providing a touch of richness.

  • Fresh Pico de Gallo: This vibrant salsa adds a crunchy, fresh element to your meal with its juicy tomatoes, spicy jalapeños, and zesty lime. Spoon some over the skirt steak for an explosion of fresh flavor that excites every taste bud.

  • Spicy Corn Salad: With sweet corn, red onion, and a hint of lime, this colorful side dish celebrates summer vibes. The sweetness of the corn is a delightful counterpoint to the marinade’s citrusy tang.

  • Chilled White Wine: A crisp Sauvignon Blanc or a fruity Pinot Grigio pairs wonderfully with the marinaded steak. The acidity and lightness of the wine enhance the dish’s flavors while cleansing the palate.

  • Warm Flour Tortillas: Soft, pillowy tortillas allow you to wrap slices of skirt steak and all your favorite toppings for a delicious taco experience. This playful, hands-on approach brings everyone together at the table.

Each of these combinations is designed to leave you and your guests with a full heart and a satisfied belly!

How to Store and Freeze Zesty Skirt Steak Marinade

Airtight Container: Keep any leftover marinade in an airtight container in the fridge for up to 2 days. This allows you to use it again for another delicious meal!

Cooked Steak Storage: Once you’ve grilled the skirt steak, store the leftovers in an airtight container. They’ll stay fresh in the fridge for up to 3 days.

Freezing Marinade: If you want to prep ahead, pour the marinade into a freezer-safe bag or container and freeze it for up to 3 months. Thaw in the fridge overnight before use.

Reheating: When ready to enjoy the cooked skirt steak, reheat gently in a skillet over low heat until warmed through, ensuring it remains juicy and flavorful.

Zesty Skirt Steak Marinade Recipe FAQs

How do I select the best oranges for the marinade?
Absolutely! For the freshest flavor, look for oranges that are firm, heavy for their size, and have vibrant, smooth skin. Avoid any with dark spots or blemishes, as these can indicate overripeness. Freshly squeezed juice from navel or Valencia oranges will give your marinade the brightest, most flavorful profile.

What is the best way to store leftover marinade?
Very simple! You can keep any leftover marinade in an airtight container in the fridge for up to 2 days. Just make sure not to use it with raw meat again to avoid contamination. For future use, consider freezing it—pour the marinade into a freezer-safe bag, and it will stay fresh for up to 3 months. Just thaw in the refrigerator overnight before using!

How should I store cooked skirt steak?
After enjoying your delicious skirt steak, let any leftovers cool completely, then transfer them to an airtight container. They’ll remain good in the refrigerator for up to 3 days. For longer storage, you can freeze the sliced steak and it will last about 2 to 3 months. Just be sure to use a freezer-safe container to maintain the quality!

What if my skirt steak turns out tough after cooking?
Don’t worry! If your skirt steak comes out tougher than expected, it might be due to overcooking or not being sliced against the grain. To ensure tenderness next time, aim for internal temperatures of about 130°F for medium-rare. Also, a quick tip—let it rest for about 5 minutes before slicing to allow the juices to redistribute. And remember, always slice against the grain to maximize tenderness!

Can I make this marinade for people with soy allergies?
Absolutely! If you’re preparing a meal for someone with a soy allergy, you can substitute the soy sauce with coconut aminos, which provides a similar umami flavor but is soy-free. Alternatively, you can use homemade broth or a mix of water and salt for seasoning. This way, everyone can enjoy your zesty skirt steak without worries!

Can I use this marinade for other meats?
Yes, indeed! This tasty marinade isn’t just for skirt steak. You can easily use it on chicken, pork, or even fish to infuse them with that lovely citrus flavor. If you’re using chicken or pork, consider decreasing the marinating time to preserve the texture, marinating for 1 to 4 hours depending on the cut. The possibilities are truly endless!

Zesty Skirt Steak Marinade

Zesty Skirt Steak Marinade for Flavorful Grilling Nights

This Zesty Skirt Steak Marinade elevates any grilling experience with vibrant flavors and tender meat.
Prep Time 10 minutes
Cook Time 10 minutes
Refrigeration Time 2 hours
Total Time 2 hours 20 minutes
Servings: 4 servings
Course: Dinner
Cuisine: American
Calories: 220

Ingredients
  

For the Marinade
  • 1 cup Fresh orange juice Freshly squeezed brings the most vibrant flavor
  • 1/4 cup Lime juice Brightens up the marinade
  • 1/4 cup Olive oil Helps tenderize the meat
  • 1/4 cup Soy sauce Use low-sodium for a healthier option
  • 1 tablespoon Worcestershire sauce Provides a savory depth
  • 2 tablespoons Apple cider vinegar Works hand in hand with the juices
  • 3 cloves Garlic Minced or crushed
  • 1/2 teaspoon Red pepper flakes Adjust according to your spice preference
  • 1 teaspoon Ground cumin Adds warm, earthy notes

Equipment

  • Medium bowl
  • whisk
  • Large baking dish or zip-top bag
  • Grill or cast-iron skillet
  • Meat thermometer

Method
 

Step-by-Step Instructions
  1. Prepare the Marinade: In a medium bowl, whisk together the freshly squeezed orange juice, lime juice, olive oil, soy sauce, Worcestershire sauce, and apple cider vinegar until well mixed. Add minced garlic, red pepper flakes, and ground cumin, blending everything into a harmonious marinade.
  2. Marinate the Steak: Place the skirt steak flat in a large baking dish or a gallon-sized zip-top bag. Pour the marinade over the steak, making sure to turn it to coat all sides thoroughly.
  3. Refrigerate: Cover the baking dish or seal the zip-top bag, ensuring no air is trapped inside. Refrigerate for at least 2 hours, but no more than 6 hours.
  4. Prepare for Cooking: Once marinated, remove the skirt steak from the refrigerator and discard the excess marinade. Pat the meat dry with paper towels.
  5. Preheat the Grill: Preheat your grill to high heat, around 450°F to 500°F.
  6. Cook the Steak: Place the skirt steak on the hot grill, cooking for about 3-4 minutes on each side for medium-rare.
  7. Rest and Slice: After grilling, remove the steak and let it rest for about 5 minutes on a cutting board. Slice the steak thinly against the grain.

Notes

For more vibrant flavor, always use freshly squeezed juices. Store leftover marinade in an airtight container for up to 2 days.

Spooky Rib Cage Mac & Cheese That Will Wow Your Guests

“Alright, folks, who’s ready for a spine-tingling twist on a classic?” As the Halloween season creeps in, it’s time to leave the fast food behind and whip up something that combines comfort and creativity. Enter my Rib Cage Mac & Cheese, a dish that’s bound to be the highlight of your Halloween potluck. With its creamy texture hugging each macaroni piece and the fun crescent roll “bones” creating a spooky rib cage, this playful recipe is sure to impress both the kids and the adult foodies at any gathering. Plus, it’s easy to make and a total crowd-pleaser! So, are you curious to see how to bring a bit of Halloween magic to your kitchen? Let’s dive in!

Why Is This Mac & Cheese Special?

Creepy Delight: This Halloween-inspired dish takes the classic mac & cheese to a whole new level with its fun rib cage presentation.

Ultra-Creamy Texture: Each bite bursts with comforting creaminess that pairs perfectly with the flaky crescent dough “bones.”

Family-Friendly Fun: The scare factor adds excitement for kids while still satisfying adults’ sophisticated palates.

Easily Customizable: Feel free to swap out cheeses or add veggies, like broccoli, making it versatile for everyone at your potluck!

Time-Saver: Whip this up in no time, allowing for more time to enjoy the festivities. Why not pair it with a refreshing green salad to balance that richness?

Rib Cage Mac & Cheese Ingredients

• Prepare to bring this spooky dish to life!

For the Mac & Cheese

  • Macaroni – The classic base that holds all the creaminess together.
  • Cheddar Cheese – Provides a rich, comforting flavor; try mixing in mozzarella and gouda for a milder touch.
  • Cream Cheese – This secret ingredient adds incredible richness; use Neufchâtel for a lighter version.
  • Milk – Gives the sauce its creamy consistency; almond milk can be a dairy-free alternative.
  • Butter – Enhances flavor and helps create a silky sauce; substitute with olive oil for a lighter option.

For the “Bones”

  • Crescent Roll Dough – Creates the spooky rib cage look; opt for homemade biscuit dough for a heartier texture.

Seasonings

  • Salt – Essential for bringing out all the flavors of this Rib Cage Mac & Cheese.
  • Pepper – A little kick goes a long way; adjust according to your taste.
  • Optional Spices – Add spices or herbs to elevate the flavor profile as you wish!

Step‑by‑Step Instructions for Spooky Rib Cage Mac & Cheese

Step 1: Cook the Macaroni
Bring a large pot of salted water to a boil, then add the macaroni. Cook until al dente, typically around 7-8 minutes, ensuring it remains slightly firm, as it will cook more in the oven. Drain the macaroni and set it aside, allowing any excess water to evaporate while you prepare the cheese sauce.

Step 2: Prepare the Cheese Sauce
In a spacious pot, melt 4 tablespoons of butter over medium heat. Stir in 4 tablespoons of flour to form a roux, cooking for about 1-2 minutes until bubbly but not browned. Gradually whisk in 2 cups of milk, followed by 8 ounces of cream cheese and 2 cups of shredded cheddar cheese, stirring constantly until the mixture is smooth and creamy.

Step 3: Combine the Mac and Cheese
Once the cheese sauce is velvety and bubbling, add the drained macaroni to the pot. Gently mix the macaroni into the cheese sauce until every piece is enveloped in that luscious, creamy goodness. Preheat your oven to 375°F (190°C) as you prepare to shape the rib cage.

Step 4: Shape the Rib Cage
Roll out the crescent roll dough on a floured surface until it’s flat. Cut it into long strips, about 1 inch wide each. Arrange these strips in a rib cage shape inside a greased 9×13 baking dish, leaving space in the center for the mac and cheese. This fun design will give your Rib Cage Mac & Cheese a spooky appearance.

Step 5: Bake the Dish
Now, pour the cheesy macaroni into the center of your rib cage shape, ensuring it’s evenly spread. Carefully lay the remaining strips of crescent dough over the top to mimic rib bones. Bake in your preheated oven for 20-25 minutes, or until the dough is golden brown and the cheese is bubbling beautifully.

Step 6: Cool and Serve
Once baked, remove your Spooky Rib Cage Mac & Cheese from the oven and let it cool for about 5-10 minutes. This resting time will help the shape set, making it easier to serve. Enjoy this playful dish at your Halloween potluck, reveling in the delighted reactions from your family and friends!

How to Store and Freeze Rib Cage Mac & Cheese

Fridge: Store leftovers covered in the fridge for up to 3 days. Let it cool completely before sealing to maintain its creamy texture.

Freezer: For longer storage, freeze in an airtight container for up to 2 months. Thaw overnight in the fridge before reheating.

Reheating: To reheat, place in an oven-safe dish and cover with foil. Bake at 350°F (175°C) for 20-25 minutes or until heated through, ensuring the cheese stays melty.

Make-Ahead Tips: Prepare the Rib Cage Mac & Cheese a day in advance and store it in the fridge. Reheat before serving—it tastes just as delicious!

What to Serve with Spooky Rib Cage Mac & Cheese

A Halloween feast deserves an equally enchanting spread that will complement the creamy goodness of this thrilling dish.

  • Crispy Green Salad: A fresh salad with a tangy vinaigrette cuts through the richness, adding a lively crunch to your meal. Toss in some spooky-themed croutons to keep the fun alive!

  • Garlic Bread Fingers: Crunchy garlic bread crafted to resemble creepy fingers enhance the cozy vibe and provide a delightful contrast to the creamy mac and cheese.

  • Roasted Veggies: Colorful roasted vegetables bring a warm, earthy flavor to the table. They also add a touch of color, making your Halloween spread both festive and nutritious.

  • Pumpkin Soup: A rich pumpkin soup makes for a comforting starter that pairs beautifully with the rib cage theme while keeping the seasonal flavors in focus.

  • Spooky Spritzer: A refreshing drink, like a sparkling apple cider spritzer, can brighten the meal, offering a sweet, bubbly respite between bites of rich, cheesy pasta.

  • Caramel Apple Slices: For a sweet finish, serve fresh apple slices drizzled in caramel to create a fun, hands-on dessert that echoes the Halloween spirit.

  • Chocolate Mousse Eyeballs: For a showstopper dessert, whip up some chocolate mousse shaped like creepy eyeballs, elevating your potluck experience with a delicious spooky touch.

Make Ahead Options

These Spooky Rib Cage Mac & Cheese are perfect for meal prep! You can prepare the entire dish up to 24 hours in advance. To do this, simply cook the macaroni and make the cheese sauce as instructed, then combine them. Shape the rib cage with the crescent dough, and once assembled, cover the dish tightly with plastic wrap and refrigerate. For the best quality, avoid baking it until you’re ready to serve. When it’s time to impress your guests, preheat your oven to 375°F (190°C), bake the assembled dish from the refrigerator without thawing for 25-30 minutes, and enjoy the eerie yet delicious comfort of this classic that’s just as satisfying as when fresh!

Tips for the Best Rib Cage Mac & Cheese

Perfect Texture: Ensure macaroni is al dente: If overcooked, the pasta can become mushy in the oven, ruining the dish’s integrity.

Flavor Enhancements: Add bacon or jalapeños: For an extra kick, consider folding in crispy bacon bits or diced jalapeños to the cheese mixture.

Dough Monitoring: Watch the baking closely: Checking the rib cage near the end of baking can prevent the crescent dough from turning too brown or burning.

Make-Ahead Magic: Prepare in advance: This rib cage mac & cheese can be made a day ahead, just store it covered and reheat before serving.

Customize Wisely: Swap cheeses for variety: Experiment with different cheese combinations to suit your taste, ensuring everyone’s happy at the potluck!

Rib Cage Mac & Cheese Variations

Customize your spooky creation to suit your taste buds and dietary needs—let the Halloween fun begin!

  • Spicy Pepper Jack: Swap cheddar for pepper jack cheese for a thrilling kick that adds a fiery twist to your mac and cheese.

  • Veggie Boost: Mix in steamed broccoli or spinach for added nutrition and vibrant color. It’s a sneaky way to incorporate veggies that kids will love!

  • Chicken Delight: Incorporate shredded cooked chicken to make this dish heartier. This addition transforms it into a complete meal everyone will enjoy.

  • Crescent-Alteration: Use homemade biscuit dough instead of crescent rolls for a denser, more rustic texture that still captures that creepy rib cage look.

  • Cheese Variation: Experiment with a blend of mozzarella and gouda for a mellower flavor. Each bite will still be creamy but without the sharpness of cheddar.

  • Herb Infusion: Add a sprinkle of garlic powder or Italian seasoning to the cheese sauce for an aromatic twist. The extra flavor might just become your new favorite addition!

  • Sweet Surprise: Fold in roasted butternut squash for a mild sweetness that creates a delightful contrast to the savory cheese. This can add a festive fall flavor to your dish.

  • Boozy Fun: Consider adding a splash of white wine to the cheese sauce for an adult-friendly version. It elevates the flavors and gives a gourmet touch to your spooky mac and cheese.

Looking for more cheesy magic? Check out these delightful recipes: Savory Vegetable Cheese Pancakes or add a sweet twist with Milky Coconut Cheese Dessert to complete your Halloween feast!

Spooky Rib Cage Mac & Cheese Recipe FAQs

What type of macaroni should I use?
Absolutely! For this Rib Cage Mac & Cheese, standard elbow macaroni is the go-to choice due to its classic shape and ability to hold onto the cheese sauce. That said, you can also explore other pasta shapes like shells or cavatappi for a fun twist!

How should I store leftovers?
To store leftovers properly, let them cool completely before transferring to an airtight container. You can keep your spooky mac and cheese in the refrigerator for up to 3 days. To reheat, cover and warm it in the oven at 350°F (175°C) for about 20 minutes, so it stays creamy and delicious.

Can I freeze this dish?
Yes, you can! To freeze, place your cooked Rib Cage Mac & Cheese in an airtight container, ensuring it’s well-sealed to prevent freezer burn. It can last in the freezer for about 2 months. When you’re ready to enjoy it, simply thaw it in the fridge overnight, and then reheat in the oven as directed.

What can I do if the pasta is overcooked?
If you accidentally overcooked the pasta, don’t fret! A quick solution is to reduce the baking time. Bake for 15-20 minutes instead and keep a close eye to prevent it from turning too mushy. You can also fold in some fresh spinach or veggies for added texture!

Are there any dietary considerations for this recipe?
Very much! If you’re serving this dish to guests with dietary restrictions, you can easily customize it. Use gluten-free pasta to accommodate gluten sensitivities and swap the dairy cheeses with dairy-free alternatives like vegan cheese. Additionally, if anyone has nut allergies, be sure to choose non-almond milk or another suitable substitute.

Can I make this in advance?
Absolutely, you can whip this up a day ahead! Prepare the mac and cheese, shape the rib cage with the crescent rolls, then cover and chill it in the fridge. Just remember to let it sit out for about 30 minutes before popping it in the oven. Reheating will give you a freshly baked taste with the convenience of advance prep!

Rib Cage Mac & Cheese

Spooky Rib Cage Mac & Cheese That Will Wow Your Guests

Discover the spooky Rib Cage Mac & Cheese, a creative and creamy twist on a classic dish that will impress at any Halloween gathering.
Prep Time 15 minutes
Cook Time 30 minutes
Cooling Time 10 minutes
Total Time 55 minutes
Servings: 8 servings
Course: Dinner
Cuisine: American
Calories: 450

Ingredients
  

For the Mac & Cheese
  • 2 cups macaroni classic base
  • 8 ounces cheddar cheese shredded
  • 8 ounces cream cheese can use Neufchâtel for lighter
  • 2 cups milk almond milk as a dairy-free alternative
  • 4 tablespoons butter substitute with olive oil for lighter
For the 'Bones'
  • 1 package crescent roll dough or use homemade biscuit dough
Seasonings
  • 1 teaspoon salt essential for flavor
  • 1 teaspoon pepper adjust to taste
  • optional spices to elevate flavor

Equipment

  • Large pot
  • Baking Dish
  • spatula
  • mixing bowl
  • Measuring cups
  • Measuring spoons

Method
 

Step-by-Step Instructions
  1. Bring a large pot of salted water to a boil, then add the macaroni. Cook until al dente, around 7-8 minutes. Drain and set aside.
  2. In a pot, melt 4 tablespoons of butter over medium heat. Stir in 4 tablespoons of flour to form a roux, cooking for about 1-2 minutes. Whisk in 2 cups of milk, then add cream cheese and cheddar cheese, stirring until smooth.
  3. Once the cheese sauce is smooth, add the drained macaroni and mix well. Preheat the oven to 375°F (190°C).
  4. Roll out the crescent roll dough and cut it into 1-inch strips. Arrange strips in a rib cage shape inside a greased baking dish, leaving room for the mac and cheese.
  5. Pour the cheesy macaroni into the rib cage shape, cover with remaining dough strips, and bake for 20-25 minutes until golden brown and bubbling.
  6. Let cool for 5-10 minutes before serving to help shape set.

Notes

This Rib Cage Mac & Cheese can be made a day ahead; just store it covered and reheat before serving.