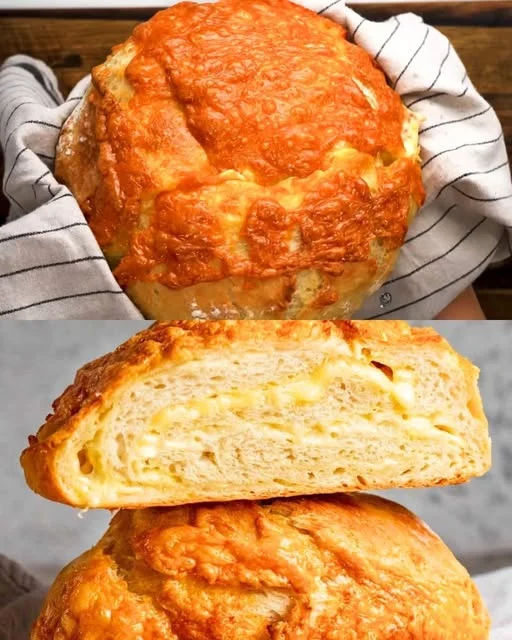
Some recipes feel like magic—how a few simple ingredients can transform into something comforting, aromatic, and utterly delicious. No-knead cheese bread is one of those recipes.
Growing up, homemade bread was a weekend tradition in our house. My mother would wake up early to mix the dough, allowing it to rise while the rest of us were still asleep. By midday, the kitchen smelled of warm, yeasty dough, mingling with the rich, savory scent of melted cheese. It was an unspoken rule that the first slice—still hot from the oven—was to be enjoyed with nothing but a smear of butter, melting into every airy pocket of the bread.
Years later, I found myself hesitant to attempt homemade bread. It always seemed too complicated—requiring hours of kneading, careful measurements, and an intimidating amount of patience. Then, I discovered no-knead bread. It felt like a revelation: no fuss, no special equipment, just time doing the work for you. And when I added cheese to the mix? That’s when it truly became a staple in my kitchen.
No-knead cheese bread is the perfect balance of rustic and indulgent. Its crisp golden crust gives way to a soft, airy interior laced with gooey, melted cheese. Whether you’re dipping it into soup, making a next-level grilled cheese, or simply tearing off pieces to enjoy as a snack, this bread never disappoints.
Now, it’s my turn to pass this recipe on to you—a bread that’s both simple and spectacular, one that fills your home with warmth and the irresistible scent of freshly baked goodness.
Why You’ll Love This No-Knead Cheese Bread
This bread is perfect for both beginners and experienced bakers alike. Here’s why it deserves a spot in your baking repertoire:
Minimal Effort, Maximum Flavor – The dough practically makes itself while you sleep, developing deep flavor without any kneading.
Crispy, Artisan-Style Crust – Baking in a Dutch oven creates a perfectly crisp and golden crust, just like bakery bread.
Soft, Cheesy Interior – Every bite is filled with gooey, melted cheese that enhances the rich, savory flavor.
Versatile & Customizable – Use your favorite cheeses or add garlic, herbs, or even jalapeños for a unique twist.
No Special Equipment Needed – If you don’t have a Dutch oven, you can still bake this in a regular loaf pan with a few adjustments.
Ingredients
Ingredient
Quantity
All-purpose flour
3 cups, plus extra for dusting
Salt
1 ½ teaspoons
Instant yeast (or active dry yeast)
½ teaspoon
Warm water (95°F – 105°F)
1 ¼ cups
Olive oil
¼ cup
Shredded cheese (cheddar, mozzarella, parmesan, or a combination)
1 – 1 ½ cups
Directions
Mix the Dough:
In a large bowl, combine flour, salt, and yeast.
Add warm water and olive oil, stirring until a shaggy dough forms.
Fold in the shredded cheese until evenly distributed.
Let It Rise:
Cover the bowl with plastic wrap or a kitchen towel.
Let the dough rise at room temperature for 12-18 hours until doubled in size and bubbly.
Shape the Dough:
Lightly flour a clean surface and gently shape the dough into a ball.
Let it rest for 30-45 minutes while preheating the oven to 450°F (230°C).
Bake to Perfection:
Place a Dutch oven or heavy-lidded pot in the oven for 30 minutes to preheat.
Carefully transfer the dough to the preheated pot. Cover and bake for 30 minutes.
Remove the lid and bake for another 10-15 minutes until golden brown.
Cool & Serve:
Let the bread cool on a wire rack before slicing. Enjoy warm with butter or on its own!
Nutritional Information (Per Slice, Approx.)
Nutrient
Amount
Calories
180-220 kcal
Carbohydrates
30g
Protein
6g
Fats
6g
Fiber
1g
Secrets to Making the Best No-Knead Cheese Bread
Even though this recipe is simple, a few key techniques can take your bread from good to extraordinary.
1. Let the Dough Rise Slowly
A long, slow rise is the secret to deep flavor and a light, airy texture. Letting the dough ferment overnight at room temperature allows the yeast to fully develop, giving the bread a slightly tangy, complex taste.
2. Use High-Moisture Cheeses
For the best melt, use cheeses like mozzarella, cheddar, or gouda. Hard cheeses like parmesan add sharpness but won’t create the same gooey pockets inside the bread. A combination of both works beautifully.
3. Preheat the Baking Dish
If using a Dutch oven, preheating it before adding the dough mimics a professional bread oven, giving you a better crust. The trapped steam inside helps create that perfect crunch.
4. Don’t Skip the Resting Time
After shaping the dough, let it rest for about 30-45 minutes before baking. This second rise helps develop a more structured crumb and makes shaping easier.
5. Adjust the Baking Time for Your Desired Texture
For an extra crisp crust, bake uncovered for a longer time. If you prefer a softer texture, you can tent the bread with foil for the last few minutes.
How to Serve & Enjoy Your Homemade Cheese Bread
Once you pull your golden, cheesy loaf out of the oven, the real fun begins. Here are some delicious ways to enjoy it:
With Soup or Stew – A thick slice of this bread is perfect for dipping into tomato soup, French onion soup, or a hearty chili.
As the Ultimate Grilled Cheese – Slice and toast it with extra cheese inside for the most decadent grilled cheese sandwich.
With Butter & Honey – The salty-sweet contrast of butter and honey on warm cheese bread is irresistible.
As a Side for Pasta – Pair it with spaghetti, lasagna, or creamy alfredo for a comforting Italian-style meal.
Torn & Dipped – Serve it as an appetizer with olive oil, balsamic vinegar, or garlic butter for dipping.
FAQs: Everything You Need to Know
1. Can I Use a Different Type of Flour?
Yes! While all-purpose flour works best for this recipe, you can substitute it with bread flour for a chewier texture. If using whole wheat flour, mix it with all-purpose flour (50/50) to prevent the bread from becoming too dense.
2. Can I Make This Bread Without a Dutch Oven?
Absolutely! You can use a baking sheet or a regular loaf pan. To create steam for a crisp crust, place a small pan of hot water in the oven while the bread bakes.
3. Can I Add Extra Ingredients to the Dough?
Yes! Try adding roasted garlic, chopped herbs (like rosemary or thyme), or even cooked bacon for extra flavor.
4. How Should I Store Leftover Bread?
Store at room temperature in an airtight bag for up to 3 days. To keep it fresh longer, freeze slices in a sealed bag and toast them when ready to eat.
5. Can I Use Active Dry Yeast Instead of Instant Yeast?
Yes! If using active dry yeast, dissolve it in warm water first and let it sit for 5-10 minutes until foamy before adding it to the flour.
6. Why Is My Bread Too Dense?
If your bread turns out dense, it could be due to not letting it rise long enough, using too much flour, or not having enough moisture in the dough. Make sure the dough looks wet and sticky before the first rise.
7. Can I Make This Gluten-Free?
Gluten-free flours don’t behave the same way as regular flour, so you’ll need a gluten-free bread flour blend with added binders like xanthan gum for the best results.
8. Can I Double the Recipe?
Yes! You can double the recipe to make two loaves, but be sure to use a larger Dutch oven or bake them separately to ensure even cooking.
Conclusion: Bread Baking Made Easy & Delicious
Making bread at home can feel intimidating, but no-knead cheese bread proves that you don’t need to be an expert baker to create something incredible. With just a little patience and a handful of ingredients, you can make a rustic, golden loaf that rivals anything from a bakery.
Whether you’re baking for yourself, sharing with family, or impressing guests, this bread is guaranteed to be a hit. Its crispy crust, gooey cheese pockets, and soft, airy crumb make it a versatile and satisfying addition to any meal.
So go ahead—mix the dough, let time do the work, and enjoy the reward of homemade bread that’s both effortless and extraordinary. Because nothing beats the smell (and taste!) of fresh bread straight from your own oven.
This no-knead cheese bread is the perfect blend of crispy crust and soft, cheesy interior. With just a few simple ingredients and minimal effort, you can create a bakery-quality loaf right in your own kitchen. Whether you’re serving it alongside a meal, making an epic grilled cheese, or enjoying it on its own, this bread is guaranteed to impress!
Some of the best desserts aren’t the ones that take hours to prepare, but the ones that come together effortlessly, yet taste like they took all day. Growing up, my family always had a love for sweet treats, but with busy schedules, making elaborate desserts wasn’t always an option.
One of my fondest memories is of my mother whipping up a quick, creamy dessert whenever we had unexpected guests or when my siblings and I craved something sweet. She never needed a recipe—just a few pantry staples, a touch of creativity, and within minutes, a rich, indulgent treat was ready. It was the kind of dessert that felt fancy, even though it was made in just a few steps.
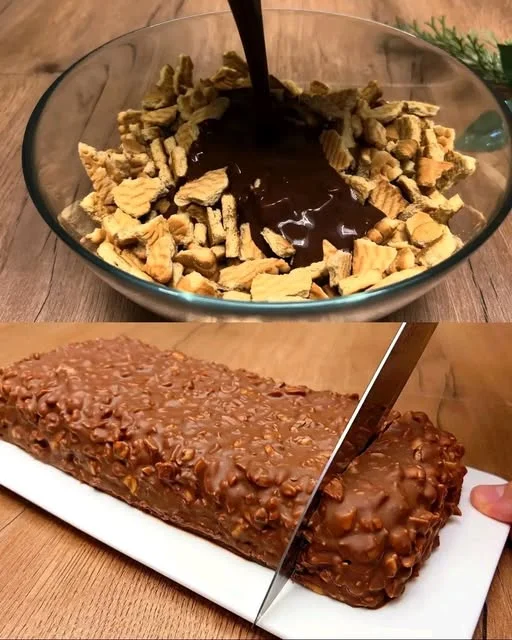
Now, every time I make this no-bake 5-minute dessert, it takes me back to those moments. The simplicity of crushed biscuits, smooth cream cheese, and a luscious chocolate topping creates a harmony of textures and flavors that feels both nostalgic and luxurious. It’s proof that you don’t need an oven, gelatin, or fancy techniques to make something truly delightful.
This recipe is perfect for those times when you want a sweet fix without the hassle. Whether you’re making it for yourself, sharing it with family, or impressing last-minute guests, this dessert is a lifesaver.
Why You’ll Love This No-Bake Dessert
There are countless reasons to fall in love with this dessert, but here are just a few:
Quick & Easy – Takes just 5 minutes to put together, with no baking required.
Minimal Ingredients – Uses simple pantry staples that you likely already have.
No Gelatin Needed – Achieves a perfectly creamy texture without any stabilizers.
Versatile & Customizable – Can be adapted with different flavors and toppings.
Perfect for Any Occasion – Great for last-minute gatherings, meal prepping, or a midnight snack.
Ingredients
Ingredient
Quantity
Biscuits (crushed)
200g
Butter (melted)
100g
Cream cheese
250g
Heavy cream
200ml
Powdered sugar
½ cup
Vanilla extract
1 teaspoon
Chocolate (melted)
100g
Cocoa powder
2 tablespoons
Honey
1 tablespoon
Salt
A pinch
Directions
Prepare the Base:
Crush the biscuits into fine crumbs.
Mix with melted butter until fully combined.
Press the mixture into a serving dish or individual dessert cups to create the base.
Make the Creamy Filling:
In a bowl, whisk together the cream cheese, heavy cream, powdered sugar, vanilla extract, and salt until smooth and fluffy.
Spread the cream mixture evenly over the biscuit base.
Add the Chocolate Layer:
Combine the melted chocolate with cocoa powder and honey, stirring until smooth.
Drizzle the chocolate over the creamy layer and spread evenly.
Chill & Serve:
Let the dessert chill in the refrigerator for at least 5 minutes.
Serve immediately or leave it to set for a firmer texture.
Nutritional Information (Per Serving)
Nutrient
Amount (Approx.)
Calories
300-350 kcal
Carbohydrates
35g
Protein
4g
Fats
18g
Sugar
20g
Secrets to Making the Perfect No-Bake Dessert
1. Use High-Quality Ingredients
Because this dessert is made with just a handful of ingredients, their quality makes all the difference. Use real butter, fresh cream cheese, and good-quality chocolate for the best results.
2. Crush the Biscuits Properly
The texture of the base depends on how finely the biscuits are crushed. For a firmer base, process them into fine crumbs. If you prefer a bit of crunch, leave some larger pieces.
3. Adjust the Sweetness to Your Liking
Some like their desserts sweeter, while others prefer a more balanced flavor. You can adjust the amount of powdered sugar in the cream filling or even use a natural sweetener like honey or maple syrup.
4. Let It Chill for the Best Texture
Although this dessert can be enjoyed immediately, letting it sit in the fridge for at least 30 minutes enhances the texture and flavor, making it even more indulgent.
5. Add a Creative Twist
You can elevate this dessert by adding layers of fruit, chopped nuts, or a drizzle of caramel for extra decadence.
Serving Suggestions: Elevate Your Dessert Experience
This no-bake treat is delicious on its own, but you can make it even better with these ideas:
Top with Fresh Berries – A handful of strawberries, raspberries, or blueberries adds a fresh contrast to the creamy texture.
Drizzle with Caramel or Honey – For an extra layer of sweetness, a light drizzle of caramel or honey works beautifully.
Sprinkle with Crushed Nuts – Almonds, walnuts, or hazelnuts add crunch and complement the rich flavors.
Pair with Coffee or Tea – Enjoy alongside a cup of espresso, chai, or green tea for a perfectly balanced treat.
Serve in Individual Cups – Layering the ingredients in small jars or glasses makes for an elegant presentation.
FAQs: Everything You Need to Know
1. Can I Make This Dessert Ahead of Time?
Yes! This dessert actually gets better with time as the flavors meld together. You can prepare it a day in advance and store it in the fridge until ready to serve.
2. Can I Use a Different Type of Biscuit?
Absolutely. Graham crackers, digestive biscuits, or even chocolate cookies work well in this recipe.
3. How Do I Store Leftovers?
Store leftovers in an airtight container in the refrigerator for up to 3 days. If layering in individual cups, simply cover each one with plastic wrap before storing.
4. Can I Freeze This Dessert?
Yes! You can freeze it for up to a month. Just thaw in the refrigerator before serving.
5. What Can I Use Instead of Cream Cheese?
If you don’t have cream cheese, you can substitute it with mascarpone, ricotta, or Greek yogurt for a slightly different texture.
6. Can I Make a Dairy-Free Version?
Yes! Use dairy-free butter, coconut cream instead of heavy cream, and a plant-based cream cheese alternative.
7. Can I Make This Dessert Less Sweet?
Of course! Reduce the powdered sugar in the cream filling or use dark chocolate instead of milk chocolate for a richer, less sweet flavor.
8. What If I Don’t Have Powdered Sugar?
You can blend regular granulated sugar into a fine powder using a food processor or blender.
9. Can I Add Other Flavors to the Cream Filling?
Yes! A splash of coffee, a bit of orange zest, or even a drop of almond extract can add a unique twist to the flavor.
10. How Do I Make the Chocolate Topping Shinier?
Mix a teaspoon of melted butter or coconut oil into the melted chocolate to give it a glossy finish.
Conclusion: A Dessert You’ll Make Again and Again
In a world where time is precious, finding a dessert that’s quick, easy, and incredibly delicious is a true win. This 5-minute no-bake dessert is proof that you don’t need complicated techniques or fancy equipment to create something indulgent.
With its creamy, velvety layers, crunchy biscuit base, and rich chocolate topping, this treat delivers everything you love about a homemade dessert—without the hassle. Whether you’re making it for a family gathering, a quick weeknight treat, or a special occasion, it’s bound to impress.
So next time you’re craving something sweet, skip the store-bought desserts and whip up this effortless masterpiece. Because sometimes, the simplest recipes bring the greatest joy.
Amal
The No-Bake 5-Minute Dessert Everyone Is Talking About
This no-bake 5-minute dessert is creamy, rich, and irresistibly delicious! Made with simple pantry staples, it requires no gelatin, no baking, and comes together effortlessly. Whether you’re craving a last-minute treat or need a quick dessert for guests, this recipe is the perfect solution. Smooth, chocolatey, and layered with velvety cream, it’s a guaranteed crowd-pleaser!
Some of the best recipes are born out of simplicity—humble ingredients coming together to create something greater than the sum of their parts. This cabbage and egg recipe is a perfect example of that.
Growing up, my grandmother always believed in making the most of what was available in the kitchen. Wasting food was never an option, and she had an incredible ability to transform basic ingredients into delicious, satisfying meals. One of her signature dishes was these crispy cabbage and egg fritters, a recipe she learned from her own mother during times when meat was scarce, and creativity in the kitchen was essential.
I remember watching her chop cabbage with swift, precise movements, mixing it with eggs, a handful of oats, and whatever herbs she had on hand. She never measured anything—she cooked by instinct, by memory, by feel. The kitchen would soon be filled with the irresistible aroma of sizzling fritters, and we would gather around, eagerly waiting to take the first bite.
Though simple, these fritters always felt like a special meal. Crispy on the outside, soft on the inside, and bursting with savory flavors, they were a comforting reminder that good food doesn’t have to be complicated. Now, whenever I make them, I feel a connection to my grandmother and to the generations before her who relied on creativity and resourcefulness to feed their families.
This recipe is a celebration of those traditions, proof that with just a few basic ingredients, you can create something truly delicious.
Why You’ll Love These Cabbage & Egg Fritters
These fritters are more than just a budget-friendly meal—they are packed with flavor, texture, and nutrition. Here’s why they deserve a spot on your table:
Simple Ingredients, Big Flavor – Made with pantry staples, yet loaded with savory goodness.
Crispy on the Outside, Soft on the Inside – A perfect balance of textures in every bite.
Nutritious & Filling – Cabbage is rich in fiber and vitamins, while eggs add a protein boost.
Customizable – You can tweak the seasonings and ingredients to suit your taste.
Quick & Easy to Make – Ready in under 30 minutes, making it perfect for busy days.
Great for Any Meal – Serve as a snack, side dish, or even a light main course.
Ingredients
Ingredient
Quantity
Cabbage
700g
Eggs
5
Salt
To taste
Oats
3 tablespoons
Flour
2 tablespoons
Onion
1, finely chopped
Olive oil
For frying
Carrot
1, grated
Potato
1, grated
Italian herbs
To taste
Dill
A sprig, chopped
Mayonnaise
2 tablespoons
Greek yogurt
2 tablespoons
Soy sauce
To taste
Black pepper
To taste
Garlic
1 clove, minced
Directions
Prepare the Vegetables:
Finely shred the cabbage and sprinkle with salt. Let it sit for 10 minutes, then squeeze out excess moisture.
In a large bowl, combine the cabbage, grated carrot, grated potato, chopped onion, and minced garlic.
Mix the Batter:
Beat the eggs and add them to the vegetable mixture.
Stir in the oats, flour, Italian herbs, and chopped dill. Mix well until everything is combined.
Cook the Fritters:
Heat olive oil in a pan over medium heat.
Scoop portions of the mixture and flatten them into small patties.
Fry for about 3-4 minutes per side, or until golden brown and crispy.
Prepare the Sauce:
In a bowl, mix mayonnaise, Greek yogurt, soy sauce, and black pepper to create a creamy dip.
Serve & Enjoy:
Serve the fritters hot with the sauce on the side. Garnish with fresh dill for extra flavor.
Nutritional Information (Per Serving)
Nutrient
Amount (Approx.)
Calories
180-220 kcal
Protein
7g
Carbohydrates
20g
Fats
8g
Fiber
4g
Secrets to the Best Cabbage & Egg Fritters
While this recipe is straightforward, a few tips can make your fritters even better:
1. Remove Excess Moisture from the Cabbage
Cabbage naturally holds a lot of water, which can make the fritters too soft. After shredding, sprinkle it with salt and let it sit for about 10 minutes, then squeeze out the excess liquid. This will help the fritters hold their shape and achieve a crispier texture.
2. Use a Combination of Binders
Eggs and flour help hold the fritters together, while oats add extra texture. If you want a firmer patty, you can also add a tablespoon of breadcrumbs or grated cheese.
3. Don’t Skip the Herbs and Seasonings
Cabbage has a mild, slightly sweet flavor, so adding Italian herbs, dill, garlic, and black pepper brings depth and balance. Feel free to experiment with spices like cumin or paprika for an extra kick.
4. Cook Over Medium Heat for the Perfect Crisp
If the heat is too high, the outside will brown too quickly while the inside stays raw. Cooking over medium heat ensures even cooking and a crispy, golden crust.
5. Serve with a Flavorful Sauce
A good dipping sauce takes these fritters to the next level. A mix of Greek yogurt, mayonnaise, soy sauce, and garlic creates a creamy, tangy contrast to the crispy fritters. You can also try sour cream, tzatziki, or even a spicy sriracha mayo.
Serving Suggestions: How to Enjoy These Fritters
These cabbage and egg fritters are incredibly versatile. Here are some great ways to serve them:
As a Side Dish – Pair them with grilled chicken, fish, or roasted vegetables for a complete meal.
In a Wrap or Sandwich – Add them to a tortilla with lettuce, tomatoes, and a drizzle of yogurt sauce for a delicious vegetarian wrap.
For Breakfast – Serve with a fried egg on top and a side of avocado for a hearty morning meal.
As a Snack or Appetizer – Enjoy them on their own with a dipping sauce or alongside a fresh salad.
With a Light Soup – A bowl of tomato soup or vegetable broth pairs wonderfully with these crispy fritters.
FAQs: Everything You Need to Know
1. Can I Make These Fritters Ahead of Time?
Yes! You can prepare the mixture a few hours in advance and store it in the fridge until ready to cook. If you want to freeze them, shape the fritters and freeze them before frying.
2. Can I Bake Instead of Frying?
Absolutely. Preheat your oven to 200°C (400°F) and place the fritters on a parchment-lined baking sheet. Lightly brush with olive oil and bake for about 20-25 minutes, flipping halfway through, until golden and crispy.
3. What Can I Use Instead of Flour?
If you’re looking for a gluten-free alternative, swap the flour for chickpea flour or a gluten-free blend.
4. Can I Add More Vegetables?
Yes! Grated zucchini, bell peppers, or spinach can be added to the mixture for extra nutrition and flavor.
5. What’s the Best Way to Store Leftovers?
Store leftover fritters in an airtight container in the refrigerator for up to 3 days. Reheat them in a pan over low heat or in the oven at 180°C (350°F) for a few minutes to regain crispiness.
6. Can I Make This Recipe Vegan?
Yes! Replace the eggs with a flaxseed mixture (1 tablespoon flaxseed meal + 2.5 tablespoons water per egg) and use a plant-based yogurt instead of Greek yogurt.
7. Can I Fry These in an Air Fryer?
Definitely. Preheat the air fryer to 180°C (350°F), lightly grease the basket, and cook for about 12-15 minutes, flipping halfway through.
Conclusion: A Simple Dish with Endless Possibilities
Cabbage and egg fritters are proof that simple ingredients can create something truly delicious. They’re crispy, satisfying, and packed with flavor, making them a wonderful addition to any meal.
This recipe embodies the beauty of home cooking—using what you have, embracing creativity, and enjoying the process of making something from scratch. Whether you grew up eating cabbage-based dishes or are trying this for the first time, these fritters are sure to become a new favorite in your kitchen.
So go ahead, give them a try, and savor the joy of a homemade meal that’s both nourishing and incredibly delicious.
Amal
Golden Cabbage & Egg Fritters
These golden cabbage and egg fritters are crispy on the outside, tender on the inside, and packed with flavor. Made with simple ingredients like shredded cabbage, eggs, and herbs, they make a perfect side dish, snack, or even a light meal. Serve them with a creamy dipping sauce for an irresistible treat!
Place the shredded cabbage in a bowl, sprinkle with salt, and let it sit for 10 minutes. Squeeze out excess moisture.
Make the Batter:
In a large bowl, mix the cabbage, grated carrot, grated potato, onion, garlic, eggs, oats, flour, Italian herbs, dill, salt, and black pepper. Stir until well combined.
Cook the Fritters:
Heat olive oil in a frying pan over medium heat.
Scoop a portion of the batter, shape it into a small patty, and place it in the pan.
Fry for 3-4 minutes per side, until golden brown and crispy. Repeat with the remaining batter.
Make the Sauce:
In a small bowl, mix mayonnaise, Greek yogurt, soy sauce, and black pepper.
Serve & Enjoy:
Serve the fritters warm with the dipping sauce on the side. Garnish with fresh dill for extra flavor.
Notes
For extra crispiness: Let the cabbage sit with salt before mixing to remove excess water.
Baking option: Instead of frying, bake at 200°C (400°F) for 20-25 minutes, flipping halfway through.
Storage: Store leftovers in an airtight container in the fridge for up to 3 days. Reheat in a pan or oven.
Customization: Add grated zucchini, cheese, or chili flakes for extra flavor.
There are certain flavors that instantly transport you back in time—orange is one of them for me. Growing up, my grandmother always had a jar of homemade cookies on her kitchen counter. Some were chocolatey, others buttery, but my absolute favorite were her citrus-infused cookies, bursting with the fresh, tangy sweetness of oranges.
She never wrote down her recipe, insisting that great baking was all about intuition. “You have to feel the dough,” she would say, as she kneaded it with practiced hands. I remember watching her zest fresh oranges, the fragrance filling the room as she stirred the bright, juicy filling over the stove. When the cookies were finally ready—golden, crisp, and filled with velvety orange goodness—they tasted like sunshine.
Now, every time I bake a batch of orange cookies, I’m reminded of those warm afternoons in my grandmother’s kitchen, where love was measured in spoonfuls of sugar and the scent of citrus meant something sweet was coming out of the oven.
This recipe brings together the buttery richness of homemade cookies with the fresh, vibrant flavor of oranges. They’re soft yet crisp, sweet yet tangy—the perfect treat for any occasion. Whether you enjoy them with a cup of tea, pack them as a snack, or share them with loved ones, these cookies are sure to brighten your day.
Why You’ll Love These Orange Cookies
These cookies offer the perfect balance of buttery richness and zesty citrus, making them an irresistible treat. Here’s why they deserve a place in your baking repertoire:
Bright, Refreshing Flavor – The natural sweetness of oranges adds a refreshing twist to classic buttery cookies.
Perfectly Crisp on the Outside, Soft on the Inside – The dough bakes into a delicate texture that melts in your mouth.
Easy to Make – No complicated techniques, just simple ingredients that come together beautifully.
Naturally Flavored – No artificial flavorings—just fresh oranges that infuse every bite with pure citrus goodness.
Great for Any Occasion – Enjoy them as a snack, dessert, or even a homemade gift for loved ones.
Ingredients
For the Cookie Dough:
Ingredient
Quantity
Flour
2½ cups (300g)
Salt
A pinch
Baking powder
½ tsp
Vanilla sugar
1 tsp
Butter
5 tbsp (100g)
Sour cream
⅔ cup (150g)
Egg
1
For the Orange Filling:
Ingredient
Quantity
Oranges
2 (450g)
Sugar
½ cup (100g)
Cornstarch
2 tbsp (30g)
Directions
Prepare the Dough:
In a bowl, mix the flour, salt, baking powder, and vanilla sugar.
Add the butter and rub it into the flour mixture until crumbly.
Stir in the sour cream and egg, then knead into a soft dough. Cover and refrigerate for 30 minutes.
Make the Orange Filling:
Peel and finely chop the oranges, removing any seeds.
In a saucepan over medium heat, cook the oranges with sugar until soft.
Stir in cornstarch and cook until thickened. Let it cool completely.
Shape the Cookies:
Preheat the oven to 180°C (350°F) and line a baking sheet with parchment paper.
Roll out the dough and cut into circles or desired shapes.
Spoon the orange filling onto half of the circles, then top with another dough circle. Press edges to seal.
Bake to Perfection:
Place the cookies on the baking sheet and bake for 15-18 minutes, or until golden brown.
Cool & Serve:
Let the cookies cool before serving. Enjoy with tea or coffee!
Nutritional Information (Per Cookie)
Nutrient
Amount (Approx.)
Calories
150-180 kcal
Carbohydrates
25g
Protein
2g
Fats
6g
Sugar
10g
Secrets to Making the Best Orange Cookies
A few key techniques can take these cookies from good to extraordinary.
1. Use Fresh, Ripe Oranges
For the best flavor, always use fresh oranges rather than bottled juice. The zest contains essential oils that add an intense citrus aroma, while the juice provides natural sweetness.
2. Chill the Dough
Refrigerating the dough for at least 30 minutes before rolling helps prevent spreading during baking, ensuring a perfect shape and texture.
3. Balance the Sweetness
Since oranges have natural sugars, it’s important to balance the flavors. A pinch of salt and a bit of vanilla sugar enhance the depth of flavor without making the cookies overly sweet.
4. Cook the Orange Filling to Perfection
To achieve a thick, jam-like consistency, cook the orange filling over low heat and stir frequently. The cornstarch helps bind the mixture, so it doesn’t leak out of the cookies during baking.
5. Don’t Overbake
These cookies should be lightly golden, not browned. Overbaking can dry them out, so keep a close eye on the oven.
Serving Suggestions: Enjoying Orange Cookies in Every Way
These cookies are delicious on their own, but you can elevate them by pairing them with complementary flavors and textures.
With a Hot Drink – Pair with a cup of tea, coffee, or hot chocolate for a cozy treat.
With a Dusting of Powdered Sugar – For an elegant finish, lightly sprinkle powdered sugar over the cooled cookies.
With Dark Chocolate Drizzle – The slight bitterness of dark chocolate pairs beautifully with the citrusy sweetness.
With a Scoop of Ice Cream – Serve warm cookies with a scoop of vanilla or almond ice cream for an indulgent dessert.
As a Gift – Pack them in a decorative tin for a thoughtful homemade present.
FAQs: Everything You Need to Know
1. Can I Make These Cookies Ahead of Time?
Yes! The dough can be made a day in advance and stored in the refrigerator until you’re ready to bake. You can also freeze the shaped dough for up to a month.
2. Can I Use Other Citrus Fruits Instead of Oranges?
Absolutely! You can substitute oranges with lemons, limes, or even tangerines for a different citrus twist.
3. How Do I Store These Cookies?
Store the cookies in an airtight container at room temperature for up to five days. If you want to keep them fresh for longer, store them in the refrigerator for up to a week.
4. Can I Freeze These Cookies?
Yes! Once baked, let them cool completely before placing them in an airtight container. Freeze for up to three months. When ready to eat, let them thaw at room temperature.
5. What Can I Use Instead of Cornstarch?
If you don’t have cornstarch, you can use flour or arrowroot powder as a thickening agent for the orange filling.
6. Can I Make These Cookies Without Eggs?
Yes! Replace the egg with a flaxseed egg (1 tablespoon ground flaxseed mixed with 2.5 tablespoons water) or a commercial egg replacer.
7. Can I Make Them Gluten-Free?
Yes! Use a high-quality gluten-free flour blend in place of regular flour. You may need to add a bit more liquid if the dough feels too dry.
8. Can I Add Nuts or Other Mix-Ins?
Definitely! Walnuts, almonds, or even dried cranberries would make great additions to the dough for added texture and flavor.
Conclusion: A Cookie Worth Savoring
Orange cookies are more than just a sweet treat; they are a celebration of simple ingredients coming together to create something magical. Their bright citrusy notes, buttery texture, and delicate sweetness make them perfect for any time of the year—whether you’re enjoying a quiet afternoon tea, baking for a holiday gathering, or simply craving something homemade and special.
What makes these cookies truly unforgettable is their ability to bring people together. Just like the ones my grandmother used to make, they carry with them a sense of warmth and nostalgia, reminding us that the best moments in life are often the simplest ones.
So go ahead, preheat the oven, zest those oranges, and bake up a batch of these delightful cookies. Because sometimes, the best way to brighten your day is with a little bit of citrus and a lot of love.
Amal
Zesty Orange Cookies with a Buttery Crumble
These zesty orange cookies are a delightful blend of buttery goodness and fresh citrus flavor. Soft, crumbly, and infused with the natural sweetness of oranges, they make the perfect treat for any occasion. Whether enjoyed with a cup of tea or as a midday snack, these cookies bring a refreshing twist to classic homemade baking.
There’s something magical about the smell of freshly baked cinnamon rolls. It’s the kind of scent that fills the air with warmth, drawing people to the kitchen with eager anticipation. For me, cinnamon rolls are more than just a sweet treat—they are a piece of my childhood, a tradition wrapped in layers of soft, buttery dough and swirls of cinnamon-sugar goodness.
I still remember the weekends when my grandmother would wake up before dawn to start the dough, letting it rise while the rest of the house was still asleep. By the time we stumbled into the kitchen, rubbing sleep from our eyes, the dough would be ready to roll out, fill, and transform into golden, spiraled perfection. The best part? The final step—spreading the rich, tangy cream cheese frosting over the warm rolls, letting it melt into every crevice.
Cinnamon rolls weren’t just food in our house; they were an experience. A bonding moment between generations. A reason to sit down together, laugh, and savor something made with love. Even now, when I bake them in my own kitchen, I feel the same sense of warmth and nostalgia, and I hope this recipe brings that same joy to your home.
Why You’ll Love These Cinnamon Rolls
If you’ve never made homemade cinnamon rolls before, you’re in for a treat. These rolls are soft, buttery, and packed with the perfect balance of sweetness and spice. Here’s why this recipe is worth trying:
Irresistibly Soft & Fluffy – The dough is light, airy, and melts in your mouth with every bite.
Perfectly Balanced Sweetness – The filling has just the right amount of sugar and cinnamon without being overpowering.
Rich & Creamy Frosting – The cream cheese frosting adds a luscious finish, making these rolls even more indulgent.
Make-Ahead Friendly – Prepare them the night before and bake fresh in the morning for an effortless breakfast.
Great for Any Occasion – Whether it’s a cozy weekend breakfast, a holiday gathering, or a special treat, these rolls are always a hit.
Ingredients
For the Dough
Ingredient
Quantity
Sugar
7 Tbsp (80g)
Dry yeast
1 tsp (4g)
Lukewarm milk
1 cup (250ml)
Egg
1
Vegetable oil
2 Tbsp
Flour
4 cups (500g)
Salt
1 tsp (4g)
For the Filling
Ingredient
Quantity
Butter (softened)
1/3 cup (80g)
Sugar
1/2 cup (80g)
Cinnamon
To taste
Crushed walnuts
1/2 cup (100g)
For the Cream Cheese Frosting
Ingredient
Quantity
Cream cheese
1 1/4 cups (300g)
Milk
3 Tbsp
Directions
Prepare the Dough:
In a bowl, mix lukewarm milk, sugar, and dry yeast. Let it sit for 5-10 minutes until foamy.
Add the egg, vegetable oil, flour, and salt. Mix until a soft dough forms.
Knead for 8-10 minutes until smooth. Cover and let rise for 1-1.5 hours, or until doubled in size.
Prepare the Filling:
In a small bowl, combine softened butter, sugar, and cinnamon. Mix until smooth.
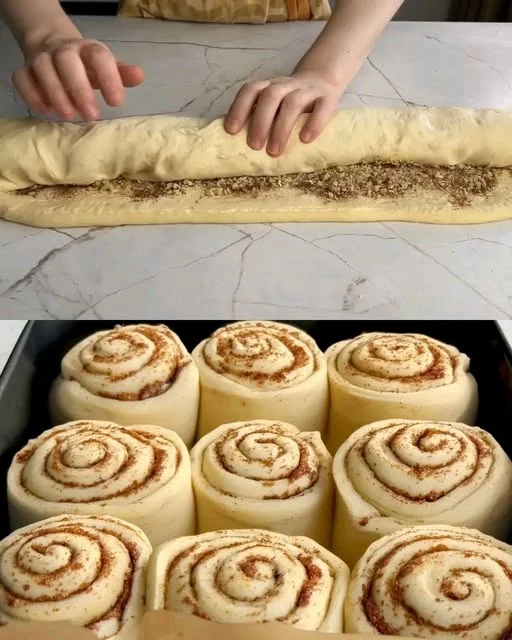
Roll Out & Fill the Dough:
Roll the dough into a large rectangle (about ¼-inch thick).
Spread the cinnamon-sugar butter mixture evenly over the dough.
Sprinkle crushed walnuts on top.
Roll & Slice:
Tightly roll the dough into a log and cut it into 12 equal slices.
Arrange the rolls in a greased baking dish, leaving some space between each.
Second Rise & Bake:
Cover and let the rolls rise for another 30-45 minutes.
Preheat the oven to 180°C (350°F).
Bake for 20-25 minutes, or until golden brown.
Make the Frosting & Serve:
In a bowl, whisk together cream cheese and milk until smooth.
Spread over warm cinnamon rolls before serving.
Nutritional Information (Per Roll)
Nutrient
Amount (Approx.)
Calories
280-320 kcal
Carbohydrates
40g
Protein
6g
Fats
12g
Sugar
18g
Secrets to the Best Cinnamon Rolls
To achieve bakery-quality cinnamon rolls at home, a few key techniques can make all the difference.
1. Use the Right Flour
A high-quality all-purpose flour works well, but for an even softer texture, consider using bread flour. The higher protein content in bread flour helps create a lighter, fluffier dough.
2. Activate the Yeast Properly
Using lukewarm milk (not too hot or too cold) ensures that the yeast activates correctly. If the liquid is too hot, it will kill the yeast; if it’s too cold, the yeast won’t activate properly, resulting in dense rolls.
3. Don’t Rush the Rising Process
Letting the dough rise twice—once after mixing and again after shaping—ensures the best texture. Patience is key; a slow rise allows the dough to develop a richer flavor.
4. Roll the Dough Evenly
When rolling out the dough, aim for an even thickness so that all the rolls bake uniformly. Too thick, and they may not cook through properly; too thin, and they may become dry.
5. Use Room Temperature Butter for the Filling
Softened butter spreads evenly, ensuring every bite is filled with rich, cinnamon-sugar flavor. If the butter is too melted, it may leak out during baking.
6. Slice with a Sharp Knife or Floss
For clean, well-defined rolls, use a sharp knife or unflavored dental floss to slice the dough. This prevents the rolls from being squished during cutting.
7. Bake Until Golden, Not Brown
Overbaking can lead to dry cinnamon rolls. Remove them from the oven when they turn lightly golden and feel soft to the touch.
8. Frost While Warm
Spreading the cream cheese frosting while the rolls are still warm allows it to melt slightly, creating that perfect gooey texture.
Serving Suggestions: Enjoying Cinnamon Rolls to the Fullest
While these cinnamon rolls are perfect on their own, pairing them with complementary flavors can make them even more special.
With a Warm Drink – Enjoy with a hot cup of coffee, chai latte, or a glass of cold milk.
With Fresh Fruit – Serve alongside sliced strawberries, raspberries, or a fruit salad for a refreshing contrast.
With a Drizzle of Caramel or Honey – For an extra indulgent touch, drizzle a little caramel sauce or honey over the rolls before serving.
With a Side of Scrambled Eggs or Bacon – If serving for breakfast, balance out the sweetness with a savory side.
FAQs: Everything You Need to Know
1. Can I Make These Cinnamon Rolls Ahead of Time?
Yes! You can prepare the rolls the night before, cover them, and refrigerate overnight. The next morning, let them sit at room temperature for about 30 minutes before baking.
2. Can I Freeze Cinnamon Rolls?
Absolutely. You can freeze them before or after baking:
Before Baking: After shaping the rolls, freeze them on a baking sheet, then transfer to an airtight container. When ready to bake, let them thaw and rise before placing them in the oven.
After Baking: Let them cool completely, then freeze. Reheat in the oven or microwave when ready to serve.
3. What’s the Best Way to Store Leftovers?
Store cinnamon rolls in an airtight container at room temperature for up to 2 days, or in the fridge for up to 5 days. Warm them in the microwave for a few seconds before eating.
4. Can I Make This Recipe Without a Stand Mixer?
Yes! You can knead the dough by hand, though it will take about 10 minutes of kneading to reach a smooth, elastic consistency.
5. What If My Dough Isn’t Rising?
If your dough isn’t rising, check that your yeast is fresh and that the liquid used wasn’t too hot or too cold. Letting the dough rise in a warm, draft-free area helps.
6. Can I Use a Different Frosting?
Of course! While cream cheese frosting is the classic choice, you can use vanilla glaze, caramel drizzle, or even a simple dusting of powdered sugar.
7. Can I Make a Healthier Version?
For a lighter version, reduce the sugar, swap in whole wheat flour for half of the white flour, or use a lower-fat frosting alternative.
Conclusion: The Perfect Cinnamon Rolls, Every Time
Few things in life compare to the simple joy of biting into a warm, homemade cinnamon roll. The soft, pillowy texture, the rich cinnamon filling, and the creamy frosting all come together in a way that’s pure comfort.
Whether you’re baking these for a holiday morning, a weekend brunch, or just because, this recipe is one you’ll find yourself coming back to again and again. The process is as rewarding as the result—there’s something deeply satisfying about watching the dough rise, filling your kitchen with that irresistible aroma, and finally pulling a tray of golden, spiraled perfection from the oven.
So go ahead, roll up your sleeves, and create something delicious. Because sometimes, the best moments in life are the ones made from scratch.
Amal
Soft & Gooey Cinnamon Rolls with Cream Cheese Frosting
These soft and gooey cinnamon rolls are the ultimate homemade treat, packed with buttery cinnamon-sugar filling and topped with a rich cream cheese frosting. Each bite melts in your mouth, offering the perfect balance of sweetness and spice. Whether you’re making them for a cozy breakfast, a weekend brunch, or a special occasion, these cinnamon rolls are guaranteed to impress!
In a bowl, combine lukewarm milk, sugar, and dry yeast. Let it sit for 5-10 minutes until foamy.
Add the egg, vegetable oil, flour, and salt. Mix until a soft dough forms.
Knead the dough for about 8-10 minutes until smooth and elastic.
Cover and let it rise for 1-1.5 hours, or until doubled in size.
Prepare the Filling:
In a small bowl, mix the softened butter, sugar, and cinnamon until smooth.
Roll Out the Dough & Add Filling:
Roll the dough into a large rectangle (about ¼-inch thick).
Spread the cinnamon-sugar butter mixture evenly over the dough.
Sprinkle the crushed walnuts on top.
Shape & Slice:
Tightly roll the dough into a log, then cut it into 12 equal slices.
Arrange the rolls in a greased baking dish, leaving some space between them.
Second Rise & Bake:
Cover the dish and let the rolls rise for another 30-45 minutes.
Preheat the oven to 180°C (350°F).
Bake for 20-25 minutes, or until golden brown and fluffy.
Make the Frosting & Serve:
In a bowl, whisk together the cream cheese and milk until smooth and creamy.
Spread the frosting over warm cinnamon rolls and serve immediately.
Notes
Make-Ahead Option: You can prepare the dough and shape the rolls the night before. Cover and refrigerate, then let them come to room temperature before baking.
Storage Tips: Store leftover cinnamon rolls in an airtight container at room temperature for up to 2 days, or refrigerate for up to 5 days. Reheat before serving.
Customization Ideas: Add raisins, chocolate chips, or swap the walnuts for pecans for a unique twist.
Alternative Frosting: If you prefer a lighter glaze, mix powdered sugar with a little milk and vanilla extract instead of using cream cheese frosting.
There’s something special about a dish that brings people together around the dinner table. For me, that dish has always been a baked casserole. Growing up, casseroles weren’t just meals; they were a symbol of home, warmth, and togetherness. My mother had a way of layering simple ingredients—potatoes, chicken, cheese—into a dish that made the whole house smell inviting.
I remember coming home from school on chilly evenings, greeted by the aroma of baked potatoes and melted cheese wafting from the oven. The golden, bubbly top hinted at the creamy, flavorful layers hidden underneath. My mom would always serve it with a side of fresh salad, reminding us that comfort food didn’t have to be heavy—it could be balanced, nourishing, and deeply satisfying.
Years later, this baked chicken and potato casserole remains one of my go-to recipes whenever I crave something cozy yet practical. It’s the kind of dish that’s easy to make, packed with simple ingredients, and rich in flavor. Whether you’re preparing a weeknight family dinner, hosting friends, or meal-prepping for the week, this recipe is guaranteed to be a hit.
Why You’ll Love This Recipe
This dish is the perfect balance of creamy, cheesy, and hearty, making it a must-try for anyone who enjoys comfort food with a homemade touch. Here’s why it deserves a place on your dinner table:
Easy to Prepare – Simple ingredients come together with minimal effort, making it ideal for busy schedules.
One-Pan Wonder – No need for multiple dishes—everything bakes beautifully in one casserole dish.
Rich & Flavorful – The combination of seasoned chicken, soft potatoes, and a creamy sauce creates an irresistible taste.
Great for Leftovers – The flavors deepen overnight, making it just as delicious (if not better) the next day.
Customizable – You can add vegetables, swap cheeses, or adjust seasonings to fit your preferences.
Secrets to the Best Baked Chicken & Potato Casserole
Achieving the perfect balance of texture and flavor takes a few simple tricks. Follow these tips to make sure your casserole turns out golden, creamy, and packed with taste.
1. Use the Right Potatoes
Russet potatoes are a great option because they hold their structure while baking and soak up the creamy sauce beautifully. If you prefer a slightly creamier texture, Yukon Golds work well too.
2. Slice Potatoes Evenly
For an evenly cooked casserole, make sure to slice your potatoes uniformly. A thickness of about ¼ inch ensures they cook through without becoming mushy.
3. Pre-Cook the Chicken for More Flavor
While some casseroles use raw chicken, lightly sautéing it beforehand enhances the flavor and keeps it juicy. Seasoning the chicken before layering adds even more depth.
4. Don’t Skip the Sauce
A homemade sauce ties everything together. Whether it’s a simple milk-based sauce or a richer béchamel, ensuring a creamy consistency prevents the casserole from drying out.
5. Bake Until Golden and Bubbly
A good casserole is all about the contrast between the crispy top and the soft, creamy layers underneath. Bake until the cheese is golden brown and slightly crisp at the edges for the best texture.
Serving Suggestions: What to Pair with This Casserole
This casserole is a meal in itself, but pairing it with the right sides can elevate your dining experience. Here are some great options:
Fresh Green Salad – A simple arugula or mixed greens salad with a light vinaigrette balances out the richness of the casserole.
Steamed or Roasted Vegetables – Broccoli, asparagus, or Brussels sprouts make excellent accompaniments.
Garlic Bread or Dinner Rolls – A warm, crusty bread is perfect for scooping up every last bit of creamy sauce.
A Refreshing Drink – Serve with a glass of white wine, iced tea, or even a light citrus-infused sparkling water for a complete meal.
FAQs: Everything You Need to Know
1. Can I Make This Recipe Ahead of Time?
Yes! You can prepare the casserole ahead of time and store it in the refrigerator for up to 24 hours before baking. This makes it a perfect dish for meal prep or hosting.
2. Can I Freeze This Casserole?
Absolutely. Assemble the casserole, but don’t bake it yet. Wrap it tightly in plastic wrap and aluminum foil, then freeze for up to 2 months. When ready to eat, thaw overnight in the fridge and bake as usual.
3. What’s the Best Way to Reheat Leftovers?
Leftovers can be stored in the fridge for up to 3 days. To reheat, cover with foil and warm in the oven at 180°C (350°F) for about 15 minutes, or microwave individual portions for a quick meal.
4. Can I Use Different Cheeses?
Of course! While shredded cheese like mozzarella or cheddar works well, you can experiment with gouda, parmesan, or even a mix of cheeses for added depth.
5. How Can I Make This Dish Healthier?
If you want a lighter version:
Use Greek yogurt instead of sour cream.
Swap some potatoes for cauliflower or zucchini.
Reduce the cheese or use a lower-fat alternative.
6. Can I Add More Vegetables?
Definitely! Bell peppers, mushrooms, or spinach are great additions. Simply sauté them with the onions before layering.
7. What Can I Use Instead of Milk for the Sauce?
If you’re dairy-free, you can use almond milk, coconut milk, or even chicken broth to make a lighter sauce.
Conclusion: A Classic Comfort Food Worth Making Again and Again
There’s a reason why casseroles have been a staple in home kitchens for generations. They’re simple, delicious, and filled with love. This baked chicken and potato casserole is no exception—it’s a dish that brings people together, creating memories over hearty, satisfying bites.
Whether you’re preparing a comforting family dinner, meal-prepping for the week, or simply looking for a foolproof recipe to impress guests, this casserole delivers. It’s creamy, cheesy, and filled with wholesome ingredients that make every bite unforgettable.
So the next time you’re craving something cozy and flavorful, give this recipe a try. You’ll find yourself coming back to it again and again—because some dishes just never go out of style.
Amal
Baked Chicken & Potato Casserole
This baked chicken and potato casserole is the ultimate comfort food—creamy, cheesy, and packed with hearty flavors. Tender chicken, perfectly seasoned potatoes, and a rich, savory sauce come together in a dish that’s perfect for family dinners, meal prep, or special gatherings. With minimal effort and simple ingredients, this casserole is guaranteed to be a hit at the table!
There’s something undeniably comforting about the smell of potatoes baking in the oven. It’s the kind of aroma that fills the kitchen and makes you feel instantly at home.
Growing up, my grandmother had a way of turning the simplest ingredients into something magical. She never believed in wasting food, and whenever we had extra potatoes lying around, she would transform them into a golden, crispy delight—what she called “potato rounds.” They weren’t fried, they weren’t mashed, but somewhere in between, perfectly crisp on the outside and soft on the inside.
I remember sitting at the kitchen counter, watching as she sliced the potatoes with precision, sprinkling just a touch of salt and pepper before sliding them into the oven. There was no fuss, no elaborate seasoning, just the natural goodness of potatoes brought to life with heat and patience.
It wasn’t until years later, when I started cooking on my own, that I realized the genius behind her method. The simplicity of oven-baked potato slices makes them endlessly versatile—perfect as a snack, a side dish, or even the base for creative toppings. Whether served alongside a main course or enjoyed straight from the pan, this dish has a way of bringing people together, just like it did in my grandmother’s kitchen.
Now, I pass this simple yet irresistible recipe on to you, hoping it becomes a staple in your home just as it has in mine.
Why You’ll Love These Baked Potato Slices
This recipe proves that great food doesn’t have to be complicated. Here’s why these crispy baked potato slices will become a favorite in your kitchen:
Minimal Ingredients, Maximum Flavor – Just a few basic spices enhance the natural taste of the potatoes.
Perfectly Crispy Texture – The right balance of heat and seasoning gives you golden edges with a soft, fluffy interior.
Healthy Alternative to Fried Potatoes – No deep frying, just wholesome baked goodness.
Pairs Well with Almost Anything – Serve them with grilled meats, salads, or enjoy them as a snack with your favorite dip.
Easy to Customize – Add cheese, herbs, or even garlic butter for a unique twist.
Ingredients
Ingredient
Quantity
Potatoes (Russet recommended)
4 medium
Salt
¼ tsp
Black Pepper
⅛ tsp
Cayenne Pepper
⅛ tsp
Directions
Prepare the Potatoes:
Preheat the oven to 400°F (200°C).
Wash and scrub the potatoes thoroughly.
Slice them into ¼-inch thick rounds, ensuring even thickness for uniform baking.
Season the Slices:
Place the potato slices in a bowl and toss them with salt, black pepper, and cayenne pepper for a subtle heat.
For extra crispiness, you can lightly brush them with olive oil or melted butter (optional).
Bake to Perfection:
Arrange the slices in a single layer on a lined baking sheet.
Bake for 20-25 minutes, flipping halfway through, until golden brown and crispy on the edges.
Serve & Enjoy:
Let them cool for a couple of minutes before serving.
Enjoy them as a side dish, snack, or appetizer with your favorite dipping sauce!
Nutritional Information (Per Serving)
Nutrient
Amount (Approx.)
Calories
120 kcal
Carbohydrates
27 g
Protein
3 g
Fats
0.2 g
Fiber
3 g
The Secret to Perfectly Crispy Potato Slices
Achieving the perfect crispiness without deep frying can be tricky, but a few simple tricks can make all the difference:
1. Choose the Right Potatoes
Russet potatoes are the best choice for baking because of their high starch content, which results in a crispy exterior and a tender inside. Yukon Golds can also work if you prefer a slightly creamier texture.
2. Slice Evenly
Cutting your potato slices to a uniform thickness (about ¼ inch) ensures they bake evenly. Too thick, and they’ll stay soft; too thin, and they may burn.
3. Soak for Extra Crispiness
For an even crispier texture, soak the potato slices in cold water for 20-30 minutes before baking. This removes excess starch, helping them crisp up better. Be sure to pat them completely dry before seasoning.
4. Don’t Overcrowd the Pan
Arrange the potato slices in a single layer on your baking sheet. Overlapping them will result in steaming rather than crisping. If necessary, use two baking sheets.
5. Flip Halfway Through Baking
Turning the potato slices over halfway through cooking ensures both sides become evenly golden and crisp.
Serving Suggestions: The Perfect Pairings
Baked potato slices are incredibly versatile and pair well with a variety of dishes. Here are some ideas to enjoy them in different ways:
As a Side Dish – Serve them alongside grilled chicken, steak, or roasted vegetables.
With Dips – Pair with ketchup, garlic aioli, sour cream, or a spicy sriracha mayo for extra flavor.
Loaded Potato Slices – Sprinkle shredded cheese on top in the last few minutes of baking, then add bacon bits and green onions for a loaded-style treat.
As a Breakfast Addition – Serve them with eggs and avocado for a hearty morning meal.
As a Snack or Appetizer – Enjoy them as a crispy, guilt-free alternative to chips!
FAQs: Everything You Need to Know
1. Can I Use Other Types of Potatoes?
Yes! While Russet potatoes yield the crispiest results, Yukon Golds provide a creamier texture, and red potatoes work well if you prefer a slightly firmer bite.
2. How Do I Store and Reheat Leftovers?
Store leftovers in an airtight container in the fridge for up to 3 days. Reheat in the oven at 375°F (190°C) for 5-7 minutes to bring back their crispiness.
3. Can I Make These Ahead of Time?
Yes! You can slice and season the potatoes ahead of time and store them in the fridge until ready to bake. You can also partially bake them and finish crisping them up just before serving.
4. Can I Freeze Baked Potato Slices?
Freezing is possible, but they won’t retain their crispy texture after thawing. If you want to freeze them, bake them halfway, let them cool, then freeze. When ready to eat, bake them straight from frozen until crisp.
5. What Other Seasonings Can I Use?
Feel free to experiment with different flavors! Some great options include:
Garlic powder and paprika for a smoky kick
Italian seasoning and Parmesan for a cheesy twist
Cajun seasoning for a spicy version
Rosemary and thyme for an herby aroma
6. Can I Make These Without Oil or Butter?
Yes! While oil helps with crispiness, you can bake them without it for a lighter version. They may not be as crispy but will still be delicious.
7. How Can I Prevent My Potato Slices from Sticking to the Pan?
Make sure to line your baking sheet with parchment paper or lightly grease it with oil to prevent sticking.
Conclusion: A Simple Dish with Endless Possibilities
There’s something so satisfying about a recipe that requires little effort yet delivers incredible flavor. These crispy oven-baked potato slices prove that you don’t need a long list of ingredients or complicated steps to create something truly delicious.
Whether you’re making them as a side dish for a family dinner, a snack for movie night, or a base for creative toppings, this recipe is bound to become a favorite in your household.
So, the next time you’re craving something warm, crispy, and satisfying, grab a few potatoes, slice them up, and let the oven do the work. Because sometimes, the simplest recipes are the ones we come back to again and again.
Amal
Crispy Oven-Baked Potato Slices
These crispy oven-baked potato slices are the perfect combination of golden, crunchy edges and a soft, fluffy interior. With just a few simple ingredients, you can create a delicious side dish or snack that pairs well with almost any meal. Lightly seasoned with salt, pepper, and a hint of cayenne, these potatoes are a healthier alternative to fried versions while still delivering incredible flavor and texture.
Set the oven to 400°F (200°C) and line a baking sheet with parchment paper or lightly grease it with oil.
Prepare the Potatoes:
Wash and scrub the potatoes thoroughly.
Slice them into ¼-inch thick rounds for even baking.
Season the Slices:
In a bowl, toss the potato slices with salt, black pepper, and cayenne pepper until evenly coated.
Bake to Perfection:
Arrange the slices in a single layer on the baking sheet, ensuring they don’t overlap.
Bake for 20-25 minutes, flipping halfway through, until the edges are golden brown and crispy.
Serve and Enjoy:
Let them cool slightly before serving. Enjoy them as a side dish or a tasty snack with your favorite dipping sauce.
Notes
For extra crispiness: Soak the potato slices in cold water for 20-30 minutes before baking to remove excess starch. Pat dry completely before seasoning.
Customize the flavors: Add garlic powder, smoked paprika, or Parmesan cheese for a unique twist.
Storage tips: Store leftovers in an airtight container in the fridge for up to 3 days. Reheat in the oven for the best texture.
Best dipping sauces: Serve with ketchup, sour cream, garlic aioli, or a spicy sriracha mayo for added flavor.
Breakfast has always been a sacred part of my day. Growing up, I remember waking up to the sounds of sizzling butter and the rich, savory aroma of sausages frying in the kitchen. My mother always believed that a good breakfast set the tone for the day, and she made sure ours was both nourishing and satisfying.
One of her go-to recipes was a simple yet incredible combination of eggs, cheese, and sausages wrapped in a warm tortilla. It was her version of comfort food—quick to make but packed with flavor. Some days, she’d sneak in a few extra ingredients like tomatoes or herbs, and other times, she’d add a dash of spice to wake up our taste buds. No matter how she made it, that breakfast wrap was always a favorite.
Years later, I find myself making the same dish, tweaking it here and there but always returning to the basics: buttery, golden-browned tortillas, fluffy scrambled eggs, gooey melted mozzarella, and perfectly seasoned sausages. It’s the kind of meal that feels indulgent yet simple, a little taste of nostalgia wrapped up in every bite.
Now, I’m excited to share this recipe with you. Whether you’re looking for a quick morning bite, a satisfying brunch, or even a comforting meal after a long day, this cheesy sausage and egg breakfast wrap is a guaranteed winner.
Why You’ll Love This Recipe
This isn’t just any breakfast wrap—it’s a game-changer. Here’s why:
Rich, Savory Flavors – The combination of juicy sausages, melted cheese, and creamy scrambled eggs creates an irresistible taste.
Quick & Easy to Make – In less than 20 minutes, you can have a restaurant-worthy breakfast right at home.
Perfect for On-the-Go – Wrap it up and take it with you for a breakfast that’s both convenient and delicious.
Versatile & Customizable – Swap out ingredients to fit your dietary needs or use up whatever’s in your fridge.
Great for Any Meal – While it’s perfect for breakfast, this wrap also makes a fantastic lunch or dinner option.
Ingredients
Ingredient
Quantity
Sausages
3, sliced
Ghee (or butter)
1.5 tbsp (for sausages)
Eggs
2 large
Salt
To taste
Mixed Peppers (Black, Red, White)
To taste
Milk
¼ cup
Ghee (or butter)
1.5 tbsp (for tortilla)
Tortilla
1 large
Mozzarella Cheese
½ cup, shredded
Tomato
1, thinly sliced
Directions
Cook the Sausages:
Heat 1.5 tablespoons of ghee (or butter) in a pan over medium heat.
Add the sliced sausages and cook until golden brown and slightly crispy. Remove from heat and set aside.
Prepare the Eggs:
In a bowl, whisk the eggs with milk, salt, and mixed peppers.
Heat a small amount of ghee or butter in a pan.
Pour in the egg mixture and cook, stirring gently, until scrambled and just set. Remove from heat.
Assemble the Wrap:
In the same pan, melt 1.5 tablespoons of ghee (or butter) over low heat.
Place the tortilla in the pan and sprinkle half of the shredded mozzarella on one side.
Layer with scrambled eggs, cooked sausages, and tomato slices.
Sprinkle the remaining mozzarella on top.
Fold & Cook:
Carefully fold the tortilla in half, pressing it down lightly.
Cook until the bottom is golden brown, then flip and cook the other side until the cheese melts and the tortilla is crispy.
Serve & Enjoy:
Slice in half and serve warm for a delicious, cheesy, and protein-packed meal!
Nutritional Information (Per Serving)
Nutrient
Amount (Approx.)
Calories
450-500 kcal
Protein
25 g
Carbohydrates
30 g
Fats
28 g
Fiber
3 g
How to Elevate Your Breakfast Wrap
Want to take this wrap to the next level? Try these simple tricks:
1. Use High-Quality Sausages
The better the sausage, the better the flavor. Opt for fresh, high-quality sausages rather than pre-cooked ones for the best taste. You can even experiment with different varieties like spicy chorizo, chicken sausage, or herb-infused Italian sausage.
2. Add a Layer of Creaminess
For an extra indulgent bite, spread a thin layer of cream cheese, avocado, or even sour cream on the tortilla before adding the fillings. This adds richness and balances out the flavors.
3. Experiment with Cheese
Mozzarella is wonderfully melty, but you can mix things up with sharp cheddar, gouda, or even a sprinkle of feta for a salty, tangy kick.
4. Toast the Tortilla Just Right
A little extra time in the pan makes all the difference. Cook the wrap on low heat to achieve a golden, crispy exterior while allowing the cheese to melt perfectly inside.
5. Spice It Up
If you like a little heat, add a few dashes of hot sauce, a sprinkle of red pepper flakes, or even some jalapeño slices inside the wrap.
6. Make It a Full Meal
Pair your wrap with a side of roasted potatoes, a fresh fruit salad, or a smoothie for a well-rounded breakfast.
Serving Suggestions & Pairings
While this wrap is satisfying on its own, here are a few ways to enhance your meal:
With a Hot Beverage – Pair it with a cup of freshly brewed coffee or a spiced chai latte for a cozy breakfast experience.
With a Side of Greens – A simple arugula or spinach salad with a light vinaigrette balances out the richness of the wrap.
With a Refreshing Drink – Fresh orange juice, a mango smoothie, or even an iced matcha latte complements the flavors beautifully.
With a Dip – Try dipping your wrap in salsa, guacamole, or a tangy yogurt-based sauce for an extra burst of flavor.
FAQs: Everything You Need to Know
1. Can I Make This Wrap Ahead of Time?
Yes! Prepare the wrap as usual, let it cool, then wrap it tightly in foil or parchment paper. Store it in the fridge for up to 2 days. When ready to eat, reheat in a pan over low heat or in the microwave for about 30 seconds.
2. Can I Freeze This Wrap?
Absolutely. Once assembled, wrap it tightly in plastic wrap and store it in a freezer-safe bag. When you’re ready to eat, thaw it overnight in the fridge and warm it up in a skillet or oven.
3. What Are Some Healthier Substitutes?
If you want to make a lighter version of this wrap:
Use turkey or chicken sausage instead of pork.
Swap the ghee or butter for a small amount of olive oil.
Use a whole wheat or low-carb tortilla.
Add more vegetables like spinach, bell peppers, or mushrooms.
4. Can I Make This Wrap Without Dairy?
Yes! Simply omit the cheese or use a dairy-free cheese alternative. You can also replace the milk in the eggs with almond or oat milk.
5. What’s the Best Way to Keep the Wrap from Getting Soggy?
To prevent sogginess, make sure your eggs aren’t too runny and let any excess moisture from the sausage evaporate before assembling the wrap. Also, toasting the tortilla before wrapping helps create a barrier that keeps it crisp.
6. Can I Make This Recipe Vegetarian?
Of course! Replace the sausages with sautéed mushrooms, black beans, or even scrambled tofu for a plant-based alternative.
7. How Do I Make This Wrap Extra Crispy?
After assembling, press the wrap lightly with a spatula while cooking to ensure even browning. A little extra time in the pan on low heat will give it that perfect crunch.
Conclusion: A Breakfast Worth Waking Up For
There’s something truly special about a breakfast that combines bold flavors, satisfying textures, and the warmth of a homemade meal. This cheesy sausage and egg wrap is not just food—it’s an experience.
Whether you’re making it as a quick breakfast before heading out the door, preparing it for a cozy weekend brunch, or even enjoying it as a late-night snack, this wrap is sure to hit the spot. It’s the perfect balance of indulgent and nourishing, crispy and melty, simple yet deliciously satisfying.
So go ahead—gather your ingredients, heat up that pan, and treat yourself to a breakfast that’s as comforting as it is flavorful. Once you take your first bite, you’ll understand why this recipe is a keeper.
Amal
Cheesy Sausage & Egg Breakfast Wrap
This cheesy sausage and egg breakfast wrap is a quick, delicious, and satisfying meal that’s perfect for busy mornings or a hearty brunch. With crispy golden tortillas, melted mozzarella, savory sausages, and fluffy scrambled eggs, this wrap is packed with flavor and protein. Whether you’re enjoying it fresh off the pan or taking it on the go, it’s an easy-to-make breakfast that never disappoints!
There are certain dishes that go beyond simple sustenance. They hold memories, tell stories, and evoke emotions with every bite. This eggplant-based dish is one of them.
I still remember the first time I saw my mother prepare it. The kitchen was filled with the aroma of sautéed onions and garlic, mingling with the sweet earthiness of roasted eggplant. I was just a child, sitting on a wooden stool, watching her work with precision and love. She always cooked with a sense of purpose—each slice, stir, and sprinkle of salt felt like a ritual passed down through generations.
This recipe wasn’t just about creating a meal; it was about gathering our family around the table, sharing laughter, and savoring the comfort of home-cooked food. Even as years passed and I moved away, I found myself returning to this dish, recreating it in my own kitchen whenever I missed home. It was my way of keeping my mother close, no matter how many miles separated us.
Now, I share this beloved dish with you, hoping it becomes a part of your story as well. Whether you’re making it for family, friends, or just for yourself, know that each bite carries warmth, tradition, and the power to bring people together.
Why This Eggplant Recipe Stands Out
This is no ordinary eggplant dish. Unlike heavier, cheese-laden casseroles, this recipe strikes a perfect balance between rich, savory flavors and light, wholesome ingredients. The combination of eggplant, mushrooms, ham, and a delicate egg custard creates a texture that is both hearty and satisfying without being overwhelming.
Here’s why you’ll love it:
Perfect for Any Occasion – Serve it as a main course, a side dish, or even as part of a brunch spread.
Nutrient-Packed – Eggplant is rich in fiber and antioxidants, while eggs provide protein to keep you full and energized.
Simple Ingredients, Big Flavor – The beauty of this dish lies in its simplicity. No fancy ingredients—just honest, delicious flavors.
Make-Ahead Friendly – Prepare it in advance, and it tastes even better the next day as the flavors meld together.
Ingredients
Ingredient
Quantity
Eggplants
2
Bell pepper
1
Onion
1
Garlic
1 clove
Cooked ham
120 g (4 ½ oz)
Eggs
4
Mushrooms
150 g (5 oz)
Kefir or milk
100 ml (½ cup)
Parmesan cheese
30 g (1 oz)
Butter
As needed
Breadcrumbs
As needed
Salt, pepper
To taste
Directions
Prepare the Ingredients:
Dice the eggplants, bell pepper, onion, mushrooms, and cooked ham.
Mince the garlic finely.
Sauté the Vegetables:
In a large pan, melt a bit of butter over medium heat.
Add the onion and garlic, sautéing until fragrant.
Stir in the bell pepper, eggplants, and mushrooms. Cook until softened.
Add the Ham & Seasoning:
Toss in the diced ham and cook for a few more minutes.
Season with salt and pepper to taste.
Prepare the Egg Mixture:
In a bowl, beat the eggs with kefir (or milk) and grated Parmesan cheese.
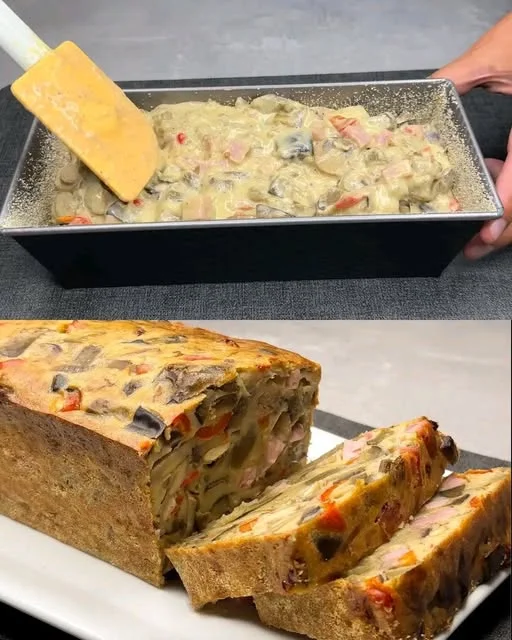
Combine & Bake:
Preheat the oven to 180°C (350°F).
Grease a baking dish with butter and coat it lightly with breadcrumbs.
Transfer the sautéed mixture to the dish and pour the egg mixture over it.
Bake for about 25-30 minutes, or until golden and set.
Serve & Enjoy:
Let it cool slightly before slicing.
Enjoy warm as a satisfying main dish or a hearty side!
Nutritional Information (Per Serving)
Nutrient
Amount (Approx.)
Calories
250-300 kcal
Protein
15 g
Carbohydrates
15 g
Fats
15 g
Fiber
4 g
The Secret to Elevating This Dish
While this recipe is already packed with flavor, a few small adjustments can make it even more special:
1. Roast the Eggplant First
Instead of just sautéing the eggplant, try roasting it in the oven for 20 minutes before adding it to the dish. This brings out a deeper, slightly smoky flavor that enhances the overall taste.
2. Experiment with Cheese
Parmesan gives the dish a rich umami boost, but if you want a creamier texture, try adding a touch of ricotta or mozzarella. For a sharper bite, pecorino works beautifully.
3. Add Fresh Herbs
A sprinkle of fresh basil or oregano can add brightness to the dish, making it feel even more vibrant.
4. Use Smoked Ham for Depth
Instead of regular cooked ham, try using smoked ham or pancetta for an extra layer of savory goodness.
5. Try Different Breadcrumbs
If you’re feeling adventurous, swap traditional breadcrumbs for panko, crushed nuts, or even a mix of ground almonds and herbs for a crunchy, unique topping.
Serving Suggestions: Pairing This Dish Like an Italian
In Italy, food is rarely eaten in isolation. It’s always part of a bigger experience. Here’s how to turn this dish into a well-rounded meal:
Pair it with a Fresh Salad – A simple arugula and cherry tomato salad with a lemon-olive oil dressing provides a refreshing contrast.
Serve with Crusty Bread – A slice of warm, rustic bread is perfect for soaking up every bit of the flavorful egg custard.
Enjoy with a Glass of Wine – A light, dry white wine like Pinot Grigio or a medium-bodied red like Chianti pairs wonderfully with this dish.
Round It Off with a Light Dessert – End your meal with something simple yet classic, like fresh berries with mascarpone or a scoop of gelato.
FAQs: Everything You Need to Know
1. Can I Make This Dish Vegetarian?
Absolutely! Simply omit the ham or replace it with sautéed spinach, sun-dried tomatoes, or even roasted red peppers for added flavor.
2. How Do I Store Leftovers?
Once cooled, store leftovers in an airtight container in the refrigerator for up to three days. Reheat in the oven at 180°C (350°F) for best results.
3. Can I Freeze It?
Yes! This dish freezes well. Let it cool completely, then wrap it tightly in plastic wrap and aluminum foil before freezing. To reheat, thaw overnight in the fridge and warm it in the oven.
4. What Can I Substitute for Kefir?
If you don’t have kefir, you can use milk, Greek yogurt, or even a splash of heavy cream for a richer texture.
5. Can I Make This Recipe Without Eggs?
If you prefer an egg-free version, you can create a custard-like texture using a mixture of blended silken tofu, plant-based milk, and a bit of cornstarch.
6. How Can I Make This Dish Lower in Calories?
Use lean turkey or omit the meat altogether, reduce the amount of cheese, and opt for baking spray instead of butter.
7. Can I Add More Vegetables?
Of course! Zucchini, spinach, or roasted bell peppers make great additions without compromising the integrity of the dish.
Conclusion: A Dish That Feels Like Home
Food is more than just nourishment—it’s a connection to the past, a celebration of the present, and a gift to those we share it with. This eggplant recipe is proof of that. Whether you’re making it to relive childhood memories, impress dinner guests, or simply enjoy a wholesome homemade meal, know that you’re creating something special.
Like all great recipes, this one invites you to make it your own. Maybe you’ll add a personal twist, swap out ingredients, or serve it in a new way. However you choose to prepare it, I hope it brings as much warmth and joy to your table as it has to mine.
So go ahead—gather your ingredients, turn on some Italian music, and let the magic happen in your kitchen. Because some recipes aren’t just about taste. They’re about love, tradition, and the stories we create with every meal.
Amal
My Italian Mom’s Eggplant Delight That Conquered the World
This hearty and flavorful eggplant dish is a true family favorite, inspired by my Italian mother’s kitchen. Combining tender eggplant, savory ham, mushrooms, and a rich egg custard, it’s the perfect balance of comforting and nutritious. Whether served as a main course or a side, this dish is simple to prepare and bursting with classic Mediterranean flavors.
If you love the classic Big Mac but want a fun twist, the Big Mac Bowl recipe is perfect for you! This dish captures all the delicious flavors of the iconic burger while offering a healthier and more convenient way to enjoy it. Imagine a hearty bowl filled with seasoned ground beef, fluffy rice, fresh veggies, and creamy dressing. It’s a meal that’s not only satisfying but also easy to prepare.
The Big Mac Bowl is a fantastic option for busy weeknights or casual gatherings. It serves as a great base for customization, allowing you to add your favorite toppings or swap ingredients to suit your dietary needs. Whether you’re a meat lover or prefer vegetarian options, this recipe can cater to everyone’s taste.
In this article, we’ll guide you through the ingredients, preparation steps, and variations of the Big Mac Bowl recipe. You’ll discover how to create a delicious meal that’s sure to impress your family and friends. So, let’s dive into the world of the Big Mac Bowl and get cooking!
Ingredients for the Big Mac Bowl Recipe
To create a mouthwatering Big Mac Bowl, you’ll need a few simple ingredients. Each component plays a vital role in bringing the flavors together. Here’s what you’ll need:
1 pound ground beef: This is the star of the dish, providing a rich and savory flavor.
1 teaspoon onion powder: Adds a subtle sweetness and depth to the beef.
1 teaspoon garlic powder: Enhances the overall taste with its aromatic qualities.
1 teaspoon salt: Essential for seasoning the beef and bringing out the flavors.
1/2 teaspoon black pepper: Adds a hint of spice to the dish.
1 cup cooked white rice: Serves as a hearty base for the bowl.
1 cup shredded lettuce: Provides a fresh crunch and balances the richness of the beef.
1/2 cup diced tomatoes: Adds juiciness and a burst of flavor.
1/2 cup shredded cheddar cheese: Melts beautifully and adds creaminess.
1/4 cup pickles, chopped: Brings a tangy kick that complements the other ingredients.
1/4 cup Thousand Island dressing: Ties everything together with its creamy, zesty flavor.
These ingredients come together to create a delicious and satisfying meal. Feel free to adjust the quantities based on your preferences or dietary needs. Now that you have everything ready, let’s move on to the next step of preparing your Big Mac Bowl!
Step-by-Step Preparation of the Big Mac Bowl Recipe
Now that you have all your ingredients ready, it’s time to dive into the preparation of your Big Mac Bowl. This step-by-step guide will help you create a delicious meal that’s sure to please everyone at the table. Let’s get started!
Step 1: Preparing the Base for the Big Mac Bowl Recipe
The first step in making your Big Mac Bowl is preparing the base. Start by cooking your rice according to the package instructions. White rice is a great choice, but you can also use brown rice for a healthier option. Once the rice is cooked, fluff it with a fork and set it aside. This fluffy rice will serve as the hearty foundation for your bowl.
Step 2: Cooking the Protein for the Big Mac Bowl Recipe
Next, it’s time to cook the ground beef. In a large skillet, heat over medium heat. Add the ground beef and cook it until it’s browned, which should take about 5-7 minutes. Make sure to break it apart with a spatula as it cooks. Once the beef is browned, drain any excess fat to keep your dish lighter. Then, stir in the onion powder, garlic powder, salt, and black pepper. Cook for an additional 2 minutes to let those flavors meld together beautifully.
Step 3: Assembling the Big Mac Bowl Recipe
Now comes the fun part—assembling your Big Mac Bowl! Grab your serving bowls and start layering. Begin with a generous scoop of the cooked rice at the bottom. Next, add a layer of the seasoned ground beef on top of the rice. This combination creates a delicious base that captures the essence of a Big Mac.
Step 4: Adding the Toppings to the Big Mac Bowl Recipe
Finally, it’s time to add the toppings! Start by adding a handful of shredded lettuce over the beef. Then, sprinkle diced tomatoes and shredded cheddar cheese on top. For that classic Big Mac flavor, add chopped pickles and finish it off with a drizzle of Thousand Island dressing. This dressing ties all the flavors together, making each bite a delightful experience.
Once you’ve assembled your bowls, serve them immediately. Enjoy the vibrant colors and delicious flavors of your Big Mac Bowl!
Variations of the Big Mac Bowl Recipe
The Big Mac Bowl recipe is incredibly versatile, allowing you to customize it to fit different dietary preferences and tastes. Whether you’re looking for vegetarian options or low-carb alternatives, there’s a variation for everyone. Let’s explore some delicious twists on this classic dish!
Vegetarian Options for the Big Mac Bowl Recipe
If you’re a vegetarian or simply want to enjoy a meat-free meal, there are plenty of tasty substitutes for the ground beef. Here are a few ideas:
Black Beans: Use canned or cooked black beans for a protein-packed option. They add a hearty texture and pair well with the other ingredients.
Quinoa: This nutritious grain can replace rice and provide a unique flavor. It’s also a great source of protein.
Grilled Vegetables: Sauté a mix of bell peppers, zucchini, and mushrooms for a colorful and flavorful topping.
Plant-Based Meat: Consider using a plant-based ground meat alternative. These products mimic the taste and texture of beef, making them a great choice for a vegetarian Big Mac Bowl.
Feel free to mix and match these options to create a delicious vegetarian Big Mac Bowl that everyone will love!
Low-Carb Alternatives for the Big Mac Bowl Recipe
If you’re watching your carb intake, there are several ways to make a low-carb version of the Big Mac Bowl. Here are some suggestions:
Cauliflower Rice: Swap out the white rice for cauliflower rice. It’s low in carbs and adds a nice texture to the bowl.
Leafy Greens: Instead of rice, use a bed of spinach or kale. This adds nutrients and keeps the dish light.
Ground Turkey or Chicken: Use lean ground turkey or chicken instead of beef. These options are lower in fat and calories.
Skip the Dressing: If you want to cut down on carbs, consider using a lighter dressing or simply squeeze some fresh lemon juice for flavor.
These low-carb alternatives will help you enjoy the Big Mac Bowl while staying on track with your dietary goals. Get creative and find the combination that works best for you!
Cooking Note for the Big Mac Bowl Recipe
When preparing the Big Mac Bowl, there are a few cooking notes to keep in mind to ensure your dish turns out perfectly every time. First, always choose high-quality ground beef for the best flavor. Look for ground beef with a good fat content, around 80/20, as it provides a juicy and flavorful result.
Additionally, make sure to drain the excess fat after cooking the beef. This step is crucial for keeping your dish lighter and preventing it from becoming greasy. If you prefer a healthier option, consider using lean ground turkey or chicken. These alternatives can still deliver great taste while reducing fat content.
When cooking the rice, follow the package instructions carefully. If you want to add extra flavor, consider cooking the rice in broth instead of water. This simple change can elevate the taste of your Big Mac Bowl significantly.
Lastly, don’t hesitate to experiment with the toppings! Fresh ingredients like avocado, jalapeños, or even crispy bacon can add a delightful twist to your bowl. The beauty of the Big Mac Bowl is its versatility, so feel free to get creative and make it your own!
Serving Suggestions for the Big Mac Bowl Recipe
Serving your Big Mac Bowl is just as important as preparing it. Presentation can enhance the dining experience, making your meal even more enjoyable. Here are some delightful serving suggestions to elevate your Big Mac Bowl:
Colorful Bowls: Use vibrant bowls to serve your Big Mac Bowl. Bright colors can make the dish more appealing and fun, especially for kids or gatherings.
Garnish with Fresh Herbs: Consider garnishing your bowl with fresh herbs like parsley or cilantro. This adds a pop of color and a fresh flavor that complements the dish.
Side Dishes: Pair your Big Mac Bowl with a side of crispy sweet potato fries or a light cucumber salad. These sides can balance the richness of the bowl and add variety to your meal.
Family Style Serving: For a casual gathering, serve the Big Mac Bowl ingredients separately. Let guests build their own bowls with their preferred toppings. This interactive approach can be a hit at parties!
Meal Prep Containers: If you’re meal prepping, use clear containers to showcase the layers of your Big Mac Bowl. This not only looks great but also makes it easy to grab and go during busy weekdays.
These serving suggestions can help you create a memorable dining experience with your Big Mac Bowl. Whether it’s a family dinner or a casual get-together, these ideas will surely impress your guests and make mealtime more enjoyable!
Tips for Perfecting the Big Mac Bowl Recipe
Creating the perfect Big Mac Bowl is all about attention to detail and a few handy tips. With these suggestions, you can elevate your dish and impress everyone at the table. Let’s explore some essential tips for perfecting your Big Mac Bowl!
Choose Quality Ingredients: Start with fresh, high-quality ingredients. Opt for grass-fed ground beef or organic vegetables. Quality ingredients make a noticeable difference in flavor.
Season Generously: Don’t be shy with your seasonings! The right amount of salt and spices can enhance the overall taste. Taste as you go to find the perfect balance.
Cook Rice with Flavor: For added depth, cook your rice in chicken or vegetable broth instead of water. This simple swap infuses the rice with extra flavor, making it even more delicious.
Layer Wisely: When assembling your bowl, layer ingredients thoughtfully. Start with rice, then beef, followed by veggies and cheese. This ensures that every bite is packed with flavor.
Experiment with Toppings: Feel free to get creative with toppings! Try adding avocado slices, crispy bacon, or even jalapeños for a spicy kick. The more variety, the better!
Serve Immediately: For the best experience, serve your Big Mac Bowl right after assembling. This keeps the ingredients fresh and the cheese melty. If you let it sit too long, the textures may change.
Make it a Family Affair: Involve your family or friends in the assembly process. Set up a toppings bar and let everyone customize their own bowl. It’s a fun way to enjoy the meal together!
Store Leftovers Properly: If you have leftovers, store them in airtight containers. Keep the dressing separate to maintain freshness. Reheat gently to enjoy your Big Mac Bowl again!
By following these tips, you’ll be well on your way to creating a Big Mac Bowl that’s not only delicious but also visually appealing. Enjoy the process and have fun experimenting with flavors!
Breakdown of Time for the Big Mac Bowl Recipe
Understanding the time needed for each step of the Big Mac Bowl recipe can help you plan your cooking efficiently. Here’s a breakdown of the time required for preparation and cooking, so you can enjoy this delicious meal without any stress.
Prep Time for the Big Mac Bowl Recipe
The prep time for the Big Mac Bowl recipe is quite manageable. You’ll need about 10-15 minutes to gather and prepare your ingredients. This includes:
Measuring out the spices and seasonings.
Chopping the vegetables like tomatoes and pickles.
Cooking the rice if it’s not already prepared.
Having everything ready before you start cooking will make the process smoother and more enjoyable!
Cooking Time for the Big Mac Bowl Recipe
The cooking time for the Big Mac Bowl is approximately 15-20 minutes. Here’s how it breaks down:
Cooking the ground beef takes about 5-7 minutes until it’s browned.
After adding the spices, let it cook for an additional 2 minutes.
Cooking the rice, if not pre-cooked, usually takes around 10-15 minutes, depending on the type of rice used.
So, if you have your rice ready, the total cooking time is around 10-12 minutes.
Total Time for the Big Mac Bowl Recipe
When you combine the prep time and cooking time, the total time to make the Big Mac Bowl is about 25-35 minutes. This makes it a quick and easy meal option for busy weeknights or casual gatherings. Here’s a quick recap:
Prep Time: 10-15 minutes
Cooking Time: 15-20 minutes
Total Time: 25-35 minutes
With this time breakdown, you can easily fit the Big Mac Bowl into your schedule. Enjoy the process and the delicious results!
Nutritional Information for the Big Mac Bowl Recipe
Understanding the nutritional information of the Big Mac Bowl recipe is essential for making informed choices about your meals. This dish is not only delicious but also provides a balanced mix of nutrients. Let’s break down the key nutritional components of the Big Mac Bowl to see how it fits into your diet.
Calories in the Big Mac Bowl Recipe
Each serving of the Big Mac Bowl contains approximately 550 calories. This calorie count makes it a satisfying meal option without being overly indulgent. The combination of ground beef, rice, and fresh vegetables contributes to the overall calorie content, ensuring you get a hearty meal that keeps you full.
Protein Content in the Big Mac Bowl Recipe
Protein is a vital nutrient for maintaining muscle mass and overall health. The Big Mac Bowl recipe provides about 30 grams of protein per serving. This protein comes primarily from the ground beef, making it an excellent choice for those looking to increase their protein intake. If you opt for ground turkey or plant-based alternatives, the protein content may vary slightly, but it will still be a good source of this essential nutrient.
Sodium Levels in the Big Mac Bowl Recipe
Sodium is another important factor to consider in your diet. Each serving of the Big Mac Bowl contains around 800 milligrams of sodium. While this is a reasonable amount for a meal, it’s essential to be mindful of your overall sodium intake throughout the day. To reduce sodium levels, consider using low-sodium versions of the Thousand Island dressing or seasoning your beef with less salt. This way, you can enjoy the flavors without exceeding your daily sodium limit.
In summary, the Big Mac Bowl recipe offers a balanced meal with a good mix of calories, protein, and sodium. By being aware of these nutritional components, you can enjoy this delicious dish while keeping your dietary goals in mind. Whether you’re looking for a quick weeknight dinner or a fun meal to share with friends, the Big Mac Bowl is a fantastic choice!
FAQs about the Big Mac Bowl Recipe
Can I make the Big Mac Bowl recipe ahead of time?
Yes, you can definitely make the Big Mac Bowl recipe ahead of time! To do this, prepare the ground beef and rice as instructed. Once cooked, let them cool before storing them in airtight containers. You can keep the beef and rice in the refrigerator for up to three days. When you’re ready to eat, simply reheat the beef and rice in the microwave or on the stovetop. Assemble your bowls with fresh toppings just before serving for the best taste and texture.
What can I substitute for the ground beef in the Big Mac Bowl recipe?
If you’re looking for alternatives to ground beef, there are plenty of options! You can use ground turkey or chicken for a leaner protein choice. For a vegetarian option, consider using black beans, lentils, or plant-based meat substitutes. These alternatives provide great flavor and texture while keeping the essence of the Big Mac Bowl intact. Feel free to experiment with different proteins to find your favorite combination!
How can I make the Big Mac Bowl recipe healthier?
Making the Big Mac Bowl healthier is easy with a few simple swaps. First, consider using brown rice instead of white rice for added fiber and nutrients. You can also opt for lean ground turkey or chicken instead of beef to reduce fat content. Adding more fresh vegetables, like bell peppers or cucumbers, can boost the nutritional value. Lastly, use a lighter dressing or make your own with yogurt and spices to cut down on calories while still enjoying that creamy flavor.
Is the Big Mac Bowl recipe suitable for meal prep?
Absolutely! The Big Mac Bowl recipe is perfect for meal prep. You can prepare the beef, rice, and toppings in advance and store them separately. This way, you can easily grab a portion for lunch or dinner throughout the week. Just remember to keep the dressing separate until you’re ready to eat to maintain freshness. Meal prepping this dish not only saves time but also ensures you have a delicious and satisfying meal ready to go!
Conclusion on the Big Mac Bowl Recipe
The Big Mac Bowl recipe is a delightful and creative way to enjoy the classic flavors of a Big Mac in a healthier format. With its layers of seasoned ground beef, fluffy rice, fresh vegetables, and creamy dressing, this dish is not only satisfying but also easy to prepare. Whether you’re cooking for a busy weeknight dinner or hosting a casual gathering, the Big Mac Bowl is sure to impress.
What makes this recipe truly special is its versatility. You can easily customize it to fit your dietary preferences, whether you choose vegetarian options or low-carb alternatives. The ability to mix and match ingredients allows everyone to create their perfect bowl, making it a fun and interactive meal for family and friends.
As you explore the various preparation tips, serving suggestions, and nutritional information, you’ll find that the Big Mac Bowl is not just a meal; it’s an experience. From the first bite to the last, you’ll enjoy a burst of flavors that remind you of the beloved burger while providing a wholesome and balanced dish.
So, gather your ingredients, follow the steps, and get ready to savor the deliciousness of the Big Mac Bowl. It’s a meal that brings joy to the table and is sure to become a favorite in your household. Happy cooking!
ating
Big Mac Bowl recipe: A delicious twist on burgers!
Craving the flavors of a Big Mac but want a healthier, low-carb option? This Big Mac Bowl is packed with seasoned ground beef, crisp iceberg lettuce, tangy pickles, shredded cheese, and a creamy homemade Big Mac sauce. It delivers all the fast-food flavors you love—without the bun! Quick, easy, and perfect for meal prep or a satisfying weeknight meal.
Cook the Beef: Heat a skillet over medium-high heat. Add ground beef and cook until browned, breaking it up with a spoon.
Season the Meat: Stir in chopped onion, yellow mustard, garlic powder, onion powder, salt, and black pepper. Cook for another 2-3 minutes until onions are soft. Drain any excess fat and set aside.
Prepare the Big Mac Sauce: In a small bowl, whisk together mayonnaise, ketchup, chopped pickles, pickle juice, garlic powder, onion powder, and paprika until smooth.
Assemble the Bowls: Divide shredded iceberg lettuce among four bowls. Top each with the cooked beef mixture.
Add Toppings: Sprinkle on shredded cheese, chopped pickles, diced tomatoes, and red onion.
Drizzle & Serve: Spoon the homemade Big Mac sauce over the top and enjoy immediately!
Notes
Meal Prep Friendly: Store ingredients separately and assemble fresh before serving.
Low-Carb Option: Use sugar-free ketchup and mayonnaise for keto-friendly Big Mac sauce.
Dairy-Free Alternative: Swap cheddar cheese for dairy-free cheese or omit it altogether.
Extra Crunch: Add crumbled bacon or sesame seeds for extra texture.