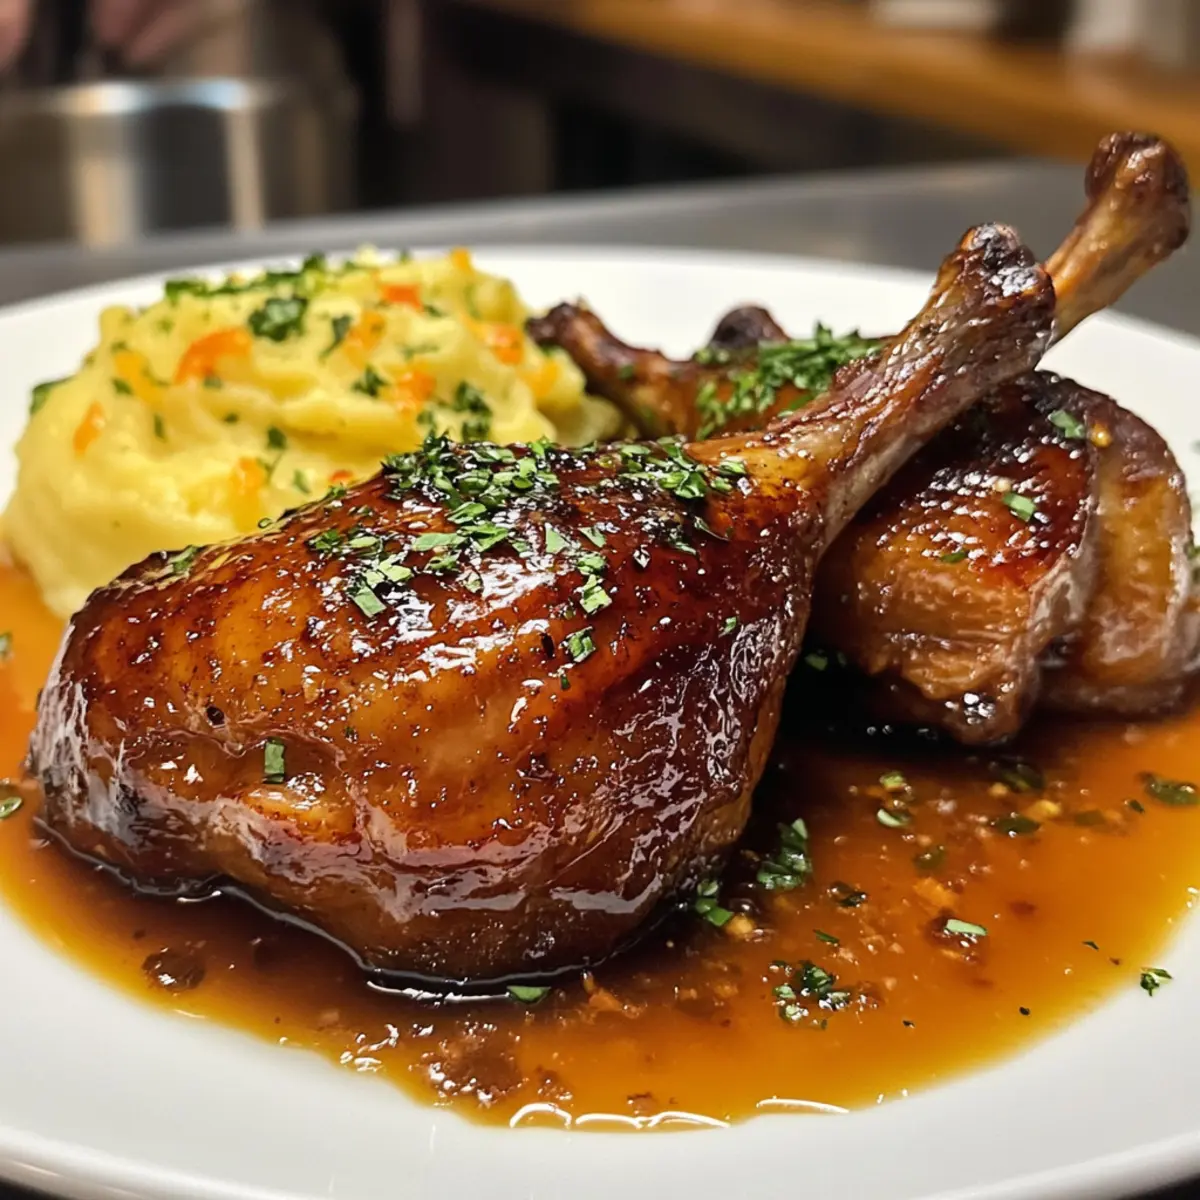
Zesty Easy Lemon Brownies That Brighten Your Day

There’s something wonderfully nostalgic about the aroma of freshly baked goods wafting through the kitchen, isn’t there? That’s exactly what I feel when whipping up these Easy Lemon Brownies, a sunny take on traditional fudgy brownies. With their zesty lemon flavor and dense texture, these delights are perfect for anyone craving a refreshing dessert that stands out from the usual chocolate options. Not only are they a breeze to make, but they’re also an instant crowd-pleaser, ideal for elevating family gatherings or simple afternoon teas. Ready to add a tart twist to your dessert repertoire? Let’s dive into this delightful recipe and transform your baking experience!

Why Are These Lemon Brownies So Special?

Bright, Zesty Flavor: Experience a burst of citrus that transforms traditional brownies into a refreshing treat.

Easy to Make: The simple steps ensure that you won’t need extensive baking skills, making it accessible to everyone!

Perfect for Any Occasion: Whether for a weekend brunch or a potluck, these brownies are guaranteed to impress your friends and family.

Irresistible Texture: With a fudgy interior and smooth lemon glaze, each bite is a delightful combination of taste and mouthfeel that feels indulgent yet light.

Versatile Options: Mix in poppy seeds, berries, or nuts for endless variations, making this recipe a staple for every season.

Discover how these Easy Lemon Brownies can brighten your day, and check out our Crisp Cabbage Dressing for a perfect side!

Easy Lemon Brownie Ingredients

• Get ready to create zesty delights!

For the Brownies

  • All-purpose flour – Provides structure; can substitute with a gluten-free blend for a gluten-free version.
  • Granulated sugar – Adds sweetness and moisture; brown sugar can deepen the flavor.
  • Salt – Enhances flavor balance; use sea salt for a hint of mineral taste.
  • Unsalted butter – Creates a rich, moist texture; coconut oil can be a dairy-free option.
  • Large eggs – Binds ingredients and contributes to texture; aquafaba can replace eggs (3 tablespoons = 1 egg).
  • Lemon zest (from 2-3 lemons) – Infuses a bright lemon flavor; ensure only the yellow part is zested to avoid bitterness.
  • Fresh lemon juice (⅓ cup) – Provides moisture and tanginess; bottled lemon juice works in a pinch, but fresh is best.
  • Vanilla extract – Adds warmth and depth to the flavor; can be omitted for a stronger lemon kick.

For the Glaze

  • Powdered sugar – For glazing, adds sweetness and a smooth finish; can substitute with erythritol for a low-calorie alternative.
  • Lemon juice – Enhances the glaze’s tanginess; fresh juice is recommended for best flavor.
  • Lemon zest – Adds an extra burst of citrus in the glaze; grate extra lemon peel before juicing.

These easy lemon brownies are bursting with flavor and utterly delightful, making the baking process a joy. Happy baking!

Step‑by‑Step Instructions for Easy Lemon Brownies

Step 1: Preheat and Prepare
Begin by preheating your oven to 350°F (175°C). While the oven warms up, line a 9×13 inch baking pan with parchment paper, ensuring to grease it lightly to prevent sticking. This step is vital for easy removal of your zesty lemon brownies later, so take a moment to get it just right!

Step 2: Whisk Dry Ingredients
In a medium mixing bowl, whisk together the all-purpose flour and salt until they are evenly combined. This will help ensure your Easy Lemon Brownies have a consistent texture. Take your time with this step; a good mix here will lead to perfectly fudgy brownies without any clumps!

Step 3: Cream Butter and Sugar
In a large bowl, cream together the softened unsalted butter and granulated sugar using a hand mixer or stand mixer on medium speed. Beat them for 3-4 minutes until the mixture is light and fluffy. The texture should be smooth and airy, a sign that your brownies will turn out nicely moist and decadent.

Step 4: Add Eggs and Flavorings
Add the large eggs one at a time to the creamed butter and sugar, mixing well after each addition. Then incorporate the fresh lemon zest, lemon juice, and vanilla extract. This combination infuses your batter with the bright flavors that make these Easy Lemon Brownies so special, ensuring a delightful tartness in every bite.

Step 5: Combine Wet and Dry Ingredients
Gently fold the flour mixture into the wet ingredients, mixing just until no dry streaks remain. Be careful not to overmix; the batter should still be slightly lumpy for the best fudgy texture. This step is crucial in maintaining the tenderness of your Easy Lemon Brownies—embrace the lumps!

Step 6: Bake the Brownies
Pour the prepared batter into the lined baking pan, spreading it evenly into the corners. Place the pan in the preheated oven and bake for 25-30 minutes. You’ll know they’re done when the edges are golden brown, and a toothpick inserted in the center comes out clean with just a few moist crumbs clinging to it.

Step 7: Cool Completely
Allow the lemon brownies to cool completely in the pan on a wire rack. This resting period helps solidify their structure and enhances the flavors. Patience is key here; while you might want to dig in, letting them cool fully will ensure a better texture and taste in every square.

Step 8: Prepare the Glaze
While your brownies are cooling, mix the powdered sugar with fresh lemon juice and additional lemon zest in a small bowl. Stir until smooth and well combined. This glaze adds a beautiful, tangy sweetness to your delicious Easy Lemon Brownies, complementing their fudgy texture beautifully.

Step 9: Glaze and Set
Once the brownies are completely cool, pour the tangy glaze over them, spreading it evenly with a spatula. Allow the glaze to set for at least 30 minutes at room temperature before cutting the brownies into squares. This final step will ensure that every bite is bursting with lemony goodness and has a smooth finish.

What to Serve with Easy Lemon Brownies

Indulge in a vibrant culinary experience that brightens any meal, perfectly complementing the zesty sweetness of your freshly baked treat.

  • Whipped Cream: The light, airy texture of homemade whipped cream contrasts beautifully with the dense brownies, adding a rich creaminess that enhances their citrus notes.

  • Berry Compote: A warm berry compote, with tartness from the fruits, pairs wonderfully, adding a fresh burst of flavor that balances the sweetness of the lemon brownies.

  • Iced Green Tea: Refreshing and slightly bitter, iced green tea creates a soothing backdrop, enhancing the brightness of the lemon while balancing the sweetness.

  • Coconut Ice Cream: Creamy coconut ice cream yields a tropical twist, offering a delightful temperature contrast that harmonizes with the tangy flavors of the brownies.

  • Poppy Seed Muffins: These add a lovely crunch, with their delicate crumb and subtle sweetness serving as a perfect side to the fudgy lemon treats.

  • Lemon Sorbet: For a double dose of citrus, the coolness of lemon sorbet refreshes your palate while mirroring the flavors of the brownies in a delightful way.

  • Chilled Rosé Wine: A chilled glass of fruity rosé enlivens the senses, its berry notes complementing the lemons in a sophisticated and refreshing sip.

  • Fruit Salad: A vibrant fruit salad featuring strawberries, blueberries, and kiwi adds color and texture, creating a refreshing medley that pairs harmoniously.

  • Almond Biscotti: Crunchy almond biscotti offers a textural contrast, providing a delightful dunking experience alongside the lemony sweetness of brownies.

Make Ahead Options

These Easy Lemon Brownies are perfect for meal prep, saving you time on busy days! You can prepare the batter and store it in the refrigerator for up to 24 hours before baking, which allows the flavors to deepen beautifully. Alternatively, you can bake the brownies in advance and refrigerate them for up to 3 days. Just be sure to let them cool completely before wrapping them tightly in plastic wrap to maintain their moist, fudgy texture. When you’re ready to serve, simply drizzle on the glaze, let it set for 30 minutes, and you’ll have a refreshing dessert that tastes just as delightful as when freshly baked!

Easy Lemon Brownies Variations

Feel free to personalize these lemon brownies and make them uniquely yours, adding your own delightful twists!

  • Gluten-Free: Swap all-purpose flour with a gluten-free flour blend for a deliciously inclusive dessert.
  • Nutty Crunch: Toss in chopped walnuts or pecans before baking for a buttery crunch; toasting them first enhances their flavor wonderfully.
  • Berry Bliss: Fold in fresh blueberries or raspberries for a fruity vibe that livens up the zesty lemon taste and adds vibrant color.
  • Poppy Seed Surprise: Add a couple of tablespoons of poppy seeds for a classic lemon-poppy seed flavor that’s delightful and unexpected.
  • Meringue Topping: Elevate your brownies by adding a light, fluffy lemon meringue topping for a sophisticated twist that balances the tangy flavors beautifully.
  • Cream Cheese Swirl: Drop in spoonfuls of softened cream cheese before baking, swirling gently to create a rich, creamy contrast to the lemon’s brightness.
  • Spicy Kick: Incorporate a pinch of cayenne pepper or ground ginger for a subtle heat that pairs surprisingly well with the citrusy flavors.
  • Chocolate Chip Addition: Mix in semi-sweet chocolate chips for a complimentary flavor that brings a touch of richness alongside the bright lemon notes.

Enjoy these variations, and don’t forget to try them alongside a Super Easy Caramel Milk Pudding or our delicious Coconut Cheese Dessert!

Storage Tips for Easy Lemon Brownies

Room Temperature: Store your Easy Lemon Brownies in an airtight container at room temperature for up to 3 days. They will maintain their delightful texture and flavor.

Fridge: For longer freshness, refrigerate the brownies in an airtight container for up to 5 days. This keeps them moist and zesty.

Freezer: Freeze the brownies for up to 3 months. Wrap them individually in plastic wrap and place them in a freezer-safe bag for easy access.

Reheating: Thaw the frozen brownies in the fridge overnight and enjoy them at room temperature or warm them slightly in the microwave for a freshly baked taste!

Expert Tips for Easy Lemon Brownies

  • Use Room Temperature Ingredients: Make sure your butter and eggs are at room temperature for better mixing and a smoother batter. This helps create the ideal texture for your easy lemon brownies.

  • Don’t Overmix: After combining the dry ingredients with the wet, mix just until no flour is visible. Overmixing can lead to tough brownies—nobody wants that!

  • Check for Doneness: Look for slightly golden edges and a center that springs back when touched. The toothpick test should result in a few moist crumbs—this ensures perfect fudgy consistency.

  • Cool Completely Before Glazing: Let your brownies cool in the pan to enhance texture and flavor melding. This step is crucial for achieving that luscious finish on your easy lemon brownies.

  • Store Properly: Keep your brownies in an airtight container for optimal freshness. They taste even better the next day as flavors develop, so you can enjoy a zesty treat anytime!

Easy Lemon Brownies Recipe FAQs

How do I choose the right lemons for my Lemon Brownies?
Absolutely! When selecting lemons, look for bright yellow ones that are firm yet slightly give when squeezed. The best lemons have a juicy interior and zest that is fragrant. Avoid lemons with dark spots or overly soft areas, as these might be overripe. Freshness is key to achieving that vibrant flavor!

How should I store my Easy Lemon Brownies?
After baking, allow your brownies to cool completely before placing them in an airtight container. They can be stored at room temperature for up to 3 days. If you want to keep them fresher for longer, refrigerate them for up to 5 days. The flavors will intensify, making for an even tastier treat the next day!

Can I freeze Lemon Brownies? If so, how?
Very! To freeze your Easy Lemon Brownies, first cut them into squares and wrap each piece individually in plastic wrap. Place the wrapped brownies in a freezer-safe bag, removing as much air as possible. They can be frozen for up to 3 months. When you’re ready to enjoy, simply thaw them in the fridge overnight and indulge at room temperature or warmed slightly in the microwave.

What if my brownies are too dense or dry?
If your Easy Lemon Brownies turn out too dense, it might be due to overmixing the batter after adding the flour, which develops gluten. To prevent this, mix until just combined for a fudgy texture. If they seem dry, it could be a result of overbaking—always check for doneness using the toothpick test! Aim for a clean pick with a few moist crumbs attached.

Are there any common allergies I should be aware of with this recipe?
Absolutely! The primary allergens in this recipe include gluten (from all-purpose flour), dairy (from butter), and eggs. For those with gluten sensitivities, you can substitute the flour with a gluten-free blend. If dairy or eggs are a concern, coconut oil can easily replace butter, and aquafaba is an excellent egg alternative (3 tablespoons equals 1 egg). Always check with your guests before serving!

How can I make these brownies more visually appealing?
Great question! To elevate presentation, consider sprinkling additional lemon zest on top of the glaze before it sets. You could also dust the brownies with a light coating of powdered sugar after glazing for an elegant touch. Elegant garnishes like edible flowers or a twist of lemon peel can also add a wow factor to serve on special occasions.

Easy Lemon Brownies

Zesty Easy Lemon Brownies That Brighten Your Day

Easy Lemon Brownies are a bright and zesty twist on traditional brownies, perfect for any occasion.
Prep Time 15 minutes
Cook Time 30 minutes
Cooling Time 30 minutes
Total Time 1 hour 15 minutes
Servings: 12 slices
Course: Dessert
Cuisine: American
Calories: 150

Ingredients
  

For the Brownies
  • 1 cup all-purpose flour can substitute with a gluten-free blend
  • 1 cup granulated sugar brown sugar can deepen flavor
  • 1/4 teaspoon salt use sea salt for flavor
  • 1/2 cup unsalted butter coconut oil can be a dairy-free option
  • 2 large eggs or aquafaba (3 tablespoons = 1 egg)
  • zest from 2-3 lemons lemon zest only the yellow part
  • 1/3 cup fresh lemon juice fresh is best
  • 1 teaspoon vanilla extract can be omitted for stronger lemon kick
For the Glaze
  • 1 cup powdered sugar can substitute with erythritol
  • 2 tablespoons lemon juice fresh juice recommended
  • zest from 1 lemon lemon zest grate extra lemon peel before juicing

Equipment

  • 9x13 inch baking pan
  • mixing bowls
  • hand mixer
  • spatula

Method
 

Step-by-Step Instructions
  1. Preheat your oven to 350°F (175°C) and line a 9x13 inch baking pan with parchment paper.
  2. In a medium mixing bowl, whisk together the all-purpose flour and salt until combined.
  3. In a large bowl, cream together the softened unsalted butter and granulated sugar until light and fluffy.
  4. Add the large eggs one at a time, mixing well after each addition. Then mix in the lemon zest, lemon juice, and vanilla extract.
  5. Gently fold the flour mixture into the wet ingredients until no dry streaks remain.
  6. Pour the prepared batter into the lined baking pan and bake for 25-30 minutes.
  7. Allow the brownies to cool completely in the pan on a wire rack.
  8. While brownies cool, mix powdered sugar with lemon juice and zest to create the glaze.
  9. Once cooled, pour the glaze over the brownies and allow it to set for at least 30 minutes before cutting.

Notes

These brownies can be stored in an airtight container for up to 3 days at room temperature, or up to 5 days in the fridge. They can also be frozen for up to 3 months.

Discover Summer Pesto Mini Meatball Soup for Ultimate Comfort!

As I stirred the pot of simmering broth, the air was filled with the vibrant aroma of fresh basil, instantly transporting me to sun-drenched summer afternoons. This Summer Pesto Mini Meatball Soup is my go-to for those moments when comfort meets the lightness of the season. Infused with homemade pesto and bursting with tender chicken meatballs, it’s a delightful bowl that feels like a warm hug on a plate. Plus, it’s a breeze to whip up on busy weeknights and offers a refreshing twist on traditional soup. With its delightful combination of textures and flavors, you won’t be able to resist going back for seconds. So, are you ready to dive into a bowl of summer bliss?

Why Choose Summer Pesto Mini Meatball Soup?

Bright, Flavorful Ingredients: This soup is packed with the fresh taste of homemade pesto, making each spoonful a burst of basil goodness.

Quick & Easy Prep: Perfect for busy weeknights, the entire dish can be on your table in under 30 minutes!

Comforting Yet Light: The mini meatballs provide a satisfying protein boost, while the broth remains light, making it ideal for warm weather.

Flexible & Customizable: Feel free to swap in your favorite types of pesto or add in extra veggies, like spinach or zucchini, for added nutrition.

Crowd-Pleasing Delight: Whether serving family or hosting friends, this recipe is sure to win everyone over, much like my Mini Pancakes or Mini Beef Pies.

Garnish for Elegance: A sprinkle of fresh basil and shaved parmesan turns this dish into an eye-catching centerpiece for any table.

Summer Pesto Mini Meatball Soup Ingredients

For the Pesto

  • Fresh basil – 1 cup packed, adds vibrant herbal freshness.
  • Pine nuts – 2 tablespoons toasted for a delightful nuttiness.
  • Garlic – 2 cloves, fundamental for aromatic depth.
  • Extra virgin olive oil – ½ cup to emulsify the pesto and enhance richness.

For the Mini Meatballs

  • Ground chicken or turkey – 1 pound, the main source of protein for a satisfying bite.
  • Breadcrumbs – ¼ cup seasoned, to help bind the meatballs together.

For the Soup Base

  • Chicken stock or broth – 8 cups low-sodium for a flavorful soup foundation.
  • Tiny cut pasta – 12 ounces (like ditalini) to add heartiness and texture.
  • Shallot – 1 diced for a mild onion flavor enhancing the broth.

Garnish

  • Fresh basil and shaved parmesan – for a finishing touch that elevates presentation and flavor.

This Summer Pesto Mini Meatball Soup recipe is designed to bring you joy in every bite, with a delightful blend of fresh ingredients that will make your time in the kitchen feel magical!

Step‑by‑Step Instructions for Summer Pesto Mini Meatball Soup

Step 1: Make the Pesto
In a food processor, combine 1 cup of packed fresh basil, 2 tablespoons of toasted pine nuts, 2 garlic cloves, and a pinch of salt. Blend these ingredients until finely chopped, then slowly stream in ½ cup of extra virgin olive oil while blending. Continue until the mixture is smooth and creamy. This vibrant pesto will be the star of your Summer Pesto Mini Meatball Soup!

Step 2: Prepare Mini Meatballs
In a mixing bowl, combine 1 pound of ground chicken or turkey, ¼ cup of seasoned breadcrumbs, ½ cup of the homemade pesto, and some grated parmesan. Mix until just combined, ensuring not to overwork the meat. Form the mixture into small meatballs, roughly the size of a tablespoon, and set them aside on a plate while you heat the pot for cooking.

Step 3: Cook Meatballs
Heat a large pot over medium heat and drizzle in a bit of olive oil. Once hot, carefully add the mini meatballs in batches, browning them on all sides for about 8-10 minutes. You want them golden and cooked through, so turn gently to avoid breakage. Once cooked, remove them from the pot and set them aside; you’ll return them to the delicious soup soon!

Step 4: Sauté Shallots
In the same pot used for the meatballs, add a touch more olive oil if necessary, and heat over medium heat. Add 1 diced shallot and sauté for about 5 minutes, or until soft and translucent. Stir periodically, allowing the shallots to develop a lightly caramelized flavor that will enhance your broth’s richness.

Step 5: Simmer Soup
Next, return the browned meatballs to the pot and pour in 8 cups of low-sodium chicken stock. Bring the mixture to a gentle simmer, allowing all the flavors to meld beautifully for about 2-3 minutes. Then, stir in 12 ounces of tiny cut pasta, like ditalini, and cook uncovered for around 10 minutes or until the pasta is al dente.

Step 6: Finalize Soup
Once the pasta is cooked through, stir in additional pesto to taste, enhancing the soup’s vibrant flavor profile. Allow the soup to simmer for another minute to warm through. Serve your delicious Summer Pesto Mini Meatball Soup hot, garnished with fresh basil and shaved parmesan for that elegant finishing touch!

How to Store and Freeze Summer Pesto Mini Meatball Soup

Fridge: Store the soup in an airtight container for up to 3 days. Make sure to let it cool completely before sealing to prevent condensation.

Freezer: For longer storage, freeze the soup in portion-sized containers for up to 3 months. Avoid freezing the pasta if possible, as it can become mushy upon thawing.

Reheating: Thaw overnight in the fridge before reheating on the stove or in the microwave. Add a little extra broth if the soup has thickened.

Leftover Meatballs: If you have any leftover mini meatballs, they can be stored in a separate container in the fridge for up to 3 days or frozen for future use in other dishes.

Expert Tips for Summer Pesto Mini Meatball Soup

  • Pesto Perfection: Use freshly made pesto for best results. If you opt for jarred pesto, taste and adjust the seasoning as needed.

  • Meatball Size Matters: Aim for uniform mini meatballs about one tablespoon each to ensure even cooking and a delightful bite-sized experience in your soup.

  • Don’t Rush the Browning: Browning the meatballs properly adds depth of flavor; resist the urge to overcrowd the pot, as this can lead to steaming instead of browning.

  • Pasta Choice: Stick to tiny cut pasta like ditalini or annellini for the best texture. Cooking it directly in the soup allows it to absorb the broth’s flavor.

  • Customize Your Ingredients: Feel free to enhance your Summer Pesto Mini Meatball Soup by adding seasonal veggies like zucchini or fresh spinach for a nutrient boost!

  • Leftover Love: This soup stores beautifully in the fridge for up to 3 days. For longer storage, freeze leftovers in portion-sized containers for a quick future meal.

Make Ahead Options

This Summer Pesto Mini Meatball Soup is a fantastic candidate for meal prep, allowing you to enjoy its comforting flavors on busy weeknights with minimal effort. You can prepare the mini meatballs and homemade pesto up to 24 hours in advance. Simply form the meatballs and place them in an airtight container in the refrigerator, and store your pesto in a jar, making sure to cover it with a thin layer of olive oil to prevent browning. When you’re ready to serve, just cook the shallots, simmer the broth, and add the prepped meatballs and pasta for a delicious, just-as-fresh result. This method saves you time while ensuring every bowl of soup remains flavorful and satisfying!

What to Serve with Summer Pesto Mini Meatball Soup

A comforting bowl of soup deserves delightful companions to create a complete meal experience.

  • Crusty Garlic Bread: A crunchy, toasty side that’s perfect for dipping into the rich broth, adding a satisfying texture. It’s a classic pairing that every soup lover adores.

  • Fresh Green Salad: Crisp greens with a light vinaigrette bring a refreshing balance to the heartiness of the soup, enhancing the meal with vibrant flavors and essential nutrients.

  • Grilled Vegetables: Smoky grilled zucchini and bell peppers add a beautiful touch and extra depth to the plate, making it visually appealing and healthy. Their charred edges complement the soup’s fresh elements.

  • Cheesy Caprese Skewers: A delightful finger food that merges mozzarella, tomatoes, and fresh basil, echoing the soup’s flavors with each bite. Perfect for casual dining that feels special!

  • Lemonade or Iced Tea: A cool, citrusy beverage refreshes the palate and enhances the summer-leaning vibes of the soup. Their brightness pairs wonderfully with the rich, herbal notes.

  • Berry Sorbet: A light, fruity dessert to cleanse the palate after the savory soup. It’s a sweet ending that refreshes, making it a delightful contrast to every comforting bite.

  • Roasted Chickpeas: Crunchy, spiced chickpeas add a nutty flavor and delightful texture, making them a fun snack alongside the soup, perfect for those craving something crunchy.

Summer Pesto Mini Meatball Soup Variations

Feel free to get creative and make this dish your own!

  • Protein Swap: Use ground beef instead of chicken for a richer flavor. If you’re watching your diet, a lean turkey works beautifully here too.

  • Vegan-Friendly: Replace the meat with plant-based ground meat alternatives, and use a vegan pesto to maintain that fresh taste.

  • Different Pesto: Switch up the flavor profile by using sun-dried tomato pesto or arugula pesto instead of traditional basil pesto for a delicious twist.

  • Vegetable Boost: Add in some fresh spinach or zucchini during the simmering phase for an extra dose of nutrients and color.

  • Nut-Free Version: Omit the pine nuts from your pesto or replace them with sunflower seeds to maintain that creamy texture without the nuts.

  • Pasta Variety: Swap tiny cut pasta for quinoa or farro for a heartier, whole grain option that adds a lovely chew to your soup.

  • Spicy Kick: Stir in some red pepper flakes or a dash of hot sauce to give your Summer Pesto Mini Meatball Soup a bit of heat.

  • Garnish Twist: Instead of just parmesan, try topping your soup with crumbled feta or goat cheese to add a tangy flavor contrast.

Whether you’re in the mood for flavors that comfort or ones that zest things up, these variations will enhance your experience. For more cozy meal ideas, check out my favorite Spaghetti with Homemade Meatballs or indulge in some Mini Cheeseburger Breads for a filling treat!

Summer Pesto Mini Meatball Soup Recipe FAQs

How do I choose the right basil for my pesto?
Absolutely! When selecting basil for your pesto, opt for fresh, vibrant leaves that are bright green and free from dark spots or wilting. The leaves should feel supple to the touch. If you can, choose basil that has a strong, aromatic scent—it means it’s bursting with flavor. This will ensure your Summer Pesto Mini Meatball Soup is vibrant and delicious!

How should I store leftover Summer Pesto Mini Meatball Soup?
For your convenience, store the soup in an airtight container in the fridge for up to 3 days. Be sure to let the soup cool completely before sealing it to prevent condensation. If you decide to freeze it, portion the soup into containers and keep it in the freezer for up to 3 months. Just remember, frozen pasta can become mushy upon thawing, so consider freezing the meatballs and broth separately!

Can I freeze my mini meatballs?
Yes, indeed! To freeze mini meatballs, first let them cool completely after cooking. Then, place them in a single layer on a baking sheet lined with parchment paper and freeze for about 1-2 hours. Once they are firm, transfer the meatballs to a freezer-safe bag or container. They can remain frozen for up to 3 months! Just reheat them in your soup or on their own for a quick meal.

What should I do if my meatballs are falling apart while cooking?
Very! If you find your mini meatballs are falling apart, it may be due to too little binder (like breadcrumbs) or overmixing the meat. Make sure you’re using enough breadcrumbs—about ¼ cup for 1 pound of meat is ideal. Additionally, handle the meat gently when forming the balls; avoid overworking them as this can break down the proteins, leading to crumbliness. Lastly, ensure your oil is hot enough to properly brown them without steaming.

Is this recipe safe for my dog?
While the ingredients in Summer Pesto Mini Meatball Soup are largely safe for dogs, it’s best to avoid the garlic and onions (in the shallots) as they can be harmful to pets in large quantities. If you want to share this meal with your furry friend, consider preparing a batch without those two ingredients, and stick to lean meats and plain stock for a dog-friendly option.

What if I don’t have fresh basil for the pesto?
No worries! You can absolutely substitute fresh basil with jarred pesto if you’re in a pinch. It still provides great flavor, though I recommend adjusting the salt in your soup recipe accordingly, as store-bought pestos can often be saltier than homemade. Alternatively, consider using other greens like spinach or arugula for a different twist. Just blend them with the same ingredients as a traditional pesto, and you’ll have a tasty alternative for your Summer Pesto Mini Meatball Soup!

Summer Pesto Mini Meatball Soup.

Discover Summer Pesto Mini Meatball Soup for Ultimate Comfort!

This Summer Pesto Mini Meatball Soup is a delightful bowl of comfort, bursting with flavors and quick to prepare.
Prep Time 15 minutes
Cook Time 20 minutes
Total Time 35 minutes
Servings: 4 bowls
Course: Dinner
Cuisine: American
Calories: 350

Ingredients
  

Pesto
  • 1 cup fresh basil packed
  • 2 tablespoons pine nuts toasted
  • 2 cloves garlic
  • ½ cup extra virgin olive oil
Mini Meatballs
  • 1 pound ground chicken or turkey
  • ¼ cup seasoned breadcrumbs
Soup Base
  • 8 cups low-sodium chicken stock or broth
  • 12 ounces tiny cut pasta like ditalini
  • 1 diced shallot
Garnish
  • fresh basil
  • shaved parmesan

Equipment

  • Food Processor
  • mixing bowl
  • Large pot

Method
 

Instructions
  1. In a food processor, combine 1 cup of packed fresh basil, 2 tablespoons of toasted pine nuts, 2 garlic cloves, and a pinch of salt. Blend until finely chopped, then stream in ½ cup of extra virgin olive oil while blending until smooth.
  2. In a mixing bowl, combine 1 pound of ground chicken or turkey, ¼ cup of seasoned breadcrumbs, ½ cup of homemade pesto, and some grated parmesan. Mix until just combined and form into small meatballs.
  3. Heat a large pot over medium heat and drizzle in olive oil. Once hot, add the mini meatballs in batches, browning them on all sides for 8-10 minutes.
  4. In the same pot, add more olive oil if needed and sauté 1 diced shallot for about 5 minutes until soft and translucent.
  5. Return the browned meatballs to the pot, pour in 8 cups of low-sodium chicken stock, and bring to a gentle simmer for 2-3 minutes. Stir in 12 ounces of tiny cut pasta and cook uncovered for about 10 minutes until al dente.
  6. Stir in additional pesto to taste, allow the soup to simmer for another minute, then serve hot garnished with fresh basil and shaved parmesan.

Notes

Feel free to customize with additional veggies and enjoy leftovers within 3 days.

Pineapple Pretzel Fluff: The Perfect Sweet-Salty Treat

As the sun sets on a balmy summer evening, the warm laughter of family and friends fills the air, and I’m reminded of one dish that brings them all together: Pineapple Pretzel Fluff. This easy-to-make dessert salad beautifully merges sweet, creamy indulgence with the irresistible crunch of salty pretzels. Perfect for potlucks, it’s not only a showstopper but also a crowd-pleaser that comes together in a snap. The delightful contrast of flavors makes every bite an enchanting experience that both kids and adults adore. Whether you’re looking to impress at your next gathering or simply craving a sweet treat, this refreshing dish is bound to become a favorite. Curious to find out how to whip up this delightful concoction? Let’s dive into the recipe!

Why is Pineapple Pretzel Fluff Irresistible?

Indulgent Flavors: The combination of sweet creaminess and salty pretzel crunch creates a truly irresistible contrast that will leave everyone asking for seconds.

Quick and Easy: With just a few simple ingredients, you can have this delightful dessert salad ready in no time, making it perfect for unexpected guests or last-minute gatherings.

Crowd-Pleasing: It’s a unique dish that appeals to all ages, ensuring that even your pickiest eaters will savor every bite.

Versatile Options: Want to make it your own? You can easily add fresh fruit or substitute different toppings to match your taste. Enjoy a similar vibe with other delicious desserts like Tropical Chicken Pineapple or Mini Pancakes.

Make-Ahead Convenience: Prepare it a day in advance for the ultimate stress-free experience at your next potluck or picnic, letting you spend more time with loved ones.

Pineapple Pretzel Fluff Ingredients

For the Base
Crushed Pretzels – Adds a salty, crunchy texture; feel free to use gluten-free pretzels for a gluten-free version.
Butter (1/2 cup, melted) – Provides richness and binds the crushed pretzels; margarine is a great alternative for a dairy-free option.
Granulated Sugar (1 cup, divided) – Sweetens the dish and balances the saltiness of the pretzels; adjust according to your sweetness preference.

For the Filling
Cream Cheese (8 ounces, softened) – Brings creaminess and rich flavor; consider swapping for non-dairy cream cheese for a vegan option.
Crushed Pineapple (1 can, 20 ounces, drained) – Infuses tropical sweetness and moisture; using pineapple in its juice enhances the flavor.
Cool Whip (1 container, 12 ounces, thawed) – Creates a light, fluffy texture; homemade whipped cream can be an even fresher substitute.

Embrace this delightful combination of flavors with these simple ingredients and watch your friends and family dig in!

Step‑by‑Step Instructions for Pineapple Pretzel Fluff

Step 1: Preheat the Oven
Begin by preheating your oven to 400°F (200°C). While it’s heating, prepare a 9×13-inch baking pan by lining it with parchment paper for easy removal of your sweet and salty crust later. This step sets the foundation for the crunchy base of your Pineapple Pretzel Fluff, ensuring it bakes perfectly.

Step 2: Mix the Pretzel Base
In a medium-sized bowl, combine the crushed pretzels, melted butter, and 1/2 cup of granulated sugar. Stir the mixture until every pretzel bit is coated evenly and the sugar is well incorporated. Once mixed, transfer the pretzel mixture into the prepared baking pan and press it down lightly to form a base, although it doesn’t need to cover the entire bottom.

Step 3: Bake and Cool the Base
Place the baking pan in the preheated oven and bake for 7 minutes. You’ll notice the pretzel mixture firming up and turning a golden hue—this is exactly what you want. Once baked, remove it from the oven and allow it to cool completely at room temperature, creating a delightful crunch for your Pineapple Pretzel Fluff.

Step 4: Prepare the Cream Cheese Mixture
In a large mixing bowl, use a hand mixer to beat the softened cream cheese with the remaining 1/2 cup of sugar until the mixture is smooth and creamy. This process should take about 2-3 minutes. Make sure there are no lumps for a velvety texture in your dessert salad.

Step 5: Fold in Pineapple and Whipped Topping
Gently fold in the drained crushed pineapple into the cream cheese mixture. Then, add the thawed Cool Whip and carefully mix until fully combined. Aim for a light and airy consistency, which adds a refreshing touch to your Pineapple Pretzel Fluff.

Step 6: Chill the Mixture
Cover the bowl with plastic wrap and place it in the refrigerator. Let the mixture chill for at least 1 hour to allow it to set properly. This chilling time enhances the flavors and helps solidify the creamy filling, making it a perfect contrast to the crunchy pretzel base.

Step 7: Combine and Serve
Just before serving, crumble the cooled pretzel mixture and gently fold it into the chilled pineapple cream mixture. Reserve some crumbles for topping. This final step brings together the best of both worlds, blending the creamy and crunchy textures that make Pineapple Pretzel Fluff irresistible. Serve chilled for the happiest gathering experience!

Expert Tips for Pineapple Pretzel Fluff

Drain Thoroughly: Ensure your crushed pineapple is well-drained to prevent a runny dessert; let it sit in a sieve for about 5-10 minutes.

Keep It Crunchy: To maintain the pretzel crunch, store the pretzel mixture separately and combine it with the pineapple filling just before serving.

Taste Balance: Adjust the sugar to your liking; you can use less if you prefer a fruitier flavor in this Pineapple Pretzel Fluff.

Prep Ahead: You can make the filling up to 24 hours in advance; just mix in the pretzel topping shortly before serving.

Substitution Flexibility: If you’re looking for a twist, consider swapping pretzels with crushed graham crackers for a different texture and taste.

What to Serve with Pineapple Pretzel Fluff?

Elevate your gatherings with perfect pairings that complement this delightful sweet-salty treat.

  • Savory BBQ Ribs: The rich smoky flavor of BBQ ribs contrasts delightfully with the bright, sweet fluff, creating a balanced meal.
  • Garden Salad: A fresh mix of greens, tomatoes, and cucumbers provides a crisp, refreshing bite that pairs perfectly with the creaming richness.
  • Grilled Chicken Skewers: The tender, juicy chicken enhances the tropical notes of the fluff while adding a satisfying, hearty element.
  • Fruit Salad: A medley of seasonal fruits adds lightness and additional sweetness to the table, making each bite a burst of freshness.
  • Homemade Lemonade: This tangy drink cuts through the richness of the fluff, offering a refreshing sip that keeps the palate enlivened.

Try serving Pineapple Pretzel Fluff alongside your favorite foods for a mouthwatering feast that everyone will enjoy!

How to Store and Freeze Pineapple Pretzel Fluff

Fridge: Store any leftovers in an airtight container in the refrigerator for up to 3 days to keep the flavors fresh.

Freezer: Pineapple Pretzel Fluff is not recommended for freezing, as the creamy texture may separate when thawed.

Reheating: There’s no need to reheat this dessert; simply serve it chilled to enjoy the delightful combination of sweet and salty flavors.

Make-Ahead Tip: Prepare the filling up to 24 hours in advance, storing the pretzel mixture separately to maintain its crunch until ready to combine and serve.

Make Ahead Options

These Pineapple Pretzel Fluff is perfect for busy home cooks looking to save time without sacrificing flavor! You can prepare the pretzel base up to 24 hours in advance. Simply make the mixture, bake it, and let it cool completely before storing it in a zip-top bag at room temperature. For the cream cheese filling, whip it up and refrigerate it for up to 3 days ahead of time. When it’s time to serve, simply crumble the pretzel topping into the pineapple mixture, giving it a gentle stir. This way, you’ll maintain that delightful crunch while enjoying an effortless dessert at your gathering!

Pineapple Pretzel Fluff Variations

Feel free to get creative and personalize your Pineapple Pretzel Fluff with these fun ideas! Each suggestion will take this delightful dessert to new, delicious heights.

  • Fresh Fruit: Add chopped strawberries, peaches, or blueberries for a burst of color and freshness. The fruity notes will enhance the sweet-tangy flavor profile delightfully.

  • Chocolate Drizzle: Drizzle melted chocolate over the top for a luxurious touch. Chocolate pairs beautifully with both the creamy filling and the crunchy pretzels, making each bite even more indulgent.

  • Nutty Crunch: Sprinkle chopped nuts like pecans or walnuts on top for added texture. This will introduce an earthy element that complements the sweet and salty balance in a lovely way.

  • Flavored Cream Cheese: Experiment with different flavored cream cheeses, such as strawberry or vanilla, to give your fluff a unique twist. Each flavor will bring its own character, making it a fun surprise for your guests.

  • Spiced Up: Add a pinch of cinnamon or nutmeg to the cream cheese filling for a warm spice note. This unexpected touch can elevate your dessert and give it a seasonal flair!

  • Graham Cracker Base: Swap pretzels for crushed graham crackers to create a delightful change. The sweetness of the graham crackers offers a different, yet scrumptious base for this dessert.

  • Cooling Mint: Stir in some finely chopped fresh mint leaves for a refreshing touch. This will add a bright pop of flavor that feels so invigorating, especially in the warmer months.

  • Zesty Lime: Incorporate a splash of lime juice or some lime zest to the filling for a zesty citrus kick. This tang will enhance the sweetness of the pineapple and add vibrant energy to your dish.

These variations not only highlight your creativity but also cater to different flavor preferences, ensuring everyone finds their favorite version of Pineapple Pretzel Fluff. You might want to pair it with other easy desserts like Tropical Pineapple Soft for an even more delightful gathering!

Pineapple Pretzel Fluff Recipe FAQs

What type of pretzels should I use for Pineapple Pretzel Fluff?
For the best flavor and texture, I recommend using regular crushed pretzels, as they provide that essential salty crunch. If you or your guests need a gluten-free option, gluten-free pretzels are a fantastic substitute and work just as well in the recipe!

How long can I store leftovers of Pineapple Pretzel Fluff?
Absolutely! Any leftovers can be kept in an airtight container in the refrigerator for up to 3 days. Just remember to keep the pretzel topping separate until right before serving to maintain that wonderful crunch.

Can I freeze Pineapple Pretzel Fluff?
Very! However, I suggest not freezing the entire dish as the creamy texture may separate upon thawing. If you make it ahead of time, consider freezing only the pretzel mixture. Store it in a zip-top bag and it will last up to 3 months. Simply mix it into the filling after it has been thawed and chilled before serving.

How can I prevent my dessert from becoming too watery?
To avoid a watery dessert, thoroughly drain the crushed pineapple. I recommend placing it in a fine-meshed sieve for about 5-10 minutes to ensure excess moisture is removed. This simple step ensures that every bite of your Pineapple Pretzel Fluff stays perfectly creamy!

Is there a way to make this recipe vegan-friendly?
Certainly! You can opt for non-dairy cream cheese and use a vegan whipped topping instead of Cool Whip to create a delicious vegan-friendly version of Pineapple Pretzel Fluff. Plus, feel free to swap the butter for margarine for a completely dairy-free treat.

Can I add other fruits to this recipe?
The more, the merrier! Feel free to mix in chopped fruits like peaches, strawberries, or blueberries for a fresh twist on the classic Pineapple Pretzel Fluff. Just keep in mind to balance the moisture and sweetness from your added fruits!

Pineapple Pretzel Fluff

Pineapple Pretzel Fluff: The Perfect Sweet-Salty Treat

Pineapple Pretzel Fluff is an easy, crowd-pleasing dessert salad that combines sweet creaminess with salty pretzel crunch.
Prep Time 15 minutes
Cook Time 7 minutes
Chilling Time 1 hour
Total Time 1 hour 22 minutes
Servings: 12 servings
Course: Dessert
Cuisine: American
Calories: 250

Ingredients
  

For the Base
  • 2 cups Crushed Pretzels Feel free to use gluten-free pretzels for a gluten-free version.
  • 1/2 cup Butter Melted; margarine is a great alternative for a dairy-free option.
  • 1 cup Granulated Sugar Divided; adjust according to your sweetness preference.
For the Filling
  • 8 ounces Cream Cheese Softened; consider swapping for non-dairy cream cheese for a vegan option.
  • 20 ounces Crushed Pineapple 1 can, drained; using pineapple in its juice enhances the flavor.
  • 12 ounces Cool Whip Thawed; homemade whipped cream can be an even fresher substitute.

Equipment

  • mixing bowl
  • oven
  • baking pan
  • hand mixer
  • plastic wrap

Method
 

Step-by-Step Instructions for Pineapple Pretzel Fluff
  1. Preheat your oven to 400°F (200°C) and prepare a 9x13-inch baking pan lined with parchment paper.
  2. In a medium-sized bowl, combine the crushed pretzels, melted butter, and 1/2 cup of granulated sugar. Mix thoroughly and press into the prepared pan.
  3. Bake for 7 minutes until golden. Remove from the oven and allow to cool completely at room temperature.
  4. In a large mixing bowl, beat the softened cream cheese with the remaining 1/2 cup of sugar until smooth and creamy, about 2-3 minutes.
  5. Gently fold in the drained crushed pineapple, then add the thawed Cool Whip, mixing until fully combined.
  6. Cover with plastic wrap and refrigerate for at least 1 hour to set.
  7. Combine the cooled pretzel mixture with the chilled pineapple cream mixture just before serving, reserving some crumbles for topping.

Notes

Ensure crushed pineapple is well-drained. Store the pretzel mixture separately to maintain crunch until serving.

Cheesy Zucchini Bake: A Creamy Comfort You’ll Love

As I stood in the kitchen, the scent of garlic and cheese filled the air, pulling me closer to the oven. This Easy Cheesy Zucchini Bake is my go-to when I want to impress without spending all day cooking. With its creamy layers of fresh zucchini and gooey cheese, it’s not just another veggie dish; it’s a delightful comfort that’s quick to whip up, making it the ultimate choice for busy weeknights or a relaxed family dinner. Plus, it’s gluten-free and can easily adapt to whatever ingredients you have on hand. Trust me, once you try this cheesy, satisfying bake, you’ll wonder how you ever lived without it! Have you ever tasted something so heartwarming that it made you want to hurry to the table?

Why Is This Zucchini Bake a Must-Try?

Creamy Comfort: The Easy Cheesy Zucchini Bake wraps tender zucchini in a luscious, creamy blend of cheese that oozes with delight.

Quick to Prepare: Perfect for bustling nights, this dish can be thrown together in under an hour.

Versatile Ingredients: Swap zucchini for yellow squash or add your favorite veggies like spinach and eggplant for a colorful twist.

Crowd-Pleasing: The gooey cheese and golden crust will have friends and family asking for seconds!

Naturally Gluten-Free: A fantastic option for gluten-sensitive diners, ensuring everyone at the table can enjoy a hearty meal.

Elevate your dinner with this mouthwatering recipe or explore other delicious dishes like Zucchini Oatmeal Bake for more veggie goodness!

Cheesy Zucchini Bake Ingredients

• To create this delectable Cheesy Zucchini Bake, gather these key ingredients for a comforting experience!

For the Bake

  • Zucchini – The star of the dish; its tender texture pairs beautifully with the creamy filling.
  • Mozzarella Cheese – Delivers that beloved gooey texture; feel free to swap in cheddar for a sharper taste!
  • Parmesan Cheese – Sprinkles on top for a crispy finish that enhances the overall flavor.
  • Sour Cream – Adds richness to the bake; Greek yogurt can be a lighter alternative.
  • Mayonnaise – Contributes a delightful creaminess; opt for vegan mayo for a dairy-free option.
  • Garlic – Use fresh for the best flavor, but garlic powder is fine in a pinch (1/4 teaspoon).
  • Salt & Black Pepper – Season to taste for a perfect balance of flavors.
  • Parsley – Fresh parsley brightens the dish; you can substitute with other herbs or omit entirely.

Dive into this Cheesy Zucchini Bake and enjoy a comforting meal that’s not only easy to prepare but also brings a smile to every dinner table!

Step‑by‑Step Instructions for Easy Cheesy Zucchini Bake

Step 1: Preheat and Prepare
Begin by preheating your oven to 375°F (190°C). While it heats up, take a medium-sized baking dish and grease it generously with olive oil. A well-greased dish will prevent sticking and promote a lovely golden crust on your Easy Cheesy Zucchini Bake. Set the prepared dish aside as you move on to mixing the creamy filling.

Step 2: Mix the Creamy Base
In a large mixing bowl, combine sour cream, mayonnaise, minced garlic, salt, black pepper, and chopped parsley. Whisk these ingredients together until the mixture is smooth and creamy, blending the flavors thoroughly. This rich base will envelop the zucchini, creating a delectable layer in your bake that adds richness and depth.

Step 3: Toss the Zucchini
Now, take your thinly sliced zucchini and add it to the creamy mixture. Gently toss the zucchini in the bowl, ensuring each slice is evenly coated with the creamy goodness. This step is crucial for infusing your Easy Cheesy Zucchini Bake with flavor; the zucchini should look luscious and well-dressed before proceeding.

Step 4: Layer in the Baking Dish
Carefully transfer the coated zucchini to your greased baking dish, spreading it out into an even layer. Make sure the slices overlap just slightly, as this will help them cook uniformly while baking. The creamy layer should envelop the zucchini beautifully, setting the stage for the cheesy topping to be added next.

Step 5: Add Cheeses Generously
Take your mozzarella and Parmesan cheese and generously sprinkle them over the zucchini layer. Make sure to cover the entire surface with cheese, as this will create a gooey, cheesy layer that melts and browns beautifully while baking. The combination of cheeses will elevate the flavors in your Easy Cheesy Zucchini Bake.

Step 6: Bake to Perfection
Place the dish in your preheated oven and let it bake for 25–30 minutes. You’ll know it’s ready when the cheese is bubbly and golden brown, and the zucchini is tender but still retains a slight bite. The aroma wafting from the oven will signal that something delicious is on its way!

Step 7: Let It Rest and Garnish
Once baked to perfection, remove the Easy Cheesy Zucchini Bake from the oven and let it cool for a few minutes. This resting period allows the layers to set, making it easier to serve. If desired, garnish with freshly chopped parsley for a burst of color and a touch of freshness before diving in!

Expert Tips for Cheesy Zucchini Bake

  • Slice Thinly: Ensure zucchini is sliced thinly to promote even cooking; thick slices may remain crunchy and undercooked.

  • Rest Before Serving: Let the dish cool for a few minutes after baking to allow the layers to set, making it easier to serve.

  • Add More Veggies: If you want to incorporate additional vegetables like eggplant or spinach, adjust the baking time to ensure proper cooking without excess moisture.

  • Storage Smartly: Keep leftovers in an airtight container for up to 3 days; when reheating, add a splash of milk if it has thickened.

  • Cheese Variations: Feel free to substitute mozzarella with cheddar for a sharper flavor, or use dairy-free cheese for a great vegan option in your Cheesy Zucchini Bake!

Make Ahead Options

These Easy Cheesy Zucchini Bakes are ideal for busy home cooks looking to save time during hectic weeknights! You can prepare the zucchini and creamy mixture up to 24 hours in advance and refrigerate it, ensuring that the flavors meld beautifully. To do this, simply follow the initial steps of mixing the sour cream, mayonnaise, garlic, and seasonings, and then toss in the thinly sliced zucchini. Cover the mixture tightly with plastic wrap before refrigerating. On the day you plan to serve, transfer the mixture to your greased baking dish, sprinkle with the cheeses, and bake it directly from the fridge, adding an extra 5-10 minutes to the cooking time for perfectly cheesy, comforting results!

How to Store and Freeze Cheesy Zucchini Bake

Fridge: Store leftovers in an airtight container for up to 3 days to maintain freshness. Allow it to cool completely before sealing to avoid moisture buildup.

Freezer: For longer storage, freeze portions wrapped tightly in plastic wrap followed by foil. It will keep for up to 2 months; label with the date for easy tracking.

Reheating: Reheat in the oven at 350°F (175°C) for 15-20 minutes, adding a splash of milk if it’s thickened. You’ll enjoy that creamy texture in your Cheesy Zucchini Bake once again!

Thawing: If frozen, thaw in the fridge overnight before reheating to ensure even warming and maintain the dish’s delightful consistency.

Cheesy Zucchini Bake Variations

Feel free to play around with this recipe and add your personal touch for an even more delightful dish!

  • Dairy-Free: Substitute mozzarella and parmesan with vegan cheese for a creamy, dairy-free option that everyone can enjoy.
    Swap your regular cheese without sacrificing that gooey texture! It’s a fantastic way to include friends who follow a plant-based lifestyle while still delivering taste.

  • Spicy Kick: Add crushed red pepper flakes or diced jalapeños for a zesty twist that will appeal to spice lovers.
    Just a pinch can awaken the flavors of this bake, and it adds an exciting dimension. The right heat will transform this dish into a family favorite!

  • Extra Veggie Boost: Mix in other veggies like spinach, bell peppers, or fresh herbs like basil or thyme for added nutrition and flavor.
    These combinations not only enhance the dish’s color but also make it wholesome. Imagine a rainbow of veggies peeking through that creamy, cheesy layer!

  • Cheese Options: Instead of mozzarella, try using cheddar or gouda for different flavor profiles.
    The result will offer a subtly different taste while still giving you that beloved cheesy experience. Each cheese brings its unique charm, so don’t hesitate to experiment!

  • Herb-Infused: Add fresh herbs like thyme or oregano in place of parsley to elevate the flavor profile.
    You’ll be surprised how much a little greenery can brighten the whole dish. Fresh herbs can transport your senses straight to a sunny Italian kitchen!

  • Protein-Packed: Incorporate cooked chicken or crumbled sausage for a heartier meal that’s sure to satisfy.
    Elevating this dish can turn it into a comforting dinner centerpiece, making it perfect for any occasion. Plus, the added protein will keep everyone feeling full!

  • Gluten-Free Crunch: For a crunchy topping, sprinkle gluten-free breadcrumbs mixed with a bit of olive oil and parmesan before baking.
    This adds a delicious texture and makes for an irresistible golden crust. Nothing like that satisfying crunch to contrast against the creamy layers!

Explore these variations, and remember that this Cheesy Zucchini Bake is your canvas! Don’t forget to try out delicious side dishes like Savory Zucchini Pancakes or Cheesy Zucchini Rolls to complete your meal!

What to Serve with Easy Cheesy Zucchini Bake

Nothing completes a cozy dinner like a delectable spread that beautifully complements your main dish.

  • Crispy Garlic Bread: This garlic-infused delight adds the perfect crunch and aroma, ideal for soaking up any leftover creamy goodness.

  • Refreshing Garden Salad: A mix of greens, cucumbers, and tomatoes drizzled with light vinaigrette brings a bright and fresh contrast to the cheesy bake, balancing the richness beautifully.

  • Roasted Chicken Thighs: Tender, juicy chicken pairs wonderfully with the cheesy, creamy textures of the zucchini, creating a hearty meal that will satisfy all appetites.

  • Steamed Asparagus: The crisp-tender spears add a nutrient-packed, vibrant burst, making each bite colorful and delightful.

  • Quinoa Pilaf: Fluffy quinoa mixed with spices and herbs offers a nutty flavor that’s a great base for the rich zucchini bake while enhancing the overall nutrition of your meal.

  • White Wine Spritzer: For a refreshing drink option, light, fizzy white wine mixed with sparkling water elevates your dinner experience, complementing the dish’s creaminess with its effervescence.

  • Chocolate Mousse: Conclude your meal with a touch of decadence; this airy dessert will cleanse your palate and add a perfect sweet ending after the savory zucchini bake.

Mix and match these delightful pairings to elevate your dinner from delightful to unforgettable!

Easy Cheesy Zucchini Bake Recipe FAQs

What type of zucchini should I use for the best results?
Absolutely! Choose medium-sized zucchinis that are firm and free of blemishes or dark spots. Look for ones with a shiny skin, as they tend to be fresh. If you can’t find zucchini, yellow squash is a fantastic substitute, offering a similar texture and flavor.

How should I store leftovers of the Cheesy Zucchini Bake?
To keep your Easy Cheesy Zucchini Bake fresh, store it in an airtight container in the refrigerator for up to 3 days. Ensure it has cooled completely before sealing it to prevent moisture buildup, which can lead to sogginess.

Can I freeze my Cheesy Zucchini Bake?
Yes, you can! To freeze, allow the dish to cool completely and then wrap it tightly in plastic wrap followed by aluminum foil to prevent freezer burn. It can be stored in the freezer for up to 2 months. When you’re ready to enjoy it again, thaw it in the fridge overnight before reheating.

What can I do if my zucchini bake turns out watery?
No worries! If your Easy Cheesy Zucchini Bake is watery, it could be due to excess moisture from the zucchini. To avoid this, slice your zucchini thinly and consider salting them for about 15 minutes before preparation; then pat dry with a paper towel. This helps draw out moisture. Make sure to bake it long enough to evaporate any excess liquid.

Are there any dietary restrictions to consider?
Certainly! This recipe is naturally gluten-free; just ensure any packaged ingredients, like mayonnaise or cheese, are marked gluten-free. If you or someone at your table has dairy allergies, you can easily substitute with dairy-free cheese and vegan mayo as alternatives for a delicious, health-conscious option.

Can I add other vegetables to the Cheesy Zucchini Bake?
Very much so! Feel free to incorporate other veggies like spinach, bell peppers, or even mushrooms to add nutritional variety and color. Just keep in mind that if you’re adding moisture-rich vegetables, you might need to adjust the baking time slightly to ensure everything cooks evenly and doesn’t get too watery.

Cheesy Zucchini Bake

Cheesy Zucchini Bake: A Creamy Comfort You’ll Love

This Cheesy Zucchini Bake combines creamy layers of zucchini and cheese, making it a quick and delightful dish that's perfect for any dinner.
Prep Time 15 minutes
Cook Time 30 minutes
Resting Time 5 minutes
Total Time 50 minutes
Servings: 4 servings
Course: Dinner
Cuisine: Comfort Food
Calories: 350

Ingredients
  

For the Bake
  • 4 cups Zucchini thinly sliced
  • 2 cups Mozzarella Cheese shredded
  • 1 cup Parmesan Cheese grated
  • 1 cup Sour Cream or Greek yogurt
  • 1/2 cup Mayonnaise or vegan mayo
  • 2 cloves Garlic minced
  • to taste Salt
  • to taste Black Pepper
  • 1/4 cup Parsley chopped

Equipment

  • oven
  • Baking Dish
  • mixing bowl
  • whisk

Method
 

Step-by-Step Instructions
  1. Preheat your oven to 375°F (190°C) and grease a medium-sized baking dish with olive oil.
  2. In a large mixing bowl, combine sour cream, mayonnaise, minced garlic, salt, black pepper, and chopped parsley, whisking until smooth.
  3. Add the thinly sliced zucchini to the creamy mixture and toss gently until well coated.
  4. Transfer the zucchini mixture to the greased baking dish, spreading it into an even layer.
  5. Sprinkle mozzarella and Parmesan cheese over the zucchini layer, covering the surface completely.
  6. Bake in the preheated oven for 25–30 minutes until the cheese is bubbly and golden brown.
  7. Allow the dish to cool for a few minutes before serving, garnishing with freshly chopped parsley if desired.

Notes

If desired, substitute mozzarella with cheddar for a sharper flavor or use dairy-free cheese for a vegan option.

Decadent Vanilla Pecan Pralines for Sweet Southern Memories

As I rummaged through my grandmother’s recipe box, the familiar scent of vanilla and caramel wafted up, tugging at my heartstrings. That’s how I revisited the beloved Vanilla Pecan Pralines, a classic Southern treat that brings a taste of home to any gathering. The rich, buttery sweetness combined with the satisfying crunch of pecans makes these pralines not just a dessert, but a celebration of cherished memories and traditions. Plus, they’re a breeze to whip up, making them perfect for both spontaneous cravings and festive occasions. Whether you’re sharing them with loved ones or indulging in a quiet moment at home, these delightful pralines promise to sweeten your day. Ready to rekindle those warm feelings and create some culinary magic? Let’s dive into this sweet indulgence together!

Why will you adore these pralines?

Nostalgic Flavor: The sweet, creamy blend of vanilla and caramel evokes memories of cherished family gatherings.
Quick to Make: With just six simple ingredients, you can enjoy homemade sweets in under an hour!
Versatile Treat: These pralines shine at holidays, parties, or as a quick snack alongside your favorite coffee.
Easy Customization: Feel free to swap nuts or drizzle chocolate for a personalized touch. If you love homemade desserts, consider trying our Nutty Vanilla Cake or Cream Puffs Vanilla.
Gifting Option: Pack them beautifully in a jar, and you’ve got a charming gift for friends or neighbors. Enjoy creating lasting memories with these delightful bites!

Vanilla Pecan Pralines Ingredients

For the Praline Mixture
Granulated Sugar – Provides sweetness and structure; essential for that perfect melt-in-your-mouth texture.
Light Brown Sugar – Adds depth of flavor with a hint of molasses; for a richer taste, dark brown sugar is a great substitute.
Heavy Cream – Contributes creaminess and richness; half-and-half can be used for a lighter version but may alter the final result.
Unsalted Butter – Enhances richness and texture; using salted butter is fine, just reduce any extra salt in your recipe.
Pure Vanilla Extract – Adds aromatic flavor, elevating the integrity of the pralines; vanilla bean paste can also work, although the flavor intensity may vary.
Pecan Halves – Main structure providing a nutty crunch; for a delightful twist, substitute with toasted walnuts or almonds.
Pinch of Salt – Balances the sweetness perfectly, ensuring flavors pop; this ingredient is essential and should not be omitted.

Step‑by‑Step Instructions for Vanilla Pecan Pralines

Step 1: Prepare the Workspace
Begin by creating a clean and tidy workspace. Line a baking sheet with parchment paper or a silicone mat, ensuring that it’s ready to catch those lovely praline droplets. This step is crucial for easy removal once your Vanilla Pecan Pralines cool, allowing them to maintain their delightful shape.

Step 2: Combine Ingredients
In a medium saucepan, combine granulated sugar, light brown sugar, heavy cream, and unsalted butter. Cook the mixture over medium heat, constantly stirring to dissolve the sugars and create a smooth blend. Keep an eye on the thermometer and bring the mixture to 240°F, which is the soft ball stage. You’ll know it’s ready when it’s bubbling and has a glossy appearance.

Step 3: Add Flavorings
Once your mixture reaches the soft ball stage, carefully remove the saucepan from heat. Stir in the pure vanilla extract, toasted pecans, and a pinch of salt, mixing well to incorporate all elements. The aroma at this point will be heavenly, as the flavors meld together to create the delicious essence of your Vanilla Pecan Pralines.

Step 4: Cool and Thicken
Allow the mixture to cool in the saucepan for about 5 minutes. After this brief cooling period, stir it vigorously for about 2-3 minutes until it thickens and becomes slightly cloudy. This vigorous stirring helps develop the ideal texture, transforming it from a liquid into a luscious, thick mixture that’s perfect for shaping.

Step 5: Shape Pralines
Using a spoon or a cookie scoop, drop spoonfuls of the thickened mixture onto the prepared baking sheet. Space each mound apart to allow room for spreading as they cool. You’ll start to see those charming little clusters of Vanilla Pecan Pralines taking shape, each promising a delightful crunch and sweetness.

Step 6: Set
Let the pralines cool completely at room temperature, which should take about 30 minutes. During this time, they will set and firm up, developing that irresistible texture that’s both slightly soft and perfectly crunchy. Resist the urge to touch them too soon; patience is key to achieving the ultimate deliciousness in your Vanilla Pecan Pralines!

What to Serve with Classic Vanilla Pecan Pralines

These delightful pralines deserve the perfect companions to elevate your dessert experience and create a well-rounded meal.

  • Rich Coffee: A robust cup of coffee complements the sweetness of pralines. The bitterness balances the buttery caramel flavors beautifully.

  • Smooth Vanilla Ice Cream: A scoop of creamy vanilla ice cream adds a luscious texture that perfectly contrasts the crunchy pralines, creating a delightful harmony of flavors.

  • Whipped Cream: Light and airy whipped cream enhances the experience, adding a touch of creaminess that pairs wonderfully with the pralines’ rich sweetness.

  • Fresh Berries: The tartness of strawberries or raspberries provides a refreshing contrast to the pralines, brightening the dessert and bringing a pop of color to your plate.

  • Chocolate Drizzle: A simple drizzle of melted chocolate over the pralines adds sophistication and richness that tantalizes your taste buds, turning each bite into an indulgent treat.

  • Herbal Tea: A cup of calming herbal tea, such as chamomile or mint, refreshes the palate and resonates with the dessert’s sweet notes, making for a lovely after-dinner pairing.

  • Nutty Biscotti: Crunchy biscotti offers a delightful textural contrast to the soft caramel of pralines, perfect for dipping and enjoying alongside your coffee.

  • Caramel Sauce: Serve with a drizzle of caramel on top or around the pralines for an added layer of sweetness, enhancing the flavor experience even further.

Make Ahead Options

These Vanilla Pecan Pralines are perfect for meal prep enthusiasts! You can prepare the praline mixture up to 24 hours in advance by cooking it through Step 3, then transferring it to an airtight container and refrigerating. For the best results, allow the mixture to warm to room temperature before stirring vigorously and proceeding to Steps 4 through 6 when you’re ready to serve. Additionally, once shaped and cooled, you can store the pralines in an airtight container at room temperature for up to one week. This method ensures they retain their delightful crunch and flavor, making your busy weeks much sweeter with minimal effort!

Storage Tips for Vanilla Pecan Pralines

Room Temperature: Store your pralines in an airtight container at room temperature for up to 1 week to maintain their delightful texture and flavor.

Refrigeration: If humidity is high, refrigerate the pralines to avoid stickiness, ensuring you separate layers with parchment paper to prevent sticking.

Make-Ahead: You can prepare these Vanilla Pecan Pralines several days in advance; just keep them tightly sealed in an airtight container until you’re ready to share or enjoy.

Freezing: For longer storage, freeze the pralines in an airtight container for up to 3 months; when ready to enjoy, let them thaw at room temperature for the best texture.

Expert Tips for Vanilla Pecan Pralines

  • Candy Thermometer Necessity: Using a candy thermometer is crucial; achieving 240°F ensures the perfect soft ball stage for that delightful praline texture.

  • Constant Stirring: Stir the mixture gently but continuously while cooking to prevent sugar crystals from forming, which could ruin the smoothness of your Vanilla Pecan Pralines.

  • Vigorously Stir to Thicken: After cooling for five minutes, stir your mixture vigorously until thickened; this ensures the pralines hold their shape and have a luscious mouthfeel.

  • Pecan Toasting Tip: Always toast your pecan halves before adding them to enhance their flavor and aroma, elevating your pralines to a whole new level of deliciousness.

  • Storing Properly: Store your pralines in an airtight container at room temperature to keep them fresh for up to a week; refrigerate in humid conditions to prevent stickiness.

Vanilla Pecan Pralines Variations

Feel free to get creative with your Vanilla Pecan Pralines and add your special touch to this already delightful treat!

  • Nutty Swap: Replace pecans with walnuts, almonds, or macadamia nuts for a different flavor experience. Each nut brings a unique twist, enhancing the overall flavor profile deliciously.

  • Chocolate Drizzle: Drizzle melted chocolate over the cooled pralines for an elegant finish. This adds a rich layer of decadence that beautifully complements the sweet, nutty flavors.

  • Flavor Infusion: Add a splash of bourbon or rum to the mixture for an adult twist. This slight enhancement creates a warm depth that warms the heart and soul.

  • Spice it Up: Incorporate a pinch of cinnamon or nutmeg into the mixture for a warm, spicy note. It’ll evoke the cozy essence of the holiday season in every bite.

  • Maple Bliss: Substitute half of the granulated sugar with maple syrup for a maple-infused twist. The natural sweetness adds a rustic charm that’s simply enchanting.

  • Crunchy Texture: Mix in crushed toffee bits or caramel pieces for added crunch and flavor. The layers of sweetness create a delightful surprise in each bite of your pralines.

  • Coconut Flakes: Fold in unsweetened toasted coconut flakes for a tropical flair. This little addition gives your pralines an enticing chewiness that pairs beautifully with the pecans.

  • Ice Cream Topping: Serve these pralines crumbled over a scoop of vanilla ice cream for a delicious sundae. The combination of textures and flavors elevates this dessert to a fabulous new level.

If you’re craving more delightful desserts, don’t forget to check out our Cream Puffs Vanilla or indulge in some rich Vanilla Pudding. Enjoy crafting your unique version of these timeless treats!

Vanilla Pecan Pralines Recipe FAQs

How do I choose ripe pecans for the recipe?
Absolutely! When selecting pecans for your Vanilla Pecan Pralines, look for those that are plump and uniform in size. Fresh pecans have a rich, nutty scent with no dark spots. If you’re purchasing pre-packaged pecans, ensure they’re labeled as “fresh” and check the expiration date to guarantee you’re getting the best quality.

What’s the best way to store Vanilla Pecan Pralines?
To maintain their freshness, store your pralines in an airtight container at room temperature for up to 1 week. If you live in a humid environment, it’s best to refrigerate them to prevent stickiness. Just make sure to layer parchment paper between the pralines if you’re stacking them!

Can I freeze my Vanilla Pecan Pralines?
Yes, you can freeze your pralines for longer storage! Simply place them in an airtight container or a freezer bag, ensuring there’s no excess air, and freeze for up to 3 months. When you’re ready to enjoy, thaw them at room temperature for the best texture and flavor experience.

What should I do if my praline mixture is too soft?
If you find that your praline mixture is too soft after you’ve made it, don’t worry! Simply transfer the mixture to the refrigerator for about 15-20 minutes. Check periodically until it firms up enough to be shaped into your desired clusters. It’s always better to err on the side of caution when checking for consistency.

Are Vanilla Pecan Pralines suitable for individuals with nut allergies?
Unfortunately, Vanilla Pecan Pralines contain nuts as a main ingredient and are not suitable for those with nut allergies. However, you can create a delightful version by using seeds (like sunflower or pumpkin seeds) instead, though the flavor will differ slightly. Always ensure that your substitutions and ingredients cater to dietary needs for a safe indulgence!

Vanilla Pecan Pralines

Decadent Vanilla Pecan Pralines for Sweet Southern Memories

Enjoy the classic taste of Vanilla Pecan Pralines, a sweet Southern treat that combines vanilla and caramel with buttery pecans.
Prep Time 10 minutes
Cook Time 30 minutes
Cooling Time 30 minutes
Total Time 1 hour 10 minutes
Servings: 12 pralines
Course: Dessert
Cuisine: Southern
Calories: 150

Ingredients
  

For the Praline Mixture
  • 1 cup Granulated Sugar Provides sweetness and structure; essential for that perfect melt-in-your-mouth texture.
  • 1/2 cup Light Brown Sugar Adds depth of flavor with a hint of molasses; for a richer taste, dark brown sugar is a great substitute.
  • 1/2 cup Heavy Cream Contributes creaminess and richness; half-and-half can be used for a lighter version but may alter the final result.
  • 1/4 cup Unsalted Butter Enhances richness and texture; using salted butter is fine, just reduce any extra salt in your recipe.
  • 1 tbsp Pure Vanilla Extract Adds aromatic flavor, elevating the integrity of the pralines; vanilla bean paste can also work, although the flavor intensity may vary.
  • 1 cup Pecan Halves Main structure providing a nutty crunch; for a delightful twist, substitute with toasted walnuts or almonds.
  • 1 pinch Salt Balances the sweetness perfectly, ensuring flavors pop; this ingredient is essential and should not be omitted.

Equipment

  • Medium saucepan
  • Candy thermometer
  • baking sheet
  • parchment paper
  • Cookie scoop

Method
 

Step-by-Step Instructions for Vanilla Pecan Pralines
  1. Prepare the Workspace: Begin by creating a clean and tidy workspace. Line a baking sheet with parchment paper or a silicone mat, ensuring that it's ready to catch those lovely praline droplets.
  2. Combine Ingredients: In a medium saucepan, combine granulated sugar, light brown sugar, heavy cream, and unsalted butter. Cook the mixture over medium heat, constantly stirring to dissolve the sugars and create a smooth blend. Bring the mixture to 240°F, which is the soft ball stage.
  3. Add Flavorings: Once your mixture reaches the soft ball stage, remove the saucepan from heat. Stir in the pure vanilla extract, toasted pecans, and a pinch of salt.
  4. Cool and Thicken: Allow the mixture to cool in the saucepan for about 5 minutes. After this, stir it vigorously for 2-3 minutes until it thickens and becomes slightly cloudy.
  5. Shape Pralines: Using a spoon or a cookie scoop, drop spoonfuls of the thickened mixture onto the prepared baking sheet. Space each mound apart.
  6. Set: Let the pralines cool completely at room temperature, which should take about 30 minutes.

Notes

Using a candy thermometer is crucial; achieving 240°F ensures the perfect soft ball stage for that delightful praline texture. Store in an airtight container for up to a week.

Crispy Squash Puppies That Redefine Comfort Food

As I stood in my kitchen, savoring the vibrant colors of summer produce, inspiration struck like a lightning bolt. Enter these delightful Crispy Yellow Squash Puppies, the perfect way to elevate your cooking game while utilizing that fresh summer squash lingering on your countertop. This unique twist on traditional hush puppies brings a tender, moist interior that pairs beautifully with a crispy golden crust. They’re not just gluten-free and vegetarian; these pups are ideal for quick summer gatherings or cozy family dinners. Imagine serving a side dish that bursts with seasonal goodness while impressing your loved ones—what could be more rewarding? So, are you ready to dive into this culinary adventure and discover the secret behind these irresistible bites?

Why Are Squash Puppies a Must-Try?

Deliciously Unique: These Crispy Squash Puppies offer a delightful twist on traditional hush puppies, infusing seasonal yellow squash for a burst of moisture and subtle sweetness.

Easy to Make: With straightforward ingredients and simple steps, this dish is perfect for both novice and seasoned cooks alike.

Versatile Flavor: Customize them with added herbs or spices to suit your taste, making them adaptable for any occasion, from cookouts to cozy family dinners.

Gluten-Free Option: Feel free to swap in gluten-free flour for a dish that caters to various dietary preferences without sacrificing taste.

Crowd-Pleaser: Share these crunchy bites at your next gathering, and watch how they disappear—everyone loves a deliciously crispy snack!

Discover more inspiring ways to use summer squash in your cooking by checking out our fresh produce recipes that celebrate the flavors of the season!

Squash Puppies Ingredients

For the Batter
Yellow Squash – Adds moisture and sweetness; steam and mash until smooth for the best texture.
Self-Rising Yellow Cornmeal – Provides structure and flavor; use gluten-free cornmeal for a gluten-free version.
All-Purpose Flour – Offers additional structure; can substitute with whole wheat or gluten-free flour as needed.
Sugar – Enhances sweetness and promotes browning; reduce or omit for a less sweet taste.
Salt – Enhances overall flavor; adjust based on your personal preference.
Black Pepper – Adds warmth and depth to the flavor profile; feel free to season to your taste.
Cayenne Pepper – Offers heat; adjust amount based on your spice tolerance.
Sweet Onion – Contributes savory notes; a yellow or white onion works best for a touch of sweetness.
Jalapeno – Adds spice and flavor complexity; omit for a milder profile.
Buttermilk – Provides moisture and a tangy flavor; substitute regular milk or a non-dairy option with vinegar.
Egg – Acts as a binder for the batter; omit or use a flax egg for a vegan option.
Vegetable Oil – Essential for frying; can be swapped with canola oil or any oil with a high smoke point.

Enjoy creating these delightful Squash Puppies, infused with fresh summer squash for an unforgettable flavor experience!

Step‑by‑Step Instructions for Crispy Yellow Squash Puppies

Step 1: Prepare the Squash
Begin by washing and trimming the ends of your yellow squash. Cut it in half lengthwise, then slice into 2-inch pieces. Steam the squash for about 12-15 minutes until it’s fork-tender. Once done, transfer the squash to a mixing bowl and mash it until smooth, ensuring a creamy base for your Crispy Yellow Squash Puppies.

Step 2: Mix Dry Ingredients
In a large bowl, combine 1 cup of self-rising yellow cornmeal, ½ cup of all-purpose flour, 1 tablespoon of sugar, and a generous pinch of salt, black pepper, and cayenne pepper for that mild kick. Whisk together until the ingredients are evenly distributed. This mixture will provide the perfect structure and flavor for the puppies, creating a delightful contrast with the moist squash.

Step 3: Prepare the Wet Ingredients
In a separate bowl, mix the mashed squash with ¼ cup of minced sweet onion, 1 minced jalapeño, ½ cup of buttermilk, and 1 beaten egg. Stir the mixture until well combined, ensuring that all ingredients are evenly incorporated. This flavorful blend will enhance the texture and taste of your Crispy Yellow Squash Puppies.

Step 4: Combine Mixtures
Gently fold the wet squash mixture into the dry ingredients using a spatula. Mix until just combined; avoid overmixing to keep your batter light and airy. This step is crucial as it ensures your Squash Puppies will have the perfect fluffiness while maintaining the distinct flavors of the fresh squash.

Step 5: Heat the Oil
In a deep skillet, pour in enough vegetable oil to cover the bottom by about an inch, then heat it over medium-high heat to 350°F (175°C). Use a kitchen thermometer to check the temperature. This is the ideal frying temperature that will give your puppies their wonderfully crispy exterior without soaking them in oil.

Step 6: Fry the Puppies
Once the oil is hot, carefully drop tablespoonfuls of the batter into the skillet, making sure not to overcrowd the pan. Fry the puppies for about 3 minutes on each side until they are golden brown and crispy. Watch them closely, flipping only once. This cooking method locks in flavor while giving your Squash Puppies that perfect crunch.

Step 7: Drain and Serve
After frying, use a slotted spoon to remove the crispy yellow squash puppies from the oil. Place them on paper towels to drain excess oil and sprinkle with the remaining salt while they are still hot. Serve immediately to enjoy the ideal texture, showcasing these delightful Crispy Yellow Squash Puppies as a tasty snack or side dish!

How to Store and Freeze Squash Puppies

Room Temperature: Let the Squash Puppies cool completely before storing. They can sit out for up to 2 hours, but for longer, transfer them to the fridge.

Fridge: Place in an airtight container and store for up to 3 days. To maintain freshness, place a paper towel in the container to absorb excess moisture.

Freezer: For longer storage, freeze cooked Squash Puppies on a baking sheet until solid, then transfer to a freezer-safe bag for up to 3 months.

Reheating: For best results, reheat in an air fryer or oven at 350°F for about 10 minutes to restore their crispy texture.

Squash Puppies Variations & Substitutions

Feel free to sprinkle your creativity on these delicious Squash Puppies, ensuring every bite is just how you like it!

  • Spicy Kick: Add more cayenne pepper for an extra kick, perfect for those who crave heat.
  • Herb-Infused: Mix in fresh or dried herbs like parsley or chives to elevate flavor profiles, adding a lovely aromatic touch.
  • Cheddar Bliss: Incorporate shredded cheese like cheddar into the batter for a savory twist that melts into delightful pockets of flavor.
  • Baked Alternative: For a healthier version, try baking these in a mini muffin tin. This method keeps the flavors intact while reducing oil.
  • Savory Add-Ins: Include ingredients like corn or diced bell peppers for pops of sweetness and crunch that complement the squash perfectly.
  • Creamy Buttermilk Swap: Experiment with sour cream or yogurt for your moisture; it adds a tangy richness that pairs beautifully with the other ingredients.
  • Vegan Variation: Replace the egg with a flax egg (1 tablespoon ground flaxseed mixed with 2.5 tablespoons water) for a delightful vegan option without compromising texture.
  • Sweet Twist: A touch of cinnamon or nutmeg can add warmth and sweetness, making these puppies a unique treat for brunch.

Explore more fresh summer flavors with our seasonal recipes that make the most of vibrant produce!

What to Serve With Crispy Yellow Squash Puppies

Complement your delightful Crispy Yellow Squash Puppies with these mouthwatering sides and dips for a complete meal experience.

  • Creamy Ranch Dip: A cool, tangy dip that perfectly pairs with the crispy texture, balancing the warmth of the squash puppies.
  • Jalapeno Jelly: This sweet and spicy condiment enhances the squash’s natural sweetness, offering a captivating flavor contrast.
  • Citrus Aioli: A zesty sauce that adds brightness, elevating each bite of the puppies with a refreshing twist of citrus.
  • Fresh Green Salad: Crisp greens with a light vinaigrette offer a refreshing counterpoint, enhancing your meal’s overall vibrancy.
  • Fried Fish: Traditional Southern fare, this savory dish complements the hush puppies well, echoing the comforting flavors of home.
  • Watermelon Salad: A juicy, refreshing side with feta and mint brings a sweet element that plays beautifully with the savory squash.
  • Coleslaw: Creamy or tangy, coleslaw adds crunch and creaminess, creating a satisfying textural contrast when enjoyed together.
  • Sparkling Lemonade: A fizzy, citrusy drink that adds a festive feeling to your meal, making any gathering extra special.
  • Corn on the Cob: Grilled or buttered, this sweet summer staple enhances the freshness of your meal and ties into the comfort food theme.

Make Ahead Options

These Crispy Yellow Squash Puppies are perfect for meal prep, allowing you to enjoy delicious homemade snacks without the morning rush! You can prepare the batter up to 24 hours in advance by mixing the mashed squash with the dry ingredients, then refrigerate it in an airtight container. To maintain their crispiness, avoid frying them until you’re ready to serve; this ensures they come out just as delicious as if made fresh. When you’re ready to enjoy, simply heat the oil to 350°F and fry the batter until golden brown (about 3 minutes per side). Trust me, your future self will thank you for this time-saving trick!

Expert Tips for Crispy Squash Puppies

Perfectly Mashed Squash: Ensure the squash is fully steamed and mashed until smooth for a creamy batter; this prevents any lumps and promotes even cooking.

Oil Temperature Matters: Use a thermometer to maintain the oil at 350°F; too cool will make them greasy and too hot can burn the puppies.

Don’t Overmix: Gently fold the wet and dry ingredients until just combined; overmixing can lead to tough and dense Squash Puppies.

Immediate Serving: Serve them right out of the fryer for the best texture; they tend to become soggy if left to sit.

Batch Frying: Fry in small batches to avoid overcrowding, allowing for even cooking and maintaining the ideal crunchiness.

Enjoy making your Crispy Squash Puppies with these helpful tips and watch as they become a new family favorite!

Crispy Yellow Squash Puppies Recipe FAQs

How do I select ripe yellow squash for this recipe?
Absolutely! Look for firm, smooth yellow squash with a bright color and no blemishes. Avoid any squash with soft spots or dark spots all over, as these indicate overripeness. Young squash is preferred for the best flavor and texture, so choose those that feel heavy for their size.

What’s the best way to store leftover Squash Puppies?
Very! Let your leftover Squash Puppies cool completely before placing them in an airtight container. They can be stored in the refrigerator for up to 3 days. To maintain their crispness, you can place a paper towel in the container to absorb excess moisture, which helps prevent them from becoming soggy.

Can I freeze Squash Puppies for later use?
Absolutely! To freeze, place your cooked Squash Puppies on a baking sheet in a single layer and freeze until solid. Once frozen, transfer them to a freezer-safe bag, pushing out excess air. They can be stored in the freezer for up to 3 months. When you’re ready to enjoy them, simply reheat in an air fryer or oven at 350°F for about 10 minutes to get that crispiness back.

What should I do if my Squash Puppies turn out greasy?
No worries! Greasy Squash Puppies are often a result of oil that isn’t hot enough when you add the batter. Make sure your oil reaches 350°F before frying—this helps create a proper crispy exterior. Additionally, avoid overcrowding the skillet, as it can drop the oil temperature and lead to frying in oil rather than crispy air.

Are Squash Puppies safe for people with gluten allergies?
Indeed! To make gluten-free Squash Puppies, simply substitute self-rising cornmeal and all-purpose flour with their gluten-free counterparts. Be sure to check the labels for cross-contamination, and use certified gluten-free products to ensure the safest option for anyone with gluten allergies.

How can I enhance the flavor of my Squash Puppies?
Very! You can customize the flavor by adding fresh or dried herbs like parsley or chives to the batter. If you enjoy bold flavors, consider including crumbled cheese or extra spices. Just adjust based on your taste preferences, and don’t hesitate to experiment—the more the merrier in the kitchen!

Squash Puppies

Crispy Squash Puppies That Redefine Comfort Food

These delicious Crispy Squash Puppies redefine comfort food with their unique twist on traditional hush puppies, packed with moisture and flavor.
Prep Time 15 minutes
Cook Time 20 minutes
Cooling Time 10 minutes
Total Time 45 minutes
Servings: 4 pups
Course: Other
Cuisine: American
Calories: 200

Ingredients
  

For the Batter
  • 1 cup Self-Rising Yellow Cornmeal Use gluten-free cornmeal for gluten-free version.
  • 1/2 cup All-Purpose Flour Can substitute with whole wheat or gluten-free flour.
  • 1 tablespoon Sugar Reduce or omit for a less sweet taste.
  • 1 teaspoon Salt Adjust based on personal preference.
  • 1/2 teaspoon Black Pepper Season to taste.
  • 1/4 teaspoon Cayenne Pepper Adjust based on spice tolerance.
  • 1/4 cup Minced Sweet Onion Use yellow or white onion for sweetness.
  • 1 chopped Jalapeno Omit for a milder flavor.
  • 1/2 cup Buttermilk Can substitute with regular milk or non-dairy option with vinegar.
  • 1 large Egg Omit or use a flax egg for vegan option.
  • Vegetable Oil for frying Can swap with canola oil or other high smoke point oil.
  • 1 medium Yellow Squash Steam and mash until smooth.

Equipment

  • Deep Skillet
  • mixing bowls
  • spatula
  • Kitchen Thermometer

Method
 

Cooking Instructions
  1. Wash and trim ends of yellow squash. Cut in half, slice into 2-inch pieces, and steam for 12-15 minutes until fork-tender. Mash until smooth.
  2. In a bowl, combine self-rising yellow cornmeal, all-purpose flour, sugar, salt, black pepper, and cayenne pepper. Whisk until evenly mixed.
  3. In a separate bowl, mix mashed squash with minced sweet onion, jalapeño, buttermilk, and beaten egg. Stir until well combined.
  4. Fold wet squash mixture into dry ingredients gently. Mix until just combined; avoid overmixing for fluffiness.
  5. Heat enough vegetable oil in a deep skillet to 350°F (175°C).
  6. Drop tablespoonfuls of the batter into the hot oil, frying for about 3 minutes on each side until golden brown and crispy.
  7. Remove from oil with a slotted spoon and drain on paper towels. Sprinkle with salt while hot and serve immediately.

Notes

Serve immediately for best texture. Fry in small batches to avoid overcrowding. Can be stored in an airtight container for up to 3 days.

Decadent Dark Chocolate Avocado Brownies You’ll Love

There’s something magical about transforming simple ingredients into a dessert that feels like a hug on a plate. Meet my Healthy Dark Chocolate Avocado Brownies! These brownies are the answer to your sweet tooth cravings without the guilt, made with creamy avocado that brings both healthy fats and a moist, fudgy texture. They’re naturally sweetened with maple syrup, making them not just a treat, but a nutritious indulgence your whole family can enjoy. Plus, they’re gluten-free if you swap in almond flour, and they can easily become vegan with a simple flax egg substitute. What’s better than a delicious dessert that you can whip up quickly and still feel good about? Curious how to charm your taste buds while keeping it healthy? Let’s dive into this delightful recipe!

Why Choose Dark Chocolate Avocado Brownies?

Guilt-Free Indulgence: These brownies deliver all the richness of your favorite dessert without the remorse.
Moist and Fudgy: The avocado ensures a delightful texture that melts in your mouth, rivaling traditional brownies.
Nutritious Ingredients: Made with wholesome items like whole wheat flour and natural sweeteners, they’re a treat you can feel great about.
Versatile Options: Easily switch to gluten-free with almond flour or vegan by substituting a flax egg.
Quick and Easy: Whip up a batch in no time, perfect for unexpected guests or a soothing dessert after a long day.
Serve them warm alongside some ice cream for a satisfying indulgence or enjoy as a wholesome snack—you’ll find yourself coming back for more!

Dark Chocolate Avocado Brownies Ingredients

For the Batter
Whole Wheat Flour – Provides structure and fiber; can be substituted with almond flour for a gluten-free version.
Cocoa Powder – Adds rich chocolate flavor; use unsweetened cocoa for the best results.
Baking Powder – Helps brownies rise; ensure it is fresh for effective leavening.
Kosher Salt – Balances sweetness; can be substituted with sea salt.
Egg – Acts as a binder for texture; for a vegan option, use 1 flax egg (1 tablespoon ground flaxseed mixed with 3 tablespoons water).
Avocado – Provides healthy fats and moisture; use one ripe avocado, peeled, pitted, and mashed for optimal creaminess.
Coconut Oil – Adds richness and moisture; can be replaced with melted vegan butter for a dairy-free option.
Vanilla Extract – Enhances flavor; using pure vanilla extract will give you a more fragrant result.
Maple Syrup – Natural sweetener that keeps brownies moist; substitute with honey or agave syrup if necessary.
Dark Chocolate Chips – For extra chocolatey richness; choose dairy-free chips if you want a vegan variation.

Step‑by‑Step Instructions for Dark Chocolate Avocado Brownies

Step 1: Preheat the Oven
Begin by preheating your oven to 350°F (175°C). While the oven warms up, lightly spray an 8×8 inch baking pan with non-stick spray to ensure the brownies release easily after baking. This crucial step will prepare the perfect base for your decadent Dark Chocolate Avocado Brownies.

Step 2: Combine Dry Ingredients
In a small mixing bowl, whisk together the whole wheat flour, cocoa powder, baking powder, and kosher salt. Ensure there are no lumps and that all ingredients are well blended, which helps the brownies rise beautifully during baking. Once combined, set this mixture aside while you prepare the wet ingredients.

Step 3: Mix Wet Ingredients
In a medium bowl, combine the egg (or flax egg for a vegan option), mashed avocado, melted coconut oil, vanilla extract, and maple syrup. Whisk everything together until the mixture is smooth and creamy, resembling a luscious batter. This step is key to incorporating healthy fats into your Dark Chocolate Avocado Brownies, keeping them moist and fudgy.

Step 4: Incorporate Dry into Wet
Gradually add the dry ingredient mixture into the wet ingredients, stirring gently until fully blended. Make sure to combine thoroughly without overmixing; the goal is a smooth batter that maintains the rich chocolate flavor without losing the creamy avocado essence.

Step 5: Fold in Dark Chocolate Chips
Once your batter is smooth, gently fold in the dark chocolate chips with a spatula. This gives the brownies that extra indulgent chocolatey flavor and texture. Pour the batter into the prepared baking pan, spreading it evenly to ensure uniform baking throughout your Dark Chocolate Avocado Brownies.

Step 6: Bake the Brownies
Place the pan in the preheated oven and bake for 20-25 minutes. Keep an eye on them as they bake; they’re ready when a toothpick inserted in the center comes out clean or with just a few moist crumbs. This is a key step in creating the decadent, moist texture that defines these brownies.

Step 7: Cool and Serve
After baking, remove the brownies from the oven and allow them to cool completely in the pan. This cooling period helps the brownies set properly. Once cool, cut them into squares and enjoy this guilt-free treat. Store any leftovers in an airtight container in the refrigerator, allowing you to savor the delicious Dark Chocolate Avocado Brownies for days!

Expert Tips for Dark Chocolate Avocado Brownies

  • Choose Ripe Avocado: Use a perfectly ripe avocado for the best texture; it should yield slightly when pressed. This creates a smooth batter that enhances the brownies’ richness.
  • Don’t Overmix: When combining wet and dry ingredients, mix just until incorporated. Overmixing can lead to denser brownies, losing that delicate moistness.
  • Check for Doneness Early: Oven temperatures can vary. Start checking your brownies a few minutes before the suggested time to avoid overbaking and ensure they stay fudgy.
  • Cool Completely: Allow your brownies to cool fully in the pan before cutting. This helps them set correctly, making it easier to achieve those perfect squares.
  • Experiment with Flavors: Feel free to add in spices like cinnamon or cayenne for an unexpected kick; it complements the chocolate beautifully while keeping the brownies delightful!

What to Serve with Healthy Dark Chocolate Avocado Brownies

Indulging in these decadent brownies opens the door to delightful meal inspirations that beautifully complement their rich flavor.

  • Vanilla Ice Cream: The creamy, cold vanilla ice cream provides a delightful contrast to the warm, fudgy brownies. It’s a classic pairing that enhances the chocolatey goodness.
  • Fresh Berries: Berries like raspberries or strawberries add a refreshing burst of flavor and lovely visual appeal, balancing the rich sweetness of the brownies.
  • Homemade Whipped Cream: Light and airy, whipped cream adds a luscious texture. A dollop on top brings an extra layer of indulgence to each bite.
  • Mint Tea: While enjoying these brownies, a warm cup of mint tea can help cleanse your palate, making the chocolate notes pop while providing a soothing finish.
  • Nuts and Dried Fruits: Create a small side dish of mixed nuts and dried fruits for a crunchy, sweet bite that contrasts the moist brownies, adding texture to your dessert plate.
  • Chai Latte: The spiced warmth of a chai latte perfectly complements the deep, rich flavor of chocolate. The aromatic spices provide a delightful sensory experience with each sip.
  • Coconut Milk Drizzle: A drizzle of coconut milk adds a tropical twist. Its creamy texture blends beautifully with the brownie, providing a unique and unexpected flavor profile.
  • Peanut Butter Swirl: If you’re feeling adventurous, a spoonful of creamy peanut butter on the side heightens the richness of the brownies and offers a saltiness that pairs beautifully with sweet chocolate.

Dark Chocolate Avocado Brownies Variations

Feel free to play around with these tasty twists that will make your Dark Chocolate Avocado Brownies uniquely yours!

  • Gluten-Free: Use almond flour instead of whole wheat flour for a delicate, gluten-free option. This swap retains moisture while adding a subtle nutty flavor.

  • Vegan Delight: Replace the egg with a flax egg (1 tablespoon ground flaxseed mixed with 3 tablespoons water) to make this treat plant-based. Your brownies will still be rich and fudgy!

  • Nutty Crunch: Stir in 1/2 cup of chopped nuts, such as walnuts or pecans, to add delightful texture and extra nutrition. The crunch pairs perfectly with the soft brownie base.

  • Spicy Twist: Mix in a pinch of cayenne or cinnamon to the batter for a warm, spicy kick that enhances the chocolate flavor. It’s an unexpected but delicious twist!

  • Minty Freshness: Add a few drops of peppermint extract to the wet ingredients for a refreshing, mint chocolate combination. This option is perfect for the holiday season!

  • Fruit Fusion: Incorporate 1/2 cup of mashed ripe bananas or pureed pumpkin for a fruity twist that pairs beautifully with chocolate. This enhances moisture and adds a subtle sweetness.

  • Decadent Swirls: Create a marbled effect by gently swirling in a layer of peanut butter or almond butter on top of the batter before baking. This adds a nutty richness that’s hard to resist.

  • Ultimate Chocolate Lovers: Boost the chocolate flavor by adding an additional 1/4 cup of dark chocolate chips or chunks to the batter. More chocolate means more fun!

For more sweet inspiration, you might enjoy trying out these Nutty Chocolate Date Cookies or indulge in some Coconut Chocolate Rolls. Let’s make these brownies your go-to recipe!

How to Store and Freeze Dark Chocolate Avocado Brownies

Fridge: Store leftover brownies in an airtight container in the refrigerator for up to one week, keeping them fresh and moist.

Freezer: For longer storage, freeze brownies by wrapping them in plastic wrap and placing them in an airtight container. They can last up to 3 months.

Reheating: To enjoy your brownies warm, reheat individual squares in the microwave for about 10-15 seconds or until warm to the touch. This will renew their fudgy texture.

Thawing: When ready to eat frozen brownies, transfer them to the fridge overnight to thaw, maintaining their delicious flavor and consistency.

Make Ahead Options

These Healthy Dark Chocolate Avocado Brownies are perfect for meal prep enthusiasts! You can prepare the brownie batter up to 24 hours in advance by mixing the dry ingredients and storing them in a sealed bag, while the wet ingredients can be mixed and kept covered in the refrigerator. For optimal quality, it’s best to bake the brownies fresh after mixing the wet and dry ingredients right before serving to ensure they remain moist and fudgy. If you need to save time during the week, you can pre-bake the brownies and refrigerate them for up to 3 days. When ready to enjoy, simply warm individual squares in the microwave for a delicious treat that feels like a fresh-baked dessert!

Dark Chocolate Avocado Brownies Recipe FAQs

What should I look for in choosing ripe avocados?
Absolutely! Choose an avocado that yields gently to gentle pressure—this indicates it’s ripe and creamy. Avoid any avocados with dark spots all over, as they can be overripe and may affect the texture of your brownies.

How should I store leftover brownies?
For optimal freshness, I recommend storing your brownies in an airtight container in the refrigerator, where they’ll last for up to 1 week. This keeps them deliciously moist and fudgy! If you haven’t enjoyed them all by then, freezing is a fantastic option.

Can I freeze Dark Chocolate Avocado Brownies? How do I do it?
Yes, you can freeze these brownies! Once cooled, wrap each brownie square tightly in plastic wrap and place them in an airtight container or a freezer-safe bag. They’ll maintain their delightful flavor for up to 3 months. To enjoy, simply transfer them to the fridge overnight to thaw, or microwave them briefly for that fresh-baked taste!

What if my brownies come out too dry?
Very often, the culprit is overbaking. To ensure your brownies remain succulent, start checking them a few minutes before the indicated baking time. A toothpick should come out with just a few moist crumbs, indicating they’re perfectly fudgy! If you do end up with dry brownies, try serving them warm with a scoop of ice cream or warm chocolate sauce for added moisture.

Are these brownies suitable for those with dietary restrictions?
Absolutely! You can easily make them vegan by swapping the egg for a flax egg—simply mix 1 tablespoon of ground flaxseed with 3 tablespoons of water and let it sit for a few minutes until it thickens. For gluten-free needs, substitute whole wheat flour with almond flour. Feel free to experiment and adjust the recipe according to your dietary preferences!

How can I make these brownies even more flavorful?
I often love adding a pinch of espresso powder to the batter, which intensifies the chocolate flavor beautifully! You can also mix in nuts like walnuts or pecans for a delightful crunch or sprinkle sea salt on top for a sweet-salty contrast that elevates these brownies to new heights.

Dark Chocolate Avocado Brownies

Decadent Dark Chocolate Avocado Brownies You’ll Love

Enjoy guilt-free indulgence with these Dark Chocolate Avocado Brownies, a perfect healthy treat for any occasion.
Prep Time 15 minutes
Cook Time 25 minutes
Cooling Time 10 minutes
Total Time 50 minutes
Servings: 9 slices
Course: Dessert
Cuisine: American
Calories: 150

Ingredients
  

For the Batter
  • 1 cup Whole Wheat Flour can be substituted with almond flour for gluten-free
  • 1/2 cup Cocoa Powder use unsweetened for the best results
  • 1 teaspoon Baking Powder ensure it is fresh
  • 1/2 teaspoon Kosher Salt can be substituted with sea salt
  • 1 large Egg or 1 flax egg for a vegan option
  • 1 medium Avocado ripe, peeled, pitted, and mashed
  • 1/4 cup Coconut Oil can be replaced with melted vegan butter
  • 1 teaspoon Vanilla Extract pure vanilla extract recommended
  • 1/2 cup Maple Syrup substitute with honey or agave if necessary
  • 1 cup Dark Chocolate Chips use dairy-free for vegan variation

Equipment

  • 8x8 inch baking pan
  • mixing bowls
  • whisk
  • spatula

Method
 

Step-by-Step Instructions
  1. Preheat your oven to 350°F (175°C) and prepare an 8x8 inch baking pan with non-stick spray.
  2. In a small mixing bowl, whisk together whole wheat flour, cocoa powder, baking powder, and kosher salt.
  3. In a medium bowl, combine the egg (or flax egg), mashed avocado, melted coconut oil, vanilla extract, and maple syrup. Whisk until smooth.
  4. Gradually add the dry mixture to the wet ingredients, stirring gently until fully blended.
  5. Fold in the dark chocolate chips with a spatula, then pour the batter into the prepared baking pan.
  6. Bake for 20-25 minutes, checking for doneness when a toothpick comes out clean or with a few moist crumbs.
  7. Remove from the oven and let cool completely in the pan before cutting into squares.

Notes

These brownies are rich and fudgy, perfect served warm or as a snack. Store leftovers in an airtight container.

Crispy Popcorn Chicken: Quick, Easy, Deliciously Addictive

The first crackle of oil as it heats fills my kitchen with an irresistible promise: crispy, juicy popcorn chicken is on the way! This quick and easy recipe transforms simple chicken into delightful, bite-sized morsels that are perfect for sharing—or (let’s be honest) hoarding all to yourself. Not only can you whip up this savory appetizer in just 25 minutes, but it’s also a fantastic option for gluten-free diets with a few simple swaps. Picture game nights or cozy movie marathons graced by this homemade favorite, and watch as everyone goes back for seconds. So, are you ready to create your new go-to snack that will leave even the pickiest eaters begging for more?

Why is this Popcorn Chicken a Must-Try?

Quick and Easy: In just 25 minutes, you can indulge in homemade popcorn chicken that’s ready for any occasion—dinner parties, movie nights, or even a late-night snack.

Customizable Flavor: With endless seasoning options, each batch can be tailored to your spice level, making it a crowd favorite. Consider pairing it with homemade dipping sauces or even try unique combinations inspired by Honey Chili Chicken.

Gluten-Free Friendly: Easily swap out ingredients to accommodate dietary preferences without sacrificing flavor—a win for everyone!

Crispy Texture: Each bite yields a crunchy outside and juicy interior, perfect for satisfying those crunchy cravings.

Family Appeal: This popcorn chicken is a fantastic dish that both kids and adults will adore, making it a great addition to any meal or gathering. You’ll never want fast food again once you taste this!

Popcorn Chicken Ingredients

For the Chicken
1 ¼ pounds chicken breast (boneless, skinless) – This is the main protein; for added juiciness, try substituting with chicken thighs or tofu/cauliflower for a vegan option.
¼ cup milk – Adds moisture to the marination; buttermilk or coconut milk works well as dairy-free substitutes.
¾ cup sour cream – Tenderizes the chicken and adds creaminess; yogurt can serve as a great alternative.

For the Breading
1 cup all-purpose flour – Coats the chicken for crispiness; can be replaced with gluten-free flour for a gluten-free option.
¾ cup panko – Gives a light, crunchy texture; use gluten-free breadcrumbs if desired.
1 ½ teaspoons salt – Enhances flavor during breading; adjust according to your taste preference.
¾ teaspoon onion powder – Provides savory depth to the coating.
1 teaspoon black pepper – Adds heat and a flourish of flavor.
¾ teaspoon garlic powder – Elevates the overall savory profile.
1 pinch cayenne pepper – Infuses a hint of spice; feel free to adjust based on heat preference.

For Frying
3 cups vegetable oil – Necessary for deep frying; canola or peanut oil adds delicious flavor with a high smoke point.

This deliciously addictive popcorn chicken is not only an easy appetizer but also a scrumptious option for gluten-free diets with simple swaps!

Step‑by‑Step Instructions for Popcorn Chicken

Step 1: Prepare Chicken
Begin by using a meat mallet to pound the boneless, skinless chicken breasts into even, thin pieces, ensuring they cook uniformly. Next, chop the pounded chicken into bite-sized cubes and set them aside on a clean cutting board. This preparation will help to create the perfect texture for your popcorn chicken.

Step 2: Marinate
In a mixing bowl, whisk together the milk and sour cream until smooth. Once combined, add the chicken cubes into the bowl, then sprinkle in the salt, ensuring each piece is well-coated. Cover the bowl with plastic wrap and let the chicken marinate for at least one hour in the refrigerator, or up to overnight for deeper flavor infusion.

Step 3: Mix Breading
While your chicken marinates, prepare the breading. In a separate large bowl, combine the all-purpose flour, panko breadcrumbs, salt, black pepper, onion powder, garlic powder, and cayenne pepper. Whisk the mixture until all ingredients are evenly distributed. This flavorful breading will provide your popcorn chicken with delicious crunch and texture.

Step 4: Coat Chicken
After marination, take each piece of chicken and dip it into the breading mixture, ensuring an even and thorough coating on all sides. Press the breadcrumbs onto the chicken gently to adhere well. Arrange the coated pieces on a plate, ready for frying, making sure they are not touching to avoid clumping.

Step 5: Heat Oil
In a heavy-bottomed pot, pour the vegetable oil and heat it over medium-high heat until it reaches a bubbling temperature (around 350°F). Use a thermometer to ensure precise heat. Once hot, carefully place a few breadcrumbs in the oil; if they sizzle and float, the oil is ready for frying your delicious popcorn chicken.

Step 6: Fry Chicken
Working in small batches, carefully add the coated chicken pieces to the hot oil, making sure not to overcrowd the pot. Fry for about 5-7 minutes or until they turn a beautiful golden brown and are cooked through. Use a slotted spoon to gently stir the chicken occasionally for even frying and to achieve that signature crispiness.

Step 7: Drain
Once the popcorn chicken is golden and crispy, use a slotted spoon to remove the pieces from the hot oil. Place them on a wire rack set over a baking sheet or on paper towels to drain excess oil. This step is crucial to maintain the crunchiness of your homemade popcorn chicken while removing greasiness.

Step 8: Serve
After the chicken has drained and cooled slightly, it’s time to serve your delicious popcorn chicken! Pair it with your favorite dipping sauces like honey mustard or BBQ for a delightful snack experience. Gather your friends or family and watch them savor every crunchy bite of your homemade creation.

What to Serve with Quick and Easy Popcorn Chicken?

Delight your senses and elevate your meal with perfect pairings that enhance the savory vibe of your popcorn chicken!

  • Creamy Mashed Potatoes: Fluffy, buttery potatoes add a comforting richness, making each bite of chicken even more indulgent. The smooth texture contrasts beautifully with the crunchy chicken.

  • Zesty Coleslaw: A refreshing, tangy slaw cuts through the richness of fried chicken and offers a satisfying crunch with every bite. Pair it with a light vinaigrette for a bright, bold flavor.

  • Crispy Sweet Potato Fries: The natural sweetness of roasted sweet potato fries complements the savory, spicy notes of the chicken. Their crispiness makes for a satisfying crunchy duo.

  • Garlic Bread: Toasted garlic bread provides a savory, buttery flavor that pairs beautifully with popcorn chicken, adding an extra layer of deliciousness for a hearty meal.

  • Homemade Dipping Sauces: From tangy honey mustard to spicy chipotle aioli, dipping sauces can elevate your popcorn chicken experience to gourmet levels of flavor. Experiment with different sauces to keep things exciting!

  • Seasoned Veggie Platter: Lightly steamed or roasted vegetables bring color, flavor, and balance to your plate. Try colorful bell peppers, carrots, and broccoli as a vibrant, healthy side.

  • Chilled Beer or Lemonade: A cold, refreshing beverage helps wash down this crispy treat perfectly. Pair with a light, citrusy beer or homemade lemonade for a refreshing contrast.

  • Chocolate Chip Cookies: For a sweet finish, serve warm chocolate chip cookies as an irresistible dessert. The warm, gooey chocolate will delight everyone after enjoying savory popcorn chicken.

Make Ahead Options

These popcorn chicken bites are a lifesaver for busy weeknights! You can marinate the chicken up to 24 hours in advance, allowing the flavors to seep in deeply for maximum deliciousness. Additionally, prepare the breadcrumb mixture a day ahead and store it in an airtight container to keep it fresh. When you’re ready to serve, simply coat the marinated chicken in the breading right before frying for that fresh, crispy texture everyone loves. For the best results, reheat any leftovers in the oven (at 375°F for about 10-15 minutes) to maintain their crunch. Enjoy the hassle-free cooking experience, knowing you’ve got those tasty bites ready to go!

Popcorn Chicken Variations & Substitutions

Unleash your culinary creativity with delightful twists that let you tailor this popcorn chicken to your preferences and dietary needs.

  • Dairy-Free: Swap out milk and sour cream with coconut milk and a dairy-free yogurt for a creamy marination without dairy. You’ll still get that yummy flavor, just in a new form!
  • Gluten-Free: Replace all-purpose flour with a gluten-free flour blend and use gluten-free panko breadcrumbs to ensure everyone can enjoy this treat. Your gluten-free friends will be cheering!
  • Hot & Spicy: Add more cayenne or toss the finished chicken with buffalo sauce for a fiery kick. Pair it with a cooling ranch dip, and you’ve got an exciting contrast!
  • Baked Option: For a healthier approach, bake at 400°F for 15-20 minutes, making sure to flip halfway through. This version still delivers crunch without the extra oil, and it feels light yet satisfying.
  • Flavor Boost: Experiment with different seasoning blends! Italian herbs or taco seasoning can add a unique twist to the breading, making it perfect for themed movie nights or festive gatherings.
  • Vegetarian Delight: Substitute chicken with cauliflower florets or chickpea nuggets for a satisfying veggie version. These options are just as crunchy and flavorful, keeping the essence of popcorn chicken intact!
  • Perfect Pairings: Serve with assorted dipping sauces; homemade honey mustard or Honey Chili Chicken sauce can elevate the experience even further!
  • Smoky Flavor: Introduce smoked paprika to the breading mix for a deeper, richer flavor that pairs beautifully with any meal or snack time.

With these variations in mind, it’s easy to enjoy popcorn chicken your way, ensuring every bite is nothing short of spectacular!

How to Store and Freeze Popcorn Chicken

Fridge: Store leftover popcorn chicken in an airtight container for up to 3 days. This keeps it fresh for snacking or quick meals.

Freezer: For longer storage, freeze the cooled popcorn chicken by spreading it on a baking sheet. Once solid, transfer to a freezer bag for up to 3 months.

Reheating: To restore crispiness, reheat in the oven at 375°F for about 10-15 minutes or use an air fryer at 350°F for 5-7 minutes. Enjoy your delicious popcorn chicken just like fresh!

Expert Tips for Popcorn Chicken

  • Uniform Sizes: Ensure all chicken pieces are cut to even sizes to promote uniform cooking. This helps achieve that perfect crunchy exterior.

  • Avoid Overcrowding: Fry chicken in small batches to prevent overcrowding in the pot, which can result in soggy popcorn chicken rather than crispy bites.

  • Temperature Check: Use a thermometer to ensure your oil is at the right temperature (around 350°F). This will ensure proper frying while preventing greasy chicken.

  • Marination Time: For the best flavor, marinate the chicken for at least one hour, but overnight provides an even more savory infusion.

  • Experiment with Flavors: Don’t hesitate to customize your breading with different spices or herbs. This allows you to create your unique twist on popcorn chicken everyone will love!

Popcorn Chicken Recipe FAQs

How do I choose the right chicken for popcorn chicken?
Absolutely! For the best results, opt for boneless, skinless chicken breasts for a lean option. If you prefer more juiciness, chicken thighs work beautifully. For a vegan alternative, consider using cubed tofu or cauliflower florets, which can also absorb flavors well.

What is the best way to store leftover popcorn chicken?
Very simple! Store your leftover popcorn chicken in an airtight container in the fridge for up to 3 days. This keeps it fresh for snacking or quick meals. Make sure to let the chicken cool to room temperature before sealing it up to retain its texture.

Can I freeze popcorn chicken, and if so, how?
Sure thing! To freeze your popcorn chicken, first allow it to cool completely. Then, spread the pieces in a single layer on a baking sheet to freeze individually. Once they are firm, transfer them to a freezer bag for up to 3 months. This method prevents clumping and ensures you can grab just the right amount later!

What if my popcorn chicken turns out soggy?
If your popcorn chicken ends up soggy, likely it was overcrowded during frying or the oil temperature was too low. Make sure to fry in small batches and check the oil’s heat with a thermometer, aiming for around 350°F. For an extra crunch, place the cooked chicken on a wire rack to drain excess oil.

Are there any dietary considerations I should keep in mind?
Absolutely! If you have dietary restrictions, you can easily make this popcorn chicken gluten-free. Simply substitute regular flour with a gluten-free flour blend and choose gluten-free panko breadcrumbs. Always check labels for allergens if serving to guests. If preparing for pets, avoid giving them any seasoned chicken, as many spices can be harmful.

How can I ensure my popcorn chicken is extra crispy?
For extra crispiness, make sure the chicken is coated thoroughly in the breading mixture. Press the breadcrumbs gently to adhere and ensure even coverage. Another tip is to let the coated chicken rest for about 10 minutes before frying; this helps the breading stick better during cooking. Enjoy this delightful crunch!

Popcorn Chicken

Crispy Popcorn Chicken: Quick, Easy, Deliciously Addictive

This popcorn chicken recipe is quick, easy, and deliciously addictive, perfect for sharing or hoarding!
Prep Time 25 minutes
Cook Time 20 minutes
Total Time 45 minutes
Servings: 4 servings
Course: Chicken
Cuisine: American
Calories: 350

Ingredients
  

For the Chicken
  • 1 ¼ pounds chicken breast (boneless, skinless) For added juiciness, substitute with chicken thighs or tofu/cauliflower for a vegan option.
  • ¼ cup milk Buttermilk or coconut milk works well as dairy-free substitutes.
  • ¾ cup sour cream Yogurt can serve as a great alternative.
For the Breading
  • 1 cup all-purpose flour Can be replaced with gluten-free flour for a gluten-free option.
  • ¾ cup panko Use gluten-free breadcrumbs if desired.
  • 1 ½ teaspoons salt Adjust according to your taste preference.
  • ¾ teaspoon onion powder
  • 1 teaspoon black pepper
  • ¾ teaspoon garlic powder
  • 1 pinch cayenne pepper Adjust based on heat preference.
For Frying
  • 3 cups vegetable oil Canola or peanut oil adds delicious flavor with a high smoke point.

Equipment

  • Heavy-bottomed pot
  • mixing bowl
  • Meat mallet
  • slotted spoon
  • Wire rack

Method
 

Step-by-Step Instructions for Popcorn Chicken
  1. Begin by using a meat mallet to pound the boneless, skinless chicken breasts into even, thin pieces, ensuring they cook uniformly. Next, chop the pounded chicken into bite-sized cubes and set them aside on a clean cutting board.
  2. In a mixing bowl, whisk together the milk and sour cream until smooth. Once combined, add the chicken cubes into the bowl, then sprinkle in the salt, ensuring each piece is well-coated. Cover the bowl with plastic wrap and let the chicken marinate for at least one hour in the refrigerator, or up to overnight for deeper flavor infusion.
  3. While your chicken marinates, prepare the breading. In a separate large bowl, combine the all-purpose flour, panko breadcrumbs, salt, black pepper, onion powder, garlic powder, and cayenne pepper. Whisk the mixture until all ingredients are evenly distributed.
  4. After marination, take each piece of chicken and dip it into the breading mixture, ensuring an even and thorough coating on all sides. Press the breadcrumbs onto the chicken gently to adhere well.
  5. In a heavy-bottomed pot, pour the vegetable oil and heat it over medium-high heat until it reaches a bubbling temperature (around 350°F). Use a thermometer to ensure precise heat.
  6. Working in small batches, carefully add the coated chicken pieces to the hot oil, frying for about 5-7 minutes or until they turn a beautiful golden brown and are cooked through. Use a slotted spoon to gently stir the chicken occasionally for even frying.
  7. Once the popcorn chicken is golden and crispy, use a slotted spoon to remove the pieces from the hot oil. Place them on a wire rack set over a baking sheet or on paper towels to drain excess oil.
  8. After the chicken has drained and cooled slightly, serve your delicious popcorn chicken! Pair it with your favorite dipping sauces like honey mustard or BBQ.

Notes

Ensure all chicken pieces are cut to even sizes for uniform cooking. Fry in small batches to maintain crispiness. Use a thermometer for the proper oil temperature around 350°F for frying and marinate for the best flavor.

Oreo Fluff: A Decadent No-Bake Dessert for Every Occasion

Is there anything more nostalgic than the combination of Oreos and whipped cream? As summer gatherings beckon, I find myself craving the comforting sweetness of a light and airy dessert. Enter Oreo Fluff—the ultimate no-bake treat that promises to impress guests without the fuss of baking. In just 15 minutes, this easy dessert mixes rich cream cheese, crunchy Oreo cookies, and fluffy mini marshmallows for a refreshing delight that’s perfect for warm-weather celebrations. It’s not just a crowd-pleaser; it’s also freezer-friendly! Imagine having a delicious dessert ready to go at a moment’s notice. Are you ready to whip up this irresistible summer indulgence that will keep everyone coming back for seconds?

Why is Oreo Fluff a Must-Try?

No-Bake Convenience: This Oreo Fluff requires zero baking skills and is ready in just 15 minutes, making it an effortless go-to for last-minute gatherings.

Irresistible Creaminess: With a base of cream cheese and Cool Whip, each bite melts in your mouth, delivering ultimate indulgence without weighing you down.

Crowd Favorite: It’s perfect for summer parties, potlucks, or leisurely family dinners—everyone will be reaching for seconds!

Versatile Ingredients: You can easily customize it by swapping Oreos for your favorite cookies, or using homemade whipped cream instead of Cool Whip.

Make-Ahead Magic: Prepare it a day in advance to enhance the flavors, ensuring you spend more time enjoying your company and less time in the kitchen.

Don’t forget to try pairing this delight with a refreshing fruit platter for an extra zing, similar to serving it with Mini Fluffy Pancakes for a fun twist!

Oreo Fluff Ingredients

For the Base

  • Cream Cheese – Provides a creamy base and richness; use light cream cheese for a lower-fat option.
  • Instant Vanilla Pudding Mix – Thickens the fluff and adds vanilla flavor; consider using vanilla bean paste for a gourmet twist.
  • Granulated Sugar – Sweetens the dish; you can reduce the amount based on your taste preference.
  • Vanilla Extract – Enhances the overall flavor; opt for pure vanilla extract for the best results.
  • Milk – Helps to blend the ingredients smoothly; any type of milk (dairy or non-dairy) can be substituted.

For the Lightness

  • Cool Whip – Adds lightness and airiness to the dessert; substitute homemade whipped cream if desired.

For the Crunch

  • Oreo Cookies – Provide chocolate flavor and a satisfying crunch; gluten-free Oreos can be used for a gluten-free version.
  • Mini Marshmallows – Add texture and chewiness to the fluff; regular marshmallows can be chopped if necessary.

Optional Garnishes

  • Mini Marshmallows & Crumbled Oreos – These enhance presentation and texture, making your Oreo Fluff even more inviting!

Now you have all the ingredients ready for this delightful treat! Get ready to enjoy making a delicious dessert that’s sure to become a favorite among family and friends.

Step‑by‑Step Instructions for Oreo Fluff

Step 1: Mix the Creamy Base
In a large mixing bowl, combine 8 ounces of softened cream cheese, 1 package of instant vanilla pudding mix, ¼ cup of granulated sugar, 1 teaspoon of vanilla extract, and 1 cup of milk. Use an electric mixer on medium speed for about 2-3 minutes, until the mixture is smooth and creamy, resembling a thick batter.

Step 2: Fold in the Cool Whip
Once your base for the Oreo Fluff is smooth, gently fold in 8 ounces of Cool Whip using a rubber spatula. Incorporate the whipped topping carefully for about 1-2 minutes until fully combined, aiming to maintain the airiness that gives this dessert its delightful texture.

Step 3: Crumble the Oreos
Take approximately 10 Oreo cookies and place them in a Ziploc bag. Using a rolling pin, crush the Oreos until they are finely crumbled, with a few larger pieces remaining for texture. This step will provide those delightful cookie bits throughout your Oreo Fluff.

Step 4: Combine with Crumbled Oreos
Stir the crumbled Oreos into the creamy mixture from the previous steps. Use a spatula to fold the Oreos in, ensuring an even distribution throughout the mix. The addition of these cookies will enhance the Oreo Fluff’s rich, chocolatey flavor.

Step 5: Add the Marshmallows
Next, gently fold in 1 cup of mini marshmallows into the Oreo Fluff mixture. Be careful not to overmix; just enough to incorporate the marshmallows will maintain the fluffiness. These mini marshmallows will add a delightful chewiness to each bite.

Step 6: Chill for Flavor
Cover the mixing bowl with plastic wrap and refrigerate the Oreo Fluff for at least 1 hour. This chilling time allows the flavors to meld and the mixture to thicken, creating the perfect creamy texture that will keep everyone coming back for more.

Step 7: Serve and Garnish
After chilling, scoop your Oreo Fluff into a serving bowl. For an extra touch, garnish the top with additional mini marshmallows and crumbled Oreos for visual appeal and added texture. This presentation will make your delightful dessert even more inviting!

Make Ahead Options

These delicious Oreo Fluff can easily be prepared ahead of time, making them a lifesaver for busy weeknights or gatherings! You can mix all the main ingredients and refrigerate the dessert up to 24 hours in advance, which allows the flavors to deepen beautifully. To ensure the fluff maintains its creamy texture, cover the bowl tightly with plastic wrap to prevent any air exposure. When you’re ready to serve, simply garnish with extra mini marshmallows and crumbled Oreos for that inviting finish. This way, you’ll have a delightful dessert ready to impress, leaving you more time to enjoy the celebration!

Expert Tips for Oreo Fluff

  • Perfectly Softened Cream Cheese: Make sure your cream cheese is at room temperature to blend effortlessly into the mix. Cold cream cheese can lead to lumps in your Oreo Fluff.

  • Gentle Folding Technique: When incorporating the Cool Whip, use a light hand to preserve its airy texture. Overmixing can result in a dense dessert rather than the fluffy delight you desire.

  • Finely Crumble Oreos: Ensure your Oreo cookies are crumbled into fine pieces for even distribution. Large chunks can disrupt the creamy texture and prevent a cohesive mix.

  • Chill Time Matters: Don’t rush the chilling step! Allowing the Oreo Fluff to rest for at least one hour enhances the flavors and helps set the dessert for a perfect spoonful.

  • Customize with Ease: Feel free to swap in your favorite cookies or even chocolate pudding to make a unique version of Oreo Fluff that suits your taste.

Storage Tips for Oreo Fluff

Fridge: Store leftover Oreo Fluff in an airtight container in the refrigerator for up to 3 days to maintain freshness and texture.

Make-Ahead: This dessert can be prepared a day in advance, allowing the flavors to meld beautifully in the fridge before serving.

Freezer: You can freeze Oreo Fluff for up to 2 months; just ensure it’s in a tightly sealed container. Thaw it overnight in the fridge before enjoying.

Reheating: There’s no need to reheat this dessert. Simply serve it chilled straight from the fridge or after thawing from the freezer for the best taste!

Oreo Fluff Variations & Substitutions

Customize your Oreo Fluff with delightful twists and turns for a truly unique dessert experience!

  • Different Cookies: Swap out classic Oreos for golden Oreos or double-stuffed versions to change the flavor profile completely. The texture still remains creamy and indulgent, with each bite bringing something fresh.

  • Chocolate Lovers’ Delight: For a chocolate version, simply mix in cocoa powder or substitute chocolate pudding for the vanilla pudding. The result? A deep, rich chocolate experience that will leave your guests in awe.

  • Nuts for Crunch: Add crushed nuts, like almonds or walnuts, for an elevated crunch. This adds a toasty flavor that beautifully complements the creaminess of the fluff. You might even enjoy that nutty twist paired with a fruit platter!

  • Fruit Infusion: Mix in ripe berries or sliced bananas for a fruity touch. Not only does it add a pop of color, but the freshness blends seamlessly with the creamy texture of your Oreo Fluff.

  • Mini Chocolate Chips: Incorporate mini chocolate chips for extra indulgence. These little bites of chocolate will add richness and a delightful surprise to every spoonful.

  • Almond or Peppermint Extract: Experiment by adding a splash of almond or peppermint extract instead of vanilla for a flavor boost. It’s a simple twist that can evoke entirely different dessert vibes.

  • Vegan Version: Use vegan cream cheese and a dairy-free whipped cream alternative to create a vegan Oreo Fluff. This way, your delightful dessert caters to everyone!

  • Spicy Kick: For an intriguing heat twist, consider folding in a tiny pinch of chili powder or cayenne pepper. The unexpected warmth pairs surprisingly well with the sweetness and makes for a fun conversation starter!

Feel free to explore these options, and consider pairing this Oreo Fluff with a side of Mini Fluffy Pancakes for a fun brunch treat, or enjoy it alongside a slice of Fluffy Souffle Pancakes for an impressive dessert spread. The possibilities are endless—let your creativity shine!

What to Serve with Oreo Fluff

Perfectly complementing your creamy delight, these suggestions will elevate your dessert experience and create a balanced meal.

  • Fresh Berries: The tartness of strawberries, blueberries, or raspberries adds a refreshing contrast that cuts through the sweetness of Oreo Fluff.

  • Chocolate Chip Cookies: Why not double the indulgence? Gooey chocolate chips alongside the light fluff create a heavenly combination that all cookie lovers will adore.

  • Vanilla Ice Cream: A scoop of vanilla ice cream offers a creamy, cool counterpart, enhancing the overall dessert experience with rich vanilla notes.

  • Graham Cracker Crust: Create a layered dessert by serving Oreo Fluff in a crisp graham cracker crust, adding a crunchy texture that perfectly offsets the creamy ingredients.

  • Nutty Candied Pecans: These bring a delightful crunch and a touch of sweetness, making your dessert not just tasty but also visually appealing.

  • Iced Coffee: An iced coffee pairs wonderfully with the rich flavors of your Oreo Fluff, offering a refreshing beverage choice that balances sweetness.

  • Lemon Sorbet: For a lighter touch, lemon sorbet serves as a palate cleanser that brightens the meal and offers an zesty freshness with every spoonful.

Oreo Fluff Recipe FAQs

What types of Oreos should I use for my Oreo Fluff?
Absolutely! You can use regular Oreos for that classic flavor, but feel free to explore variations like golden Oreos for a different twist. If you prefer to go gluten-free, gluten-free Oreos work wonderfully too!

How should I store leftover Oreo Fluff?
Keep any leftover Oreo Fluff covered in an airtight container in the refrigerator. It will stay fresh for up to 3 days. Just make sure to check for any dark spots, as they can indicate spoilage.

Can I freeze Oreo Fluff for later enjoyment?
Yes, you can freeze your Oreo Fluff! To do this, scoop the fluff into a tightly sealed container and freeze for up to 2 months. When you’re ready to enjoy it, transfer it to the fridge to thaw overnight. This way, you’ll have a delightful dessert ready to serve at a moment’s notice.

What if my mixture is too thick?
If you find that your Oreo Fluff is thicker than expected, don’t fret! Gradually mix in a bit more milk, a tablespoon at a time. This can help achieve that perfect creamy, fluffy texture you’re aiming for. Just be sure to fold it gently to maintain the airiness.

Can dogs eat Oreo Fluff?
Unfortunately, the ingredients in Oreo Fluff—including chocolate and sugar—are not safe for dogs. Always keep this tempting dessert out of their reach. If you want to treat your furry friend, consider making a special dog-friendly treat instead!

How can I customize Oreo Fluff for dietary preferences?
There are many options for customization! For a lighter version, you might use light cream cheese and sugar substitutes. Additionally, you can swap out the Cool Whip for homemade whipped cream made from heavy cream and sweetener of your choice. Get creative with this recipe to suit your taste and dietary needs!

Oreo Fluff

Oreo Fluff: A Decadent No-Bake Dessert for Every Occasion

Oreo Fluff is a nostalgic no-bake dessert that combines Oreos and whipped cream for a light and airy treat.
Prep Time 15 minutes
Chill Time 1 hour
Total Time 1 hour 15 minutes
Servings: 8 servings
Course: Dessert
Cuisine: American
Calories: 240

Ingredients
  

For the Base
  • 8 ounces Cream Cheese softened, can use light cream cheese
  • 1 package Instant Vanilla Pudding Mix or vanilla bean paste for a gourmet twist
  • 1/4 cup Granulated Sugar adjust based on taste preference
  • 1 teaspoon Vanilla Extract opt for pure vanilla extract
  • 1 cup Milk any type (dairy or non-dairy) can be used
For the Lightness
  • 8 ounces Cool Whip or homemade whipped cream if desired
For the Crunch
  • 10 cookies Oreo Cookies gluten-free Oreos are an option
  • 1 cup Mini Marshmallows regular marshmallows can be chopped if needed
Optional Garnishes
  • Mini Marshmallows for garnish
  • Crumpled Oreos for garnish

Equipment

  • Large mixing bowl
  • electric mixer
  • rubber spatula
  • Ziploc bag
  • Rolling Pin

Method
 

Step-by-Step Instructions for Oreo Fluff
  1. In a large mixing bowl, combine cream cheese, pudding mix, sugar, vanilla extract, and milk. Use an electric mixer on medium speed for about 2-3 minutes until smooth and creamy.
  2. Gently fold in the Cool Whip using a rubber spatula for about 1-2 minutes until fully combined.
  3. Crumble the Oreo cookies in a Ziploc bag using a rolling pin until finely crumbled, leaving a few larger pieces.
  4. Stir the crumbled Oreos into the creamy mixture, folding gently to combine evenly.
  5. Fold in the mini marshmallows into the mixture, being careful not to overmix.
  6. Cover the bowl with plastic wrap and refrigerate for at least 1 hour to allow flavors to meld.
  7. Scoop the Oreo Fluff into a serving bowl and garnish with mini marshmallows and crumbled Oreos.

Notes

Make sure to use softened cream cheese and handle the Cool Whip gently to ensure the dessert's airy texture. Customize with your favorite cookies if desired.

Savory Honey Mustard Salmon with Crunchy Panko Topping

As I stood in my kitchen, the sweet and tangy aroma of honey mustard wafted through the air, instantly lifting my spirits after a long day. This is the magic of Honey Mustard Salmon with Panko Crust—an easy weeknight dinner that transforms simple ingredients into something extraordinary. With each bite, the juicy salmon fillets are enveloped in a crunchy panko topping, delivering a delightful contrast that’s sure to impress. This 30-minute recipe is perfect for those busy evenings when you crave something homemade yet don’t want to spend hours in the kitchen. Plus, using store-bought honey mustard makes it even more accessible! Are you ready to indulge in a healthy, flavor-packed meal that your whole family will love? Let’s dive into this delicious creation together!

Why is Honey Mustard Salmon Irresistible?

Fast, Delicious Dinner: Perfect for busy weekdays, this recipe takes just 30 minutes from start to finish!
Healthy and Nutritious: Packed with protein, this salmon dish offers a wholesome meal that’s lower in calories.
Flavor Explosion: The combination of sweet honey and tangy mustard creates a mouthwatering glaze that elevates the fish.
Crunchy Texture: The panko topping adds an irresistible crunch, contrasting beautifully with juicy salmon.
Versatile Serving Options: Pair this dish with crispy air fryer potatoes or roasted veggies for a complete meal. Don’t forget to check out my Honey Garlic Slow recipe for a different take on flavorful weeknight dinners!

Honey Mustard Salmon Ingredients

For the Salmon

  • Salmon Fillets – A fresh source of protein that ensures a tender and flavorful meal.
  • Honey Mustard Sauce – This sweet and tangy base is key to enhancing the salmon’s flavor; you can easily use store-bought for convenience.

For the Topping

  • Panko Breadcrumbs – These give the salmon its crunchy topping; opt for plain or seasoned based on your preference.
  • Butter – Adds richness and helps the panko crisp up beautifully in the oven.
  • Fresh Parsley – A sprinkle of freshness that enhances the dish; feel free to substitute with dill for a different flavor.

With these simple yet impactful ingredients, your Honey Mustard Salmon will be a delight to the senses!

Step‑by‑Step Instructions for Honey Mustard Salmon

Step 1: Preheat the Oven
Begin by preheating your oven to 400°F (200°C). While the oven is heating, line a rimmed baking sheet with cooking spray or aluminum foil for easy cleanup later. This initial step sets the stage for perfectly baked Honey Mustard Salmon with Panko Crust.

Step 2: Make Panko Topping
In a medium-sized mixing bowl, combine 2 tablespoons of melted butter, ¼ cup of panko breadcrumbs, and 1 tablespoon of chopped fresh parsley. Stir well until the panko is evenly coated with butter and the parsley is well distributed. This crunchy topping will create a delightful texture on your salmon.

Step 3: Prep Salmon
Take your fresh salmon fillets and place them skin-side down on the prepared baking sheet. Using a brush or a spoon, generously coat each fillet with ⅓ cup of honey mustard sauce. Make sure the salmon is thoroughly covered, as this glaze will provide a luscious flavor that complements the crust.

Step 4: Coat Fillets
Now it’s time to apply the panko mixture! Press the prepared panko topping firmly onto each honey mustard-coated fillet, ensuring it adheres well. This topping will not only add crunch but also enhance the overall flavor of the Honey Mustard Salmon.

Step 5: Bake Salmon
Place the baking sheet with the coated salmon fillets into the preheated oven. Bake for 12 to 16 minutes, or until the salmon easily flakes with a fork and reaches an internal temperature of 145°F (63°C). You’ll know it’s done when the panko crust turns golden brown and the fish looks moist and flaky.

Step 6: Rest & Serve
Once the salmon is baked to perfection, remove it from the oven and let it rest for about 5 minutes. This brief resting period allows the juices to redistribute throughout the fish, ensuring each bite is succulent. After resting, serve your delicious Honey Mustard Salmon with Panko Crust alongside your favorite sides.

How to Store and Freeze Honey Mustard Salmon

Fridge: Store leftover Honey Mustard Salmon in an airtight container for up to 3 days to maintain its freshness and flavor.

Freezer: For longer storage, freeze the salmon in a tightly sealed, freezer-safe container or wrapped in plastic wrap for up to 3 months.

Reheating: To reheat, place the salmon in a preheated oven at 350°F (175°C) for about 10-15 minutes, ensuring it’s heated through without drying out.

Wrapping: If storing in the fridge or freezer, make sure to wrap the salmon well to avoid freezer burn and keep it as tasty as the day you cooked it.

Make Ahead Options

These Honey Mustard Salmon fillets are perfect for meal prep enthusiasts! You can prepare the panko topping (butter, panko, and parsley) up to 24 hours in advance; simply store it in an airtight container in the refrigerator. Additionally, you can coat your salmon fillets with honey mustard sauce and refrigerate them for up to 3 days. To maintain quality, be sure to cover the salmon tightly to prevent drying out. When you’re ready to serve, just press the prepped panko topping onto the salmon and bake as instructed—no one will know it was made ahead of time, and you’ll enjoy a delicious, home-cooked meal with minimal effort during busy weeknights!

Honey Mustard Salmon Variations

Feel free to explore these delightful twists that make your honey mustard salmon even more exciting!

  • BBQ Sauce: Swap the honey mustard for your favorite BBQ sauce to create a smoky, sweet profile.
    The rich flavors of BBQ bring a whole new vibe to the dish. Your family will love this unexpected twist!

  • Cheesy Delight: Add grated cheese on top before baking for a creamy, savory richness.
    Melted cheese complements the salmon beautifully and takes the flavors to the next level.

  • Fresh Herbs: Try different herbs like dill or thyme instead of parsley for a fresh aroma.
    This simple change can transform the entire dish with aromatic notes that refresh in every bite.

  • Citrus Splash: Add a touch of lemon juice or zest to the honey mustard sauce for a bright, zesty kick.
    This little burst of citrus elevates the dish, making it perfect for a light, refreshing meal.

  • Nutty Crunch: Incorporate chopped nuts like almonds or walnuts into the panko mix for added texture.
    The nutty flavor paired with the salmon will create an unforgettable taste and delightful crunch.

  • Spicy Kick: Mix in some cayenne or crushed red pepper flakes for heat if you love spice.
    This variation introduces a playful heat that pairs remarkably well with the sweetness of honey.

  • Sweet & Savory: Add a sprinkle of brown sugar on top before baking for an extra crispy, caramelized crust.
    The sweetness of the sugar will caramelize beautifully, adding a delightful layer of flavor to your salmon.

  • Side Options: Serve with lightly sautéed spinach or a refreshing cucumber salad for a nutritious balance.
    These sides not only round out the meal but also provide a vibrant contrast to the rich salmon.

Looking for a complete dinner inspiration? Be sure to check out my Honey Garlic Slow recipe for a delicious pairing to go with your honey mustard salmon!

Expert Tips

  • Uniform Fillets: Choose salmon fillets of similar size for even cooking. This prevents some pieces from being overcooked while others are undercooked.

  • Skin on, Flavor in: Keeping the skin on during baking helps retain moisture and enhances the flavor of the Honey Mustard Salmon.

  • Use a Thermometer: Invest in a meat thermometer to ensure your salmon reaches an internal temperature of 145°F for safety and perfect texture.

  • Customize Your Glaze: Adjust the sweetness and tanginess of your honey mustard sauce by modifying the amounts of honey or mustard according to your taste preferences.

  • Avoid Dryness: Don’t overbake the salmon; keep an eye on it and remove it from the oven once it flakes easily with a fork for optimal tenderness.

What to Serve with Honey Mustard Salmon?

Elevate your dining experience with delightful sides that perfectly complement the zingy flavors of honey mustard salmon!

  • Crispy Air Fryer Potatoes: Golden and crispy, these potatoes bring a satisfying crunch that pairs beautifully with the flaky salmon. They absorb any delicious sauce left on the plate.

  • Roasted Seasonal Vegetables: A medley of colorful veggies creates a vibrant contrast, adding freshness and nutrients that balance the rich fish flavors. Their natural sweetness complements the honey mustard glaze perfectly.

  • Garlic Butter Quinoa: Nutty and fluffy quinoa tossed in garlic butter provides a hearty base that soaks up the flavors of the salmon while adding a healthful grain option.

  • Simple Green Salad: A refreshing mix of greens with a light vinaigrette can cut through the richness of the salmon, providing a crisp texture and tangy flavor that enhances your meal.

  • Sautéed Spinach with Lemon: Tender, sautéed spinach with a squeeze of lemon introduces a burst of brightness, making every bite feel light and refreshing alongside the rich salmon.

  • Chilled White Wine: A glass of chilled Sauvignon Blanc or Chardonnay complements the honey mustard salmon, enhancing the dish’s flavors while making your meal feel even more special.

  • Lemon Tart: End your meal on a sweet note with a zesty lemon tart. The tartness harmonizes with the sweet undertones of the salmon, creating a harmonious finish.

  • Creamy Risotto: Velvety and luxurious, a creamy risotto can serve as an elegant side, amplifying the flavors of the salmon while adding an exquisite texture to your plate.

Honey Mustard Salmon Recipe FAQs

How should I select the best salmon fillets?
When choosing salmon, look for fillets with a vibrant color and firm texture. The flesh should be moist, not dry, and free from dark spots or strong odors. Fresh salmon should also have a mild, ocean-like scent. If possible, buy wild-caught salmon for superior flavor and health benefits.

How long can I store leftover Honey Mustard Salmon?
Leftover Honey Mustard Salmon can be stored in an airtight container in the refrigerator for up to 3 days. Ensure that it’s cooled to room temperature before sealing it to keep it fresh longer. For best taste, consume it within this timeframe.

Can I freeze Honey Mustard Salmon?
Absolutely! You can freeze Honey Mustard Salmon for up to 3 months. To do so, wrap each individually portioned fillet in plastic wrap or aluminum foil, followed by placing it in a freezer-safe bag or container. This double-wrapping prevents freezer burn and helps maintain flavor.

What’s the best way to reheat frozen salmon without drying it out?
To reheat frozen Honey Mustard Salmon, it’s best to thaw it overnight in the refrigerator first. Then, preheat your oven to 350°F (175°C) and bake the salmon for about 10-15 minutes. This method warms it gently and helps maintain moisture, ensuring a delicious meal just as good as when it was first prepared.

Are there any dietary considerations for this recipe?
Yes! This Honey Mustard Salmon is naturally gluten-free if you use gluten-free panko breadcrumbs. Additionally, it’s rich in protein and healthy omega-3 fatty acids, making it a nutritious choice. If you or guests have allergies to fish or mustard, consider alternative proteins like chicken with a different sauce option.

What should I do if my panko topping isn’t crispy?
If your panko topping isn’t turning crispy enough, ensure that your oven is preheated properly before baking. Using enough butter in the panko mixture is crucial for achieving that delightful crunch. A tip I often follow is to give the panko a quick toast in a pan over medium heat before adding it to the salmon. This can help it crisp up beautifully in the oven!

Honey Mustard Salmon

Savory Honey Mustard Salmon with Crunchy Panko Topping

This Honey Mustard Salmon is an easy, flavorful weeknight dinner that transforms simple ingredients into something extraordinary, featuring a crunchy panko topping.
Prep Time 10 minutes
Cook Time 15 minutes
Resting Time 5 minutes
Total Time 30 minutes
Servings: 4 servings
Course: Dinner
Cuisine: American
Calories: 350

Ingredients
  

For the Salmon
  • 4 fillets Salmon Skin-on preferred for moisture
  • cup Honey Mustard Sauce Store-bought for convenience
For the Topping
  • 2 tablespoons Butter Melted
  • ¼ cup Panko Breadcrumbs Plain or seasoned as preferred
  • 1 tablespoon Fresh Parsley Chopped, can substitute with dill

Equipment

  • baking sheet
  • mixing bowl
  • oven

Method
 

Preparation
  1. Preheat your oven to 400°F (200°C) and prepare a baking sheet with cooking spray or aluminum foil.
  2. In a mixing bowl, combine melted butter, panko breadcrumbs, and chopped parsley until evenly coated.
  3. Place salmon fillets skin-side down on the baking sheet and coat each with honey mustard sauce.
  4. Press the panko mixture firmly onto each fillet.
  5. Bake for 12 to 16 minutes or until it flakes easily and reaches an internal temperature of 145°F (63°C).
  6. Let the salmon rest for 5 minutes before serving.

Notes

Store leftovers in an airtight container for up to 3 days. For longer storage, freeze for up to 3 months.

Stay Connected

Get recipes via email: