Hanky Panky Recipe: A Classic Party Favorite

Imagine walking into a party and being greeted by the warm, savory aroma of cheesy, meaty appetizers fresh from the oven. That’s the magic of the Hanky Panky Recipe—a tried-and-true favorite for gatherings, game days, and casual dinners. This dish combines ground beef, spicy pork sausage, and Velveeta cheese to create a rich and flavorful topping that’s served on crispy cocktail rye bread. The result? A bite-sized treat that’s so good, it disappears from the table in minutes!

Whether you’re hosting friends or looking for a nostalgic dish to whip up at home, Hanky Panky is simple, satisfying, and downright irresistible. Let’s dive into the details of this crowd-pleasing recipe that’s sure to become a favorite in your kitchen.

Why the Hanky Panky Recipe Is a Must-Try

The Hanky Panky Recipe is more than just an appetizer—it’s a bite-sized piece of comfort food nostalgia. Here’s why this dish is loved by so many:

  • Perfect for Entertaining: These hearty little snacks are easy to grab, making them ideal for parties and casual gatherings.
  • Rich and Flavorful: The combination of beef, spicy sausage, and creamy Velveeta cheese creates a mouthwatering flavor in every bite.
  • Quick and Easy: With just a few simple ingredients, you can prepare this dish in under an hour.
  • Customizable: You can adjust the heat level and toppings to suit your taste.
  • Freezer-Friendly: Hanky Panky is easy to make ahead of time and store for later use.

Now, let’s take a closer look at the ingredients you’ll need to make this classic dish.

Ingredients for the Hanky Panky Recipe

Here’s everything you need to prepare this flavorful appetizer:

IngredientQuantity
Ground beef1 pound
Hot pork sausage1 pound
Velveeta cheese, diced16 ounces
Garlic salt½ teaspoon
Oregano1 teaspoon
Red pepper flakes½ teaspoon
Cocktail rye bread1 loaf

Step-by-Step Instructions for the Hanky Panky Recipe

1. Gather Your Ingredients

Before you begin, make sure you have all your ingredients ready. Dice the Velveeta cheese and set it aside so it’s ready to melt. Preheat your oven to 375°F (190°C).

2. Cook the Meat

In a large skillet over medium heat, cook the ground beef and hot pork sausage together. Use a wooden spoon to break the meat into small crumbles as it browns. Cook until no pink remains and the meat is fully cooked, about 7–10 minutes.

3. Drain the Grease

Once the meat is cooked, carefully drain any excess grease from the skillet. This step ensures your topping won’t be overly greasy.

4. Add Seasonings

Return the skillet to the stove and reduce the heat to low. Stir in the garlic salt, oregano, and red pepper flakes. Mix well to evenly distribute the flavors throughout the meat.

5. Melt the Cheese

Add the diced Velveeta cheese to the skillet. Stir continuously as the cheese melts and combines with the meat mixture. This will create a rich, creamy topping. Keep the heat low to prevent the cheese from burning.

6. Prepare the Bread

While the cheese is melting, arrange the cocktail rye bread slices on a large baking sheet. You can lightly toast the bread in the oven for 2–3 minutes if desired, but this step is optional.

7. Assemble the Hanky Pankies

Using a spoon, spread a generous amount of the cheesy meat mixture onto each slice of cocktail rye bread. Make sure the topping is evenly distributed.

8. Bake

Place the baking sheet in the preheated oven and bake the Hanky Pankies for 10–12 minutes, or until the topping is bubbly and the bread is slightly crispy.

9. Serve

Remove the Hanky Pankies from the oven and let them cool for a minute before serving. Arrange them on a platter and watch them disappear as your guests dig in!

Tips for Making the Perfect Hanky Panky

  • Customize the Heat: If you prefer a milder flavor, use regular pork sausage instead of hot sausage and omit the red pepper flakes.
  • Use Fresh Bread: Cocktail rye bread works best, but you can substitute with mini slices of French bread or baguette.
  • Make It Ahead: Prepare the meat and cheese mixture in advance, then assemble and bake the Hanky Pankies just before serving.
  • Freeze for Later: Freeze assembled but unbaked Hanky Pankies on a baking sheet. Once frozen, transfer them to a freezer bag. Bake directly from frozen when needed, adding a few extra minutes to the cooking time.
  • Add Toppings: Sprinkle chopped parsley or shredded Parmesan on top for a fresh twist.

Why This Recipe Works

The Hanky Panky Recipe works so well because it combines simple ingredients to create a rich, satisfying flavor. The hot sausage adds spice, the Velveeta provides creaminess, and the rye bread adds a sturdy, crispy base. Together, they create the perfect bite-sized snack that’s easy to prepare and loved by all.

Nutritional Information for Hanky Panky Recipe

Here’s an approximate breakdown per piece (based on 24 servings):

NutrientAmount
Calories~120
Protein7g
Carbohydrates5g
Fat8g
Fiber1g
Sodium280mg

What to Serve with Hanky Panky

Hanky Pankies are a fantastic appetizer on their own, but they also pair well with a variety of sides and dips. Here are some ideas:

  • Fresh Veggies: Serve with celery and carrot sticks for a lighter contrast.
  • Chips and Salsa: Add a bowl of tortilla chips and your favorite salsa for a Tex-Mex vibe.
  • Dipping Sauces: Try ranch dressing, spicy aioli, or honey mustard for dipping.
  • Side Salads: Pair with a simple green salad or coleslaw for a balanced meal.

Make-Ahead and Storage Tips

Hanky Panky is a great dish for meal prep or parties. Here’s how to store and reheat it:

  • Make Ahead: Prepare the meat and cheese mixture up to 2 days in advance and store it in an airtight container in the refrigerator.
  • Refrigerate Leftovers: Store cooked Hanky Pankies in an airtight container in the fridge for up to 3 days.
  • Freeze: Assemble the Hanky Pankies and freeze them unbaked. Bake directly from frozen as needed.
  • Reheat: Reheat cooked Hanky Pankies in a 350°F (175°C) oven for 5–7 minutes, or until warmed through.

FAQs About Hanky Panky Recipe

1. Can I use a different type of bread?
Yes! Mini slices of baguette or French bread work well as substitutes for cocktail rye bread.

2. Can I make this recipe gluten-free?
Absolutely. Use gluten-free bread and check that your seasonings and Velveeta are gluten-free.

3. What other cheeses can I use?
While Velveeta melts beautifully, you can use a combination of shredded cheddar and Monterey Jack for a similar texture.

4. Can I make this vegetarian?
To make a vegetarian version, use plant-based sausage and ground meat alternatives.

5. Can I add other toppings?
Of course! Try diced jalapeños, green onions, or a sprinkle of smoked paprika for added flavor.

6. How do I prevent the bread from getting soggy?
Lightly toasting the bread before adding the topping helps keep it crispy.

Your Turn to Make Hanky Panky

Now that you know how to make this classic Hanky Panky Recipe, it’s time to roll up your sleeves and give it a try. Whether you’re serving it for a party, a family dinner, or a special occasion, this dish is guaranteed to impress. Gather your ingredients, preheat your oven, and enjoy a plate of these cheesy, meaty delights that will have everyone asking for the recipe!
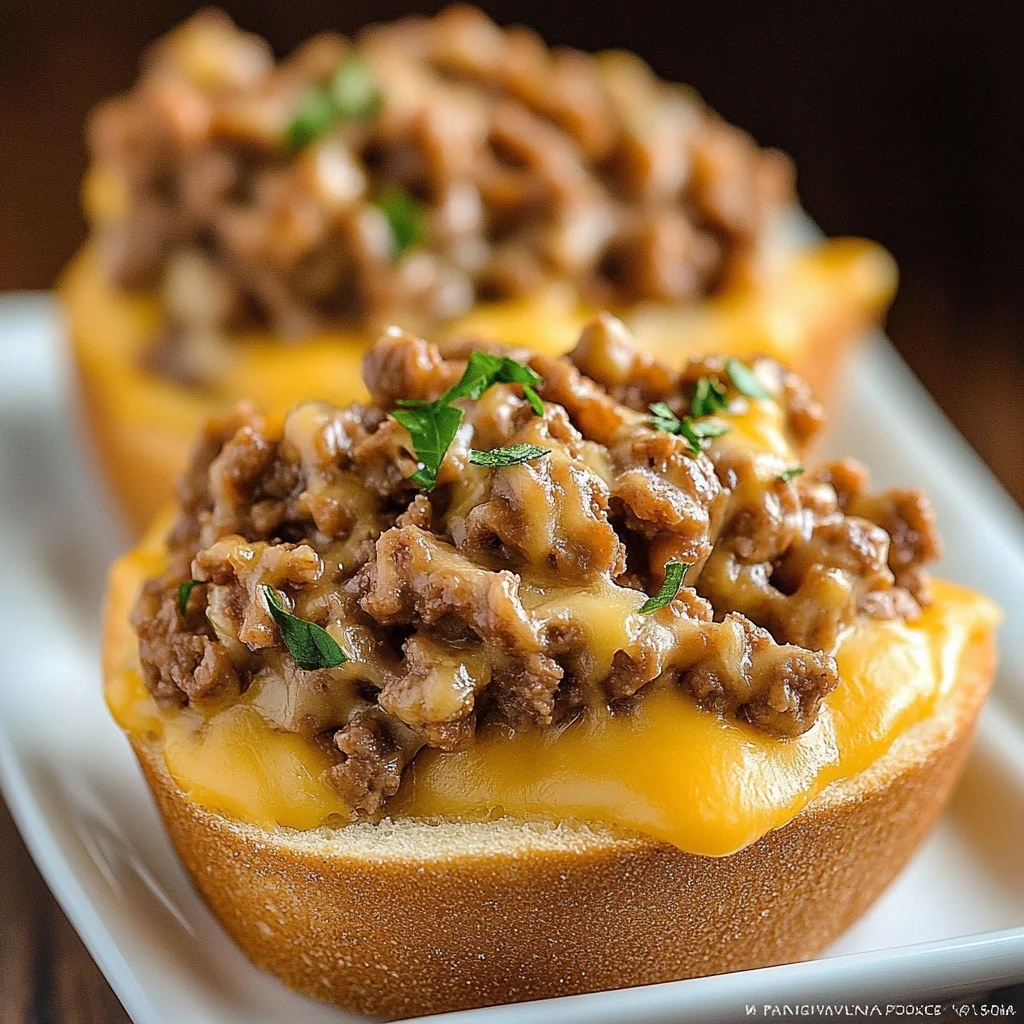
Hanky Panky Recipe: A Classic Party Favorite

Hanky Panky Recipe is a timeless party favorite that combines ground beef, hot pork sausage, and Velveeta cheese, seasoned with garlic, oregano, and red pepper flakes, and served on crispy cocktail rye bread.
Prep Time 10 minutes
Cook Time 20 minutes
Total Time 30 minutes
Servings: 24 Piece
Course: Appetizer
Cuisine: American
Calories: 120

Ingredients
  

  • 1 pound ground beef
  • 1 pound hot pork sausage
  • 16 ounces Velveeta cheese diced
  • ½ teaspoon garlic salt
  • 1 teaspoon oregano
  • ½ teaspoon red pepper flakes
  • 1 loaf cocktail rye bread

Method
 

  1. Preheat Oven: Preheat your oven to 375°F (190°C).
  2. Cook Meat: In a large skillet, cook ground beef and hot pork sausage over medium heat until browned and fully cooked. Drain any grease.
  3. Add Seasonings: Stir in garlic salt, oregano, and red pepper flakes. Mix well.
  4. Melt Cheese: Add diced Velveeta cheese to the skillet, stirring over low heat until fully melted and combined with the meat mixture.
  5. Prepare Bread: Arrange slices of cocktail rye bread on a baking sheet. Optionally, toast the bread for 2–3 minutes.
  6. Assemble: Spoon the cheesy meat mixture onto each bread slice, spreading evenly.
  7. Bake: Bake for 10–12 minutes or until the topping is bubbly and the bread is slightly crispy.
  8. Serve: Remove from the oven, let cool slightly, and serve warm.
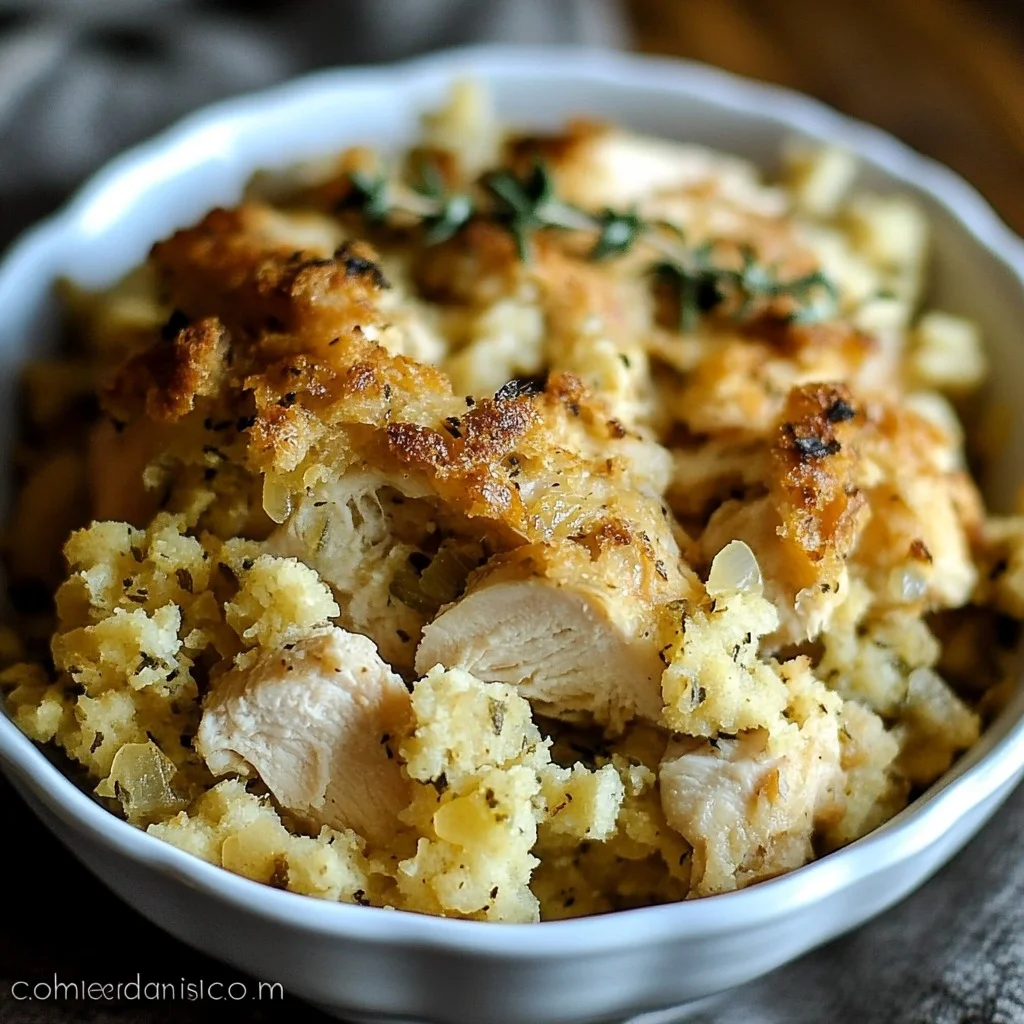
Crockpot Chicken and Stuffing: A Comfort Food Classic Made Easy

There’s something magical about a hearty, home-cooked meal that requires minimal effort yet delivers maximum flavor. Crockpot Chicken and Stuffing is exactly that kind of dish—warm, comforting, and perfect for busy days when you want to come home to a delicious dinner waiting for you. It’s a one-pot wonder that combines tender chicken, savory stuffing, creamy soup, and fresh green beans, all cooked to perfection in your slow cooker.

Whether you’re feeding a family, hosting a casual dinner, or looking for a meal that makes fantastic leftovers, Crockpot Chicken and Stuffing ticks all the boxes. Let’s explore how this easy recipe can become a go-to favorite in your kitchen!

Why Crockpot Chicken and Stuffing Is the Ultimate Comfort Food

Crockpot Chicken and Stuffing is the epitome of comfort food for a few simple reasons:

  • Minimal Effort: All the ingredients come together in your crockpot, so you don’t have to worry about multiple pots or pans.
  • Deliciously Tender Chicken: Cooking chicken in the slow cooker ensures it stays juicy and full of flavor.
  • Savory, Seasoned Stuffing: The stuffing mix absorbs all the flavors, creating a perfectly seasoned and fluffy side dish.
  • Nutritious Additions: Green beans add a pop of color and nutrients to balance the dish.
  • Crowd-Pleasing Appeal: It’s a meal everyone will love, from kids to adults.

Let’s dive into the ingredients and step-by-step instructions for making this amazing dish.

Ingredients for Crockpot Chicken and Stuffing

Here’s what you’ll need to prepare this easy and satisfying dish:

IngredientQuantity
Cream of chicken soup1 (10.5 oz) can
Stuffing mix1 (6 oz) box
Water¾ cup
Frozen green beans1 (16 oz) bag
Chicken breasts, salted and peppered3–4 large

These simple ingredients combine to create a meal that’s rich, savory, and comforting.

Step-by-Step Instructions for Crockpot Chicken and Stuffing

1. Gather Your Ingredients

Before you start, make sure all your ingredients are ready to go. This recipe is straightforward, so having everything prepared will make the process even easier.

2. Prepare the Chicken

Season the chicken breasts generously with salt and pepper. This step adds flavor and ensures the chicken is well-seasoned throughout the cooking process.

3. Layer the Crockpot

Start layering the ingredients in your crockpot in the following order:

  • Place the chicken breasts at the bottom of the crockpot.
  • Pour the can of cream of chicken soup over the chicken, spreading it evenly.
  • Add the frozen green beans as the next layer.

4. Prepare the Stuffing

In a mixing bowl, combine the stuffing mix with ¾ cup of water. Stir until the stuffing is moistened but not overly soggy. Spread the stuffing mixture evenly over the green beans in the crockpot.

5. Cover and Cook

Cover the crockpot with its lid and cook on low for 6–7 hours or high for 3–4 hours. The slow cooking process allows the flavors to meld together and ensures the chicken is tender.

6. Check for Doneness

After the cooking time is up, check the chicken with a meat thermometer to ensure it has reached an internal temperature of 165°F (74°C). The stuffing should be fluffy, and the green beans should be tender.

7. Serve and Enjoy

Once cooked, scoop out portions of chicken, stuffing, and green beans onto plates. Serve warm and enjoy the delicious comfort of this hearty meal.

Tips for Making the Best Crockpot Chicken and Stuffing

  • Use Rotisserie Chicken: If you’re short on time, you can use pre-cooked rotisserie chicken. Add it in during the last hour of cooking.
  • Customize the Vegetables: Swap the green beans for broccoli, carrots, or peas if you prefer.
  • Add Cheese: Sprinkle shredded cheddar or mozzarella over the stuffing during the last 30 minutes for a cheesy twist.
  • Choose the Right Stuffing: Herb-flavored stuffing mix works beautifully, but you can use cornbread stuffing for a different flavor profile.
  • Make It Creamier: For extra creaminess, mix ¼ cup of sour cream or cream cheese into the cream of chicken soup.

Why This Recipe Works

Crockpot Chicken and Stuffing works so well because it brings together complementary flavors and textures in one dish. The chicken becomes perfectly tender, the stuffing absorbs all the delicious juices, and the green beans add a fresh balance to the richness of the soup and stuffing. Plus, cooking it all in the slow cooker means the flavors meld together beautifully without any extra effort.

Nutritional Information for Crockpot Chicken and Stuffing

Here’s an approximate breakdown per serving (based on 6 servings):

NutrientAmount
Calories~360
Protein30g
Carbohydrates28g
Fat12g
Fiber4g
Sodium780mg

What to Serve with Crockpot Chicken and Stuffing

This dish is hearty on its own, but you can round out the meal with these delicious sides:

  • Fresh Side Salad: A crisp green salad with a tangy vinaigrette balances the richness of the dish.
  • Dinner Rolls: Warm, fluffy rolls are perfect for soaking up the creamy sauce.
  • Mashed Potatoes: If you’re serving a crowd, mashed potatoes are a great addition.
  • Cranberry Sauce: For a holiday-inspired twist, serve with cranberry sauce on the side.

Make-Ahead and Storage Tips

Crockpot Chicken and Stuffing is ideal for meal prep and leftovers. Here’s how to store and reheat it:

  • Make Ahead: Assemble the ingredients in the crockpot the night before, then start cooking in the morning.
  • Refrigerate Leftovers: Store leftovers in an airtight container in the fridge for up to 3 days.
  • Freeze: Freeze portions of the dish in freezer-safe containers for up to 2 months. Thaw overnight in the fridge before reheating.
  • Reheat: Warm leftovers in the microwave or on the stovetop until heated through.

FAQs About Crockpot Chicken and Stuffing

1. Can I use chicken thighs instead of chicken breasts?
Yes, chicken thighs work wonderfully in this recipe and will be just as tender and flavorful.

2. Can I use fresh green beans instead of frozen?
Absolutely. Just trim and wash the fresh green beans before adding them to the crockpot.

3. What can I substitute for cream of chicken soup?
You can use cream of mushroom soup or cream of celery soup for a slightly different flavor.

4. Can I make this recipe gluten-free?
Yes! Use a gluten-free stuffing mix and check that your cream of chicken soup is gluten-free.

5. How do I prevent the stuffing from getting soggy?
Make sure to use the exact amount of water for the stuffing and avoid overmixing. Cooking on low heat also helps keep the stuffing fluffy.

6. Can I double the recipe?
Yes, you can double the ingredients, but make sure your crockpot is large enough to accommodate everything. Cooking time may increase slightly.

Your Turn to Make Crockpot Chicken and Stuffing

Now that you know how to make this easy and delicious Crockpot Chicken and Stuffing, it’s time to bring this comforting dish to your table. Whether you’re feeding your family on a busy weeknight or prepping for a holiday meal, this recipe is guaranteed to be a hit. Gather your ingredients, plug in your slow cooker, and get ready to enjoy a meal that’s as satisfying to make as it is to eat.

Crockpot Chicken and Stuffing: A Comfort Food Classic Made Easy

Crockpot Chicken and Stuffing is the ultimate one-pot meal that combines juicy chicken, savory stuffing, creamy soup, and green beans for a hearty, comforting dish.
Prep Time 10 minutes
Cook Time 6 hours
Total Time 6 hours 10 minutes
Servings: 6
Course: Main Course
Cuisine: American Comfort Food
Calories: 360

Ingredients
  

  • 1 10.5 oz can cream of chicken soup: Adds creaminess to the dish.
  • 1 6 oz box stuffing mix: A savory, seasoned base.
  • ¾ cup water: To moisten the stuffing.
  • 1 16 oz bag frozen green beans: A nutritious vegetable addition.
  • 3 –4 large chicken breasts: Salted and peppered for flavor.

Method
 

Prepare the Chicken
  1. Season the chicken breasts generously with salt and pepper.
Layer the Crockpot
  1. Place the chicken breasts at the bottom of the crockpot.
  2. Spread the cream of chicken soup evenly over the chicken.
  3. Add the green beans as the next layer.
Prepare and Add Stuffing
  1. In a bowl, mix the stuffing mix with ¾ cup of water until moistened. Spread the stuffing mixture over the green beans.
Cook
  1. Cover and cook on low for 6–7 hours or high for 3–4 hours.
Check Doneness
  1. Ensure the chicken reaches an internal temperature of 165°F (74°C).
Serve
  1. Scoop out portions of chicken, stuffing, and green beans onto plates. Serve warm and enjoy!

Cheesy Ranch Soup: The Ultimate Comfort in a Bowl

There’s something magical about a warm, creamy bowl of soup on a chilly day. And when that soup is loaded with smoky bacon, tender chicken, melty cheese, and the irresistible flavor of ranch seasoning, it’s not just a meal—it’s pure comfort. Cheesy Ranch Soup is the perfect blend of hearty, rich flavors and creamy textures that feels like a hug in a bowl.

Whether you’re preparing it for a cozy family dinner, a quick meal after a busy day, or even as a star dish for a potluck, this recipe is guaranteed to bring everyone back for seconds. Let’s dive into how to make this crowd-pleasing, indulgent soup that will warm your heart and soul.

Why Cheesy Ranch Soup is the Perfect Comfort Food

Cheesy Ranch Soup stands out because it combines everything you love about ranch seasoning with creamy, cheesy goodness. It’s hearty, flavorful, and packed with wholesome ingredients like chicken and fresh vegetables. Here’s why you’ll fall in love with this recipe:

  • Bold Ranch Flavor: The ranch seasoning mix adds a deliciously tangy, herby kick.
  • Creamy & Cheesy: The combination of cream cheese, cheddar, and heavy cream makes this soup irresistibly rich.
  • Hearty Ingredients: Chicken, bacon, and fresh vegetables turn this into a filling, satisfying meal.
  • One-Pot Wonder: It’s easy to make in one pot, which means less cleanup and more time to enjoy.

Now, let’s gather the ingredients and start cooking!

Ingredients for Cheesy Ranch Soup

Here’s everything you’ll need to whip up this creamy and delicious soup:

IngredientQuantity
Bacon, diced4 slices
Unsalted butter1 tablespoon
Yellow onion, diced1 medium
Celery ribs, diced2
Garlic cloves, minced2
Baby spinach, chopped3 cups
Low sodium chicken broth6 cups
Ranch seasoning mix2 tablespoons
Black pepper½ teaspoon
Shredded chicken4 cups
Cream cheese, cubed and softened8 ounces
Shredded sharp cheddar cheese1 cup
Heavy cream⅓ cup
Optional garnishesExtra cheese, parsley, crumbled bacon

Step-by-Step Instructions for Cheesy Ranch Soup

1. Cook the Bacon

Start by cooking the diced bacon in a large pot or Dutch oven over medium heat until it’s crispy. Remove the bacon using a slotted spoon and set it aside, leaving the rendered fat in the pot for flavor.

2. Sauté the Vegetables

Add the unsalted butter to the pot with the bacon fat. Toss in the diced onion and celery, and sauté for 3–4 minutes, or until the onion becomes soft and translucent. Add the minced garlic and cook for another 30 seconds, just until fragrant.

3. Add the Broth and Seasonings

Pour in the chicken broth and stir in the ranch seasoning mix and black pepper. Bring the mixture to a gentle simmer to allow the flavors to meld together.

4. Stir in the Chicken

Add the shredded chicken to the pot, stirring well to combine. Let it simmer for about 5 minutes so the chicken can soak up the flavorful broth.

5. Add the Creamy Ingredients

Reduce the heat to low and stir in the softened cream cheese, one cube at a time, until fully melted and incorporated. Slowly add the shredded cheddar cheese, stirring constantly to create a smooth, creamy soup base.

6. Toss in the Spinach

Stir in the chopped baby spinach and let it cook for 2–3 minutes, just until it wilts. This step adds a fresh pop of color and nutrients to the soup.

7. Finish with Heavy Cream

Pour in the heavy cream, stirring to combine. Let the soup simmer for another 2–3 minutes to bring all the flavors together. Taste and adjust seasoning if needed.

8. Garnish and Serve

Ladle the soup into bowls and garnish with crumbled bacon, extra shredded cheddar, and fresh parsley. Serve warm with crusty bread or crackers for dipping.

Tips for Making the Best Cheesy Ranch Soup

  • Use Rotisserie Chicken: For convenience, grab a pre-cooked rotisserie chicken and shred it for this recipe.
  • Don’t Skip the Cream Cheese: This ingredient is key to creating the creamy, rich texture. Make sure it’s softened for easier mixing.
  • Control the Salt: Using low-sodium chicken broth allows you to control the salt level, especially since bacon and ranch mix can be salty.
  • Make It Spicy: Add a pinch of red pepper flakes or a splash of hot sauce for a spicy kick.
  • Freeze for Later: This soup freezes well. Just leave out the spinach and heavy cream if you plan to freeze it, and add them when reheating.

Why This Recipe Works

Cheesy Ranch Soup works because it’s the perfect balance of flavors and textures. The ranch seasoning provides a tangy, herby flavor that pairs beautifully with the richness of cream cheese and cheddar. Bacon adds a smoky crunch, while the chicken and vegetables make it hearty enough to be a complete meal. It’s a versatile recipe that’s simple to prepare but delivers restaurant-quality results.

Nutritional Information for Cheesy Ranch Soup

Here’s an approximate nutritional breakdown per serving (based on 6 servings):

NutrientAmount
Calories~400
Protein25g
Carbohydrates6g
Fat30g
Fiber1g
Sodium700mg

What to Serve with Cheesy Ranch Soup

This soup is hearty enough to be a meal on its own, but it pairs wonderfully with these sides:

  • Crusty Bread: Perfect for soaking up the creamy broth.
  • Side Salad: A fresh green salad with a light vinaigrette balances the richness of the soup.
  • Crackers or Breadsticks: For extra crunch and dipping.
  • Roasted Vegetables: Add some roasted carrots or asparagus for a touch of sweetness.

Make-Ahead and Storage Tips

Cheesy Ranch Soup is great for meal prep and leftovers. Here’s how to store and reheat it:

  • Make Ahead: Prepare the soup up to 1 day in advance and store it in the refrigerator. Reheat gently on the stovetop.
  • Refrigerate Leftovers: Store leftover soup in an airtight container in the fridge for up to 3 days.
  • Freeze: Freeze the soup in freezer-safe containers for up to 2 months. Thaw overnight in the fridge and reheat gently, adding fresh spinach and cream if needed.

FAQs About Cheesy Ranch Soup

1. Can I use a different type of cheese?
Yes, you can substitute cheddar with Monterey Jack, Gouda, or even a spicy pepper jack for extra flavor.

2. How do I make this soup vegetarian?
Omit the chicken and bacon, and use vegetable broth instead of chicken broth. You can add diced potatoes, mushrooms, or chickpeas for protein.

3. Can I use frozen spinach?
Yes, frozen spinach works well. Thaw and drain it before adding it to the soup.

4. What’s the best way to reheat this soup?
Reheat it gently on the stovetop over low heat, stirring occasionally to prevent the cream and cheese from separating.

5. Can I make this soup gluten-free?
Absolutely! Ensure your ranch seasoning mix is gluten-free, and you’re good to go.

6. How do I thicken the soup if it’s too thin?
If the soup is too thin, mix 1 tablespoon of cornstarch with 2 tablespoons of cold water, then stir it into the soup and simmer until thickened.

Your Turn to Make Cheesy Ranch Soup

Now that you know all the tips and tricks, it’s time to whip up a pot of this delicious Cheesy Ranch Soup. Whether you’re making it for your family, hosting a gathering, or meal-prepping for the week, this soup is sure to be a hit. Gather your ingredients, follow the simple steps, and enjoy a bowl of creamy, ranch-flavored goodness that will warm your heart and soul.

Cheesy Ranch Soup: The Ultimate Comfort in a Bowl

Cheesy Ranch Soup is a creamy, hearty, and flavor-packed dish perfect for chilly days or cozy family dinners. Made with tender chicken, smoky bacon, melty cheddar cheese, and tangy ranch seasoning, this one-pot meal is as easy to make as it is satisfying.
Prep Time 15 minutes
Cook Time 30 minutes
Total Time 45 minutes
Servings: 6
Course: Soup
Cuisine: American
Calories: 400

Ingredients
  

  • 4 slices bacon diced
  • 1 tablespoon unsalted butter
  • 1 medium yellow onion diced
  • 2 celery ribs diced
  • 2 garlic cloves minced
  • 3 cups fresh baby spinach chopped
  • 6 cups low sodium chicken broth
  • 2 tablespoons ranch seasoning mix
  • ½ teaspoon black pepper
  • 4 cups shredded chicken
  • 8 ounces cream cheese cubed and softened
  • 1 cup shredded sharp cheddar cheese
  • ⅓ cup heavy cream
  • Optional garnishes: extra cheese parsley, and crumbled bacon

Method
 

Cook the Bacon
  1. In a large pot or Dutch oven, cook diced bacon over medium heat until crispy. Remove with a slotted spoon and set aside, leaving the rendered fat in the pot.
Sauté Vegetables
  1. Add the butter to the bacon fat, then toss in the diced onion and celery. Sauté for 3–4 minutes until softened. Add minced garlic and cook for another 30 seconds.
Simmer the Broth and Seasonings
  1. Pour in the chicken broth and stir in the ranch seasoning mix and black pepper. Bring the mixture to a gentle simmer.
Add Chicken
  1. Stir in the shredded chicken and let it cook for 5 minutes, allowing the chicken to absorb the flavors.
Incorporate Cream Cheese and Cheddar
  1. Reduce the heat to low and stir in the softened cream cheese until fully melted and smooth. Gradually add the shredded cheddar cheese, stirring continuously.
Add Spinach and Cream
  1. Stir in the chopped spinach and let it wilt for 2–3 minutes. Pour in the heavy cream and simmer for another 2 minutes to bring everything together.
Garnish and Serve
  1. Ladle the soup into bowls and garnish with crumbled bacon, extra shredded cheese, and fresh parsley. Serve warm with crusty bread or crackers.

Cheese Sausage Balls: A Crowd-Pleasing Snack Everyone Will Love

There’s something magical about bite-sized, cheesy, savory snacks that disappear from the plate in no time. Cheese Sausage Balls are the perfect combination of hearty ground sausage, gooey cheese, and flavorful spices, all baked into a golden, irresistible bite. These tasty morsels are perfect for parties, game-day gatherings, holiday spreads, or even as a quick, satisfying snack.

Whether you’re hosting a large group or just looking to whip up something delicious for your family, cheese sausage balls are a breeze to make and guaranteed to impress. With their simple ingredients and bold flavors, they bring comfort and joy to any table.

Why You’ll Love Cheese Sausage Balls

Cheese Sausage Balls are not only easy to prepare but also incredibly versatile. Here’s why you’ll fall in love with this recipe:

  • Packed with Flavor: The combination of sausage, cheddar cheese, and Rotel tomatoes creates a savory and slightly spicy flavor profile that everyone loves.
  • Perfect for Any Occasion: These bite-sized snacks work as appetizers, finger foods, or even a breakfast option!
  • Easy to Customize: You can tweak the recipe by changing the sausage or cheese, or even adding different spices.
  • Quick to Prepare: With only a few simple steps, these sausage balls come together in no time.

Let’s dive into how to make these crowd-pleasers step by step!

Ingredients for Cheese Sausage Balls

Here’s what you’ll need to make these delicious sausage balls:

IngredientQuantity
Ground sausage1 pound
Cream cheese, softened8 ounces
Rotel diced tomatoes and green chilies, drained1 can (10 ounces)
Shredded cheddar cheese2 cups
Biscuit baking mix (e.g., Bisquick)2 cups
Garlic powder½ teaspoon
Onion powder½ teaspoon
Black pepper¼ teaspoon
Optional: Chopped parsley or green onions for garnishAs desired

These simple ingredients come together to create a snack that’s bursting with flavor and texture.

Step-by-Step Instructions for Cheese Sausage Balls

1. Gather and Prepare Your Ingredients

Start by ensuring all your ingredients are ready to go. Preheat your oven to 375°F (190°C) and line a baking sheet with parchment paper or a silicone baking mat for easy cleanup.

2. Brown the Sausage

In a skillet over medium heat, cook the ground sausage until it’s browned and fully cooked. Drain any excess grease and let it cool slightly. This step ensures that the sausage balls won’t become greasy during baking.

3. Combine the Wet Ingredients

In a large mixing bowl, combine the softened cream cheese and drained Rotel tomatoes. Mix well until the cream cheese is smooth and evenly incorporated with the tomatoes.

4. Add the Sausage and Cheese

Add the cooked sausage and shredded cheddar cheese to the cream cheese mixture. Stir everything together until the ingredients are well-combined.

5. Mix in the Dry Ingredients

Gradually add the biscuit baking mix, garlic powder, onion powder, and black pepper to the sausage and cheese mixture. Use a spoon or your hands to mix until a dough forms. It should be slightly sticky but firm enough to shape into balls.

6. Form the Sausage Balls

Using a tablespoon or small scoop, take portions of the dough and roll them into balls about 1–1.5 inches in diameter. Place the sausage balls on the prepared baking sheet, leaving about an inch of space between each one.

7. Bake to Perfection

Bake the sausage balls in the preheated oven for 18–20 minutes, or until they are golden brown and cooked through. To check for doneness, the internal temperature of the sausage balls should reach 160°F (70°C).

8. Garnish and Serve

Once baked, let the sausage balls cool slightly. Garnish with chopped parsley or green onions for a fresh pop of color and added flavor. Serve warm and enjoy!

Tips for Making the Best Cheese Sausage Balls

  • Use Fresh Ingredients: Freshly shredded cheese melts better than pre-packaged shredded cheese, making the sausage balls creamier.
  • Drain the Rotel Properly: Make sure to drain the Rotel tomatoes and chilies well to avoid excess moisture in the mixture.
  • Don’t Overmix: Overmixing the dough can make the sausage balls dense. Mix just until everything is combined.
  • Double the Recipe: These sausage balls are so popular that you’ll want to make extra! They store and reheat well.
  • Add a Kick: For a spicier version, use hot sausage or add a pinch of cayenne pepper to the mixture.

Why This Recipe Works

Cheese Sausage Balls work because they hit all the right flavor notes: savory, cheesy, slightly spicy, and perfectly balanced. The cream cheese adds creaminess, while the biscuit baking mix provides structure and a slightly crisp exterior. The Rotel tomatoes and chilies elevate the flavor with a subtle tang and heat, making these sausage balls anything but boring. Plus, they’re incredibly easy to customize, ensuring you can tweak the recipe to suit your preferences.

Nutritional Information for Cheese Sausage Balls

Here’s an approximate breakdown per serving (based on 24 sausage balls):

NutrientAmount
Calories~120
Protein6g
Carbohydrates4g
Fat9g
Fiber0g
Sodium260mg

What to Serve with Cheese Sausage Balls

Cheese Sausage Balls are versatile and pair well with a variety of sides and dips. Here are a few ideas:

  • Dipping Sauces: Ranch dressing, honey mustard, or spicy sriracha mayo make excellent accompaniments.
  • Fresh Veggies: Serve alongside celery and carrot sticks for a balanced snack platter.
  • Breakfast Pairing: Add them to a breakfast spread with scrambled eggs, fresh fruit, and biscuits.
  • Game Day Snacks: Pair them with chips, guacamole, and buffalo wings for the ultimate game-day feast.

Make-Ahead and Storage Tips

Cheese Sausage Balls are perfect for meal prep or making in advance. Here’s how to store and reheat them:

  • Make Ahead: Prepare the sausage balls and place them on a baking sheet. Cover and refrigerate for up to 24 hours before baking.
  • Refrigerate Leftovers: Store cooked sausage balls in an airtight container in the fridge for up to 3 days.
  • Freeze: Freeze uncooked sausage balls on a baking sheet, then transfer them to a freezer bag. They can be baked straight from frozen—just add a few extra minutes to the baking time.
  • Reheat: Warm leftovers in the oven at 350°F (175°C) for 5–8 minutes to maintain their crispy exterior.

FAQs About Cheese Sausage Balls

1. Can I use a different type of sausage?
Yes! You can use spicy sausage, Italian sausage, or even chicken or turkey sausage for a lighter option.

2. Can I make this recipe gluten-free?
Absolutely. Use a gluten-free biscuit mix to make these sausage balls suitable for gluten-free diets.

3. Can I prepare the mixture ahead of time?
Yes, you can mix the ingredients and refrigerate the dough for up to 24 hours before shaping and baking.

4. How do I keep the sausage balls from drying out?
Make sure not to overbake them. Also, using cream cheese helps keep the sausage balls moist and tender.

5. Can I add other ingredients to the mixture?
Definitely! Try adding diced jalapeños, shredded pepper jack cheese, or chopped bacon for extra flavor.

6. Can I serve these cold?
While they’re best served warm, cheese sausage balls can also be enjoyed at room temperature or cold.

Your Turn to Make Cheese Sausage Balls

Now that you have all the tips and tricks, it’s time to roll up your sleeves and make these delicious Cheese Sausage Balls. Whether you’re preparing them for a party, a quick snack, or a hearty breakfast addition, this recipe is sure to become a go-to favorite. Gather your ingredients, preheat your oven, and get ready to impress your family and friends with this easy, cheesy, and satisfying treat!

Cheese Sausage Balls: A Crowd-Pleasing Snack

Cheese Sausage Balls combine ground sausage, creamy cheese, Rotel tomatoes, and a biscuit mix for a savory, cheesy bite-sized snack. These golden-brown morsels are easy to make, perfect for any occasion, and packed with bold flavors. They’re a guaranteed hit for parties, game days, or even a hearty breakfast side.
Prep Time 15 minutes
Cook Time 20 minutes
Total Time 35 minutes
Servings: 24 Balls
Course: Snack
Cuisine: American Comfort Food
Calories: 120

Ingredients
  

  • 1 pound ground sausage
  • 8 ounces cream cheese softened
  • 1 can 10 ounces Rotel diced tomatoes and green chilies, drained
  • 2 cups shredded cheddar cheese
  • 2 cups biscuit baking mix e.g., Bisquick
  • ½ teaspoon garlic powder
  • ½ teaspoon onion powder
  • ¼ teaspoon black pepper
  • Optional: Chopped parsley or green onions for garnish

Method
 

  1. Preheat Oven: Preheat your oven to 375°F (190°C) and line a baking sheet with parchment paper.
  2. Cook Sausage: Brown the ground sausage in a skillet over medium heat. Drain and let it cool.
  3. Mix Wet Ingredients: In a bowl, combine softened cream cheese and drained Rotel tomatoes until smooth.
  4. Combine Everything: Add the sausage, cheddar cheese, biscuit mix, garlic powder, onion powder, and black pepper to the cream cheese mixture. Mix until a dough forms.
  5. Form Balls: Roll the dough into 1–1.5-inch balls and place them on the baking sheet.
  6. Bake: Bake for 18–20 minutes until golden brown.
  7. Garnish and Serve: Let cool slightly, garnish with parsley or green onions, and serve warm.

Cheesy Beef Cake: A Show-Stopping Comfort Food Recipe

Imagine slicing into a golden, flaky crust to reveal layers of juicy, seasoned beef and a gooey, cheesy filling that melts in your mouth. That’s the magic of a Cheesy Beef Cake, a dish that combines the best parts of a savory pie and a cheeseburger. This recipe is the ultimate comfort food, perfect for cozy family dinners, potlucks, or special occasions.

It’s rich, hearty, and easy to make, yet it feels fancy enough to impress your guests. Whether you’re feeding a crowd or simply looking to elevate your weeknight dinners, Cheesy Beef Cake is guaranteed to be a hit at the table. Plus, it’s highly customizable, so you can adjust it to suit your preferences.

Why You’ll Fall in Love with Cheesy Beef Cake

The Cheesy Beef Cake is not your typical savory pie. It’s a delightful fusion of creamy cheese, juicy beef, and a flaky crust. It’s one of those recipes that instantly puts a smile on your face with its hearty flavors and indulgent texture. Here’s why you’ll love making and eating this dish:

  • Rich and Cheesy Filling: The combination of cheddar cheese, cream cheese, and sour cream creates a luscious, creamy filling.
  • Juicy Ground Beef: Perfectly seasoned ground beef adds a savory, meaty base to the dish.
  • Flaky Crust: Whether you use a pie crust or puff pastry, the golden crust ties everything together beautifully.
  • Simple to Make: With just a few steps and basic ingredients, this dish is surprisingly easy to prepare.

It’s the kind of recipe that turns any meal into a celebration, and it’s sure to become a family favorite.

Ingredients for Cheesy Beef Cake

Here’s everything you’ll need to create this delicious dish:

IngredientQuantity
Ground beef1 lb
Garlic powder½ tsp
Onion powder½ tsp
Salt and pepperTo taste
Cheddar cheese, shredded1 cup
Cream cheese, softened½ cup
Sour cream¼ cup
Worcestershire sauce1 tbsp
Ketchup¼ cup
Mustard2 tbsp
Pie crust or puff pastry1 sheet

These ingredients are easy to find and come together to create a dish that’s packed with flavor.

Step-by-Step Instructions for Cheesy Beef Cake

1. Prepare the Ingredients

Before you begin, gather all your ingredients and preheat your oven to 375°F (190°C). Allow the cream cheese to soften at room temperature for easier mixing.

2. Cook the Ground Beef

Heat a large skillet over medium heat. Add the ground beef, garlic powder, onion powder, salt, and pepper. Cook the beef, breaking it into crumbles, until it’s browned and fully cooked. Drain any excess grease.

3. Add the Flavor Enhancers

Stir in the Worcestershire sauce, ketchup, and mustard. Mix well to coat the beef evenly and cook for an additional 2–3 minutes. Remove the skillet from the heat and let the beef cool slightly.

4. Create the Cheesy Filling

In a mixing bowl, combine the cream cheese, sour cream, and shredded cheddar cheese. Stir until the mixture is smooth and creamy. This will serve as the rich, cheesy layer of your beef cake.

5. Assemble the Cheesy Beef Cake

Roll out your pie crust or puff pastry and place it into a greased pie dish, leaving some overhang on the edges. Spread half of the cheesy mixture evenly across the bottom of the crust. Top with the beef mixture, then spread the remaining cheesy filling over the beef. Fold the overhanging edges of the crust over the filling.

6. Bake to Perfection

Place the pie dish in the preheated oven and bake for 25–30 minutes, or until the crust is golden brown and crispy. Keep an eye on it during the last 5 minutes to prevent overbrowning.

7. Let It Rest

Remove the Cheesy Beef Cake from the oven and let it rest for 5–10 minutes. This allows the filling to set, making it easier to slice.

8. Slice and Serve

Cut the beef cake into slices and serve it warm. Pair it with a fresh green salad or steamed vegetables for a balanced meal.

Tips for Making the Perfect Cheesy Beef Cake

  • Use Quality Ingredients: Opt for high-quality ground beef and cheese for the best flavor.
  • Don’t Skip the Resting Time: Letting the beef cake rest before slicing prevents the filling from spilling out.
  • Customize the Filling: Add diced onions, bell peppers, or even mushrooms to the beef mixture for extra flavor.
  • Experiment with Cheese: Try using mozzarella, Gouda, or Monterey Jack for a different cheesy twist.
  • Make It Spicy: Add a pinch of chili powder or red pepper flakes to the beef for a hint of heat.

Why This Recipe Works

Cheesy Beef Cake works because it combines simple ingredients in a way that’s greater than the sum of its parts. The seasoned beef brings a savory depth, while the creamy cheese layer adds richness and indulgence. The flaky crust ties everything together, creating a dish that’s hearty, comforting, and satisfying. It’s a recipe that feels both familiar and special, making it perfect for any occasion.

Nutritional Information for Cheesy Beef Cake

Here’s an approximate breakdown per serving (based on 6 servings):

NutrientAmount
Calories~400
Protein22g
Carbohydrates20g
Fat28g
Fiber1g
Sodium720mg

What to Serve with Cheesy Beef Cake

This dish is a complete meal on its own, but it pairs wonderfully with the following sides:

  • Fresh Green Salad: A light salad with a tangy vinaigrette complements the richness of the beef cake.
  • Roasted Vegetables: Try roasted carrots, broccoli, or asparagus for added color and nutrition.
  • Mashed Potatoes: Creamy mashed potatoes make for a classic, comforting side.
  • Garlic Bread: Perfect for soaking up any extra cheesy filling.

Make-Ahead and Storage Tips

Cheesy Beef Cake is ideal for meal prep or leftovers. Here’s how to store and reheat it:

  • Make Ahead: Assemble the beef cake up to a day in advance, cover it with plastic wrap, and store it in the fridge. Bake it fresh when ready to serve.
  • Refrigerate Leftovers: Store leftover slices in an airtight container in the fridge for up to 3 days.
  • Reheat: Reheat slices in the oven at 350°F (175°C) for 10–15 minutes or until warmed through. Avoid microwaving, as it may make the crust soggy.
  • Freeze: Wrap the unbaked beef cake tightly in plastic wrap and aluminum foil, then freeze for up to 2 months. Thaw in the fridge overnight before baking.

FAQs About Cheesy Beef Cake

1. Can I use a different type of meat?
Yes! Ground turkey, chicken, or plant-based meat substitutes can be used instead of ground beef.

2. Can I make this recipe gluten-free?
Absolutely. Use a gluten-free pie crust or puff pastry to make this dish suitable for gluten-free diets.

3. What’s the best way to prevent the crust from getting soggy?
Blind-bake the crust for 5–7 minutes before adding the filling to help it stay crispy.

4. Can I make this recipe spicy?
Yes! Add diced jalapeños or a dash of hot sauce to the beef mixture for some heat.

5. Can I use store-bought crust?
Of course! Store-bought pie crust or puff pastry works perfectly and saves time.

6. How do I store leftovers?
Refrigerate leftovers in an airtight container and reheat in the oven to maintain the crust’s crispiness.

Your Turn to Make Cheesy Beef Cake

Now that you’ve learned all the tips and tricks, it’s time to make your own Cheesy Beef Cake. This recipe is perfect for any occasion, whether it’s a weeknight dinner or a special celebration. With its flaky crust, savory filling, and gooey cheese, it’s guaranteed to be a hit. Gather your ingredients, preheat your oven, and enjoy the cheesy, comforting goodness of this delicious dish.

Cheesy Beef Cake: A Show-Stopping Comfort Food Recipe

Cheesy Beef Cake combines seasoned ground beef, creamy cheese, and a golden, flaky crust for a rich and indulgent dish. Perfect for cozy dinners or special occasions, this savory pie is easy to make and bursting with flavor. It’s the ultimate comfort food that’s sure to impress your family or guests.
Prep Time 10 minutes
Cook Time 30 minutes
Total Time 40 minutes
Servings: 6
Course: Main Course
Cuisine: American Comfort Food
Calories: 400

Ingredients
  

  • 1 lb ground beef
  • ½ tsp garlic powder
  • ½ tsp onion powder
  • Salt and pepper to taste
  • 1 cup cheddar cheese shredded
  • ½ cup cream cheese softened
  • ¼ cup sour cream
  • 1 tbsp Worcestershire sauce
  • ¼ cup ketchup
  • 2 tbsp mustard
  • 1 sheet pie crust or puff pastry

Method
 

  1. Cook the Beef: Brown the ground beef with garlic powder, onion powder, salt, and pepper. Drain any grease.
  2. Add Flavor: Stir in Worcestershire sauce, ketchup, and mustard. Cook for 2–3 minutes. Let the beef cool slightly.
  3. Make the Cheese Mixture: Combine cream cheese, sour cream, and shredded cheddar in a bowl. Stir until smooth.
  4. Assemble: Place the pie crust or puff pastry in a greased pie dish. Spread half of the cheese mixture on the bottom, then add the beef mixture, followed by the remaining cheese mixture. Fold the crust edges over.
  5. Bake: Bake at 375°F (190°C) for 25–30 minutes, or until the crust is golden brown.
  6. Serve: Let rest for 5–10 minutes before slicing. Serve warm with a salad or roasted vegetables.

Cheesy Ranch Chicken Soup: The Perfect Comfort Food

Imagine coming home after a long, chilly day and wrapping your hands around a warm bowl of soup. Not just any soup, but Cheesy Ranch Chicken Soup—a dish loaded with creamy cheese, tender chicken, smoky bacon, and a hint of ranch seasoning that brings everything together. This soup is the ultimate comfort food, satisfying your soul and warming you from the inside out.

It’s a meal that feels like a big hug in a bowl, perfect for weeknight dinners, family gatherings, or anytime you’re craving something indulgent and hearty. The best part? It’s simple to make, and you likely have most of the ingredients in your kitchen already. Let’s dive into how you can create this irresistible bowl of comfort.

Why You’ll Love Cheesy Ranch Chicken Soup

There’s something magical about the combination of cheese, chicken, and ranch seasoning. It’s the perfect trio that delivers rich, creamy flavors with a hint of herbs and spices. Add crispy bacon and baby spinach to the mix, and you’ve got a one-pot wonder that feels fancy but is incredibly easy to prepare.

This soup is perfect for:

  • Cozy weeknight dinners when you want something quick yet filling
  • A comforting dish to serve at family get-togethers
  • Meal prep for the week because it reheats beautifully

Ingredients for Cheesy Ranch Chicken Soup

Here’s everything you need to make this creamy, flavorful soup:

IngredientQuantity
Bacon, diced4 slices
Butter1 tablespoon
Yellow onion, diced1 small
Garlic, minced3 cloves
Low sodium chicken broth4 to 6 cups
Garlic powder½ teaspoon
Onion powder½ teaspoon
Dried dill weed½ teaspoon
Dried chives½ teaspoon
Salt and pepperTo taste
Bay leaf1
Cooked shredded chicken4 cups
Cream cheese, softened8 ounces
Shredded cheddar cheese1 cup
Baby spinach3 to 4 cups
Heavy cream¼ cup
Sliced green scallionsFor garnish

This ingredient list combines classic comfort food staples with ranch-inspired flavors to create a soup that’s creamy, cheesy, and absolutely irresistible.

Step-by-Step Instructions for Cheesy Ranch Chicken Soup

1. Cook the Bacon

Start by cooking the diced bacon in a large pot or Dutch oven over medium heat until it’s crispy. Remove the bacon with a slotted spoon and set it aside, leaving the rendered fat in the pot for added flavor.

2. Sauté the Aromatics

Add the butter to the pot with the bacon drippings. Once melted, toss in the diced yellow onion and sauté until it becomes soft and translucent (about 3–4 minutes). Add the minced garlic and cook for another 30 seconds until fragrant.

3. Add the Broth and Seasonings

Pour in 4 to 6 cups of low sodium chicken broth, depending on how thick you want your soup to be. Stir in the garlic powder, onion powder, dried dill weed, dried chives, salt, pepper, and the bay leaf. Bring the mixture to a gentle simmer.

4. Add the Shredded Chicken

Stir in the cooked shredded chicken and let it simmer for about 5 minutes. This step allows the chicken to soak up the flavors of the broth and seasonings.

5. Melt the Cream Cheese

Reduce the heat to low and stir in the softened cream cheese. Whisk continuously until the cream cheese is fully melted and the broth becomes creamy.

6. Stir in the Cheddar Cheese

Gradually add the shredded cheddar cheese to the pot, stirring as you go to ensure it melts evenly. The cheese will thicken the soup and give it that signature cheesy flavor.

7. Add the Spinach and Heavy Cream

Toss in the baby spinach and stir until it wilts. Then, pour in the heavy cream for an extra layer of richness. Let the soup simmer for another 2–3 minutes to bring all the flavors together.

8. Serve and Garnish

Remove the bay leaf before serving. Ladle the soup into bowls and top with crispy bacon and sliced green scallions for garnish. Serve warm and enjoy!

Tips for Making the Best Cheesy Ranch Chicken Soup

  • Use Rotisserie Chicken: For a time-saving shortcut, use pre-cooked rotisserie chicken instead of cooking and shredding your own.
  • Adjust the Broth: Start with 4 cups of chicken broth and add more if you prefer a thinner soup.
  • Fresh Herbs: If you have fresh dill or chives, use them instead of dried herbs for a burst of freshness.
  • Spice It Up: Add a pinch of red pepper flakes or cayenne for a touch of heat.
  • Make It Low-Carb: Skip the heavy cream and use coconut milk as a lighter alternative.

Why This Recipe Works

Cheesy Ranch Chicken Soup works because it combines familiar flavors in an exciting way. The smoky bacon, creamy cheeses, and ranch-inspired seasonings create a soup that feels indulgent but is balanced by the freshness of baby spinach. It’s hearty enough to stand on its own as a meal, yet light enough to leave you feeling satisfied without being overly full. Plus, it’s easy to make in just one pot, making cleanup a breeze.

Nutritional Information for Cheesy Ranch Chicken Soup

Here’s an approximate breakdown per serving (based on 6 servings):

NutrientAmount
Calories~320
Protein26g
Carbohydrates6g
Fat20g
Fiber1g
Sodium640mg

What to Serve with Cheesy Ranch Chicken Soup

This soup is hearty on its own, but it pairs beautifully with a variety of sides. Here are some suggestions to round out your meal:

  • Crusty Bread: Perfect for dipping into the creamy broth.
  • Side Salad: A fresh green salad with a light vinaigrette complements the richness of the soup.
  • Grilled Cheese Sandwich: For the ultimate comfort food combo.
  • Baked Potatoes: A simple baked potato topped with butter or sour cream is a filling side dish.

Make-Ahead and Storage Tips

Cheesy Ranch Chicken Soup is great for meal prep and leftovers. Here’s how to store and reheat it:

  • Make Ahead: Prepare the soup a day in advance and let the flavors develop overnight.
  • Store Leftovers: Keep the soup in an airtight container in the refrigerator for up to 3 days.
  • Reheat: Warm the soup gently on the stovetop over low heat, stirring occasionally to prevent the cheese from separating.
  • Freeze: Freeze the soup in freezer-safe containers for up to 3 months. Thaw overnight in the fridge before reheating.

FAQs About Cheesy Ranch Chicken Soup

1. Can I use a different type of cheese?
Yes! You can substitute cheddar with Monterey Jack, Colby, or even Gouda for a different flavor profile.

2. How do I thicken the soup if it’s too thin?
If the soup is too thin, you can thicken it by mixing 1 tablespoon of cornstarch with 2 tablespoons of cold water, then stirring it into the soup.

3. Can I make this soup vegetarian?
To make a vegetarian version, substitute the chicken with diced tofu or canned chickpeas and use vegetable broth instead of chicken broth.

4. Can I omit the bacon?
Absolutely! The soup will still be flavorful without bacon. You can use olive oil or butter as a base for sautéing the onions and garlic.

5. Can I use frozen spinach?
Yes, frozen spinach works well. Just thaw and drain it before adding it to the soup.

6. How do I prevent the cheese from clumping?
Gradually add the cheese over low heat, stirring constantly to ensure it melts evenly without clumping.

Your Turn to Make Cheesy Ranch Chicken Soup

Now that you know how to make this delicious and comforting soup, it’s time to bring it to your own kitchen. Cheesy Ranch Chicken Soup is the perfect meal to warm up your evenings and impress your family. Gather your ingredients, follow the simple steps, and enjoy a bowl of creamy, cheesy goodness that’s guaranteed to become a household favorite.

Cheesy Ranch Chicken Soup: The Perfect Comfort Food

Cheesy Ranch Chicken Soup combines tender chicken, smoky bacon, creamy cheese, and flavorful ranch-inspired seasonings into one hearty, comforting bowl. With fresh spinach and rich broth, this one-pot recipe is perfect for weeknight dinners or meal prep. It's easy to make, customizable, and packed with bold, satisfying flavors.
Prep Time 10 minutes
Cook Time 25 minutes
Total Time 35 minutes
Servings: 6
Course: Main Course
Cuisine: American-inspired
Calories: 320

Ingredients
  

  • 4 slices bacon diced
  • 1 tablespoon butter
  • 1 small yellow onion diced
  • 3 cloves garlic minced
  • 4 to 6 cups low sodium chicken broth
  • ½ teaspoon garlic powder
  • ½ teaspoon onion powder
  • ½ teaspoon dried dill weed
  • ½ teaspoon dried chives
  • Salt and pepper to taste
  • 1 bay leaf
  • 4 cups cooked shredded chicken
  • 8 ounces cream cheese softened
  • 1 cup shredded cheddar cheese
  • 3 to 4 cups baby spinach
  • ¼ cup heavy cream
  • Sliced green scallions for garnish

Method
 

  1. Cook the Bacon: Fry diced bacon in a large pot until crispy. Remove and set aside, keeping the rendered fat.
  2. Sauté the Aromatics: Add butter, diced onion, and minced garlic to the pot. Cook until softened and fragrant.
  3. Simmer the Broth: Pour in chicken broth, then stir in garlic powder, onion powder, dill weed, chives, salt, pepper, and the bay leaf. Simmer gently.
  4. Add Shredded Chicken: Stir in the cooked chicken and let it simmer for 5 minutes to absorb the flavors.
  5. Melt Cream Cheese: Reduce the heat and whisk in the softened cream cheese until smooth.
  6. Add Cheddar Cheese: Gradually stir in the shredded cheddar cheese until fully melted.
  7. Add Spinach and Cream: Toss in baby spinach and let it wilt, then stir in the heavy cream. Let the soup simmer for 2–3 minutes.
  8. Garnish and Serve: Remove the bay leaf and serve the soup hot, garnished with crispy bacon and scallions.

Cheeseburger Pasta: The Comfort Food Mashup You Didn’t Know You Needed

Have you ever craved the gooey, cheesy goodness of a classic cheeseburger and the comforting warmth of pasta at the same time? If so, Cheeseburger Pasta is here to make all your comfort food dreams come true. This dish brings together the bold flavors of a cheeseburger—savory beef, tangy ketchup and mustard, and melty cheese—with the heartiness of pasta to create a meal that’s as satisfying as it is simple to make.

Whether you’re looking for a quick weeknight dinner or something to impress your family, Cheeseburger Pasta has it all. It’s a recipe that appeals to kids and adults alike and is perfect for any occasion.

Why Cheeseburger Pasta Is a Must-Try Dish

Cheeseburger Pasta isn’t just another dinner recipe; it’s a comfort food hybrid that’s destined to become a family favorite. Think of it as a one-pot wonder that combines everything you love about burgers into a pasta dish. Plus, it’s easy to prepare, uses simple ingredients you probably already have in your kitchen, and is ready in under 30 minutes.

This dish is perfect for:

  • Quick and hearty weeknight dinners
  • Potluck gatherings where you want to bring something unique
  • Leftovers that taste just as good the next day

Ingredients for Cheeseburger Pasta

Here’s everything you’ll need to create this cheesy, savory masterpiece:

IngredientQuantity
Pasta (penne or macaroni)12 ounces
Ground beef1 pound
Onion, diced1 medium
Garlic, minced2 cloves
Ketchup1 cup
Mustard1 cup
Shredded cheddar cheese1 cup
Shredded mozzarella cheese1 cup
Heavy cream1/2 cup
Olive oil1 tablespoon
SaltTo taste
Black pepperTo taste
Optional toppingsChopped pickles, bacon bits, additional cheese

This combination of simple ingredients is all you need to create a dish that’s loaded with flavor and creamy goodness.

Step-by-Step Instructions for Cheeseburger Pasta

1. Cook the Pasta

Start by boiling a large pot of salted water. Add the pasta and cook it according to the package instructions, aiming for al dente. Drain the pasta and set it aside.

2. Sauté the Onion and Garlic

In a large skillet or Dutch oven, heat the olive oil over medium heat. Add the diced onion and minced garlic, cooking until the onion is translucent and fragrant (about 3–4 minutes).

3. Brown the Ground Beef

Add the ground beef to the skillet with the onions and garlic. Cook until the beef is browned and fully cooked, breaking it up into small pieces as it cooks. Drain any excess grease from the skillet.

4. Add the Sauce Ingredients

Stir in the ketchup and mustard, mixing well to coat the beef. Allow the mixture to simmer for 2–3 minutes so the flavors meld together.

5. Stir in the Heavy Cream

Slowly pour in the heavy cream and stir until fully combined. The cream adds a rich, velvety texture to the sauce and balances the tanginess of the ketchup and mustard.

6. Add the Cheese

Lower the heat and gradually stir in the shredded cheddar and mozzarella cheeses. Keep stirring until the cheese is completely melted and the sauce becomes creamy.

7. Combine the Pasta and Sauce

Add the cooked pasta to the skillet and toss until the pasta is fully coated in the cheesy, meaty sauce. Taste and adjust the seasoning with salt and pepper if needed.

8. Add Optional Toppings

If you’re feeling adventurous, top your Cheeseburger Pasta with chopped pickles, crispy bacon bits, or extra cheese for added texture and flavor.

9. Serve and Enjoy

Serve the Cheeseburger Pasta warm, straight from the skillet. Pair it with a simple green salad or garlic bread for a complete meal.

Tips for Perfect Cheeseburger Pasta

  • Choose the Right Pasta: Penne, macaroni, or any short pasta works best for this dish because it holds the sauce well.
  • Use Freshly Grated Cheese: Pre-shredded cheese often contains additives that prevent it from melting smoothly. For the best results, grate your cheese fresh.
  • Add Extra Veggies: Sneak in some nutrition by adding diced bell peppers, mushrooms, or even spinach to the beef mixture.
  • Make It Spicy: Add a pinch of red pepper flakes or a splash of hot sauce to the sauce for a little heat.

Why This Recipe Works

Cheeseburger Pasta works because it’s a perfect balance of flavors and textures. The creamy cheese sauce coats the pasta beautifully, while the ketchup and mustard bring tanginess reminiscent of a classic cheeseburger. The ground beef adds heartiness, and the optional toppings like pickles or bacon provide that signature burger crunch. It’s a fun, family-friendly meal that feels familiar yet exciting.

Nutritional Information for Cheeseburger Pasta

Here’s an approximate breakdown per serving (based on 6 servings):

NutrientAmount
Calories~480
Protein25g
Carbohydrates38g
Fat23g
Fiber2g
Sodium880mg

What to Serve with Cheeseburger Pasta

Cheeseburger Pasta is a hearty dish, but it pairs wonderfully with a variety of sides. Here are a few ideas:

  • Garlic Bread: Perfect for soaking up any extra sauce.
  • Green Salad: A light salad with a vinaigrette helps balance the richness of the pasta.
  • Steamed Vegetables: Broccoli or green beans are simple and healthy additions to the meal.
  • Coleslaw: A tangy coleslaw adds crunch and complements the cheeseburger flavors.

Make-Ahead and Storage Tips

Cheeseburger Pasta is great for meal prep or leftovers. Here’s how to store and reheat it:

  • Make Ahead: You can prepare the sauce in advance and refrigerate it for up to 2 days. Reheat it and toss with freshly cooked pasta when ready to serve.
  • Store Leftovers: Place leftovers in an airtight container and refrigerate for up to 3 days.
  • Reheat: Reheat in a skillet over medium heat, adding a splash of water or cream to loosen the sauce.
  • Freeze: Store the sauce (without the pasta) in a freezer-safe container for up to 2 months. Thaw overnight in the fridge before reheating.

FAQs About Cheeseburger Pasta

1. Can I use a different type of meat?
Yes! Ground turkey, chicken, or even plant-based ground meat works as a substitute for beef.

2. Can I make this recipe gluten-free?
Absolutely. Use gluten-free pasta and check that your ketchup and mustard are gluten-free.

3. Can I use milk instead of heavy cream?
You can, but the sauce may be slightly less creamy. Whole milk or half-and-half works best as substitutes.

4. Can I make this dish vegetarian?
Yes! Replace the ground beef with a plant-based ground meat alternative or cooked lentils for a vegetarian version.

5. How do I prevent the sauce from becoming too thick?
If your sauce becomes too thick, simply add a splash of milk, cream, or pasta water to loosen it.

6. Can I add other cheeses?
Definitely! Try mixing in Gouda, Monterey Jack, or Parmesan for added flavor.

Your Turn to Make Cheeseburger Pasta

Now that you know how to create this creamy, cheesy, and utterly satisfying dish, it’s time to bring Cheeseburger Pasta to your dinner table. This recipe is perfect for busy nights, family gatherings, or whenever you’re craving the ultimate comfort food. It’s simple to make, easy to customize, and guaranteed to become a favorite in your household. So grab your ingredients, preheat your skillet, and enjoy a meal that’s as fun to make as it is to eat!

Cheeseburger Pasta: A Comfort Food Mashup

Cheeseburger Pasta combines the bold flavors of a classic cheeseburger—savory ground beef, tangy ketchup and mustard, and creamy cheese—with the hearty goodness of pasta. It’s quick, easy, and perfect for busy weeknights or family gatherings. This one-pot dish is a cheesy, satisfying comfort meal that everyone will love.
Prep Time 10 minutes
Cook Time 20 minutes
Total Time 30 minutes
Servings: 6
Course: Main Course
Cuisine: American-inspired
Calories: 480

Ingredients
  

  • 12 ounces pasta penne or macaroni
  • 1 pound ground beef
  • 1 medium onion diced
  • 2 cloves garlic minced
  • 1 cup ketchup
  • 1 cup mustard
  • 1 cup shredded cheddar cheese
  • 1 cup shredded mozzarella cheese
  • 1/2 cup heavy cream
  • 1 tablespoon olive oil
  • Salt and pepper to taste
  • Optional toppings: chopped pickles bacon bits, additional cheese

Method
 

  1. Cook the Pasta: Boil the pasta in salted water until al dente. Drain and set aside.
  2. Sauté Aromatics: Heat olive oil in a skillet and cook the onion and garlic until fragrant.
  3. Brown the Beef: Add ground beef to the skillet, cook until browned, and drain any excess fat.
  4. Make the Sauce: Stir in ketchup and mustard, simmer for 2–3 minutes, and then add the heavy cream. Mix until smooth.
  5. Add Cheese: Gradually stir in cheddar and mozzarella cheeses until melted and creamy.
  6. Combine with Pasta: Toss the cooked pasta with the cheesy beef sauce until fully coated.
  7. Top and Serve: Garnish with optional toppings like chopped pickles or bacon bits and enjoy!

Cheesy Pocket Tacos: Your New Favorite Handheld Snack

Imagine biting into a warm, cheesy taco pocket bursting with bold flavors, creamy filling, and perfectly seasoned ground beef. It’s the kind of meal that instantly brings a smile to your face and keeps everyone at the table reaching for seconds. Cheesy Pocket Tacos are everything you love about tacos but wrapped in a portable, melty, handheld delight. Whether you’re hosting a game day party, looking for a fun weeknight dinner, or simply craving something irresistible, this dish is guaranteed to be a hit.

What makes these tacos so special is the combination of creamy cheese, tender beef, and soft tortillas that crisp up beautifully in the oven. And the best part? You can customize them with your favorite toppings to make each bite uniquely yours.

Why Cheesy Pocket Tacos Are a Game-Changer

Cheesy Pocket Tacos are more than just a meal—they’re an experience. Unlike traditional tacos, where fillings can spill out, these pocket tacos keep everything neatly tucked inside, making them perfect for eating on the go or serving to kids. They combine the best of Tex-Mex flavors with the comfort of melty cheese and crispy tortillas. Plus, they’re ridiculously easy to make, even if you’re short on time.

Ingredients for Cheesy Pocket Tacos

To create these delicious taco pockets, you’ll need the following ingredients:

IngredientQuantity
Taco seasoning1 packet
Ground beef1 pound
Salsa1/2 cup
Cream cheese, softened8 ounces
Melted butter2 tablespoons
Cheddar cheese, shredded1 cup
6-inch tortillas12
Optional toppingsSour cream, salsa, green onions

These simple, affordable ingredients come together to create a dish that’s bursting with flavor.

Step-by-Step Instructions to Make Cheesy Pocket Tacos

1. Gather Your Ingredients

Before you start, make sure you have all your ingredients prepped and ready. Softening the cream cheese ahead of time will make mixing much easier.

2. Cook the Ground Beef

In a large skillet, cook the ground beef over medium heat until browned and fully cooked. Drain any excess grease to prevent the filling from becoming soggy. Add the taco seasoning and 1/4 cup of water to the beef, stirring until the meat is coated in the flavorful seasoning. Let it simmer for 2–3 minutes.

3. Add the Salsa

Stir in the salsa, mixing it into the beef until well combined. This adds moisture and a tangy flavor to the filling. Remove the skillet from heat and let the mixture cool slightly.

4. Create the Cheesy Filling

In a medium-sized bowl, combine the softened cream cheese, shredded cheddar cheese, and the cooled beef mixture. Stir until everything is evenly mixed. The cream cheese will add a luscious, creamy texture to the filling.

5. Assemble the Tacos

Lay out your tortillas on a flat surface. Spoon about 2–3 tablespoons of the cheesy beef mixture onto one side of each tortilla. Fold the other side over to create a half-moon shape, pressing the edges gently to seal.

6. Brush with Butter

Brush the tops of the folded tortillas with melted butter. This step ensures they turn golden and crispy in the oven.

7. Bake to Perfection

Place the tacos on a baking sheet lined with parchment paper or foil. Bake in a preheated oven at 375°F (190°C) for 12–15 minutes, or until the tortillas are lightly browned and crispy.

8. Add Your Favorite Toppings

Once the tacos are out of the oven, let them cool slightly before adding your favorite toppings like sour cream, extra salsa, or chopped green onions.

9. Serve and Enjoy

Serve the tacos warm with a side of guacamole, pico de gallo, or a fresh salad. Watch as your family and friends devour them in no time!

Tips for Making the Best Cheesy Pocket Tacos

  • Use Fresh Tortillas: Soft, pliable tortillas are easier to fold and seal, ensuring your filling stays inside.
  • Customize the Filling: Add black beans, diced jalapeños, or corn to the cheesy beef mixture for extra flavor.
  • Make It Spicy: If you love heat, stir in some hot sauce or chopped chili peppers.
  • Prevent Sogginess: Allow the beef mixture to cool slightly before adding it to the tortillas to avoid making them soggy.

Why This Recipe Works

Cheesy Pocket Tacos are a brilliant combination of flavors and textures. The taco seasoning adds bold spices, the cream cheese makes the filling irresistibly creamy, and the melted cheddar provides the ultimate cheesy pull. Baking the tacos ensures they’re crispy on the outside while staying warm and gooey on the inside. It’s the kind of recipe that looks and tastes impressive but is so easy to make, it’ll become a regular in your dinner rotation.

Nutritional Information for Cheesy Pocket Tacos

Here’s an approximate nutritional breakdown per taco (without optional toppings):

NutrientAmount
Calories~250
Protein13g
Carbohydrates18g
Fat15g
Fiber1g
Sodium580mg

What to Serve with Cheesy Pocket Tacos

Cheesy Pocket Tacos are a meal in themselves, but you can elevate your dinner with some delicious sides:

  • Mexican Rice: A classic side that complements the bold flavors of the tacos.
  • Refried Beans: Creamy and hearty, they’re perfect for rounding out the meal.
  • Guacamole and Chips: Add a creamy, refreshing element to your plate.
  • Corn Salad: A tangy, crunchy salad made with fresh corn, lime juice, and cilantro.

Make-Ahead and Storage Tips

Cheesy Pocket Tacos are ideal for meal prep and leftovers. Here’s how to store and reheat them:

  • Make Ahead: Assemble the tacos up to 24 hours in advance and store them in the refrigerator. Brush them with butter just before baking.
  • Refrigerate Leftovers: Store cooked tacos in an airtight container in the fridge for up to 3 days.
  • Freeze for Later: Wrap each taco individually in plastic wrap, then store in a freezer-safe bag. Freeze for up to 2 months.
  • Reheat: Reheat in the oven at 350°F (175°C) for 10–12 minutes to keep them crispy.

FAQs About Cheesy Pocket Tacos

1. Can I use ground turkey instead of beef?
Yes, ground turkey works perfectly as a leaner alternative to ground beef.

2. Can I make this recipe vegetarian?
Absolutely! Swap the ground beef for cooked black beans or a plant-based meat substitute.

3. Can I use flour tortillas instead of corn tortillas?
Yes, flour tortillas are actually recommended for this recipe because they’re more flexible and easier to fold.

4. How do I prevent the tortillas from tearing?
Warm the tortillas slightly in the microwave or a skillet before folding them to make them more pliable.

5. Can I make this dish gluten-free?
Yes! Use gluten-free tortillas and check that your taco seasoning is certified gluten-free.

6. What other cheeses can I use?
Monterey Jack, pepper jack, or a Mexican cheese blend are great alternatives to cheddar.

Your Turn to Try Cheesy Pocket Tacos

Now that you know how to make these irresistibly creamy and cheesy tacos, it’s time to get cooking! Cheesy Pocket Tacos are perfect for family dinners, potlucks, or even game day snacks. They’re easy to customize, quick to prepare, and guaranteed to impress everyone who tries them. Gather your ingredients, preheat your oven, and treat yourself to a dish that’s as fun to eat as it is delicious. You’ll love how simple and satisfying this recipe is—so much so that it’ll become a staple in your kitchen.

Cheesy Pocket Tacos: Your New Favorite Handheld Snack

Cheesy Pocket Tacos combine seasoned ground beef, creamy cheese, and crispy tortillas for a portable and flavorful meal. These tacos are easy to prepare, customizable with your favorite toppings, and perfect for weeknight dinners, parties, or snack time. Each bite offers bold Tex-Mex flavors with a cheesy, gooey center.
Prep Time 10 minutes
Cook Time 15 minutes
Total Time 25 minutes
Servings: 6
Course: Snack
Cuisine: Tex-Mex
Calories: 250

Ingredients
  

  • 1 packet taco seasoning
  • 1 pound ground beef
  • 1/2 cup salsa
  • 8 ounces cream cheese softened
  • 2 tablespoons melted butter
  • 1 cup shredded cheddar cheese
  • 12 6- inch tortillas
  • Optional toppings: sour cream salsa, green onions

Method
 

  1. Cook Ground Beef: Brown ground beef in a skillet over medium heat. Drain excess fat, add taco seasoning and 1/4 cup water, and let simmer for 2–3 minutes.
  2. Add Salsa: Stir salsa into the beef mixture and let cool slightly.
  3. Mix Cheesy Filling: Combine softened cream cheese, shredded cheddar, and the beef mixture in a bowl. Mix until smooth.
  4. Assemble Tacos: Lay tortillas flat, spoon 2–3 tablespoons of filling onto one side, and fold into half-moon shapes.
  5. Brush with Butter: Brush tops with melted butter to ensure crispiness.
  6. Bake: Arrange tacos on a baking sheet and bake at 375°F (190°C) for 12–15 minutes until golden and crispy.
  7. Top and Serve: Add your favorite toppings like sour cream, salsa, or green onions and serve warm.

Million Dollar Ravioli Casserole: A Dish Worth Every Bite

Picture this: a bubbling casserole, rich with layers of cheese, hearty beef, and tender ravioli, coming out of the oven, filling your kitchen with the most comforting aroma. That’s the magic of a Million Dollar Ravioli Casserole. Despite its luxurious name, this dish is incredibly easy to prepare and perfect for feeding your family or impressing your guests. It’s creamy, cheesy, and loaded with Italian flavors that will have everyone asking for seconds—and maybe even thirds! Whether you’re planning a cozy weeknight dinner or a weekend celebration, this casserole is a guaranteed crowd-pleaser.

Why You’ll Love Million Dollar Ravioli Casserole

Million Dollar Ravioli Casserole isn’t just a meal—it’s an experience. It combines everything you love about comfort food into one dish. The creamy cheese mixture melts into the marinara sauce, the ravioli absorbs all the savory goodness, and the melted mozzarella on top seals the deal. It’s indulgent, satisfying, and feels like something you’d get at a fancy Italian restaurant, but it’s so simple to make at home. Plus, it’s the kind of recipe that’s easy to customize, making it perfect for picky eaters or adventurous foodies.

Ingredients for Million Dollar Ravioli Casserole

Here’s everything you’ll need to make this rich and creamy casserole:

IngredientQuantity
Frozen cheese ravioli25 ounces
Ground beef1 pound
Marinara sauce28 ounces
Cream cheese, softened8 ounces
Sour cream1 cup
Parmesan cheese, freshly grated1 cup
Garlic powder1 teaspoon
Italian seasoning1 teaspoon
Salt1/2 teaspoon
Grated mozzarella cheese2 cups (divided)

This ingredient list balances convenience and flavor, giving you a restaurant-quality dish with minimal effort.

Step-by-Step Instructions for Making Million Dollar Ravioli Casserole

1. Prepare Your Ingredients

Start by gathering all your ingredients. Let the cream cheese soften to room temperature for easier mixing. Preheat your oven to 375°F (190°C) and grease a 9×13-inch baking dish to prevent sticking.

2. Cook the Ground Beef

In a large skillet, cook the ground beef over medium heat until it’s browned and no longer pink. Drain any excess fat. Stir in the marinara sauce and let it simmer for a few minutes, allowing the flavors to meld together.

3. Make the Creamy Cheese Mixture

In a mixing bowl, combine the softened cream cheese, sour cream, Parmesan cheese, garlic powder, Italian seasoning, and salt. Stir until the mixture is smooth and creamy. This is what gives the casserole its “million-dollar” richness.

4. Layer the Casserole

Now it’s time to assemble the layers:

  • Spread a thin layer of the beef and marinara mixture on the bottom of your prepared baking dish.
  • Arrange half of the frozen cheese ravioli in a single layer over the sauce.
  • Spoon half of the creamy cheese mixture over the ravioli and spread it out evenly.
  • Sprinkle 1 cup of mozzarella cheese over the top.
  • Repeat the layers: marinara sauce, ravioli, cheese mixture, and finish with the remaining mozzarella.

5. Bake to Perfection

Cover the casserole with aluminum foil and bake in the preheated oven for 30 minutes. Then, remove the foil and bake for an additional 15 minutes, or until the cheese is melted, bubbly, and golden brown.

6. Let It Rest and Serve

Once out of the oven, let the casserole rest for 5–10 minutes. This allows the layers to set, making it easier to serve. Garnish with fresh parsley or extra Parmesan cheese if you like, and enjoy!

Tips for Making the Perfect Ravioli Casserole

  • Use Quality Ingredients: The better your marinara sauce and cheese, the better your casserole will taste.
  • Try Fresh Ravioli: While frozen ravioli works perfectly, you can use fresh ravioli for a more gourmet feel.
  • Customize Your Filling: Add sautéed spinach, mushrooms, or diced zucchini for extra nutrition and flavor.
  • Experiment with Cheese: Swap out mozzarella for provolone, or add a layer of ricotta for an extra creamy twist.
  • Make It Spicy: Add red pepper flakes to the marinara sauce for a subtle heat.

Why This Recipe Works

Million Dollar Ravioli Casserole hits all the right notes. The frozen ravioli acts as both the pasta and filling, saving you time and effort. The creamy cheese layer provides a luscious texture that complements the tangy marinara sauce and hearty ground beef. It’s a foolproof recipe that comes together quickly but tastes like you spent hours in the kitchen. Plus, it’s a one-dish meal, meaning cleanup is a breeze!

Nutritional Information for Million Dollar Ravioli Casserole

Here’s an approximate nutritional breakdown per serving (based on 8 servings):

NutrientAmount
Calories450
Protein25g
Carbohydrates28g
Fat28g
Fiber3g
Calcium220mg

What to Serve with Million Dollar Ravioli Casserole

This hearty casserole pairs well with a variety of sides. Here are some ideas to round out your meal:

  • Garlic Bread: A crusty, buttery garlic bread is perfect for soaking up any extra sauce.
  • Simple Green Salad: A light salad with a tangy vinaigrette balances the richness of the casserole.
  • Steamed Vegetables: Broccoli, asparagus, or green beans make for a nutritious and colorful side.
  • Wine Pairing: A glass of red wine like Chianti or Merlot complements the Italian flavors beautifully.

Make-Ahead and Storage Tips

Million Dollar Ravioli Casserole is ideal for meal prep and leftovers. Here’s how to store and reheat it:

  • Make Ahead: Assemble the casserole up to 24 hours in advance and store it in the refrigerator, covered. Bake it fresh when you’re ready to serve.
  • Store Leftovers: Keep any leftovers in an airtight container in the fridge for up to 3 days.
  • Freeze for Later: You can freeze the assembled casserole (unbaked) for up to 2 months. Thaw overnight in the fridge before baking.

FAQs About Million Dollar Ravioli Casserole

1. Can I use a different type of ravioli?
Yes! Try using spinach and ricotta ravioli, mushroom ravioli, or even meat-filled ravioli for a unique twist.

2. Can I make this vegetarian?
Absolutely! Simply omit the ground beef and add extra vegetables like mushrooms, spinach, or zucchini.

3. Can I use homemade marinara sauce?
Yes, homemade marinara sauce will add a fresh and personal touch to this recipe.

4. How do I prevent the cheese from burning?
Cover the casserole with foil during the first 30 minutes of baking, then uncover it to let the cheese brown slightly.

5. Can I substitute sour cream?
If you don’t have sour cream, you can use plain Greek yogurt as a lighter alternative.

6. Can I reheat this in the microwave?
Yes, but for the best texture, reheat individual portions in the oven at 350°F (175°C) until warmed through.

Your Turn to Make Million Dollar Ravioli Casserole

Now that you have all the details, it’s time to bring this delicious dish to life in your kitchen. Million Dollar Ravioli Casserole is more than a meal—it’s a way to bring people together over something comforting and indulgent. With simple ingredients and easy-to-follow steps, this recipe is perfect for cooks of all skill levels. So grab your ingredients, preheat your oven, and treat yourself to this million-dollar masterpiece. Your family (and your taste buds) will thank you.

Summary for Million Dollar Ravioli Casserole: A Dish Worth Every Bite

Million Dollar Ravioli Casserole is a decadent yet simple dish combining layers of creamy cheese, hearty marinara, tender cheese ravioli, and melty mozzarella. This comforting, crowd-pleasing casserole is perfect for cozy weeknight dinners or family gatherings.
Prep Time 15 minutes
Cook Time 45 minutes
Total Time 1 hour
Servings: 8
Course: Main Course
Cuisine: Italian-inspired
Calories: 450

Ingredients
  

  • 25 ounces frozen cheese ravioli
  • 1 pound ground beef
  • 28 ounces marinara sauce
  • 8 ounces cream cheese softened
  • 1 cup sour cream
  • 1 cup freshly grated Parmesan cheese
  • 1 teaspoon garlic powder
  • 1 teaspoon Italian seasoning
  • 1/2 teaspoon salt
  • 2 cups grated mozzarella cheese divided

Method
 

  1. Preheat the Oven: Preheat your oven to 375°F (190°C) and grease a 9×13-inch baking dish.
  2. Cook the Beef: In a skillet, cook ground beef over medium heat until browned. Drain excess fat, then stir in marinara sauce and let it simmer for a few minutes.
  3. Make Cheese Mixture: Combine softened cream cheese, sour cream, Parmesan cheese, garlic powder, Italian seasoning, and salt in a bowl. Mix until smooth.
  4. Assemble Layers:
  5. Spread a thin layer of marinara sauce in the baking dish.
  6. Add half of the frozen ravioli in a single layer.
  7. Spread half of the cheese mixture over the ravioli.
  8. Sprinkle 1 cup of mozzarella over the cheese mixture.
  9. Repeat layers, finishing with the remaining mozzarella.
  10. Bake: Cover with foil and bake for 30 minutes. Remove the foil and bake for another 15 minutes, until cheese is melted and bubbly.
  11. Cool and Serve: Let rest for 5–10 minutes before serving. Garnish with parsley or Parmesan, if desired.

Ham Cheese Quiche: A Deliciously Simple Comfort Food

There’s something magical about the warm, flaky crust of a quiche paired with its creamy, cheesy filling. It’s a dish that feels fancy but is surprisingly easy to make. Ham cheese quiche is the perfect blend of savory ham, gooey cheese, and a rich custard, all nestled in a buttery pie crust. Whether you’re planning a weekend brunch, a casual dinner, or a comforting breakfast-for-dinner meal, this dish is a surefire hit that feels homemade in the best way possible. Let’s explore how you can create this timeless favorite step by step!

Why Ham Cheese Quiche Is Perfect for Any Occasion

Quiches are incredibly versatile. You can serve them warm, cold, or at room temperature, making them ideal for everything from elegant brunch spreads to simple weekday leftovers. Plus, they’re customizable—ham cheese quiche offers a classic flavor combination, but you can easily tweak it to suit your family’s preferences. The mix of creamy custard, savory ham, and cheesy goodness makes every bite comforting and satisfying.

Ingredients for Ham Cheese Quiche

To get started, you’ll need a few simple ingredients. Here’s what makes up this delicious quiche:

IngredientQuantity
Diced ham1 cup
Cream cheese2 oz
Shredded cheddar cheese1/2 cup
Green onion, chopped1
Hot sauce1/4 teaspoon
Worcestershire sauce1/2 teaspoon
Sour cream3 tablespoons
Heavy cream1 cup
Eggs3
Deep dish pie crust (9-inch)1

Step-by-Step Instructions to Make Ham Cheese Quiche

1. Gather and Prepare Your Ingredients

Before diving in, make sure you have all your ingredients measured, chopped, and ready to go. Preheat your oven to 375°F (190°C) so it’s hot and ready when your quiche goes in.

2. Prepare the Pie Crust

Place your 9-inch deep-dish pie crust on a baking sheet to make transferring it to the oven easier. If you’re using a frozen crust, let it thaw for a few minutes while you prepare the filling.

3. Cook the Ham

If your ham is pre-cooked, you can use it as-is. However, for extra flavor, you can lightly sauté the diced ham in a skillet for a few minutes to bring out its natural sweetness and savory notes.

4. Blend the Cheese Mixture

In a mixing bowl, combine the cream cheese, shredded cheddar cheese, and sour cream. Use a spatula or fork to mix everything together until it forms a smooth, creamy mixture.

5. Prepare the Custard Base

In another bowl, whisk together the heavy cream, eggs, hot sauce, Worcestershire sauce, and a pinch of salt and pepper. This rich custard base is what gives your quiche its silky texture.

6. Assemble the Quiche

Now it’s time to bring everything together:

  • Spread the ham evenly across the bottom of the pie crust.
  • Sprinkle the chopped green onion over the ham.
  • Spoon the cheese mixture on top, spreading it evenly.
  • Pour the custard mixture over everything, letting it fill all the gaps.

7. Bake to Perfection

Carefully place the quiche in your preheated oven and bake for 35–40 minutes. You’ll know it’s done when the center is set and a knife inserted into the middle comes out clean.

8. Cool and Serve

Once baked, let your quiche cool for 10–15 minutes before slicing. This helps the filling set further and ensures clean, beautiful slices.

Tips for Making the Perfect Ham Cheese Quiche

  • Use Quality Ingredients: Fresh eggs, high-quality ham, and sharp cheddar cheese will elevate the flavor of your quiche.
  • Customize the Fillings: Add spinach, mushrooms, or even diced bell peppers to give your quiche extra depth and nutrition.
  • Avoid Soggy Crusts: Pre-bake the crust for 5 minutes before adding the filling if you prefer a crisper base.
  • Check for Doneness: Keep an eye on the quiche during the last few minutes of baking to prevent overcooking. The center should be set but still slightly jiggly.

Why This Recipe Works

Ham cheese quiche is a simple recipe, but its balance of flavors and textures is what makes it a standout. The diced ham adds a salty, savory bite, while the creamy cheeses and custard create a luscious, melt-in-your-mouth filling. The flaky crust ties it all together, creating a dish that’s both hearty and elegant.

Nutritional Benefits of Ham Cheese Quiche

Quiche isn’t just delicious; it also offers several key nutrients:

  • Protein: The eggs, ham, and cheese provide a protein-packed base to keep you full and energized.
  • Calcium: Cheddar cheese and cream contribute to your daily calcium needs, supporting bone health.
  • Healthy Fats: The cream and cheese provide fats essential for brain function and energy.
  • Vitamins: Green onions add a dose of vitamins A and C.

What to Serve with Ham Cheese Quiche

Ham cheese quiche pairs beautifully with a variety of side dishes. Here are some ideas:

  • A simple green salad with a light vinaigrette
  • Fresh fruit salad with berries and melon
  • Toasted baguette slices or garlic bread
  • A refreshing drink like iced tea or lemonade

Make-Ahead Tips and Storage

Ham cheese quiche is a great dish to make ahead. Here’s how you can prepare and store it:

  • Prep Ahead: Assemble the quiche a day in advance and store it in the refrigerator, unbaked. Bake it fresh the next day.
  • Store Leftovers: Wrap leftover quiche tightly in foil or place in an airtight container. Refrigerate for up to 3 days.
  • Freeze for Later: Cooked quiche freezes well! Let it cool completely, wrap it in plastic wrap, and store it in the freezer for up to 2 months. Reheat in the oven before serving.

FAQs About Ham Cheese Quiche

1. Can I use a different type of cheese?
Yes! Swap cheddar for Swiss, Gruyère, or mozzarella for a different flavor profile.

2. Can I make this quiche crustless?
Absolutely! Simply skip the crust and bake the filling in a greased pie dish for a low-carb version.

3. Can I use milk instead of heavy cream?
You can, but the quiche may not be as rich. For the best results, use whole milk or a mix of milk and cream.

4. Can I make it vegetarian?
Yes! Omit the ham and add more veggies like spinach, mushrooms, or roasted red peppers.

5. How do I reheat quiche?
Reheat slices in the oven at 350°F (175°C) for 10–15 minutes. Avoid the microwave as it can make the crust soggy.

6. Can I use store-bought crust?
Of course! Store-bought crust saves time and works perfectly for this recipe.

Your Turn to Make Ham Cheese Quiche

Now that you know how to create this delicious ham cheese quiche, it’s time to give it a try! This versatile dish is perfect for brunches, family dinners, or even meal prep. The flaky crust, creamy filling, and savory ham will make it an instant favorite in your home. Gather your ingredients, preheat your oven, and start baking—you won’t regret it!

Summary for Ham Cheese Quiche: A Deliciously Simple Comfort Food

Ham cheese quiche combines savory ham, creamy custard, and gooey cheese baked into a flaky pie crust. This versatile dish is perfect for brunches, casual dinners, or meal prep. Its rich texture and comforting flavors make it a standout favorite that’s surprisingly easy to prepare.
Prep Time 15 minutes
Cook Time 40 minutes
Total Time 55 minutes
Servings: 6
Course: Breakfast
Cuisine: French-American Fusion
Calories: 320

Ingredients
  

  • 1 cup diced ham
  • 2 oz cream cheese
  • 1/2 cup shredded cheddar cheese
  • 1 green onion chopped
  • 1/4 teaspoon hot sauce
  • 1/2 teaspoon Worcestershire sauce
  • 3 tablespoons sour cream
  • 1 cup heavy cream
  • 3 eggs
  • 1 9-inch deep dish pie crust

Method
 

  1. Preheat Oven: Preheat your oven to 375°F (190°C).
  2. Prepare Crust: Place the deep-dish pie crust on a baking sheet for easy transfer.
  3. Cook Ham (Optional): For extra flavor, sauté diced ham in a skillet until slightly caramelized.
  4. Mix Cheese Base: Combine cream cheese, shredded cheddar, and sour cream in a bowl until smooth.
  5. Whisk Custard: In a separate bowl, whisk together heavy cream, eggs, Worcestershire sauce, hot sauce, salt, and pepper.
  6. Assemble Quiche: Layer ham and chopped green onion in the pie crust. Spread the cheese mixture evenly over the ham, then pour the custard mixture on top.
  7. Bake: Bake for 35–40 minutes or until the center is set and a knife inserted into it comes out clean.
  8. Cool and Serve: Let the quiche cool for 10–15 minutes before slicing. Serve warm or at room temperature.

Stay Connected

Get recipes via email: