The Heartwarming Story Behind the Apricot Cake

Growing up, I spent countless afternoons in my grandmother’s kitchen, the smell of fresh-baked cakes and sweet fruit filling the air. One of my fondest memories is the apricot cake she would make during the summer months, when the trees in her garden were heavy with ripe, golden fruit. There was something about the way the tangy apricots blended with the soft, pillowy cake that made every bite feel like a little piece of home.

Every time we gathered around the table to enjoy her creations, the room would fill with laughter, stories, and a sense of togetherness. The apricot cake became more than just a dessert—it was a symbol of comfort, family, and the magic that happens when ingredients come together to create something truly special. Today, I’m passing on this cherished recipe, hoping to create new memories in my own kitchen with friends and family, just as my grandmother did with me.

What Makes This Apricot Cake So Special?

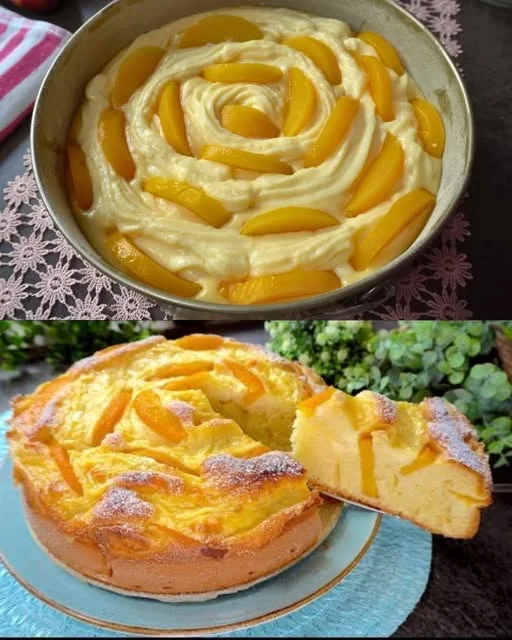
The beauty of this apricot cake lies in its perfect balance of textures and flavors. It’s not just a cake; it’s an experience. The light, airy layers of the cake pair perfectly with the smooth and creamy pudding center, creating a dessert that’s both indulgent and refreshing. The pudding is rich and velvety, providing a delightful contrast to the softness of the cake. The addition of apricots, whether fresh or canned, adds a lovely hint of sweetness and a touch of tartness that enhances every bite.

This cake is ideal for any occasion, whether you’re hosting a gathering, celebrating a special event, or simply treating yourself to something delightful. It’s a dessert that is sure to impress and become a staple in your recipe collection.

Ingredients:

For the Pudding Cream

IngredientAmount
Egg (separated)1
Egg yolk1
Milk (divided)350 ml (1 1/2 cups)
Cornstarch2 heaped tablespoons
Vanilla extract1 teaspoon
Sugar50 g (1/4 cup)

For the Cake

IngredientAmount
Eggs3
Egg white (reserved)1
SaltA pinch
Sugar130 g (2/3 cup)

Directions:

  1. Prepare the Pudding Cream:
    • In a bowl, whisk the egg yolk, cornstarch, and sugar together until smooth.
    • In a saucepan, bring 250 ml (1 cup) of milk to a simmer. Gradually whisk in the egg mixture, continuing to stir until it thickens, about 2-3 minutes.
    • Remove from heat and stir in the remaining 100 ml of milk and vanilla extract. Set aside to cool.
  2. Make the Cake:
    • Preheat your oven to 180°C (350°F) and grease a cake pan or line it with parchment paper.
    • In a bowl, whisk together 3 eggs, the reserved egg white, a pinch of salt, and the sugar until the mixture is frothy and light.
    • Pour the cake batter into the prepared pan, smoothing the top.
    • Bake for 15-18 minutes, or until a toothpick inserted comes out clean. Let the cake cool slightly once it’s done.
  3. Assemble the Cake:
    • Once the cake has cooled a bit, carefully slice it in half horizontally.
    • Spread the pudding cream evenly over the bottom layer.
    • Place the top layer back on and refrigerate the assembled cake for 1-2 hours before serving.

Nutritional Information (per serving):

NutrientAmount
Calories180
Carbohydrates25 g
Protein5 g
Fat7 g
Fiber1 g

Why You Should Try This Recipe

A Perfect Balance of Flavors and Textures

One of the standout features of this apricot cake is the fusion of cake and pudding. While the fluffy cake provides a light and airy base, the creamy pudding filling adds a smooth, indulgent richness. Together, they create a harmony of textures that’s incredibly satisfying. Each bite offers something unique—soft, moist cake paired with a rich, custard-like filling that melts in your mouth.

Versatility and Customization

While this recipe features apricots, the beauty of this cake is its versatility. You can easily swap out apricots for other fruits, such as peaches, berries, or even pears, depending on what’s in season or what you have on hand. The pudding cream is also incredibly customizable. If you prefer a more decadent option, you could add a bit of chocolate or caramel to the cream, or even infuse it with spices like cinnamon or nutmeg for an autumn-inspired twist. The possibilities are endless, allowing you to make this cake your own.

Easy to Prepare Yet Impressive to Serve

One of the most appealing aspects of this apricot cake is how easy it is to make. While it may look and taste like a dessert that took hours to prepare, it comes together fairly quickly. The steps are simple, and the ingredients are easy to find, making it a great choice for both novice and experienced bakers. Despite its simplicity, the cake has an elegant appearance and rich flavors that are sure to impress your guests.

Frequently Asked Questions (FAQs)

Can I Use Fresh Apricots Instead of Canned?

Yes, absolutely! Fresh apricots are a great alternative to canned apricots. Simply peel and slice them into thin pieces before layering them onto the cake. If you choose to use fresh apricots, be sure they are ripe for the best flavor. If they’re too tart, you might want to sprinkle a little sugar over them before baking to balance out the flavor.

How Do I Store Leftover Cake?

This apricot cake should be stored in an airtight container in the refrigerator to keep it fresh. The pudding filling will need to be refrigerated to maintain its texture, and the cake will last for about 3-4 days. If you want to store the cake for longer, you can freeze it. Wrap the cake tightly in plastic wrap and foil before placing it in the freezer. It should keep for up to 3 months. To thaw, simply let it sit at room temperature for a few hours.

Can I Make This Cake Ahead of Time?

Yes, this cake can be made ahead of time. In fact, it’s often even better the next day after the flavors have had time to meld together. You can prepare the cake and pudding cream a day in advance, store them separately in the refrigerator, and then assemble the cake when you’re ready to serve. This makes it an excellent choice for entertaining since much of the work can be done in advance.

Can I Make This Cake Gluten-Free?

Yes, you can make this cake gluten-free by substituting the all-purpose flour with a gluten-free flour blend. Keep in mind that the texture may differ slightly from the original recipe, but the flavor will still be delicious. If you’re using a gluten-free flour blend, ensure that it’s one designed for baking, as this will provide the best results.

How Can I Make the Cake Lighter?

If you prefer a lighter cake, you can substitute some of the sugar with a natural sweetener like honey or maple syrup. Additionally, you can reduce the amount of sugar in the pudding cream for a less sweet result. If you’re looking for a lower-calorie option, you can also use a lighter milk alternative, such as almond milk, and reduce the amount of butter or oil in the cake.

How to Personalize Your Apricot Cake

While this cake is already a showstopper, there are a few simple ways to make it even more personalized and reflective of your own tastes.

Fruit Variations

The apricot is the star of this recipe, but it’s versatile enough to allow for substitutions. You can experiment with other fruits like peaches, plums, or berries. If you’re using a different fruit, consider the sweetness of the fruit you choose, as this may affect the amount of sugar needed in the recipe.

Flavor Enhancements

Want to elevate the flavor profile? Consider adding a splash of liqueur such as amaretto or brandy to the pudding cream for an adult twist. You could also infuse the cream with vanilla bean or citrus zest for an added layer of flavor. For an indulgent touch, add a dollop of whipped cream or a drizzle of caramel sauce when serving.

Frosting and Garnishes

If you want to add a decorative touch, try topping the cake with a dusting of powdered sugar or finely chopped nuts like almonds or pistachios. You can also use fresh apricot slices to garnish the top of the cake before serving, enhancing its visual appeal and adding a fresh, fruity element.

Conclusion: A Cake That Brings People Together

This apricot cake is more than just a dessert—it’s an invitation to create memories. Whether you’re baking it for a holiday, a celebration, or a simple weekend gathering, this cake has the power to bring people together over shared moments and delicious food. Just like my grandmother’s kitchen was a place for laughter and connection, I hope this recipe finds its way into your home and becomes a part of your family’s traditions.

Its light, airy texture, creamy filling, and fresh fruit topping make it a perfect choice for any occasion. It’s a cake that can be personalized to your tastes and shared with the people you love, making it a timeless addition to your recipe collection.

Amal

The Heartwarming Story Behind the Apricot Cake

This Apricot Cake is the perfect blend of airy, soft cake layers and a smooth, creamy pudding filling. The combination of sweet apricots and rich pudding makes it an irresistible treat for any occasion.
Prep Time 20 minutes
Cook Time 30 minutes
Total Time 50 minutes
Servings: 8 -10 servings
Course: Dessert
Cuisine: European-inspired

Ingredients
  

For the Pudding Cream:
  • 1 egg separated
  • 1 egg yolk
  • 350 ml 1 1/2 cups milk (divided)
  • 2 heaped tablespoons cornstarch
  • 1 teaspoon vanilla extract
  • 50 g 1/4 cup sugar
For the Cake:
  • 3 eggs
  • 1 egg white reserved from the pudding cream
  • A pinch of salt
  • 130 g 2/3 cup sugar

Method
 

  1. Prepare the Pudding Cream: In a saucepan, whisk together the egg yolk, cornstarch, sugar, and vanilla extract. Gradually add 150 ml of milk while whisking continuously to create a smooth mixture. Heat the mixture over medium heat, stirring constantly until it begins to thicken. Once thickened, remove from heat and set aside to cool. In a separate bowl, whisk the egg white until stiff peaks form. Gently fold the whipped egg white into the cooled pudding mixture, ensuring it’s evenly incorporated. Set aside.
  2. Prepare the Cake: Preheat the oven to 180°C (350°F). Grease and flour a cake pan. In a mixing bowl, beat the 3 eggs with sugar and a pinch of salt until the mixture becomes light and fluffy. Gently fold in the pudding cream mixture. Mix well until smooth. Pour the batter into the prepared cake pan and bake for 25-30 minutes or until a toothpick inserted comes out clean. Once baked, let the cake cool completely before frosting or serving.
  3. Assemble and Serve: Once the cake has cooled, cut it into slices or serve as a whole. Top with fresh apricot slices or apricot jam for extra flavor.

Notes

  • If you prefer a stronger apricot flavor, you can add apricot jam or fresh apricot slices into the batter before baking.
  • Make sure to allow the cake to cool completely before slicing to ensure it holds its shape and the pudding filling stays intact.
  • For an extra touch of elegance, dust the cake with powdered sugar or garnish with a few fresh mint leaves before serving.

Banana, Cocoa & Oat: A Slice of Comfort in Every Bite

There are recipes that whisper comfort the moment you begin preparing them. For me, this banana, cocoa, and oat dessert wasn’t just another healthy treat—it was born in a quiet morning moment that I’ll never forget.

It started with a leftover banana, too ripe for cereal but too precious to waste. The kettle had just whistled, and as I poured hot milk into my mug, I reached for my jar of oats. That was the moment. I remembered the way my grandmother used to mash bananas into her oatmeal and sprinkle cocoa on top when we were kids. It felt indulgent, even magical back then. And suddenly, I wasn’t just making breakfast—I was about to revive a memory in the form of a bake.

With nothing but intuition and warmth guiding my hands, I mixed those familiar ingredients together, added a pinch of vanillin, some baking powder, and a handful of walnuts from the pantry. A few minutes later, a rich chocolate aroma filled the kitchen—one that took me straight back to my childhood. The result? A cake that wasn’t too sweet, perfectly moist, and bursting with flavor and nostalgia.

Now, this banana-oat chocolate bake has become a tradition in my kitchen. It’s the dessert I bake when I want to give my family something hearty, healthy, and deeply satisfying. It’s also my answer when someone asks, “What can I make with ripe bananas that isn’t banana bread?”

The Magic Behind the Mix

This dessert isn’t your standard banana bread, nor is it a classic chocolate cake. It’s something in between—soft, fudgy, gently sweet, and made with ingredients that nourish without compromising on taste.

Oats: The Backbone of Texture

Oats give the structure and heartiness to this bake. When soaked in hot milk, they swell and soften, providing a tender texture that mimics flour while packing in fiber and nutrients. You can use quick oats or rolled oats, depending on the texture you prefer—rolled oats give a bit more bite, while quick oats make it more tender.

Bananas: Nature’s Sweetener

Ripe bananas add more than just sweetness. They bring moisture, richness, and a creamy consistency. Their natural sugars replace the need for added sweeteners in many cases, making this dessert a healthier option that still satisfies sweet cravings.

Cocoa Powder: The Deep Flavor Layer

Bitter cocoa balances the natural sugars of the banana. It brings a rich, chocolaty depth to the dish without overwhelming it. You can use Dutch-processed cocoa for a smoother flavor or natural cocoa powder if you want a bolder kick.

Eggs, Baking Powder, and Vanillin: The Binders and Lifters

Eggs bind everything together, ensuring the final bake is tender yet stable. Baking powder adds lift, and a pinch of vanillin (or pure vanilla extract) brightens the whole flavor profile.

Optional, but Worth It: Walnuts and Chocolate Chips

These add texture and decadence. Walnuts bring crunch and healthy fats; chocolate chips melt into gooey surprises with every bite.

INGREDIENTS

IngredientQuantity
Oat flakes120 g (3/4 cup + 1 tbsp)
Hot milk200 ml (5/6 cup)
Eggs2
Bananas (ripe, mashed)2
VanillinA pinch
Bitter cocoa powder40 g (1/2 cup)
Baking powder1 teaspoon
Walnuts (chopped)To taste
Chocolate chipsTo taste

DIRECTIONS

  1. Preheat your oven to 180°C (350°F). Grease or line a small baking pan.
  2. In a bowl, pour hot milk over oat flakes and let them soak for 10 minutes until softened.
  3. Add mashed bananas, eggs, and a pinch of vanillin to the oat mixture. Stir to combine.
  4. Mix in cocoa powder and baking powder until smooth and evenly incorporated.
  5. Fold in chopped walnuts and chocolate chips to taste.
  6. Pour the mixture into the prepared baking pan and level the surface.
  7. Bake for 25–30 minutes or until a toothpick inserted comes out with moist crumbs.
  8. Let it cool slightly before slicing. Serve warm or chilled for a fudgier texture.

NUTRITION INFORMATION (Per Serving – Based on 8 Slices)

NutrientAmount
Calories~210 kcal
Protein6 g
Carbohydrates24 g
Sugars10 g
Fiber4 g
Fat10 g
Saturated Fat2.5 g
Sodium70 mg
Potassium~300 mg
Iron8% DV

Why This Recipe Works for Every Occasion

Whether you’re catering to kids, guests, or simply yourself, this chocolate-banana oat dessert adapts beautifully.

As a Breakfast

Yes, it’s technically a dessert—but its healthy profile makes it perfect for breakfast too. Pair it with a cup of black coffee or a matcha latte and you’re starting your day with fuel and flavor.

As a Snack

Cut it into bars and pack them in lunchboxes or tote bags. It doesn’t crumble easily, making it ideal for on-the-go snacking.

As a Dessert

Serve it warm with a dollop of Greek yogurt or a spoonful of whipped coconut cream. Sprinkle with powdered cinnamon for added warmth.

Healthier Sweet Tooth Satisfaction

This bake feels indulgent but stays grounded in whole food ingredients:

  • No refined sugar needed (thanks to bananas)
  • Whole grains from oats
  • Healthy fats from walnuts and eggs
  • Antioxidants from cocoa
  • No processed flour, keeping it light and gluten-friendly (if using certified GF oats)

It’s ideal for those who want to treat themselves without the sugar crash or post-dessert guilt.

Common Questions About the Recipe (FAQs)

1. Can I make this recipe vegan?

Absolutely. Replace the eggs with flax eggs (1 tbsp flaxseed meal + 2.5 tbsp water per egg, let sit 5 min) and use plant-based milk like almond, oat, or soy. The result will be slightly more moist but still delicious.

2. Can I use steel-cut oats?

Steel-cut oats are not recommended for this recipe as they do not soften enough in the soak. Stick to rolled or quick oats.

3. How ripe should the bananas be?

The riper, the better. Bananas with brown speckles or fully browned skin have higher sugar content and mash more easily, which improves both taste and texture.

4. Is it freezer-friendly?

Yes. Slice and freeze in an airtight container for up to 3 months. Defrost overnight in the fridge or reheat in the oven or microwave for a warm, gooey treat.

5. Can I make it in muffin form?

Definitely. Divide the batter into muffin tins and bake for 15–20 minutes or until a toothpick comes out clean.

6. How long does it last?

Stored in the fridge, it stays fresh for 4–5 days. You can also store it at room temperature for 2 days in an airtight container.

7. Can I skip the cocoa or add other flavors?

You can omit cocoa for a banana-oat version, or add cinnamon, nutmeg, or cardamom for a spiced twist. A handful of raisins or dried cranberries also works beautifully.

Tips for Success

  • Let it rest: After baking, allow it to sit for at least 10 minutes. This helps it firm up and intensifies the flavors.
  • Use parchment paper: It helps prevent sticking and makes cleanup easier.
  • Don’t overmix: Stir just enough to combine. Overmixing can lead to a denser texture.

A Slice of Home in Every Bite

What started as a spontaneous breakfast experiment became one of the most-loved recipes in my home. There’s something deeply satisfying about baking something so simple, so honest, and having it come out not just tasty, but memorable. Each slice carries the warmth of banana, the richness of cocoa, and the nourishment of oats—wrapped up in love and shared freely.

Food doesn’t need to be extravagant to be special. It just needs to be made with purpose and enjoyed with gratitude.

In Conclusion: A Dessert That Speaks of Comfort and Nourishment

This chocolate-banana oat dessert is more than a recipe—it’s a reminder. A reminder that the best flavors often come from humble ingredients, and that baking can be both healing and nourishing. It celebrates the everyday—what’s in the fruit bowl, what’s in the pantry—and transforms it into something that feels like a hug on a plate.

Whether you bake it for your family, a friend, or just for yourself, may it bring the same joy to your table as it has to mine.

Amal

Banana, Cocoa & Oat: A Slice of Comfort in Every Bite

A wholesome, fudgy chocolate dessert made with ripe bananas, oats, and cocoa—naturally sweet, nutrient-rich, and perfect for guilt-free indulgence. Moist, rich, and just the right amount of sweet, this bake is a crowd-pleaser at any time of day.
Prep Time 10 minutes
Cook Time 30 minutes
Total Time 40 minutes
Servings: 8 slices
Course: Dessert
Cuisine: Fusion

Ingredients
  

  • 120 g oat flakes approximately 3/4 cup + 1 tbsp
  • 200 ml hot milk
  • 2 ripe bananas mashed
  • 2 eggs
  • A pinch of vanillin or vanilla extract
  • 40 g unsweetened cocoa powder about 1/2 cup
  • 1 teaspoon baking powder
  • Chopped walnuts optional, to taste
  • Chocolate chips optional, to taste

Method
 

  1. Preheat the oven to 180°C (350°F). Grease or line a small baking pan.
  2. In a mixing bowl, pour the hot milk over the oat flakes and let them soak for 10 minutes.
  3. Add the mashed bananas, eggs, and vanillin to the soaked oats. Stir until well combined.
  4. Mix in cocoa powder and baking powder until the batter is smooth.
  5. Fold in chopped walnuts and chocolate chips if using.
  6. Pour the mixture into the prepared baking pan and smooth the top.
  7. Bake for 25–30 minutes, or until a toothpick inserted comes out with moist crumbs.
  8. Let cool slightly before slicing and serving.

Notes

  • This recipe is naturally sweetened by ripe bananas; no extra sugar needed unless desired.
  • For a more intense chocolate flavor, increase cocoa powder slightly or add dark chocolate chips.
  • For added protein, you can replace one egg with 2 tablespoons of Greek yogurt.
  • Keeps well in the fridge for up to 3 days and tastes even fudgier when chilled.

Cool & Crunchy: A Cucumber Snack That’s Always in Season

Some of the best recipes don’t come from a cookbook. They come from memories, trial and error, and a need to make something special out of what we already have. That’s exactly how this cucumber snack came to life in my kitchen—unexpectedly, during a summer afternoon when the sun was high, the fridge was nearly empty, and hunger was knocking.

I remember standing barefoot on the kitchen tiles, a slight breeze coming through the window. I had cucumbers from the garden—still cool from the soil—half a lemon, a small bunch of fresh dill, and garlic waiting patiently in the pantry. With a dash of olive oil and a sprinkle of salt, something magic happened. That first bite was crunchy, refreshing, and unexpectedly addictive. My family devoured the entire bowl before the iced tea had even been poured.

Since that day, this quick cucumber snack has become a permanent resident in my recipe box. It’s served on lazy weekends, at BBQs, as a fresh side to rich meals, or simply when I need something satisfying but light. It reminds me that great food doesn’t need fanfare—just a little balance, freshness, and intention.

The Humble Power of Cucumbers

Cucumbers are often seen as a sidekick ingredient—tucked into salads, sliced for sandwiches, or floating in spa water. But this recipe places them center stage, where they belong. Their naturally high water content, gentle crunch, and subtle flavor make cucumbers ideal for soaking up vibrant dressings and aromatic herbs.

This snack highlights the cucumber’s clean flavor and complements it with a touch of acidity, a hint of sweetness, a burst of garlic, and the bright, unmistakable flavor of fresh dill. It’s a recipe that brings balance: tangy yet mellow, crunchy yet juicy, familiar yet new.

Beyond flavor, cucumbers are a nutritional powerhouse. Low in calories, high in hydration, and packed with antioxidants and vitamins like C and K, they are the perfect guilt-free snack.

Ingredients

IngredientQuantity
Cucumbers400 g
Salt1/2 teaspoon
Fresh dill (chopped)1 bunch
Garlic (minced)3 cloves
Lemon juice2 tablespoons
Sugar1/2 teaspoon
Olive oil1 tablespoon
Salt and pepperTo taste

Directions

  1. Wash the cucumbers thoroughly. Slice them thinly or into sticks, depending on your preference.
  2. Place the cucumbers in a bowl and toss with the 1/2 teaspoon of salt. Let them sit for 10 minutes to release excess moisture.
  3. Drain any liquid, then add the chopped dill, minced garlic, lemon juice, sugar, olive oil, and additional salt and pepper to taste.
  4. Mix everything thoroughly, ensuring the cucumbers are evenly coated.
  5. Chill in the fridge for at least 15 minutes before serving.

Nutritional Information (Per serving, based on 4 servings)

NutrientAmount
Calories60 kcal
Protein1 g
Carbohydrates4 g
Fiber1 g
Sugars1.5 g
Fat4.5 g
Saturated Fat0.6 g
Sodium250 mg
Vitamin C10% DV
Vitamin K25% DV

Why This Snack Works Anytime, Anywhere

This cucumber snack isn’t tied to seasons or trends. It’s timeless. And more importantly, it’s flexible.

  • Hot summer day? This dish cools you down.
  • Hearty dinner menu? It balances heavy mains with something light.
  • Hosting a brunch? Serve it in little cups as a refreshing side.
  • Busy weekday? Prep it ahead and keep it chilled for a grab-and-go moment of freshness.

The prep is so minimal that you can whip it together in under 10 minutes, and the ingredients are pantry and fridge staples. No complicated steps. No fancy tools. Just a bowl, a spoon, and your hands.

Flavor Notes and Customizations

While the classic combination of lemon, garlic, dill, and olive oil is a surefire hit, the recipe is endlessly adaptable:

  • Love spice? Add chili flakes or a splash of hot sauce.
  • Craving richness? Stir in a spoonful of Greek yogurt or sour cream to make a creamy cucumber salad.
  • Want more crunch? Toss in thinly sliced radishes or red onions.
  • No lemon? Use vinegar—apple cider, rice, or white wine all work beautifully.

The core concept remains the same: cucumbers + acidity + seasoning + herb = a snack that sings.

Pairing Ideas: More Than Just a Snack

Though it shines on its own, this cucumber snack also plays well with others. Here are some great ways to serve it:

  • As a side dish with grilled meats, roasted chicken, or baked fish
  • With sandwiches or wraps as a crisp counterpoint
  • Alongside a mezze platter with olives, hummus, pita, and feta
  • As a cooling topping on spicy rice bowls, tacos, or curries
  • Or simply served in small bowls as a refreshing starter at your next gathering

Its simplicity allows it to complement bold, rich, or spicy foods without overwhelming them.

Health Benefits That Make You Feel Good

This cucumber snack isn’t just tasty—it’s nourishing. Each bite offers a health boost:

  • Hydration: Cucumbers are over 95% water, supporting hydration and skin health.
  • Digestive Support: Garlic can help stimulate digestion and support the gut microbiome.
  • Heart Health: Olive oil offers heart-friendly fats, and lemon juice adds vitamin C.
  • Low in Calories: This snack is ideal for anyone watching their intake or seeking lighter fare.
  • Detoxifying: The combination of cucumber and lemon is a natural detox duo, loved for cleansing effects.

It’s a great choice for wellness-focused eaters, but even the most indulgent food lovers will appreciate its flavor and crunch.

FAQs: All Your Cucumber Snack Questions Answered

Can I make this ahead of time?

Absolutely. It actually tastes better after chilling in the fridge for 15–30 minutes. Just note that cucumbers release water over time, so stir before serving and drain any excess liquid if needed.

What type of cucumbers should I use?

Persian or English cucumbers are ideal because they’re less watery and have tender skins. If using regular cucumbers, peel and deseed them for the best texture.

How long does it keep in the fridge?

For the best taste and crunch, enjoy within 24 hours. After that, it becomes softer, though still flavorful.

Can I use dried dill instead of fresh?

Yes, though fresh dill offers a brighter, more vibrant flavor. Use about 1 teaspoon of dried dill if that’s what you have.

Is this snack suitable for kids?

Definitely! It’s mild, fresh, and crunchy—great for little ones, especially if you reduce the garlic.

Can I add protein to make it more filling?

Yes! Add chickpeas, cooked shrimp, or grilled tofu for a protein-packed version that still keeps the light vibe.

What if I don’t like garlic?

You can leave it out or substitute with shallots, chives, or green onions for a milder flavor.

Culinary Inspiration from the Everyday

Recipes like this cucumber snack are a reminder that great food isn’t about expensive ingredients or complicated techniques—it’s about thoughtful combinations, intuitive flavor, and sharing moments.

It’s the kind of dish that feels more like a gesture than a production. Something you whip up without stress, knowing it will always bring smiles, freshness, and comfort. Whether it accompanies a lavish dinner or stands on its own as a quick bite between errands, it never fails to deliver a satisfying experience.

Conclusion: The Snack That Keeps Giving

There’s a reason this cucumber snack has stood the test of time in my kitchen. It’s the perfect example of what I love most about cooking: taking something ordinary and turning it into something memorable.

It reminds us that snacks don’t have to come from a package, meals don’t have to take hours, and flavor doesn’t have to be complicated. With a cucumber, a bit of dill, and a squeeze of lemon, you have something refreshing, nourishing, and deeply satisfying.

Keep this recipe close—it’s your go-to for heatwaves, unexpected guests, and those little moments when your taste buds crave something real. It might just become the most underrated star of your recipe collection.

Amal

Cool & Crunchy: A Cucumber Snack That’s Always in Season

A crisp, refreshing cucumber snack tossed with lemon, garlic, dill, and a hint of sweetness. This quick and healthy bite is perfect for hot days, party platters, or as a light side that always delivers on flavor.
Prep Time 10 minutes
Total Time 10 minutes
Servings: 2 -3 servings
Course: Snack
Cuisine: Healthy

Ingredients
  

  • 400 g cucumbers
  • 1/2 teaspoon salt
  • 1 bunch of fresh dill chopped
  • 3 cloves of garlic minced
  • 2 tablespoons lemon juice
  • 1/2 teaspoon sugar
  • 1 tablespoon olive oil
  • Salt and pepper to taste

Method
 

  1. Slice cucumbers into thin rounds or sticks.
  2. Toss them in a bowl with 1/2 tsp of salt and let sit for 10 minutes.
  3. Drain any excess water released from the cucumbers.
  4. Add dill, garlic, lemon juice, sugar, and olive oil.
  5. Season with additional salt and pepper to taste.
  6. Mix well and refrigerate for 15–30 minutes before serving for best flavor.

Notes

  • For extra zing, add a splash of apple cider vinegar or a pinch of chili flakes.
  • This snack is best served chilled.
  • You can make it ahead and store it for up to 2 days in the fridge.
  • Works wonderfully as a side for grilled meats, falafel, or rice dishes.

Pumpkin Power Bake: From Humble Ingredients to Hearty Delight

It all started one crisp autumn afternoon, the kind where the kitchen becomes the heart of the home. I was rummaging through the fridge, searching for inspiration, when I stumbled upon a half-used pumpkin, some eggs, and a small stash of ground meat left from the previous night’s dinner. I didn’t have a recipe in mind, just a desire to make something warm, filling, and comforting—a dish that could bring everyone to the table without the need for a grand occasion.

As the scent of roasting pumpkin began to fill the kitchen, something special began to happen. It wasn’t just the transformation of simple ingredients into a nourishing meal—it was the way the aroma pulled my family out from their screens, their distractions, and into the moment. That afternoon, this pumpkin-based creation became a new family favorite. What started as an improvised bake quickly became a signature dish in our home, a recipe now requested at gatherings, weekday dinners, and cozy weekends alike.

This pumpkin and meat bake, simple as it may seem, carries with it a powerful lesson: the best meals are not always the most elaborate. Sometimes, all it takes is a handful of basic ingredients, a baking sheet, and a bit of heart to create something unforgettable.

Why Pumpkin Deserves a Starring Role

Pumpkin is often underrated outside of its seasonal spotlight. We associate it with pies and lattes, but its versatility in savory dishes is where it truly shines. Naturally sweet and packed with nutrients like vitamin A, fiber, and potassium, pumpkin makes an ideal base for baked dishes.

In this recipe, it creates a soft, lightly sweet canvas that balances the savory richness of ground meat and cheese. The eggs bind everything together, forming a sliceable bake with texture and depth. Unlike pasta or pastry-heavy casseroles, this dish is gluten-light, vegetable-rich, and satisfying without being overly heavy.

Ingredients

IngredientQuantity
Eggs4
Cheese150 g
Pumpkin (peeled & grated or chopped)1 and a half pumpkins
Flour50 g
Salt10 g
Black pepper5 g
Oil for frying50 g
Ground meat400 g
Baking sheet size47 cm x 35 cm

Directions:

  1. Prep the Pumpkin Base:
    Grate or finely chop the pumpkin and combine it with flour, salt, pepper, and eggs in a large bowl. Mix thoroughly to form a thick batter.
  2. Cook the Meat:
    In a frying pan, heat oil and brown the ground meat. Season lightly with salt and pepper and set aside.
  3. Assemble the Layers:
    On a greased 47 x 35 cm baking sheet, spread half the pumpkin mixture evenly as the first layer. Distribute the cooked ground meat evenly on top, followed by grated cheese. Cover with the remaining pumpkin mixture.
  4. Bake to Perfection:
    Preheat oven to 180°C (350°F). Bake for 30–35 minutes until golden and firm. Allow it to rest before slicing.

Nutritional Information (per serving, based on 6 servings)

NutrientAmount
Calories370 kcal
Protein22 g
Carbohydrates12 g
Fiber2 g
Fat26 g
Saturated Fat9 g
Cholesterol150 mg
Sodium680 mg

The Unexpected Charm of Simplicity

One of the most charming aspects of this recipe is how little it asks of you—and how much it gives back. It doesn’t demand fancy techniques or expensive ingredients. It’s forgiving and flexible, perfect for beginner cooks or seasoned home chefs looking for something low-maintenance yet crowd-pleasing.

Have extra vegetables? Grate them in. Want more protein? Swap ground beef for turkey or plant-based crumbles. Want to keep it vegetarian? Leave out the meat and add spinach, mushrooms, or chickpeas. The base recipe is strong enough to handle creativity, which makes it ideal for weeknight dinners or clearing out the fridge in a delicious way.

Versatility for Every Occasion

While it was born as a no-fuss dinner, this bake has evolved to suit many needs in our household:

  • Meal Prep Hero: It stores beautifully in the fridge and reheats well, making it perfect for lunches throughout the week.
  • Brunch Showstopper: Sliced into squares and served warm with sour cream or yogurt, it pairs beautifully with salads or soup.
  • Kid-Friendly Favorite: Its soft texture and mild flavors appeal to picky eaters, and you can sneak in extra veggies without detection.
  • Dinner Party Dish: When dressed with herbs, spices, or drizzled with a flavorful sauce, it elevates into an elegant yet rustic offering.

Frequently Asked Questions (FAQs)

1. Can I use canned or frozen pumpkin instead of fresh?
Yes, though fresh pumpkin gives the best texture. If using canned, make sure it’s pure pumpkin (not pumpkin pie filling). Frozen pumpkin should be thawed and drained well to avoid excess moisture.

2. Is this recipe gluten-free?
Not as written due to the small amount of flour. However, you can easily substitute a gluten-free flour blend or oat flour without altering the results too much.

3. What kind of cheese works best?
The recipe is flexible. Hard cheeses like cheddar, mozzarella, or gouda melt beautifully, while sharper cheeses like feta or parmesan add bold flavor. Manchego also pairs wonderfully with pumpkin.

4. Can I prepare it in advance?
Absolutely. You can prepare the entire mixture and refrigerate it (uncooked) for a few hours, or bake it and reheat individual portions later. It keeps well in the fridge for 3–4 days and can be frozen for up to 2 months.

5. Is it suitable for vegetarians?
Yes, simply omit the meat and increase the amount of pumpkin or add sautéed vegetables like mushrooms, peppers, or lentils for added substance.

6. Can I make it dairy-free?
You can replace the cheese with a dairy-free version or leave it out entirely. For creaminess, add a few tablespoons of plant-based yogurt or a dairy-free béchamel layer.

7. How do I know when it’s done?
The top should be golden brown and set, and a knife inserted in the center should come out clean. If the top is browning too quickly, cover loosely with foil and continue baking until the inside is cooked through.

8. Can I add spices or herbs?
Definitely. This bake welcomes flavor! Try paprika, cumin, nutmeg, thyme, or rosemary. Fresh parsley or basil can also add a lovely brightness when served.

Nutrition and Health Benefits

This pumpkin bake isn’t just delicious—it’s good for you too. Pumpkin is low in calories and high in antioxidants, especially beta-carotene, which converts to vitamin A in the body. Combined with protein-rich eggs and meat, it makes a satisfying meal that supports muscle growth, eye health, and immune function.

Compared to traditional casseroles or pies, this version is lower in carbohydrates and can be modified to suit many dietary needs. It’s a great way to enjoy comfort food while still eating mindfully.

Serving Suggestions and Pairings

To make it a complete meal, serve this bake with a light side:

  • A fresh green salad with lemon vinaigrette
  • Steamed green beans or sautéed zucchini
  • Roasted garlic yogurt sauce or sour cream
  • A slice of rustic bread or flatbread on the side

For drinks, try pairing with:

  • A glass of dry white wine or light red (if you’re serving it for dinner)
  • Fresh mint lemonade or unsweetened iced tea

Tips for Success

  • Grate the pumpkin finely for even cooking and smoother texture.
  • Drain excess moisture from grated pumpkin if it’s too watery. A quick squeeze in a towel works well.
  • Let it rest after baking before slicing—this helps the layers settle and makes it easier to portion.

Conclusion: More Than Just a Bake

This simple pumpkin recipe is more than a quick dinner—it’s a story on a plate. It’s about resourcefulness, warmth, and the magic that happens when you bring together humble ingredients with care and creativity. Whether you’re feeding a crowd, trying to sneak vegetables into a kid’s plate, or just craving something wholesome and nourishing, this dish is a reminder that the best meals don’t always come from cookbooks—they come from the heart.

So next time you have a pumpkin in your pantry and no grand plan, remember this recipe. It might just become a family favorite, just like it did in my home.

Amal

Pumpkin Power Bake: From Humble Ingredients to Hearty Delight

A cozy, savory pumpkin bake layered with ground meat and melty cheese—this simple yet hearty dish transforms humble ingredients into a golden, comforting meal that the whole family will love. Perfect for chilly evenings, meal prepping, or when you want something wholesome without a lot of fuss.
Prep Time 15 minutes
Cook Time 35 minutes
Total Time 50 minutes
Servings: 4 –6 servings
Course: Main Dish
Cuisine: Comfort Food

Ingredients
  

  • 4 eggs
  • 150 g cheese grated
  • 1 and a half pumpkins peeled, grated or chopped finely
  • 50 g flour
  • 10 g salt
  • 5 g black pepper
  • 50 g oil for frying
  • 400 g ground meat
  • Baking sheet size: 47 cm x 35 cm

Method
 

  1. Preheat oven to 180°C (350°F). Grease your 47 x 35 cm baking sheet.
  2. In a large bowl, combine grated pumpkin, eggs, flour, salt, and pepper. Mix well.
  3. In a pan, heat oil and cook ground meat until browned and crumbly. Season lightly.
  4. Spread half of the pumpkin mixture over the baking sheet. Add the cooked meat on top, then sprinkle with grated cheese.
  5. Cover with the remaining pumpkin mixture, spreading evenly.
  6. Bake for 30–35 minutes or until golden and set.
  7. Let cool slightly before slicing and serving.

Notes

  • You can use mozzarella, cheddar, or even feta for a different cheese profile.
  • For added flavor, mix fresh herbs like thyme or parsley into the pumpkin batter.
  • The recipe works well for meal prep—just slice and reheat.
  • This dish also freezes well after baking.

Oatmeal, Egg, and Cheese Pizza: A Delicious Fusion of Comfort and Creativity

There are those dishes in life that begin as mere experiments, a blend of ingredients gathered in the kitchen based on whim, necessity, or a desire to use up what’s left in the fridge. These dishes, however, often end up being far more than just an improvised meal. They become staples in our homes, carrying with them stories of family gatherings, moments of solitude, and even the pure joy of creating something out of nothing. For me, oatmeal, egg, and cheese pizza is one such dish.

I remember the first time I stumbled upon the idea. It was a lazy Saturday morning when the weather outside had turned unexpectedly chilly. I didn’t want anything too heavy for breakfast, but I also wanted something hearty enough to fuel my day. The ingredients were simple: oatmeal, eggs, and some cheese in the fridge. At first, I wasn’t sure how they would come together, but I decided to give it a shot. To my surprise, not only did the combination work, but it also satisfied my cravings in a way that no typical pizza ever could. What started as an experiment quickly became a cherished recipe in my kitchen, one that I continue to make for myself and my loved ones when we need something warm, comforting, and just a little bit different.

What I love about this dish is how it combines the richness of eggs and cheese with the humble heartiness of oatmeal. It’s a marriage of two worlds: the savory and the nourishing. The result is a crispy, cheesy, and satisfying “pizza” that can easily be enjoyed for breakfast, lunch, or dinner. This recipe is an ode to the beauty of simplicity and creativity in cooking. It’s not just about what’s in the dish, but about how the ingredients come together in ways we least expect, surprising us with new flavors and textures.

The Fusion of Flavors: Why This Dish Works

At first glance, oatmeal might seem like an unusual base for pizza. After all, oatmeal is typically associated with breakfast, not something savory and satisfying like pizza. But that’s the beauty of this dish—it challenges our expectations and introduces us to a new way of looking at our favorite foods. Oatmeal, when prepared properly, provides a soft yet slightly chewy texture that holds up well as a base for toppings. Its mild flavor acts as the perfect canvas for the richness of eggs and the saltiness of cheese, while the addition of herbs and spices adds depth and complexity.

The eggs serve as both a flavor enhancer and a binding agent, holding the oatmeal base together and adding a creamy richness that complements the other ingredients. The cheese, of course, is the star of the show. Its meltiness and savory flavor bring the whole dish together, making each bite satisfying and full of flavor. Whether you opt for sharp cheddar, creamy mozzarella, or any other cheese you prefer, it adds an indulgent quality that transforms this simple dish into something special.

What’s more, this dish is highly customizable. You can add fresh herbs like parsley or basil to brighten the flavor, or sprinkle a bit of chili flakes for a gentle kick. The beauty of oatmeal, egg, and cheese pizza lies in its adaptability. You can experiment with different cheeses, herbs, and spices, or even add vegetables, bacon, or sausage to make it more filling. It’s a dish that can evolve with your taste preferences and the ingredients you have on hand, making it a go-to recipe when you need something easy, quick, and satisfying.

Ingredients

IngredientQuantity
Oatmeal1 cup
Eggs2
Milk1 glass
Parsley, choppedTo taste
Cheese, grated100g
SaltTo taste
Dry Provençal herbsTo taste
Chili flakesTo taste
Oil for fryingAs needed
Sesame seeds for garnishTo taste

Directions:

  1. Prepare the Oatmeal Mixture:
    In a medium-sized bowl, combine the oatmeal, eggs, and milk. Mix well until all ingredients are fully incorporated. Season with salt, dry Provençal herbs, and chili flakes to taste.
  2. Cook the Base:
    Heat a little oil in a frying pan over medium heat. Pour the oatmeal mixture into the pan, spreading it evenly to form a base. Cook for 3-4 minutes, allowing the base to firm up slightly.
  3. Add the Cheese and Parsley:
    Sprinkle the grated cheese and chopped parsley evenly over the top of the base. Let the cheese melt and the base cook for another 3-4 minutes until golden and crispy.
  4. Flip and Cook the Other Side:
    Carefully flip the base using a spatula, and cook for an additional 2-3 minutes until the other side is browned and the cheese has fully melted.
  5. Serve and Garnish:
    Remove the pizza from the pan and transfer to a plate. Sprinkle sesame seeds on top for an added crunch and serve hot.

Nutritional Information (per serving, assuming 2 servings):

NutrientAmount per serving
Calories350 kcal
Protein17g
Carbohydrates30g
Fiber4g
Fat20g
Saturated Fat5g
Cholesterol160mg
Sodium400mg
Sugars4g

A Healthier Take on Traditional Pizza

One of the key reasons I love this dish is that it’s a healthier alternative to traditional pizza. While the classic pizza dough is often heavy with refined flour, oatmeal provides a more nutrient-dense base. Oatmeal is high in fiber, which can help promote digestion and keep you feeling fuller for longer. It’s also a great source of complex carbohydrates, which provide sustained energy without causing blood sugar spikes.

In addition to the fiber, oatmeal is rich in vitamins and minerals, including manganese, phosphorus, magnesium, and iron. These nutrients support everything from bone health to immune function. Eggs, meanwhile, are an excellent source of high-quality protein, vitamins A, B12, and D, and choline, an essential nutrient that supports brain health. Cheese, though rich in fats, is also packed with protein and calcium, making it a good addition to a balanced diet when consumed in moderation.

This combination of nutrients makes oatmeal, egg, and cheese pizza not only delicious but also a filling and satisfying meal. It’s a great option for anyone looking for a healthier alternative to traditional pizza without sacrificing flavor or satisfaction. Plus, it’s a dish that can easily be adapted to suit various dietary preferences, from vegetarian to gluten-free.

How This Dish Can Be Customizable to Your Tastes

One of the reasons this dish has become a personal favorite is its versatility. It can be made to suit any occasion or mood, depending on what you feel like eating. If you’re in the mood for a more hearty meal, you can add sautéed mushrooms, spinach, or bell peppers to the top for extra nutrients and flavor. If you prefer a touch of sweetness, try adding a sprinkle of caramelized onions or roasted tomatoes. The possibilities are endless.

Another variation of this dish could include swapping out the cheese for a dairy-free option, making it suitable for those with lactose intolerance or vegan preferences. You could also experiment with adding a variety of spices to give the dish a more international flair. Imagine a sprinkle of cumin, coriander, or turmeric for a Middle Eastern-inspired twist, or perhaps a dash of smoked paprika for a touch of Spanish flavor.

What I particularly enjoy is that this recipe can easily be tailored to accommodate what you have in your pantry. The beauty of this dish lies in its simplicity, and its adaptability makes it a great go-to when you’re short on time or ingredients but still want something flavorful.

FAQs: Answering Your Questions About Oatmeal, Egg, and Cheese Pizza

  1. Can I make this dish ahead of time? Yes! You can prepare the base ahead of time and store it in the fridge. When ready to serve, just add the cheese and other toppings, then heat it through. This makes it a perfect meal prep option for busy mornings.
  2. Can I use instant oatmeal for this recipe? While it’s best to use traditional rolled oats for texture, you can use instant oatmeal in a pinch. However, be aware that the texture might be slightly different, and you may need to adjust the liquid amount.
  3. What if I don’t have milk on hand? You can substitute milk with water or a plant-based milk like almond or soy milk. This will not affect the overall flavor too much but might slightly change the texture.
  4. Can I add meat to this dish? Absolutely! Adding cooked bacon, sausage, or ham can make this dish more substantial and add an extra layer of savory flavor.
  5. How can I make this dish spicier? If you like heat, feel free to increase the amount of chili flakes or add fresh sliced jalapeños to the top for an extra kick.

Conclusion: A Dish That Brings Comfort, Creativity, and Flavor

Oatmeal, egg, and cheese pizza is more than just a quirky take on traditional pizza—it’s a dish that combines comfort, creativity, and nourishment in one delicious bite. Whether you’re cooking for yourself, your family, or friends, this recipe provides a satisfying meal that’s both healthy and indulgent. It’s a perfect example of how sometimes, the best dishes come from unexpected combinations, where simplicity and flavor collide in ways that leave you craving more.

This dish reminds us that cooking doesn’t always need to be complicated to be rewarding. With just a handful of ingredients, you can create something that feels both familiar and new. It’s the kind of recipe that invites experimentation, yet still delivers a comforting and satisfying result every time. So the next time you’re in need of a quick, nourishing meal, give oatmeal, egg, and cheese pizza a try. It might just become your new favorite go-to recipe.

Amal

Oatmeal, Egg, and Cheese Pizza: A Delicious Fusion of Comfort and Creativity

This oatmeal, egg, and cheese pizza is a creative and nutritious alternative to traditional pizza, blending the heartiness of oats with the richness of eggs and cheese. It’s crispy on the outside, soft on the inside, and packed with flavor. Perfect for breakfast, lunch, or a light dinner, this dish is quick to prepare and surprisingly satisfying.
Prep Time 5 minutes
Cook Time 10 minutes
Total Time 15 minutes
Servings: 2 -3 servings
Course: Breakfast
Cuisine: Healthy

Ingredients
  

  • 1 cup oatmeal
  • 2 eggs
  • 1 glass of milk
  • Parsley chopped
  • 100 g cheese grated
  • Salt to taste
  • Dry Provençal herbs to taste
  • Chili flakes to taste
  • Oil for frying
  • Sesame seeds for garnish

Method
 

  1. In a bowl, mix oatmeal, eggs, and milk until well combined. Season with salt, dry Provençal herbs, and chili flakes.
  2. Heat oil in a frying pan over medium heat. Pour the mixture in, spreading it evenly to form a round shape.
  3. Cook for 3-4 minutes until the bottom is firm, then sprinkle cheese and chopped parsley on top.
  4. Flip the base carefully and cook for another 2-3 minutes until golden and crispy.
  5. Transfer to a plate, garnish with sesame seeds, and serve hot.

Notes

  • Use any cheese you like—cheddar, feta, or mozzarella all work well.
  • For a spicier kick, add extra chili flakes or black pepper.
  • This dish pairs beautifully with a fresh salad or a dollop of yogurt on the side.
  • If you prefer a crunchier texture, cook the base a little longer before flipping.

Cabbage with Eggs: A Comforting Journey to Simplicity and Flavor

There are moments in life when food is not just sustenance, but a doorway to memories. For me, cabbage with eggs is one of those dishes. I remember my grandmother making it in her warm, cozy kitchen, where the scent of sautéed cabbage and onions would fill the house, wrapping everyone in a comforting embrace. This dish was humble, yet so satisfying—simple ingredients coming together to create something much greater than the sum of its parts. It was the kind of meal that brought the whole family around the table, sharing stories, laughter, and comfort.

At first glance, cabbage with eggs may seem like a basic, no-frills dish. However, its beauty lies in its simplicity and versatility. It’s a dish that can be made quickly with ingredients you probably already have in your kitchen, yet it offers an unexpected depth of flavor and heartiness. Over the years, this dish has become more than just a family favorite for me; it’s a symbol of the joy found in simple pleasures. Cooking this dish brings me back to those quiet moments in my grandmother’s kitchen, reminding me that sometimes the simplest meals are the ones that leave the most lasting impressions.

The Beauty of Cabbage with Eggs: Why This Dish Resonates

In a world filled with complex recipes and elaborate techniques, cabbage with eggs stands as a testament to the power of simplicity. It’s a dish that doesn’t require fancy ingredients or intricate methods. Yet, it delivers a deep, nourishing satisfaction that is hard to beat. Whether you are looking for a quick weeknight meal or something to serve for breakfast, brunch, or dinner, cabbage with eggs is an option that can easily fit into any part of your day.

The beauty of this dish lies in its balance of flavors and textures. The cabbage, when sautéed just right, becomes soft and sweet, while still maintaining a slight crunch. The eggs, whether scrambled or gently cooked, provide a creamy texture that complements the cabbage perfectly. Add a bit of grated cheese and fresh parsley, and you have a meal that is bursting with flavor yet grounded in a sense of comfort and warmth.

This dish is also incredibly versatile. The cabbage can be prepared in a variety of ways: shredded, chopped, or even lightly sautéed for a different texture. The eggs can be scrambled for a more traditional approach, or you can make them more runny if you prefer a softer consistency. If you’re feeling adventurous, you can even add other vegetables or spices to enhance the flavor. Some people enjoy a bit of garlic or onions, while others may add a dash of hot sauce for a touch of heat. The possibilities are endless, but no matter how you prepare it, cabbage with eggs always tastes like home.

Ingredients

IngredientQuantity
Olive oil2 tbsp
Medium onion, finely chopped1 medium
Carrot, grated1
White cabbage, shredded2 lb / 900g
Eggs, beaten5-6
All-purpose flour (optional)1 tbsp
Manchego cheese, grated (optional)As needed
Fresh parsley, chopped (optional)As needed

Directions:

  1. Sauté the Vegetables:
    Heat the olive oil in a large skillet over medium heat. Add the finely chopped onion and sauté for 2-3 minutes until softened. Add the grated carrot and shredded cabbage to the skillet. Stir well and cook for about 8-10 minutes until the cabbage is tender but still slightly crisp.
  2. Prepare the Eggs:
    While the cabbage mixture is cooking, beat the eggs in a bowl. If you’d like a thicker texture, you can whisk in the optional tablespoon of flour. This step is optional, but it helps to bind the ingredients together and give the dish a little extra body.
  3. Cook the Eggs:
    Once the cabbage is tender, create a little space in the center of the skillet, then pour in the beaten eggs. Allow them to cook for 1-2 minutes, stirring occasionally to scramble the eggs into the vegetables.
  4. Add the Finishing Touches:
    If desired, sprinkle some grated Manchego cheese over the top of the cabbage and eggs, allowing it to melt into the dish. Garnish with freshly chopped parsley for a burst of color and flavor.
  5. Serve and Enjoy:
    Once the eggs are fully cooked and the cheese has melted, serve your cabbage and eggs hot, either as a main dish or as a side dish with your favorite protein.

Nutritional Information (per serving, assuming 4 servings):

NutrientAmount per serving
Calories250 kcal
Protein10g
Carbohydrates15g
Fiber5g
Fat18g
Saturated Fat3g
Cholesterol180mg
Sodium150mg
Sugars6g

Why Cabbage with Eggs is the Ultimate Comfort Food

Comfort food is about more than just flavor. It’s about the memories, the feelings it evokes, and the nourishment it provides for the body and soul. Cabbage with eggs is the epitome of comfort food—unpretentious, yet incredibly satisfying. In a busy world full of distractions and demands, this dish offers a quiet moment of reprieve. It’s a chance to slow down, savor a homemade meal, and reconnect with something simple and grounding.

In many ways, cabbage with eggs is a perfect example of how food can bring people together. Whether served at a family dinner or made for yourself after a long day, this dish has a way of making everything feel just a little bit better. There’s something undeniably comforting about a hot plate of cabbage with eggs, especially when shared with loved ones.

The Nutritional Benefits of Cabbage with Eggs

While cabbage with eggs may be simple, it’s also surprisingly nutritious. Cabbage is a powerhouse of vitamins and minerals, packed with vitamin C, vitamin K, fiber, and antioxidants. It’s a great addition to any diet, helping to support digestion, reduce inflammation, and promote overall health. Eggs, of course, are an excellent source of protein, vitamins, and minerals, particularly vitamin B12 and choline, which are essential for brain health.

When combined, cabbage and eggs create a well-rounded, balanced dish that can help fuel your body for hours. This dish is low in carbohydrates, making it a great option for those following low-carb or ketogenic diets. It’s also a great option for vegetarians, provided you skip the optional meat additions. The healthy fats from the olive oil, along with the protein from the eggs, provide a filling meal that doesn’t leave you feeling overly full or sluggish.

Additionally, cabbage is incredibly versatile. It’s a low-calorie vegetable, which makes it an ideal choice for those looking to manage their weight while still enjoying a satisfying meal. The richness of the eggs and olive oil helps to balance out the dish, so you won’t feel deprived, even on a calorie-conscious diet.

A Versatile Dish: Customizing Cabbage with Eggs

One of the reasons cabbage with eggs continues to be such a beloved dish in my family is its versatility. There are endless variations of this recipe, and you can easily make it your own depending on your tastes and dietary preferences. Here are just a few ways you can customize this dish to make it uniquely yours:

  1. Add More Vegetables: While cabbage and eggs are the stars of this dish, feel free to add other vegetables you enjoy. Mushrooms, bell peppers, or zucchini would work wonderfully in this recipe. You can sauté them alongside the cabbage for a more hearty, veggie-packed meal.
  2. Try Different Cheeses: The recipe calls for Manchego cheese, which adds a rich, nutty flavor to the dish. However, you can substitute this with any cheese you like—cheddar, feta, or goat cheese would all work beautifully. Experiment with different cheeses to find your perfect match.
  3. Herbs and Spices: Fresh parsley is a great addition to this dish, but you can also add other herbs like thyme, dill, or rosemary. If you prefer a little heat, consider adding a pinch of chili flakes or a dash of hot sauce.
  4. Add Meat: For those who enjoy a bit of protein with their meal, adding bacon, sausage, or ham would make a delicious variation of this dish. These meats pair wonderfully with the sweetness of the cabbage and the richness of the eggs.
  5. Change the Cooking Method: While the eggs are typically scrambled into the cabbage, you can also prepare them in a different style. Try frying or poaching the eggs separately and serving them on top of the cabbage for a more elegant presentation.

FAQs about Cabbage with Eggs

1. Can I use a different type of cabbage?
Yes! While green cabbage is the most common choice for this recipe, you can use red cabbage or Savoy cabbage for a different flavor and texture. Each type of cabbage has its own unique flavor, so feel free to experiment.

2. Can I make this dish ahead of time?
Cabbage with eggs is best served fresh, but you can store leftovers in an airtight container in the refrigerator for up to 2 days. Reheat gently in a skillet to avoid overcooking the eggs.

3. Can I make this dish vegan?
Yes, this dish can easily be made vegan by replacing the eggs with a plant-based egg substitute, such as tofu scramble or chickpea flour batter. You can also omit the cheese or use a dairy-free alternative.

Conclusion: A Dish That Connects Generations

Cabbage with eggs may be simple, but it’s a dish that’s rich with meaning. It connects us to the past, to our roots, and to the people who taught us how to cook with love and care. Whether you’re preparing this dish for a family meal or a solo dinner, it’s a reminder that sometimes the best meals are the ones that don’t require a lot of effort—just a few good ingredients and a lot of heart. Cabbage with eggs is more than just food; it’s a celebration of simplicity, nourishment, and tradition.

Amal

Cabbage with Eggs: A Comforting Journey to Simplicity and Flavor

Cabbage with eggs is a simple yet delicious dish that combines the earthy flavor of sautéed cabbage with the rich, creamy texture of eggs. This hearty and nutritious meal is perfect for any time of day, whether you’re enjoying it as a satisfying breakfast, lunch, or dinner. With just a few basic ingredients, this dish offers both comfort and nourishment, all in one bowl.
Prep Time 10 minutes
Cook Time 15 minutes
Total Time 25 minutes
Servings: 4 –6 servings
Course: Main Dish
Cuisine: Mediterranean-Inspired

Ingredients
  

  • 2 tbsp olive oil
  • 1 medium onion finely chopped
  • 1 carrot grated
  • 2 lb / 900g white cabbage shredded
  • 5-6 eggs beaten
  • 1 tbsp all-purpose flour optional
  • Manchego cheese grated (optional)
  • Fresh parsley chopped (optional)

Method
 

  1. Heat the olive oil in a large skillet over medium heat. Add the finely chopped onion and cook for 2-3 minutes until softened.
  2. Stir in the grated carrot and shredded cabbage. Continue sautéing for 8-10 minutes, stirring occasionally, until the cabbage is tender but slightly crisp.
  3. In a separate bowl, beat the eggs. If you prefer a thicker texture, whisk in the optional tablespoon of flour. Add the beaten eggs to the skillet, stirring gently to combine with the cabbage and carrots. Cook for 2-3 minutes, allowing the eggs to scramble and cook through.
  4. If desired, sprinkle grated Manchego cheese over the top of the dish and let it melt into the eggs and cabbage.
  5. Garnish with freshly chopped parsley and serve hot.

Notes

  • For a creamier texture, you can add a splash of milk or cream to the beaten eggs before adding them to the skillet.
  • To make the dish more filling, you can add cooked sausage or bacon for extra protein and flavor.
  • Feel free to experiment with different cheeses like cheddar or feta for a unique twist on the dish.

Homemade Butter: A Journey to the Heart of Simplicity and Tradition

I’ll never forget the first time I made butter from scratch. It was a quiet afternoon in the kitchen, and I had just finished reading a passage in an old cookbook about the art of butter-making. Intrigued, I decided to give it a try, not fully expecting to succeed. The process was simple—almost deceptively so—but the result was nothing short of magical. As the cream transformed into soft, golden butter, I realized that what I was doing was not just a kitchen experiment—it was a step back in time, reconnecting with a tradition that’s been passed down through generations.

Growing up, I never considered making butter myself. It was always a product that came from the grocery store shelves. But as I started to delve deeper into the world of homemade, artisanal foods, I came to understand the joy and satisfaction that comes from making something so fundamental from scratch. Making butter isn’t just about the final product; it’s about the process, the connection to the ingredients, and the feeling of pride that comes from creating something with your own hands. It was during that first batch of homemade butter that I realized how much the simple, everyday things in life—like fresh butter on warm bread—can bring about the deepest sense of contentment.

The Magic of Making Homemade Butter

There’s something incredibly satisfying about making butter from scratch. It’s one of the oldest forms of food preparation, dating back to ancient civilizations. Butter-making is a process that’s deeply rooted in culture and history. It’s amazing how something as simple as cream can transform, through just a little patience and care, into a creamy, rich product that enhances so many dishes.

For generations, butter was made by hand, churned in large wooden barrels by farmers and homemakers alike. Today, making butter at home has become something of a lost art in many parts of the world. But for those who decide to make their own butter, the process is not only a connection to the past—it’s also a deeply rewarding experience. The final product is richer, fresher, and more flavorful than anything you can buy at the store. It carries the love and effort of the maker, and every spoonful is a reminder of the beauty in simple things.

What’s even more remarkable is how quickly the process can be done. In just five minutes, you can turn 1 liter of cream into a kilogram of butter. The trick is to use a stand mixer or hand mixer, which speeds up the churning process. The butter forms almost magically as the cream separates into thick, golden butter and buttermilk. It’s a fun, simple way to take control of your food, and the best part is you can use it immediately.

Ingredients

IngredientQuantity
Cream (33% fat)1 liter
Ice cubesAs needed
Cold waterAs needed

Directions:

  1. Prepare the Cream:
    Pour the 1 liter of cream (33% fat) into a stand mixer or a large bowl if you’re using a hand mixer. Ensure the cream is cold for the best results.
  2. Whip the Cream:
    Begin mixing the cream on medium speed. In a few minutes, the cream will start to thicken and whip into whipped cream. Continue mixing until the whipped cream turns into butter, separating from the buttermilk.
  3. Drain the Buttermilk:
    Once the butter forms, carefully drain the buttermilk from the mixing bowl. You can use the buttermilk for other recipes like pancakes or scones.
  4. Wash the Butter:
    To wash the butter, add cold water to the bowl and knead the butter to remove any remaining buttermilk. Repeat this process a few times, changing the water as necessary, until the water runs clear.
  5. Solidify the Butter:
    Place the butter into a clean bowl and add a few ice cubes. Knead the butter until it’s solidified and firm. The ice helps to quickly harden the butter.
  6. Store the Butter:
    Once the butter is firm and free from buttermilk, transfer it to an airtight container for storage. You can refrigerate it for up to 2 weeks or freeze it for longer storage.

Nutritional Information (per 100g of butter):

NutrientAmount per 100g
Calories717 kcal
Protein1g
Carbohydrates0g
Fat81g
Saturated Fat51g
Cholesterol215mg
Sodium11mg

Why Make Your Own Butter?

In today’s world of mass production and convenience, making your own butter might seem like a labor-intensive task. But the truth is, homemade butter offers several advantages that store-bought versions simply can’t match. Here are a few reasons why making butter at home is worth the effort:

  1. Freshness: Homemade butter is incredibly fresh. The moment you churn it, you’re able to taste the difference in texture and flavor compared to store-bought varieties, which may have been sitting on shelves for weeks or even months.
  2. Control Over Ingredients: When you make your own butter, you control what goes into it. There are no preservatives, additives, or artificial flavors—just pure cream. If you prefer, you can experiment with different flavors by adding herbs, spices, or even a bit of sea salt.
  3. Rich Flavor: Homemade butter has a richness and depth of flavor that store-bought butter simply can’t replicate. It’s smooth, creamy, and has a fuller taste. Whether spread on toast, added to recipes, or used to finish a dish, it’s a delight in every bite.
  4. Satisfaction and Tradition: Making butter is a hands-on process that connects you to the tradition of food-making. It’s a beautiful way to slow down and savor the process of creating something nourishing from scratch. There’s a deep satisfaction in making something so fundamental and basic, yet so full of flavor.
  5. Economic: While store-bought butter is relatively inexpensive, making your own can save money in the long run. One liter of cream yields about 1 kilogram of butter, which can be much more cost-effective compared to buying high-quality butter.
  6. Environmental Impact: By making your own butter, you can reduce packaging waste associated with buying pre-packaged butter. You also support smaller, local dairies if you choose to source your cream from local farmers.

What You’ll Need for Homemade Butter

Making butter at home requires just three basic ingredients: cream, ice cubes, and cold water. But more than the ingredients, the key to success lies in the process—the art of churning the cream until it separates into butter and buttermilk. While a stand mixer or hand mixer is ideal, you can also use a manual butter churn for a more traditional approach, though it requires a bit more time and effort.

The quality of your cream will make a big difference in the final product. Opt for heavy cream with a high-fat content (at least 33% fat). The higher the fat content, the more butter you’ll yield. Fresh, high-quality cream will give your butter the best flavor and texture. If possible, seek out cream from a local farm or a reputable dairy to ensure the freshest product.

Frequently Asked Questions (FAQs)

1. How do I know when the butter is ready?
You’ll know the butter is ready when the cream separates into clumps of butter and a thin, watery liquid (buttermilk). This process typically happens after a few minutes of mixing. If you’re unsure, just stop the mixer and check—if the mixture looks thick and the buttermilk is separated, you’re done.

2. Can I add flavors to my homemade butter?
Absolutely! Once your butter is formed and rinsed, you can add various flavors. Fresh herbs like rosemary or thyme, garlic, lemon zest, or even a pinch of sea salt can elevate your homemade butter. Simply knead the additions into the butter after it has been rinsed and shaped.

3. Can I use this method for smaller quantities of cream?
Yes, you can use this method for smaller amounts of cream. The process remains the same, but it will take less time to churn. However, the larger the amount of cream, the easier it is to get a good separation of butter and buttermilk.

4. What should I do with the buttermilk?
Buttermilk is a valuable byproduct of the butter-making process! It can be used in cooking and baking, such as in pancakes, muffins, biscuits, or as a marinade for chicken. Don’t throw it away—use it for its tangy, slightly acidic flavor.

5. How long does homemade butter last?
Homemade butter typically lasts for about two weeks in the refrigerator. If you want to keep it longer, you can freeze the butter for up to three months. Make sure to wrap it tightly in plastic wrap or store it in an airtight container.

Conclusion: The Joy of Homemade Butter

Making your own butter is a simple yet incredibly rewarding process. From the moment the cream transforms into golden butter, you experience the satisfaction of creating something fresh, flavorful, and full of history. It’s a journey into the past, a return to traditional methods of food preparation, and a reminder that some of the best things in life come from the simplest ingredients.

As I continue to make butter in my own kitchen, I am reminded of the connection between food, family, and tradition. Butter may seem like a small, everyday food, but it carries with it a sense of comfort, of home, and of care. Whether you’re using it to spread on warm bread, dollop onto pancakes, or enhance your favorite dishes, homemade butter has a way of making everything taste a little better. So, the next time you’re in the kitchen, consider making your own batch of butter—it’s not just a culinary skill, it’s a connection to the past, a labor of love, and a beautiful reminder of the joy found in simple things.

Amal

Homemade Butter: A Journey to the Heart of Simplicity and Tradition

Making butter at home is easier than you might think. With just a few simple ingredients and a little bit of patience, you can turn 1 liter of cream into 1 kilogram of fresh, creamy butter in just 5 minutes. The result is richer, fresher, and more flavorful than anything you’ll find in stores. This homemade butter will add a touch of luxury to your daily meals, whether you’re spreading it on toast or using it in your favorite recipes.
Prep Time 10 minutes
Cook Time 5 minutes
Total Time 15 minutes
Servings: 1 kg of butter
Course: Butter
Cuisine: Homemade

Ingredients
  

  • 1 liter of cream 33% fat
  • Ice cubes as needed
  • Cold water as needed

Method
 

  1. Pour the cream into a stand mixer or a large mixing bowl if you are using a hand mixer. Ensure the cream is cold for the best results.
  2. Begin whipping the cream on medium speed. As you continue mixing, the cream will thicken and eventually begin to turn into whipped cream.
  3. Keep mixing until the whipped cream separates into butter and buttermilk. This process should take around 5 minutes.
  4. Drain the buttermilk and save it for other recipes, like pancakes or scones.
  5. Add cold water to the butter and knead it to remove any remaining buttermilk. Change the water as needed until it runs clear.
  6. Place a few ice cubes into the butter and knead until it becomes firm. This will help solidify the butter and improve its texture.
  7. Transfer the butter into an airtight container for storage. Refrigerate for up to two weeks or freeze for longer storage.

Notes

  • For extra flavor, you can experiment with adding a pinch of salt or fresh herbs like rosemary or thyme to the butter after it has solidified.
  • Be sure to wash the butter thoroughly to remove any traces of buttermilk. This will help extend its shelf life.
  • If you want to make a larger batch, simply scale up the ingredients accordingly. For each liter of cream, you’ll get about 1 kilogram of butter.

Turkish Bread: A Flavorful Tradition that Brings People Together

The smell of freshly baked bread has always been a comforting part of my life. Growing up, I would visit my grandmother’s home every weekend, and the moment I walked through the door, I knew that something magical was happening in the kitchen. The warm, inviting aroma of freshly baked Turkish bread would fill the air, beckoning me into the heart of the home. My grandmother, always smiling, would hand me a piece of the golden loaf, the crust perfectly crisp and the inside soft and pillowy. There was something about the texture, the warmth, and the comfort of that bread that made me feel like I was wrapped in a hug. Every bite told a story—of family, tradition, and love passed down through generations.

As I got older and moved away from home, I missed the comforting feeling of gathering around the table with loved ones, sharing a warm loaf of Turkish bread. I realized that food has an incredible way of connecting us to our roots. It isn’t just about the ingredients or the techniques—it’s about the emotions and memories that come along with it. This is why I decided to recreate my grandmother’s Turkish bread recipe, to carry forward the traditions that defined my childhood and bring a taste of home to wherever I am. The recipe I now share with you has been passed down, made with love, and baked with memories. It’s more than just bread; it’s an experience, a journey, and a connection to the past.

Why Turkish Bread is a Staple of Warmth and Tradition

Turkish bread, or pide, is more than just a side dish—it’s a cultural symbol that brings people together. Whether served alongside a hearty meal or used to scoop up dips, Turkish bread is the heart and soul of Turkish cuisine. It’s often enjoyed at family gatherings, celebrations, and meals shared with friends, much like how it was present in my own home growing up. Its versatility makes it a perfect companion to a variety of dishes, from meze to grilled meats, stews, or even a simple breakfast.

The beauty of Turkish bread lies in its simplicity. Made with basic ingredients—flour, yeast, salt, and water—this bread requires patience and time to allow the dough to rise and develop its incredible flavor. The result is a golden, soft interior with a beautifully crisp crust. It’s the kind of bread that brings people together, whether you’re pulling off chunks with your fingers at a family dinner or slicing it up for sandwiches. The process of making this bread is as important as the end result. It’s a tradition that has been passed down for generations, and with every loaf, you become a part of that long history.

Ingredients

IngredientQuantity
Flour500g (1 pound)
Warm Milk150ml (5 fl. oz)
Warm Water150ml (5 fl. oz)
Salt1 tsp
Dry Yeast2 tbsp

Directions:

  1. Activate the Yeast:
    In a small bowl, mix the warm milk, warm water, and dry yeast. Stir to dissolve the yeast and allow it to sit for about 5 minutes until it becomes frothy.
  2. Prepare the Dough:
    In a large mixing bowl, combine the flour and salt. Gradually add the yeast mixture to the flour while stirring. Continue mixing until a dough forms.
  3. Knead the Dough:
    Transfer the dough to a floured surface and knead for 10-15 minutes until it becomes smooth and elastic. If the dough feels too sticky, add a small amount of flour as needed.
  4. First Rise:
    Place the dough into a lightly oiled bowl, cover with a damp cloth, and let it rise in a warm place for about 1-1.5 hours, or until it doubles in size.
  5. Shape the Dough:
    Once the dough has risen, punch it down and divide it into two equal portions. Shape each portion into a round or oval loaf, depending on your preference.
  6. Second Rise:
    Place the shaped dough onto a baking sheet lined with parchment paper. Cover and let it rise for another 30-45 minutes until it puffs up.
  7. Preheat the Oven:
    Preheat your oven to 425°F (220°C). If you’d like, you can create a crispy crust by placing a small pan of water in the bottom of the oven during baking.
  8. Bake the Bread:
    Bake the bread for 25-30 minutes, or until the loaves are golden brown and sound hollow when tapped on the bottom.
  9. Cool and Serve:
    Allow the bread to cool on a wire rack before slicing. Serve warm with your favorite dips or alongside a hearty meal.

Nutritional Information (per serving, based on 8 servings):

NutrientAmount per serving
Calories150 kcal
Protein4g
Carbohydrates30g
Fiber2g
Fat1g
Sodium300mg

What Makes Turkish Bread So Special?

There’s a distinct charm about Turkish bread that’s hard to replicate. The method of baking, the type of flour used, and the way it’s shaped all contribute to its unique texture and flavor. Turkish bread has a lighter, airier quality compared to some other types of bread, with its slightly chewy interior and perfectly crisp crust. It’s the kind of bread that makes you want to savor every bite.

The warm, soft center of Turkish bread is often paired with a subtle saltiness, making it incredibly satisfying. The exterior is golden brown, with just enough crispiness to provide texture, but it remains light and not overly dense. This balance between soft and crispy is one of the reasons Turkish bread stands out. It can be enjoyed on its own or as a versatile accompaniment to any meal, holding up to rich stews, spicy dips, or even just a slathering of butter.

Baking Turkish Bread: A Labor of Love

While making Turkish bread might seem simple, it’s a process that requires patience and attention to detail. The dough must be given time to rise properly, and shaping the dough into the perfect round or oval form takes a bit of practice. The magic, however, happens during baking. When the dough hits the hot oven, it expands, creating a light, airy texture that is both satisfying and irresistible. The crisp crust, once golden and brown, gives way to the tender, fluffy interior.

For me, baking Turkish bread has become a form of self-care. It’s a quiet, meditative process. From mixing the ingredients to the moment the bread emerges from the oven, there’s a sense of accomplishment in every step. The house fills with the scent of freshly baked bread, reminding me of the comfort I felt as a child. And when the bread finally cools, it’s hard to resist tearing off a piece and enjoying it warm, just as my grandmother once did. The bread might only last for a few hours, but the memories it stirs last much longer.

Frequently Asked Questions (FAQs)

1. Can I use a bread machine to make Turkish bread?
Yes, a bread machine can be used to knead the dough for Turkish bread. However, it’s important to note that the bread machine may not give the same texture and results as hand-kneading. The process of kneading by hand helps develop the gluten in the dough, which contributes to the bread’s airy texture.

2. Can I freeze Turkish bread?
Absolutely! Turkish bread can be frozen once it has cooled. Wrap it tightly in plastic wrap or aluminum foil, then place it in a freezer-safe bag. When you’re ready to eat it, simply thaw it at room temperature or heat it in the oven for a few minutes to refresh its crust.

3. Can I add other ingredients to the dough?
Certainly! While traditional Turkish bread is made with simple ingredients, you can experiment by adding herbs like rosemary or thyme, or even olives for a Mediterranean twist. Garlic and cheese can also make excellent additions to the dough for a more indulgent version of the bread.

4. Why is my Turkish bread too dense?
If your Turkish bread turns out dense, it could be due to under-proofing or overworking the dough. Be sure to give the dough enough time to rise during both the first and second proofing stages. Overworking the dough can also cause it to become dense, so handle it gently.

5. Can I make Turkish bread without a stand mixer?
Yes, you can make Turkish bread without a stand mixer. Simply mix the ingredients by hand in a large bowl, and then knead the dough on a floured surface. It will take a bit more effort, but it’s well worth it for the results.

6. What should I serve with Turkish bread?
Turkish bread pairs wonderfully with a variety of dishes. Serve it with hummus, baba ganoush, or tzatziki for a Mediterranean-inspired meal. It also complements grilled meats, kebabs, soups, or a simple spread of olive oil and herbs. You can even enjoy it with a traditional Turkish breakfast of cheeses, olives, and tomatoes.

Conclusion: A Slice of Tradition

Baking Turkish bread is a beautiful way to honor tradition, share culture, and create memories with your loved ones. Every loaf is a connection to the past, and every slice tells a story. The simple process of mixing flour, yeast, water, and salt becomes an act of love, passed down through generations. Whether you’re baking for your family or sharing the loaf with friends, Turkish bread brings people together in ways that are both delicious and meaningful.

As you bake and share this bread, you’re not just feeding people—you’re nourishing their hearts with the warmth and comfort of a centuries-old tradition. And just as my grandmother’s bread filled my childhood with love and laughter, so too can this simple yet profound recipe enrich your home, one slice at a time.

Amal

Turkish Bread: A Flavorful Tradition that Brings People Together

This Turkish bread, with its soft, pillowy interior and golden, crispy crust, is the perfect companion to any meal. Whether you’re serving it with soups, stews, or using it to scoop up dips, this bread is a true delight. Made from simple ingredients and baked with care, it will soon become a favorite in your kitchen.
Prep Time 20 minutes
Cook Time 30 minutes
Total Time 1 hour 50 minutes
Servings: 2 loaves
Course: Bread
Cuisine: Turkish-Inspired

Ingredients
  

  • 500 g 1 pound flour
  • 150 ml 5 fl. oz warm milk
  • 150 ml 5 fl. oz warm water
  • 1 tsp salt
  • 2 tbsp dry yeast

Method
 

  1. Activate the Yeast: In a small bowl, combine the warm milk, warm water, and dry yeast. Stir to dissolve and let it sit for about 5 minutes until the mixture becomes frothy.
  2. Mix the Dough: In a large mixing bowl, combine the flour and salt. Slowly add the yeast mixture to the flour, stirring continuously to form a dough.
  3. Knead the Dough: Transfer the dough onto a floured surface. Knead for about 10-15 minutes until the dough is smooth and elastic. If needed, add a small amount of flour to prevent stickiness.
  4. First Rise: Place the dough in an oiled bowl, cover with a damp cloth, and let it rise in a warm place for about 1-1.5 hours, or until it has doubled in size.
  5. Shape the Dough: Once the dough has risen, punch it down and divide it into two portions. Shape each portion into a round or oval loaf.
  6. Second Rise: Place the shaped loaves on a baking sheet lined with parchment paper. Cover with a damp cloth and let them rise for another 30-45 minutes.
  7. Preheat the Oven: Preheat the oven to 425°F (220°C). For a crispier crust, place a small pan of water in the bottom of the oven.
  8. Bake the Bread: Bake the bread for 25-30 minutes, or until the loaves are golden brown and sound hollow when tapped on the bottom.
  9. Cool and Serve: Let the bread cool on a wire rack before slicing. Serve warm with your favorite dishes.

Notes

  • For a more rustic flavor, you can experiment by adding a small amount of olive oil to the dough or brushing the bread with olive oil before baking.
  • You can store any leftover bread in an airtight container for up to 2 days. If it begins to harden, warm it in the oven to refresh the crust.
  • This bread is best served fresh, but it can also be frozen once cooled. Just wrap it tightly and freeze it for up to a month. To reheat, place it in the oven for a few minutes.

Crisp and Fresh: The Story Behind Cucumber Salad

There’s something undeniably refreshing about a simple cucumber salad. For me, it’s more than just a side dish—it evokes memories of summer afternoons spent in the kitchen with family. Growing up, my grandmother would often prepare this salad for our family gatherings. The crisp cucumbers, the earthy carrots, the smooth yogurt dressing—each bite was like a burst of freshness that cooled you down after a long day. Even as a child, I could appreciate the way this dish blended simplicity and flavor, something that has stuck with me over the years.

The beauty of cucumber salad lies in its ability to be both light and satisfying. Unlike heavier dishes that leave you feeling weighed down, this salad offers a refreshing, wholesome option that’s both nutritious and delicious. Whether as a side dish at a summer barbecue, a light lunch, or a quick snack, cucumber salad has a way of bringing people together and offering a taste of nostalgia with each bite.

I always felt that food has a way of connecting us to our past. Every time I make this salad, I feel the same joy I did as a child, when my grandmother would place the bowl in front of me and tell me to enjoy. That feeling of sitting around the table with loved ones, sharing food and stories, is something that will always be special to me. Cucumber salad, for all its simplicity, has a way of making ordinary moments feel extraordinary. It’s a reminder that food doesn’t have to be complicated to be comforting.

The Joy of Simple, Fresh Ingredients

One of the most appealing aspects of cucumber salad is its simplicity. The ingredients are basic, yet when combined, they create a dish that feels fresh, vibrant, and full of life. Cucumbers, a key ingredient, are hydrating and light, providing a crisp texture that serves as the perfect base for this salad. Carrots add a subtle sweetness and vibrant color, while eggs provide protein, making the salad more satisfying. The cooked corn offers a touch of warmth and sweetness, rounding out the flavors.

The dressing, made with thick yogurt and mustard, is what elevates this salad. It’s creamy without being heavy, tangy without overpowering the freshness of the vegetables. The mustard adds a slight zing, balancing out the richness of the yogurt. Together, the ingredients create a harmonious blend that is light enough for a hot summer day but satisfying enough to complement any meal.

Ingredients

IngredientQuantity
Cucumbers2
Salt1/3 teaspoon
Eggs3
Carrots1-2
Cooked Corn80g
Green OnionTo taste
ParsleyTo taste
Thick Yogurt3-4 tablespoons
Mustard1 tablespoon

Directions:

  1. Prepare the Ingredients
    Peel the cucumbers and carrots, then slice the cucumbers into thin rounds and grate the carrots. Boil the eggs until hard-boiled, peel them, and chop them into small pieces.
  2. Combine the Vegetables and Eggs
    In a large bowl, add the cucumbers, grated carrots, cooked corn, and chopped eggs. Mix them together gently.
  3. Make the Dressing
    In a small bowl, combine the thick yogurt, mustard, and salt. Whisk until smooth and well-combined.
  4. Toss the Salad
    Pour the yogurt dressing over the salad mixture and toss everything together until evenly coated.
  5. Garnish and Serve
    Sprinkle finely chopped green onion and parsley on top of the salad for extra flavor and a fresh finish. Serve chilled for a refreshing side dish.

Nutritional Information (per serving, based on 4 servings):

NutrientAmount per serving
Calories120 kcal
Protein6g
Carbohydrates14g
Fiber3g
Fat5g
Sodium250mg

Why Cucumber Salad Should Be Part of Your Regular Rotation

If you’re looking for a dish that is quick, easy, and versatile, cucumber salad is your answer. It’s a fantastic option for meal prep, as it keeps well in the refrigerator for a day or two. The best part? It only gets better as the flavors marinate. It’s a great way to use up leftover cooked corn or hard-boiled eggs and can easily be customized to suit your preferences.

In addition to its versatility, cucumber salad is packed with nutrients. Cucumbers are low in calories but high in water content, making them excellent for hydration. Carrots are rich in beta-carotene, which is great for skin health and vision. Eggs provide essential protein, while the yogurt dressing adds a dose of probiotics, supporting gut health. All in all, this is a dish that’s as healthy as it is satisfying.

The Perfect Side for Any Occasion

Cucumber salad is a versatile side dish that pairs wonderfully with a wide variety of main courses. It complements grilled meats like chicken, steak, and pork, adding a light and refreshing contrast to the richness of the meat. It also works well with seafood, providing a cooling effect when paired with spicy or strongly flavored dishes.

This salad can also stand on its own as a light meal. On hot summer days when you don’t want to turn on the stove, cucumber salad is an excellent choice for a quick and refreshing meal. Add a slice of whole-grain bread or a handful of nuts, and you’ve got a complete, nourishing meal.

Frequently Asked Questions (FAQs)

1. Can I make this cucumber salad ahead of time?

Yes! One of the great things about this salad is that it actually tastes better after the flavors have had time to meld together. You can make it a few hours ahead of time or even the night before. Just make sure to store it in an airtight container in the refrigerator. Keep in mind that the cucumbers may release some water as it sits, so you can drain the excess liquid before serving if needed.

2. Can I use a different dressing instead of yogurt?

Absolutely! If you’re not a fan of yogurt, there are several other dressing options you can try. A vinaigrette made with olive oil and vinegar can add a tangy kick, while a creamy dressing with mayonnaise or sour cream would offer a richer texture. You could even experiment with tahini for a nutty flavor or a simple lemon dressing for a fresh, zesty twist.

3. Can I add other vegetables to this salad?

Definitely! Cucumber salad is a fantastic base for adding other vegetables. Feel free to experiment with bell peppers, radishes, or even tomatoes. If you prefer a more robust salad, you could also add some leafy greens like spinach or arugula.

4. How can I make this salad vegan?

To make this salad vegan, you can substitute the eggs for a plant-based protein like chickpeas or tofu. For the dressing, swap the yogurt with a non-dairy alternative like cashew cream or coconut yogurt. The mustard-based dressing is already vegan-friendly, so with a few simple substitutions, you can make this salad suitable for a vegan diet.

5. How do I store leftovers?

Cucumber salad can be stored in an airtight container in the refrigerator for up to two days. However, keep in mind that the cucumbers may become a bit soft as they release moisture. If you have leftovers, you can drain any excess water before serving again.

6. Can I add some protein to this salad for a more filling meal?

Yes! To turn this salad into a more substantial meal, you can add grilled chicken, tofu, or even chickpeas for a plant-based protein. The salad pairs wonderfully with these additions, making it both filling and balanced.

The Simple Pleasure of Cucumber Salad

In a world where we are constantly bombarded with complex recipes and intricate cooking techniques, there’s something beautifully satisfying about returning to the basics. Cucumber salad is a reminder that food doesn’t have to be complicated to be delicious. It’s a dish that can be thrown together quickly, yet it carries with it a depth of flavor that makes every bite special.

Whether you’re serving it at a family gathering, enjoying it as a solo lunch, or pairing it with a main course, cucumber salad brings a refreshing balance to any meal. The joy of this salad is not just in its taste, but in the memories it creates—those moments spent sharing a meal with loved ones, savoring the simplicity of fresh ingredients, and appreciating the comfort that food can bring.

Conclusion: A Timeless Classic

Cucumber salad is more than just a dish—it’s a celebration of simplicity, freshness, and the joy of cooking. It’s the kind of recipe that you’ll find yourself turning to time and time again, whether you’re in need of a quick lunch or a vibrant side dish to complement a larger meal. With its light yet satisfying combination of flavors, this salad has earned its place as a timeless classic in kitchens all over the world.

So, the next time you find yourself craving something refreshing, light, and full of flavor, reach for this easy cucumber salad recipe. With just a few simple ingredients and a little love, you’ll create a dish that’s perfect for any occasion. Enjoy!

Amal

Crisp and Fresh: The Story Behind Cucumber Salad

This light and vibrant cucumber salad is the perfect side dish to accompany any meal. With fresh cucumbers, sweet carrots, boiled eggs, and a creamy yogurt-mustard dressing, it’s a refreshing burst of flavor that’s easy to prepare and even easier to enjoy. Ideal for hot summer days or as a quick meal prep option, this salad is both nutritious and satisfying.
Prep Time 20 minutes
Cook Time 10 minutes
Total Time 30 minutes
Servings: 4 –6 servings
Course: Salad
Cuisine: International

Ingredients
  

  • 2 cucumbers
  • 1/3 teaspoon salt
  • 3 eggs
  • 1-2 carrots
  • 80 g cooked corn
  • Green onion to taste
  • Parsley to taste
  • 3-4 tablespoons thick yogurt
  • 1 tablespoon mustard

Method
 

  1. Prepare the Ingredients: Peel the cucumbers and carrots. Slice the cucumbers into thin rounds and grate the carrots. Boil the eggs, peel them, and chop them into small pieces.
  2. Mix the Vegetables and Eggs: In a large bowl, combine the cucumbers, grated carrots, cooked corn, and chopped eggs.
  3. Prepare the Dressing: In a small bowl, mix the thick yogurt, mustard, and salt until well combined.
  4. Combine and Toss: Pour the yogurt dressing over the vegetable and egg mixture. Toss everything together gently until evenly coated.
  5. Garnish and Serve: Garnish with finely chopped green onions and parsley for a fresh finish. Serve chilled and enjoy!

Notes

  • This salad is best served chilled, making it a perfect dish for summer.
  • You can customize the dressing to your taste by adding a bit of lemon juice or herbs.
  • It can be stored in the refrigerator for up to 2 days, though the cucumbers may release some water after sitting. Drain if needed before serving.

A Slice of Home: The Magic of Homemade Sourdough Bread

There’s something deeply comforting about the smell of freshly baked bread wafting through the kitchen. For me, it’s not just the warmth that fills the room, but the memories attached to the process itself. I remember the first time I decided to make sourdough bread from scratch. I was feeling a little disconnected from the world, longing for something authentic and deeply rooted in tradition. As I mixed the ingredients, kneaded the dough, and watched it rise, I felt a sense of connection not only to the bread but also to generations of bakers who had made this same bread for centuries. Each stretch of the dough felt like a meditation, a moment to focus on something tangible, something nourishing.

Making sourdough isn’t just about the bread; it’s about the process, the patience, and the connection to something bigger than ourselves. It’s about using ingredients that are simple yet magical, allowing nature to do much of the hard work. As the dough rises, so does our appreciation for the art of baking. For me, baking sourdough is a journey—one that takes time, effort, and love, but rewards you with the kind of bread that can transform an ordinary meal into something extraordinary.

The Beauty of Sourdough: Why It’s Worth the Effort

Sourdough bread is unique because it’s made using a naturally fermented starter rather than store-bought yeast. This starter, which is a mixture of flour and water that captures wild yeast and bacteria from the air, transforms into the magical leavening agent that makes sourdough so distinctive. The natural fermentation process is what gives sourdough its signature tangy flavor and chewy texture.

While making sourdough bread may seem intimidating at first glance, it’s actually a wonderfully rewarding process. Once you learn the rhythm of caring for your starter and understand how to knead and shape the dough, you’ll begin to appreciate the subtle art of sourdough. The end result is a loaf with a rich, complex flavor profile and a crispy, golden crust that’s simply irresistible.

Ingredients

IngredientQuantity
Fresh Sourdough Starter200g (1 cup)
Wheat Flour600g (5 cups)
All-Purpose or Bread Flour400g (3¼ cups)

Directions:

  1. Prepare the Dough
    In a large bowl, combine the fresh sourdough starter, wheat flour, and all-purpose flour. Slowly add water (about 400ml), stirring to form a rough dough. Knead the dough on a floured surface for 10-15 minutes until it becomes smooth and elastic.
  2. First Rise
    Place the dough in a lightly oiled bowl, cover with a damp cloth, and let it rise at room temperature for 4-6 hours, or until doubled in size.
  3. Shape the Dough
    Once the dough has risen, turn it out onto a floured surface. Gently deflate the dough and shape it into a round or oval loaf, depending on your preference.
  4. Second Rise
    Transfer the shaped dough to a lightly floured proofing basket or bowl. Cover and let it rise for another 2-3 hours, or until it has noticeably puffed up.
  5. Preheat the Oven
    Preheat your oven to 475°F (245°C) with a Dutch oven or baking stone inside.
  6. Bake the Bread
    Once the oven is hot, carefully transfer the dough to the preheated Dutch oven or baking stone. Cover with the lid or a baking dish and bake for 30 minutes. After 30 minutes, remove the cover and continue baking for another 15-20 minutes, or until the bread is golden brown and sounds hollow when tapped on the bottom.
  7. Cool and Enjoy
    Let the bread cool on a wire rack for at least 30 minutes before slicing.

Nutritional Information (per serving, based on 12 servings):

NutrientAmount per serving
Calories150 kcal
Protein5g
Carbohydrates30g
Fiber2g
Fat0.5g
Sodium5mg

Understanding the Science Behind Sourdough

What makes sourdough bread stand out from other types of bread is its leavening process, which relies on wild yeast and lactic acid bacteria present in the environment. The fermentation process is slow, allowing the natural yeasts to rise and the bacteria to create lactic acid, which gives sourdough its signature tang.

The wild yeast in the sourdough starter is very different from the commercial yeast typically used in quick-rise breads. Wild yeast works more slowly, producing smaller bubbles that create the dense, chewy texture sourdough is known for. This is why sourdough bread often takes longer to rise and bake than other bread types. However, the flavor and texture are well worth the wait.

Tips for Perfect Sourdough Every Time

If you’re new to sourdough, there are a few things you can do to ensure that your loaf turns out just right.

  1. Patience is Key
    The first thing you need to understand about sourdough bread is that it takes time. Sourdough is a slow fermenting bread, and the dough needs to rise and develop over several hours. Don’t rush the process—allowing the dough the time it needs to rise and ferment will result in a better flavor and texture.
  2. Use a Mature Sourdough Starter
    Your starter is the heart and soul of your sourdough bread, and a mature starter will give you better results. Make sure your starter is active and bubbly before using it in your bread recipe. Feed it regularly with fresh flour and water, and it will reward you with delicious, tangy bread.
  3. Don’t Skip the Stretch and Fold
    One of the keys to achieving the perfect sourdough texture is developing gluten properly. During the bulk fermentation phase, you’ll need to periodically stretch and fold the dough. This helps to strengthen the gluten and ensures that the dough rises evenly. It also contributes to the beautiful open crumb that sourdough is known for.
  4. Master the Art of Scoring
    Scoring the dough just before baking helps it rise evenly and allows you to control the way the bread expands in the oven. It also creates a beautiful pattern on the top of the loaf. Use a sharp knife or a bread lame to make a few shallow cuts on the surface of the dough before baking.
  5. Don’t Forget the Steam
    Sourdough loves steam. When baking, steam helps create the crispy, golden crust that everyone loves. If you’re baking your sourdough in a Dutch oven, the lid traps steam, giving you the perfect environment for a crunchy, rustic crust. If you’re baking it on a baking stone, consider adding a pan of hot water to the oven to create steam.

Frequently Asked Questions (FAQs)

1. How long does it take to make sourdough bread?

Making sourdough bread from scratch generally takes between 24 and 48 hours, depending on the environment and the fermentation process. The actual hands-on time is relatively short, but the dough requires several hours to rise and develop flavor. Be prepared for a slow, intentional process—this isn’t a recipe you’ll want to rush.

2. How can I make my sourdough starter more active?

If your sourdough starter isn’t as bubbly as you’d like, it may need more frequent feedings or warmer conditions. Try feeding it once a day and keeping it in a warm, draft-free place. If your starter is sluggish, consider increasing the amount of flour and water you feed it, or leave it in a warmer spot in your kitchen.

3. Can I use all-purpose flour instead of bread flour for sourdough?

Yes, you can use all-purpose flour in place of bread flour, although bread flour has a higher protein content, which contributes to a stronger gluten structure and a chewier texture in the finished loaf. If you use all-purpose flour, you may need to adjust the hydration level of the dough slightly, as all-purpose flour absorbs less water than bread flour.

4. Can I make sourdough without a Dutch oven?

Yes, a Dutch oven is great for trapping steam and producing a crisp, golden crust, but it’s not essential. If you don’t have one, you can bake sourdough on a baking stone or even a regular baking sheet. Just be sure to add steam to the oven—either by spraying water into the oven or placing a pan of hot water on the bottom rack.

5. Why is my sourdough bread dense and heavy?

A dense sourdough loaf can be caused by several factors, including under-fermentation, insufficient gluten development, or using too little starter. Make sure you allow enough time for the dough to rise and develop flavor. Additionally, make sure you are stretching and folding the dough during the bulk fermentation phase to build strength in the gluten.

Sourdough Troubleshooting: Common Mistakes and How to Fix Them

Even the most experienced bakers face challenges when making sourdough, but that’s part of the beauty of it. With a little patience and practice, you’ll learn how to solve any issues that arise.

  • Problem: Flat or misshapen loaf
    Solution: Make sure your dough is well-shaped before the final rise. If your dough is too slack, try adding a little more flour during the mixing phase and be sure to knead it properly to develop the gluten. If your loaf is spreading too much during baking, you may need to reduce the hydration of the dough or increase the flour content slightly.
  • Problem: Sourdough lacks flavor
    Solution: The flavor of your sourdough comes from the fermentation process. If you’re not getting a tangy flavor, your dough may not have fermented long enough. Try allowing the dough to rise for a longer period during the bulk fermentation stage, or use a more active starter.
  • Problem: Crust is too thick or hard
    Solution: A thick, hard crust can happen if your oven is too hot or the dough is over-baked. Ensure your oven is properly preheated, and consider covering the bread with foil in the final stage of baking to prevent over-browning.

Conclusion: The Reward of Slow, Intentional Baking

Sourdough bread is more than just a recipe—it’s an experience, a journey through time and tradition. It’s a process that rewards patience, practice, and a little bit of love. With each loaf, you’ll become more attuned to the art of bread-making and more connected to the generations of bakers who have passed down their knowledge. Whether it’s for a special occasion or simply to enjoy with a bowl of soup, sourdough bread has the power to elevate any meal.

As you embark on your own sourdough journey, remember that perfection comes with time. Each loaf will teach you something new about the process, and with each bake, you’ll get closer to mastering the craft. The joy of sourdough lies not only in the end result but in the act of creating something from scratch, using simple ingredients and your own hands. And that, perhaps, is the most rewarding part of all.

Amal

A Slice of Home: The Magic of Homemade Sourdough Bread

This homemade rustic sourdough bread is the perfect blend of tangy flavor and chewy texture. Made with a simple combination of flour, water, and a well-maintained sourdough starter, this bread is an artisanal delight that you’ll want to make again and again. Whether you’re a beginner or a seasoned baker, this recipe will guide you through the process, resulting in a golden, crusty loaf with a soft, flavorful interior.
Prep Time 20 minutes
Cook Time 45 minutes
Servings: 1 loaf
Course: Bread
Cuisine: International

Ingredients
  

  • 200 g 1 cup fresh sourdough starter
  • 600 g 5 cups wheat flour
  • 400 g 3¼ cups all-purpose or bread flour
  • Water approximately 400ml, adjust as needed
  • Salt around 10g or 1 teaspoon

Method
 

  1. Combine Ingredients: In a large mixing bowl, combine the sourdough starter with the wheat flour and all-purpose flour. Gradually add the water, mixing until a rough dough forms.
  2. Knead the Dough: Transfer the dough to a floured surface and knead it for about 10-15 minutes until it becomes smooth and elastic. The dough should be slightly tacky but not too sticky.
  3. First Rise: Place the dough in an oiled bowl, cover it with a damp cloth, and let it rise for 4-6 hours at room temperature, or until it doubles in size.
  4. Shape the Dough: Once the dough has risen, gently punch it down and transfer it to a floured surface. Shape it into a round or oval loaf, depending on your preference.
  5. Second Rise: Place the shaped dough into a proofing basket or bowl, cover, and let it rise for another 2-3 hours, until the dough puffs up.
  6. Preheat the Oven: Preheat your oven to 475°F (245°C) with a Dutch oven or baking stone inside for at least 30 minutes.
  7. Bake the Bread: Carefully transfer the dough to the preheated Dutch oven or stone. Cover with a lid or baking dish and bake for 30 minutes. Then, remove the cover and continue baking for another 15-20 minutes, until the loaf is golden brown with a crisp crust.
  8. Cool and Slice: Let the bread cool on a wire rack for at least 30 minutes before slicing to allow the flavors to fully develop.

Notes

  • Sourdough Starter: Make sure your sourdough starter is bubbly and well-fed before use. A mature starter gives better results.
  • Steam is Key: For a crispy crust, create steam in the oven by baking the bread inside a covered Dutch oven or by adding a pan of hot water to the oven.
  • Let It Rest: Allow your bread to cool completely before slicing to preserve the texture and flavor.

Stay Connected

Get recipes via email: