There’s something truly comforting about starting your day with a warm bowl of oatmeal. For many, it evokes memories of early mornings at home, where the smell of oats cooking on the stove mingles with the first rays of sunlight streaming through the kitchen window. I can remember my childhood mornings when my mom would serve us a simple yet wholesome breakfast of oatmeal with fresh fruit. It was a ritual that helped center us for the busy day ahead. While life may have changed since then, the simplicity and nourishing qualities of that breakfast have stayed with me.
One morning, in the midst of a hectic week, I found myself craving that same comforting breakfast. However, I didn’t have much in the fridge except some ripe bananas, a box of oat flakes, and a bit of vanilla extract. The result was nothing short of magical. It took only a few minutes, yet it transported me back to those simpler times. This oatmeal recipe with bananas is a nod to that familiar, nostalgic breakfast, but with a modern twist that’s equally satisfying and delicious.
The Magic of Oats and Bananas: A Perfect Pairing
Oats are often touted for their health benefits, and for good reason. They’re high in fiber, which is great for digestion, and they’re a fantastic source of slow-releasing energy. This makes oatmeal an excellent option for keeping you full throughout the morning. Bananas, on the other hand, bring natural sweetness and potassium to the table. When combined, these two ingredients form the perfect foundation for a hearty and nourishing breakfast.
What makes this recipe even more special is its simplicity. With just a handful of ingredients, this dish is quick to prepare, easy to digest, and can be customized to suit different dietary preferences. Whether you need a quick breakfast before heading out the door or a comforting bowl to enjoy during a leisurely weekend morning, this oatmeal with bananas fits the bill.
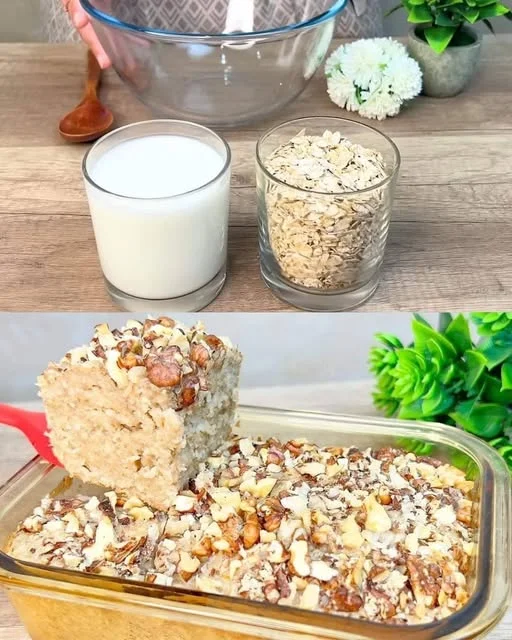
Ingredients:
| Ingredient | Quantity |
|---|---|
| Oat flakes | 100g (1 cup) |
| Warm water | 150 ml (⅔ cup) |
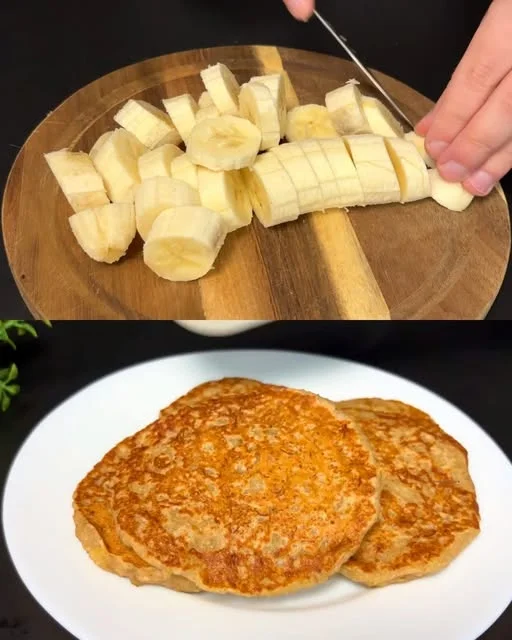
| Ripe bananas | 2 |
| Vanilla extract | ½ teaspoon (or to taste) |
Directions:
- Prepare the Oats:
- In a medium-sized pot, bring the warm water to a simmer. Add the oat flakes and stir occasionally. Allow the oats to absorb the water and cook for about 5–7 minutes, or until they reach a creamy consistency.
- Mash the Bananas:
- While the oats are cooking, peel the bananas and mash them in a bowl using a fork until smooth. If you prefer a chunkier texture, you can mash them less.
- Combine:
- Once the oats are cooked, stir in the mashed bananas and vanilla extract. Mix until well combined, and continue to cook on low heat for an additional 2-3 minutes to let the flavors meld together.
- Serve:
- Remove from heat and transfer the oatmeal to bowls. Serve warm, and enjoy a naturally sweet and creamy breakfast!
Nutritional Information (Approximate per serving):
| Nutrient | Amount per serving |
|---|---|
| Calories | 180 kcal |
| Carbohydrates | 40g |
| Protein | 4g |
| Fat | 2g |
| Fiber | 5g |
| Sugars | 12g |
| Sodium | 5mg |
Why Oatmeal and Bananas Are the Ultimate Comfort Food
The beauty of this oatmeal recipe lies in its versatility. Oats are often thought of as a blank canvas for toppings, and bananas are naturally sweet, providing a perfect balance of flavor without the need for added sugar. Here are some reasons why this combination is so popular:
- Nutrient-Rich: Bananas are packed with potassium, fiber, and vitamins such as Vitamin C and Vitamin B6. Oats, on the other hand, are rich in soluble fiber, which helps lower cholesterol and maintain blood sugar levels. This pairing provides a solid nutritional foundation to start your day.
- Quick and Easy: With only a few minutes of preparation, this recipe is ideal for those busy mornings when you don’t have much time but still want something healthy and filling.
- Satisfying: The fiber content in both oats and bananas ensures you’ll feel full for hours, making this an excellent breakfast option for sustaining energy until lunchtime.
- Versatile: While this recipe is delicious on its own, it can be easily adapted. You can add nuts, seeds, or even a spoonful of almond butter for an extra boost of protein and healthy fats. It’s also easily made dairy-free by swapping the milk for a non-dairy alternative like almond or oat milk.
Frequently Asked Questions (FAQs)
1. Can I use instant oats for this recipe?
Yes, instant oats can be used, but they will cook faster and have a slightly different texture. If you use instant oats, reduce the cooking time to about 1-2 minutes. For a creamier texture, you can add a little more milk or water as the oats cook.
2. Can I use frozen bananas?
Frozen bananas work perfectly for this recipe. In fact, they can create a creamier texture when mashed and incorporated into the oatmeal. Just be sure to thaw them for a few minutes before mashing.
3. Can I make this recipe without milk?
Yes, you can make this oatmeal without milk by using water or a dairy-free milk alternative like almond, oat, or soy milk. The flavor will still be delicious and comforting.
4. How can I make this oatmeal sweeter?
If you prefer a sweeter oatmeal, you can add a drizzle of honey, maple syrup, or a sprinkle of brown sugar. Additionally, using very ripe bananas will naturally sweeten the dish.
5. How do I store leftovers?
If you have any leftover oatmeal, store it in an airtight container in the refrigerator for up to 2-3 days. To reheat, simply add a little extra milk or water and heat on the stove or in the microwave until warm.
6. Can I add other fruits to the oatmeal?
Absolutely! This recipe is versatile, and you can add other fruits like berries, apples, or even dried fruit. Experiment with different combinations to suit your taste.
7. Can I prepare this oatmeal the night before?
Yes, you can prepare this oatmeal the night before and store it in the fridge. The oats will absorb the liquid overnight, and the texture will be a bit thicker. In the morning, simply heat it up and enjoy.
Additional Tips and Variations
- Add Nuts for Texture: If you like a bit of crunch, try adding chopped nuts like almonds, walnuts, or pecans to the oatmeal. Not only will they add texture, but they will also boost the protein content.
- Spices and Flavoring: Spice it up by adding a pinch of cinnamon, nutmeg, or even cardamom for a warm, aromatic twist. Vanilla extract is already a great addition, but you can also use almond extract for a different flavor profile.
- Use a Slow Cooker: If you have extra time, try making this oatmeal in a slow cooker. Combine all the ingredients in the slow cooker and cook on low for 4-6 hours for an incredibly creamy and rich oatmeal experience.
- Dairy-Free Option: As mentioned earlier, you can make this dish dairy-free by using any plant-based milk, such as almond milk, coconut milk, or oat milk. For added creaminess, coconut milk is a great option.
Conclusion: A Simple Meal with Lasting Benefits
This oatmeal recipe with bananas is more than just a breakfast; it’s a reminder of how simple ingredients can create something nourishing and comforting. Whether you’re trying to simplify your mornings or are looking for a way to fuel your body with wholesome, natural ingredients, this dish has everything you need. Packed with fiber, potassium, and healthy carbohydrates, it will keep you satisfied and energized for the day ahead.
In a world where we often overcomplicate things, it’s refreshing to return to the basics and enjoy a meal that is both nourishing and full of love. Just as I was reminded of the comfort and warmth of my childhood mornings, I hope this recipe brings you the same sense of peace and satisfaction. So the next time you find yourself searching for something simple yet delicious, give this oatmeal with bananas a try. It might just become your new favorite comfort food too.
The Simple Joy of Oatmeal with Bananas
Ingredients
Method
- Cook the Oats: In a medium saucepan, bring the warm water to a simmer. Add the oat flakes, stir, and cook for 5-7 minutes until the oats absorb the water and become creamy. Stir occasionally to avoid sticking.
- Mash the Bananas: While the oats are cooking, peel the bananas and mash them in a bowl using a fork until smooth. You can also leave some small chunks for added texture.
- Combine and Flavor: Once the oats are cooked, stir in the mashed bananas and vanilla extract. Mix well and let it cook for an additional 2-3 minutes over low heat to blend the flavors together.
- Serve: Remove from heat, transfer to bowls, and enjoy this simple, wholesome oatmeal for breakfast.
Notes
- Sweetness Adjustment: Depending on how ripe your bananas are, you might want to adjust the amount of vanilla extract for a sweeter taste. If you like it sweeter, a drizzle of honey or maple syrup can be added as well.
- Vegan/Dairy-Free Option: To make this recipe dairy-free, substitute the warm water with a non-dairy milk like almond or oat milk.
- Customization: Add nuts, seeds, or fresh fruit on top for a more filling breakfast. Berries, chia seeds, or a spoonful of peanut butter would work wonderfully.