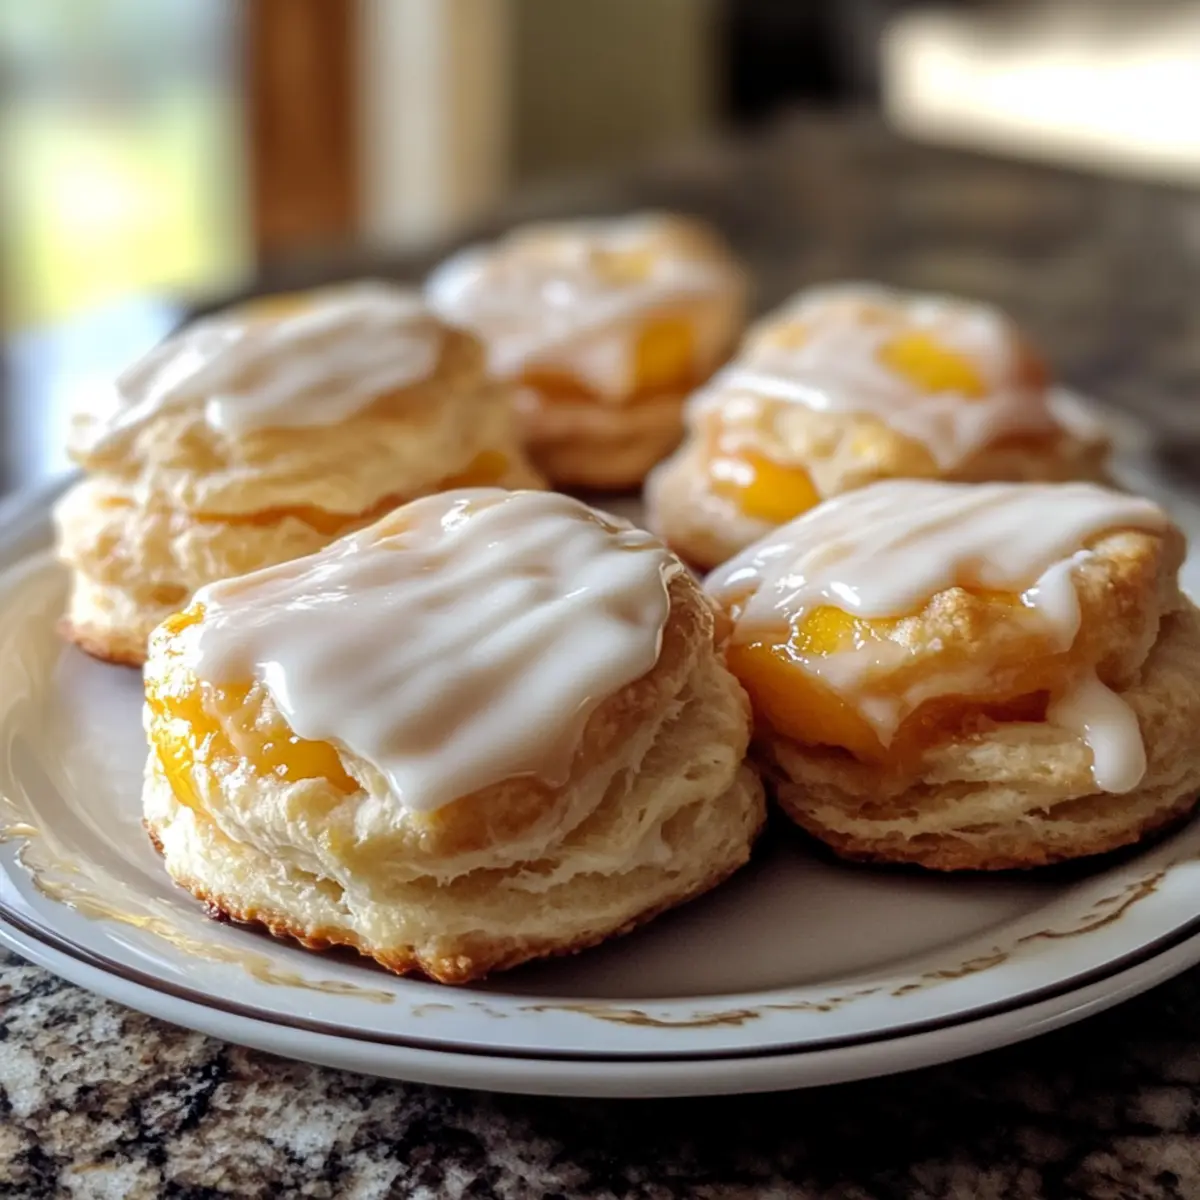
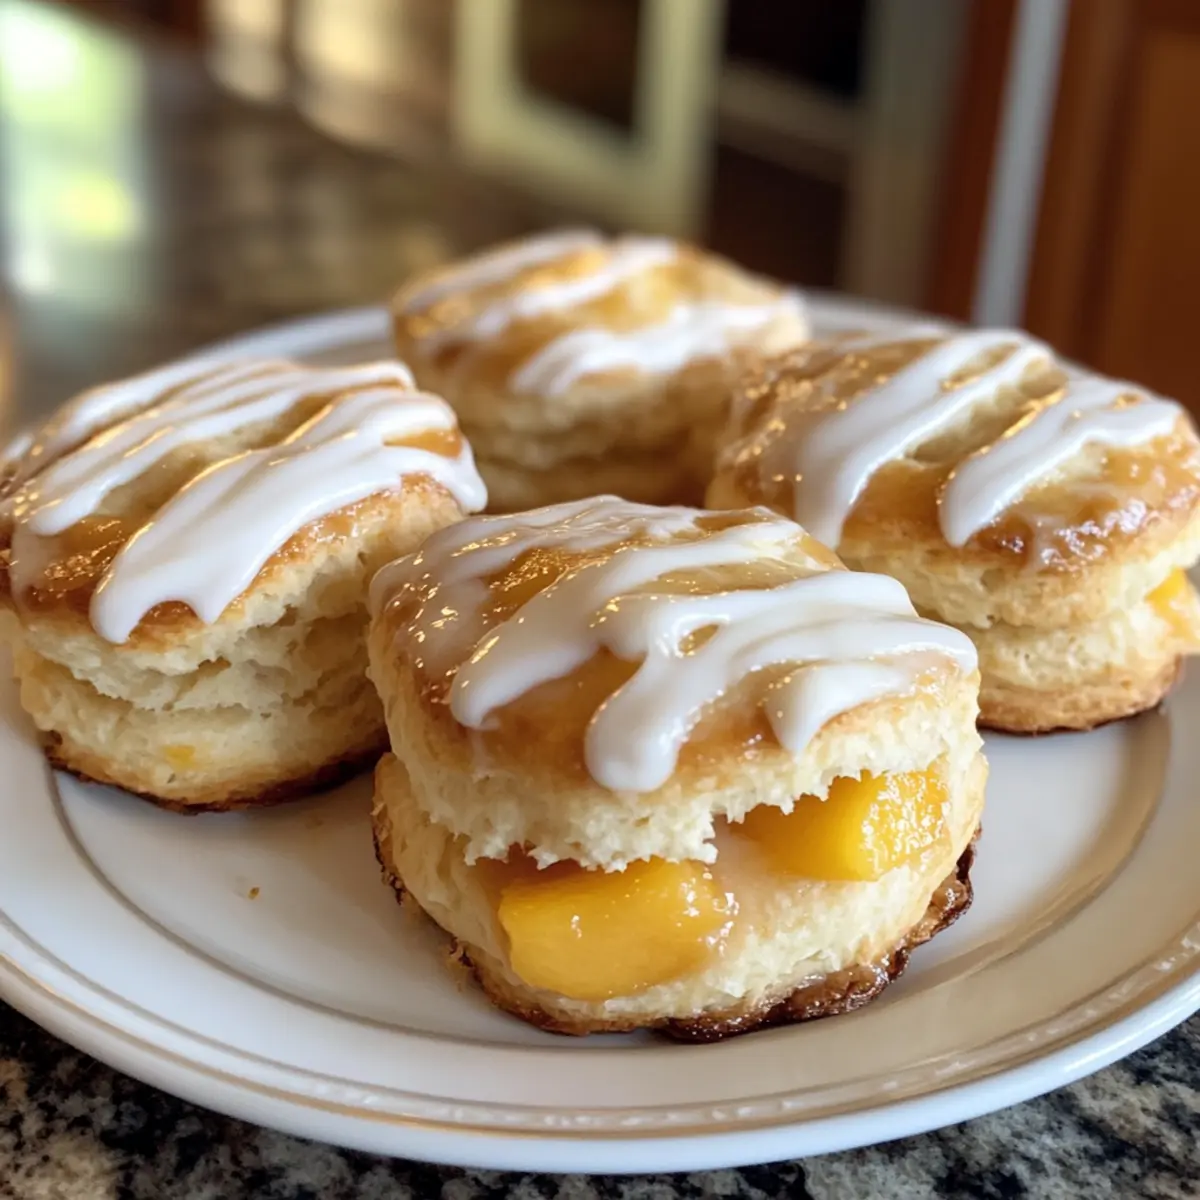
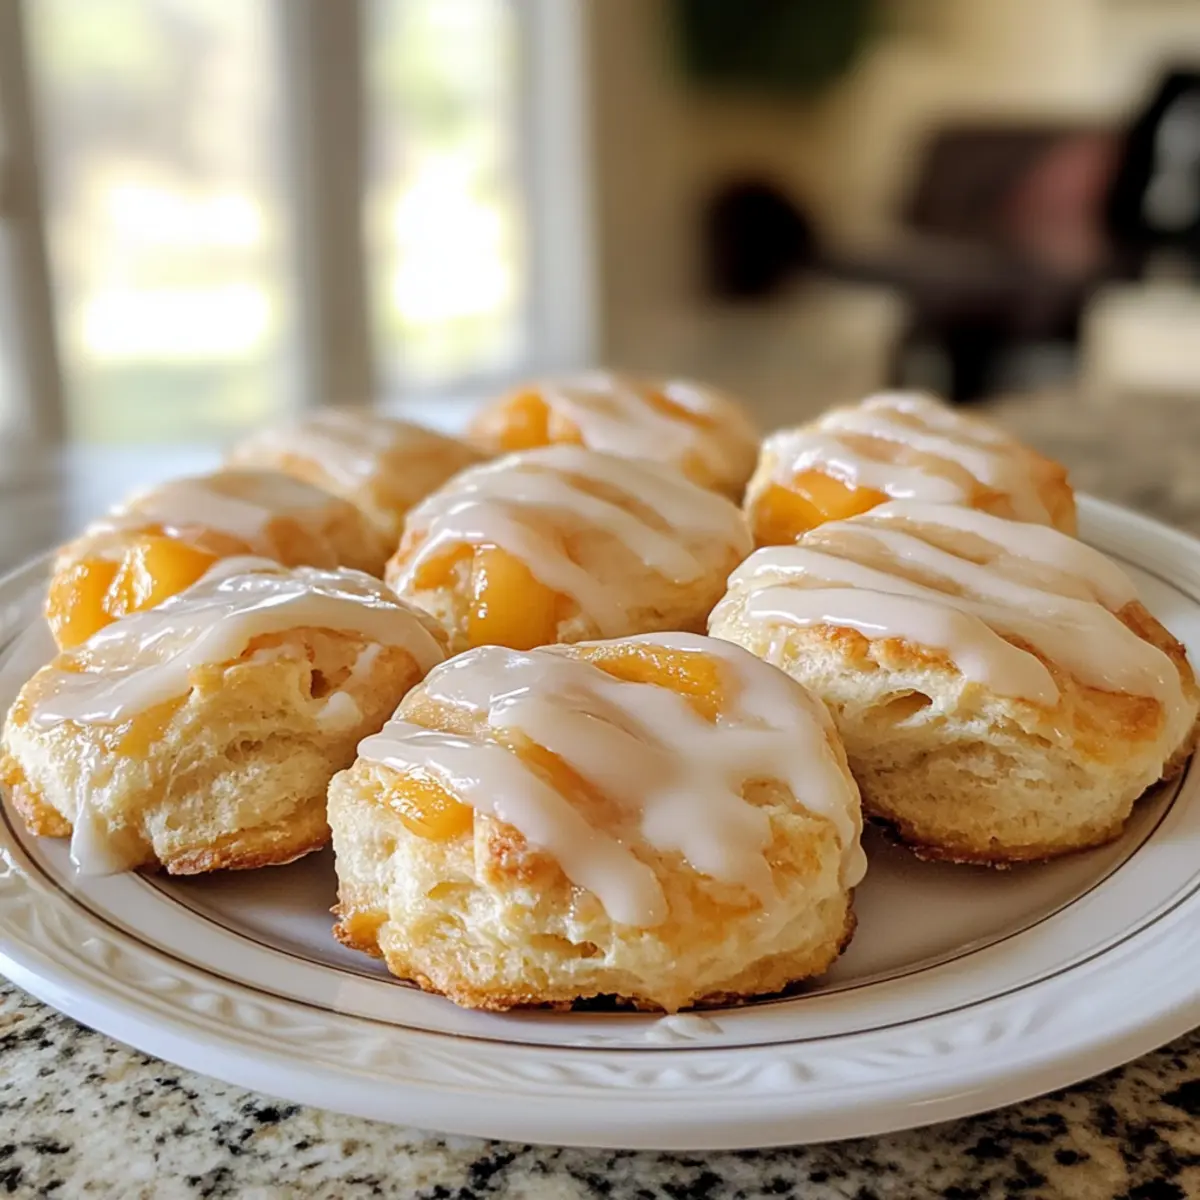
Sicilian Tuna Crudo: Fresh & Quick Antipasto Bliss

As the sun dips below the horizon, painting the sky with hues of orange and pink, I find myself craving something vibrant and fresh. Enter Sicilian Tuna Crudo, a dish that celebrates the simplicity of quality ingredients and brings a taste of Italy right to my kitchen. This elegant seafood delight takes just fifteen minutes to prepare, making it an effortless yet impressive addition to any gathering. With fresh, raw tuna glistening from a drizzle of extra virgin olive oil, zesty lemon, and the delightful crunch of pistachios, it’s a meal that’s not only quick to whip up but also a health-conscious choice bursting with rich flavors. Have you ever tried your hand at crudo? Let’s dive into this culinary adventure together!

Why is Sicilian Tuna Crudo a Must-Try?

Freshness: This recipe showcases fresh sushi-grade tuna, making every bite a burst of oceanic flavor.
Quick Preparation: In just 15 minutes, you can create a stunning antipasto that’s perfect for any occasion.
Versatile Ingredients: Feel free to experiment with herbs or nuts to personalize your dish to your taste!
Elegant Presentation: Impress your guests with its vibrant colors and beautiful arrangement—perfect for gatherings.
Healthy Choice: Low in calories and rich in healthy fats, it’s an indulgence you can feel good about! If you love quick, healthy meals, check out my Tuna Potato Pancakes for another delightful option.

Sicilian Tuna Crudo Ingredients

• Enjoy crafting this fresh and healthy dish!

For the Tuna

  • Fresh Sushi-Grade Tuna – The star of Sicilian Tuna Crudo; choose high-quality, sustainable fish for the best flavor.

For the Dressing

  • Lemon – Zest and juice provide a refreshing acidity; consider Meyer lemon or lime for a unique twist.
  • Extra Virgin Olive Oil – Use the finest quality available to elevate the dish with its fruity richness.
  • Coarse Flaky Sea Salt – Adds texture and enhances flavor; Maldon or sel gris is perfect for that delightful crunch.
  • Red Pepper Flakes – Optional spice element; adjust according to your heat preference.

For the Toppings

  • Castelvetrano Olives – Their mild, buttery flavor pairs beautifully with tuna; other mild green olives work as a substitute.
  • Pistachios – Offers a crunchy contrast; feel free to replace them with almonds, or omit if desired.
  • Fresh Basil – Adds aromatic freshness; parsley or mint can be used for an alternate flavor profile.

Crafting this Sicilian Tuna Crudo is not only about the ingredients; it’s about savoring the beauty of fresh, raw food! Enjoy every bite!

Step‑by‑Step Instructions for Sicilian Tuna Crudo

Step 1: Prepare the Tuna
Using a sharp knife, slice the fresh sushi-grade tuna against the grain into thin pieces, about 1/4 to 1/8 inch thick. Ensure the knife is cold for cleaner cuts. This step is crucial for creating the delicate texture characteristic of Sicilian Tuna Crudo, making your slices gleam and inviting.

Step 2: Arrange the Tuna
Gently lay the sliced tuna in a single layer on chilled plates, ensuring even spacing without overlap to maintain presentation. Chilling the plates enhances the dish’s elegance and keeps the tuna’s freshness intact. This beautiful arrangement will serve as the canvas for the vibrant toppings to come.

Step 3: Dress the Tuna
Squeeze fresh lemon juice over the arranged tuna slices generously, allowing the bright acidity to enhance the fish’s natural flavors. Then, season it with coarse flaky sea salt and sprinkle a touch of red pepper flakes for optional warmth. This step will elevate your Sicilian Tuna Crudo, making it both refreshing and flavorful.

Step 4: Add Toppings
Sprinkle the Castelvetrano olives and crushed pistachios evenly over the tuna. Their contrasting textures and flavors will complement the dish beautifully. Follow with a dusting of lemon zest for added brightness. This is the moment to appreciate how these elements will bring your Sicilian Tuna Crudo to life!

Step 5: Finish with Olive Oil
Drizzle extra virgin olive oil generously over the top, allowing it to flow over the vibrant ingredients, enhancing both flavor and presentation. The oil’s fruity notes will blend seamlessly with the lemon and tuna. Finish by scattering fresh basil leaves over the dish. This final touch brings aromatic freshness and completes your stunning Sicilian Tuna Crudo.

Step 6: Serve Immediately
Present your Sicilian Tuna Crudo immediately after preparation to maintain the freshness and beauty of the ingredients. Accompany it with crisp bread or a selection of marinated olives for an enjoyable antipasto experience. This enticing dish is sure to impress your guests with its vibrant colors and delightful flavors.

How to Store and Freeze Sicilian Tuna Crudo

Fridge: Store sliced tuna covered in the refrigerator for up to 5 hours before drizzling with lemon juice or seasoning. This helps maintain the freshness and texture of the fish.

Freezer: If you need to store raw tuna longer, wrap it tightly in plastic wrap and then place it in an airtight container to freeze for up to 2 months. Thaw in the fridge the night before serving.

Reheating: Sicilian Tuna Crudo is best served fresh; avoid reheating as it may compromise the quality. Always prepare just before serving for optimal taste and presentation.

Serving Tips: Keep all components separate until ready to serve. This ensures that the tuna remains fresh and the flavors are vibrant when you’re ready to enjoy this elegant dish.

Sicilian Tuna Crudo Variations & Substitutions

Feel free to explore delightful twists to customize your Sicilian Tuna Crudo and cater to your taste buds!

  • Herb Swap: Experiment with fresh dill or cilantro for a unique flavor profile that adds freshness.

  • Citrus Twist: Incorporate segments of orange or grapefruit to bring a sweet brightness and add color to your dish.

  • Nutty Alternatives: Swap pistachios with almonds or sunflower seeds for a different crunch. Toast them lightly for extra flavor!

  • Vegan Version: Replace tuna with marinated tofu or jackfruit for a plant-based adaptation that still satisfies.

  • Heat Levels: Adjust red pepper flakes to your desired spice level, or try a drizzle of sriracha for an exciting kick.

  • Olive Alternatives: If Castelvetrano olives are unavailable, any mild green olives like green Kalamata will work beautifully.

  • Dress It Up: Add a drizzle of balsamic glaze for a tangy sweetness that complements the dish’s freshness.

For more ideas on flavor and texture, check out my Tuna Potato Pancakes for another tasty recipe that can inspire your culinary adventures! Enjoy crafting your version of this stunning antipasto!

Make Ahead Options

These Sicilian Tuna Crudo are perfect for busy cooks looking to save time without sacrificing freshness! You can slice the sushi-grade tuna and keep it covered in the refrigerator for up to 5 hours before serving. Just remember, avoid adding lemon juice or salt until you’re ready to dress it, as this will help maintain its quality and prevent the tuna from curing prematurely. Additionally, you can prepare the toppings—like slicing the Castelvetrano olives and chopping the pistachios—up to 24 hours in advance; simply store them in airtight containers refrigerated. When it’s time to serve, just arrange the tuna on chilled plates, drizzle with lemon juice, oil, and add the toppings for restaurant-quality results with minimal effort!

Expert Tips for Sicilian Tuna Crudo

  • Choose Quality: Always select high-quality, fresh sushi-grade tuna to ensure flavor and safety in your dish. Look for fish that is bright and smells like the ocean.
  • Chill Before Serving: Chill your plates before assembling the Sicilian Tuna Crudo to keep the dish fresh and enhance its presentation—it’s a small detail that makes a big difference!
  • Slice Carefully: Use a sharp, cold knife when slicing the tuna; this helps achieve those perfect, tender slices without tearing the fish.
  • Dress at the Last Minute: To prevent the tuna from ‘cooking’ in lemon juice, avoid adding it or the salt until just before serving, preserving the raw quality.
  • Experiment with Toppings: Feel free to customize your toppings; different herbs, nuts, or even fruits can transform your Sicilian Tuna Crudo into a unique masterpiece!
  • Balance Flavors: Adjust the seasoning according to your taste; some may prefer a little more salt or a hint of heat from the red pepper flakes.

What to Serve with Sicilian Tuna Crudo

Expand your culinary experience by pairing refreshing elements and delightful sides with this exquisite dish.

  • Crisp Bread: The light crunch of crusty bread enhances the flavor of the tuna while providing a delightful textural contrast. Perfect for scooping up every delectable morsel.

  • Marinated Olives: Add a selection of marinated olives to create a beautiful antipasti spread. Their briny richness complements the fresh seafood beautifully.

  • Zucchini Noodles: A light, fresh alternative to traditional pasta, zucchini noodles will provide a refreshing crunch and soak up the vibrant flavors of olive oil and lemon.

  • Arugula Salad: The peppery bite of arugula paired with a light vinaigrette brings a bright, bold flavor that enhances the seafood without overpowering it.

  • White Wine Spritzer: A light and refreshing drink option, the crispness of a white wine spritzer will elevate the meal while balancing the rich flavors of the tuna.

  • Fresh Fruit Platter: Slices of juicy watermelon, citrus segments, or fresh berries can add a sweet and refreshing finish, cleansing the palate beautifully after each bite of Sicilian Tuna Crudo.

  • Chocolate Mousse: A rich, creamy dessert like chocolate mousse can provide a delightful contrast to the fresh flavors of the appetizer, leaving your guests with a truly indulgent experience.

Sicilian Tuna Crudo Recipe FAQs

What type of tuna should I use for Sicilian Tuna Crudo?
Absolutely, I recommend using fresh sushi-grade tuna for this dish, as its quality is crucial. Look for bright-colored fish with a fresh ocean scent. You can often find sustainable options at high-quality seafood markets or reputable grocery stores.

How should I store leftover Sicilian Tuna Crudo?
If you have any slices left, keep the tuna covered in the refrigerator for up to 5 hours before serving. Remember not to add lemon juice or seasoning until right before you eat it to maintain freshness!

Can I freeze tuna for Sicilian Tuna Crudo?
Yes, you can! If you need to store raw tuna longer, wrap it tightly in plastic wrap and place it in an airtight container; it will last for up to 2 months. When you’re ready to use it, thaw it in the fridge overnight. This helps preserve its texture for your crudo masterpiece.

What if I can’t find Castelvetrano olives?
No worries! If you can’t find Castelvetrano olives, you can easily substitute them with any mild green olives. Look for options like Kalamata or green olives that suit your flavor preferences. They may not be as buttery, but they’ll still add a nice briny touch!

How can I tell if my tuna is fresh enough to eat raw?
Look for a bright red color without any dark spots, which can indicate spoilage. The fish should smell clean, like the ocean, and the flesh should be firm to the touch. If you’re unsure, ask your fishmonger for guidance on their freshest options.

Is there a particular way to cut the tuna for the best texture?
Certainly! Slice the tuna against the grain into thin pieces, about 1/4 to 1/8 inch thick. This technique will give you tender slices that practically melt in your mouth. For the best results, consider chilling your knife in the freezer prior to cutting to ensure clean, straight cuts.

Sicilian Tuna Crudo

Sicilian Tuna Crudo: Fresh & Quick Antipasto Bliss

Sicilian Tuna Crudo is a vibrant and fresh seafood dish made with sushi-grade tuna, perfect for a quick and healthy meal.
Prep Time 15 minutes
Total Time 15 minutes
Servings: 2 servings
Course: Lunch
Cuisine: Italian
Calories: 250

Ingredients
  

For the Tuna
  • 1 pound Fresh Sushi-Grade Tuna Choose high-quality, sustainable fish
For the Dressing
  • 1 each Lemon Zest and juice
  • 2 tablespoons Extra Virgin Olive Oil Use the finest quality available
  • 1 teaspoon Coarse Flaky Sea Salt Maldon or sel gris recommended
  • 1/4 teaspoon Red Pepper Flakes Optional
For the Toppings
  • 1/2 cup Castelvetrano Olives Or other mild green olives
  • 1/4 cup Pistachios Can substitute with almonds or omit
  • 1/4 cup Fresh Basil Can substitute with parsley or mint

Equipment

  • sharp knife
  • Chilled plates

Method
 

Step-by-Step Instructions
  1. Using a sharp knife, slice the fresh sushi-grade tuna against the grain into thin pieces, about 1/4 to 1/8 inch thick.
  2. Gently lay the sliced tuna in a single layer on chilled plates, ensuring even spacing without overlap.
  3. Squeeze fresh lemon juice over the arranged tuna slices, season with coarse flaky sea salt and sprinkle red pepper flakes.
  4. Sprinkle the Castelvetrano olives and crushed pistachios evenly over the tuna.
  5. Drizzle extra virgin olive oil generously over the top and scatter fresh basil leaves.
  6. Serve immediately with crisp bread or a selection of marinated olives.

Notes

For best taste, prepare Sicilian Tuna Crudo just before serving. Keep all components separate until ready to serve to maintain freshness.

Savory Thai Fried Fish With Tamarind Sauce Delight

As I prepped for dinner one evening, the aroma of sizzling fish filled my kitchen, transporting me straight to the vibrant markets of Thailand. There’s something special about whipping up a dish that resonates with authenticity, and this Crispy Thai Fried Fish with Tamarind Sauce does just that. Not only is it gluten-free, making it a great option for varied diets, but it’s also a quick recipe that can elevate any weeknight meal into a feast fit for a celebration. The glorious interplay of crispy fish paired with a sweet, tangy tamarind sauce creates a flavor experience that’s both exciting and comforting. Are you ready to bring a bit of Thai flair to your table and impress your loved ones? Let’s dive into this incredible recipe together!

Why is Thai Fried Fish a Must-Try?

Flavor Explosion: Each bite offers a harmonious blend of sweet, tangy, and spicy flavors that will transport your taste buds straight to Thailand!

Gluten-Free Delight: This dish is naturally gluten-free, allowing everyone to enjoy it without worry.

Easy and Quick: With straightforward steps, it’s perfect for busy weeknights!

Perfect Pairing: Serve it alongside Cucumber Carrot Salad or steaming jasmine rice for a full meal that pleases the whole family.

Fun to Make: Whether you choose a whole fish or fillets, the cooking process is fun and rewarding, making it an exciting choice for budding chefs.

Thai Fried Fish With Tamarind Sauce Ingredients

  • For the Fish
    Fish (2 lb) – Any flaky white fish like tilapia, cod, or snapper works wonderfully for this dish.
    Cornflour – Coating the fish with cornflour enhances its crispy texture. Adjust as needed for coverage.
    Oil – Vegetable or peanut oil is ideal for deep-frying; ensure enough oil to submerge the fish halfway.

  • For the Sauce
    Garlic (10 cloves) – Adds a fragrant base; remember to peel before use.
    Chilies (1 handful) – Fresh and dried varieties deliver heat; adjust to your spice preference for this Thai Fried Fish with Tamarind Sauce.
    Palm Sugar (2.5 oz) – A perfect sweetener for the sauce; can swap with brown sugar in a pinch.
    Tamarind Paste (4 tbsp) – Key for that signature tang; blend well for a smooth sauce.
    Fish Sauce (6 tbsp) – Essential for umami flavor and authenticity.
    Water (2 tsp and 2 tbsp) – Used to achieve the right sauce consistency and to help thicken with cornstarch.
    Cornstarch (1 tbsp) – Helps thicken the tamarind sauce to a glossy finish.

Now that you have all the ingredients ready, you’re one step closer to creating a delightful meal perfect for impressing friends and family!

Step‑by‑Step Instructions for Thai Fried Fish With Tamarind Sauce

Step 1: Prepare the Fish
Begin by rinsing the fish under cold water and gently patting it dry with paper towels. To ensure even cooking, make shallow diagonal cuts on both sides of the fish, creating slits about an inch apart. This allows the flavors to penetrate deeper while frying, enhancing the taste of the Thai Fried Fish with Tamarind Sauce.

Step 2: Coat with Cornflour
Lightly dust the prepared fish with cornflour on all sides, ensuring an even coating. This step is crucial for achieving that satisfying crispy texture when fried. Make sure to tap off any excess flour to prevent clumping, which can lead to uneven frying—a key factor in perfecting this Thai Fried Fish with Tamarind Sauce.

Step 3: Heat the Oil
In a deep skillet or pan, pour enough vegetable or peanut oil to submerge half of the fish. Heat the oil over medium heat until it reaches about 350°F (175°C). You can test the oil’s readiness by dropping a small piece of bread in; it should sizzle and brown within 30 seconds. This ensures a crispy exterior for your fried fish.

Step 4: Fry the Fish
Carefully lower the fish into the hot oil and fry for approximately 8 minutes on one side until golden and crispy. Then, using a large spatula, gently flip the fish and continue frying for another 8 minutes on the other side. The fish should have a beautiful amber color and be flake-prone, signifying the perfect doneness for your Thai Fried Fish with Tamarind Sauce.

Step 5: Drain Excess Oil
Once the fish is cooked to perfection, carefully lift it out of the oil using the spatula. Place it on a paper towel-lined colander to soak up any excess oil—this step is vital for keeping your fish crispy and light. Allow it to rest briefly while you prepare the tamarind sauce.

Step 6: Crush the Garlic and Chilies
In a mortar, crush the garlic cloves and chilies together until they form a coarse paste. This aromatic mixture serves as the base for your tamarind sauce. If you don’t have a mortar, a food processor can be used; just pulse until you achieve a similar consistency, releasing those wonderful flavors essential for your Thai Fried Fish with Tamarind Sauce.

Step 7: Sauté the Mixture
In a saucepan, heat a tablespoon of oil over medium heat. Add the crushed garlic and chili paste, sautéing until fragrant—around 2 minutes. Be careful not to burn the mixture, as you want to create a rich aroma that complements the fried fish. This sautéing step is crucial for building the depth of flavor in your tamarind sauce.

Step 8: Combine Sauce Ingredients
To the fragrant sauté, add palm sugar, tamarind paste, fish sauce, and 2 tablespoons of water. Stir the ingredients together and let them cook for about 3–4 minutes, stirring occasionally until the sugar is completely dissolved. This mixture forms the foundation of the delectable sauce that will drizzle over your Thai Fried Fish with Tamarind Sauce.

Step 9: Thicken the Sauce
In a small bowl, combine 1 tablespoon of cornstarch with 2 teaspoons of cold water to make a slurry. Gently stir this slurry into the tamarind sauce, cooking for another 2-3 minutes until the sauce thickens to a glossy consistency. You want it to be thick enough to coat the back of a spoon for that luxurious finish on your fish.

Step 10: Serve and Garnish
Transfer the crispy fried fish to a serving plate and generously drizzle the tamarind sauce over it. For an extra touch of freshness, consider garnishing with chopped cilantro or additional sliced chilies if desired. This beautiful presentation will surely impress your family and friends, making your Thai Fried Fish with Tamarind Sauce a focal point at the dinner table.

How to Store and Freeze Thai Fried Fish

  • Fridge: Store leftover Thai Fried Fish with Tamarind Sauce in an airtight container for up to 2 days. To maintain flavor and texture, reheat in an oven for best results.

  • Freezer: If you have extra fried fish, wrap it tightly in plastic wrap and then aluminum foil. It can be frozen for up to 1 month. To avoid freezer burn, ensure it’s sealed well.

  • Reheating: When ready to enjoy leftovers, place the fish in a preheated oven at 375°F (190°C) for about 10-15 minutes until heated through and crispy. Adding a splash of water to the baking tray may help keep it from drying out.

  • Sauce Storage: If you have extra tamarind sauce, store it in a sealed container in the fridge for up to 5 days. Reheat gently in a saucepan before serving over your reheated fish.

Make Ahead Options

These Crispy Thai Fried Fish with Tamarind Sauce are perfect for meal prep enthusiasts! You can coat the fish with cornflour up to 24 hours in advance and store it in the refrigerator, ensuring a quick frying process. The tamarind sauce can also be made ahead; simply prepare it up to 3 days prior, letting it cool completely before storing it in an airtight container in the fridge. To maintain the crispy texture, fry the fish right before serving to achieve that delicious crunch. When you’re ready to enjoy, just reheat the sauce gently on the stove while frying the fish, and you’ll have a delightful meal with minimal effort!

What to Serve with Crispy Thai Fried Fish with Tamarind Sauce

Pair your meal with delightful sides that elevate the experience and create a well-rounded feast!

  • Steamed Jasmine Rice: The fluffy texture absorbs the tangy tamarind sauce beautifully, making each bite irresistible.

  • Cucumber Salad: Refreshing and light, this salad with a zesty dressing complements the richness of the fish and adds a crunch.

  • Thai Mango Salad: Sweet and spicy, this salad enhances the dish’s flavors while providing a vibrant color contrast on your plate.

  • Stir-Fried Vegetables: A mix of crunchy veggies sautéed in garlic and oyster sauce can balance the crispy fish, making for a flavorful combo.

  • Chili Garlic Noodles: Soft, slippery noodles tossed with a hint of garlic and chili make for a satisfying texture that pairs beautifully with the fish’s crispiness.

  • Mango Sticky Rice: For dessert, this sweet treat contrasts the savory fish, rounding off the meal with an indulgent tropical flair.

Thai Fried Fish With Tamarind Sauce Variations

Feel free to explore these exciting variations to tailor the dish to your family’s palate and dietary needs!

  • Sweet Swap: Substitute palm sugar with brown sugar for a deeper, richer sweetness that enhances the tamarind flavor.
  • Fillets Instead: Use fish fillets instead of a whole fish for quicker cooking and easier serving—perfect for busy nights!
  • Spice It Up: Adjust the number of chilies to tailor the heat level to your preference; more chilies provide a delightful kick.
  • Herb Infusion: Try adding fresh chopped basil or cilantro to the tamarind sauce for an aromatic twist that brightens the dish.
  • Vegan Delight: Replace the fish with tofu or eggplant for a delicious plant-based alternative that captures the spirit of the original dish.
  • Nutty Flavor: Incorporate a tablespoon of toasted sesame oil in the frying process for an added layer of nuttiness that complements the tamarind sauce beautifully.
  • Zesty Touch: Adding a squeeze of lime juice just before serving offers a refreshing zing that lifts the flavors in your Thai Fried Fish.
  • Crunchy Coating: Experiment with panko breadcrumbs mixed with cornflour for an even crunchier finish that will impress your guests!

Looking to complement your meal? Serve alongside a light Cucumber Carrot Salad or steaming jasmine rice for a complete, mouthwatering experience!

Expert Tips for Thai Fried Fish

  • Oil Temperature: Ensure the oil is heated to around 350°F (175°C) before frying, as cooler oil can lead to soggy fish—ruining your Thai Fried Fish with Tamarind Sauce.

  • Avoid Overcrowding: Fry one or two pieces at a time instead of overloading the pan. Overcrowding lowers the oil temperature and prevents even cooking.

  • Dry Fish Thoroughly: Pat the fish completely dry before coating with cornflour to ensure a crispy texture. Moisture can create steam and inhibit crispiness.

  • Use Fresh Ingredients: For the best flavors, use fresh garlic and chilies in your sauce. Fresh ingredients significantly enhance the overall taste of your Thai Fried Fish with Tamarind Sauce.

  • Monitor Frying Time: Fry the fish until it reaches a perfect golden-brown color, about 8 minutes per side, while carefully observing to avoid burning.

  • Serve Immediately: For the best texture and flavor, serve the fried fish immediately after cooking. Letting it sit too long can lead to sogginess.

Thai Fried Fish with Tamarind Sauce Recipe FAQs

What type of fish is best for this recipe?
You can use any flaky white fish like tilapia, cod, or snapper. I often opt for snapper due to its firm flesh and mild flavor, which pairs beautifully with the tamarind sauce. Just make sure the fish is fresh and look for bright, clear eyes and red gills—these are signs of freshness!

How should I store leftovers?
Store any leftover Thai Fried Fish with Tamarind Sauce in an airtight container in the fridge for up to 2 days. To retain the crispy exterior, reheat it in the oven at 375°F (190°C) for about 10-15 minutes. This method helps keep the fish from turning soggy and brings back that delightful crunch.

Can I freeze the fried fish?
Absolutely! To freeze Thai Fried Fish, wrap each piece tightly in plastic wrap and then in aluminum foil to protect against freezer burn. You can freeze it for up to 3 months. When you’re ready to enjoy it, thaw it in the refrigerator overnight, then reheat in the oven for the best texture.

What if my sauce is too thin?
If your tamarind sauce turns out too thin, don’t worry! Simply mix 1 tablespoon of cornstarch with 2 teaspoons of cold water to form a slurry, then stir it into the simmering sauce. Keep cooking while stirring until the sauce thickens to your desired consistency. This typically takes just a few minutes and will give you that glossy finish we love!

Is this recipe suitable for gluten-free diets?
Yes! This Thai Fried Fish with Tamarind Sauce is naturally gluten-free, making it perfect for those with gluten sensitivities. Just ensure that any sauces you use, like fish sauce and tamarind paste, are labeled gluten-free, as cross-contamination can sometimes occur with processed foods.

How long will the tamarind sauce last in the fridge?
If you have any leftover tamarind sauce, store it in a sealed container in the refrigerator for up to 5 days. Just reheat it gently in a saucepan before serving again. This sauce is delightful to drizzle over other dishes too, adding a touch of Thai flair!

Thai Fried Fish With Tamarind Sauce

Savory Thai Fried Fish With Tamarind Sauce Delight

Thai Fried Fish with Tamarind Sauce brings a delightful mix of flavors, perfect for a quick weeknight dinner.
Prep Time 20 minutes
Cook Time 16 minutes
Resting Time 5 minutes
Total Time 41 minutes
Servings: 4 servings
Course: Dinner
Cuisine: Thai
Calories: 350

Ingredients
  

For the Fish
  • 2 lb Fish (any flaky white fish like tilapia, cod, or snapper)
  • Cornflour for coating
  • Oil (vegetable or peanut) enough to submerge fish halfway
For the Sauce
  • 10 cloves Garlic peeled
  • 1 handful Chilies fresh and dried varieties to taste
  • 2.5 oz Palm Sugar can swap with brown sugar
  • 4 tbsp Tamarind Paste
  • 6 tbsp Fish Sauce for umami flavor
  • 2 tsp Water
  • 2 tbsp Water for sauce consistency
  • 1 tbsp Cornstarch to thicken sauce

Equipment

  • Deep skillet or pan
  • Mortar
  • Food Processor
  • Saucepan

Method
 

Instructions
  1. Prepare the Fish: Rinse and pat dry the fish, making shallow cuts on both sides.
  2. Coat with Cornflour: Lightly dust fish with cornflour on all sides.
  3. Heat the Oil: In a deep skillet, heat oil to about 350°F (175°C).
  4. Fry the Fish: Fry fish for about 8 minutes on each side until golden and crispy.
  5. Drain Excess Oil: Lift fish from oil and place on a paper towel-lined colander.
  6. Crush the Garlic and Chilies: In a mortar, crush garlic and chilies into a coarse paste.
  7. Sauté the Mixture: Sauté crushed mixture in oil until fragrant.
  8. Combine Sauce Ingredients: Add palm sugar, tamarind paste, fish sauce, and water.
  9. Thicken the Sauce: Stir in cornstarch slurry and cook until the sauce thickens.
  10. Serve and Garnish: Drizzle sauce over fish, optionally garnishing with cilantro or chilies.

Notes

For the best flavor, use fresh ingredients and serve immediately for the best texture.

Savory Baked Prosciutto and Egg Breakfast Tart for a Bright Morning

As I lifted the golden crust from the oven, a savory aroma wafted through my kitchen, instantly transporting me to the sun-drenched streets of Italy. This Baked Prosciutto and Egg Breakfast Tart is more than just a meal; it’s a beautiful celebration of spring’s bounty, featuring creamy Boursin cheese, crispy prosciutto, and a bright arugula topping. Not only is it visually stunning, but this breakfast delight is also quick to whip up—perfect for leisurely weekends or busy weekday mornings. Plus, it’s highly customizable, inviting you to get creative with your favorite ingredients. Ready to elevate your brunch game or impress your family with a unique twist on the morning routine? Let’s dive into this delicious tart that will have everyone coming back for seconds!

Why is this tart a breakfast game-changer?

Simplicity at Its Finest: With easy steps and minimal prep, this tart can be yours in just over an hour.

Flavor Explosion: The rich blend of Boursin cheese and crispy prosciutto offers a delightful savory punch that will brighten your morning.

Customizable Delight: Feel free to swap ingredients to create your perfect breakfast; whether it’s different cheeses or greens, the possibilities are endless!

Crowd-Pleasing Appeal: This dish is bound to impress, making it ideal for brunch gatherings or special occasions. Pair it with a refreshing Crisp Cabbage Apple or a bubbly mimosa for an unforgettable experience.

Health-Conscious Choice: With its thoughtful ingredient choices, each serving provides a hearty yet balanced meal that won’t weigh you down.

Baked Prosciutto and Egg Breakfast Tart Ingredients

For the Tart Base

  • Large Eggs – Provide structure and richness; use room temperature eggs for even cooking.
  • Puff Pastry Dough – Acts as the base, delivering a crispy texture; be sure to thaw fully before using.
  • Kosher Salt – Enhances overall flavor; adjust quantity based on your taste preference.

For the Topping

  • Boursin Cheese – Adds creaminess and savory flavor; substitute with goat cheese if preferred.
  • Prosciutto – Offers a salty, savory element; alternatives include crispy bacon or lox.
  • Everything But The Bagel Seasoning – Adds flavor to the crust; substitute with sesame seeds or flaky sea salt if desired.
  • Green Onion – Provides freshness and color; can be replaced with chives or shallots.

For the Salad

  • Arugula – Fresh greens that add peppery flavor; can substitute with spinach or mixed greens.
  • Olive Oil & Lemon Juice – Light dressing that enhances freshness; adjust quantities to taste.
  • Parmigiano Cheese – Adds sharpness and richness; substitute with any hard cheese like Pecorino Romano.

Indulge in this Baked Prosciutto and Egg Breakfast Tart, and let it transform your morning routine into a delightful and savory experience!

Step‑by‑Step Instructions for Baked Prosciutto and Egg Breakfast Tart

Step 1: Preheat Oven
Begin by preheating your oven to 400°F (200°C). While the oven heats up, line a baking sheet with parchment paper to prevent sticking. This step ensures that your Baked Prosciutto and Egg Breakfast Tart cooks evenly and develops a beautifully golden crust, setting you up for success from the start.

Step 2: Prepare Dough
Once the oven is preheated, roll out the thawed puff pastry dough into a rectangle on a lightly floured surface. Trim any excess dough as needed, then score a half-inch border around the edges using a knife—this will create a lovely raised crust. Puncture the center of the pastry with a fork to prevent it from puffing up too much during baking.

Step 3: Egg Wash
In a small bowl, whisk together one egg and one tablespoon of water to create an egg wash. Brush the egg wash over the edges of the pastry, giving it a lovely sheen as it bakes. Next, sprinkle the crust with Everything But The Bagel Seasoning for an extra flavor kick. Bake the pastry for about 10 minutes, or until it begins to turn golden and puff slightly.

Step 4: Add Cheese & Eggs
Remove the partially baked pastry from the oven and spread a layer of creamy Boursin cheese evenly across the center, leaving the edges bare. Carefully crack the desired number of eggs on top of the cheese, ensuring even spacing. Sprinkle with kosher salt and visually check for any egg whites that might spill over. Bake again for 12-14 minutes, until the egg whites are set but the yolks remain slightly runny.

Step 5: Finish Tart
Once the eggs are cooked to your liking, take the Baked Prosciutto and Egg Breakfast Tart out of the oven. Carefully top it with crispy prosciutto and finely sliced green onions, adding a touch of color and flavor. Allow it to cool for a few minutes before serving so the flavors meld beautifully and the pastry maintains its crisp texture.

Step 6: Prepare Salad
While the tart is cooling, mix arugula with a drizzle of olive oil, a splash of lemon juice, and a pinch of salt in a bowl. Toss the greens gently until evenly coated, creating a refreshing salad that complements the richness of the tart. Serve the salad on top of the warm tart or on the side, finishing it off with shavings of Parmigiano cheese for added elegance.

Make Ahead Options

These Baked Prosciutto and Egg Breakfast Tarts are ideal for meal prep, allowing you to enjoy mornings without the stress! You can prepare the puff pastry and spread the Boursin cheese up to 24 hours in advance; simply cover the prepared pastry with plastic wrap and refrigerate to keep it fresh. If you want to prep further, crack the eggs on top right before baking, as this ensures they remain perfectly set. When ready to enjoy, simply bake as instructed, and you’ll have a delicious breakfast tart in no time, maintaining the lovely flakiness of the crust and vibrant flavors. Enjoy the convenience and the delight of a savory breakfast made easy!

Baked Prosciutto and Egg Breakfast Tart Variations

Feel free to let your culinary creativity shine with these delightful twists on the classic tart!

  • Cheese Alternatives: Swap Boursin for cream cheese or a herbed cheese spread for a different creamy texture. Both options bring a unique flavor profile to your tart.

  • Additional Toppings: Consider adding cooked asparagus, green beans, or sun-dried tomatoes for a pop of color and flavor. These vibrant vegetables will elevate your tart, making it even more appealing.

  • Greens Substitute: Try using spinach or kale instead of arugula for added nutrition and a different leafy texture. Each greens choice brings a unique taste to this delicious breakfast.

  • Meat Twist: Replace prosciutto with crispy bacon or smoked lox for an equally savory experience. Each option lends its distinct flavor, adding variety to your breakfast.

  • Spice It Up: If you enjoy a little heat, sprinkle red pepper flakes or add sliced jalapeños to the filling for an exciting kick. Your taste buds will thank you for the spicy twist!

  • Sweet Finish: Consider drizzling a touch of honey or maple syrup atop the tart before serving. This sweet contrast balances the savory flavors beautifully, making for a truly gourmet experience.

  • Dairy-Free Delight: For a dairy-free option, replace cheese with a vegan cheese substitute and use a plant-based puff pastry. Embrace all the flavors while accommodating dietary needs.

  • Herb Infusion: Add fresh herbs like basil or tarragon to the cheese mixture for a fragrant twist. The aroma will fill your kitchen, inviting everyone to the table.

For even more inspiration, try pairing it with a refreshing Crisp Cabbage Apple salad or serving it alongside a warm glass of mimosas. The possibilities are truly endless!

What to Serve with Baked Prosciutto and Egg Breakfast Tart

Elevate your breakfast experience with delightful pairings that complement the rich flavors and textures of this savory tart.

  • Crispy Hash Browns: The crispy texture of hash browns adds a comforting crunch that balances the softness of the tart while enhancing your breakfast feast.

  • Fresh Fruit Salad: Bursting with color and natural sweetness, a fruit salad provides a refreshing contrast, brightening each bite and bringing in a touch of spring.

  • Mimosas: This bubbly cocktail with orange juice adds a celebratory feel, perfectly complementing the rich flavors of the tart while awakening your palate.

  • Sautéed Spinach: Lightly sautéed spinach with garlic offers a fresh and earthy taste that beautifully contrasts the crispy prosciutto and creamy cheese.

  • Mini Ceasar Salad: A classic Caesar with crunchy croutons and tangy dressing mirrors the tart’s richness, creating a balanced, satisfying meal.

  • Roasted Tomatoes: Sweet, juicy roasted tomatoes add a burst of flavor and vibrant color, enhancing both the visual appeal and taste experience of the meal.

  • Herbed Yogurt Dip: A cool, tangy yogurt dip seasoned with herbs brings a refreshing element that plays well with the savory notes of the tart.

  • Coffee or Tea: A warm cup of coffee or herbal tea is the perfect finishing touch, enhancing the overall morning vibe and helping to savor each bite leisurely.

  • Chocolate Croissants: For those with a sweet tooth, serving flaky chocolate croissants as a delectable side will add a touch of indulgence to your breakfast selection.

Expert Tips for Baked Prosciutto and Egg Breakfast Tart

  • Thaw Pastry Completely: Ensure your puff pastry is fully thawed before use to achieve that delightful flaky texture we’re striving for in the Baked Prosciutto and Egg Breakfast Tart.
  • Egg Placement Matters: Crack the eggs evenly across the tart to promote balanced cooking; avoid overcrowding as it may lead to unevenly cooked eggs.
  • Fork Punctures: Use a fork to prick the pastry in the center. This simple step helps prevent it from puffing up too much, ensuring an even base for your tart.
  • Adjust Cook Times for Individual Tarts: If you’re making smaller, individual tarts, use one egg per pastry piece and adjust baking times accordingly to achieve perfect doneness.
  • Dressing the Salad: A touch of olive oil and lemon juice elevates the arugula salad perfectly, enhancing freshness without overpowering the tart’s rich flavors.

Storage Tips for Baked Prosciutto and Egg Breakfast Tart

  • Room Temperature: Enjoy your Baked Prosciutto and Egg Breakfast Tart fresh out of the oven for the best experience. If you need to let it cool, place it on a wire rack for up to 1 hour before storage.
  • Fridge: Store any leftover tart in an airtight container in the fridge for up to 3 days. To retain flavor and freshness, cover it with plastic wrap before sealing the container.
  • Freezer: If you want to save it for later, wrap individual slices tightly in foil and place them in a freezer-safe bag. It can last in the freezer for up to 2 months.
  • Reheating: Reheat in the oven at 350°F (175°C) for 10-15 minutes until warmed through, ensuring the pastry stays crispy. Enjoy it just like the first bite!

Baked Prosciutto and Egg Breakfast Tart Recipe FAQs

What kind of prosciutto should I use for the tart?
Absolutely! Look for high-quality prosciutto that feels silky and has a pleasant aroma. I often choose thinly sliced, dry-cured types from reputable brands. If you’re in a pinch, crispy bacon or smoked lox can also work as delicious alternatives that still bring that savory element to your breakfast tart!

How do I store leftovers of the Baked Prosciutto and Egg Breakfast Tart?
After enjoying your delicious tart, let it cool for no more than an hour and then place any leftovers in an airtight container. You can store it in the fridge for up to 3 days. Be sure to cover it well with plastic wrap to maintain freshness. Trust me, it’s still delightful even on day three!

Can I freeze the Baked Prosciutto and Egg Breakfast Tart?
Yes, you can! To freeze, wrap individual slices tightly in foil, and then put them in a freezer-safe bag. If stored properly, the tart can last up to 2 months in the freezer. When you’re ready to enjoy it again, reheat in the oven at 350°F (175°C) for 10-15 minutes to keep that delightful flaky texture intact.

What should I do if my eggs overflow while baking?
Very! If you find that the eggs are overflowing during the baking process, it’s usually due to overcrowding. To prevent this, space the eggs evenly and avoid using more than four per tart. If you encounter a spillage, simply use a spatula to clean it up after baking. This will help ensure that the crust remains crisp without any messy edges!

Are there any dietary considerations for this recipe?
Absolutely! For those with dietary restrictions, you can customize the Baked Prosciutto and Egg Breakfast Tart easily. If you’re gluten-free, swap in a gluten-free puff pastry. For dairy allergies, try a vegan cheese option instead of Boursin. Remember, you can always adjust ingredients based on your family’s preferences and health needs, ensuring that everyone can enjoy this savory breakfast treat!

Baked Prosciutto and Egg Breakfast Tart

Savory Baked Prosciutto and Egg Breakfast Tart for a Bright Morning

This Baked Prosciutto and Egg Breakfast Tart is a delightful celebration of spring’s bounty, featuring creamy Boursin cheese and crispy prosciutto.
Prep Time 20 minutes
Cook Time 25 minutes
Cooling Time 5 minutes
Total Time 50 minutes
Servings: 4 slices
Course: Breakfast
Cuisine: Italian
Calories: 320

Ingredients
  

For the Tart Base
  • 4 large Eggs Room temperature for even cooking
  • 1 sheet Puff Pastry Dough Thawed fully before using
  • 1 teaspoon Kosher Salt Adjust to taste
For the Topping
  • 8 ounces Boursin Cheese Substitute with goat cheese if preferred
  • 4 ounces Prosciutto Alternatives include crispy bacon or lox
  • 1 tablespoon Everything But The Bagel Seasoning Substitute with sesame seeds or flaky sea salt
  • 2 tablespoons Green Onion Can be replaced with chives or shallots
For the Salad
  • 4 cups Arugula Can substitute with spinach or mixed greens
  • 2 tablespoons Olive Oil Adjust quantities to taste
  • 1 tablespoon Lemon Juice Adjust quantities to taste
  • 2 tablespoons Parmigiano Cheese Substitute with any hard cheese like Pecorino Romano

Equipment

  • oven
  • baking sheet
  • parchment paper
  • mixing bowl
  • Fork

Method
 

Step-by-Step Instructions
  1. Preheat your oven to 400°F (200°C) and line a baking sheet with parchment paper.
  2. Roll out the thawed puff pastry dough into a rectangle, trim excess, and score a half-inch border.
  3. In a small bowl, whisk together one egg and one tablespoon of water for the egg wash, brush it over the pastry edges.
  4. Sprinkle the crust with Everything But The Bagel Seasoning and bake for about 10 minutes.
  5. Spread a layer of Boursin cheese, crack the eggs on top, sprinkle with kosher salt, and bake for 12-14 minutes.
  6. Top with crispy prosciutto and sliced green onions, allow to cool for a few minutes before serving.
  7. Mix arugula with olive oil, lemon juice, and salt, serve alongside or on top of the tart with Parmigiano shavings.

Notes

This tart is perfect for brunch gatherings or special occasions, and is easily customizable with favorite ingredients.

Savory Chinese Bàn Fàn: Quick Comfort in a Bowl

As I hurriedly rummaged through my fridge, the last scraps of dinner from the night before caught my eye—leftover rice, veggies, and a couple of eggs just waiting for their moment to shine. That’s when I remembered the magic of Chinese bàn fàn, a mixed rice bowl that transforms simple ingredients into a comforting delight. This 15-minute recipe is a lifesaver on busy days, allowing you to whip up a filling meal with minimal effort. Not only is it a fantastic way to use up leftover rice, but it’s versatile enough for any time of day—breakfast, lunch, or dinner. Let’s dive into this quick, satisfying dish that will leave you feeling cozy and nourished. What’s your favorite way to give new life to leftovers?

Why Is Chinese Bàn Fàn So Amazing?

Quick and Easy: You can throw this dish together in just 15 minutes, making it perfect for those hectic days when time is short.

Versatile Ingredients: Use whatever leftover veggies or proteins you have on hand, whether it’s chicken, tofu, or just the last bits of broccoli.

Comforting Flavors: The harmonious blend of savory sauces infuses each bite with rich umami flavors.

Nourishing & Filling: Each bowl delivers a satisfying meal that’s not only delicious but also nutritionally balanced, making it a great option for any time.

Perfect for Meal Prep: Since it’s easy to customize, you can prepare and pack it ahead for quick lunch solutions.

Crowd-Pleaser: Whether it’s family or friends, everyone will appreciate the welcoming warmth of this delightful dish, making it a great addition to any gathering.

Chinese Bàn Fàn Ingredients

For the Sauce
Oyster Sauce – Adds depth and umami flavor; substitute with hoisin sauce for a sweeter alternative.
Light Soy Sauce – Provides salty, savory notes; use tamari for a gluten-free option.
Sugar – Balances the savory sauces; honey or agave can be a natural sweetener substitute.
Garlic (minced) – Infuses the dish with aromatic flavor; fresh garlic is best, though powdered can be a handy backup.

For the Toppings
Scallion (chopped) – Adds freshness and crunch; green onions can serve as a good substitute.
Cilantro (chopped) – Offers a fresh, herbaceous note; feel free to omit if not a fan, using parsley instead if desired.
Eggs – Provides richness and protein; adjust the cooking style (scrambled or fried) to suit your preference.

For the Base
Cooked Rice – Acts as the foundation of the dish; leftover rice works best, but freshly cooked also does the trick.
Vegetable Oil – Used for frying the eggs and drizzling; any neutral oil such as canola or sunflower oil is perfect.

This Chinese bàn fàn recipe is a delightful way to enjoy hearty comfort with the bliss of using leftover ingredients!

Step‑by‑Step Instructions for Chinese bàn fàn

Step 1: Mix the Sauces
In a medium heatproof bowl, combine 2 tablespoons of oyster sauce, 1 tablespoon of light soy sauce, 1 teaspoon of sugar, and 1 minced garlic clove. Add chopped scallions and cilantro, mixing thoroughly until the sugar dissolves. This blend of flavors will create the base for your Chinese bàn fàn, setting the foundation for a delicious meal.

Step 2: Heat the Oil
Pour 2 tablespoons of vegetable oil into a small saucepan and heat over medium-high heat for about 1-2 minutes until the oil shimmers. You want it hot enough to sizzle the aromatics when added to the sauce mixture. Make sure to keep an eye on the oil to prevent it from smoking, as you’ll want just the right amount of heat.

Step 3: Sizzle the Aromatics
Once the oil is hot, carefully drizzle it over the prepared sauce in the bowl. Listen for the gratifying sizzle as it meets the ingredients, releasing aromatic flavors. Stir vigorously to ensure that everything is well combined, and the heat from the oil will enhance the fragrant essence of your Chinese bàn fàn.

Step 4: Cook the Eggs
In the same saucepan used for the oil, crack 2 eggs and fry them to your preference—sunny side up or scrambled. Cook for about 2-3 minutes, flipping if needed, until the whites are set, and the yolk remains slightly runny for added richness. The eggs will provide a delightful protein boost and texture contrast to the rice.

Step 5: Combine Ingredients
Add 2 cups of warmed cooked rice into the bowl with the saucy mixture. Using a spatula or wooden spoon, gently mix until the rice is well-coated with the flavorful sauce. Make sure every grain of rice is infused with those scrumptious flavors, creating a cohesive dish ready for the final touch.

Step 6: Serve and Enjoy
Top the rice mixture with the cooked eggs and an extra sprinkle of scallions and cilantro if desired. Serve your Chinese bàn fàn warm, perhaps with a side of pickled vegetables for a refreshing crunch. This versatile dish is ready in just 15 minutes, making it perfect for any meal of the day.

Storage Tips for Chinese Bàn Fàn

  • Room Temperature: It’s best to enjoy Chinese bàn fàn fresh; however, if left out, consume within 2 hours to ensure safety.
  • Fridge: Store leftovers in an airtight container, and refrigerate for up to 2 days. Reheat thoroughly before serving to maintain flavor and texture.
  • Freezer: For longer storage, freeze the mixed rice bowl without eggs for up to 1 month. Reheat straight from the freezer—just add the eggs freshly cooked.
  • Reheating: When reheating, add a splash of water to the rice to avoid dryness, and warm in the microwave or on the stovetop until heated through.

Make Ahead Options

Preparing your Chinese bàn fàn in advance is a fantastic way to save time during busy weeks! You can mix the sauce and chop the scallions and cilantro up to 24 hours ahead; just refrigerate them in an airtight container to keep them fresh. Additionally, you can cook and refrigerate the rice for up to 3 days to ensure it’s ready to go when you need it. When you’re ready to serve, simply warm the rice in a pan with a splash of water, stir in the sauce mixture, and top with freshly cooked eggs. This method guarantees that your dish will come together quickly while still being just as delicious!

What to Serve with 15-Minute Chinese Mixed Rice Bowl (Ban Fan)

Imagine a vibrant table filled with delightful sides that elevate your comforting rice bowl experience to a feast of flavors and textures!

  • Pickled Vegetables: A refreshing crunch that complements the savory notes of the bàn fàn, balancing richness perfectly. Think tangy pickles or spicy kimchi for exciting contrast.

  • Steamed Broccoli: Softly tender yet slightly crisp, adding a nutritious touch that melds beautifully with the rice without overwhelming the meal.

  • Crispy Tofu: Adding a protein-packed option, crispy tofu brings a satisfying crunch and absorb those lovely sauce flavors, enhancing the dish’s depth.

  • Asian Slaw: A crunchy medley of cabbage, carrots, and scallions tossed in a light sesame dressing adds a zesty freshness that lightens each bite!

  • Sesame Noodles: This dish’s nutty flavor complements the rich umami in the rice bowl while providing a delightful alternative texture.

  • Chilled Soba Noodles: These buckwheat noodles provide a tender yet chewy compliment, served with a light dipping sauce, making each bite a mini adventure.

  • Green Tea: The earthy notes help cleanse the palate and balance the savory richness of the bàn fàn, providing a soothing finish to the meal.

Chinese Bàn Fàn Variations & Substitutions

Feel free to explore these delightful twists on traditional Chinese bàn fàn as you create your own comforting bowl of goodness!

  • Protein Boost: Add leftover chicken or tofu for extra heartiness. This simple addition can transform your dish into a protein powerhouse, making it even more satisfying.

  • Whole Grain Swap: Use brown rice or cauliflower rice to give the dish a healthier spin. Not only do they add fiber, but they also provide delightful textures that food lovers will appreciate.

  • Spice It Up: For a heat kick, add a dash of sriracha or red pepper flakes. This fiery twist will take your taste buds on a vibrant journey with each delectable bite.

  • Veggie Medley: Experiment with seasonal veggies such as bell peppers, spinach, or carrots. Mixing in colorful ingredients will elevate your meal visually and taste-wise, creating a feast for the senses.

  • Flavor Fusion: Toss in a splash of sesame oil for a nutty aroma. This swap introduces a lovely depth of flavor, making your Chinese bàn fàn feel extra special and exciting.

  • Coconut Rice Delight: Substitute your regular rice with coconut rice for a unique twist. The subtle sweetness enhances the dish, making it an exotic treat that’s full of flavor.

  • Herb Alternatives: If cilantro isn’t your favorite, switch it out for fresh parsley or basil. This will bring a new layer of freshness that still elevates the dish without overpowering it.

  • Breakfast Style: Top with a fried egg and a sprinkle of cheese for a breakfast option. What a great way to shake up morning routines with a savory, comforting kick!

Remember, the beauty of Chinese bàn fàn lies in its adaptability, so have fun customizing it to suit your taste! If you’re looking for more ideas, don’t miss our delightful take on leftover rice recipes or tips on meal prepping.

Expert Tips for Chinese Bàn Fàn

  • Crispy Rice: Ensure leftover rice is cold from the fridge to avoid mushiness; this helps achieve that coveted crispy texture when reheated.
  • Egg Preferences: Experiment with egg styles—scrambled or fried—to find your favorite texture; a runny yolk adds richness that complements the rice beautifully.
  • Prep Ahead: Chop scallions, garlic, and any veggies in advance to streamline the cooking process; having everything ready makes assembly quick and easy.
  • Flavor Variations: Don’t hesitate to mix in any leftover proteins or seasonal vegetables for added nutrients and flavors; this Chinese bàn fàn is super adaptable!
  • Mix & Match: If you’re avoiding certain ingredients, substitute the sauces or toppings as needed—just remember to maintain the flavor balance for a satisfying meal.

Chinese Bàn Fàn Recipe FAQs

What type of rice should I use for Chinese bàn fàn?
Absolutely! The best rice for this dish is leftover cooked rice, ideally cold from the fridge, as it helps in achieving the perfect texture. However, freshly cooked rice will also work well if you’re in a pinch.

How long can I store Chinese bàn fàn leftovers?
You can refrigerate leftovers in an airtight container for up to 2 days. Just make sure to reheat thoroughly before enjoying again to maintain the delicious flavors and textures.

Can I freeze Chinese bàn fàn?
Yes, you can freeze the mixed rice bowl without the eggs for up to 1 month. To freeze, allow the mixture to cool completely, then scoop it into an airtight container. When you’re ready to enjoy it, just reheat directly from the freezer and cook fresh eggs to top it off!

What can I do if my rice becomes mushy?
Very common! If your rice is too mushy, the key is to ensure it’s cold straight from the fridge before reheating. For the best results, spread out the leftover rice on a plate and let it cool for a few minutes before using it in the recipe. This will help separate the grains so they don’t clump together.

Are there any dietary considerations for the ingredients in Chinese bàn fàn?
Certainly! If you have gluten sensitivities, make sure to use tamari instead of light soy sauce. Additionally, if you’re cooking for picky eaters or pets, adjust the seasonings and ingredients accordingly. Always be cautious with ingredients, especially garlic and onion, as they can be harmful to pets.

Chinese bàn fàn

Savory Chinese Bàn Fàn: Quick Comfort in a Bowl

Experience the comforting delight of Chinese bàn fàn, a quick and versatile mixed rice bowl perfect for using up leftovers.
Prep Time 5 minutes
Cook Time 10 minutes
Total Time 15 minutes
Servings: 2 bowls
Course: Lunch
Cuisine: Chinese
Calories: 450

Ingredients
  

Sauce
  • 2 tablespoons oyster sauce Substitute with hoisin sauce for a sweeter alternative.
  • 1 tablespoon light soy sauce Use tamari for a gluten-free option.
  • 1 teaspoon sugar Honey or agave can be a substitute.
  • 1 clove garlic (minced) Fresh garlic is best, but powdered can be a backup.
  • 2 tablespoons scallion (chopped) Green onions can serve as a substitute.
  • 2 tablespoons cilantro (chopped) Omit if not a fan, using parsley instead if desired.
Toppings
  • 2 eggs eggs Adjust cooking style (scrambled or fried) as preferred.
Base
  • 2 cups cooked rice Leftover rice works best, but freshly cooked is fine.
  • 2 tablespoons vegetable oil Any neutral oil such as canola or sunflower oil is perfect.

Equipment

  • medium heatproof bowl
  • Small saucepan
  • Spatula or wooden spoon

Method
 

Preparation Steps
  1. In a medium heatproof bowl, combine the oyster sauce, light soy sauce, sugar, and minced garlic. Add chopped scallions and cilantro, mixing thoroughly until the sugar dissolves.
  2. Pour vegetable oil into a small saucepan and heat over medium-high heat for about 1-2 minutes until the oil shimmers.
  3. Drizzle the hot oil over the prepared sauce in the bowl and stir vigorously to ensure everything is well combined.
  4. In the same saucepan, crack the eggs and fry them to your preference for about 2-3 minutes until the whites are set.
  5. Add warmed cooked rice into the bowl with the saucy mixture and mix gently until the rice is well-coated.
  6. Top the rice mixture with the cooked eggs and an extra sprinkle of scallions and cilantro if desired. Serve warm.

Notes

This recipe is easy to customize with leftover proteins or seasonal vegetables. Serve with pickled vegetables for added crunch.

Comforting Thai Broth Recipe to Warm Your Soul

The aroma of simmering garlic and cilantro wafting through the kitchen is a perfect reminder of the warmth of comforting homemade meals. Today, I’m excited to share my recipe for Thai Broth, a nourishing base that can effortlessly elevate your soups, noodle dishes, and even serve as a soothing sip on chilly nights. This clear broth is not only low in calories but also wonderfully versatile. Whether you prefer the traditional chicken version or a rich vegetarian twist, this recipe allows you to personalize each bowl according to your taste and dietary needs. Packed with depth and flavor, this homemade broth is a delightful way to embrace authentic Thai cuisine without the fuss of fast food. So, are you ready to discover how to create your own pot of happiness? Let’s dive in!

Why is Thai Broth a Must-Try?

Comforting warmth fills your kitchen as you simmer this broth, making it the perfect cozy meal addition. Endless variations allow you to enjoy different flavors year-round, whether you’re craving chicken or a vegetarian option. Low in calories, this nourishing broth is a guilt-free delight for health-conscious food lovers. Plus, it’s a fantastic time-saver—prep it ahead and stash it in your freezer for later use! Finally, its crowd-pleasing appeal makes it an impeccable choice for family dinners or entertaining friends. Want more delicious homemade options? Check out our Nourishing Chicken Broth for another comforting recipe!

Thai Broth Ingredients

Get ready to make a comforting, homemade Thai broth!

For the Broth

  • Chicken Bones – Provides richness and natural collagen for a silky texture; can substitute with pork bones for a deeper flavor.
  • Water – The base of your broth; using cold water ensures a clearer result.
  • Garlic (6-8 cloves) – Infuses depth and warmth; crush lightly before adding to enhance flavor extraction.
  • Cilantro Roots (or stems) – Adds an earthy aroma typical of Thai broth; if roots aren’t available, stems work perfectly too.
  • Ground White Pepper – Offers a subtle kick; feel free to use black pepper as a suitable alternative.
  • Thin Soy Sauce (2 tablespoons) – Provides color and mild savoriness; tamari is a great gluten-free substitute.
  • Fish Sauce (1 tablespoon or more) – Gives an authentic salty depth; adjust based on taste preference for optimal flavor.

For Flavor Enhancements

  • Sugar – A pinch can help balance the salty notes from soy and fish sauce, enriching the broth’s overall taste.
  • Lemongrass, Galangal, or Kaffir Lime Leaves – These aromatics can be added for an extra layer of fragrance and flavor; perfect for Thai-inspired variations!

This delicious Thai broth is low in calories and serves as a fantastic base for countless dishes!

Step‑by‑Step Instructions for Thai Broth

Step 1: Prepare Ingredients
Begin by rinsing the chicken bones under cool running water to eliminate any impurities, ensuring a clean broth. While the bones are draining, take 6-8 cloves of garlic and lightly crush them using the flat side of a knife. This crushing action will release the aromatic oils, enhancing the overall flavor of your homemade Thai Broth.

Step 2: Simmer Components
In a large pot, combine the prepared chicken bones with about 4 quarts of cold water. Add the crushed garlic and roughly chopped cilantro roots or stems to the pot. Place it over medium heat and bring the mixture to a gentle simmer. Avoid boiling, as you want to achieve a clear broth, allowing flavors to infuse for about 10 minutes.

Step 3: Skim Surface
For the first 30 minutes of simmering, use a ladle or fine mesh skimmer to carefully remove any floating impurities or foam that collects on the surface. This step is essential for ensuring that your Thai Broth remains clear and visually appealing. Keep the simmer low, adjusting the heat as needed, to maintain consistency without boiling.

Step 4: Adjust Flavor
After simmering for one hour, taste the broth carefully to assess the flavor. At this point, add 1 tablespoon of fish sauce and 2 tablespoons of thin soy sauce for a touch of savory depth. If you prefer a sweeter broth, sprinkle in a pinch of sugar. Stir well, allowing the seasonings to dissolve and infuse into the broth.

Step 5: Continue Simmering
Allow the broth to continue simmering for an additional hour. This extended cooking time melds the flavors beautifully, resulting in a rich yet light broth that embodies the essence of Thai cuisine. Check back occasionally, ensuring it maintains a gentle simmer and the aroma fills your kitchen with comfort.

Step 6: Strain Broth
Once two hours have passed, turn off the heat and carefully strain the broth through a fine-mesh sieve into another pot or bowl. Discard the solids, including bones, garlic, and cilantro remnants. The result should be a clear, golden liquid that is light but full of flavor, perfect as a base for your favorite dishes.

Step 7: Cool and Store
Let the strained Thai Broth cool to room temperature. Once cooled, transfer it into airtight containers for storage. You can keep it in the refrigerator for up to four days or freeze it in ice cube trays for longer-term use, providing you with easy access to a comforting broth whenever you desire a warm, homemade soup.

Make Ahead Options

These Thai Broth preparations are a game changer for busy home cooks! You can prepare the broth up to 24 hours in advance by following the initial simmering process and then cooling it before storing in airtight containers. Ensure you refrigerate it to maintain its delicate flavors. For longer-term storage, freeze the broth in ice cube trays, where it will last for up to 3 months. When you’re ready to enjoy your broth, simply reheat it on the stove, adjusting seasoning as necessary. This way, you’ll have a comforting homemade Thai Broth ready to elevate your meals without any last-minute fuss!

Thai Broth Variations & Substitutions

Feel free to make this Thai Broth your own with these fun and flavorful twists that cater to your cravings!

  • Vegetarian Option: Replace chicken bones with a variety of mushrooms, seaweed, and herbs for a delicious plant-based broth.

  • Richer Broth: Opt for roasted chicken or pork bones to create a heartier, more robust flavor that warms the soul.

  • Additional Aromatics: Introduce fresh lemongrass, galangal, or kaffir lime leaves during simmering for a fragrant aromatic boost.

  • Spicy Kick: Add fresh sliced Thai chilies or a dash of chili oil to ignite a pleasant heat that tickles your palate.

  • Coconut Cream: Stir in coconut cream at the end for a creamy, decadent twist that adds richness without overpowering the broth.

  • Citrusy Zing: A squeeze of fresh lime juice just before serving brightens the flavors, making your broth refreshing and uplifting.

  • Herbal Infusion: Experiment by adding fresh basil and mint while simmering for a captivating herbal flavor that’s traditional in Thai cooking.

  • Quick Stock Base: If you’re short on time, combine store-bought vegetable broth with fresh garlic, cilantro, and lime to whip up a quick and satisfying alternative!

Exploring these variations allows you to embrace creativity in the kitchen. For even more nourishing additions, consider using my Nourishing Chicken Broth as a foundation for soups or savoring alone!

Helpful Tricks for Thai Broth

  • Cold Water Start: Always begin with cold water for a clearer broth; it helps extract flavors without cloudiness.

  • Gentle Simmering: Keep the heat low during cooking. Boiling can cause impurities to mix, resulting in a murky broth—aim for a soft simmer.

  • Season Towards the End: Flavors intensify as the broth cooks, so wait until the last hour to taste and adjust seasonings with fish sauce and soy sauce.

  • Consider Blanching: Blanching chicken bones beforehand can significantly enhance clarity; it’s a simple step for a more polished final product.

  • Variations Matter: Don’t hesitate to experiment with herbs like lemongrass or adjust ingredients for a richer broth—embrace the versatility of Thai Broth!

What to Serve with Homemade Thai Broth?

The gentle warmth and aromatic notes of homemade Thai Broth create an inviting backdrop for a delightful meal filled with fresh flavors and comforting textures.

  • Fresh Spring Rolls: These light and crisp rolls filled with shrimp and herbs offer a fun, vibrant contrast to the warm broth.
  • Coconut Rice: The creamy sweetness of coconut rice pairs beautifully, creating a harmonious balance with the savory broth.
  • Any Stir-Fried Vegetables: Crisp, sautéed vegetables like bok choy or snap peas provide a satisfying crunch, enhancing the wholesome experience of your broth.
  • Classic Pad Thai: A plate of this popular dish topped with crunchy peanuts and fresh lime complements the broth’s rich flavors perfectly.

Feel free to serve the broth on its own for a soothing sip, or create a noodle bowl with additions of your choice. For something sweeter to finish, consider enjoying a slice of coconut cake—its light, fluffy texture offers a delicious contrast to the savory notes of the meal!

Storage Tips for Thai Broth

  • Fridge: Store your Thai Broth in sealed containers for up to 4 days. If you prefer a less fatty broth, you can skim off the fat before sealing.
  • Freezer: Pour the cooled broth into ice cube trays for convenient portions. Once frozen, transfer the cubes to freezer bags and use within 3 months for optimal freshness.
  • Reheating: To enjoy, simply reheat the broth on the stove over medium heat until warmed through. You can also microwave in a covered container; stir midway for even warming.

Thai Broth Recipe FAQs

What type of chicken bones should I use for the best flavor?
I recommend using raw chicken bones, such as carcasses or wings, for the richest and silkiest broth. You can also mix in some necks or backs for added depth. If you prefer a deeper flavor, pork bones can be substituted.

How should I store leftover Thai broth?
Store your Thai Broth in airtight containers in the refrigerator for up to 4 days. To reduce fat content, consider skimming off the top layer before storing. Always allow the broth to cool to room temperature before sealing to avoid condensation build-up.

Can I freeze Thai broth, and how should I do it?
Absolutely! Pour your cooled broth into ice cube trays for easy portion control. Once frozen, transfer the cubes to freezer bags, making sure to label them with the date. Properly stored, it will last up to 3 months in the freezer.

Why is my broth cloudy, and how can I fix it?
Cloudiness commonly occurs if the broth is boiled instead of gently simmered. To avoid this, always start with cold water and keep the heat low. If your broth is already cloudy, straining it through a fine mesh sieve can help improve clarity—unfortunately, you may not achieve complete transparency after boiling.

Is there a vegetarian option for Thai broth?
Yes! For a comforting vegetarian version, substitute the chicken bones with a combination of mushrooms, seaweed, radish, and fresh herbs like cilantro and basil. This gives you a rich, umami flavor that is just as satisfying without meat.

Can I give Thai broth to my pets?
While homemade broth can be a tasty treat for pets, ensure it’s free of seasonings like garlic and onion, which can be harmful. Plain chicken broth without additives is safe for dogs, while cats may enjoy it as a special treat—just ensure it’s cooled down before serving!

Thai Broth

Comforting Thai Broth Recipe to Warm Your Soul

This Thai Broth serves as a comforting base for soups and dishes, low in calories and rich in flavor.
Prep Time 15 minutes
Cook Time 2 hours
Cooling Time 30 minutes
Total Time 2 hours 45 minutes
Servings: 4 cups
Course: Other
Cuisine: Thai
Calories: 50

Ingredients
  

For the Broth
  • 2 lbs Chicken Bones Can substitute with pork bones for richer flavor.
  • 4 quarts Water Use cold water.
  • 6-8 cloves Garlic Crushed lightly.
  • 3 stalks Cilantro Roots or Stems Either works for flavor.
  • 1 teaspoon Ground White Pepper Black pepper can be used as an alternative.
  • 2 tablespoons Thin Soy Sauce Tamari for gluten-free option.
  • 1 tablespoon Fish Sauce Adjust based on taste.
For Flavor Enhancements
  • 1 pinch Sugar To balance salty flavors.
  • Lemongrass, Galangal, or Kaffir Lime Leaves Optional for added fragrance.

Equipment

  • Large pot
  • Fine Mesh Sieve
  • ladle

Method
 

Step-by-Step Instructions for Thai Broth
  1. Begin by rinsing the chicken bones under cool running water to eliminate any impurities.
  2. Combine chicken bones with cold water in a large pot, add crushed garlic and cilantro roots or stems, and bring to a gentle simmer for about 10 minutes.
  3. Skim any floating impurities or foam for the first 30 minutes to keep the broth clear.
  4. After one hour, taste the broth and add fish sauce and soy sauce; adjust sweetness with sugar if desired.
  5. Continue simmering for an additional hour, ensuring a gentle simmer throughout.
  6. Turn off the heat and strain the broth through a fine-mesh sieve into another pot or bowl.
  7. Let the broth cool to room temperature before storing in airtight containers.

Notes

Use cold water for a clearer broth and keep the heat low while cooking to avoid cloudiness.

Refresh Your Day with Cucumber Peanut Butter Salad Delight

The moment I tasted this unique Cucumber Peanut Butter Salad for the first time, a lightbulb went off in my mind: why hadn’t I thought of this before? This refreshing salad offers the perfect crunch from crisp cucumbers, paired with a creamy peanut butter dressing that adds a delightful twist to the classic summer fare. Not only is it a breeze to whip up, making it ideal for quick weeknight dinners, but it’s also entirely vegan and gluten-free, so everyone can enjoy it. Plus, its vibrant colors and bold flavors are sure to impress at any gathering. So, are you ready to elevate your salad game and wow your dinner guests with something extraordinary?

Why Choose Cucumber Peanut Butter Salad?

Unique Flavors: This salad combines refreshing cucumber with a creamy peanut butter dressing, creating a harmonious blend that tantalizes the taste buds.
Vegan & Gluten-Free: Enjoy peace of mind knowing this dish is accessible to all, making it a great option for gatherings with diverse dietary preferences.
Quick & Easy: Perfect for busy weeknights, this salad comes together in mere minutes, letting you focus on what really matters—savoring each bite.
Colorful Presentation: With its vibrant colors, it’s a feast for the eyes as well as the palate; a great way to brighten up your dinner table.
Versatile Pairing: Serve alongside grilled veggies or noodles for a complete meal, or enjoy it solo as a light lunch option! Dive into this deliciousness today, and for more fantastic ideas, check out our refreshing Cucumber Carrot Salad and Crunch Cucumber Salad!

Cucumber Peanut Butter Salad Ingredients

• Here’s what you need to create this refreshing delight:

For the Salad

  • Cucumber – Adds a refreshing crunch; can substitute with zucchini, carrots, or bell peppers for variety.
  • Fresh Parsley – Provides a fresh herbaceous flavor; ensure it’s finely chopped for even distribution.
  • Fresh Chilies – Adds a kick of heat to the dish; substitute with red bell pepper for a milder flavor.
  • Sesame Seeds – Offers crunch and nutty flavor; toast before use for added depth.

For the Dressing

  • Peanut Butter – Creates a creamy dressing; smooth, unsweetened peanut butter is ideal; crunchy can add texture.
  • Soy Sauce – Provides umami and saltiness; use gluten-free soy sauce or tamari for gluten-free needs.
  • Sesame Oil – Adds depth and a slight toasty flavor; for a lighter option, replace with water or extra rice vinegar.
  • Maple Syrup – Balances the savory elements with sweetness; honey can be a substitute for non-vegan versions.
  • Rice Vinegar – Offers tanginess to the dressing; lemon or lime juice can be used as alternatives.
  • Garlic – Infuses the dressing with flavor; use minced fresh garlic for best results.

Step‑by‑Step Instructions for Cucumber Peanut Butter Salad

Step 1: Prepare the Cucumbers
Start by washing 2 large cucumbers thoroughly under cold water, then peel them if desired for a softer texture. Cut the cucumbers into thin strips or rounds using a sharp knife. Once sliced, place the cucumber pieces into a large mixing bowl, allowing their refreshing essence to fill the air.

Step 2: Add Fresh Ingredients
Chop a handful of fresh parsley and finely slice 1-2 fresh chilies according to your heat preference. Add these vibrant ingredients to the bowl of cucumbers along with a sprinkle of toasted sesame seeds for that extra crunch. Gently stir the salad components together until well combined, showcasing a colorful medley.

Step 3: Whisk Together the Dressing
In a separate medium-sized bowl, combine 4 tablespoons of smooth peanut butter with 3 tablespoons of gluten-free soy sauce, 1 tablespoon of sesame oil, 2 tablespoons of rice vinegar, and 1 tablespoon of maple syrup. Mince 1 garlic clove and add it to the mixture. Whisk the ingredients together for about 1-2 minutes, until you achieve a smooth, creamy dressing.

Step 4: Combine Salad and Dressing
Pour the luscious peanut butter dressing over the cucumber mixture in the large bowl. Use a pair of tongs or a spatula to gently toss the salad, ensuring each cucumber piece is coated in the creamy dressing. This fusion of flavors creates the signature essence of the Cucumber Peanut Butter Salad.

Step 5: Serve and Garnish
Once combined, transfer the salad to a serving bowl or individual plates. For an elegant touch, sprinkle additional toasted sesame seeds on top. This Cucumber Peanut Butter Salad is best served immediately to preserve the crispness of the cucumbers and the vibrant flavors. Enjoy the delightful combination of textures and tastes!

What to Serve with Cucumber Peanut Butter Salad?

Transform your meal into a delightful feast with these complementary dishes and drinks that perfectly enhance your refreshing salad.

  • Grilled Veggies: Charred zucchini, bell peppers, and eggplant add a smokiness that beautifully contrasts the salad’s creamy dressing.
  • Cold Rice Noodles: Light and silky, they soak up the peanut butter dressing while providing a nutritious base for your meal. Toss with some sesame oil for extra flavor!
  • Quinoa Salad: A hearty quinoa salad with cherry tomatoes and cucumbers echoes the salad’s freshness while adding protein and substance.
  • Tofu Skewers: Serve marinated and grilled tofu skewers as a crowd-pleasing source of plant-based protein that pairs well with the nutty flavors.
  • Asian-Inspired Spring Rolls: Light and crisp, these colorful rolls filled with fresh veggies offer an enjoyable crunch and satisfyingly complement the peanut butter dressing.
  • Sweet Mango Chutney: A spoonful of this tangy-sweet chutney can heighten the flavor profile on your plate, adding an exotic twist to your meal.
  • Green Tea: A refreshing cup of chilled green tea cleanses your palate and enhances the salad’s vibrant flavors.
  • Coconut Milk Ice Cream: For dessert, indulge in a creamy coconut milk ice cream; its richness beautifully balances the salad’s crunchiness and adds a sweet note.
  • Fruit Salad: Finish with a light fruit salad of mixed berries and melons for a refreshing, bright dessert that ties the meal together perfectly.

Expert Tips for Cucumber Peanut Butter Salad

  • Freshness Matters: Always use freshly cut cucumbers to keep them crisp. If making ahead, store cucumbers and dressing separately until serving time.

  • Flavor Balance: Adjust the amount of maple syrup or soy sauce in the dressing to get a perfect balance of creamy and tangy in your Cucumber Peanut Butter Salad.

  • Chop Wisely: Finely chop herbs and spices to ensure even distribution throughout the salad, enhancing the overall flavor profile.

  • Customize Your Heat: If you prefer a milder taste, replace fresh chilies with sweet red bell pepper or omit them altogether for a family-friendly option.

  • Store Leftover Dressing: If you have dressing left over, store it in an airtight container in the fridge for up to 5 days. Shake well before use!

Make Ahead Options

These Cucumber Peanut Butter Salad components are perfect for meal prep enthusiasts! You can cut the cucumbers and chop the parsley up to 24 hours in advance, storing them separately in the refrigerator to maintain their crunch. The peanut butter dressing can also be prepared ahead of time and kept in an airtight container for up to 5 days—just give it a good shake before using. When you’re ready to serve, combine the cucumbers, herbs, and dressing together for a quick toss. This way, you’ll enjoy a refreshing Cucumber Peanut Butter Salad that’s just as delicious and vibrant on your busy weeknights!

How to Store and Freeze Cucumber Peanut Butter Salad

Room Temperature: Best enjoyed fresh, do not leave this salad out for more than 2 hours to maintain its crispness and safety.

Fridge: Leftover Cucumber Peanut Butter Salad can be stored in an airtight container in the fridge for up to 3 days, but for the best texture, store cucumbers and dressing separately until serving.

Freezer: Freezing is not recommended due to the high water content of cucumbers which may become mushy upon thawing.

Reheating: This salad is best served cold, so no reheating is necessary. Simply remove from the fridge and enjoy the refreshing flavors!

Cucumber Peanut Butter Salad Variations

Feel free to get creative and customize this salad to suit your taste preferences!

  • Zucchini Swap: Replace cucumbers with zucchini for a slightly different texture while keeping the refreshing crunch.
  • Nut Butter Twist: Try almond or cashew butter instead of peanut butter for a unique flavor profile. Each nut brings its own delightful characteristics to the salad.
  • Extra Crunch: Toss in some shredded carrots or sliced radishes for an added crunch and vibrant color. These veggies will add a beautiful contrast to the creamy dressing!
  • Spicy Kick: Incorporate sliced jalapeños for a fiery heat, or even a dash of sriracha in the dressing to spice things up. Balance it with extra maple syrup for sweetness if needed.
  • Herb Infusion: Experiment with fresh mint or cilantro instead of parsley for an entirely new aromatic experience. Both herbs will give your salad a fresh, lively flair.
  • Bowl Addition: For a heartier meal, mix in some cooked quinoa or brown rice. This not only enhances the nutritional value but also makes it a filling dish.
  • Citrusy Zest: Add a splash of fresh lime or lemon juice to brighten the flavors even more. The acid will enhance the dressing and meld beautifully with the nut butter.
  • Savoury Seeds: Instead of sesame seeds, sprinkle in pumpkin seeds or sunflower seeds for a delightful crunch and additional nutrition. They also bring a different nutty flavor to the dish.

Feel inspired to create your own version of this delicious salad! If you’re in the mood for more salad ideas, don’t forget to check out our refreshing Garden Harvest Salad for another awesome choice!

Cucumber Peanut Butter Salad Recipe FAQs

How do I choose the best cucumbers for this salad?
Absolutely! Look for firm, glossy cucumbers with a vibrant green color. Avoid any that have dark spots or are overly soft, as these may be past their prime. If you can, opt for organic varieties to ensure they haven’t been treated with pesticides. Fresh cucumbers will keep the salad crunchy and refreshing!

How should I store leftover Cucumber Peanut Butter Salad?
To maintain its freshness, store the leftover salad in an airtight container in the fridge for up to 3 days. However, for optimal texture, I recommend keeping the cucumbers and dressing separate until you’re ready to serve. If combined, the cucumbers may release water and become limp.

Can I freeze Cucumber Peanut Butter Salad?
Freezing is not recommended for this recipe. The high water content in cucumbers will lead to a mushy texture when thawed. If you want to prepare ingredients ahead of time, chop up the cucumbers and herbs, and store them in the fridge separately from the dressing for fresh-tasting salad whenever you crave it!

What should I do if my dressing is too thick?
Very! If you find your peanut butter dressing is too thick, simply add a tablespoon of warm water or extra rice vinegar and whisk until it reaches your desired consistency. This will help to loosen it without losing any flavor. You can also adjust the flavors by adding a dash more soy sauce or maple syrup to taste!

Are there any dietary considerations for this recipe?
Yes! This Cucumber Peanut Butter Salad is entirely vegan and gluten-free, making it suitable for a wide array of dietary preferences. However, if preparing for guests with nut allergies, consider substituting the peanut butter with sunbutter or tahini as an alternative. Always double-check labels on sauces to ensure they meet your guests’ dietary needs!

Cucumber Peanut Butter Salad

Refresh Your Day with Cucumber Peanut Butter Salad Delight

This Cucumber Peanut Butter Salad combines crisp cucumbers with a creamy peanut butter dressing for a refreshing and satisfying dish.
Prep Time 10 minutes
Total Time 10 minutes
Servings: 4 servings
Course: Lunch
Cuisine: Gluten-Free, Vegan
Calories: 220

Ingredients
  

For the Salad
  • 2 large Cucumbers adds a refreshing crunch; can substitute with zucchini, carrots, or bell peppers.
  • 1 handful Fresh Parsley ensure it’s finely chopped.
  • 1-2 Fresh Chilies adds a kick of heat; substitute with red bell pepper for milder flavor.
  • 2 tablespoons Sesame Seeds toast before use for added depth.
For the Dressing
  • 4 tablespoons Peanut Butter smooth, unsweetened is ideal.
  • 3 tablespoons Soy Sauce use gluten-free if needed.
  • 1 tablespoon Sesame Oil or replace with water for lighter option.
  • 2 tablespoons Maple Syrup honey can be substituted.
  • 2 tablespoons Rice Vinegar lemon or lime juice can be used as alternatives.
  • 1 clove Garlic minced fresh for best results.

Equipment

  • mixing bowl
  • Knife
  • spatula
  • whisk

Method
 

Preparation Steps
  1. Wash the cucumbers thoroughly under cold water and peel if desired. Cut into thin strips or rounds and place into a large bowl.
  2. Chop parsley and finely slice fresh chilies. Add to the cucumber bowl along with toasted sesame seeds. Stir gently to combine.
  3. In a separate bowl, whisk together the peanut butter, soy sauce, sesame oil, rice vinegar, maple syrup, and minced garlic until smooth.
  4. Pour the dressing over the cucumber mixture and gently toss to coat.
  5. Transfer the salad to serving bowls and sprinkle with additional toasted sesame seeds. Serve immediately.

Notes

Best enjoyed fresh. Store leftovers separately in the fridge for up to 3 days.

Deliciously Crunchy Tiger Salad That Will Brighten Your Day

As I tossed the fresh ingredients together, the vibrant colors of green, white, and red danced before my eyes, instantly lifting my spirits. This Quick & Easy Chinese Tiger Salad brings a burst of life to any meal, making it a perfect fit for those warm evenings when you crave something light yet satisfying. With just five minutes of prep, this gluten-free dish is not only a true crowd-pleaser, but it’s also a fun way to shake up your regular dinner routine. Plus, it’s packed with crisp textures and aromatic herbs that take your taste buds on a joyful adventure. Don’t you just love it when healthy meals are just as quick as they are delicious? Let’s dive into this delightful recipe that is sure to impress!

Why is Tiger Salad a Must-Try?

Vibrant Colors: The array of fresh ingredients not only appeals to the eye but is a visual reminder of the freshness packed into every bite.

Quick Preparation: Ready in just five minutes, it’s perfect for busy weeknights when you want something wholesome without sacrificing quality.

Gluten-Free Option: Using tamari instead of soy sauce makes this a wonderful choice for those seeking gluten-free meals.

Versatile Dish: Serve it as a light appetizer or as a refreshing side alongside your favorite protein, like Cabbage Apple Salad for a complete meal.

Bold Flavors: The blend of cilantro, mild heat from chilies, and nutty sesame oil creates a delightful harmony that excites the palate.

Healthful Crunch: With each bite, enjoy a satisfying crunch that enhances your overall dining experience while keeping the dish light and nutritious!

Tiger Salad Ingredients

For the Salad
Cilantro – Adds a fresh, fragrant note; if you’re not a fan, substitute with parsley for a milder flavor.
English Cucumber – Provides a cool, crisp texture; slice into thin strips for optimal crunch.
Anaheim Chili Peppers – Introduces a gentle heat; replace with other long green chilis if you’d like a different spice level.
Green Onions – Adds a mild onion flavor; diagonally slice for enhanced aesthetic and flavor distribution.

For the Dressing
Rice Vinegar – Supplies a mild acidity for balance, which is essential for preparing the Tiger Salad dressing.
Sesame Oil – Contributes nutty flavor depth, making it a key component of the aromatic dressing.
Soy Sauce – Adds umami and salty notes; use tamari for a gluten-free option.
Sugar – Balances acidity and enhances flavors for a well-rounded dressing.
Salt – Enhances the overall flavor profile, making every bite delicious!

Get ready to toss these ingredients together and enjoy the bright, refreshing taste of this vibrant Tiger Salad!

Step‑by‑Step Instructions for Tiger Salad

Step 1: Prepare the Vegetables
In a large mixing bowl, combine 1 cup of chopped cilantro, 1 English cucumber sliced into thin strips, 1-2 Anaheim chili peppers cut into thin rings, and 3 green onions diagonally sliced. As you layer the vegetables, admire their vibrant colors; this will set the tone for the refreshing Tiger Salad. Make sure each ingredient is evenly distributed to enhance flavor in every bite.

Step 2: Mix the Dressing
In a separate bowl, whisk together 3 tablespoons of rice vinegar, 2 tablespoons of sesame oil, 2 tablespoons of soy sauce (or tamari for a gluten-free option), 1 teaspoon of sugar, and a pinch of salt. Whisk vigorously for about 30 seconds until the sugar is dissolved, and the dressing is well-combined. This aromatic mixture is essential for bringing the flavors of the Tiger Salad to life.

Step 3: Combine & Toss
Pour the freshly made dressing over the prepared salad ingredients. Using tongs or a large spoon, gently toss the salad for about 1-2 minutes until the vegetables are well coated with the dressing. Observe how the colors brighten and the textures merge harmoniously; this step is crucial for ensuring each element of your Tiger Salad is flavorful and cohesive.

Step 4: Serve and Enjoy
Transfer your beautifully mixed Tiger Salad into a serving bowl or individual plates. If you’d like, garnish with additional sliced green onions for a pop of freshness. This vibrant salad is best served immediately for optimal crunch but can be chilled for a few minutes if desired. Dive into this refreshing dish and relish the delightful medley of flavors and textures!

Tiger Salad Variations & Substitutions

Feel free to explore these creative twists to make this salad your own!

  • Add Protein: Toss in edamame or chickpeas for a heartier meal, making this salad even more filling and nutritious.
    Switching up the protein can turn this light dish into a satisfying lunch or dinner option.

  • Extra Crunch: Incorporate water chestnuts to elevate the crunch factor. Their crisp texture adds an exciting twist that complements the other ingredients beautifully.

  • Herb Swap: Replace cilantro with parsley or basil for a different flavor profile. Each herb brings a unique essence, allowing you to customize the dish to your liking.

  • Spice it Up: Use jalapeños instead of Anaheim peppers for a fiery kick. Adjusting the spice level can elevate your salad experience, making it as mild or as hot as you desire.

  • Zesty Hint: Add some lime juice for an extra burst of flavor. The acidity can brighten up the dish even more, enhancing the overall freshness of your Tiger Salad.

  • Creamy Twist: Stir in a dollop of creamy avocado or tahini for richness. This adds a smooth texture that contrasts with the crisp veggies, creating a delightful balance.

  • Nutty Addition: Sprinkle in some toasted sesame seeds for an uplifting nutty note. They make for a perfect finishing touch that combines well with the flavors of sesame oil.

  • Crunchy Sidekick: Serve alongside a light dip like hummus or tzatziki for a delightful snack platter. Pairing with dips can take your meal to the next level, especially with a side of Crunch Cucumber Salad for extra freshness!

Make Ahead Options

These lovely Tiger Salad components can be prepped in advance, making it a perfect choice for busy home cooks! You can chop the cilantro, cucumber, chilies, and green onions up to 24 hours ahead of time; just store them in an airtight container in the refrigerator to maintain freshness and prevent browning. The dressing can also be whisked together and refrigerated separately for up to 3 days. To serve, simply combine the salad ingredients with the dressing right before enjoying, as this ensures the crisp textures remain intact. With these make-ahead tips, you can savor this delicious Tiger Salad with minimal effort on any busy weeknight!

What to Serve with Quick & Easy Chinese Tiger Salad

The vibrant, refreshing flavors of this salad invite a symphony of sides and complements to create a delightful meal.

  • Grilled Chicken Skewers: Juicy and smoky, these complement the salad’s fresh crunch, adding protein for a satisfying main dish.
  • Spring Rolls: These crispy delights pair perfectly, offering a satisfying crunch and a burst of flavor that harmonizes with the Tiger Salad.
  • Sesame Noodles: Their savory taste and soft texture create a lovely contrast to the crisp salad, bringing an Asian flair to your table.
  • Stir-Fried Tofu: Lightly seasoned tofu adds a savory element while keeping the overall meal plant-based and wholesome.
  • Quinoa Salad: Nutty and hearty, this dish provides additional texture and is a fantastic way to incorporate more grain into your meal.
  • Chilled Sake or Green Tea: These drinks enhance the overall experience, offering a refreshing counterpart to the vibrant flavors of the salad.
  • Fruity Sorbet: A light, icy dessert like mango or lemon sorbet is a delightful way to cleanse your palate after enjoying this refreshing salad.

Expert Tips for Tiger Salad

  • Fresh Ingredients Matter: Always use the freshest veggies, as they enhance the salad’s vibrant flavors and crunchy texture. Dull ingredients can lead to a soggier Tiger Salad.

  • Chop Wisely: For the best presentation and taste, aim for julienne cuts on your vegetables. This not only enhances the aesthetic but also improves the overall texture of the salad.

  • Adjust the Heat: Feel free to modify the amount of Anaheim chili peppers based on your spice tolerance. Balancing heat ensures the fresh herb flavors shine through without overwhelming your palate.

  • Dress Just Before Serving: To maintain the crunch and freshness of your salad, dress it right before serving. If prepared ahead, keep the dressing separate until just prior to enjoying your Tiger Salad.

  • Taste as You Go: Always taste your dressing before pouring it over your salad. This helps you fine-tune flavors, especially with the addition of sugar or salt. Trust your instincts for the perfect balance!

How to Store and Freeze Tiger Salad

Fridge: Store any leftover Tiger Salad in an airtight container for up to 3 days. This helps maintain the crispness of the veggies while enhancing the flavors.

Prepping Ahead: You can prepare the salad components a few hours in advance, keeping the dressing separate until just before serving to avoid sogginess.

Freezer: Freezing is not recommended for Tiger Salad, as the fresh vegetables lose their texture and quality after thawing.

Reheating: This salad is best enjoyed cold or at room temperature; simply serve it fresh for a vibrant taste experience.

Chinese Tiger Salad Recipe FAQs

How do I choose ripe ingredients for my Tiger Salad?
Absolutely! For the best flavor and texture in your Tiger Salad, look for bright green cilantro, firm and unblemished cucumbers, and glossy chili peppers. Avoid any ingredients with dark spots or signs of wilting, as these can detract from the salad’s freshness.

How should I store leftover Tiger Salad?
Very! If you have any leftovers, place the Tiger Salad in an airtight container and refrigerate it for up to 3 days. This storage method helps maintain the crispness of the vegetables while allowing the flavors to meld. Just remember, the salad is best enjoyed fresh!

Can I freeze Tiger Salad for later use?
Not recommended! Freezing Tiger Salad is not ideal, as the fresh vegetables will lose their crispness and texture when thawed. Instead, prepare the salad fresh each time for the ultimate flavor experience.

What if my dressing is too salty?
If you find your dressing too salty, there’s an easy fix! Try adding a splash more rice vinegar to cut through the saltiness. If you have extra sugar on hand, a tiny bit can balance the flavors nicely. Always taste your mixture before pouring it over the salad for the perfect finish!

Is this recipe suitable for people with allergies?
Absolutely! This Tiger Salad can be made gluten-free by using tamari instead of soy sauce. However, it’s essential to double-check all ingredient labels for allergens, especially if serving others. If anyone has concerns, consider making the dressing from scratch and ensuring all components are safe for everyone’s dietary needs.

Tiger Salad

Deliciously Crunchy Tiger Salad That Will Brighten Your Day

This Tiger Salad is a vibrant and refreshing dish packed with crisp vegetables and aromatic herbs, perfect for a light meal.
Prep Time 5 minutes
Total Time 5 minutes
Servings: 4 servings
Course: Lunch
Cuisine: Chinese
Calories: 120

Ingredients
  

For the Salad
  • 1 cup chopped cilantro Substitute with parsley if desired.
  • 1 English cucumber Slice into thin strips.
  • 1-2 Anaheim chili peppers Cut into thin rings.
  • 3 green onions Diagonally sliced.
For the Dressing
  • 3 tablespoons rice vinegar
  • 2 tablespoons sesame oil
  • 2 tablespoons soy sauce Use tamari for gluten-free.
  • 1 teaspoon sugar
  • pinch salt

Equipment

  • mixing bowl
  • whisk
  • tongs

Method
 

Step-by-Step Instructions
  1. In a large mixing bowl, combine the chopped cilantro, sliced English cucumber, Anaheim chili peppers, and green onions.
  2. In a separate bowl, whisk together rice vinegar, sesame oil, soy sauce, sugar, and salt.
  3. Pour the dressing over the prepared salad ingredients and toss gently until well coated.
  4. Transfer to a serving bowl or plates and garnish with additional sliced green onions if desired.

Notes

For best results, dress just before serving and use the freshest ingredients available.

Gluten Free Chocolate Rugelach: Buttery Treats Everyone Loves

As the winter air fills with the scent of spices and sweet laughter, I can’t help but think of the joy that comes with baking traditional treats like Gluten Free Chocolate Rugelach. This delightful pastry, rich and flaky, boasts a luscious chocolate filling that feels like a warm hug during the chilly holiday season. Not only is this gluten-free version perfect for your loved ones who follow a gluten-free diet, but it’s also an impressive showstopper for gatherings, offering a comforting twist to the classic recipe. With the combination of cream cheese for tenderness and a hint of dark chocolate, these pastries are simply irresistible. Have you ever wondered how one little treat can bring together flavors and memories, making every bite a celebration? Let’s dive into the heart of this recipe and make some pastry magic happen!

Why is this rugelach so irresistible?

Deliciously Flaky: The rich texture of these pastries, achieved through a careful layering of dough, will have everyone swooning.
Decadent Chocolate Filling: Each bite is filled with luscious dark chocolate that melts in your mouth, providing a delightful contrast to the flaky layers.
Customizable Creations: Feel free to experiment with unique fillings; try cinnamon sugar or fruit preserves for a twist that excites your palate.
Perfect for Celebrations: Whether it’s a holiday gathering or a cozy family night, these rugelach are an instant hit that elevates every occasion.
Simplified Preparation: With straightforward instructions and tips for ingredient substitutions, you’ll create bakery-worthy treats right at home.

Gluten Free Chocolate Rugelach Ingredients

Discover the perfect ingredients for your gluten-free baking adventure!

For the Dough

  • Gluten Free Flour – A blend like Cup4Cup ensures flakiness; any gluten-free mix with xanthan gum works too.
  • Kosher Salt – Essential for enhancing the flavors of your rugelach.
  • Baking Powder – Helps create a tender texture, particularly important for gluten-free recipes.
  • Granulated Sugar – Sweetens the dough; swap it with coconut sugar for a healthier option.
  • Unsalted Butter (cold) – Keeps the pastry flaky; ensure it’s chilled to prevent overmixing.
  • Cream Cheese (full fat, cold) – Adds moisture and richness to the dough, enhancing the overall flavor.
  • Milk (cold or water) – Hydrates the dough; almond milk makes a great non-dairy choice.
  • Vanilla Extract – Provides a delicious depth of flavor, making each bite even more delightful.

For the Filling

  • Dark Chocolate (60% or darker) – The star of your rugelach, offering a rich, melty filling that brings a smile to every face.
  • Cocoa Powder (preferably Dutch processed) – Intensifies the chocolate flavor; regular cocoa may be used if needed.
  • Brown Sugar – Adds an extra layer of sweetness and depth to the chocolate filling.

For the Topping

  • Egg (for egg wash) – Gives a lovely shiny crust; substitute with non-dairy milk for a vegan twist.
  • Coarse Sugar – Adds a delightful crunch on top of your finished pastries.

With these carefully selected ingredients, your gluten-free chocolate rugelach will not only be delicious but also a beautiful centerpiece for any gathering!

Step‑by‑Step Instructions for Gluten Free Chocolate Rugelach

Step 1: Prepare the Dough
In a food processor, combine the gluten-free flour, granulated sugar, baking powder, and kosher salt. Add cold, cubed unsalted butter and cold cream cheese to the mixture. Pulse until the mixture resembles coarse crumbs, about 15-20 seconds. Slowly add cold milk (or water) and vanilla extract, pulsing just until the dough comes together, around 10 seconds.

Step 2: Chill the Dough
Transfer the dough onto a lightly floured surface, gently shaping it into a rectangle about 1 inch thick. Wrap the dough in plastic wrap and refrigerate for 10-15 minutes. This chilling time is crucial to keep the butter solid, ensuring your Gluten Free Chocolate Rugelach will be tender and flaky once baked.

Step 3: Laminate the Dough
Remove the chilled dough from the refrigerator and roll it out on a floured surface to a thickness of about ¼ inch. Fold the rolled dough into thirds, like a letter, then wrap and refrigerate for another 10-15 minutes. Repeat this rolling and folding process three times in total, maintaining a cool environment to achieve that delicate, multi-layered structure.

Step 4: Prepare the Filling
While the dough chills, prepare the filling by mixing the chopped dark chocolate, cocoa powder, brown sugar, and a pinch of salt in a bowl. This rich chocolate filling will add delicious decadence to your Gluten Free Chocolate Rugelach. Make sure to set it aside until the dough is ready to create those tasty rolls.

Step 5: Assemble the Rugelach
Once your dough has been laminated and chilled, roll it out again into a large circle. Brush the surface with melted butter, then evenly sprinkle the chocolate filling mixture over the dough, covering it completely. Starting from one edge, gently roll the dough into a tight log, ensuring all the filling stays inside.

Step 6: Slice and Chill
Cut the rolled log into 1.5-inch segments and place them on a parchment-lined baking sheet. For the best results, chill these segments in the refrigerator for at least 1 hour. Chilling helps maintain their shape while baking, resulting in perfectly formed Gluten Free Chocolate Rugelach.

Step 7: Preheat the Oven and Prepare for Baking
Preheat your oven to 400°F. While the oven warms, prepare an egg wash by whisking an egg with a splash of water. Brush this mixture over the tops of your chilled rugelach, giving them a glossy finish that enhances the presentation and texture when baked.

Step 8: Bake to Perfection
Place the rugelach in the preheated oven and bake at 400°F for 10 minutes. Then, reduce the temperature to 375°F and continue baking for an additional 20-24 minutes, or until they are golden brown and flaky. Keep a close eye on them to avoid over-baking and achieve that perfect finish.

Step 9: Cool and Serve
After baking, remove the Gluten Free Chocolate Rugelach from the oven and let them cool on a wire rack for about 10 minutes. This cooling period allows them to set and enhance their flaky texture. Once slightly cooled, they are ready to be enjoyed warm or at room temperature!

Expert Tips for Gluten Free Chocolate Rugelach

Use a Food Processor: This tool ensures the butter and cream cheese remain cold, which is vital for flaky texture. Avoid overmixing!

Chill Time is Key: Properly chilling your dough layers after rolling and folding is essential. It helps maintain the shape and flakiness during baking.

Don’t Skip the Egg Wash: Brushing your rugelach with an egg wash before baking gives them a beautiful golden crust. For a vegan option, use non-dairy milk.

Monitor Baking Time: Keep an eye on your pastries! Begin at 400°F for the first 10 minutes, then reduce to 375°F until golden brown, about 20-24 minutes total.

Experiment with Fillings: Besides chocolate, try adding cinnamon sugar or fruit preserves, allowing you to create gluten-free rugelach that fits your taste preferences.

What to Serve with Gluten Free Chocolate Rugelach

As you prepare to serve your rich and flaky pastries, let’s explore delightful pairings that will create a memorable spread for your loved ones.

  • Fresh Berries: Brighten up your table with a mix of strawberries and blueberries, adding a burst of freshness that complements the chocolate beautifully.

  • Creamy Vanilla Ice Cream: The warm, buttery rugelach paired with cold, creamy ice cream creates a decadent dessert experience for those cozy evenings.

  • Whipped Cream: Light and airy, homemade whipped cream offers a delightful contrast to the rich chocolate filling, enhancing every bite with sweetness.

  • Coffee or Espresso: A well-brewed cup adds warmth and depth, making each pastry taste even better as you enjoy the rich beverage alongside.

  • Herbal Tea: Soothing flavors of chamomile or mint will balance the chocolate’s richness, making for a lovely afternoon treat that warms the soul.

  • Dark Chocolate Drizzle: Elevate your rugelach with a gentle drizzle of melted dark chocolate on top for an elegant touch that any chocolate lover will appreciate.

  • Milk or Almond Milk: A comforting glass of milk or a creamy, non-dairy alternative provides a classic pairing that brings back nostalgic memories of treats from childhood.

Gluten Free Chocolate Rugelach Variations

Customize your Gluten Free Chocolate Rugelach to fit your tastes, and explore exciting new flavors!

  • Dairy-Free: Swap cream cheese with vegan cream cheese and use almond milk for a delightful dairy-free adaptation.
    Try adding a sprinkle of cinnamon in the filling for a warm, cozy twist!

  • Nutty Delight: Incorporate finely chopped nuts, like walnuts or pecans, into the chocolate filling for a rich texture.
    The nuts add a lovely crunch, perfect for those who enjoy a bit of crunch in each bite.

  • Fruit Preserves: Replace the chocolate filling with fruit preserves such as apricot or raspberry for a fruity twist.
    Each sweet bite will remind you of bright, sunny days, bringing a fresh vibrancy to these pastries.

  • Cinnamon Sugar: Use a mix of cinnamon and sugar as the filling for a warm, comforting flavor reminiscent of cinnamon rolls.
    This twist offers an aromatic experience that fills your kitchen with delightful scents while baking!

  • Spicy Kick: Introduce a pinch of cayenne or chili powder in the chocolate filling for a surprising heat that complements the richness.
    This unexpected kick can elevate your rugelach to a gourmet treat that delights adventurous palates.

  • Milk Chocolate: Substitute dark chocolate with milk chocolate for a sweeter, creamier filling that pleases chocolate lovers.
    This variation offers a velvety experience perfect for those who prefer a less intense chocolate flavor.

  • Flavored Chocolate: Experiment with flavored chocolate, like orange or mint, to create unique variations that tantalize the taste buds.
    These delightful surprises make each pastry a sweet journey through different flavor landscapes.

  • Gluten-Free Oat Flour: Use oat flour as a replacement for half of the gluten-free flour for a lovely nutty flavor and chewy texture.
    This addition can create an appealing depth that makes them even more special for your holiday spread.

By experimenting with these variations, you can create a tray of Gluten Free Chocolate Rugelach that thrills your family and friends. Happy baking!

How to Store and Freeze Gluten Free Chocolate Rugelach

Room Temperature: Store your gluten free chocolate rugelach in an airtight container at room temperature for up to 3 days to maintain their delightful flakiness.

Fridge: If you need a bit more time, these pastries can be kept in the fridge for up to 5 days in an airtight container, but they may lose some texture.

Freezer: For longer storage, freeze the uncooked logs wrapped tightly in plastic wrap and foil for up to 2 months. Bake straight from the freezer; just add a few minutes to the baking time.

Reheating: To enjoy leftovers, reheat in a 350°F oven for about 10 minutes, allowing them to crisp up while warming the rich chocolate filling.

Make Ahead Options

These Gluten Free Chocolate Rugelach are perfect for busy home cooks looking to save time without sacrificing flavor! You can prepare the dough up to 24 hours in advance; simply follow steps 1 through 3, wrap it tightly in plastic wrap, and refrigerate. For even longer storage, the dough can be frozen for up to 2 months—just thaw in the refrigerator overnight before rolling and filling. The assembled rugelach can also be refrigerated for up to 3 days before baking. When you’re ready to bake, brush the chilled pastries with egg wash and follow the baking instructions. This way, you’ll enjoy fresh, flaky treats with minimal effort on your busy days!

Gluten Free Chocolate Rugelach Recipe FAQs

How do I choose the right gluten-free flour for this recipe?
Absolutely! I recommend using Cup4Cup gluten-free flour for the best results because it provides the right structure and flakiness. If you opt for another gluten-free blend, ensure it contains xanthan gum, as this ingredient helps mimic the elasticity of traditional flour.

How should I store leftover rugelach?
These delightful pastries can be stored at room temperature in an airtight container for up to 3 days. If you have more time, placing them in the fridge extends their freshness to about 5 days, albeit with a slight texture change. To maintain their luscious texture, have them at room temperature or warm them slightly before enjoying.

Can I freeze the dough or baked rugelach?
Absolutely! For freezing, wrap the uncooked logs tightly in plastic wrap and foil and freeze for up to 2 months. When you’re ready to bake, there’s no need to thaw; just add a few extra minutes to the baking time. If you’ve baked them, you can freeze the leftovers in an airtight container, reheating them in a 350°F oven for about 10 minutes to restore their flakiness.

What if my dough becomes too crumbly while mixing?
No worries! If your dough starts to crumble too much, you can simply add one tablespoon of cold water. This addition can help hydrate the mixture, allowing you to gather it into a cohesive dough. Just remember that the key is to keep it chilled for that perfect texture, so a little cold water may do the trick.

Are there any dietary considerations for these rugelach?
Yes, indeed! If you have dairy allergies or follow a vegan diet, substitute the cream cheese with a vegan cream cheese option for moisture and richness. For the egg wash, you can replace it with non-dairy milk to give your rugelach a lovely finish. Always double-check ingredient labels to ensure they are gluten-free and free from allergens.

Can I customize the filling to suit my tastes?
Very much so! The filling for these rugelach is wonderfully versatile. Aside from the dark chocolate, consider mixing in cinnamon sugar, chopped nuts, or fruit preserves like apricot or raspberry for a different flavor profile. Experimenting with fillings allows you to create unique twists on this classic recipe!

null

Gluten Free Chocolate Rugelach: Buttery Treats Everyone Loves

Delight in these gluten-free chocolate rugelach, a buttery, flaky pastry filled with rich chocolate—a perfect holiday treat.
Prep Time 45 minutes
Cook Time 30 minutes
Chilling Time 15 minutes
Total Time 1 hour 30 minutes
Servings: 12 pieces
Course: Dessert
Cuisine: Jewish
Calories: 200

Ingredients
  

Dough Ingredients
  • 2 cups Gluten Free Flour A blend like Cup4Cup
  • 1/2 teaspoon Kosher Salt
  • 1 teaspoon Baking Powder
  • 1/4 cup Granulated Sugar Can substitute with coconut sugar
  • 1 cup Unsalted Butter Cold, cubed
  • 8 oz Cream Cheese Full fat, cold
  • 4 tablespoons Milk Cold or water, almond milk is a great choice
  • 1 teaspoon Vanilla Extract
Filling Ingredients
  • 6 oz Dark Chocolate 60% or darker, chopped
  • 2 tablespoons Cocoa Powder Preferably Dutch processed
  • 1/4 cup Brown Sugar
Topping Ingredients
  • 1 large Egg For egg wash; substitute with non-dairy milk for a vegan option
  • 2 tablespoons Coarse Sugar For topping

Equipment

  • Food Processor
  • Rolling Pin
  • baking sheet
  • parchment paper

Method
 

Dough Preparation
  1. In a food processor, combine gluten-free flour, granulated sugar, baking powder, and kosher salt. Add cold butter and cream cheese. Pulse until coarse crumbs form, about 15-20 seconds. Slowly add milk and vanilla, pulsing until dough comes together, about 10 seconds.
  2. Transfer the dough to a floured surface, shape into a rectangle about 1 inch thick. Wrap in plastic wrap and refrigerate for 10-15 minutes.
  3. Roll out the chilled dough to ¼ inch thick. Fold into thirds like a letter, wrap and refrigerate for another 10-15 minutes. Repeat rolling and folding three times.
Filling and Assembly
  1. While the dough chills, mix chopped chocolate, cocoa powder, brown sugar, and salt in a bowl.
  2. Roll the laminated dough into a large circle. Brush melted butter over it, sprinkle chocolate filling mixture evenly. Roll the dough into a tight log.
  3. Cut the log into 1.5-inch segments and place on a parchment-lined baking sheet. Chill in the refrigerator for at least 1 hour.
Baking
  1. Preheat oven to 400°F. Prepare an egg wash by whisking an egg with water. Brush over the tops of chilled rugelach.
  2. Bake in the oven at 400°F for 10 minutes, then reduce to 375°F for an additional 20-24 minutes until golden brown.
  3. Remove from oven and let cool on a wire rack for about 10 minutes before serving.

Notes

Store in an airtight container at room temperature for up to 3 days, or refrigerate for 5 days. For longer storage, freeze logs for up to 2 months and bake from frozen.

Beef Tataki with Garlic Chips & Ponzu: Elevate Your Appetizer Game

As I stood in my kitchen, the allure of crispy garlic wafting through the air whisked me away to my favorite Japanese restaurant. The star of the evening? Beef Tataki with Garlic Chips & Ponzu Sauce, a dish that’s deceptively simple yet feels like an upscale indulgence. This easy tataki recipe showcases tender, melt-in-your-mouth steak paired with a bright, zesty ponzu sauce that dazzles the taste buds. Not only is it gluten-free adaptable, making it friendly for various diets, but it also makes for an impressive appetizer that requires minimal effort. Your guests will be begging to know your secret! Ready to discover how to create this restaurant-worthy dish at home?

Why Is Beef Tataki So Irresistible?

Exquisite flavors shine through in this dish, with perfectly seared beef complemented by a zesty ponzu sauce. Crispy garlic chips add a delightful crunch, elevating the texture of this appetizer. Quick to prepare, this recipe ensures you spend less time in the kitchen and more time enjoying your guests’ company. Versatile options await you; try substituting with sushi-grade tuna for a seafood twist! Explore other delicious pairings like Savory Beef Bacon or Garlic Butter French to complete an impressive meal.

Beef Tataki with Garlic Chips & Ponzu Ingredients

• Experience the charm of homemade Beef Tataki with these simple, high-quality ingredients.

For the Beef

  • Filet Mignon – A tender cut that melts in your mouth; can be substituted with sirloin or ribeye for a different texture.
  • Kosher Salt – Enhances the beef’s natural flavors; use less table salt as a replacement to avoid over-salting.
  • Freshly Ground Black Pepper – Adds a mild kick; essential for seasoning and depth.
  • Neutral Oil (e.g., vegetable or canola) – Necessary for searing the steak; avoid olive oil due to its low smoke point.

For the Ponzu Sauce

  • Yuzu Juice or Lime Juice – Provides necessary acidity; if yuzu isn’t available, lime juice works perfectly as a substitute.
  • Low-Sodium Soy Sauce or Tamari – Serves as the base for the ponzu sauce; tamari is gluten-free.
  • Grated Ginger – Adds depth and warmth; fresh ginger is the best choice for flavor.
  • Sugar – Balances the sauce’s flavors; can easily be replaced with honey for a unique taste.
  • White Onion – Provides sweetness and complexity; shallots can also be used for a milder flavor.

For the Garlic Chips

  • Garlic – The star ingredient for crispy chips; fresh garlic elevates the dish to new heights.
  • Neutral Oil (for frying garlic) – Used for frying the garlic until it’s beautifully golden and crispy; same as oil for searing.

For Garnish

  • Chives – Enhances presentation and adds a mild onion flavor; feel free to use other herbs for a personal touch.

Dive into your culinary adventure with this easy-to-make Beef Tataki with Garlic Chips & Ponzu, and impress everyone with a restaurant-worthy taste!

Step‑by‑Step Instructions for Beef Tataki with Garlic Chips & Ponzu

Step 1: Season Steak
Begin by patting your filet mignon dry with paper towels. Generously season the beef on all sides with kosher salt and freshly ground black pepper, enhancing its natural flavors. This step is crucial, as it lays the foundation for a delicious Beef Tataki. Let the seasoned steak sit for about 10 minutes to absorb the flavors.

Step 2: Sear Steak
In a skillet, heat a splash of neutral oil over high heat until it shimmers, about 2 minutes. Carefully add the seasoned filet mignon and sear for 2-3 minutes on each side, ensuring a beautifully browned crust while keeping the center rare. A perfect sear will create a rich flavor profile for your Beef Tataki. Remove the steak from the skillet and place it on a cutting board.

Step 3: Chill Steak
Transfer the seared beef to a plate and let it cool for a couple of minutes. Once slightly cooled, wrap the filet securely in plastic wrap and refrigerate for at least 2 hours or overnight if possible. Chilling allows the flavors to deepen and makes slicing easier, resulting in beautifully tender Beef Tataki.

Step 4: Prepare Ponzu Sauce
While the beef chills, prepare the zesty ponzu sauce. In a bowl, combine yuzu juice (or lime juice), low-sodium soy sauce (or tamari), grated ginger, sugar, and minced white onion. Whisk the ingredients together until the sugar dissolves. Set this refreshing sauce aside as it will perfectly complement your Beef Tataki.

Step 5: Make Garlic Chips
Next, thinly slice the garlic cloves using a sharp knife. In a separate pan, pour enough neutral oil to cover the bottom and heat it over medium-low heat. Add the garlic slices and fry gently, stirring occasionally, until golden brown and crispy, about 5-7 minutes. Once done, drain them on paper towels to absorb excess oil and let them cool.

Step 6: Assemble Dish
Once the beef is thoroughly chilled, remove it from the refrigerator. Using a sharp knife, slice the filet thinly against the grain to achieve that melt-in-your-mouth texture. Arrange the slices artfully on a platter, pour the ponzu sauce over, and garnish generously with crispy garlic chips and chopped chives. Your Beef Tataki with Garlic Chips & Ponzu is beautifully presented and ready to impress!

How to Store and Freeze Beef Tataki with Garlic Chips & Ponzu

Fridge: Store leftover Beef Tataki in an airtight container for up to 3 days. Keep the ponzu sauce separate to maintain the texture of the beef.

Freezer: While fresh Beef Tataki is best, you can freeze sliced steak for up to 1 month. Wrap it tightly in plastic wrap and then in foil for extra protection.

Garlic Chips: Store crisp garlic chips in a sealed container at room temperature for about a week for optimal crunchiness.

Reheating: Gently warm the beef in a skillet over low heat to avoid cooking it further. Serve with the ponzu sauce and crispy garlic chips for best results.

Make Ahead Options

Preparing Beef Tataki with Garlic Chips & Ponzu ahead of time is a fantastic strategy for busy weeknights or special occasions! You can sear the filet mignon and chill it up to 24 hours in advance, wrapping it tightly in plastic wrap to preserve its quality. The ponzu sauce can be mixed and stored in the refrigerator for up to 3 days, ensuring the flavors meld beautifully. For the crispy garlic chips, you can prepare them ahead and store in an airtight container for about a week. When you’re ready to serve, simply slice the chilled beef, pour the ponzu over, and top with garlic chips for a delicious, effortless finishing touch. This way, you’ll enjoy restaurant-quality results with minimal last-minute effort!

What to Serve with Beef Tataki with Garlic Chips & Ponzu

Elevate your dinner experience by pairing flavors and textures that harmonize beautifully with this stunning dish.

  • Crispy Rice Cakes: These light, crunchy bites add a delightful contrast to the tender beef. Their subtle flavor enhances the meal without overwhelming it.

  • Miso Soup: A warm bowl of umami-rich miso soup provides a comforting start. The delicate flavors complement the bold garlicky notes in the tataki.

  • Blistered Shishito Peppers: The sweet and slightly smoky shishito peppers create a fun textural variation and offer a mild heat that pairs wonderfully with the ponzu.

  • Steamed Edamame: Simple yet satisfying, this shareable appetizer gives a fresh, light contrast to the rich tataki, ensuring your meal feels balanced.

  • Japanese Pickles (Tsukemono): These tangy, colorful side dishes add brightness and acidity, cutting through the richness of the beef and garlic chips.

  • Chilled Sake or Green Tea: Both drinks enhance the dining experience. Sake, particularly, with its soft flavors, beautifully pairs with the umami richness of the dish.

  • Fresh Garden Salad: A light salad with citrus dressing introduces refreshing crunch. It adds a vibrant touch that contrasts with the savory qualities of the tataki.

With these delightful pairings, your Beef Tataki with Garlic Chips & Ponzu will shine even brighter, creating a memorable meal that everyone will rave about!

Beef Tataki with Garlic Chips & Ponzu: Customize Your Dish!

Feel free to get creative with this delectable recipe and make it your own with these fantastic variations!

  • Seafood Option: Substitute filet mignon with sushi-grade tuna for a delightful seafood twist. Tuna is tender and flavorful, making it a perfect alternative.

  • Herb Garnish: Try using fresh cilantro or mint alongside chives to refresh the dish. These herbs add a unique taste and vibrant color that will brighten up your presentation.

  • Spicy Kick: Add a dash of chili flakes or a drizzle of hot sauce to your ponzu sauce. This brings an exciting heat to the dish, stunning those spice-loving friends.

  • Vegetarian Delight: For a vegetarian take, replace the beef with thinly sliced eggplant or portobello mushrooms. Grill them briefly for added flavor before garnishing with garlic chips.

  • Fruit Twist: Incorporate a splash of orange juice into your ponzu sauce for a subtle sweetness to balance the savory elements. The citrusy notes will elevate your Beef Tataki experience.

  • Fermented Flavor: A spoonful of miso paste in your ponzu sauce adds depth and umami richness. This twist suits the adventurous eater!

  • Different Oils: Using sesame oil instead of neutral oil for frying garlic can infuse a nutty flavor that beautifully complements the dish’s overall taste.

  • Wrap it Up: Serve your Beef Tataki as a wrap in lettuce leaves for a fun, bite-sized appetizer that’s great for parties. Pair it with extra ponzu for dipping!

Explore other delightful recipes, like Heirloom Herb Garlic or Honey Garlic Slow to serve alongside your Beef Tataki. Let your culinary imagination soar!

Expert Tips for Perfect Beef Tataki

  • Knife Skills: Use a sharp knife to slice the beef thinly against the grain, ensuring a tender melt-in-your-mouth experience in your Beef Tataki.

  • Garlic Chip Perfection: Thinly slice the garlic for even frying; thicker pieces won’t crisp well and may burn. Aim for uniformity for gorgeous garlic chips.

  • Chill for Success: Don’t skip the chilling step—refrigerating the seared beef for at least 2 hours not only makes slicing easier but also enhances the flavors.

  • Avoid Overcooking: Sear the beef quickly to keep the center rare. Overcooking can lead to a chewy texture, so keep a close eye on it while in the pan.

  • Fresh Ingredients Matter: Opt for fresh ingredients, especially ginger and garlic, to elevate the flavor profile of your ponzu sauce and garlic chips.

Beef Tataki with Garlic Chips & Ponzu Recipe FAQs

What kind of beef should I use for the best flavor?
Absolutely! For the richest flavor and tender texture, filet mignon is the ideal choice for Beef Tataki. However, if you need a more budget-friendly option, both sirloin and high-quality ribeye work wonderfully as substitutes, delivering delicious results.

How should I store leftover Beef Tataki?
Very! To prolong freshness, store your Beef Tataki in an airtight container in the fridge for up to 3 days. Be sure to keep the ponzu sauce separate; this will help maintain the texture of the beef and prevent it from becoming soggy.

Can I freeze leftover Beef Tataki?
Absolutely! You can freeze sliced Beef Tataki for up to 1 month. To do this, wrap the slices tightly in plastic wrap first, then in foil for added protection. When you’re ready to enjoy again, simply thaw it in the fridge overnight.

What happens if my garlic chips burn?
Oh no! If your garlic chips start to burn, it’s likely because the slices were too thick or the oil was too hot. Ensure you slice the garlic thinly and fry it on medium-low heat, which allows them to crisp evenly without burning. If they do burn, I recommend starting fresh to achieve that beautiful golden color and crispy texture.

Is there a gluten-free option for the ponzu sauce?
Yes, indeed! For a gluten-free version, substitute regular soy sauce with tamari, which is a gluten-free soy sauce alternative. This way, you can enjoy the delightful flavors of Beef Tataki with Garlic Chips & Ponzu without concern for gluten.

Beef Tataki with Garlic Chips & Ponzu

Beef Tataki with Garlic Chips & Ponzu

Delight your guests with this Beef Tataki with Garlic Chips & Ponzu, a simple yet upscale appetizer that offers vibrant flavors.
Prep Time 30 minutes
Cook Time 10 minutes
Chilling Time 2 hours
Total Time 2 hours 40 minutes
Servings: 4 slices
Course: Dinner
Cuisine: Japanese
Calories: 320

Ingredients
  

For the Beef
  • 1 pound Filet Mignon Can be substituted with sirloin or ribeye.
  • 1 teaspoon Kosher Salt Use less table salt as a replacement.
  • 1 teaspoon Freshly Ground Black Pepper Essential for seasoning.
  • 2 tablespoons Neutral Oil (e.g., vegetable or canola) Avoid olive oil for searing.
For the Ponzu Sauce
  • 2 tablespoons Yuzu Juice or Lime Juice Use lime juice if yuzu isn't available.
  • 1 tablespoon Low-Sodium Soy Sauce or Tamari Tamari is gluten-free.
  • 1 teaspoon Grated Ginger Fresh ginger is the best choice.
  • 1 teaspoon Sugar Can be replaced with honey.
  • 1 small White Onion Shallots can also be used.
For the Garlic Chips
  • 4 cloves Garlic Fresh garlic elevates the dish.
  • 1 cup Neutral Oil (for frying garlic) Same as oil for searing.
For Garnish
  • 2 tablespoons Chives Feel free to use other herbs.

Equipment

  • Skillet
  • Cutting Board
  • Knife
  • Bowl
  • plastic wrap
  • Paper Towels

Method
 

Step-by-Step Instructions
  1. Pat the filet mignon dry with paper towels and season generously with kosher salt and freshly ground black pepper. Let sit for 10 minutes.
  2. Heat neutral oil in a skillet over high heat until it shimmers. Sear the filet mignon for 2-3 minutes on each side. Remove and place on a cutting board.
  3. Let the seared beef cool for a couple minutes, then wrap it in plastic wrap and refrigerate for at least 2 hours.
  4. In a bowl, combine yuzu juice, low-sodium soy sauce, grated ginger, sugar, and minced white onion. Whisk together and set aside.
  5. Thinly slice the garlic cloves. Fry in neutral oil over medium-low heat until golden brown and crispy. Drain on paper towels.
  6. Slice the chilled beef thinly against the grain. Arrange on a platter, pour ponzu sauce over, and garnish with garlic chips and chives.

Notes

For best results, use fresh ingredients and don’t skip the chilling step.

Decadent Sweet Potato Fondant with Smoked Almond Cream & Rosemary Oil

There’s something magical about the way sweet potatoes transform when given a little love in the kitchen. The beauty of this Sweet Potato Fondant with Smoked Almond Cream & Rosemary Oil lies in its simplicity—a dish that whispers elegance while also wrapping you in warmth. It’s not only stunning to look at but also incredibly easy to whip up in just one pan, making it perfect for those evenings when you want to impress without the stress. This crowd-pleaser offers a creamy, smoky almond sauce that perfectly balances the sweetness of the fondant. Have you ever thought about how comfort and sophistication can coexist on your plate? Let’s dive into creating this delightful dish together!

Why is this dish a must-try?

Comforting Elegance: This Sweet Potato Fondant with Smoked Almond Cream & Rosemary Oil radiates sophistication without sacrificing warmth, perfect for cozy dinners or festive gatherings.
One-Pan Wonder: Enjoy the ease of a stunning meal prepared in just one pan, minimizing cleanup and maximizing flavor.
Savory-Sweet Harmony: The combination of sweet potatoes and smoky almond cream creates a delightful balance, making every bite a taste sensation.
Impressive Presentation: Stunning layers of color and texture elevate your dining experience, impressing guests with little effort.
Versatile Delight: Serve as a main dish or a side, it complements everything from roasted proteins to fresh salads.

Sweet Potato Fondant Ingredients

• Create a delightful foundation for your dish!

For the Fondant

  • Sweet Potatoes – Provide natural sweetness and structure; ensure they are firm and evenly cut for uniform cooking.
  • Olive Oil – Adds richness and helps achieve a perfect caramelization of the sweet potatoes.
  • Butter – Enhances flavor and contributes to creaminess; can be replaced with vegan margarine for a dairy-free option.
  • Garlic – Infuses aromatic depth; try roasted garlic for a gentler flavor.
  • Fresh Thyme – Brings herbaceous notes that complement the dish beautifully; dried thyme works in a pinch.
  • Vegetable Stock – Provides moisture for braising and adds savory flavor; water can be a substitute if stock is unavailable.

For the Smoked Almond Cream

  • Smoked Almonds – Impart deep, savory flavors that balance the sweetness of the potatoes; regular almonds with a pinch of smoked paprika can be used instead.
  • Lemon Juice – Brightens the creamy sauce and can be adjusted according to your taste preferences.
  • Olive Oil – A smooth base for the almond cream, adding richness.

For the Rosemary Oil

  • Rosemary Sprig – Infuses the oil with fragrant, earthy notes; using fresh rosemary yields the best flavor!

For Garnish

  • Micro Herbs or Crushed Almonds – Adds a visually appealing touch and delightful texture to your dish.

Embrace the flavors of this Sweet Potato Fondant with Smoked Almond Cream & Rosemary Oil as you create a meal that is both simple yet exquisite!

Step‑by‑Step Instructions for Sweet Potato Fondant with Smoked Almond Cream & Rosemary Oil

Step 1: Prepare Rosemary Oil
In a small saucepan, gently warm ¼ cup of olive oil over low heat with a fresh rosemary sprig for 5–7 minutes. This process allows the oil to absorb the fragrant notes of rosemary. Once aromatic, remove from heat and let it steep while you prepare the other components of the Sweet Potato Fondant, enhancing the dish’s depth of flavor.

Step 2: Sauté Sweet Potatoes
Peel and cut the sweet potatoes into 4–5 cm thick squares. In a large skillet, melt 2 tablespoons of butter with 2 tablespoons of olive oil over medium heat. Once melted and bubbling, add the sweet potatoes in a single layer. Sear for about 5 minutes until they develop a beautiful golden crust and caramelization, which will elevate the dish’s overall taste.

Step 3: Braise
Gently flip the sweet potatoes and add 2 cloves of minced garlic and a handful of fresh thyme, seasoning with salt and pepper. Pour in enough vegetable stock to reach halfway up the sweet potatoes, then cover the skillet. Reduce the heat to low and braise for 20–25 minutes, basting occasionally, until the sweet potatoes are tender yet firm, showcasing their delicate texture.

Step 4: Make Smoked Almond Cream
While the sweet potatoes are braising, prepare the smoked almond cream. In a blender, combine 1 cup of smoked almonds, ½ cup of vegetable stock or water, the juice of half a lemon, and 2 tablespoons of olive oil. Blend until completely smooth, adjusting the consistency with more liquid if needed. The cream should be velvety and rich, perfectly complementing the sweetness of the fondant.

Step 5: Plate
To serve, elegantly spread a generous layer of the smoked almond cream on a plate. Arrange the cooked sweet potato fondants on top, allowing their beautiful golden color to shine through. Drizzle the rosemary oil over both the sweet potatoes and cream for extra flavor, and finish the dish with a garnish of crushed almonds or fresh micro herbs for a pop of color and added texture.

What to Serve with Sweet Potato Fondant with Smoked Almond Cream & Rosemary Oil

Elevate your dining experience by pairing this heavenly dish with delightful sides and drinks that will have your guests talking long after the meal.

  • Crispy Green Salad: Fresh, crunchy greens tossed in a tangy vinaigrette provide a refreshing contrast to the creaminess of the fondant.

  • Quinoa Pilaf: A nutty and fluffy quinoa dish, enriched with herbs and lemon, complements the smoky flavors of the almond cream beautifully.

  • Roasted Brussels Sprouts: Their caramelized outer leaves and tender hearts bring a savory, earthy quality, enhancing the sweet potatoes’ natural sweetness.

  • Herbed Couscous: Fluffy couscous tossed with fresh herbs and lemon zest adds a light, airy texture that balances the dish’s richness.

  • Grilled Asparagus: Charred asparagus drizzled with olive oil adds a burst of flavor and vibrant color, elevating the overall appeal of your meal.

  • Creamy Polenta: Soft, cheesy polenta acts as a comforting base, harmoniously blending flavor and texture with the sweet potato fondant.

  • Sparkling Riesling: A chilled glass of sparkling Riesling strikes a perfect balance, its acidity cutting through the richness while enhancing the dish’s flavors.

  • Chocolate Mousse: End your meal on a sweet note with a light and airy chocolate mousse, providing a delightful contrast to the savory elements of the dinner.

With these pairings, your Sweet Potato Fondant with Smoked Almond Cream & Rosemary Oil will undoubtedly shine at your next gathering!

How to Store and Freeze Sweet Potato Fondant

Fridge: Store leftover sweet potato fondant in an airtight container for up to 3 days. When ready to enjoy, gently reheat in a pan over low heat with a splash of vegetable stock to maintain moisture.

Freezer: Freeze the fondants in a single layer on a baking sheet for 1–2 hours, then transfer to a zip-top bag. They can be stored for up to 2 months. Thaw overnight in the fridge and reheat before serving.

Almond Cream: The smoked almond cream can last for 4 days in the fridge. Store it in an airtight container and stir well before using, adding a little water or stock if needed for a smooth consistency.

Reheating: Always reheat fondants slowly to prevent them from becoming mushy. Consider using a microwave on low power or a stove with a lid over low heat for even warming.

Sweet Potato Fondant Variations & Substitutions

Delve into the world of flavors and textures by customizing your Sweet Potato Fondant with delightful twists and swaps!

  • Dairy-Free: Swap butter for vegan margarine and create a luscious dairy-free version that still tastes divine.
  • Nut-Free: Replace smoked almonds with sunflower seeds blended with a hint of smoked paprika for a nut-free alternative that packs a punch.
  • Herb Infusion: Experiment with fresh sage or oregano instead of thyme for a totally unique flavor profile that keeps things exciting.
  • Spicy Kick: Add a pinch of red pepper flakes while braising for a touch of heat, giving your fondant a surprising twist.
  • Creamy Texture Boost: Blend in a few tablespoons of tahini into the smoked almond cream for a richer, creamier consistency that’s nutty and delicious.
  • Sweetness Upgrade: Drizzle a bit of maple syrup over the fondants before serving for an added layer of sweetness that complements the savory elements beautifully.
  • Savory Vegetable Swap: Include caramelized leeks or shallots in place of garlic for a sweeter, less pungent aromatic experience.
  • Crunchy Top: Top your fondants with panko breadcrumbs before plating and broil for a crispy texture that contrasts beautifully with the creamy almond sauce.

Feel free to let your creativity shine! And if you’re in the mood for an equally satisfying pairing, check out these Savory Zucchini Potato Mini Pancakes or enjoy some delightful Zucchini Potato Fritters. These variations are all about enhancing your culinary journey while keeping the comfort of home cooking right at your fingertips!

Expert Tips for Sweet Potato Fondant

  • Uniform Cutting: Ensure sweet potatoes are cut into even squares for consistent cooking; uneven pieces may lead to some being undercooked or mushy.

  • Perfect Browning: Allow the sweet potatoes to develop a golden crust by not overcrowding the pan. Searing in batches ensures optimal caramelization for your Sweet Potato Fondant.

  • Adjusting Cream Consistency: The smoked almond cream should be smooth and velvety. If too thick, blend in a little extra stock or water gradually until desired texture is reached.

  • Flavor Balancing: Taste the almond cream before serving; adjusting the lemon juice can brighten the flavor and complement the sweetness of the fondant perfectly.

  • Make Ahead: Prepare the sweet potato fondants a day in advance. Store in the fridge and reheat gently with a splash of stock, making entertaining a breeze!

  • Presentation Tips: Garnishing with both crushed almonds and micro herbs not only adds texture but elevates the visual appeal of your Sweet Potato Fondant.

Make Ahead Options

Making your Sweet Potato Fondant with Smoked Almond Cream & Rosemary Oil ahead of time is a great way to save on those busy weeknights! You can prepare the sweet potato fondants up to 24 hours in advance—simply sauté and braise them, then let them cool completely before storing in an airtight container in the fridge. For the almond cream, blend it ahead and refrigerate for up to 4 days. To maintain quality, reheat the fondants gently with a splash of vegetable stock before serving, and give the almond cream a quick stir. This way, you’ll enjoy a restaurant-worthy meal with minimal effort, every time!

Sweet Potato Fondant with Smoked Almond Cream & Rosemary Oil Recipe FAQs

How do I select ripe sweet potatoes?
Absolutely! When choosing sweet potatoes, look for firm, smooth-skinned tubers with no dark spots or blemishes. A good sweet potato should feel heavy for its size and have a vibrant orange color. Avoid sweet potatoes that appear wrinkled or have soft spots, as these indicate they may be past their prime.

What are the best storage methods for leftover sweet potato fondant?
Very! Store leftover sweet potato fondant in an airtight container in the refrigerator for up to 3 days. When you’re ready to enjoy it, gently reheat in a pan with a splash of vegetable stock to maintain moisture and keep that delicious texture intact.

Can I freeze sweet potato fondants?
Absolutely! To freeze your sweet potato fondants, arrange them in a single layer on a baking sheet and place them in the freezer for about 1–2 hours. Once frozen, transfer them to a zip-top bag and store for up to 2 months. When you’re ready to serve, thaw them overnight in the fridge and reheat thoroughly before enjoying.

What should I do if my smoked almond cream is too thick?
If your smoked almond cream turns out too thick, don’t worry! Simply add a little more vegetable stock or water, one tablespoon at a time, and blend again until smooth. It should have a velvety consistency that beautifully complements the sweet potatoes. Remember, tasting as you go can help you achieve the perfect balance!

What dietary considerations should I keep in mind?
The sweet potato fondant is naturally vegetarian, and you can easily make it vegan by substituting butter with vegan margarine. If serving to guests with nut allergies, consider using sunflower seeds blended with a touch of liquid smoke in place of smoked almonds for the cream. Always check with your diners about their dietary preferences and allergies to ensure everyone can enjoy this delightful dish!

How can I enhance the flavor of the rosemary oil?
To deepen the flavor of your rosemary oil, ensure you’re using fresh rosemary, as it provides a more vibrant taste compared to dried. You can also infuse the oil with additional aromatics like garlic or lemon zest while it warms. Just remember to strain the oil before using it, ensuring a clear, aromatic drizzling oil over your dish!

Sweet Potato Fondant with Smoked Almond Cream & Rosemary Oil

Decadent Sweet Potato Fondant with Smoked Almond Cream & Rosemary Oil

Delight in this Sweet Potato Fondant with Smoked Almond Cream & Rosemary Oil, capturing comfort and sophistication in every bite.
Prep Time 15 minutes
Cook Time 40 minutes
Total Time 55 minutes
Servings: 4 servings
Course: Dinner
Cuisine: American
Calories: 350

Ingredients
  

Sweet Potato Fondant Ingredients
  • 4 medium Sweet Potatoes ensure they are firm and evenly cut
  • 2 tablespoons Olive Oil for sautéing sweet potatoes
  • 2 tablespoons Butter or vegan margarine for dairy-free
  • 2 cloves Garlic minced
  • 1 handful Fresh Thyme or dried thyme
  • 1 cup Vegetable Stock or water if stock is unavailable
Smoked Almond Cream Ingredients
  • 1 cup Smoked Almonds or regular almonds with smoked paprika
  • ½ cup Vegetable Stock or water
  • ½ unit Lemon Juice freshly squeezed
  • 2 tablespoons Olive Oil for almond cream
Rosemary Oil Ingredients
  • ¼ cup Olive Oil for infusing
  • 1 sprig Rosemary fresh
Garnish
  • to taste Micro Herbs or Crushed Almonds for garnish

Equipment

  • Skillet
  • Blender
  • Saucepan

Method
 

Preparation Steps
  1. In a small saucepan, gently warm ¼ cup of olive oil with a fresh rosemary sprig for 5–7 minutes.
  2. Peel and cut the sweet potatoes into 4–5 cm thick squares. Melt 2 tablespoons of butter with 2 tablespoons of olive oil in a large skillet.
  3. Add the sweet potatoes in a single layer, searing for about 5 minutes until golden.
  4. Gently flip the sweet potatoes, add minced garlic and thyme, and season with salt and pepper.
  5. Pour in enough vegetable stock to cover halfway up the sweet potatoes, then cover and reduce heat to low, braising for 20–25 minutes.
  6. In a blender, combine smoked almonds, vegetable stock, lemon juice, and olive oil. Blend until smooth.
  7. To serve, spread smoked almond cream on a plate, add sweet potato fondants on top, drizzle with rosemary oil, and garnish.

Notes

Ensure uniform cutting of sweet potatoes and do not overcrowd the pan for perfect browning. Prepare in advance to make entertaining easier.