Easter Cathedral Candy: A Sweet Tradition of Love and Celebration

As a child, Easter was always one of my favorite holidays. It wasn’t just about the Easter egg hunts or the promise of a chocolate-filled basket; it was about the traditions that brought my family together. My grandmother had a way of making every holiday magical, and one of her most cherished recipes was what she called Easter Cathedral Candy.

She would gather us in the kitchen, dusting the countertops with powdered sugar and letting us sneak a few pastel candy-coated chocolate eggs before they made it onto the dessert. The scent of peanut butter and melted chocolate would fill the air, making our anticipation grow. When the dessert was finally set, she would slice it into perfect squares, handing each of us a piece as we sat around the table, laughing and sharing stories.

Now, every Easter, I recreate this tradition in my own kitchen. This recipe isn’t just about the delicious combination of peanut butter, chocolate, and crispy rice cereal—it’s about creating memories, sharing moments of joy, and carrying on the sweet legacy of family traditions.

What Makes Easter Cathedral Candy Special?

Easter Cathedral Candy is more than just another no-bake dessert. It stands out for several reasons:

  • Perfect Balance of Flavors and Textures – The creamy peanut butter, crispy rice cereal, and smooth chocolate create a delightful contrast.
  • No-Bake Convenience – No need to turn on the oven, making it a stress-free dessert, especially when preparing for a big Easter gathering.
  • Kid-Friendly and Fun to Make – This recipe is simple enough for kids to help with, making it an excellent way to get the family involved in holiday preparations.
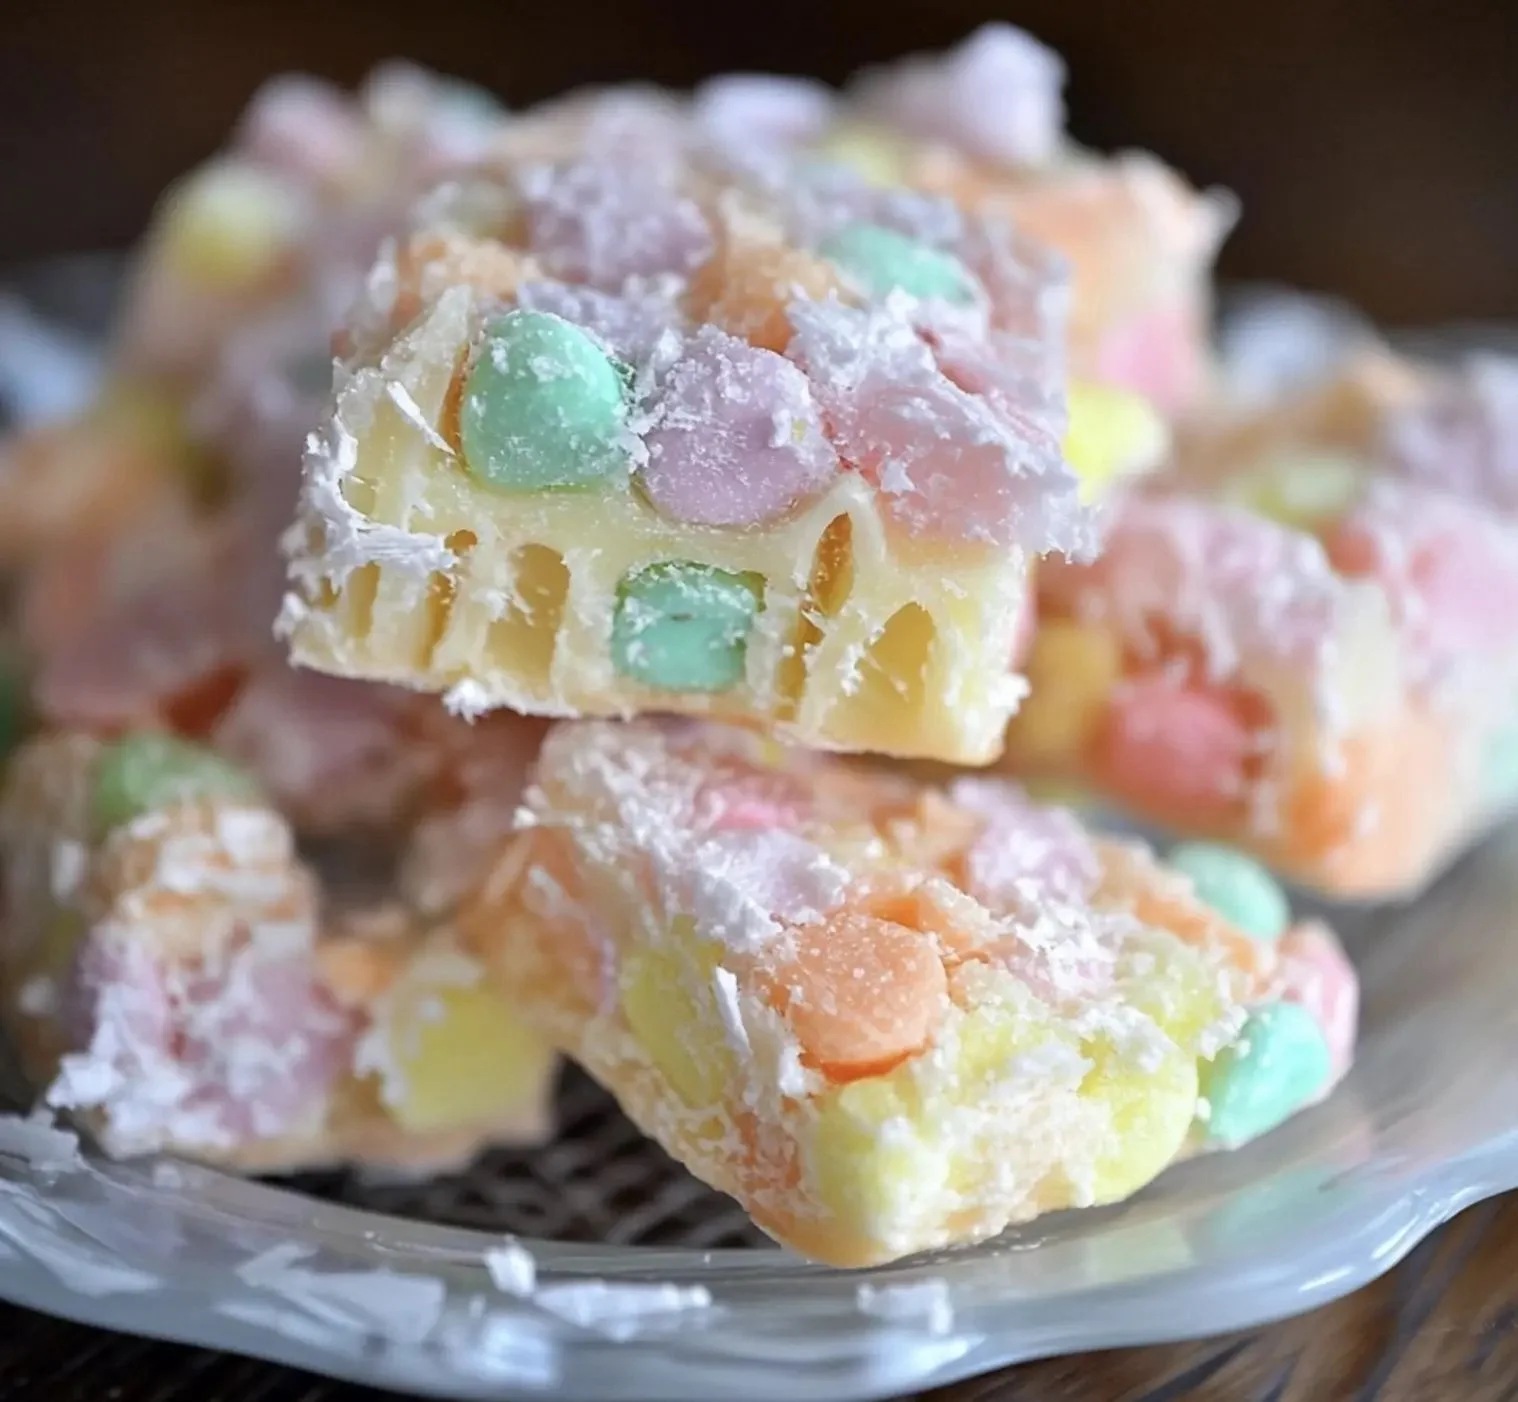
  • Visually Stunning – The pastel-colored candy-coated eggs sprinkled on top give it a festive look, reminiscent of stained glass in a cathedral—hence the name.

Ingredients

IngredientAmount
Powdered sugar2 cups
Creamy peanut butter1 cup
Unsalted butter, softened1/2 cup
Vanilla extract1 teaspoon
Rice cereal3 cups
Semi-sweet chocolate chips1 cup
Vegetable oil1 tablespoon
Pastel-colored candy-coated chocolate eggs1/2 cup

Instructions

  1. In a large mixing bowl, combine the powdered sugar, peanut butter, softened butter, and vanilla extract. Mix until smooth and well combined.
  2. Gently fold in the rice cereal until evenly coated with the peanut butter mixture.
  3. Press the mixture into a greased 9×13-inch baking dish, spreading it evenly.
  4. In a microwave-safe bowl, combine the chocolate chips and vegetable oil. Heat in the microwave in 30-second intervals, stirring in between, until melted and smooth.
  5. Pour the melted chocolate over the rice cereal mixture in the baking dish, spreading it evenly to cover the top.
  6. Sprinkle the pastel-colored candy-coated chocolate eggs on top of the melted chocolate, pressing them in slightly.
  7. Refrigerate for at least 1 hour or until firm. Cut into squares before serving.

Nutritional Information (Per Serving)

NutrientAmount
Calories~250 kcal
Carbohydrates~30g
Protein~4g
Fat~14g
Saturated Fat~6g
Sugar~20g
Fiber~1g
Sodium~80mg

The History of Easter Sweets and Symbolism

Easter is deeply connected to sweet treats, with chocolate eggs, marshmallow chicks, and candy-filled baskets taking center stage. But why?

  • Eggs as a Symbol of Renewal – Eggs have long been associated with rebirth and renewal, making them a natural fit for Easter, which celebrates new beginnings.
  • Chocolate as a Modern Addition – The tradition of giving chocolate eggs dates back to the 19th century when European chocolatiers began crafting edible eggs as a luxury treat.
  • Bright Colors Representing Spring – Pastel-colored candies are a nod to the soft hues of spring, symbolizing warmth and new life after the cold winter months.

Easter Cathedral Candy fits beautifully within this tradition, combining the nostalgic flavors of peanut butter and chocolate with the festive look of spring.

Creative Variations to Try

One of the best things about this recipe is its versatility. Here are some variations to experiment with:

  • Nut-Free Version – Replace peanut butter with sunflower seed butter or a similar nut-free alternative for those with allergies.
  • White Chocolate Twist – Instead of semi-sweet chocolate, try melting white chocolate for a sweeter, creamier topping.
  • Extra Crunch – Add chopped pretzels or crushed graham crackers for an extra crunch.
  • Easter Nest Style – Instead of pressing the mixture into a dish, form small nests and place a few candy eggs in each one for a cute, individual serving option.

Frequently Asked Questions

1. Can I make Easter Cathedral Candy ahead of time?

Yes! This recipe is perfect for making in advance. Simply store it in the refrigerator for up to a week in an airtight container. It actually tastes even better after a day or two, as the flavors have time to meld together.

2. Can I freeze Easter Cathedral Candy?

Absolutely. Once the dessert has fully set, cut it into squares and place them in an airtight container with parchment paper between layers. They can be frozen for up to two months. When ready to serve, let them thaw in the refrigerator for a few hours.

3. What if I don’t have rice cereal?

If you don’t have rice cereal on hand, you can use crushed cornflakes, crushed graham crackers, or even crushed digestive biscuits for a slightly different but equally delicious texture.

4. Can I use natural peanut butter?

Yes, but be aware that natural peanut butter tends to have more oil separation, which may affect the texture. If using natural peanut butter, stir it very well before adding it to the recipe.

5. How do I keep the chocolate layer from cracking when cutting?

For cleaner cuts, let the dessert sit at room temperature for 5-10 minutes before slicing. You can also use a warm knife (run it under hot water and wipe dry) to glide through the chocolate smoothly.

Serving and Presentation Ideas

Presentation can elevate this simple treat into a stunning centerpiece for your Easter celebration.

  • Arrange on a Festive Platter – Serve on a pastel-colored dish or a decorative Easter tray to enhance the holiday theme.
  • Drizzle with Extra Chocolate – A drizzle of white or dark chocolate over the top adds a gourmet touch.
  • Pair with Fresh Fruit – Serve alongside fresh berries or citrus slices for a refreshing contrast to the sweetness.
  • Gift in Decorative Boxes – Wrap individual portions in small treat boxes or clear bags tied with pastel ribbons for a thoughtful Easter gift.

Why This Recipe Will Become Your New Easter Tradition

There’s something magical about recipes that bring people together. Easter Cathedral Candy isn’t just a dessert—it’s an experience. It’s the laughter of children as they press colorful candies into warm chocolate. It’s the quiet joy of sneaking a piece straight from the fridge before breakfast. It’s the warmth of tradition passed down through generations, linking the past to the present with each bite.

This recipe is more than just sugar and chocolate; it’s a reminder that the sweetest moments in life are the ones we share. Whether you’re making it for the first time or carrying on a family tradition, Easter Cathedral Candy is sure to bring joy to your holiday celebration.

So, this Easter, gather your loved ones, tie on your aprons, and create something sweet—not just for your taste buds but for your hearts as well.

Amal

Easter Cathedral Candy: A Sweet Tradition of Love and Celebration

Easter Cathedral Candy is a delightful no-bake treat that blends creamy peanut butter, crispy rice cereal, and rich chocolate, topped with pastel-colored candy eggs for a festive touch. This easy-to-make dessert is perfect for Easter gatherings, bringing together the flavors of childhood nostalgia and holiday cheer. With a simple preparation process and no need for baking, it’s a fun and delicious way to celebrate the season with family and friends.
Prep Time 15 minutes
Cook Time 1 hour
Total Time 1 hour 15 minutes
Servings: 12 -16 squares
Course: Dessert
Cuisine: American

Ingredients
  

  • 2 cups powdered sugar
  • 1 cup creamy peanut butter
  • 1/2 cup unsalted butter softened
  • 1 teaspoon vanilla extract
  • 3 cups rice cereal
  • 1 cup semi-sweet chocolate chips
  • 1 tablespoon vegetable oil
  • 1/2 cup pastel-colored candy-coated chocolate eggs

Method
 

  1. In a large mixing bowl, combine powdered sugar, peanut butter, softened butter, and vanilla extract. Stir until smooth and well combined.
  2. Gently fold in the rice cereal, ensuring the mixture is evenly coated.
  3. Press the mixture firmly into a greased 9×13-inch baking dish, spreading it into an even layer.
  4. In a microwave-safe bowl, add chocolate chips and vegetable oil. Microwave in 30-second intervals, stirring in between, until fully melted and smooth.
  5. Pour the melted chocolate over the rice cereal mixture, spreading it evenly.
  6. Sprinkle the pastel-colored candy-coated eggs on top, pressing them slightly into the chocolate.
  7. Refrigerate for at least 1 hour or until firm.
  8. Once set, cut into squares and serve.

Notes

  • If using natural peanut butter, stir well before adding, as oil separation may affect consistency.
  • To make slicing easier, let the candy sit at room temperature for 5-10 minutes before cutting.
  • Store in an airtight container in the refrigerator for up to a week.
  • For a nut-free version, substitute peanut butter with sunflower seed butter.
  • This dessert can be frozen for up to two months; thaw in the fridge before serving.

Cheesy Chicken & Egg Macaroni Bake – A Hearty Family Favorite

Some recipes bring a sense of comfort the moment they hit the table. For me, this chicken and egg macaroni bake is one of those dishes. It’s warm, satisfying, and has all the right flavors and textures to make you feel like you’re eating a meal made with love.

Growing up, this was my mother’s go-to recipe whenever we needed something filling yet simple. She always said that baked pasta was like a hug on a plate—soft noodles, a hearty layer of seasoned chicken, and just the right touch of spices to make everything come together. While most people associate baked pasta with beef or tomato sauce, this version highlights the tenderness of minced chicken and the richness of eggs, making it a delicious twist on a classic.

The best part? It was a dish that could feed a crowd. Whether it was a Sunday family gathering, a quick meal after school, or a cozy dinner on a cold evening, this bake was always a favorite. Now, I make it for my own family, and just like when I was younger, it disappears from the table in no time.

If you’re looking for a simple, comforting, and protein-packed pasta dish, this one is sure to become a staple in your home as well.

Why This Chicken & Egg Macaroni Bake is a Must-Try

1. A Hearty and Satisfying Meal

With minced chicken, eggs, and pasta, this dish is packed with protein and carbohydrates, making it a complete and balanced meal.

2. Budget-Friendly and Made with Pantry Staples

There’s nothing fancy about this dish—it uses simple, affordable ingredients that you probably already have in your kitchen.

3. Perfect for Meal Prep and Leftovers

This bake stores and reheats beautifully, so you can make it ahead of time and enjoy it throughout the week.

4. Great for Feeding a Crowd

It’s an ideal dish for family dinners, potlucks, or gatherings, since one pan can easily serve multiple people.

5. Customizable to Your Taste

You can add cheese, vegetables, or a creamy sauce to make this dish exactly how you like it.

Ingredients

For the Pasta Bake

IngredientAmount
Minced chicken1.2 kg (about 2.5 lbs)
Chicken eggs2
SaltTo taste
Ground black pepperTo taste
Dried ground sweet paprika1 tsp
Onion1 medium, chopped

Directions

Step 1: Prepare the Chicken Mixture

  1. In a large bowl, combine minced chicken, eggs, salt, black pepper, sweet paprika, and chopped onion. Mix well.

Step 2: Cook the Pasta

  1. Boil macaroni pasta until al dente, then drain and set aside.

Step 3: Assemble the Bake

  1. Preheat oven to 180°C (350°F).
  2. Layer cooked pasta in a greased baking dish, then spread the chicken mixture evenly over the top.

Step 4: Bake to Perfection

  1. Bake for 30-35 minutes or until the chicken is cooked through and the top is golden.

Step 5: Serve & Enjoy

  1. Let cool slightly before slicing. Serve warm with a side salad or garlic bread.

Nutritional Information (Per Serving – Approx.)

NutrientAmount (Approx.)
Calories320 kcal
Protein28 g
Carbohydrates20 g
Fats12 g
Fiber2 g
Sodium450 mg

Secrets to Making the Best Chicken & Egg Macaroni Bake

1. Season the Chicken Well

Minced chicken has a mild flavor, so it’s important to season it generously with salt, black pepper, paprika, and even garlic or herbs for extra depth.

2. Cook the Pasta Just Until Al Dente

Since the pasta will continue to cook in the oven, boiling it until just slightly firm ensures it doesn’t become too soft.

3. Use Eggs to Bind Everything Together

The eggs help create a soft and slightly firm texture, making the bake hold together when sliced.

4. Add Cheese for Extra Flavor

For a creamier and richer dish, mix in mozzarella, cheddar, or Parmesan cheese. The cheese will melt into the layers, creating a more indulgent texture.

5. Let the Bake Rest Before Slicing

Allowing the dish to rest for 5-10 minutes after baking helps the layers set, making it easier to cut into perfect portions.

How to Serve This Pasta Bake

1. Pair It with a Fresh Salad

A light salad with crisp greens, tomatoes, and a lemon vinaigrette balances the richness of the bake.

2. Serve It with Garlic Bread

A slice of warm garlic bread makes the meal even more satisfying.

3. Enjoy It as a Lunch or Dinner

Since it’s packed with protein, this dish works well as a hearty lunch or a filling dinner.

4. Add a Side of Roasted Vegetables

Serve with roasted zucchini, bell peppers, or mushrooms for a nutritious and colorful plate.

5. Top It with Cheese and Herbs

For extra flavor, grate some fresh Parmesan on top and sprinkle with chopped parsley or basil.

Frequently Asked Questions (FAQs)

Q1: Can I use ground turkey instead of chicken?

Yes! Ground turkey works just as well in this recipe and has a slightly richer flavor.

Q2: Can I add vegetables to this dish?

Absolutely! Try mixing in diced bell peppers, mushrooms, spinach, or peas for extra nutrition and flavor.

Q3: How do I store leftovers?

Store any leftovers in an airtight container in the refrigerator for up to 3 days. Reheat in the oven or microwave before serving.

Q4: Can I freeze this pasta bake?

Yes! Allow the dish to cool completely, then wrap it tightly in plastic wrap or aluminum foil. Freeze for up to 2 months. When ready to eat, thaw in the fridge overnight and reheat in the oven.

Q5: How do I make this dish cheesier?

Mix shredded mozzarella or cheddar into the pasta before baking and sprinkle extra on top for a crispy, cheesy crust.

Q6: What’s the best way to prevent the pasta from drying out?

Make sure to cover the dish with foil while baking to keep it moist. You can also mix in a little broth or a splash of cream for added moisture.

Q7: Can I make this recipe gluten-free?

Yes! Simply swap out the regular pasta for gluten-free macaroni and use gluten-free flour if making a sauce.

Q8: Can I make this recipe ahead of time?

Yes! Assemble the dish up to 24 hours in advance, cover it, and store it in the refrigerator until ready to bake.

Conclusion: A Comforting Classic That Never Disappoints

There’s something special about a warm, cheesy, oven-baked dish that brings people together. This chicken and egg macaroni bake is simple to make, yet packed with rich flavors, hearty textures, and comforting goodness.

Whether you’re preparing it for a weeknight dinner, a family gathering, or meal prepping for the week, this dish is guaranteed to satisfy and impress. The combination of seasoned chicken, fluffy eggs, and tender pasta makes it a meal that’s both filling and flavorful—without being complicated.

So next time you’re looking for an easy yet delicious baked pasta dish, give this recipe a try. One bite, and it just might become a new family favorite!

Amal

Cheesy Chicken & Egg Macaroni Bake – A Hearty Family Favorite

This cheesy chicken and egg macaroni bake is the perfect comfort food—hearty, satisfying, and packed with flavor. Made with seasoned minced chicken, eggs, and tender pasta, this oven-baked dish is simple yet incredibly delicious. Whether you’re making it for a family dinner or meal prepping for the week, this pasta bake is sure to become a favorite at your table.
Prep Time 15 minutes
Cook Time 35 minutes
Total Time 50 minutes
Servings: 6 servings
Course: Main Dish
Cuisine: International

Ingredients
  

  • For the Pasta Bake
  • 1.2 kg about 2.5 lbs minced chicken
  • 2 large eggs
  • Salt to taste
  • Ground black pepper to taste
  • 1 teaspoon dried ground sweet paprika
  • 1 medium onion chopped
  • 300 g macaroni pasta or any short pasta
  • 1 cup shredded mozzarella optional, for extra cheesiness

Method
 

  1. Prepare the Chicken Mixture: In a large bowl, combine minced chicken, eggs, salt, black pepper, paprika, and chopped onion. Mix well.
  2. Cook the Pasta: Boil the macaroni pasta until al dente, then drain and set aside.
  3. Assemble the Bake: Preheat the oven to 180°C (350°F). Grease a baking dish and layer the cooked pasta at the bottom. Spread the seasoned chicken mixture evenly over the top.
  4. Bake: Cover with foil and bake for 30-35 minutes, or until the chicken is fully cooked. For a cheesy top, sprinkle shredded mozzarella over the dish and bake uncovered for an additional 5 minutes.
  5. Serve & Enjoy: Let cool slightly before slicing. Serve warm with a side salad or garlic bread.

Notes

  • For a crispy topping, sprinkle with breadcrumbs and Parmesan before baking.
  • Want a creamier version? Add a splash of heavy cream or a dollop of sour cream to the chicken mixture.
  • Storage: Keep leftovers in an airtight container in the fridge for up to 3 days. Reheat in the oven for best results.
  • Make it ahead: Assemble the dish and refrigerate it overnight, then bake the next day.

Cheesy Cabbage & Mozzarella Savory Pie – A Comforting, Flavorful Dish

Some dishes feel like home. They bring warmth, comfort, and a sense of nostalgia with every bite. For me, this cheesy cabbage and mozzarella savory pie is one of those recipes.

Growing up, my grandmother always found ways to turn simple, everyday ingredients into meals that felt special. Cabbage was one of her favorite ingredients—affordable, healthy, and always in the kitchen. While many saw it as just a humble vegetable, she knew how to transform it into something truly delicious.

One of my fondest memories is sitting in her kitchen, watching her chop cabbage finely while the smell of butter and baking filled the air. She would mix a creamy, rich batter, fold in the shredded cabbage, and bake it until golden brown. The result? A soft, cheesy, and flavorful dish that was both comforting and surprisingly light. It was the kind of meal that didn’t need anything fancy—it was simple, but it always brought us together at the table.

Now, every time I make this savory pie, I think of those moments. It’s proof that some of the best recipes come from everyday ingredients and a little creativity. Whether you’re making it for a family dinner, a cozy lunch, or as a side dish for a gathering, this pie is guaranteed to impress.

Why You’ll Love This Recipe

1. Light, Fluffy, and Cheesy

Unlike heavy, doughy pies, this cabbage and mozzarella pie is soft, airy, and packed with cheesy goodness. The cabbage keeps it light, while the cheese adds a creamy richness.

2. Made with Simple, Budget-Friendly Ingredients

This recipe uses everyday kitchen staples like eggs, flour, and cabbage. It’s affordable, easy to make, and perfect for meal planning.

3. Perfect for Any Meal

Serve it warm for dinner, as a quick lunch, or even cold as a snack. It also makes a great side dish for roasted meats or grilled vegetables.

4. Easily Customizable

Want to add more flavor? Mix in ham, sautéed mushrooms, or fresh herbs. Prefer a crunchier texture? Top it with breadcrumbs before baking.

5. A Healthier Comfort Food

Cabbage is low in calories but rich in fiber and vitamins, making this a nutritious option for those who want something filling but not too heavy.

Ingredients (Serves 6)

For the Savory Pie

IngredientAmount
Eggs4 large
Sour cream¼ cup
Mayonnaise¼ cup
All-purpose flour¼ cup
Baking powder½ tsp
Cornstarch½ tsp
Green cabbage1 lb (½ medium head or 6 cups, finely sliced)

Directions

Step 1: Prepare the Cabbage

  1. Finely slice the cabbage and set aside.

Step 2: Make the Batter

  1. In a large bowl, whisk together eggs, sour cream, mayonnaise, flour, baking powder, and cornstarch until smooth.

Step 3: Combine Everything

  1. Add the sliced cabbage into the batter, mixing well until fully coated.

Step 4: Bake the Pie

  1. Preheat the oven to 180°C (350°F). Grease a baking dish and pour in the cabbage mixture.
  2. Bake for 35-40 minutes, or until golden and set.

Step 5: Serve & Enjoy

  1. Let cool for a few minutes before slicing. Serve warm as a main dish or side.

Nutritional Information (Per Serving – Approx.)

NutrientAmount (Approx.)
Calories180 kcal
Protein7 g
Carbohydrates10 g
Fats12 g
Fiber2 g
Sodium220 mg

Secrets to Making the Best Cabbage & Mozzarella Savory Pie

1. Finely Shred the Cabbage for the Best Texture

Finely slicing or shredding the cabbage ensures it bakes evenly and blends well into the batter, giving the pie a soft, uniform texture.

2. Use a Combination of Cheeses for More Depth

Mozzarella gives the pie a gooey, stretchy texture, but you can also mix in Parmesan for a nutty flavor or cheddar for a sharper bite.

3. Don’t Overmix the Batter

For a light and fluffy texture, mix the ingredients just until combined—overmixing can make the pie dense.

4. Let It Rest Before Slicing

Allowing the pie to cool slightly before serving helps it set, making it easier to cut into perfect slices.

5. Bake Until Golden and Slightly Crispy

A beautifully golden crust with a slight crispiness on the edges makes this pie even more irresistible.

How to Serve This Savory Pie

1. As a Standalone Meal

Enjoy a warm slice with a dollop of sour cream or Greek yogurt for a simple yet satisfying meal.

2. Paired with a Fresh Salad

Serve alongside a crisp green salad with a lemon vinaigrette to balance the richness of the cheese.

3. As a Side Dish

This pie pairs wonderfully with roasted chicken, grilled fish, or even a hearty stew.

4. As a Quick Snack or Lunchbox Addition

Slice it into squares and pack it for an on-the-go snack or a lunchbox treat.

5. Topped with Extra Cheese or Breadcrumbs

For an added layer of texture, sprinkle the top with grated Parmesan or crunchy panko breadcrumbs before baking.

Frequently Asked Questions (FAQs)

Q1: Can I make this pie ahead of time?

Yes! You can bake it ahead and store it in the refrigerator for up to 3 days. Simply reheat in the oven or microwave before serving.

Q2: Can I freeze this savory pie?

Absolutely! Bake the pie, let it cool completely, then wrap it tightly in plastic wrap and freeze for up to 2 months. Reheat in the oven for best results.

Q3: What other cheeses can I use?

Mozzarella is great for a melty texture, but you can also try:

  • Cheddar for a sharper taste
  • Feta for a tangy twist
  • Gouda for a slightly smoky flavor

Q4: Can I make it gluten-free?

Yes! Simply substitute the all-purpose flour with a gluten-free flour blend and ensure the baking powder is gluten-free.

Q5: How can I make this pie even crispier?

For a crispier top, sprinkle breadcrumbs mixed with melted butter over the pie before baking.

Q6: What can I use instead of mayonnaise?

If you don’t have mayonnaise, you can use Greek yogurt or extra sour cream for a similar creamy texture.

Q7: Can I add meat to this recipe?

Yes! You can add cooked bacon, diced ham, or shredded chicken for extra protein and flavor.

Conclusion: A Simple Dish with Big Flavor

This cheesy cabbage and mozzarella savory pie proves that comfort food doesn’t have to be complicated. With just a few simple ingredients, you can create a dish that’s light, fluffy, and full of flavor.

Whether you’re making it as a quick dinner, a cozy weekend meal, or a side dish for a gathering, this pie is a delicious way to enjoy cabbage in a whole new way. It’s easy to customize, great for leftovers, and guaranteed to become a family favorite.

So, next time you’re wondering what to do with a head of cabbage, try this recipe. One bite, and you’ll understand why it’s a dish that’s been loved for generations.

Amal

Cheesy Cabbage & Mozzarella Savory Pie – A Comforting, Flavorful Dish

This cheesy cabbage and mozzarella savory pie is light, fluffy, and packed with flavor. Made with finely sliced cabbage, eggs, sour cream, and melty mozzarella, it’s a perfect dish for breakfast, lunch, or dinner. Simple to make and wonderfully satisfying, this pie is a delicious way to transform humble ingredients into something extraordinary. Serve it warm with a side salad or as a comforting snack anytime!
Prep Time 10 minutes
Cook Time 40 minutes
Total Time 50 minutes
Servings: 6 servings
Course: Main Dish
Cuisine: European

Ingredients
  

  • For the Pie
  • 4 large eggs
  • ¼ cup sour cream
  • ¼ cup mayonnaise
  • ¼ cup all-purpose flour
  • ½ tsp baking powder
  • ½ tsp cornstarch
  • 1 lb green cabbage ½ medium head or 6 cups, finely sliced

Method
 

  1. Preheat & Prepare: Preheat the oven to 180°C (350°F). Grease a baking dish and set aside.
  2. Prepare the Batter: In a large bowl, whisk together the eggs, sour cream, mayonnaise, flour, baking powder, and cornstarch until smooth.
  3. Add Cabbage: Fold the finely sliced cabbage into the batter, ensuring it is well coated.
  4. Bake the Pie: Pour the mixture into the prepared baking dish. Bake for 35-40 minutes, or until golden brown and set.
  5. Cool & Serve: Let the pie cool slightly before slicing. Enjoy warm as a main dish or a side!

Notes

  • For extra cheesiness, mix in shredded mozzarella, cheddar, or Parmesan.
  • Add protein by incorporating diced ham, cooked bacon, or sautéed mushrooms.
  • Store leftovers in an airtight container for up to 3 days and reheat before serving.
  • Make it crispier by sprinkling breadcrumbs on top before baking.

Zesty Lemon Sugar Cookies – A Bite of Sunshine in Every Cookie

There are certain flavors that instantly transport us to a different time and place. For me, the taste of lemon always reminds me of baking with my grandmother in her cozy kitchen, where the scent of citrus and warm vanilla filled the air.

She had a love for simple, elegant desserts—the kind that didn’t require fancy techniques but always turned out perfect. One of my favorites was her lemon sugar cookies. She would zest fresh lemons with care, telling me how the oils in the peel held all the flavor. I would sneak tiny spoonfuls of sugar while she wasn’t looking, giggling as I dusted the cookies with powdered sugar before they went into the oven.

When they emerged, golden and delicate, we would sit at the kitchen table with a cup of tea, enjoying the soft, buttery texture and the burst of lemon in every bite. Those moments were simple, yet they held so much warmth.

Now, every time I bake these cookies, I feel that same nostalgia. They are buttery, melt-in-your-mouth soft, with just the right balance of sweetness and citrusy tang. Whether you’re making them for a special occasion, as a gift, or simply to brighten your day, these cookies are a delightful reminder of how food can bring us back to the sweetest moments in life.

Why You’ll Love These Lemon Sugar Cookies

1. The Perfect Balance of Sweet and Tangy

These cookies aren’t overly sweet—the fresh lemon juice and zest add just enough tartness to complement the sugar, creating a bright and refreshing flavor.

2. Soft and Buttery Texture

Unlike crisp sugar cookies, these are soft and tender, with a delicate crumb that practically melts in your mouth.

3. Simple Ingredients, Maximum Flavor

You don’t need any fancy ingredients—just butter, sugar, flour, eggs, and fresh lemons. The real magic happens when the vanilla and lemon combine to create an irresistible aroma.

4. Easy to Make and Perfect for Any Occasion

Whether you’re baking for a holiday, a party, or just craving a homemade treat, these cookies are quick to prepare and sure to impress.

5. Versatile and Customizable

Want to get creative? Add poppy seeds, swap lemon for orange, or drizzle them with a lemon glaze for an extra touch of decadence.

Ingredients

For the Cookie Dough

IngredientAmount
Butter100g, softened
Powdered sugar100g
Vanilla sugar1 packet (10g)
Egg1
Lemon juice2 tbsp
Lemon zestZest of 1 lemon
Salt¼ tsp
All-purpose flour250g
Baking powder1 tsp

For Rolling

IngredientAmount
Sugar2-3 tbsp
Powdered sugar2-3 tbsp

Directions

Step 1: Prepare the Dough

  1. In a mixing bowl, cream together butter, powdered sugar, and vanilla sugar until light and fluffy.
  2. Add the egg, lemon juice, lemon zest, and salt, mixing until well combined.
  3. Sift in flour and baking powder, stirring until a soft dough forms.

Step 2: Shape the Cookies

  1. Chill the dough in the refrigerator for 30 minutes to make it easier to handle.
  2. Roll the dough into small balls, then coat each one in granulated sugar and powdered sugar.

Step 3: Bake to Perfection

  1. Preheat the oven to 180°C (350°F) and line a baking sheet with parchment paper.
  2. Place the cookies on the baking sheet, spacing them slightly apart.
  3. Bake for 10-12 minutes, or until the edges are lightly golden.

Step 4: Cool & Serve

  1. Let the cookies cool on a wire rack before serving. Enjoy their soft, buttery texture with a burst of lemon flavor!

Nutritional Information (Per Cookie – Approx.)

NutrientAmount (Approx.)
Calories120 kcal
Protein2 g
Carbohydrates16 g
Fats5 g
Fiber1 g
Sugar8 g

The Secrets to Perfect Lemon Sugar Cookies

1. Use Fresh Lemon Zest and Juice

Bottled lemon juice won’t give the same flavor as fresh lemons. The zest contains essential oils that add a deep, natural citrus aroma to the cookies.

2. Don’t Overmix the Dough

Overmixing can lead to tough, dense cookies. Mix just until the ingredients are combined to keep the texture light and soft.

3. Chill the Dough for Easy Handling

Refrigerating the dough for 30 minutes makes it easier to roll and prevents the cookies from spreading too much while baking.

4. Roll in Sugar for a Delicate Crunch

Coating the cookie dough in granulated sugar and powdered sugar before baking gives the cookies a slightly crisp exterior while keeping the inside soft.

5. Bake Until Just Set

These cookies should be slightly golden on the edges but still soft in the center when removed from the oven. They will continue to firm up as they cool.

Delicious Ways to Enjoy Lemon Sugar Cookies

1. With a Cup of Tea or Coffee

The subtle lemon flavor pairs beautifully with Earl Grey, chamomile, or a light roast coffee.

2. As an Elegant Dessert

Serve these cookies with a side of fresh berries and whipped cream for a simple yet sophisticated dessert.

3. Dipped in White Chocolate

For an extra indulgent treat, dip half of each cookie in melted white chocolate and let it harden before serving.

4. Turn Them into Ice Cream Sandwiches

Spread a layer of vanilla or lemon ice cream between two cookies and freeze for a refreshing summer treat.

5. Packaged as a Homemade Gift

Stack the cookies in a decorative tin or a ribbon-tied bag for a thoughtful homemade gift during the holidays or for special occasions.

Frequently Asked Questions (FAQs)

Q1: Can I make these cookies ahead of time?

Yes! The dough can be refrigerated for up to 24 hours before baking, or frozen for up to 2 months. Simply thaw slightly before rolling and baking.

Q2: Can I use orange instead of lemon?

Absolutely! Swap the lemon juice and zest for orange to create orange sugar cookies with a slightly sweeter citrus flavor.

Q3: How do I store these cookies?

Store the cookies in an airtight container at room temperature for up to 5 days. For longer storage, freeze them for up to 3 months and thaw before serving.

Q4: What if I don’t have vanilla sugar?

You can replace it with an extra teaspoon of vanilla extract for the same rich, warm flavor.

Q5: Can I make these cookies gluten-free?

Yes! Substitute the all-purpose flour with a gluten-free 1:1 baking flour mix. The texture may be slightly different, but the flavor will remain delicious.

Q6: Why do my cookies spread too much?

This could be due to warm butter or overmixing. Make sure to chill the dough before baking and avoid overworking it.

Q7: Can I make these cookies without eggs?

Yes! You can use a flaxseed egg (1 tbsp ground flaxseed + 3 tbsp water) or a tablespoon of yogurt as an egg substitute.

Conclusion: A Cookie That Feels Like Sunshine

There’s something magical about a cookie that can instantly brighten your day. These lemon sugar cookies are the perfect balance of sweet, tangy, and buttery, making them a go-to treat for any occasion.

Whether you’re baking for a family gathering, treating yourself to a cozy afternoon snack, or gifting a loved one with homemade goodness, these cookies are guaranteed to bring a little extra joy to your day.

So, grab a fresh lemon, preheat the oven, and let the warm, citrusy aroma fill your kitchen. Because sometimes, the simplest treats are the ones we remember the most.

Amal

Zesty Lemon Sugar Cookies – A Bite of Sunshine in Every Cookie

These zesty lemon sugar cookies are the perfect combination of buttery softness, delicate sweetness, and a refreshing citrus kick. Made with fresh lemon juice and zest, these cookies melt in your mouth with every bite. Whether enjoyed with a cup of tea, as an afternoon treat, or packaged as a homemade gift, these cookies are sure to brighten any occasion!
Prep Time 15 minutes
Cook Time 15 minutes
Total Time 30 minutes
Servings: 20 -24 cookies
Course: Dessert
Cuisine: International

Ingredients
  

  • For the Cookies
  • 100 g butter softened
  • 100 g powdered sugar
  • 1 packet vanilla sugar 10g
  • 1 egg
  • 2 tbsp lemon juice
  • Zest of 1 lemon
  • ¼ tsp salt
  • 250 g all-purpose flour
  • 1 tsp baking powder
  • For Rolling
  • 2-3 tbsp granulated sugar
  • 2-3 tbsp powdered sugar

Method
 

  1. Prepare the Dough: In a mixing bowl, cream together the butter, powdered sugar, and vanilla sugar until light and fluffy. Add the egg, lemon juice, lemon zest, and salt, mixing well.
  2. Incorporate Dry Ingredients: Sift in the flour and baking powder, then mix until a soft dough forms. Cover and chill the dough for 30 minutes.
  3. Shape the Cookies: Roll the dough into small balls and coat them in granulated sugar first, then powdered sugar.
  4. Bake: Preheat the oven to 180°C (350°F). Arrange cookies on a parchment-lined baking sheet, leaving space between each. Bake for 10-12 minutes, or until lightly golden on the edges.
  5. Cool and Serve: Allow cookies to cool on a wire rack before enjoying their soft, buttery texture and bright lemon flavor.

Notes

  • For a stronger lemon flavor, add an extra teaspoon of lemon zest.
  • Want a crispier texture? Bake for an additional 2-3 minutes.
  • For an extra touch of sweetness, drizzle with a simple lemon glaze.
  • Storage: Keep in an airtight container for up to 5 days or freeze for longer storage.

Soft Milk Bread – A Timeless Comfort in Every Bite

There’s something about the smell of freshly baked bread that makes a house feel like a home. Growing up, my grandmother had a simple tradition—every Sunday morning, she would wake up early and make a batch of soft, pillowy milk bread. It wasn’t anything extravagant, just a few basic ingredients mixed together with love, yet it was one of the things I looked forward to the most.

The process was almost magical. Watching the yeast bubble in warm milk, kneading the dough until it became smooth and elastic, and finally, waiting for it to rise—those were the moments that made baking special. By the time the golden loaves emerged from the oven, the entire kitchen smelled warm and inviting. She would tear off a piece, slather it with butter, and hand it to me while it was still warm. I didn’t need anything else—just that soft, buttery bread and the comfort of knowing that home was wherever that smell was.

Now, whenever I bake this bread, I think of those Sundays. I think of the simplicity of homemade food and how something as basic as a loaf of milk bread can bring people together. It’s more than just bread—it’s a tradition, a memory, and a reminder that the best things in life are often the simplest.

This soft milk bread is incredibly fluffy, slightly sweet, and perfect for any occasion. Whether you’re eating it plain, spreading it with jam, or turning it into French toast, it’s a recipe that you’ll want to make again and again.

Why You’ll Love This Recipe

1. Incredibly Soft and Fluffy

This bread is light, airy, and has a delicate, cloud-like texture thanks to the combination of milk, butter, and the right kneading technique.

2. Simple Ingredients, Amazing Flavor

You don’t need anything fancy—just flour, milk, butter, sugar, and yeast. The ingredients are basic, but the result is rich, slightly sweet, and deeply satisfying.

3. Perfect for Any Occasion

This bread can be enjoyed in so many ways. Toast it for breakfast, use it for sandwiches, serve it with soup, or simply eat it warm with butter. It’s versatile enough for both sweet and savory dishes.

4. Easy to Make, Even for Beginners

If you’ve never baked bread before, this is a great recipe to start with. The dough is easy to work with, and the process is straightforward and beginner-friendly.

5. Stays Soft for Days

Unlike some homemade breads that dry out quickly, this milk bread remains soft and tender for up to three days when stored properly.

Ingredients

For the Dough

IngredientAmount
Warm milk150 ml (⅔ cup)
Yeast6 g (2 tsp)
Wheat flour250 g (2 cups)
Powdered sugar50 g (¼ cup)
Salt¼ tsp
Milk powder10 g (1 tbsp)
Unsalted butter15 g (1 tbsp)

For Brushing & Topping

IngredientAmount
Egg yolk1 (for brushing)
Sesame seeds1 tsp (optional)

Directions

Step 1: Prepare the Dough

  1. In a bowl, dissolve yeast in warm milk and let it sit for 5-10 minutes until foamy.
  2. In a large mixing bowl, combine flour, powdered sugar, salt, and milk powder.
  3. Add the yeast mixture and knead until a soft dough forms.
  4. Incorporate butter and continue kneading for 8-10 minutes until smooth.

Step 2: Let It Rise

  1. Cover the dough and let it rise in a warm place for 1-1.5 hours, or until doubled in size.

Step 3: Shape the Bread

  1. Punch down the dough, shape it into rolls or a loaf, and place it in a greased baking pan.
  2. Cover and let rise for another 30-45 minutes.

Step 4: Bake to Perfection

  1. Preheat the oven to 180°C (350°F).
  2. Brush the dough with egg yolk and sprinkle with sesame seeds if desired.
  3. Bake for 18-22 minutes or until golden brown and fluffy.

Step 5: Cool & Serve

  1. Let the bread cool slightly before serving. Enjoy warm or at room temperature!

Nutritional Information (Per Serving – Approx.)

NutrientAmount (Approx.)
Calories180 kcal
Protein5 g
Carbohydrates32 g
Fats4 g
Fiber1 g
Sugar6 g

The Secrets to Perfect Soft Milk Bread

1. Use Warm Milk for the Best Rise

Warm milk activates the yeast properly, leading to a beautifully risen, fluffy bread. The ideal temperature is around 38-40°C (100-105°F)—warm to the touch but not too hot.

2. Knead Until the Dough is Smooth and Elastic

A well-kneaded dough is the key to soft, stretchy bread. Knead the dough for at least 8-10 minutes until it becomes smooth and slightly bouncy.

3. Let the Dough Rise Fully

Patience is essential when making bread. Let the dough double in size during the first rise. A properly risen dough will have a light, airy texture after baking.

4. Brush with Egg Yolk for a Beautiful Golden Crust

Brushing the bread with egg yolk before baking creates a lovely golden-brown finish. If you prefer a softer crust, brush with milk instead.

5. Bake at the Right Temperature

Baking at 180°C (350°F) ensures even cooking. The bread should be golden on the outside and fully cooked inside without drying out.

Creative Ways to Enjoy Soft Milk Bread

1. Classic Buttered Bread

Enjoy it warm with butter and honey for a simple yet indulgent treat.

2. Homemade French Toast

Turn this bread into the fluffiest French toast by soaking it in an egg-milk mixture and pan-frying it to golden perfection.

3. Perfect for Sandwiches

Use it for grilled cheese, ham and cheese sandwiches, or even peanut butter and jam.

4. Make It Sweet

Dust it with powdered sugar, drizzle it with chocolate, or fill it with custard or Nutella for a sweet version.

5. Serve It with Soup

This bread pairs beautifully with creamy soups like tomato soup, pumpkin soup, or mushroom soup.

Frequently Asked Questions (FAQs)

Q1: Can I use water instead of milk?

You can, but the bread won’t be as rich or soft. Milk adds flavor, moisture, and tenderness that water alone can’t provide.

Q2: How do I store this bread?

Store it in an airtight container at room temperature for up to 3 days. If storing longer, freeze it for up to 2 months and reheat when needed.

Q3: Can I use whole wheat flour instead of white flour?

Yes, but the texture will be denser. If using whole wheat flour, mix it with half white flour for a balance between softness and nutrition.

Q4: What if I don’t have milk powder?

Milk powder enhances the softness and flavor, but if you don’t have it, you can omit it or replace it with an extra tablespoon of flour.

Q5: Can I make this bread without yeast?

This recipe relies on yeast for its texture. However, you can try baking powder or sourdough starter as a substitute, but the texture will be different.

Q6: How can I make this dairy-free?

Use plant-based milk (like almond or oat milk) and replace butter with coconut oil or vegan butter.

Q7: Why didn’t my bread rise properly?

  • Your yeast might be expired—always check the date.
  • The milk might have been too hot or too cold—yeast needs the right temperature to activate.
  • The dough wasn’t left to rise long enough—give it enough time in a warm place.

Conclusion: A Bread Worth Baking Again and Again

There’s something deeply satisfying about baking your own bread. The process itself—mixing, kneading, waiting, baking, and finally tasting—is an experience that connects us to the heart of homemade food.

This soft milk bread isn’t just delicious; it’s a reminder that the simplest ingredients can create something truly special. Whether you’re making it for yourself, for family, or to share with friends, it’s a recipe that brings people together.

So, next time you crave fresh, warm bread, skip the store-bought version and try this homemade recipe instead. One bite of its pillowy softness, buttery richness, and subtle sweetness, and you’ll understand why this bread has been loved for generations.

Amal

Soft Milk Bread – A Timeless Comfort in Every Bite

This soft milk bread is incredibly fluffy, slightly sweet, and irresistibly tender. Made with simple pantry staples like flour, milk, and butter, this bread is perfect for breakfast, sandwiches, or enjoying with a smear of butter and jam. Whether you’re baking it for a cozy morning treat or to share with loved ones, this homemade bread will quickly become a favorite!
Prep Time 15 minutes
Cook Time 20 minutes
Total Time 35 minutes
Servings: 6 rolls
Course: Bread
Cuisine: International

Ingredients
  

  • For the Dough
  • 150 ml ⅔ cup warm milk
  • 6 g 2 tsp yeast
  • 250 g 2 cups wheat flour
  • 50 g ¼ cup powdered sugar
  • ¼ tsp salt
  • 10 g 1 tbsp milk powder
  • 15 g 1 tbsp unsalted butter
  • For Brushing & Topping
  • 1 egg yolk for brushing
  • 1 tsp sesame seeds optional, for topping

Method
 

  1. Prepare the Dough: In a bowl, dissolve yeast in warm milk and let sit for 5-10 minutes until foamy. In a separate bowl, combine flour, powdered sugar, salt, and milk powder. Add the yeast mixture and knead until a soft dough forms. Incorporate butter and continue kneading for 8-10 minutes until smooth.
  2. First Rise: Cover the dough and let it rise in a warm place for 1-1.5 hours, or until doubled in size.
  3. Shape the Bread: Punch down the dough, shape it into rolls or a loaf, and place it in a greased baking pan. Cover and let rise for another 30-45 minutes.
  4. Bake: Preheat the oven to 180°C (350°F). Brush the dough with egg yolk and sprinkle with sesame seeds if desired. Bake for 18-22 minutes or until golden brown and fluffy.
  5. Cool & Serve: Let the bread cool slightly before serving. Enjoy warm or at room temperature!

Notes

  • For extra softness, brush with melted butter after baking.
  • Make it sweeter by adding a drizzle of honey or jam.
  • Store leftovers in an airtight container for up to 3 days.
  • Freeze for later and reheat before serving.

Cheesy Mozzarella & Salami Stuffed Bread – A Savory Delight

There are some recipes that instantly transport us to moments of warmth and togetherness. For me, this cheesy mozzarella and salami stuffed bread is one of those meals. It reminds me of cozy Sunday mornings with my family, when my mother would transform a simple loaf of bread into something extraordinary.

She always had a knack for making delicious meals out of what seemed like basic ingredients. A day-old loaf of bread? Not a problem. With eggs, cheese, and a few toppings, she would turn it into a meal that brought everyone to the table. The scent of baking bread, melted cheese, and sizzling salami would fill the house, making it impossible to wait until it was done.

This dish became a tradition. Sometimes, we’d switch up the ingredients—adding fresh herbs, swapping salami for ham, or using different cheeses—but the essence remained the same. Now, whenever I make this stuffed bread, I’m reminded of those mornings, of laughter around the breakfast table, and of the simple joy of a homemade meal shared with loved ones.

Whether you’re making this for a weekend brunch, a quick weeknight dinner, or as a fun party snack, this recipe is sure to become a favorite in your home too.

Why You’ll Love This Recipe

1. Quick and Easy to Make

This stuffed bread requires just a few basic ingredients and minimal prep time. It’s perfect for when you need something filling and delicious but don’t want to spend hours in the kitchen.

2. Great Way to Use Day-Old Bread

Instead of letting that loaf of bread go to waste, turn it into a cheesy, savory masterpiece. The slightly firmer texture of day-old bread holds up beautifully, soaking in all the flavors of the creamy egg mixture.

3. Perfect for Any Occasion

Whether you’re making it for breakfast, brunch, lunch, or dinner, this dish fits any mealtime. It’s also an excellent party snack—just slice it up and watch it disappear!

4. Completely Customizable

You can easily adapt this recipe to your taste by switching out the cheese, using different meats, or adding vegetables and herbs for extra freshness.

5. A Family-Friendly Crowd-Pleaser

With crispy bread, melted cheese, and flavorful salami, this dish is something both kids and adults will love.

Ingredients

For the Stuffed Bread

IngredientAmount
Eggs4
SaltTo taste
Sour cream2-3 tablespoons
Bread loaf1 (preferably day-old)
Cherry tomatoes5, chopped
Ketchup or sauce2 tablespoons
Mozzarella cheese½ cup, grated
Salami100 g, sliced
Milk60 ml
Black pepperTo taste
Parmesan cheese40 g, grated
Spring onions1 bunch, chopped
Fresh parsleyFor garnish

Directions

Step 1: Prepare the Bread

  1. Preheat the oven to 180°C (350°F).
  2. Cut the top off the bread loaf and hollow out the inside, leaving a sturdy shell.

Step 2: Make the Filling

  1. In a bowl, whisk together eggs, milk, sour cream, salt, and black pepper.
  2. Stir in chopped cherry tomatoes, mozzarella, salami, Parmesan cheese, and spring onions.

Step 3: Assemble and Bake

  1. Spread ketchup or sauce inside the hollowed bread, then pour in the egg mixture.
  2. Bake for 20-25 minutes or until golden and set.

Step 4: Serve & Enjoy

  1. Garnish with fresh parsley, slice, and serve warm.

Nutritional Information (Per Serving – Approx.)

NutrientAmount (Approx.)
Calories320 kcal
Protein15 g
Carbohydrates28 g
Fats18 g
Fiber2 g
Sodium480 mg

The Secrets to Making the Best Stuffed Bread

1. Choosing the Right Bread

A firm loaf of bread works best for this recipe. A French baguette, Italian bread, or sourdough loaf holds its shape well and develops a crispy crust when baked. Avoid soft sandwich bread, as it won’t hold up to the filling.

2. Whisking the Egg Mixture Properly

The eggs, milk, and sour cream should be whisked until smooth to ensure a creamy, custard-like texture. This step is key to achieving a filling that is soft, yet holds together when sliced.

3. Layering the Ingredients Evenly

Distribute the cheese, salami, and vegetables evenly so that every bite is filled with flavor. Placing a little cheese on top before baking creates a beautiful golden, melted topping.

4. Baking at the Right Temperature

Baking at 180°C (350°F) ensures that the filling sets without overcooking, while the bread becomes crispy on the outside. If the top browns too quickly, cover it loosely with foil.

5. Letting It Rest Before Slicing

Allowing the bread to cool for a few minutes before cutting helps the filling set, making it easier to slice without falling apart.

Creative Ways to Serve Cheesy Stuffed Bread

1. Serve with a Fresh Salad

Balance the richness of the cheese and salami with a light side salad. A simple arugula and cherry tomato salad with balsamic dressing pairs beautifully.

2. Pair with a Warm Soup

This bread goes wonderfully with a bowl of tomato soup, mushroom soup, or creamy potato soup. The crispy crust soaks up the broth perfectly.

3. Make It a Party Appetizer

Slice the stuffed bread into smaller pieces and serve it as finger food at gatherings. It’s an easy-to-share dish that guests will love.

4. Add a Spicy Kick

If you like heat, sprinkle some red pepper flakes, chopped jalapeños, or spicy sausage into the filling.

5. Enjoy It for Breakfast

Pair it with scrambled eggs or a fried egg on top for an extra protein-packed morning meal.

Frequently Asked Questions (FAQs)

Q1: Can I make this recipe ahead of time?

Yes! You can prepare the stuffed bread, cover it, and store it in the refrigerator for up to 12 hours before baking. When ready, bake it straight from the fridge, adding an extra 5 minutes to the cooking time.

Q2: Can I freeze this stuffed bread?

Absolutely! Wrap the baked stuffed bread in foil and freeze for up to 2 months. To reheat, bake at 180°C (350°F) for 10-15 minutes until warmed through.

Q3: What other cheeses can I use?

Besides mozzarella and Parmesan, you can try:

  • Cheddar for a sharper taste
  • Gouda for a creamy texture
  • Feta for a salty, tangy flavor
  • Gruyère for a nutty, rich depth

Q4: What can I substitute for salami?

If you’re looking for alternatives, try:

  • Ham or turkey for a lighter version
  • Bacon for a smoky taste
  • Sautéed mushrooms or spinach for a vegetarian option

Q5: How do I prevent the filling from spilling out?

Make sure to press the filling down gently and pour the egg mixture in slowly. You can also wrap the bottom of the loaf in foil to help it hold its shape.

Q6: Can I air-fry this recipe?

Yes! Air-fry at 175°C (350°F) for 12-15 minutes or until the cheese is melted and the bread is crispy.

Q7: How do I store leftovers?

Store leftovers in an airtight container in the fridge for up to 2 days. Reheat in the oven at 180°C (350°F) for 5-10 minutes for the best texture.

Conclusion: A Simple Dish with Big Flavor

This cheesy mozzarella and salami stuffed bread proves that some of the best meals come from the simplest ingredients. It’s crispy on the outside, gooey on the inside, and filled with flavors that make every bite satisfying.

Whether you’re making it for a quick family meal, a cozy brunch, or as a party appetizer, this dish is guaranteed to impress. It’s the kind of food that brings people together—just like it did in my childhood home.

So next time you have a loaf of bread and a few simple ingredients, try this recipe. One bite, and it just might become your new favorite too.

Amal

Cheesy Mozzarella & Salami Stuffed Bread – A Savory Delight

This cheesy mozzarella and salami stuffed bread is the perfect combination of crispy bread, gooey melted cheese, and savory salami. With a creamy egg mixture that binds everything together, this dish is easy to make and bursting with flavor. Serve it as a hearty breakfast, a quick lunch, or a delicious party appetizer that everyone will love!
Prep Time 10 minutes
Cook Time 25 minutes
Total Time 35 minutes
Servings: 4 –6 servings
Course: Snack
Cuisine: European

Ingredients
  

  • For the Stuffed Bread
  • 4 eggs
  • Salt to taste
  • 2-3 tablespoons sour cream
  • 1 loaf of bread preferably day-old
  • 5 cherry tomatoes chopped
  • 2 tablespoons ketchup or other sauce of choice
  • ½ cup mozzarella cheese grated
  • 100 g salami sliced
  • 60 ml milk
  • Black pepper to taste
  • 40 g Parmesan cheese grated
  • 1 bunch spring onions chopped
  • Fresh parsley for garnish

Method
 

  1. Prepare the Bread: Preheat the oven to 180°C (350°F). Cut the top off the bread loaf and hollow out the inside, leaving a sturdy shell.
  2. Make the Filling: In a bowl, whisk together eggs, milk, sour cream, salt, and black pepper. Stir in chopped cherry tomatoes, mozzarella, salami, Parmesan cheese, and spring onions.
  3. Assemble the Stuffed Bread: Spread ketchup or sauce inside the hollowed-out bread, then pour in the egg mixture.
  4. Bake: Place in the oven and bake for 20-25 minutes, or until the filling is set and golden brown on top.
  5. Garnish & Serve: Sprinkle with fresh parsley, slice, and serve warm.

Notes

  • For a crispier crust, brush the outside of the bread with olive oil before baking.
  • Try different cheeses like gouda, cheddar, or feta for a new twist.
  • Add extra veggies like bell peppers, mushrooms, or spinach for more flavor.
  • Store leftovers in the fridge for up to 2 days, and reheat in the oven before serving.

Fluffy Cheese-Stuffed Bread – My Father’s Favorite Recipe

Some recipes become more than just food; they turn into cherished traditions. For me, this fluffy cheese-stuffed bread is exactly that. It’s simple, made with just flour, yeast, milk, and cheese, but it carries so much meaning.

Growing up, my father always preferred homemade food over store-bought treats. He didn’t ask for much, but whenever I made this bread, his eyes would light up like a child’s. He would sit at the table, waiting for the warm, golden rolls to come out of the oven, the smell of freshly baked dough filling the house.

I remember the first time I made it—nervous, hoping it would turn out as soft and delicious as I imagined. When I handed him a warm roll, filled with melted cheese, he took one bite, smiled, and said, “This is it. Make this again.” From that day on, it became a staple in our home.

Now, every time I make this bread, I think of him—his love for simple yet comforting food, his appreciation for homemade flavors, and how something as basic as bread and cheese can bring so much joy.

If you’re looking for a soft, easy-to-make bread recipe, this one is for you. It’s affordable, requires only pantry staples, and is perfect for breakfast, snacks, or alongside a warm bowl of soup.

Why You’ll Love This Recipe

1. Incredibly Soft and Fluffy

This bread is light and airy, thanks to the perfect balance of yeast, milk, and flour. It has a delicate texture that makes each bite melt in your mouth.

2. Made with Simple, Affordable Ingredients

You only need a few basic ingredients that you likely already have—flour, milk, yeast, salt, sugar, and cheese. It’s budget-friendly yet feels like a gourmet treat.

3. Perfect for Any Meal

Serve it warm for breakfast, lunch, or dinner. It pairs beautifully with soup, salads, or even just a cup of tea.

4. Easy to Make, Even for Beginners

This recipe requires no special skills—just mix, knead, let it rise, and bake! The result? Golden, fluffy bread with a creamy cheese filling.

5. Versatile and Customizable

While triangular cheese is a classic filling, you can experiment with mozzarella, feta, or even a sweet version with chocolate or jam.

Ingredients

IngredientAmountPreparation
Milk400 mlWarmed
Flour4 cups (600 g)
Salt1 teaspoon (5 g)
Sugar2 tablespoons (26 g)
Yeast1 tablespoon (8 g)
Sesame seedsAs neededFor topping
Triangular cheeseAs neededFor filling

Directions

Step 1: Prepare the Dough

  1. In a bowl, combine warm milk, sugar, and yeast. Let sit for 5-10 minutes until foamy.
  2. Add flour and salt, then knead into a smooth dough. Cover and let rise for 1 hour.

Step 2: Shape & Fill the Dough

  1. Divide the dough into equal portions. Flatten each piece and place a triangular cheese in the center.
  2. Fold and seal the dough around the cheese, forming round or triangular shapes.

Step 3: Add Sesame & Bake

  1. Brush with milk or water and sprinkle with sesame seeds.
  2. Bake at 180°C (350°F) for 20-25 minutes or until golden brown.

Step 4: Serve & Enjoy

  1. Let cool slightly before serving. Enjoy warm, soft, and cheesy bread!

Nutritional Information (Per Serving – Approx.)

NutrientAmount (Approx.)
Calories220 kcal
Protein7 g
Carbohydrates40 g
Fats5 g
Fiber2 g
Sodium300 mg

The Secrets to Making the Best Fluffy Bread

1. Use Warm Milk for the Dough

Using warm (not hot) milk activates the yeast properly, helping the dough rise beautifully. If the milk is too hot, it can kill the yeast; too cold, and the dough won’t rise as well.

2. Knead the Dough Until Smooth

A well-kneaded dough is elastic and soft, leading to the fluffiest texture. Aim for at least 8-10 minutes of kneading.

3. Let the Dough Rise in a Warm Place

For the best texture, allow the dough to rise until doubled in size. This ensures the bread is light, airy, and soft when baked.

4. Don’t Overload with Cheese

While it’s tempting to add extra cheese, too much can cause the filling to leak out during baking. Stick to a moderate amount for the best balance of flavors.

5. Brush with Milk or Butter for a Golden Crust

Brushing the dough with milk or melted butter before baking gives it a beautiful golden color and enhances its soft texture.

Creative Ways to Enjoy This Bread

1. Serve with a Side of Soup

This bread is perfect alongside creamy soups like tomato, mushroom, or lentil soup. The fluffy texture soaks up the broth beautifully.

2. Make a Sweet Version

Instead of cheese, try filling the dough with chocolate, jam, or sweetened cream cheese for a dessert-style bread.

3. Turn It into a Sandwich

Slice the bread open and fill it with fresh vegetables, grilled chicken, or smoked salmon for a delicious sandwich.

4. Toast and Spread with Butter

For a simple yet tasty snack, toast the bread and spread butter or honey over it.

5. Freeze for Later

Make extra and freeze the rolls. When you’re ready to eat them, just reheat in the oven for a fresh, warm treat.

Frequently Asked Questions (FAQs)

Q1: Can I use water instead of milk?

Yes, but milk makes the bread softer and richer in flavor. If using water, add a little extra butter or oil to keep it soft.

Q2: How do I store leftover bread?

Keep it in an airtight container at room temperature for up to 3 days. For longer storage, freeze the bread and reheat before serving.

Q3: Can I use whole wheat flour instead of all-purpose flour?

Yes, but whole wheat flour makes the bread denser. Try using half whole wheat and half all-purpose flour for a good balance.

Q4: How do I prevent the cheese from leaking out?

Make sure to seal the dough tightly around the cheese, and avoid overfilling.

Q5: Can I make this bread without yeast?

Yes! You can use baking powder instead, but the texture will be more like a biscuit rather than fluffy bread.

Q6: What other cheeses work well in this recipe?

Besides triangular cheese, you can use cheddar, mozzarella, feta, or even a mix of cheeses for different flavors.

Q7: Can I make the dough ahead of time?

Yes! You can let the dough rise in the fridge overnight and bake it fresh in the morning.

Conclusion: A Simple Recipe with a Big Impact

This cheese-stuffed bread may be made with simple ingredients, but it carries deep meaning. It’s a dish that brings families together, fills homes with warmth, and reminds us of the beauty of homemade food.

For me, it will always be the bread my father asks for—a recipe that connects the past with the present. It’s a reminder that the best meals aren’t always the most complicated; sometimes, all you need is flour, cheese, and love.

So next time you’re in the kitchen, give this recipe a try. Make it for yourself, for your family, or for someone you love. Because sometimes, the simplest dishes bring the greatest joy.

Amal

Fluffy Cheese-Stuffed Bread – My Father’s Favorite Recipe

This fluffy cheese-stuffed bread is made with simple, budget-friendly ingredients like flour, yeast, milk, and soft cheese. The result is a warm, soft, and slightly chewy bread filled with melty cheese. Perfect for breakfast, snacks, or alongside soup, this easy homemade bread is a family favorite that you’ll want to make again and again.
Prep Time 15 minutes
Cook Time 25 minutes
Total Time 40 minutes
Servings: 8 -10 pieces
Course: Snack
Cuisine: International

Ingredients
  

  • For the Dough
  • 400 ml warm milk
  • 4 cups 600 g all-purpose flour
  • 1 teaspoon 5 g salt
  • 2 tablespoons 26 g sugar
  • 1 tablespoon 8 g yeast
  • For the Filling & Topping
  • Triangular cheese as needed
  • Sesame seeds as needed

Method
 

  1. Prepare the Dough: In a bowl, mix warm milk, sugar, and yeast. Let sit for 5-10 minutes until foamy. Add flour and salt, then knead until smooth. Cover and let rise for 1 hour.
  2. Shape and Fill: Divide the dough into equal portions. Flatten each piece, place a triangular cheese in the center, and seal the edges tightly.
  3. Add Topping: Brush with milk or water and sprinkle with sesame seeds.
  4. Bake: Preheat the oven to 180°C (350°F). Bake for 20-25 minutes or until golden brown.
  5. Serve and Enjoy: Let cool slightly before serving. Best enjoyed warm with tea or soup.

Notes

  • For a crispier crust, brush with butter after baking.
  • Try different fillings like mozzarella, feta, or cream cheese for variety.
  • Store leftovers in an airtight container for up to 3 days or freeze for later.
  • For a sweet version, swap the cheese for chocolate or jam.

Zucchini & Eggplant Ratatouille: A Meat-Free Treasure of Flavors

Some recipes are more than just food—they are stories, emotions, and cherished traditions passed down through generations. This Zucchini & Eggplant Ratatouille is one of those dishes for me.

I remember summer afternoons in my grandmother’s kitchen, where the air was filled with the scent of roasting vegetables and fresh herbs. She grew her own zucchini and eggplant in a small garden behind the house, and every year, we’d gather them at their peak ripeness to make this dish. She never rushed the process—every ingredient was carefully sliced, sautéed, and layered with love.

Unlike the meat-heavy meals we often had, this dish felt light, comforting, and bursting with natural flavors. It was a celebration of fresh produce, slow cooking, and simple yet delicious ingredients. Now, as an adult, I continue to make it—not just because it tastes incredible, but because it reminds me of home.

If you’ve never made ratatouille, you’re in for a treat. It’s rich yet healthy, creamy yet fresh, and it showcases vegetables in the most delicious way possible.

Why This Ratatouille Will Become Your Favorite Meat-Free Dish

1. Packed with Vibrant, Fresh Flavors

Every bite of this dish is filled with the natural sweetness of zucchini, the earthiness of eggplant, and the slight tang of tomatoes. The combination of creamy milk, rich Parmesan cheese, and aromatic herbs brings everything together beautifully.

2. Completely Satisfying Without Meat

Many people think a dish needs meat to be filling, but this ratatouille proves otherwise. The creamy texture, layers of flavors, and hearty vegetables make this a deeply satisfying meal.

3. Easy to Make Yet Impressively Elegant

Despite its impressive appearance, this dish is surprisingly easy to prepare. Whether you’re making it for a quick family dinner or serving it at a dinner party, it always looks and tastes gourmet.

4. Nutritious and Wholesome

Made entirely from fresh vegetables, healthy fats, and natural seasonings, this ratatouille is packed with fiber, vitamins, and antioxidants. It’s gluten-free, meat-free, and can easily be adapted for dairy-free diets.

5. Versatile and Customizable

You can enjoy it on its own, as a side dish, or served over pasta, rice, or crusty bread. Plus, it’s easy to tweak based on what vegetables and spices you have on hand.

Ingredients

For the Ratatouille

IngredientAmountPreparation
Zucchini2 smallSliced
Eggplant2 smallSliced
SaltTo taste
Onion1, chopped
Vegetable oilAs neededFor frying
Garlic3 cloves, minced
Carrot1, sliced
Bell pepper1 (red, yellow, or orange)Sliced
Tomatoes3, diced
Mushrooms7, sliced
Milk cream350 mlUse low-fat for a lighter option
Ground black pepperTo taste
Fresh parsleyAs neededChopped, for garnish
Parmesan cheese200 gGrated

Directions

Step 1: Prepare the Vegetables

  1. Slice the zucchini and eggplant, then sprinkle with salt and let them sit for 10 minutes to remove excess moisture. Pat dry before cooking.

Step 2: Sauté the Aromatics

  1. In a large pan, heat vegetable oil over medium heat. Sauté the onion and garlic until soft and fragrant.

Step 3: Cook the Vegetables

  1. Add the carrot, bell pepper, and mushrooms, stirring occasionally. Cook for 5 minutes.
  2. Stir in the tomatoes and let them simmer until softened.

Step 4: Combine Everything

  1. Add the zucchini and eggplant to the pan and mix well. Cook for another 5 minutes.
  2. Pour in the milk cream, season with black pepper and salt, and let it simmer for a few minutes.

Step 5: Add the Cheese & Garnish

  1. Stir in the grated Parmesan cheese until melted and well combined.
  2. Remove from heat and sprinkle with fresh parsley.

Step 6: Serve & Enjoy

  1. Serve warm as a main dish or side, paired with crusty bread or over pasta.

Nutritional Information (Per Serving)

NutrientAmount (Approx.)
Calories280 kcal
Protein10 g
Carbohydrates20 g
Fats18 g
Fiber4 g
Sodium450 mg

The Secrets to a Perfect Zucchini & Eggplant Ratatouille

1. Choose the Right Vegetables

The key to a great ratatouille is using fresh, high-quality vegetables. Look for zucchini and eggplant that are firm and glossy, with no soft spots. The fresher your ingredients, the better the dish will taste.

2. Remove Excess Moisture for the Best Texture

Eggplant and zucchini contain a lot of water, which can make the dish watery if not prepared properly. Salting the slices and letting them sit for 10 minutes helps draw out excess moisture, resulting in a more concentrated flavor and firmer texture.

3. Sauté the Vegetables Separately

Cooking each vegetable separately before combining them helps to preserve their individual flavors and textures. It also ensures that everything is cooked evenly and to perfection.

4. Let It Simmer for Maximum Flavor

The magic of ratatouille happens when the ingredients have time to meld together over gentle heat. The longer you let it simmer, the deeper and richer the flavors become.

5. Finish with Parmesan for Creamy Perfection

The final touch of grated Parmesan cheese takes this dish to another level. It adds a slight saltiness and creamy texture, making every bite irresistible.

Creative Ways to Serve Zucchini & Eggplant Ratatouille

1. Over Pasta or Rice

For a more filling meal, serve the ratatouille over cooked pasta, quinoa, or brown rice. The creamy sauce coats the grains beautifully.

2. With Crusty Bread

Pairing this dish with a loaf of warm, rustic bread allows you to soak up all the delicious juices.

3. As a Side Dish

Serve alongside grilled fish, roasted chicken, or tofu for a complete and balanced meal.

4. Stuffed into a Baked Potato

For a creative twist, use this ratatouille as a filling for baked sweet potatoes or regular potatoes.

5. Topped with a Fried Egg

A simple fried or poached egg on top makes this dish even more satisfying, perfect for a hearty brunch or dinner.

Frequently Asked Questions (FAQs)

Q1: Can I make this dish vegan?

Yes! Simply replace the milk cream with coconut cream or cashew cream, and use nutritional yeast instead of Parmesan cheese for a dairy-free version.

Q2: How do I store leftovers?

Store any leftovers in an airtight container in the refrigerator for up to 3 days. The flavors actually deepen over time, making it even more delicious the next day!

Q3: Can I freeze ratatouille?

Absolutely! Let it cool completely, then transfer to freezer-safe containers. It can be frozen for up to 2 months. Thaw overnight in the fridge and reheat on the stove.

Q4: What other vegetables can I add?

You can customize this dish with squash, baby spinach, leeks, or even cauliflower. Just make sure to adjust the cooking time accordingly.

Q5: Can I make this without dairy?

Yes! You can omit the cream entirely or use a dairy-free alternative. The dish will still be rich and flavorful thanks to the natural sweetness of the vegetables.

Q6: What’s the best way to reheat this dish?

For the best texture, reheat it gently on the stove over low heat, stirring occasionally. You can also reheat it in the oven at 180°C (350°F) for 10-15 minutes.

Q7: Can I serve this cold?

Yes! Ratatouille can also be enjoyed cold or at room temperature, making it a perfect dish for summer picnics or light lunches.

Conclusion: A Meat-Free Dish That Feels Like Home

This Zucchini & Eggplant Ratatouille is more than just a recipe—it’s a celebration of simple ingredients, slow cooking, and deep, comforting flavors. It’s proof that you don’t need meat to create a meal that is rich, satisfying, and packed with flavor.

Whether you make it for a family gathering, a dinner with friends, or a quiet meal for yourself, this dish is sure to bring warmth and joy to your table. And if you have leftovers? Even better—it tastes even more delicious the next day.

So grab your freshest vegetables, take your time with the process, and enjoy the magic of homemade ratatouille. One bite, and you’ll see why this recipe is truly a meat-free treasure.

Amal

Zucchini & Eggplant Ratatouille: A Meat-Free Treasure of Flavors

This Zucchini & Eggplant Ratatouille is a delicious and hearty dish that proves you don’t need meat for a satisfying meal. Made with tender zucchini, eggplant, bell peppers, mushrooms, and a rich, creamy sauce, this dish is packed with flavor and perfect for any occasion. Whether served as a main dish with crusty bread or as a flavorful side, it’s a simple yet elegant way to enjoy fresh vegetables.
Prep Time 15 minutes
Cook Time 30 minutes
Total Time 45 minutes
Servings: 4 servings
Course: Main Dish
Cuisine: French-inspired

Ingredients
  

  • For the Ratatouille
  • 2 small zucchini sliced
  • 2 small eggplant sliced
  • Salt to taste
  • 1 onion chopped
  • Vegetable oil for frying
  • 3 cloves garlic minced
  • 1 carrot sliced
  • 1 bell pepper red, yellow, or orange, sliced
  • 3 tomatoes diced
  • 7 mushrooms sliced
  • 350 ml milk cream or low-fat cream for a lighter option
  • Ground black pepper to taste
  • Fresh parsley chopped (for garnish)
  • 200 grams Parmesan cheese grated

Method
 

  1. Prepare the Vegetables: Sprinkle salt over the sliced zucchini and eggplant. Let them sit for 10 minutes, then pat dry with a paper towel to remove excess moisture.
  2. Sauté the Aromatics: Heat vegetable oil in a pan over medium heat. Sauté the onion and garlic until soft and fragrant.
  3. Cook the Vegetables: Add the carrot, bell pepper, and mushrooms. Cook for 5 minutes, stirring occasionally.
  4. Add Tomatoes and Simmer: Stir in the diced tomatoes and let them simmer until softened.
  5. Combine Everything: Add the zucchini and eggplant to the pan, mixing well. Cook for another 5 minutes.
  6. Add the Cream and Cheese: Pour in the milk cream, season with black pepper and salt, and let it simmer for a few minutes. Stir in the grated Parmesan cheese until melted and fully combined.
  7. Garnish and Serve: Remove from heat and sprinkle with fresh parsley. Serve warm with crusty bread, pasta, or as a side dish.

Notes

  • For a vegan version, substitute milk cream with coconut cream or cashew cream and use nutritional yeast instead of Parmesan cheese.
  • To enhance the flavors, roast the vegetables before adding them to the pan.
  • Store leftovers in an airtight container in the fridge for up to 3 days.
  • Make it spicy by adding a pinch of red pepper flakes or smoked paprika.

Crispy Golden Potato Croquettes: A Classic Comfort Food

There are some foods that instantly transport us back to childhood—the kind that brings warmth, nostalgia, and the feeling of home with every bite. Potato croquettes have always been one of those dishes for me.

Growing up, my grandmother made these crispy bites of heaven for every special occasion. Whether it was a holiday dinner, a birthday gathering, or just a cozy weekend treat, her potato croquettes were always the star of the table. She had a way of turning the simplest ingredients—potatoes, cheese, and breadcrumbs—into something magical. I remember sitting on a stool in her kitchen, watching as she carefully shaped each croquette by hand, rolling them in golden crumbs before frying them to crispy perfection. The smell alone was enough to make my mouth water.

She would always let me have the first taste, straight from the pan, still steaming. That first bite was pure bliss—a crisp, golden shell giving way to a soft, cheesy, buttery center. No matter how many times I make them, they still remind me of those moments. Now, whenever I prepare these croquettes for friends and family, I see the same joy on their faces that I felt back then.

If you’ve never made homemade potato croquettes, this recipe will show you just how easy and rewarding it is. These crispy, cheesy bites are the perfect side dish, appetizer, or snack. They’re elegant enough for special occasions, yet simple enough to whip up for a casual treat.

Why You’ll Love These Potato Croquettes

1. The Perfect Crunchy Outside, Creamy Inside

The contrast of crispy, golden breadcrumbs and a smooth, cheesy potato filling makes each bite absolutely irresistible.

2. Simple, Budget-Friendly Ingredients

These croquettes are made with staple ingredients—potatoes, cheese, eggs, and breadcrumbs—making them an affordable, yet impressive dish.

3. Ideal for Any Occasion

Serve them as a side dish, appetizer, or even a snack. They work perfectly for family dinners, holiday feasts, or party platters.

4. Versatile and Customizable

You can easily change the flavors by adding different cheeses, seasonings, or fillings like herbs, bacon, or vegetables.

5. Can Be Baked or Fried

If you prefer a lighter version, these croquettes can be baked instead of fried and still come out crispy and delicious.

Ingredients

For the Croquettes

IngredientAmountPreparation
Potatoes3 medium (500 g)Boiled, mashed
Parmesan cheese½ cup (50 g)Grated
Egg yolk1
Butter2 tablespoonsMelted
Salt½ teaspoon
Black pepper¼ teaspoon
Garlic powder½ teaspoonOptional
Parsley2 tablespoonsChopped, optional

For the Coating

IngredientAmountPreparation
All-purpose flour½ cup (60 g)
Egg1Beaten
Breadcrumbs1 cup (100 g)Panko or regular
OilAs neededFor frying

Directions

Step 1: Prepare the Potato Mixture

  1. In a large bowl, combine mashed potatoes, Parmesan cheese, egg yolk, melted butter, salt, black pepper, garlic powder, and parsley. Mix until smooth.
  2. Shape the mixture into small cylinders or balls and place them on a tray. Refrigerate for 15-20 minutes to firm up.

Step 2: Coat the Croquettes

  1. Roll each croquette in flour, then dip in beaten egg, and finally coat with breadcrumbs, pressing lightly for even coverage.

Step 3: Fry to Golden Perfection

  1. Heat oil in a pan over medium heat. Fry the croquettes in batches for 2-3 minutes per side, until crispy and golden brown.
  2. Transfer to a plate lined with paper towels to remove excess oil.

Step 4: Serve & Enjoy

  1. Serve warm with your favorite dipping sauce, such as garlic aioli, ketchup, or spicy mayo.

Nutritional Information (Per Serving – 2 Croquettes)

NutrientAmount (Approx.)
Calories180 kcal
Protein5 g
Carbohydrates22 g
Fats8 g
Fiber2 g
Sodium250 mg

The Secrets to Perfect Potato Croquettes

1. Use the Right Type of Potatoes

For the best texture, use starchy potatoes like Russet or Yukon Gold. These mash easily and create a smooth, creamy filling.

2. Chill the Mixture Before Shaping

Letting the potato mixture rest in the fridge for 15-20 minutes makes it firmer and easier to shape, preventing the croquettes from falling apart.

3. Double-Coat for Extra Crunch

For an ultra-crispy exterior, dip the croquettes in breadcrumbs twice—once after coating in flour and egg, and again just before frying.

4. Fry at the Right Temperature

Make sure your oil is heated to 175-180°C (350-360°F). If the oil is too hot, the croquettes will brown too quickly and remain undercooked inside; too cold, and they’ll absorb excess oil and become greasy.

5. Let Them Rest After Frying

Place fried croquettes on a paper towel-lined plate to drain excess oil. Let them rest for a few minutes before serving—this allows the crispy coating to set.

Delicious Variations & Additions

1. Cheese-Stuffed Croquettes

For an extra gooey center, insert a cube of mozzarella or cheddar into each croquette before shaping them.

2. Herb & Garlic Infused

Mix in fresh parsley, chives, or thyme along with garlic powder to elevate the flavor.

3. Bacon & Onion Croquettes

Add crispy bacon bits and caramelized onions to the mashed potatoes for a smoky, savory twist.

4. Spicy Croquettes

If you love heat, mix in a pinch of cayenne pepper, smoked paprika, or finely chopped jalapeños.

5. Vegetarian & Vegan Options

  • For a vegetarian version, replace Parmesan with a stronger cheese like feta or gruyère.
  • For a vegan version, swap out the egg for a flaxseed egg and use a plant-based cheese alternative.

Serving Ideas: How to Enjoy Potato Croquettes

1. As a Party Appetizer

Serve croquettes with toothpicks and dipping sauces for an easy party snack.

2. With a Classic Dipping Sauce

Pair them with garlic aioli, ketchup, honey mustard, or spicy mayo for extra flavor.

3. As a Side Dish

They go perfectly with grilled meats, roasted vegetables, or a fresh green salad.

4. In a Sandwich

Place croquettes inside a crusty bread roll with lettuce and a drizzle of sauce for a unique and indulgent sandwich.

5. As a Breakfast Treat

Serve croquettes alongside scrambled eggs and avocado for a hearty breakfast.

Frequently Asked Questions (FAQs)

Q1: Can I make potato croquettes ahead of time?

Yes! Shape the croquettes and store them uncooked in the fridge for up to 2 days before frying or baking.

Q2: Can I freeze croquettes?

Absolutely! Arrange uncooked croquettes on a baking sheet, freeze them, then transfer to a freezer bag. They last up to 2 months. Cook straight from frozen—just add a couple of extra minutes to the cooking time.

Q3: Can I bake croquettes instead of frying?

Yes! Brush them with oil and bake at 200°C (400°F) for 20-25 minutes, flipping halfway through. They won’t be as crispy as fried croquettes but will still be delicious.

Q4: How do I prevent croquettes from falling apart while frying?

Chilling the mixture before shaping and ensuring your oil is at the right temperature helps keep them intact.

Q5: What breadcrumbs work best for croquettes?

Panko breadcrumbs make the crispiest croquettes, but regular breadcrumbs also work well.

Q6: How do I store leftovers?

Keep cooked croquettes in an airtight container in the fridge for up to 3 days. Reheat in the oven or air fryer for the best texture.

Q7: Can I air-fry croquettes?

Yes! Air-fry at 190°C (375°F) for 12-15 minutes, flipping halfway through for even crispiness.

Conclusion: A Comforting Classic That Never Disappoints

Few things in life are as satisfying as biting into a crispy, golden potato croquette. Whether you’re making them for a special gathering, a quick snack, or to relive a childhood memory, these croquettes never fail to bring joy.

They’re simple, budget-friendly, and endlessly versatile, proving that sometimes, the best comfort foods come from the simplest ingredients.

So, the next time you have some leftover mashed potatoes or want to make something crispy, cheesy, and absolutely delicious, give this recipe a try. One bite, and you’ll understand why these croquettes have been a favorite for generations.

Amal

Crispy Golden Potato Croquettes: A Classic Comfort Food

These Crispy Golden Potato Croquettes are the perfect combination of a crunchy exterior and a creamy, cheesy inside. Made with mashed potatoes, Parmesan, and a crispy breadcrumb coating, they are ideal as a side dish, appetizer, or snack. Serve them with your favorite dipping sauce, and enjoy a bite-sized piece of comfort food that’s crispy on the outside and soft on the inside.
Prep Time 15 minutes
Cook Time 10 minutes
Total Time 25 minutes
Servings: 12 croquettes
Course: Snack
Cuisine: European

Ingredients
  

  • For the Croquettes
  • 3 medium potatoes about 500 g, boiled and mashed
  • ½ cup 50 g grated Parmesan cheese
  • 1 egg yolk
  • 2 tablespoons melted butter
  • ½ teaspoon salt
  • ¼ teaspoon black pepper
  • ½ teaspoon garlic powder optional
  • 2 tablespoons chopped parsley optional
  • For the Coating
  • ½ cup 60 g all-purpose flour
  • 1 egg beaten
  • 1 cup 100 g breadcrumbs (panko or regular)
  • Oil for frying

Method
 

  1. Prepare the Potato Mixture: In a bowl, mix mashed potatoes, Parmesan cheese, egg yolk, melted butter, salt, black pepper, garlic powder, and parsley until well combined. Shape into small cylinders or balls and refrigerate for 15-20 minutes to firm up.
  2. Coat the Croquettes: Roll each croquette in flour, then dip in beaten egg, and finally coat with breadcrumbs, ensuring an even layer.
  3. Fry to Perfection: Heat oil in a pan over medium heat. Fry the croquettes in batches for 2-3 minutes per side, until golden brown and crispy.
  4. Drain & Serve: Transfer to a paper towel-lined plate to remove excess oil. Serve warm with garlic aioli, ketchup, or your favorite dipping sauce.

Notes

  • Extra crispy croquettes: Double-coat in breadcrumbs before frying.
  • Baking option: Brush with oil and bake at 200°C (400°F) for 20-25 minutes, flipping halfway.
  • Cheesy surprise: Insert a cube of mozzarella inside each croquette for a gooey center.
  • Make ahead: Store uncooked croquettes in the fridge for up to 2 days or freeze for up to 1 month.

Juicy Stuffed Chicken Rolls: The Best Recipe for Chicken Breast

There was a time when I thought chicken breast was boring—dry, bland, and uninspiring. It was always my least favorite cut of chicken until I discovered this recipe for Juicy Stuffed Chicken Rolls. The first time I had it, my mother made it for a special Sunday dinner. I remember watching her butterfly the chicken with such precision, marinate it in a simple but flavorful mixture, and roll it up with gooey, melted cheese inside. When it came out of the oven, golden and tender, I took one bite and knew this was no ordinary chicken dish.

Since then, this recipe has been a family staple. It’s the perfect way to transform simple chicken breast into something extraordinary. Whether I make it for a cozy family meal or a dinner party, it never fails to impress. The best part? It’s incredibly easy to prepare, yet the final result looks and tastes like a dish straight out of a restaurant.

If you’re looking for the best way to cook chicken breast—something juicy, flavorful, and full of cheesy goodness—this is it.

Why You’ll Love This Recipe

1. No More Dry Chicken Breast

Chicken breast gets a bad reputation for being dry and bland, but this recipe changes everything. The marinade locks in moisture, while the cheese filling melts beautifully, making each bite rich and tender.

2. Quick and Easy to Make

This recipe requires just a few basic ingredients and takes only 30 minutes to bake. It’s perfect for a weeknight dinner when you want something delicious but don’t have hours to spend in the kitchen.

3. Packed with Bold Flavors

From the tanginess of mustard and lemon juice to the richness of olive oil and garlic, every ingredient works together to create a perfectly balanced flavor profile. The cheese filling adds an indulgent touch that makes this dish truly special.

4. Versatile and Customizable

You can experiment with different cheeses, seasonings, and fillings to create endless variations. Whether you add spinach, sun-dried tomatoes, or even wrap the rolls in bacon, there’s no wrong way to make them.

5. Great for Meal Prep

These chicken rolls store well, making them perfect for meal prep. You can even prepare them ahead of time and bake them when needed.

Ingredients

For the Chicken Rolls

IngredientAmount
Chicken fillets2 large, butterflied or pounded thin
SaltTo taste
4-pepper mixTo taste
Egg1, beaten
Mustard1 tablespoon
Lemon juice1 tablespoon
Olive oil2 tablespoons
Garlic cloves2, minced
Parsley1 tablespoon, chopped
Gouda or cheddar cheese100 g, sliced into sticks

Directions

Step 1: Prepare the Chicken

  1. Preheat the oven to 180°C (350°F).
  2. Season the chicken fillets with salt and a 4-pepper mix on both sides.

Step 2: Make the Marinade

  1. In a bowl, mix beaten egg, mustard, lemon juice, olive oil, garlic, and parsley until well combined.

Step 3: Assemble the Rolls

  1. Brush each chicken fillet with the marinade.
  2. Place a cheese stick in the center of each fillet and roll it tightly. Secure with toothpicks if needed.

Step 4: Bake to Perfection

  1. Place the chicken rolls in a greased baking dish and brush with the remaining marinade.
  2. Bake for 25-30 minutes or until golden and fully cooked through.

Step 5: Serve & Enjoy

  1. Let the rolls rest for 5 minutes before slicing. Serve with your favorite sides and enjoy!

Nutritional Information (Per Serving)

NutrientAmount (Approx.)
Calories280 kcal
Protein35 g
Carbohydrates3 g
Fats14 g
Fiber1 g
Sodium450 mg

Secrets to Making the Perfect Stuffed Chicken Rolls

1. Choose the Right Chicken Breast

For the best results, use large, evenly sized chicken fillets. This ensures they cook evenly and are easy to roll without tearing.

2. Marinate for Maximum Flavor

A simple marinade of mustard, lemon juice, garlic, and olive oil adds so much depth to the chicken. Let it sit for at least 15-30 minutes for the best results.

3. Secure the Rolls Properly

Use toothpicks or kitchen twine to keep the rolls in place while baking. This prevents them from unrolling and helps them cook evenly.

4. Don’t Overcook the Chicken

Since chicken breast is lean, it’s important to bake it just until done. An internal temperature of 165°F (75°C) ensures the chicken is juicy, not dry.

5. Let It Rest Before Slicing

Allow the chicken rolls to rest for a few minutes after baking. This helps the juices redistribute, keeping the meat tender and moist.

Delicious Variations & Additions

1. Try Different Cheese Fillings

  • Mozzarella for a mild, creamy melt
  • Feta cheese for a tangy, salty bite
  • Gruyère or Swiss cheese for a nutty, rich flavor

2. Wrap It in Bacon

For extra flavor, wrap each chicken roll in a slice of bacon before baking. The bacon keeps the chicken even juicier while adding a smoky, crispy texture.

3. Add a Vegetable Filling

Stuff the chicken with spinach, mushrooms, or roasted bell peppers for an extra boost of nutrients and flavor.

4. Make It Spicy

For a kick of heat, add a sprinkle of chili flakes or a touch of cayenne pepper to the marinade.

5. Coat It for a Crispy Crust

For extra texture, roll the chicken in panko breadcrumbs before baking. This creates a crispy, golden crust while keeping the inside tender.

Serving Ideas: How to Enjoy Chicken Rolls

1. Pair with Roasted Vegetables

Serve with roasted carrots, zucchini, or asparagus for a balanced and nutritious meal.

2. Serve Over a Bed of Mashed Potatoes

Creamy garlic mashed potatoes complement the juicy chicken perfectly.

3. Add a Fresh Salad on the Side

A simple arugula or Greek salad with a light vinaigrette balances out the richness of the dish.

4. Drizzle with a Creamy Sauce

Serve with a side of garlic butter sauce, mushroom sauce, or a lemon cream sauce for an extra layer of indulgence.

5. Slice and Serve as an Appetizer

Cut the chicken rolls into bite-sized pieces and serve them with toothpicks for an easy party appetizer.

Frequently Asked Questions (FAQs)

Q1: Can I make these chicken rolls ahead of time?

Yes! You can assemble the rolls a day in advance and keep them in the fridge. When ready to cook, just pop them in the oven—no extra prep needed.

Q2: How do I store leftovers?

Leftover chicken rolls can be stored in an airtight container in the fridge for up to 3 days. Reheat in the oven at 180°C (350°F) for 10 minutes to maintain the best texture.

Q3: Can I freeze stuffed chicken rolls?

Absolutely! Freeze them uncooked for up to 2 months. When ready to bake, thaw overnight in the fridge and cook as directed.

Q4: Can I cook these in an air fryer?

Yes! Air fry at 190°C (375°F) for 15-18 minutes, flipping halfway through for even cooking.

Q5: What other seasonings can I use?

Feel free to add Italian seasoning, smoked paprika, or a touch of cumin for extra depth of flavor.

Q6: Can I make this recipe with chicken thighs?

Yes! Boneless, skinless chicken thighs work well and add even more juiciness and flavor.

Q7: What’s the best way to check if the chicken is done?

Use a meat thermometer to ensure the internal temperature reaches 165°F (75°C).

Conclusion: The Only Chicken Breast Recipe You’ll Ever Need

If you’ve ever struggled with dry, flavorless chicken breast, this Juicy Stuffed Chicken Rolls recipe is a game-changer. It’s easy to make, packed with flavor, and endlessly customizable. Whether you’re making it for a simple weeknight meal or a fancy dinner, it’s guaranteed to impress.

This dish proves that chicken breast doesn’t have to be boring—it can be tender, cheesy, and incredibly satisfying. Try it once, and it just might become your new favorite way to cook chicken!

Amal

Juicy Stuffed Chicken Rolls: The Best Recipe for Chicken Breast

This Juicy Stuffed Chicken Rolls recipe takes ordinary chicken breast to the next level! Butterflied chicken fillets are marinated in a flavorful mix of mustard, garlic, and lemon juice, then stuffed with melty cheese before being baked to golden perfection. The result? A tender, juicy, and irresistibly cheesy dish that’s perfect for weeknight dinners or special occasions.
Prep Time 15 minutes
Cook Time 30 minutes
Total Time 45 minutes
Servings: 2 servings
Course: Main Dish
Cuisine: International

Ingredients
  

  • For the Chicken Rolls
  • 2 large chicken fillets butterflied or pounded thin
  • Salt to taste
  • 4- pepper mix to taste
  • 1 egg beaten
  • 1 tablespoon mustard
  • 1 tablespoon lemon juice
  • 2 tablespoons olive oil
  • 2 garlic cloves minced
  • 1 tablespoon parsley chopped
  • 100 g gouda or cheddar cheese sliced into sticks

Method
 

  1. Preheat oven to 180°C (350°F) and grease a baking dish.
  2. Season the chicken fillets with salt and 4-pepper mix on both sides.
  3. Prepare the marinade by whisking together the egg, mustard, lemon juice, olive oil, garlic, and parsley.
  4. Brush the chicken fillets with the marinade and let them sit for at least 15 minutes.
  5. Place a cheese stick in the center of each fillet and roll it tightly. Secure with toothpicks if needed.
  6. Transfer the chicken rolls to the baking dish and brush with the remaining marinade.
  7. Bake for 25-30 minutes or until the chicken is golden brown and cooked through.
  8. Let rest for 5 minutes before slicing. Serve warm and enjoy!

Notes

  • For extra crispiness, coat the chicken in breadcrumbs before baking.
  • Try different cheeses like mozzarella or feta for unique flavors.
  • Storage: Keep leftovers in an airtight container for up to 3 days and reheat in the oven for the best texture.
  • Freezing: Freeze uncooked rolls for up to 2 months. Thaw overnight before baking.
  • Great pairings: Serve with mashed potatoes, roasted vegetables, or a fresh salad.