Single-Serve Blueberry Cobbler: Try This Easy Recipe!

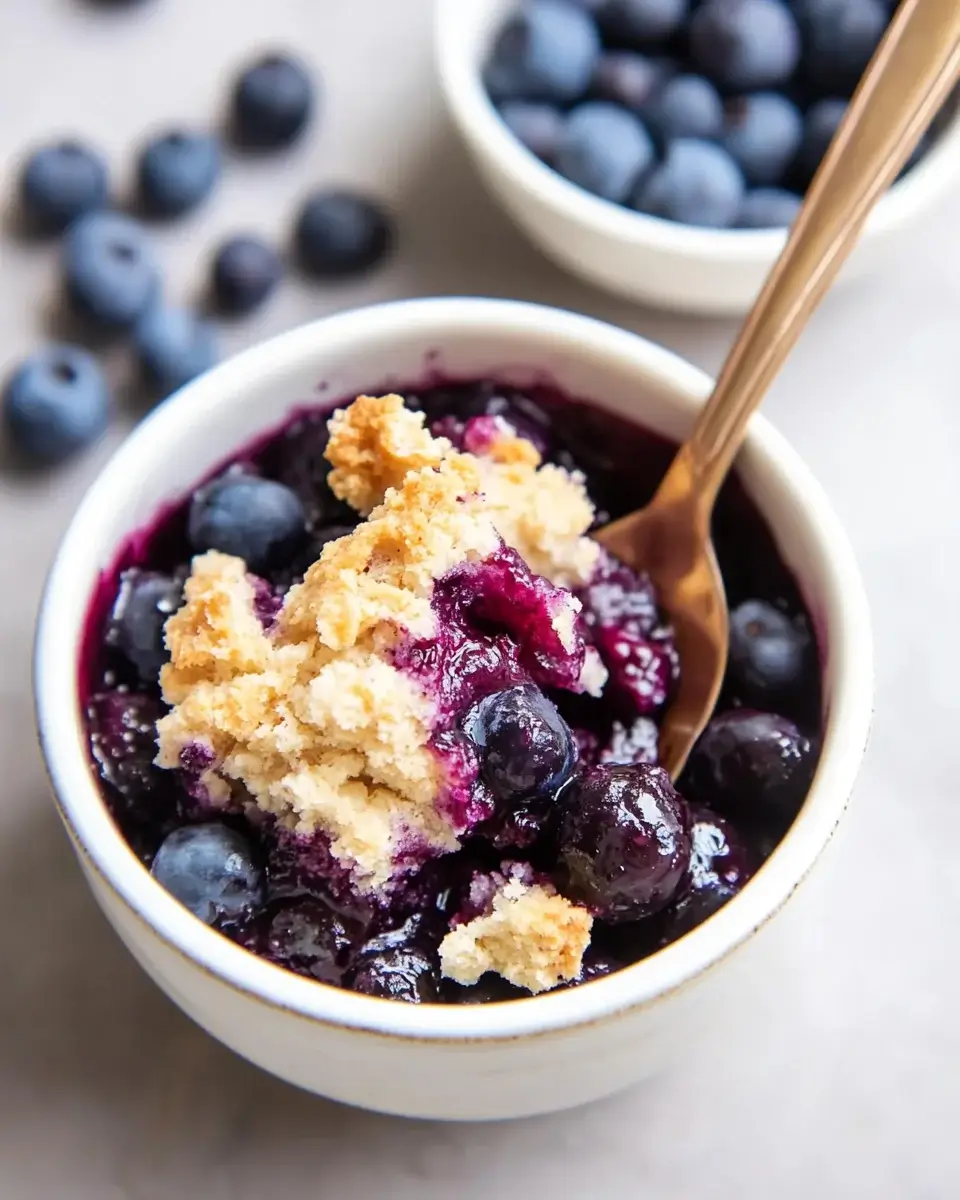
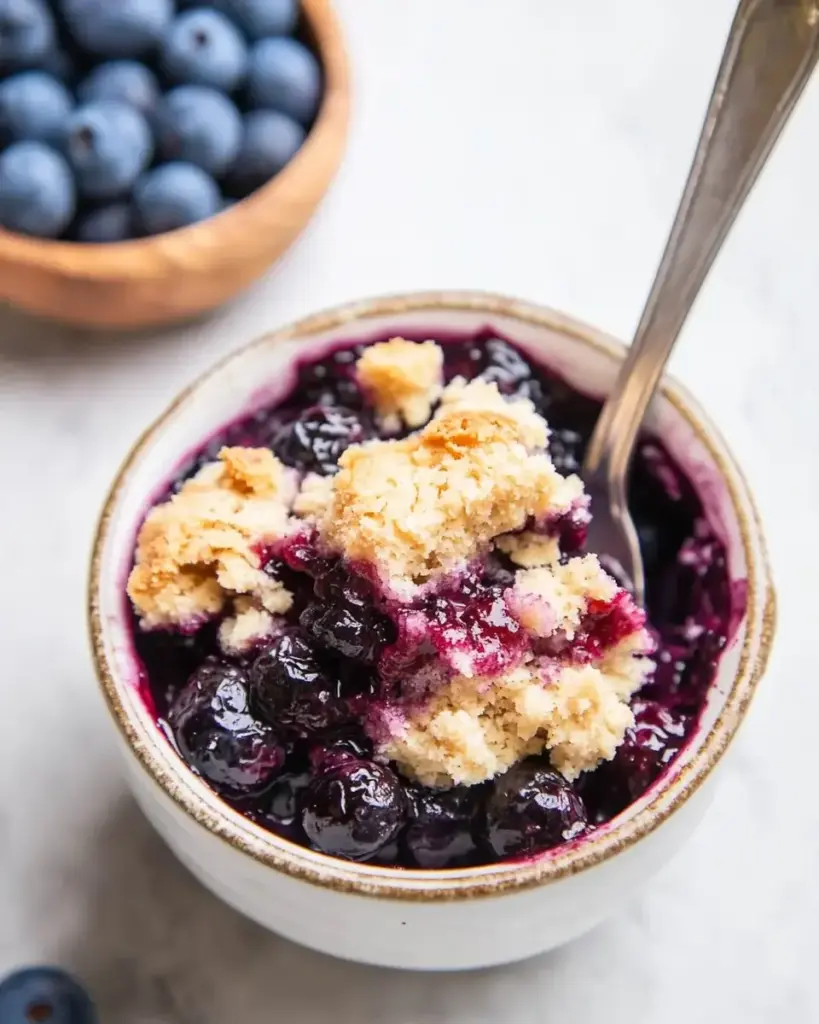
Introduction to Single-Serve Blueberry Cobbler

There’s something magical about a warm dessert that feels like a hug in a bowl. My go-to for those sweet cravings is this delightful Single-Serve Blueberry Cobbler. It’s perfect for those evenings when you want a quick solution after a long day or a little something special to impress a loved one. With just a handful of ingredients and minimal effort, you can whip up a delicious treat that satisfies your sweet tooth without the guilt of leftovers. Trust me, this recipe is a game-changer for any dessert lover!

Why You’ll Love This Single-Serve Blueberry Cobbler

This Single-Serve Blueberry Cobbler is a dream come true for busy folks like us. It’s quick to prepare, taking just 10 minutes of your time, and the baking does the rest. The taste? Absolutely divine! Bursting with juicy blueberries and a crunchy topping, it’s a dessert that feels indulgent yet is surprisingly healthy. Plus, there’s no need to share—this sweet treat is all yours!

Ingredients for Single-Serve Blueberry Cobbler

Gathering the right ingredients is the first step to creating your delicious Single-Serve Blueberry Cobbler. Here’s what you’ll need:

  • Blueberries: Fresh or frozen, these little gems are the star of the show. They bring sweetness and a burst of flavor.
  • Maple Syrup: A natural sweetener that adds depth. You can also use honey or agave if you prefer.
  • Lemon Juice: Just a splash brightens the flavors and balances the sweetness of the blueberries.
  • Cinnamon: This warm spice adds a cozy touch, enhancing the overall flavor profile.
  • Rolled Oats: They create a hearty, crunchy topping. Quick oats work too, but rolled oats give a better texture.
  • Almond Flour: Adds a nutty flavor and helps bind the topping. You can substitute with regular flour if needed.
  • Coconut Oil: This healthy fat keeps the topping moist and adds a subtle coconut flavor. Butter is a great alternative.
  • Brown Sugar: For that caramel-like sweetness. Coconut sugar is a fantastic substitute for a healthier option.
  • Vanilla Extract: A splash of this elevates the dessert, making it taste even more indulgent.
  • Salt: Just a pinch enhances all the flavors, making them pop.

For exact measurements, check the bottom of the article where you can find everything listed for easy printing. Happy baking!

How to Make Single-Serve Blueberry Cobbler

Creating your own Single-Serve Blueberry Cobbler is a breeze! Follow these simple steps, and you’ll have a warm, delicious dessert ready in no time. Let’s dive in!

Step 1: Preheat the Oven

Start by preheating your oven to 350°F. This step is crucial because it ensures even baking. A hot oven helps the topping become golden and crispy while the blueberries bubble away, creating that irresistible aroma.

Step 2: Prepare the Blueberry Mixture

In a small bowl, combine your blueberries with maple syrup, lemon juice, and cinnamon. Stir gently to coat the berries evenly. This mixture is where the magic begins, as the flavors meld together beautifully. Once mixed, transfer it to your small baking dish or ramekin.

Step 3: Make the Topping

In another bowl, mix the rolled oats, almond flour, melted coconut oil, brown sugar, vanilla extract, and a pinch of salt. Use a fork or your fingers to combine everything until it resembles a crumbly texture. This topping is what gives your cobbler that delightful crunch!

Step 4: Assemble the Cobbler

Now, sprinkle the oat mixture evenly over the blueberry layer in your baking dish. Make sure to cover the berries well, as this will create a delicious crust. It’s like giving your blueberries a cozy blanket!

Step 5: Bake

Place your cobbler in the preheated oven and bake for 25-30 minutes. Keep an eye on it! You’ll know it’s done when the topping is golden brown and the blueberries are bubbling around the edges. That’s the sign of a perfect cobbler!

Step 6: Cool and Serve

Once baked, let your cobbler cool for a few minutes. This step is important because it allows the juices to settle. For an extra treat, serve it with a dollop of coconut yogurt or a scoop of vanilla ice cream. Trust me, it’s the cherry on top!

Tips for Success

  • Use fresh blueberries for the best flavor, but frozen works just as well.
  • Don’t skip the cooling step; it helps the cobbler set up nicely.
  • Experiment with spices like nutmeg for a unique twist.
  • For a crunchier topping, add chopped nuts to the oat mixture.
  • Store leftovers in the fridge for up to two days—if there are any!

Equipment Needed

  • Oven: Essential for baking. A toaster oven works too if you’re short on space.
  • Baking Dish or Ramekin: Any small oven-safe dish will do. A mug can work in a pinch!
  • Mixing Bowls: You’ll need two for mixing ingredients. Any size will suffice.
  • Fork or Spoon: For mixing and assembling. A spatula can also be handy.

Variations

  • Berry Medley: Swap out blueberries for a mix of raspberries, blackberries, or strawberries for a colorful twist.
  • Gluten-Free: Use certified gluten-free oats and almond flour to make this dessert suitable for gluten-sensitive diets.
  • Vegan Option: Ensure your coconut oil is refined and use maple syrup for sweetness, keeping it entirely plant-based.
  • Spiced Up: Add a pinch of nutmeg or ginger to the topping for an extra layer of warmth and flavor.
  • Chocolate Lover: Mix in some dark chocolate chips with the blueberries for a decadent touch.

Serving Suggestions

  • Pair with Ice Cream: A scoop of vanilla or coconut ice cream complements the warm cobbler perfectly.
  • Fresh Whipped Cream: A dollop of whipped cream adds a light, airy touch.
  • Serve with Coffee: Enjoy your cobbler with a hot cup of coffee or tea for a cozy experience.
  • Garnish: Top with fresh mint leaves for a pop of color and freshness.

FAQs about Single-Serve Blueberry Cobbler

Can I use frozen blueberries for this recipe?

Absolutely! Frozen blueberries work just as well as fresh ones. Just remember to adjust the baking time slightly, as they may take a bit longer to cook through.

How can I make this Single-Serve Blueberry Cobbler healthier?

To make it healthier, consider using less sugar or substituting with a natural sweetener like stevia. You can also add more oats for fiber and reduce the amount of coconut oil.

Can I prepare the cobbler in advance?

Yes! You can prepare the blueberry mixture and topping separately, then assemble and bake when you’re ready to enjoy. Just keep the components in the fridge until you’re set to bake.

What can I substitute for almond flour?

If you don’t have almond flour, regular all-purpose flour works fine. For a nut-free option, try using oat flour or a gluten-free flour blend.

Is this recipe suitable for vegans?

Yes! This Single-Serve Blueberry Cobbler is naturally vegan as long as you use maple syrup and ensure your coconut oil is refined. Enjoy guilt-free!

Final Thoughts

There’s a certain joy that comes from creating a warm, comforting dessert just for yourself. This Single-Serve Blueberry Cobbler is not just a recipe; it’s a little moment of happiness in your day. The sweet, juicy blueberries paired with a crunchy topping make every bite a delightful experience. Whether you’re winding down after a busy day or treating yourself on a lazy weekend, this cobbler is your perfect companion. So, grab those ingredients and let the aroma fill your kitchen. You deserve this sweet indulgence, and trust me, it’s worth every spoonful!

Paul

Single-Serve Blueberry Cobbler: Try This Easy Recipe!

A delicious and easy recipe for a single-serving blueberry cobbler, perfect for satisfying your sweet tooth.
Prep Time 10 minutes
Cook Time 30 minutes
Total Time 40 minutes
Servings: 1 serving
Course: Dessert
Cuisine: American
Calories: 320

Ingredients
  

  • 1 cup fresh or frozen blueberries
  • 1 tablespoon maple syrup
  • 1 teaspoon lemon juice
  • 1/4 teaspoon cinnamon
  • 1/4 cup rolled oats
  • 1 tablespoon almond flour
  • 1 tablespoon coconut oil melted
  • 1 tablespoon brown sugar or coconut sugar
  • 1/4 teaspoon vanilla extract
  • Pinch of salt

Method
 

  1. Preheat your oven to 350°F.
  2. In a small bowl, combine the blueberries, maple syrup, lemon juice, and cinnamon. Mix well and transfer to a small baking dish or oven-safe ramekin.
  3. In another bowl, mix the rolled oats, almond flour, melted coconut oil, brown sugar, vanilla extract, and salt until crumbly.
  4. Sprinkle the oat mixture evenly over the blueberries.
  5. Bake for 25-30 minutes, or until the topping is golden brown and the blueberries are bubbly.
  6. Allow to cool for a few minutes before serving.

Notes

  • For a creamier texture, serve with a dollop of coconut yogurt or vanilla ice cream.
  • To add a nutty flavor, mix in chopped nuts like almonds or walnuts into the topping.

Keto Hamburger Broccoli Skillet: A Quick, Tasty Meal!

Introduction to Keto Hamburger Broccoli Skillet

After a long day, the last thing I want is to spend hours in the kitchen. That’s where my Keto Hamburger Broccoli Skillet comes to the rescue! This dish is not just a quick solution for a busy day; it’s a delightful blend of flavors that will impress your loved ones. With ground beef and fresh broccoli, all topped with melted cheddar cheese, it’s a meal that satisfies both the taste buds and the keto diet. Trust me, once you try this recipe, it’ll become a staple in your weeknight rotation!

Why You’ll Love This Keto Hamburger Broccoli Skillet

This Keto Hamburger Broccoli Skillet is a game-changer for anyone juggling a busy lifestyle. It’s not just quick to prepare; it’s also packed with flavor and nutrition. In just 30 minutes, you can whip up a satisfying meal that keeps you on track with your keto goals. Plus, the combination of savory ground beef and tender broccoli topped with gooey cheese is simply irresistible. You’ll find yourself craving this dish again and again!

Ingredients for Keto Hamburger Broccoli Skillet

Gathering the right ingredients is the first step to creating this delicious Keto Hamburger Broccoli Skillet. Here’s what you’ll need:

  • Ground Beef: The star of the dish, providing rich flavor and protein. You can use lean ground beef for a healthier option.
  • Broccoli Florets: Fresh and vibrant, broccoli adds crunch and essential nutrients. It’s low in carbs, making it perfect for keto.
  • Onion: Diced onion brings sweetness and depth to the skillet. It caramelizes beautifully, enhancing the overall flavor.
  • Garlic: Minced garlic adds a punch of flavor. It’s aromatic and pairs perfectly with beef.
  • Shredded Cheddar Cheese: This melty goodness tops off the dish, adding creaminess and a savory kick.
  • Olive Oil: Used for sautéing, olive oil is a healthy fat that complements the dish well.
  • Paprika: A dash of paprika gives a subtle smokiness and vibrant color to the skillet.
  • Salt and Black Pepper: Essential seasonings that enhance all the flavors. Adjust to your taste.
  • Red Pepper Flakes (optional): For those who like a bit of heat, these flakes add a spicy kick.
  • Beef Broth: This adds moisture and richness to the dish, helping the broccoli cook perfectly.

For exact measurements, check the bottom of the article where you can find everything listed for easy printing. Feel free to mix in some cooked bacon bits or sautéed mushrooms for extra flavor, or swap the ground beef for ground turkey or chicken if you prefer a leaner option!

How to Make Keto Hamburger Broccoli Skillet

Now that you have your ingredients ready, let’s dive into the cooking process! This Keto Hamburger Broccoli Skillet is straightforward and quick, making it perfect for any weeknight dinner. Follow these simple steps, and you’ll have a delicious meal on the table in no time!

Step 1: Heat the Olive Oil

Start by grabbing a large skillet and placing it over medium heat. Pour in the olive oil and let it warm up. You want it hot enough to sizzle when you add the onions. This step is crucial as it sets the stage for the flavors to come!

Step 2: Sauté the Onion

Once the oil is shimmering, toss in the diced onion. Sauté it for about 3-4 minutes until it turns translucent. The aroma will fill your kitchen, making your mouth water. This is where the magic begins!

Step 3: Add Garlic

Next, stir in the minced garlic. Cook it for just 1 minute until it becomes fragrant. Be careful not to burn it; burnt garlic can turn bitter. This step adds a wonderful depth of flavor to your Keto Hamburger Broccoli Skillet.

Step 4: Cook the Ground Beef

Now, it’s time to add the ground beef. Break it apart with a spatula as it cooks. You want to ensure it browns evenly, which should take about 6-8 minutes. The beef should be fully cooked and no longer pink. This is where the dish starts to take shape!

Step 5: Season the Mixture

Once the beef is browned, it’s time to season! Sprinkle in the paprika, salt, black pepper, and red pepper flakes if you’re feeling adventurous. Stir everything together, allowing the spices to coat the beef evenly. This is where the flavor really kicks in!

Step 6: Incorporate Broccoli and Beef Broth

Next, add the broccoli florets and pour in the beef broth. Give it a good stir to combine everything. Cover the skillet with a lid and let it cook for 5-7 minutes. This will steam the broccoli until it’s tender but still vibrant. You’ll love the color it brings to the dish!

Step 7: Melt the Cheese

Finally, remove the lid and sprinkle the shredded cheddar cheese over the top. Cover the skillet again and let it sit for 2-3 minutes. The heat will melt the cheese into gooey perfection. When you lift the lid, you’ll be greeted with a cheesy, savory delight!

Tips for Success

  • Use a non-stick skillet to prevent sticking and make cleanup easier.
  • Don’t rush the browning of the beef; it adds flavor!
  • For extra crunch, add the broccoli in the last few minutes of cooking.
  • Feel free to adjust the spices to suit your taste preferences.
  • Leftovers can be stored in the fridge for up to three days.

Equipment Needed

  • Large Skillet: A non-stick skillet works best, but any large frying pan will do.
  • Spatula: Use a sturdy spatula for breaking up the ground beef.
  • Lid: A lid is essential for steaming the broccoli.
  • Cutting Board and Knife: For chopping the onion and garlic.

Variations

  • Swap the Protein: Use ground turkey or chicken for a leaner option. You can also try ground pork for a different flavor profile.
  • Add More Veggies: Incorporate bell peppers, zucchini, or spinach for added nutrition and color.
  • Spice it Up: Experiment with different spices like cumin or chili powder for a unique twist.
  • Cheese Choices: Try different cheeses like mozzarella or pepper jack for a fun flavor change.
  • Make it Creamy: Stir in a splash of heavy cream or cream cheese for a richer, creamier dish.

Serving Suggestions

  • Pair your Keto Hamburger Broccoli Skillet with a fresh side salad for a refreshing crunch.
  • A glass of sparkling water with a slice of lemon complements the meal beautifully.
  • For presentation, serve in a colorful bowl and sprinkle with fresh herbs like parsley.

FAQs about Keto Hamburger Broccoli Skillet

Can I make this Keto Hamburger Broccoli Skillet ahead of time?

Absolutely! You can prepare the dish in advance and store it in the fridge for up to three days. Just reheat it on the stove or in the microwave when you’re ready to enjoy it again.

Is this recipe suitable for meal prep?

Yes! This Keto Hamburger Broccoli Skillet is perfect for meal prep. It keeps well and can be portioned into containers for easy grab-and-go lunches or dinners throughout the week.

Can I use frozen broccoli instead of fresh?

Definitely! Frozen broccoli works just as well. Just add it to the skillet a bit earlier to ensure it cooks through and becomes tender.

What can I serve with this dish?

This skillet is delicious on its own, but you can pair it with a side salad or some cauliflower rice for a complete meal. A refreshing drink like iced tea or sparkling water complements it nicely.

How can I make this dish spicier?

If you love heat, add more red pepper flakes or even some diced jalapeños. You can also experiment with spicy cheese varieties for an extra kick!

Final Thoughts

Cooking should be a joyful experience, and my Keto Hamburger Broccoli Skillet embodies that spirit. It’s not just about the delicious flavors; it’s about the memories created around the dinner table. This dish is a reminder that healthy eating doesn’t have to be complicated or time-consuming. With just a few ingredients and simple steps, you can whip up a meal that nourishes both body and soul. So, whether you’re feeding a family or enjoying a quiet night in, this skillet will bring warmth and satisfaction to your kitchen. Give it a try, and savor the joy it brings!

Paul

Keto Hamburger Broccoli Skillet: A Quick, Tasty Meal!

A quick and tasty keto-friendly meal featuring ground beef and broccoli, topped with melted cheddar cheese.
Prep Time 10 minutes
Cook Time 20 minutes
Total Time 30 minutes
Servings: 4 servings
Course: Main Dish
Cuisine: Keto
Calories: 350

Ingredients
  

  • 1 pound ground beef
  • 2 cups broccoli florets
  • 1 medium onion diced
  • 2 cloves garlic minced
  • 1 cup shredded cheddar cheese
  • 1 tablespoon olive oil
  • 1 teaspoon paprika
  • 1 teaspoon salt
  • ½ teaspoon black pepper
  • ½ teaspoon red pepper flakes optional
  • ¼ cup beef broth

Method
 

  1. In a large skillet, heat olive oil over medium heat.
  2. Add the diced onion and cook until translucent, about 3-4 minutes.
  3. Stir in the minced garlic and cook for an additional 1 minute until fragrant.
  4. Add the ground beef to the skillet, breaking it apart with a spatula.
  5. Season with paprika, salt, black pepper, and red pepper flakes if using.
  6. Cook until the beef is browned and cooked through, about 6-8 minutes.
  7. Stir in the broccoli florets and beef broth.
  8. Cover the skillet and cook for 5-7 minutes, or until the broccoli is tender.
  9. Remove the lid and sprinkle the shredded cheddar cheese over the top.
  10. Cover again and let it sit for 2-3 minutes until the cheese is melted.
  11. Serve hot and enjoy!

Notes

  • For added flavor, mix in some cooked bacon bits or sautéed mushrooms.
  • Substitute the ground beef with ground turkey or chicken for a leaner option.

Crispy Air Fryer Pasta Chips: Try This Quick Recipe!

Introduction to Crispy Air Fryer Pasta Chips

There’s something magical about discovering a new snack that’s both easy to make and utterly delicious. Crispy air fryer pasta chips are just that! They’re the perfect solution for those busy days when you crave something crunchy yet satisfying. I remember the first time I made these; my friends couldn’t believe how simple they were. With just a handful of ingredients and a few minutes in the air fryer, you can whip up a treat that’s sure to impress. Whether you’re binge-watching your favorite show or hosting a game night, these pasta chips are a must-try!

Why You’ll Love This Crispy Air Fryer Pasta Chips

These crispy air fryer pasta chips are a game changer for snack lovers! They’re incredibly easy to make, taking just 20 minutes from start to finish. The air fryer gives them that perfect crunch without the guilt of deep frying. Plus, you can customize the flavors to suit your taste buds. Whether you’re looking for a quick snack or a fun appetizer, these chips deliver on all fronts!

Ingredients for Crispy Air Fryer Pasta Chips

Gathering the right ingredients is the first step to creating these delightful crispy air fryer pasta chips. Here’s what you’ll need:

  • Uncooked pasta: Any shape works, but rotini or penne are my favorites for their texture.
  • Olive oil: This adds richness and helps the pasta crisp up beautifully.
  • Garlic powder: A must for that savory kick; it elevates the flavor profile.
  • Italian seasoning: A blend of herbs that brings a taste of Italy to your snack.
  • Salt: Essential for enhancing all the flavors in your chips.
  • Black pepper: Just a pinch adds a subtle warmth.
  • Grated Parmesan cheese: This cheesy topping melts into the hot chips, creating a delicious finish.
  • Optional: Marinara sauce for dipping adds a fun twist and extra flavor.

For those looking to mix things up, consider using whole wheat or gluten-free pasta for a healthier option. You can also experiment with different cheese toppings like cheddar or mozzarella. If you want a bit of heat, a pinch of red pepper flakes can do wonders! For exact quantities, check the bottom of the article where you can find them available for printing.

How to Make Crispy Air Fryer Pasta Chips

Making crispy air fryer pasta chips is a breeze! Follow these simple steps, and you’ll have a crunchy snack ready in no time. Let’s dive in!

Step 1: Cook the Pasta

Start by boiling a pot of water. Once it’s bubbling, add your uncooked pasta. Cook it according to the package instructions until it’s al dente. This usually takes about 8-10 minutes. When it’s done, drain the pasta and rinse it under cold water. This stops the cooking process and keeps your chips from getting mushy.

Step 2: Season the Pasta

In a large bowl, toss the cooked pasta with olive oil, garlic powder, Italian seasoning, salt, and black pepper. Make sure every piece is coated evenly. This is where the magic happens! The oil helps the pasta crisp up in the air fryer, while the seasonings add a burst of flavor.

Step 3: Preheat the Air Fryer

While you’re seasoning the pasta, preheat your air fryer to 400°F. This step is crucial for achieving that perfect crunch. A hot air fryer ensures that your pasta chips cook evenly and get that golden-brown color we all love.

Step 4: Air Fry the Pasta

Now it’s time to air fry! Place the seasoned pasta in a single layer in the air fryer basket. If you have a smaller air fryer, you might need to do this in batches. Air fry the pasta for 8-10 minutes, shaking the basket halfway through. Keep an eye on them; you want them crispy but not burnt!

Step 5: Add Parmesan Cheese

As soon as the pasta chips come out of the air fryer, sprinkle them with grated Parmesan cheese. The heat from the chips will melt the cheese slightly, creating a deliciously cheesy coating. Trust me, this step is non-negotiable!

Step 6: Serve and Enjoy

Let the chips cool for a minute before serving. They’re best enjoyed warm and crispy! If you like, serve them with marinara sauce for dipping. It adds a fun twist and makes for a delightful snack experience. Enjoy your crispy air fryer pasta chips!

Tips for Success

  • Don’t overcrowd the air fryer basket; it’s better to cook in batches for even crispiness.
  • Experiment with different pasta shapes for unique textures and flavors.
  • For extra crunch, let the chips cool completely before serving.
  • Adjust seasonings to your taste; feel free to get creative!
  • Store any leftovers in an airtight container to maintain crispness.

Equipment Needed

  • Air Fryer: The star of the show! If you don’t have one, an oven can work, but the texture won’t be the same.
  • Large Pot: For boiling the pasta; any size will do.
  • Colander: To drain the pasta after cooking.
  • Mixing Bowl: For tossing the pasta with seasonings.
  • Spatula or Tongs: To help you shake the basket and serve the chips.

Variations

  • Spicy Kick: Add a pinch of red pepper flakes or cayenne pepper to the seasoning mix for a fiery twist.
  • Cheesy Delight: Experiment with different cheeses like cheddar, mozzarella, or even a sprinkle of feta for a unique flavor.
  • Herb Infusion: Try adding fresh herbs like rosemary or thyme for a fragrant touch.
  • Sweet and Savory: For a different approach, toss the pasta with cinnamon and sugar before air frying for a sweet snack.
  • Gluten-Free Option: Use gluten-free pasta to make this snack suitable for those with dietary restrictions.

Serving Suggestions

  • Dip it Right: Serve your crispy air fryer pasta chips with marinara sauce, ranch dressing, or even a spicy aioli for a flavor explosion.
  • Pair with Drinks: Enjoy with a cold beer or a refreshing soda to balance the savory crunch.
  • Presentation: Serve in a colorful bowl or on a wooden platter for a rustic touch that impresses guests.

FAQs about Crispy Air Fryer Pasta Chips

Can I use any type of pasta for this recipe?

Absolutely! You can use any shape of uncooked pasta, like rotini, penne, or even bowtie. Each shape offers a unique texture, so feel free to experiment!

How do I store leftover pasta chips?

To keep your crispy air fryer pasta chips fresh, store them in an airtight container at room temperature. They’re best enjoyed within a day or two for maximum crunch.

Can I make these pasta chips in the oven instead of an air fryer?

Yes, you can! Spread the seasoned pasta on a baking sheet and bake at 400°F for about 15-20 minutes, flipping halfway through. Just keep an eye on them to avoid burning.

What can I dip these chips in?

These pasta chips pair wonderfully with marinara sauce, ranch dressing, or even a spicy aioli. The dipping options are endless, so get creative!

Are crispy air fryer pasta chips healthy?

While they’re a fun snack, moderation is key. Using olive oil and whole wheat or gluten-free pasta can make them a healthier option compared to traditional chips. Enjoy them guilt-free!

Final Thoughts

Creating crispy air fryer pasta chips is more than just whipping up a snack; it’s about bringing joy to your kitchen and delighting your taste buds. The crunch, the flavor, and the ease of preparation make this recipe a winner in my book. Whether you’re enjoying them solo or sharing with friends, these chips are bound to spark smiles and conversations. Plus, the versatility means you can tailor them to your mood or occasion. So, roll up your sleeves, fire up that air fryer, and let the snacking adventure begin. You won’t regret it!

Paul

Crispy Air Fryer Pasta Chips: Try This Quick Recipe!

A quick and easy recipe for crispy air fryer pasta chips that are perfect for snacking.
Prep Time 10 minutes
Cook Time 10 minutes
Total Time 20 minutes
Servings: 4 servings
Course: Snack
Cuisine: Italian
Calories: 210

Ingredients
  

  • 8 ounces uncooked pasta any shape, such as rotini or penne
  • 2 tablespoons olive oil
  • 1 teaspoon garlic powder
  • 1 teaspoon Italian seasoning
  • ½ teaspoon salt
  • ¼ teaspoon black pepper
  • ¼ cup grated Parmesan cheese
  • Optional: marinara sauce for dipping

Method
 

  1. Cook the pasta according to package instructions until al dente. Drain and rinse under cold water to stop the cooking process.
  2. In a large bowl, combine the cooked pasta, olive oil, garlic powder, Italian seasoning, salt, and black pepper. Toss until the pasta is evenly coated.
  3. Preheat the air fryer to 400°F.
  4. Place the seasoned pasta in a single layer in the air fryer basket. You may need to do this in batches depending on the size of your air fryer.
  5. Air fry the pasta for 8-10 minutes, shaking the basket halfway through, until the pasta chips are golden brown and crispy.
  6. Remove the chips from the air fryer and immediately sprinkle with grated Parmesan cheese while they are still hot.
  7. Allow the chips to cool slightly before serving. Enjoy with marinara sauce for dipping if desired.

Notes

  • For extra flavor, try adding a pinch of red pepper flakes for heat.
  • Experiment with different cheese toppings like cheddar or mozzarella.
  • You can use whole wheat or gluten-free pasta for a healthier or dietary-specific option.

Italian Chopped Salad: A Fresh and Flavorful Delight!

Introduction to Italian Chopped Salad

When I think of summer gatherings, the vibrant colors of an Italian Chopped Salad come to mind. This dish is not just a salad; it’s a celebration of fresh ingredients and bold flavors.

Perfect for a quick solution on a busy day or a delightful side to impress your loved ones, this salad is a go-to in my kitchen.

With its crunchy veggies and tangy dressing, it’s a refreshing choice that never fails to please.

Let’s dive into this easy recipe that brings a taste of Italy right to your table!

Why You’ll Love This Italian Chopped Salad

This Italian Chopped Salad is a game-changer for anyone looking to whip up something quick yet delicious.

In just 15 minutes, you can create a vibrant dish that bursts with flavor.

It’s not only easy to make, but it’s also packed with fresh veggies that make you feel good.

Whether you’re serving it at a barbecue or enjoying it solo, this salad is sure to impress!

Ingredients for Italian Chopped Salad

Creating a delicious Italian Chopped Salad starts with fresh, vibrant ingredients. Here’s what you’ll need:

  • Romaine lettuce: This crunchy base adds a refreshing crunch and is packed with nutrients.
  • Cherry tomatoes: Sweet and juicy, they bring a burst of color and flavor to the mix.
  • Cucumber: Crisp and hydrating, cucumbers add a cool contrast to the other ingredients.
  • Red onion: Finely chopped, it provides a sharp bite that balances the salad’s flavors.
  • Bell pepper: Any color works! They add sweetness and a pop of color to your dish.
  • Kalamata olives: These briny gems introduce a Mediterranean flair and a savory depth.
  • Mozzarella balls: Creamy and mild, they add richness. For a tangy twist, try feta instead.
  • Fresh basil: Aromatic and fragrant, basil elevates the salad with its herbal notes.
  • Red wine vinegar: This tangy dressing component brightens the salad and enhances the flavors.
  • Olive oil: A drizzle of good-quality olive oil adds richness and helps the flavors meld.
  • Dried oregano: This herb brings a classic Italian taste that complements the fresh ingredients.
  • Garlic powder: A hint of garlic adds depth without overpowering the salad.
  • Salt and pepper: Essential for seasoning, they enhance all the flavors in the salad.

Feel free to get creative! You can add grilled chicken or shrimp for extra protein, or swap out the mozzarella for feta cheese if you prefer a tangier flavor.

For exact measurements, check the bottom of the article where you can find everything available for printing.

How to Make Italian Chopped Salad

Making an Italian Chopped Salad is as easy as pie, or should I say, as easy as tossing a salad?

With just a few simple steps, you’ll have a colorful, fresh dish ready to impress.

Let’s get started!

Step 1: Prepare the Vegetables

Begin by washing all your vegetables thoroughly.

Chop the romaine lettuce into bite-sized pieces and place it in a large bowl.

Next, halve the cherry tomatoes and dice the cucumber.

For the red onion, finely chop it to ensure its sharp flavor is evenly distributed.

Dice the bell pepper into small pieces, and don’t forget to pit and slice the Kalamata olives.

Finally, halve the mozzarella balls.

With all these vibrant veggies prepped, you’re well on your way to a delicious salad!

Step 2: Make the Dressing

In a separate small bowl, it’s time to whip up that tangy dressing.

Start by pouring in the red wine vinegar and olive oil.

Add the dried oregano and garlic powder, then sprinkle in some salt and pepper to taste.

Whisk everything together until it’s well combined.

This dressing is the magic that ties all the flavors together, so don’t rush it!

Step 3: Combine Ingredients

Now, it’s time to bring everything together.

Pour the dressing over the bowl of chopped vegetables.

Gently toss the salad to ensure every piece is coated in that delicious dressing.

This is where the Italian Chopped Salad really comes to life, as the flavors meld beautifully.

Step 4: Let it Rest

Patience is key here!

Let the salad sit for about 10 minutes.

This resting period allows the flavors to develop and intensify.

Trust me, it’s worth the wait!

Step 5: Serve

When you’re ready to serve, give the salad one last gentle toss.

You can enjoy it immediately or refrigerate it for up to an hour for a chilled option.

This salad pairs wonderfully with grilled meats or can stand alone as a light meal.

Feel free to garnish with extra basil or a sprinkle of cheese for that finishing touch!

Tips for Success

  • Use fresh, high-quality ingredients for the best flavor.
  • Chill your salad bowl beforehand for an extra refreshing touch.
  • Don’t skip the resting time; it enhances the flavors.
  • Adjust the dressing to your taste—add more vinegar for tang or oil for richness.
  • Experiment with different veggies or proteins to keep it exciting!

Equipment Needed

  • Large mixing bowl: Essential for combining all your ingredients. A salad bowl works too!
  • Small bowl: Perfect for whisking the dressing. A mason jar can double as a shaker.
  • Cutting board and knife: For chopping veggies. A good chef’s knife makes prep a breeze.
  • Whisk or fork: To mix the dressing thoroughly. A fork does the job just fine!

Variations

  • Protein Boost: Add grilled chicken, shrimp, or chickpeas for a heartier salad.
  • Cheese Swap: Substitute mozzarella with feta or goat cheese for a tangy twist.
  • Veggie Medley: Incorporate other vegetables like radishes, artichokes, or zucchini for added flavor and texture.
  • Herb Infusion: Experiment with different herbs like parsley, dill, or mint to change up the flavor profile.
  • Spicy Kick: Toss in some sliced jalapeños or a dash of red pepper flakes for a bit of heat.

Serving Suggestions

  • Pair your Italian Chopped Salad with grilled chicken or fish for a complete meal.
  • Serve it alongside crusty Italian bread or garlic knots for a satisfying crunch.
  • For drinks, a chilled glass of white wine or sparkling water complements the flavors beautifully.
  • Garnish with extra basil or a sprinkle of Parmesan for an elegant touch.

FAQs about Italian Chopped Salad

Can I make Italian Chopped Salad ahead of time?

Absolutely! You can prepare the salad a few hours in advance. Just keep the dressing separate until you’re ready to serve. This way, the veggies stay crisp and fresh.

What can I substitute for Kalamata olives?

If Kalamata olives aren’t your thing, feel free to use green olives or even sliced black olives. Each will bring its own unique flavor to the salad.

Is this salad suitable for meal prep?

<pDefinitely! This Italian Chopped Salad is perfect for meal prep. Just store it in airtight containers, and it will stay fresh for a couple of days in the fridge.

Can I add fruits to my Italian Chopped Salad?

<pSure! Adding fruits like diced apples or pears can introduce a sweet contrast to the savory ingredients. It’s a delightful twist!

How can I make this salad vegan?

<pTo make your Italian Chopped Salad vegan, simply omit the mozzarella or replace it with a plant-based cheese. The salad will still be delicious and satisfying!

Final Thoughts

Creating an Italian Chopped Salad is more than just preparing a meal; it’s about embracing the joy of fresh ingredients and vibrant flavors.

Each bite transports you to sun-soaked Italian markets, where the air is filled with the scent of basil and ripe tomatoes.

This salad is a canvas for creativity, allowing you to mix and match ingredients to suit your taste.

Whether you’re enjoying it solo or sharing it with friends, this dish brings a sense of satisfaction and delight.

So grab your veggies, toss them together, and savor the fresh flavors of Italy right at home!

Paul

Italian Chopped Salad: A Fresh and Flavorful Delight!

A fresh and flavorful Italian Chopped Salad that combines a variety of vegetables and a tangy dressing.
Prep Time 15 minutes
Total Time 15 minutes
Servings: 4 servings
Course: Salad
Cuisine: Italian
Calories: 210

Ingredients
  

  • 2 cups romaine lettuce chopped
  • 1 cup cherry tomatoes halved
  • 1 cup cucumber diced
  • 1/2 cup red onion finely chopped
  • 1/2 cup bell pepper diced (any color)
  • 1/2 cup Kalamata olives pitted and sliced
  • 1/2 cup mozzarella balls halved
  • 1/4 cup fresh basil chopped
  • 1/4 cup red wine vinegar
  • 1/4 cup olive oil
  • 1 teaspoon dried oregano
  • 1 teaspoon garlic powder
  • Salt and pepper to taste

Method
 

  1. In a large bowl, combine the chopped romaine lettuce, cherry tomatoes, cucumber, red onion, bell pepper, Kalamata olives, mozzarella balls, and fresh basil. Toss gently to mix the ingredients evenly.
  2. In a separate small bowl, whisk together the red wine vinegar, olive oil, dried oregano, garlic powder, salt, and pepper until well combined.
  3. Pour the dressing over the salad and toss again to ensure all the ingredients are coated.
  4. Let the salad sit for about 10 minutes to allow the flavors to meld.
  5. Serve immediately or refrigerate for up to 1 hour before serving for a chilled option.

Notes

  • Add grilled chicken or shrimp for extra protein.
  • Substitute the mozzarella with feta cheese for a tangy flavor.

Red, White, and Blue Dirt Cups: Delightful Treats Await!

Introduction to Red, White, and Blue Dirt Cups

There’s something magical about desserts that bring a splash of color and a burst of flavor to the table. Red, White, and Blue Dirt Cups are just that! These delightful treats are not only visually appealing but also incredibly easy to whip up. Whether you’re celebrating a holiday or just want to impress your loved ones, this no-bake dessert is a quick solution for a busy day. With layers of chocolate cookies, creamy pudding, and fresh berries, it’s a sweet way to show your patriotic spirit while satisfying your sweet tooth.

Why You’ll Love This Red, White, and Blue Dirt Cups

These Red, White, and Blue Dirt Cups are a game-changer for any dessert lover. They come together in just 15 minutes, making them perfect for those last-minute gatherings. The combination of rich chocolate, creamy vanilla, and fresh berries creates a flavor explosion that’s hard to resist. Plus, they’re a hit with both kids and adults, ensuring everyone leaves the table with a smile. What’s not to love?

Ingredients for Red, White, and Blue Dirt Cups

Gathering the right ingredients is the first step to creating these delightful Red, White, and Blue Dirt Cups. Here’s what you’ll need:

  • Chocolate sandwich cookies: These provide a rich, crunchy base that mimics dirt, adding a fun twist to your dessert.
  • Vanilla pudding: Creamy and smooth, this layer brings a sweet contrast to the chocolate cookies.
  • Whipped topping: Light and airy, it adds a fluffy texture that balances the denser layers.
  • Strawberries: Fresh and juicy, they add a vibrant red color and a burst of sweetness.
  • Blueberries: These little gems not only enhance the patriotic theme but also provide a tangy flavor.
  • Fresh mint leaves (optional): A touch of mint can elevate the presentation and add a refreshing note.

For those looking to make healthier choices, consider substituting the vanilla pudding with Greek yogurt and using low-fat whipped topping. You can also customize the fruit layers by adding raspberries or using other seasonal berries for a different flavor profile. The exact quantities for each ingredient are available at the bottom of the article for easy printing.

How to Make Red, White, and Blue Dirt Cups

Creating these Red, White, and Blue Dirt Cups is a breeze! Follow these simple steps, and you’ll have a stunning dessert ready in no time. Let’s dive into the fun of layering and assembling this delightful treat!

Step 1: Prepare the Cookie Base

Start by crushing the chocolate sandwich cookies. You can place them in a zip-top bag and use a rolling pin to smash them into fine crumbs. Alternatively, a food processor works wonders for this task. Once you have a nice, crumbly texture, set the cookie base aside. This will be the foundation of your dessert, adding that delicious crunch!

Step 2: Mix the Pudding and Topping

In a medium bowl, combine the vanilla pudding and whipped topping. Use a spatula or whisk to mix them together until the mixture is smooth and creamy. This step is crucial, as it creates the luscious layer that balances the crunch of the cookies. Make sure there are no lumps; you want it silky and inviting!

Step 3: Layer the Ingredients

Grab your serving cups or bowls and start layering! Begin with a generous spoonful of the crushed cookie mixture at the bottom. This will be your first layer, setting the stage for the creamy goodness to come. Spread it evenly, creating a solid base for the next layer.

Step 4: Add the Fresh Fruits

Now it’s time to add some color! Spoon a layer of the creamy pudding mixture over the cookie base. Then, sprinkle diced strawberries and blueberries on top. The vibrant red and blue fruits not only enhance the patriotic theme but also add a refreshing burst of flavor. Don’t be shy—load them up!

Step 5: Repeat and Finish

Repeat the layering process until your cups are filled to the brim. Start with another layer of cookie crumbs, followed by more pudding, and finish with a final layer of whipped topping. For the crowning touch, sprinkle some crushed cookies on top. This adds a delightful crunch and makes your dessert look even more appealing!

Step 6: Chill Before Serving

Once your cups are assembled, it’s time to let them chill. Place them in the refrigerator for at least 30 minutes. This step is essential as it allows the flavors to meld together beautifully. Plus, it makes the dessert refreshingly cool, perfect for warm days!

Tips for Success

  • Use a food processor for quick cookie crushing; it saves time and effort.
  • Let the pudding mixture sit for a few minutes after mixing to thicken slightly.
  • For a fun twist, try adding a layer of chocolate pudding for extra richness.
  • Make ahead of time! These cups can be prepared a day in advance.
  • Experiment with different fruits based on the season for variety.

Equipment Needed

  • Mixing bowls: Essential for combining ingredients; any size will do.
  • Spatula or whisk: Perfect for mixing the pudding and whipped topping.
  • Zip-top bags or food processor: Use for crushing cookies easily.
  • Serving cups or bowls: Choose your favorite for a fun presentation.

Variations

  • Chocolate Pudding Layer: Swap out the vanilla pudding for chocolate pudding for a double chocolate delight.
  • Greek Yogurt Substitute: Use Greek yogurt instead of vanilla pudding for a healthier, protein-packed option.
  • Seasonal Fruits: Experiment with seasonal fruits like peaches or blackberries for a unique twist.
  • Nutty Crunch: Add a layer of crushed nuts, like almonds or pecans, for an extra crunch and flavor.
  • Dairy-Free Option: Use dairy-free whipped topping and pudding for a vegan-friendly dessert.

Serving Suggestions

  • Pair with a refreshing lemonade or iced tea for a perfect summer treat.
  • Serve alongside grilled burgers or hot dogs for a festive barbecue.
  • Garnish with extra mint leaves for a pop of color and freshness.
  • Use clear cups to showcase the beautiful layers of your dessert.

FAQs about Red, White, and Blue Dirt Cups

Can I make Red, White, and Blue Dirt Cups ahead of time?

Absolutely! These delightful cups can be prepared a day in advance. Just make sure to keep them covered in the refrigerator until you’re ready to serve. This allows the flavors to meld beautifully.

What can I substitute for chocolate sandwich cookies?

If you’re looking for alternatives, crushed graham crackers or even vanilla wafers can work well. They’ll give a different flavor but still provide that crunchy base.

How can I make these cups healthier?

For a healthier twist, swap the vanilla pudding for Greek yogurt and use low-fat whipped topping. You can also add more fresh fruits to boost the nutritional value.

Can I use frozen berries instead of fresh?

Yes, frozen berries can be used! Just make sure to thaw and drain them before adding to your cups to avoid excess moisture.

What’s the best way to serve these cups?

Serving them in clear cups showcases the beautiful layers. You can also garnish with fresh mint leaves or extra berries for a stunning presentation!

Final Thoughts

Creating Red, White, and Blue Dirt Cups is more than just making a dessert; it’s about crafting a joyful experience. Each layer tells a story, from the crunch of the cookies to the sweetness of the berries. These cups are perfect for gatherings, sparking conversations and smiles around the table. They remind us of summer celebrations, family barbecues, and the simple pleasure of sharing something delicious. So, whether you’re celebrating a holiday or just indulging in a sweet treat, these delightful cups are sure to bring a little extra joy to your day!

Paul

Red, White, and Blue Dirt Cups: Delightful Treats Await!

Red, White, and Blue Dirt Cups are delightful layered desserts featuring chocolate cookies, vanilla pudding, and fresh berries, perfect for celebrating patriotic occasions.
Prep Time 15 minutes
Total Time 45 minutes
Servings: 4 servings
Course: Dessert
Cuisine: American
Calories: 250

Ingredients
  

  • 1 cup chocolate sandwich cookies crushed
  • 1 cup vanilla pudding
  • 1 cup whipped topping
  • 1 cup strawberries diced
  • 1 cup blueberries
  • Fresh mint leaves for garnish optional

Method
 

  1. In a medium bowl, combine the crushed chocolate sandwich cookies and set aside.
  2. In another bowl, mix the vanilla pudding and whipped topping until well combined and smooth.
  3. In serving cups or bowls, layer the ingredients starting with a layer of the cookie mixture, followed by a layer of the pudding mixture.
  4. Add a layer of diced strawberries and blueberries on top of the pudding.
  5. Repeat the layers until the cups are filled, finishing with a layer of whipped topping and a sprinkle of crushed cookies on top.
  6. Garnish with fresh mint leaves if desired.
  7. Refrigerate for at least 30 minutes before serving to allow the flavors to meld.

Notes

  • For a healthier option, substitute the vanilla pudding with Greek yogurt and use low-fat whipped topping.
  • You can customize the fruit layers by adding raspberries or using other seasonal berries for a different flavor profile.

Oreganata Shrimp: Discover the Perfect Recipe Today!

Introduction to Oreganata Shrimp

There’s something magical about a dish that brings the warmth of home and the excitement of a restaurant right to your table. Oreganata Shrimp does just that. This delightful recipe is not only quick to whip up but also bursting with flavor, making it a perfect solution for those busy weeknights or a special dinner with friends. Imagine the aroma of garlic and herbs wafting through your kitchen as you prepare this dish. It’s a simple yet impressive way to show your loved ones that you care, all while enjoying a taste of Italian cuisine.

Why You’ll Love This Oreganata Shrimp

Oreganata Shrimp is a game-changer in the kitchen. It’s incredibly easy to make, taking just 22 minutes from start to finish. The combination of crispy breadcrumbs and succulent shrimp creates a flavor explosion that will have everyone asking for seconds. Plus, it’s a versatile dish that fits any occasion, whether it’s a casual weeknight dinner or a fancy gathering. Trust me, your taste buds will thank you!

Ingredients for Oreganata Shrimp

Gathering the right ingredients is the first step to creating a mouthwatering Oreganata Shrimp dish. Here’s what you’ll need:

  • Shrimp: Large, peeled, and deveined shrimp are the stars of this dish. They cook quickly and soak up all the delicious flavors.
  • Breadcrumbs: Use fresh or store-bought breadcrumbs for that perfect crunchy topping. They provide texture and help absorb the flavors.
  • Parmesan Cheese: Grated Parmesan adds a rich, nutty flavor that complements the shrimp beautifully. It also helps create a golden crust.
  • Fresh Parsley: Chopped parsley brings a burst of color and freshness. It’s a great way to brighten up the dish.
  • Dried Oregano: This herb is essential for that classic Italian flavor. It pairs perfectly with seafood and adds depth to the dish.
  • Garlic: Minced garlic infuses the dish with a savory aroma. It’s a must-have for any seafood recipe.
  • Olive Oil: A drizzle of olive oil keeps the breadcrumbs moist and helps them crisp up in the oven.
  • Lemon Juice: Freshly squeezed lemon juice adds brightness and acidity, balancing the richness of the cheese and shrimp.
  • Salt and Pepper: Essential for seasoning, these staples enhance all the flavors in the dish.
  • Lemon Wedges: Serve with lemon wedges on the side for an extra zing when plating.

For those looking to spice things up, consider adding a pinch of red pepper flakes to the breadcrumb mixture. If you want to switch things up, scallops or fish fillets can be great substitutes for shrimp. You can find the exact quantities for each ingredient at the bottom of the article, ready for printing!

How to Make Oreganata Shrimp

Creating Oreganata Shrimp is a breeze, and I’m here to guide you through each step. With just a few simple actions, you’ll have a delicious dish ready to impress. Let’s dive in!

Step 1: Preheat the Oven

First things first, preheat your oven to 400°F (200°C). This ensures that your shrimp will cook evenly and the topping will get that perfect golden brown color. While the oven heats up, you can prepare the rest of the ingredients.

Step 2: Prepare the Breadcrumb Mixture

In a mixing bowl, combine the breadcrumbs, grated Parmesan cheese, chopped parsley, dried oregano, minced garlic, olive oil, lemon juice, salt, and pepper. Mix everything together until the breadcrumbs are well coated. This mixture is what gives your Oreganata Shrimp that irresistible crunch and flavor.

Step 3: Arrange the Shrimp

Next, take your large shrimp and arrange them in a single layer on a baking sheet. Make sure they’re not overcrowded; this helps them cook evenly. If you have a non-stick baking sheet, that’s even better, but a little olive oil can help prevent sticking.

Step 4: Add the Topping

Now comes the fun part! Spoon the breadcrumb mixture evenly over each shrimp. Press down slightly to make sure it adheres well. This step is crucial for that crispy topping that everyone loves. Don’t be shy—load them up!

Step 5: Bake the Shrimp

Pop the baking sheet into your preheated oven and bake for 10-12 minutes. Keep an eye on them! You’ll know they’re done when the shrimp turn pink and opaque, and the topping is golden brown. The aroma will be absolutely mouthwatering!

Step 6: Serve and Enjoy

Once baked, remove the shrimp from the oven and let them cool for a couple of minutes. Serve them with lemon wedges on the side for that extra zing. Trust me, your taste buds will be dancing with joy!

Tips for Success

  • Use fresh shrimp for the best flavor and texture.
  • Don’t skip the lemon juice; it brightens the dish.
  • For extra crunch, broil the shrimp for the last minute.
  • Let the breadcrumb mixture sit for a few minutes to absorb flavors.
  • Experiment with herbs like basil or thyme for a twist.

Equipment Needed

  • Baking Sheet: A standard baking sheet works well, but a cast-iron skillet adds a nice touch.
  • Mixing Bowl: Any large bowl will do; a glass bowl lets you see the mixture.
  • Measuring Cups: Essential for precise ingredient amounts, but eyeballing can work too.
  • Spatula: A rubber spatula helps mix and spread the topping evenly.

Variations

  • Spicy Oreganata Shrimp: Add a pinch of red pepper flakes to the breadcrumb mixture for a kick of heat.
  • Herb-Infused: Mix in fresh herbs like basil or thyme for a fragrant twist on the classic flavor.
  • Gluten-Free Option: Substitute regular breadcrumbs with gluten-free breadcrumbs to accommodate dietary needs.
  • Seafood Medley: Use a combination of shrimp, scallops, and fish fillets for a delightful seafood platter.
  • Cheesy Delight: Experiment with different cheeses like mozzarella or feta for a unique flavor profile.

Serving Suggestions

  • Pair with Pasta: Serve Oreganata Shrimp over a bed of spaghetti or linguine for a hearty meal.
  • Fresh Salad: A crisp arugula or mixed greens salad complements the dish beautifully.
  • Wine Selection: A chilled Sauvignon Blanc or Pinot Grigio enhances the flavors.
  • Presentation: Garnish with extra parsley and lemon wedges for a vibrant touch.

FAQs about Oreganata Shrimp

What is Oreganata Shrimp?

Oreganata Shrimp is a delicious Italian dish featuring large shrimp topped with a flavorful breadcrumb mixture. The combination of garlic, herbs, and Parmesan cheese creates a crispy, savory crust that elevates the shrimp to a whole new level.

Can I use frozen shrimp for this recipe?

Absolutely! Just make sure to thaw the shrimp completely before cooking. Frozen shrimp can be just as tasty, but fresh shrimp will give you the best flavor and texture.

How can I make Oreganata Shrimp spicier?

If you’re looking for a kick, add a pinch of red pepper flakes to the breadcrumb mixture. This simple addition will give your Oreganata Shrimp a delightful heat that pairs perfectly with the other flavors.

What can I serve with Oreganata Shrimp?

Oreganata Shrimp pairs wonderfully with pasta, fresh salads, or even crusty bread. A chilled glass of white wine, like Sauvignon Blanc, complements the dish beautifully.

Can I make this dish ahead of time?

While Oreganata Shrimp is best enjoyed fresh, you can prepare the breadcrumb mixture in advance. Just store it in the fridge until you’re ready to bake the shrimp. This way, you can enjoy a quick and easy meal on busy nights!

Final Thoughts

Cooking Oreganata Shrimp is more than just preparing a meal; it’s about creating a moment. The joy of watching your loved ones savor each bite, their faces lighting up with delight, is truly priceless. This dish brings the essence of Italian cuisine right into your home, making it feel special, even on a regular weeknight. With its vibrant flavors and simple preparation, Oreganata Shrimp is a reminder that great food doesn’t have to be complicated. So, roll up your sleeves, embrace the process, and enjoy the delicious rewards that come from your kitchen!

Paul

Oreganata Shrimp: Discover the Perfect Recipe Today!

A delicious and easy recipe for Oreganata Shrimp, featuring a flavorful breadcrumb topping.
Prep Time 10 minutes
Cook Time 12 minutes
Total Time 22 minutes
Servings: 4 servings
Course: Seafood
Cuisine: Italian
Calories: 320

Ingredients
  

  • 1 pound large shrimp peeled and deveined
  • 1 cup breadcrumbs
  • 1/2 cup grated Parmesan cheese
  • 1/4 cup fresh parsley chopped
  • 2 teaspoons dried oregano
  • 3 cloves garlic minced
  • 1/4 cup olive oil
  • 1 lemon juiced
  • Salt and pepper to taste
  • Lemon wedges for serving

Method
 

  1. Preheat your oven to 400°F (200°C).
  2. In a mixing bowl, combine the breadcrumbs, Parmesan cheese, parsley, oregano, garlic, olive oil, lemon juice, salt, and pepper. Mix until well combined and the breadcrumbs are evenly coated.
  3. Arrange the shrimp in a single layer on a baking sheet.
  4. Spoon the breadcrumb mixture evenly over each shrimp, pressing down slightly to adhere.
  5. Bake in the preheated oven for 10-12 minutes, or until the shrimp are pink and cooked through, and the topping is golden brown.
  6. Remove from the oven and let cool for a couple of minutes. Serve with lemon wedges on the side.

Notes

  • For a spicier kick, add a pinch of red pepper flakes to the breadcrumb mixture.
  • Substitute the shrimp with scallops or fish fillets for a different seafood twist.

Decadent Hot Fudge Cake: Indulge in This Easy Recipe!

Introduction to Decadent Hot Fudge Cake

There’s something magical about a dessert that feels like a warm hug, and that’s exactly what this Decadent Hot Fudge Cake delivers. Picture a rich chocolate cake, oozing with gooey fudge, just waiting to be devoured. Whether you’re looking to impress guests or simply treat yourself after a long day, this recipe is your go-to solution. It’s quick, easy, and perfect for any occasion. Trust me, once you take that first bite, you’ll understand why this cake is a favorite among chocolate lovers everywhere.

Why You’ll Love This Decadent Hot Fudge Cake

This Decadent Hot Fudge Cake is a dream come true for busy home cooks. It’s incredibly easy to whip up, taking just about an hour from start to finish. The rich, chocolatey flavor is a crowd-pleaser, making it perfect for family gatherings or a cozy night in. Plus, the gooey fudge layer adds an indulgent twist that will have everyone coming back for seconds. Who can resist that?

Ingredients for Decadent Hot Fudge Cake

Gathering the right ingredients is the first step to creating this chocolate masterpiece. Here’s what you’ll need:

  • All-purpose flour: The backbone of your cake, providing structure and texture.
  • Granulated sugar: Sweetens the cake and helps it rise, giving it that perfect fluffiness.
  • Unsweetened cocoa powder: This is where the chocolate magic happens, adding rich flavor and color.
  • Baking powder: A leavening agent that helps the cake rise, ensuring it’s light and airy.
  • Salt: Just a pinch enhances the sweetness and balances the flavors.
  • Milk: Adds moisture and richness, making the cake tender.
  • Vegetable oil: Keeps the cake moist and adds a lovely texture.
  • Vanilla extract: A splash of this aromatic essence elevates the overall flavor.
  • Brown sugar: This adds a deeper sweetness and a hint of caramel flavor to the fudge layer.
  • Hot water: Surprisingly, this is key to creating that gooey fudge layer as it bakes.
  • Vanilla ice cream (optional): A scoop on top takes this dessert to the next level of indulgence.

For those looking to customize, consider adding a teaspoon of espresso powder to enhance the chocolate flavor. You can also toss in some chopped nuts or chocolate chips for added texture. Exact measurements for these ingredients can be found at the bottom of the article, ready for printing!

How to Make Decadent Hot Fudge Cake

Now that you have your ingredients ready, let’s dive into the fun part: making this Decadent Hot Fudge Cake! Follow these simple steps, and you’ll be savoring a slice of chocolate heaven in no time.

Step 1: Preheat and Prepare

First things first, preheat your oven to 350°F (175°C). This ensures your cake bakes evenly. While that’s heating up, grab a 9×13-inch baking dish and grease it well. You want to make sure your cake slides out easily when it’s done.

Step 2: Mix Dry Ingredients

In a large mixing bowl, combine the all-purpose flour, granulated sugar, unsweetened cocoa powder, baking powder, and salt. Whisk them together until they’re well blended. This step is crucial; it helps to evenly distribute the leavening agents and flavors throughout the cake.

Step 3: Add Wet Ingredients

Next, pour in the milk, vegetable oil, and vanilla extract. Stir gently until just combined. Be careful not to overmix; a few lumps are perfectly fine. This will keep your cake light and fluffy, which is exactly what you want!

Step 4: Pour the Batter

Now, transfer the batter into your prepared baking dish. Spread it out evenly with a spatula. This is where the magic begins, as the batter will soon transform into a rich chocolate delight.

Step 5: Create the Fudge Layer

In a separate bowl, mix the packed brown sugar and the remaining cocoa powder. Sprinkle this mixture evenly over the batter. Then, carefully pour the hot water over the top. Do not stir! The water will create that luscious fudge layer as it bakes, so trust the process.

Step 6: Bake

Pop the baking dish into your preheated oven and bake for 40-45 minutes. Keep an eye on it! You’ll know it’s done when the top is set and a toothpick inserted in the center comes out mostly clean. A few moist crumbs are okay; that just means more fudgy goodness!

Step 7: Serve

Once baked, let the cake cool for about 10 minutes. This waiting period is tough, but it’s worth it! Serve warm, ideally with a scoop of vanilla ice cream on top. The contrast of the hot cake and cold ice cream is pure bliss.

Tips for Success

  • Measure your ingredients accurately for the best results.
  • Don’t overmix the batter; a few lumps are okay!
  • Use hot water straight from the tap for the fudge layer.
  • Let the cake cool slightly before serving to enhance the flavors.
  • Experiment with toppings like whipped cream or fresh berries for a twist.

Equipment Needed

  • 9×13-inch baking dish: A standard size for this cake; a similar-sized pan works too.
  • Mixing bowls: Use any size; just ensure they’re large enough for your ingredients.
  • Whisk: A hand whisk is perfect, but an electric mixer can save time.
  • Spatula: Essential for spreading the batter evenly.
  • Measuring cups and spoons: Accurate measurements are key for success.

Variations

  • Gluten-Free Option: Substitute all-purpose flour with a gluten-free flour blend for a delicious gluten-free version.
  • Nutty Delight: Add chopped walnuts or pecans to the batter for a crunchy texture and nutty flavor.
  • Mint Chocolate: Incorporate a teaspoon of peppermint extract into the batter for a refreshing minty twist.
  • Spicy Kick: Add a pinch of cayenne pepper or cinnamon to the batter for a surprising flavor boost.
  • Vegan Version: Replace milk with almond or oat milk and use a flax egg instead of regular eggs for a plant-based treat.

Serving Suggestions

  • Pair with Ice Cream: A scoop of vanilla or chocolate ice cream complements the warm cake beautifully.
  • Fresh Berries: Serve with strawberries or raspberries for a refreshing contrast.
  • Chocolate Sauce: Drizzle extra chocolate sauce on top for an indulgent touch.
  • Whipped Cream: A dollop of whipped cream adds a light, airy finish.
  • Hot Coffee: Enjoy with a cup of coffee for a delightful dessert experience.

FAQs about Decadent Hot Fudge Cake

Can I make Decadent Hot Fudge Cake ahead of time?

Absolutely! You can prepare the cake a day in advance. Just bake it, let it cool, and store it covered in the fridge. When you’re ready to serve, warm it up slightly in the oven for that fresh-baked taste.

What can I substitute for vegetable oil?

If you’re out of vegetable oil, you can use melted butter or even applesauce for a healthier twist. Both options will keep your cake moist and delicious.

How do I store leftovers?

Store any leftover Decadent Hot Fudge Cake in an airtight container in the fridge. It should stay fresh for about 3-4 days. Just reheat individual slices in the microwave for a quick treat!

Can I freeze this cake?

Yes, you can freeze the cake! Wrap it tightly in plastic wrap and then in aluminum foil. It can last up to three months in the freezer. Just thaw it in the fridge overnight before serving.

What’s the best way to serve Decadent Hot Fudge Cake?

For the ultimate experience, serve it warm with a scoop of vanilla ice cream on top. The melting ice cream creates a delightful contrast with the warm fudge layer, making every bite heavenly!

Final Thoughts

Creating this Decadent Hot Fudge Cake is more than just baking; it’s about crafting a moment of joy. The rich aroma of chocolate fills your kitchen, wrapping you in warmth and nostalgia. Each slice offers a delightful contrast of textures, with the fudgy layer melting in your mouth. Whether you’re sharing it with family or savoring it solo, this cake brings smiles and satisfaction. It’s a simple yet indulgent treat that transforms any day into a special occasion. So, roll up your sleeves and dive into this chocolatey adventure—you won’t regret it!

Paul

Decadent Hot Fudge Cake: Indulge in This Easy Recipe!

A rich and indulgent dessert that combines a chocolate cake with a gooey fudge layer, perfect for chocolate lovers.
Prep Time 15 minutes
Cook Time 45 minutes
Total Time 1 hour
Servings: 8 servings
Course: Dessert
Cuisine: American
Calories: 320

Ingredients
  

  • 1 cup all-purpose flour
  • 1 cup granulated sugar
  • 1/2 cup unsweetened cocoa powder
  • 2 teaspoons baking powder
  • 1/2 teaspoon salt
  • 1 cup milk
  • 1/3 cup vegetable oil
  • 2 teaspoons vanilla extract
  • 1 cup packed brown sugar
  • 1 3/4 cups hot water
  • Vanilla ice cream optional, for serving

Method
 

  1. Preheat your oven to 350°F (175°C). Grease a 9x13-inch baking dish.
  2. In a large mixing bowl, combine the flour, granulated sugar, cocoa powder, baking powder, and salt. Mix well.
  3. Add the milk, vegetable oil, and vanilla extract to the dry ingredients. Stir until just combined; do not overmix.
  4. Pour the batter into the prepared baking dish, spreading it evenly.
  5. In a separate bowl, mix the brown sugar and remaining cocoa powder. Sprinkle this mixture evenly over the batter.
  6. Carefully pour the hot water over the top of the cake batter. Do not stir; the water will create a fudge layer as it bakes.
  7. Bake in the preheated oven for 40-45 minutes, or until the top is set and a toothpick inserted in the center comes out mostly clean.
  8. Let the cake cool for about 10 minutes before serving. Serve warm, ideally with a scoop of vanilla ice cream on top.

Notes

  • For a richer flavor, add a teaspoon of espresso powder to the batter to enhance the chocolate taste.
  • Try adding chopped nuts or chocolate chips to the batter for added texture and flavor.

Shrimp Egg Roll in a Bowl: A Quick, Tasty Recipe!

Introduction to Shrimp Egg Roll in a Bowl

After a long day, the last thing I want is to spend hours in the kitchen. That’s where my Shrimp Egg Roll in a Bowl comes to the rescue! This dish is a delightful blend of shrimp, fresh veggies, and savory sauces, all in one bowl. It’s quick, easy, and bursting with flavor, making it the perfect solution for busy weeknights or a casual dinner with friends. Plus, it’s a healthier twist on traditional egg rolls, so you can indulge without the guilt. Trust me, your taste buds will thank you!

Why You’ll Love This Shrimp Egg Roll in a Bowl

This Shrimp Egg Roll in a Bowl is a game-changer for anyone who craves flavor without the fuss. It comes together in just 25 minutes, making it a lifesaver on hectic nights. The combination of tender shrimp and crisp veggies creates a satisfying crunch that will have you coming back for seconds. Plus, it’s a low-calorie option that doesn’t skimp on taste, so you can enjoy every bite guilt-free!

Ingredients for Shrimp Egg Roll in a Bowl

Gathering the right ingredients is key to making a delicious Shrimp Egg Roll in a Bowl. Here’s what you’ll need:

  • Shrimp: Large, peeled, and deveined shrimp are the star of this dish, providing a protein-packed punch.
  • Olive Oil: A splash of olive oil helps sauté the aromatics and shrimp, adding a rich flavor.
  • Shredded Carrots: These add a sweet crunch and vibrant color to the mix.
  • Coleslaw Mix: A blend of cabbage and carrots gives that classic egg roll taste without the wrapper.
  • Green Onions: Sliced green onions bring a fresh, zesty kick to the dish.
  • Garlic: Minced garlic infuses the dish with a warm, aromatic flavor.
  • Fresh Ginger: A touch of minced ginger adds a delightful zing and depth.
  • Coconut Aminos: This soy sauce alternative is perfect for a savory, umami flavor.
  • Rice Vinegar: A splash of rice vinegar brightens the dish with a tangy note.
  • Sesame Oil: Just a drizzle enhances the overall flavor with its nutty essence.
  • Salt and Pepper: Essential for seasoning to taste, bringing all the flavors together.
  • Sesame Seeds: Optional, but they make a lovely garnish for added texture and visual appeal.

For those looking to mix things up, consider tossing in some chopped water chestnuts or bell peppers for extra crunch. If shrimp isn’t your thing, feel free to substitute with chicken or tofu. You can find the exact quantities for each ingredient at the bottom of the article, ready for printing!

How to Make Shrimp Egg Roll in a Bowl

Now that you have your ingredients ready, let’s dive into the cooking process! This Shrimp Egg Roll in a Bowl is not only quick but also a fun way to get your family involved. Follow these simple steps, and you’ll have a delicious meal in no time!

Step 1: Sauté Aromatics

Start by heating a large skillet over medium heat. Add a tablespoon of olive oil and let it warm up. Once it’s shimmering, toss in the minced garlic and ginger. Sauté for about a minute until they become fragrant. This step is crucial; it sets the flavor foundation for your dish!

Step 2: Cook the Shrimp

Next, add the shrimp to the skillet. Cook them for 2-3 minutes, stirring occasionally. You’ll know they’re done when they turn pink and opaque. Once cooked, remove the shrimp from the skillet and set them aside. This keeps them juicy and prevents overcooking.

Step 3: Stir-Fry Vegetables

In the same skillet, it’s time to add the shredded carrots and coleslaw mix. Stir-fry these vibrant veggies for about 5 minutes. You want them tender but still crisp. This is where the magic happens, as the veggies soak up all those delicious flavors!

Step 4: Combine Ingredients

Return the cooked shrimp to the skillet with the veggies. Pour in the coconut aminos, rice vinegar, and sesame oil. Stir everything together, ensuring the shrimp and veggies are well-coated in the sauce. Cook for an additional 2 minutes to let the flavors meld beautifully.

Step 5: Season and Serve

Finally, season your dish with salt and pepper to taste. Remove it from the heat and garnish with sliced green onions and sesame seeds if you like. Serve it hot, and watch everyone dig in with delight! This Shrimp Egg Roll in a Bowl is sure to impress!

Tips for Success

  • Prep all your ingredients before starting to cook. It makes the process smoother.
  • Don’t overcrowd the skillet; cook in batches if necessary for even cooking.
  • Adjust the seasoning to your taste. A little extra ginger or garlic can elevate the dish.
  • For a spicier kick, add red pepper flakes or sriracha.
  • Serve immediately for the best texture and flavor.

Equipment Needed

  • Large Skillet: A non-stick skillet works best, but any large pan will do.
  • Spatula: A wooden or silicone spatula is perfect for stirring without scratching your pan.
  • Knife and Cutting Board: Essential for chopping veggies and shrimp.
  • Measuring Spoons: Handy for precise ingredient measurements.

Variations

  • Protein Swap: Substitute shrimp with chicken, beef, or tofu for a different protein experience.
  • Vegetarian Delight: Omit the shrimp and add more vegetables like bell peppers, snap peas, or mushrooms.
  • Spicy Kick: Incorporate diced jalapeños or a splash of sriracha for a fiery twist.
  • Low-Carb Option: Use cauliflower rice instead of coleslaw mix for a lighter, low-carb version.
  • Herb Infusion: Add fresh herbs like cilantro or basil for an aromatic boost.

Serving Suggestions

  • Rice or Noodles: Serve over steamed jasmine rice or rice noodles for a heartier meal.
  • Fresh Salad: Pair with a light cucumber salad for a refreshing contrast.
  • Drink Pairing: Enjoy with a crisp iced tea or a light beer.
  • Presentation: Garnish with extra green onions and sesame seeds for a pop of color.

FAQs about Shrimp Egg Roll in a Bowl

Can I make this Shrimp Egg Roll in a Bowl ahead of time?

Absolutely! You can prepare the ingredients and store them separately in the fridge. When you’re ready to eat, just stir-fry everything together. It’s a great way to save time on busy nights!

What can I substitute for shrimp?

If shrimp isn’t your thing, you can easily swap it out for chicken, beef, or even tofu. Each option brings its own unique flavor, so feel free to experiment!

Is this dish gluten-free?

Yes, as long as you use gluten-free coconut aminos instead of soy sauce, this Shrimp Egg Roll in a Bowl can be a gluten-free delight. Always check labels to be sure!

How can I make this recipe spicier?

For a spicy kick, add red pepper flakes or a splash of sriracha during the cooking process. You can also toss in some diced jalapeños for an extra layer of heat!

Can I freeze leftovers?

While it’s best enjoyed fresh, you can freeze leftovers. Just make sure to store them in an airtight container. When you’re ready to eat, thaw and reheat in a skillet for the best texture.

Final Thoughts

Cooking this Shrimp Egg Roll in a Bowl is more than just preparing a meal; it’s about creating a moment of joy in your kitchen. The vibrant colors, enticing aromas, and satisfying crunch come together to make a dish that feels both comforting and exciting. Whether you’re whipping it up for a quick weeknight dinner or impressing friends at a casual gathering, this recipe delivers on flavor and ease. Plus, it’s a fantastic way to enjoy a healthier version of a classic favorite. So grab your skillet and let the deliciousness unfold—your taste buds are in for a treat!

Paul

Shrimp Egg Roll in a Bowl: A Quick, Tasty Recipe!

A quick and tasty recipe for Shrimp Egg Roll in a Bowl, combining shrimp, vegetables, and flavorful sauces.
Prep Time 10 minutes
Cook Time 15 minutes
Total Time 25 minutes
Course: Main Dish
Cuisine: Asian
Calories: 220

Ingredients
  

  • 1 pound large shrimp peeled and deveined
  • 1 tablespoon olive oil
  • 1 cup shredded carrots
  • 4 cups coleslaw mix cabbage and carrots
  • 3 green onions sliced
  • 3 cloves garlic minced
  • 1 tablespoon fresh ginger minced
  • 3 tablespoons coconut aminos
  • 1 tablespoon rice vinegar
  • 1 teaspoon sesame oil
  • Salt and pepper to taste
  • Sesame seeds for garnish optional

Method
 

  1. In a large skillet, heat the olive oil over medium heat. Add the minced garlic and ginger, sautéing for about 1 minute until fragrant.
  2. Add the shrimp to the skillet and cook for 2-3 minutes, or until they turn pink and opaque. Remove the shrimp from the skillet and set aside.
  3. In the same skillet, add the shredded carrots and coleslaw mix. Stir-fry for about 5 minutes until the vegetables are tender but still crisp.
  4. Return the cooked shrimp to the skillet. Pour in the coconut aminos, rice vinegar, and sesame oil. Stir everything together and cook for an additional 2 minutes.
  5. Season with salt and pepper to taste. Remove from heat and garnish with sliced green onions and sesame seeds if desired.

Notes

  • For added crunch, toss in some chopped water chestnuts or bell peppers during the stir-fry.
  • Substitute shrimp with chicken or tofu for a different protein option.

Honey Pineapple Glazed Salmon Recipe You Must Try Today!

Introduction to Honey Pineapple Glazed Salmon

Cooking can sometimes feel like a chore, especially on those busy weeknights when you just want something quick yet delicious. That’s where this Honey Pineapple Glazed Salmon comes in. It’s a delightful blend of sweet and savory that’s not only easy to whip up but also impressive enough to serve to guests. I remember the first time I made this dish; the aroma filled my kitchen, and my family couldn’t wait to dig in. This recipe is perfect for anyone looking to elevate their dinner game without spending hours in the kitchen.

Why You’ll Love This Honey Pineapple Glazed Salmon

This Honey Pineapple Glazed Salmon is a game-changer for your dinner routine. It’s incredibly easy to prepare, taking just 30 minutes from start to finish. The combination of honey and pineapple creates a mouthwatering glaze that perfectly complements the rich flavor of salmon. Plus, it’s a healthy option packed with protein and omega-3s. Whether you’re cooking for yourself or impressing guests, this dish is sure to become a favorite!

Ingredients for Honey Pineapple Glazed Salmon

Gathering the right ingredients is the first step to creating a memorable meal. For this Honey Pineapple Glazed Salmon, you’ll need a few key components that come together beautifully.

  • Salmon fillets: Fresh salmon is the star of this dish, offering a rich flavor and flaky texture. Look for wild-caught if possible for the best taste.
  • Honey: This natural sweetener adds a delightful sweetness to the glaze, balancing the savory elements perfectly.
  • Pineapple juice: Fresh or canned, pineapple juice brings a tropical flair and acidity that brightens the dish.
  • Soy sauce: A splash of soy sauce adds depth and umami, enhancing the overall flavor profile.
  • Olive oil: This helps to keep the salmon moist while grilling and adds a subtle richness.
  • Minced garlic: Garlic infuses the marinade with a savory kick, elevating the taste of the salmon.
  • Ground ginger: A hint of ginger adds warmth and a touch of spice, complementing the sweetness of the honey and pineapple.
  • Salt and pepper: Essential for seasoning, these staples enhance the natural flavors of the salmon.
  • Fresh pineapple slices (optional): Grilling fresh pineapple adds a caramelized sweetness that pairs wonderfully with the salmon.
  • Chopped green onions (for garnish): These add a pop of color and a fresh, mild onion flavor to finish the dish.

For exact measurements, check the bottom of the article where you can find everything listed for easy printing. Feel free to get creative with substitutions; for instance, chicken breasts or tofu can work well if you’re looking for alternatives!

How to Make Honey Pineapple Glazed Salmon

Now that you have your ingredients ready, let’s dive into the steps for making this delicious Honey Pineapple Glazed Salmon. Each step is straightforward, ensuring you can whip this up with ease. Let’s get cooking!

Step 1: Preheat the Grill

Preheating your grill is crucial for achieving that perfect sear on your salmon. It helps lock in moisture and flavor. Set your grill or grill pan to medium-high heat. If you’re using a grill, lightly oil the grates to prevent sticking. This little step makes a big difference!

Step 2: Prepare the Marinade

In a small bowl, whisk together the honey, pineapple juice, soy sauce, olive oil, minced garlic, and ground ginger. Each ingredient plays a role: honey adds sweetness, pineapple juice brings acidity, and soy sauce adds depth. This marinade is the heart of your dish, so mix it well until combined.

Step 3: Season the Salmon

Seasoning your salmon fillets with salt and pepper is essential. It enhances the natural flavors and ensures every bite is delicious. Don’t be shy—season generously on both sides. This simple step elevates your dish from good to great!

Step 4: Marinate the Salmon

Place the seasoned salmon in a shallow dish and pour half of the honey-pineapple mixture over it. Let it marinate for about 15-20 minutes. This allows the flavors to penetrate the fish, making it even more flavorful. If you have time, marinating longer can deepen the taste.

Step 5: Grill the Salmon

Remove the salmon from the marinade and place it on the grill. Cook for 4-5 minutes on each side. During the last few minutes, baste the salmon with the reserved honey-pineapple mixture. This adds a glossy finish and extra flavor. If you’re grilling fresh pineapple slices, add them to the grill for about 2-3 minutes on each side until they have beautiful grill marks.

Step 6: Rest and Serve

Once the salmon is cooked through and flakes easily with a fork, remove it from the grill. Let it rest for a couple of minutes. Resting allows the juices to redistribute, keeping the salmon moist. Serve it garnished with chopped green onions and those lovely grilled pineapple slices for a stunning presentation!

Tips for Success

  • Always preheat your grill for the best sear and flavor.
  • Don’t skip the marinating step; it’s key for flavor infusion.
  • Use a meat thermometer to ensure your salmon reaches 145°F for perfect doneness.
  • Experiment with the marinade by adding spices like red pepper flakes for a kick.
  • For a smoky flavor, try using cedar planks on the grill.

Equipment Needed

  • Grill or Grill Pan: A standard outdoor grill works best, but a grill pan on the stovetop is a great alternative.
  • Whisk: Essential for mixing the marinade; a fork can work in a pinch.
  • Shallow Dish: For marinating the salmon; any flat dish will do.
  • Spatula: To flip the salmon gently on the grill.
  • Meat Thermometer: Optional, but helpful for checking doneness.

Variations

  • Spicy Honey Pineapple Glazed Salmon: Add a pinch of red pepper flakes to the marinade for a spicy kick that complements the sweetness.
  • Teriyaki Style: Substitute soy sauce with teriyaki sauce for a different flavor profile that adds a sweet and savory twist.
  • Herb-Infused: Mix in fresh herbs like cilantro or basil into the marinade for an aromatic touch that brightens the dish.
  • Grilled Chicken or Tofu: Swap out salmon for chicken breasts or firm tofu for a different protein option that still captures the essence of the glaze.
  • Fruit Medley: Experiment with other fruits like mango or peach slices on the grill for a tropical flair alongside your salmon.

Serving Suggestions

  • Steamed Asparagus: The crispness of asparagus pairs beautifully with the sweet glaze.
  • Quinoa Salad: A light quinoa salad with cucumbers and tomatoes complements the richness of the salmon.
  • White Wine: Serve with a chilled Sauvignon Blanc for a refreshing contrast.
  • Presentation: Plate the salmon on a bed of greens and drizzle with extra glaze for a stunning look.

FAQs about Honey Pineapple Glazed Salmon

Can I use frozen salmon for this recipe?

Absolutely! Just make sure to thaw the salmon completely before marinating. Frozen salmon can still be delicious when cooked properly.

What can I substitute for honey in the glaze?

If you’re looking for alternatives, maple syrup or agave nectar can work well. They’ll provide a similar sweetness, though the flavor will vary slightly.

How do I know when the salmon is done cooking?

The best way to check is by using a meat thermometer. Salmon should reach an internal temperature of 145°F. If you don’t have one, look for the fish to flake easily with a fork.

Can I make the marinade ahead of time?

Yes! You can prepare the marinade a day in advance and store it in the fridge. Just give it a good stir before using it to ensure everything is well mixed.

What sides pair well with Honey Pineapple Glazed Salmon?

Steamed vegetables, a light salad, or even coconut rice make excellent companions. They balance the sweetness of the glaze and enhance the overall meal experience.

Final Thoughts

Cooking this Honey Pineapple Glazed Salmon is more than just preparing a meal; it’s about creating a moment. The sweet aroma wafting through your kitchen, the vibrant colors on your plate, and the smiles around the table make it all worthwhile. This dish is a celebration of flavors that brings everyone together, whether it’s a casual weeknight dinner or a special occasion. I love how simple ingredients can transform into something extraordinary. So, fire up that grill, and let this recipe bring joy and deliciousness to your dining experience. You won’t regret it!

Paul

Honey Pineapple Glazed Salmon Recipe You Must Try Today!

A delicious and easy recipe for Honey Pineapple Glazed Salmon that combines sweet and savory flavors.
Prep Time 20 minutes
Cook Time 10 minutes
Total Time 30 minutes
Servings: 2 servings
Course: Main Course
Cuisine: American
Calories: 350

Ingredients
  

  • 2 6-ounce salmon fillets
  • 1/4 cup honey
  • 1/4 cup pineapple juice
  • 2 tablespoons soy sauce
  • 1 tablespoon olive oil
  • 1 teaspoon minced garlic
  • 1/2 teaspoon ground ginger
  • Salt and pepper to taste
  • Fresh pineapple slices for grilling (optional)
  • Chopped green onions for garnish

Method
 

  1. Preheat your grill or a grill pan over medium-high heat. If using a grill, lightly oil the grates to prevent sticking.
  2. In a small bowl, whisk together the honey, pineapple juice, soy sauce, olive oil, minced garlic, and ground ginger until well combined.
  3. Season the salmon fillets with salt and pepper on both sides.
  4. Place the salmon fillets in a shallow dish and pour half of the honey-pineapple mixture over them, reserving the other half for later. Let the salmon marinate for about 15-20 minutes.
  5. If using fresh pineapple slices, brush them lightly with olive oil and set aside.
  6. Remove the salmon from the marinade and place it on the grill. Cook for 4-5 minutes on each side, basting with the reserved honey-pineapple mixture during the last few minutes of cooking. If using pineapple slices, grill them for about 2-3 minutes on each side until grill marks appear.
  7. Once the salmon is cooked through and flakes easily with a fork, remove it from the grill and let it rest for a couple of minutes.
  8. Serve the salmon garnished with chopped green onions and grilled pineapple slices, if desired.

Notes

  • For a spicier kick, add a pinch of red pepper flakes to the marinade.
  • Substitute the salmon with chicken breasts or tofu for a different protein option.

Grilled Chicken Pasta Salad with Balsamic Vinaigrette: Discover a Fresh Flavor!

Introduction to Grilled Chicken Pasta Salad with Balsamic Vinaigrette

When the sun shines and the days get longer, I crave something light yet satisfying. That’s where my Grilled Chicken Pasta Salad with Balsamic Vinaigrette comes in. It’s the perfect dish for those busy evenings when you want to whip up something quick but still impress your family or friends.

This salad is not just a meal; it’s a celebration of fresh flavors and vibrant colors. With juicy grilled chicken, crisp veggies, and a tangy dressing, it’s a delightful way to enjoy a healthy meal without spending hours in the kitchen.

Why You’ll Love This Grilled Chicken Pasta Salad with Balsamic Vinaigrette

This Grilled Chicken Pasta Salad with Balsamic Vinaigrette is a game-changer for busy weeknights.

It’s quick to prepare, taking just 25 minutes from start to finish.

The combination of tender chicken, fresh veggies, and a zesty dressing creates a flavor explosion that will have everyone asking for seconds.

Plus, it’s versatile enough to serve as a main dish or a side, making it a must-have in your recipe arsenal.

Ingredients for Grilled Chicken Pasta Salad with Balsamic Vinaigrette

Creating a delicious Grilled Chicken Pasta Salad with Balsamic Vinaigrette starts with gathering the right ingredients. Here’s what you’ll need:

  • Rotini pasta: This spiral-shaped pasta holds onto the dressing beautifully, making every bite flavorful.
  • Cooked chicken: Diced grilled chicken adds protein and heartiness. You can use leftovers or rotisserie chicken for convenience.
  • Cherry tomatoes: These sweet, juicy gems bring a burst of color and freshness to the salad.
  • Cucumber: Diced cucumber adds a refreshing crunch, balancing the richness of the chicken.
  • Red onion: Thinly sliced red onion provides a mild bite that complements the other ingredients.
  • Feta cheese: Crumbled feta adds a creamy, tangy element that elevates the flavor profile.
  • Fresh basil: Chopped basil introduces a fragrant herbaceous note, enhancing the overall freshness.
  • Olive oil: A key ingredient in the dressing, it adds richness and helps emulsify the vinaigrette.
  • Balsamic vinegar: This tangy vinegar is the star of the dressing, giving it a sweet and sour kick.
  • Dijon mustard: A touch of Dijon adds depth and a slight tang to the dressing.
  • Honey: A drizzle of honey balances the acidity of the vinegar, creating a harmonious flavor.
  • Salt and pepper: Essential for seasoning, these staples enhance all the flavors in the salad.

Feel free to get creative! You can add grilled vegetables like bell peppers or zucchini for extra flavor and nutrition.

For those looking for a creamier dressing, consider substituting Greek yogurt for half of the olive oil.

Exact quantities for each ingredient are available at the bottom of the article for easy printing.

How to Make Grilled Chicken Pasta Salad with Balsamic Vinaigrette

Making this Grilled Chicken Pasta Salad with Balsamic Vinaigrette is a breeze.

Follow these simple steps, and you’ll have a delicious meal ready in no time.

Step 1: Cook the Pasta

Start by boiling a pot of salted water.

Add the rotini pasta and cook according to the package instructions until al dente.

This usually takes about 8 to 10 minutes.

Once done, drain the pasta and rinse it under cold water.

This step cools it down and prevents it from sticking together.

Step 2: Combine the Ingredients

In a large mixing bowl, combine the cooled pasta, diced chicken, cherry tomatoes, cucumber, red onion, feta cheese, and fresh basil.

Make sure to mix them gently to keep the ingredients intact.

Each bite should be a delightful mix of flavors and textures.

Step 3: Prepare the Dressing

In a small bowl, whisk together the olive oil, balsamic vinegar, Dijon mustard, honey, salt, and pepper.

This dressing is where the magic happens!

The balance of sweet and tangy will elevate your salad.

Make sure it’s well combined for an even flavor throughout.

Step 4: Toss the Salad

Pour the dressing over the pasta salad.

Toss everything together gently until all the ingredients are coated.

This is the moment when your salad transforms into a vibrant dish bursting with flavor.

Step 5: Chill and Serve

Cover the salad and refrigerate it for at least 30 minutes.

This allows the flavors to meld beautifully.

When you’re ready to serve, you can enjoy it chilled or at room temperature.

Trust me, the wait is worth it!

Tips for Success

  • Always salt your pasta water; it enhances the flavor of the pasta.
  • For a quicker meal, use pre-cooked chicken or rotisserie chicken.
  • Let the salad chill for at least 30 minutes to allow flavors to develop.
  • Feel free to customize with your favorite veggies or proteins.
  • Store leftovers in an airtight container for up to three days.

Equipment Needed

  • Large pot: For boiling pasta. A deep skillet can work in a pinch.
  • Colander: To drain the pasta. A fine mesh strainer is a good alternative.
  • Mixing bowl: A large bowl for combining ingredients. Any large dish will do.
  • Whisk: For mixing the dressing. A fork can also get the job done.
  • Measuring cups and spoons: For accurate ingredient measurements. Use your eyes if you’re feeling adventurous!

Variations

  • Grilled Vegetables: Add bell peppers, zucchini, or asparagus for a smoky flavor and extra nutrients.
  • Protein Swaps: Substitute grilled shrimp or tofu for a different protein option that still packs a punch.
  • Pasta Alternatives: Use whole wheat or gluten-free pasta to cater to dietary preferences.
  • Herb Infusion: Experiment with different herbs like parsley or cilantro for a unique twist on flavor.
  • Cheese Choices: Swap feta for goat cheese or mozzarella for a creamier texture.

Serving Suggestions

  • Pair with Garlic Bread: A warm slice of garlic bread complements the salad perfectly.
  • Refreshing Drink: Serve with a chilled glass of lemonade or iced tea for a refreshing touch.
  • Presentation: Garnish with extra basil or a sprinkle of feta for a beautiful finish.
  • Side Options: Consider a light fruit salad or a simple green salad for added variety.

FAQs about Grilled Chicken Pasta Salad with Balsamic Vinaigrette

Can I make this salad ahead of time?

Absolutely! This Grilled Chicken Pasta Salad with Balsamic Vinaigrette tastes even better after sitting for a while. You can prepare it a day in advance and store it in the fridge. Just give it a good toss before serving to refresh the flavors.

What can I substitute for balsamic vinegar?

If you’re not a fan of balsamic vinegar, you can use red wine vinegar or apple cider vinegar instead. Both will add a nice tang to the dressing, though the flavor will differ slightly.

Is this salad gluten-free?

Yes, this salad can be made gluten-free by using gluten-free rotini pasta. Just check the packaging to ensure it meets your dietary needs.

How long will leftovers last?

Leftovers of this Grilled Chicken Pasta Salad can be stored in an airtight container in the fridge for up to three days. Just keep in mind that the veggies may lose some crunch over time.

Can I add more protein to this salad?

Definitely! You can add grilled shrimp, diced ham, or even chickpeas for an extra protein boost. This salad is versatile, so feel free to get creative!

Final Thoughts

Creating this Grilled Chicken Pasta Salad with Balsamic Vinaigrette is more than just cooking; it’s about bringing joy to the table.

Each bite is a delightful mix of flavors that can brighten any day.

Whether you’re enjoying it on a sunny patio or sharing it at a family gathering, this salad is sure to impress.

It’s quick, easy, and packed with fresh ingredients, making it a go-to recipe for any occasion.

So, roll up your sleeves, gather your loved ones, and dive into this vibrant dish that celebrates the simple pleasures of good food.

Paul

Grilled Chicken Pasta Salad with Balsamic Vinaigrette: Discover a Fresh Flavor!

A refreshing Grilled Chicken Pasta Salad with Balsamic Vinaigrette, perfect for a light meal or side dish.
Prep Time 15 minutes
Cook Time 10 minutes
Total Time 25 minutes
Servings: 4 servings
Course: Salad
Cuisine: American
Calories: 350

Ingredients
  

  • 8 ounces rotini pasta
  • 2 cups cooked chicken diced
  • 1 cup cherry tomatoes halved
  • 1 cup cucumber diced
  • 1/2 cup red onion thinly sliced
  • 1/2 cup feta cheese crumbled
  • 1/4 cup fresh basil chopped
  • 1/4 cup olive oil
  • 2 tablespoons balsamic vinegar
  • 1 teaspoon Dijon mustard
  • 1 teaspoon honey
  • Salt and pepper to taste

Method
 

  1. Cook the rotini pasta according to package instructions until al dente. Drain and rinse under cold water to cool.
  2. In a large bowl, combine the cooked pasta, diced chicken, cherry tomatoes, cucumber, red onion, feta cheese, and fresh basil.
  3. In a small bowl, whisk together the olive oil, balsamic vinegar, Dijon mustard, honey, salt, and pepper until well combined.
  4. Pour the dressing over the pasta salad and toss gently to combine all ingredients evenly.
  5. Refrigerate the salad for at least 30 minutes to allow the flavors to meld. Serve chilled or at room temperature.

Notes

  • For a creamier dressing, substitute Greek yogurt for half of the olive oil.
  • Add grilled vegetables like bell peppers or zucchini for extra flavor and nutrition.