As I sifted through my pantry one sunny afternoon, the vibrant pink grapefruits caught my eye, whispering promises of zesty delights. That’s when I decided it was high time to create a Grapefruit Pie Recipe that beautifully blends tangy citrus with creamy decadent goodness. This dessert not only elevates your culinary repertoire but also requires minimal prep time, making it the perfect treat for surprise guests or a satisfying end to a weeknight dinner. With its crunchy graham cracker crust and luscious filling, every bite is a delightful dance of sweet and tangy flavors that will leave you craving just one more slice. Are you ready to indulge in a refreshing twist on classic desserts?
Why is Grapefruit Pie the Ultimate Dessert?
Refreshing and unique, this grapefruit pie recipe offers a delightful twist on traditional desserts. Easy to prepare, you’ll impress your friends and family with minimal effort. Zesty flavor comes from fresh grapefruit juice, balancing perfectly with the creamy filling. Versatile enough to serve at any gathering, it’s a crowd-pleaser that simply shines. For a wholesome experience, consider pairing it with homemade whipped cream, just like in our delicious Matcha Sponge Cake or our rich Banana Bread Brownies.
Grapefruit Pie Ingredients
• Treat yourself to this delightful grapefruit pie recipe with these easy-to-find ingredients.
For the Filling
- Sweetened Condensed Milk – This is essential for creating a creamy, luscious custard that embodies the pie’s rich flavor.
- Fresh Grapefruit Juice – Freshly squeezed juice provides the vibrant tartness integral to the pie’s refreshing taste; avoid using store-bought options.
- Granulated Sugar – This balances the pie’s tangy citrus; feel free to adjust the amount based on your sweetness preference.
- Egg Yolks – Vital for structure and richness, they contribute to the overall flavor; remember, no substitutes with egg whites!
For the Crust
- Graham Cracker Crust – This delightful crunchy base pairs beautifully with the smooth filling; consider a homemade version for an extra touch!
Step‑by‑Step Instructions for Grapefruit Pie Recipe
Step 1: Preheat the Oven
Begin by preheating your oven to 325°F (163°C). This ensures a perfect baking temperature for the grapefruit pie. While the oven heats up, gather your ingredients and equipment, including a mixing bowl and a baking sheet, to streamline your preparation process.
Step 2: Prepare the Grapefruit Juice
Juice two large grapefruits to yield about one cup of fresh grapefruit juice. Using freshly squeezed juice is key to achieving that bold citrus flavor in your grapefruit pie. To enhance the taste, strain the juice through a sieve to remove any seeds or pulp, ensuring a smooth filling.
Step 3: Beat the Egg Yolks
In a medium bowl, beat the egg yolks until they become light and fluffy, about 2-3 minutes. Gradually incorporate the sweetened condensed milk and granulated sugar into the yolks. Mix until fully combined and smooth, creating a rich custard base for your grapefruit pie recipe.
Step 4: Combine the Mixtures
Slowly add the strained grapefruit juice into the egg mixture, whisking gently until all ingredients are well blended. You should achieve a vibrant, creamy mixture that boasts both tang and sweetness, perfect for filling your pie. Take a moment to appreciate the delightful color and aroma!
Step 5: Pour into the Crust
Place your graham cracker crust on a baking sheet for stability, then pour the grapefruit filling into the crust. Ensure an even distribution, and watch for any air bubbles as you fill. This step is crucial for a smooth texture in your finished grapefruit pie.
Step 6: Bake the Pie
Carefully place the baking sheet in the preheated oven and bake for approximately 25 minutes. The filling should be set but still slightly wobbly in the center — this indicates a creamy, luscious texture is on its way. Keep an eye on it to avoid overbaking!
Step 7: Cool and Refrigerate
Once baked, remove the grapefruit pie from the oven and allow it to cool at room temperature for about 30 minutes. After cooling, it’s important to refrigerate the pie for at least 3 hours or overnight, helping it firm up and develop rich flavors before serving.
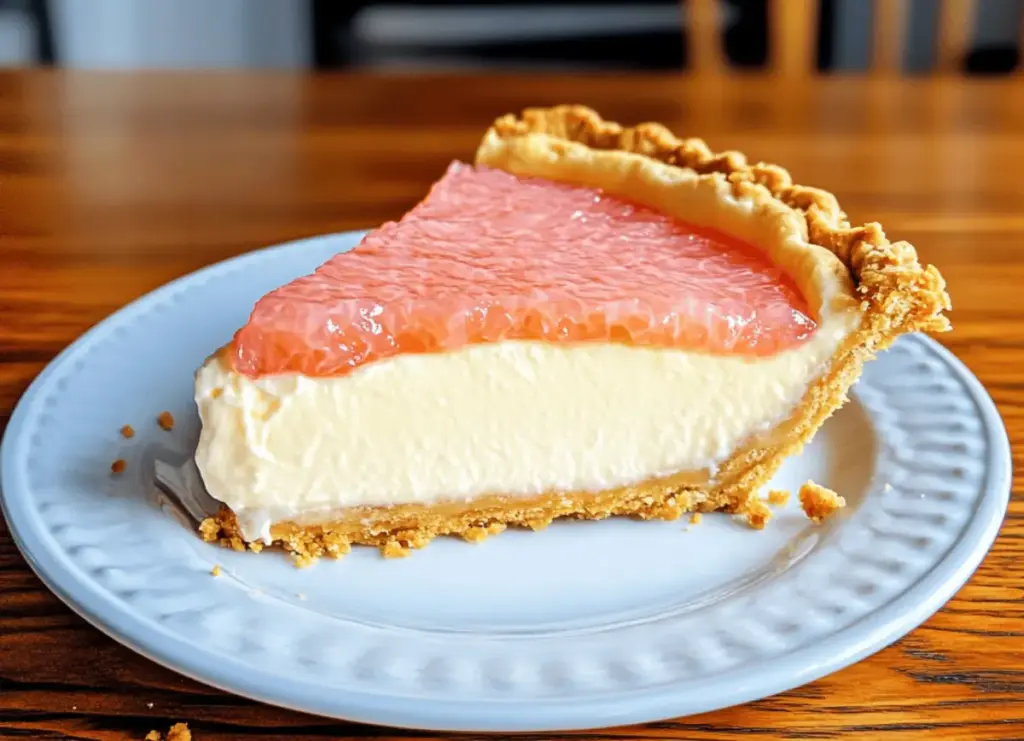
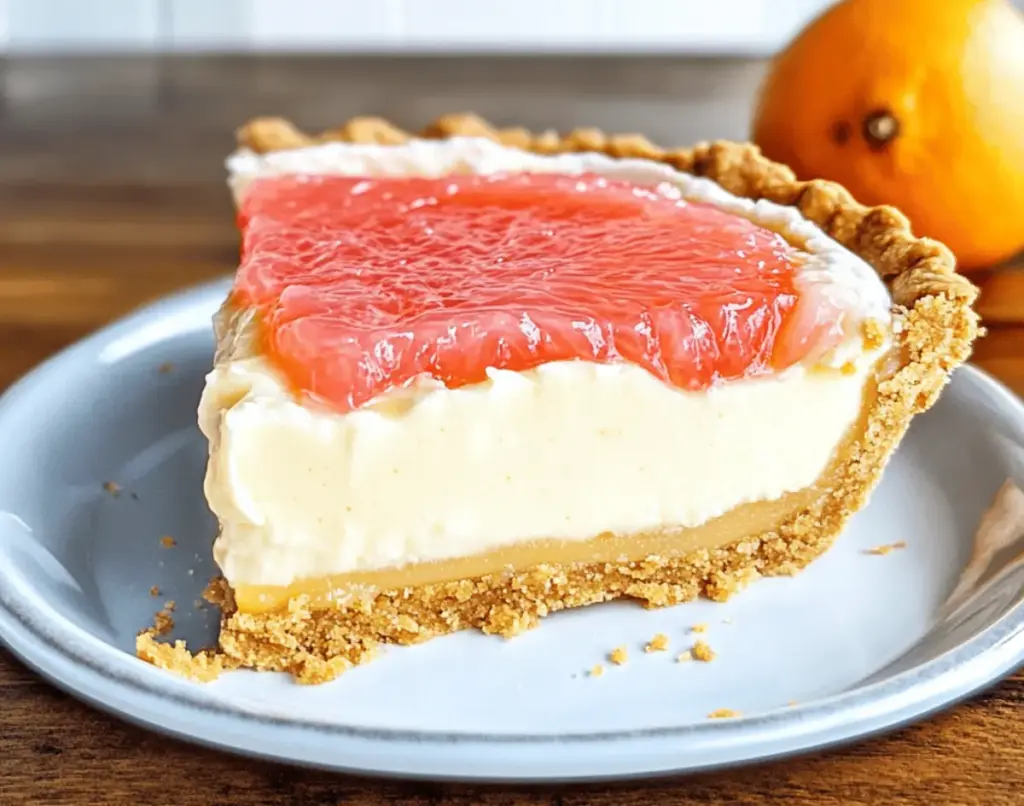
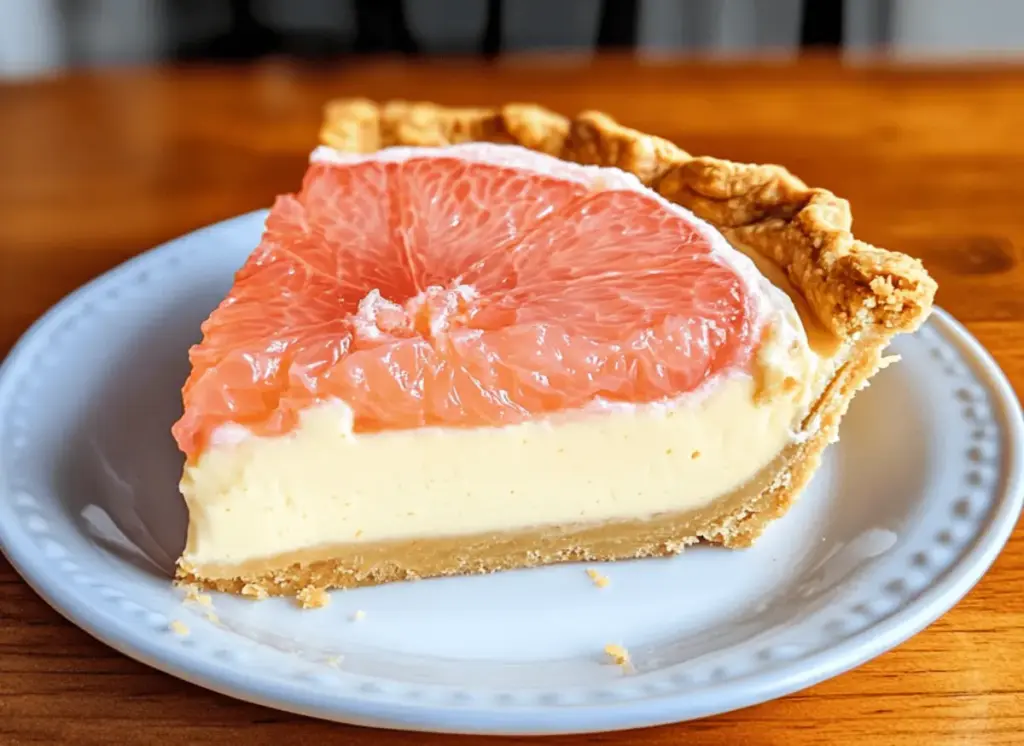
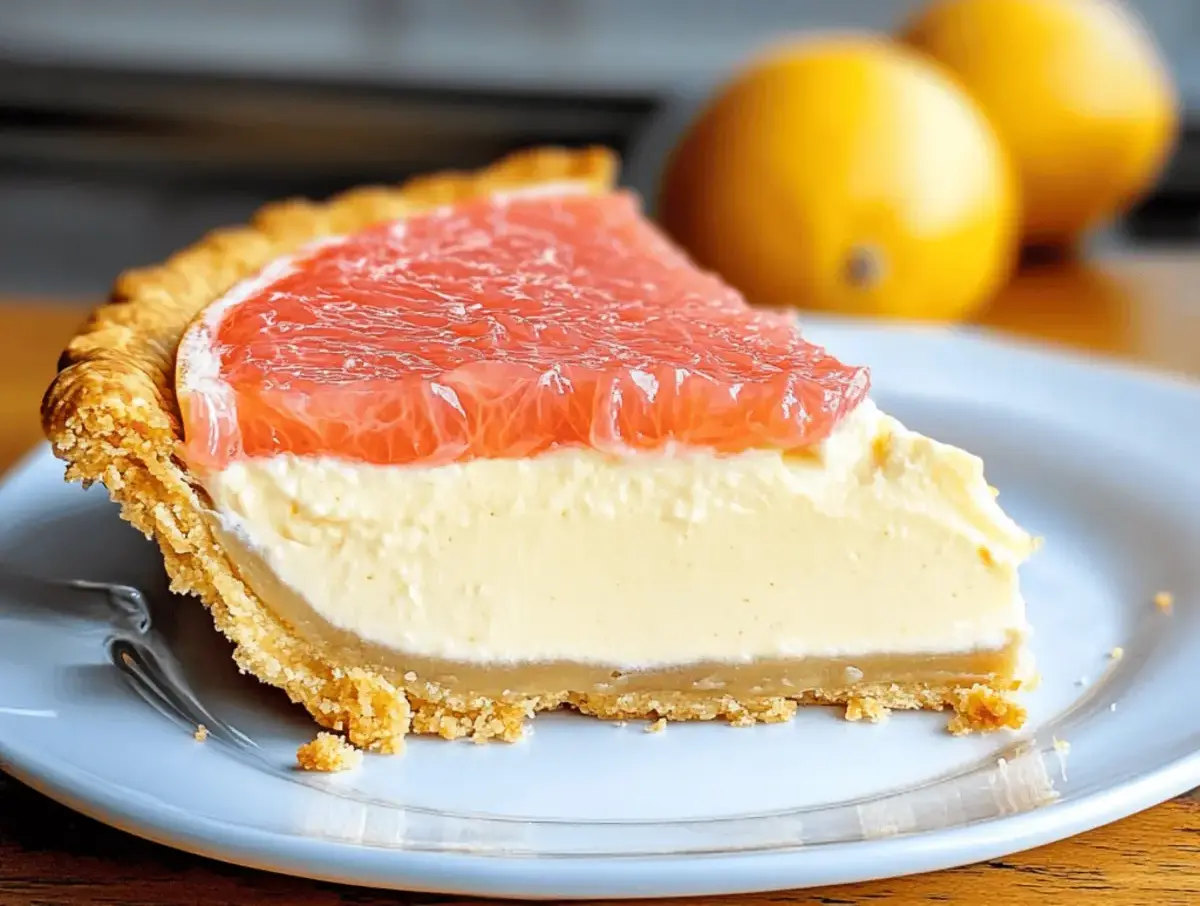
Step 8: Serve and Garnish
When ready to serve your refreshing grapefruit pie, cut into slices and plate them with a dollop of whipped cream. For an extra touch, garnish with thin grapefruit slices or zest for added flair. This pie will certainly make a striking statement at your dessert table!
How to Store and Freeze Grapefruit Pie
Fridge: Keep the grapefruit pie in an airtight container in the refrigerator for up to 3 days. This preserves its creamy texture and refreshing tang.
Freezer: For longer storage, wrap the pie tightly in plastic wrap and then aluminum foil before placing it in the freezer. It can last for up to one month.
Thawing: When you’re ready to enjoy your grapefruit pie again, simply transfer it to the refrigerator and thaw overnight for the best flavor and texture.
Reheating: While it’s best served cold, you can bring it to room temperature for a softer texture. Avoid reheating the pie in the oven to maintain its integrity.
Make Ahead Options
These grapefruit pie recipes are perfect for busy home cooks looking to save time during the week! You can prepare the filling and refrigerate it for up to 24 hours in advance, allowing the flavors to meld beautifully. To do this, simply make the custard filling and pour it into the prepared graham cracker crust, then cover tightly with plastic wrap to prevent drying. When you’re ready to bake, simply remove the wrap and pop it in the oven. After baking, let it cool for about 30 minutes before refrigerating for at least 3 hours or overnight to achieve that perfect chilled texture. Rest assured, this preparation method ensures your grapefruit pie is just as delicious and refreshing!
Expert Tips for Grapefruit Pie Recipe
- Avoid Soggy Crust: Blind-baking your graham cracker crust ensures it holds up against the creamy filling without getting soggy.
- Whip It Right: For the best homemade whipped cream, whip heavy cream until soft peaks form, adding confectioners’ sugar for sweetness.
- Chill Thoroughly: Always refrigerate your grapefruit pie for at least three hours to firm up the filling and enhance its flavor.
- Fresh Juice Matters: Use freshly squeezed grapefruit juice for a vibrant flavor; store-bought juice can lead to a less tangy result.
- Experiment with Toppings: Consider adding shaved white chocolate or grapefruit zest to elevate the pie’s presentation and flavor complexity.
Grapefruit Pie Recipe Variations
Feel free to get creative with this grapefruit pie recipe and make it your own in delightful ways!
- Homemade Crust:
Swap the store-bought graham cracker crust for a homemade one. Combine crushed graham crackers, melted butter, and sugar for an extra special touch! - Citrus Burst:
Add a splash of orange or lemon juice along with grapefruit juice for a more complex citrus flavor. This twist will enhance the pie with a brighter aroma. - Dairy-Free:
Replace sweetened condensed milk with coconut milk or almond milk to make this pie dairy-free. The coconut will lend a tropical flair to the tangy filling. - Flavorful Zest:
Incorporate some grated grapefruit or lemon zest into the filling. This will elevate the citrus notes and give your pie a beautiful burst of flavor. - Nutty Crunch:
For added texture, mix chopped nuts like pecans or almonds into the crust. Their crunchiness will provide a delightful contrast to the creamy filling, adding a gourmet flair. - Decadent Toppings:
Top with shaved white chocolate or a drizzle of dark chocolate for an irresistible finish. Pair it with some homemade whipped cream, just like in our Easy Homemade Creamy Pastry for a richer dessert experience. - Extra Sweetness:
If you love sweeter desserts, sprinkle some powdered sugar on top before serving. This delightful touch will illuminate the pie’s beautiful presentation and make every bite even more indulgent. - Spicy Kick:
For those who enjoy heat, try adding a pinch of cayenne pepper or chili powder into the filling. This surprising hint of spice contrasts nicely with the pie’s sweetness and citrusy tang.
What to Serve with Grapefruit Pie
Elevate your grapefruit pie experience with delightful pairings that harmonize beautifully with its sweet-tangy flavors.
- Fresh Whipped Cream: A dollop of homemade whipped cream adds a light, airy texture that perfectly balances the creamy custard filling. It’s a classic complement that everyone loves.
- Mint Sprigs: Garnish with vibrant mint leaves for a pop of freshness and color. The cooling notes of mint beautifully enhance the zesty citrus notes in the pie.
- Coconut Ice Cream: Scoop of creamy coconut ice cream offers a sweet, tropical contrast that lingers on the palate. The smooth texture nicely complements the pie’s crunchy crust.
- Chilled White Wine: A glass of chilled Sauvignon Blanc or Riesling showcases crisp acidity that matches the pie’s tang. It turns dessert into an elegant occasion!
- Grapefruit Sorbet: Serve grapefruit sorbet alongside for an extra burst of citrus goodness. This refreshing treat echoes the flavors of the pie while adding a delightful icy texture.
- Chocolate Shavings: Sprinkle dark chocolate shavings on top of each slice to add a rich, decadent touch. The bittersweet chocolate melds beautifully with the pie’s flavorful layers.
- Pistachio Crumble: A crunchy pistachio crumble or nut topping provides a delightful contrast and adds an unexpected yet complementary nutty flavor to each bite.
- Herbal Tea: Pair with a warm cup of chamomile or mint tea for a cozy finish. These soothing flavors wrap up your meal perfectly, enhancing the grapefruit notes.
Grapefruit Pie Recipe FAQs
What ripeness should the grapefruits be for the pie?
Absolutely, you want to select grapefruits that are firm with smooth skin, free of dark spots or discoloration. The fruit should feel heavy for its size, which indicates juiciness. Freshness is key for vibrant flavor, so if possible, choose grapefruits that are in season for the best taste!
How should I store leftover grapefruit pie?
To keep your scrumptious grapefruit pie fresh, store it in an airtight container in the refrigerator for up to 3 days. Make sure it’s well-sealed to prevent it from absorbing any odors from the fridge. If you have concerns about keeping the crust crisp, you can loosely cover it with plastic wrap.
Can I freeze grapefruit pie?
Yes, you can! To freeze, wrap the pie tightly in plastic wrap and then in aluminum foil. This double-wrapping helps prevent freezer burn. The grapefruit pie can be frozen for up to one month—just remember to thaw it in the fridge overnight before serving for the best texture!
What should I do if my crust becomes soggy?
To avoid a soggy crust, consider blind-baking it before adding the filling. Pre-bake the graham cracker crust in your preheated oven at 325°F (163°C) for about 10 minutes, or until it’s golden and firm. Let it cool before adding the custard, ensuring it maintains its crunch even with the creamy filling.
Is there any concern about sugar for dietary restrictions?
Indeed! Since sweetened condensed milk significantly contributes to the sugar content of this grapefruit pie, those watching their sugar intake should be mindful. Consider using a sugar-free sweetened condensed milk alternative or reducing the amount of sugar in the recipe if needed. Always check for allergies as well, especially if serving to guests!
How can I enhance the flavor of the pie?
For an extra flavor boost, you can add a teaspoon of grapefruit zest to the filling for a more intense citrus note. Additionally, consider garnishing the pie with fresh grapefruit slices or shaved white chocolate for a beautiful, decadent presentation that’s sure to impress!
Refreshing Grapefruit Pie Recipe for a Sweet-Tangy Treat
Ingredients
Equipment
Method
- Preheat your oven to 325°F (163°C).
- Juice two large grapefruits to yield about one cup of fresh juice, then strain it.
- In a medium bowl, beat the egg yolks until light and fluffy, then mix in the sweetened condensed milk and granulated sugar until smooth.
- Slowly add the strained grapefruit juice into the egg mixture, whisking until well blended.
- Pour the grapefruit filling into the graham cracker crust.
- Bake for approximately 25 minutes until filling is set but still slightly wobbly in the center.
- Cool at room temperature for about 30 minutes, then refrigerate for at least 3 hours or overnight.
- Serve slices with whipped cream and garnish with thin grapefruit slices or zest.