Swamp Guac with Creepy Crawler Chips for Spooky Fun Dips

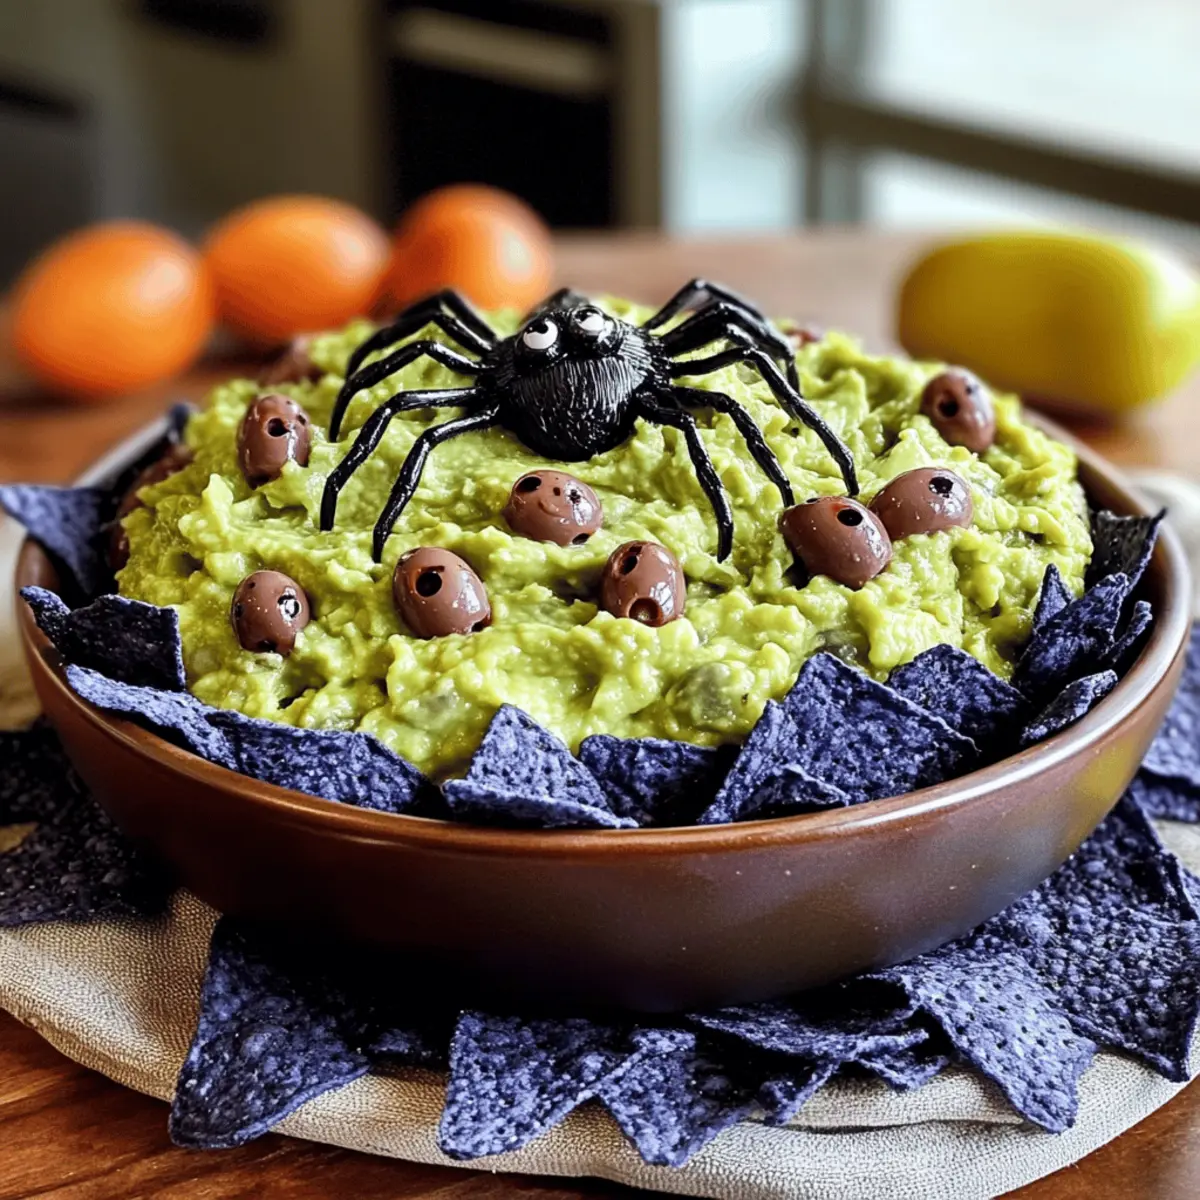
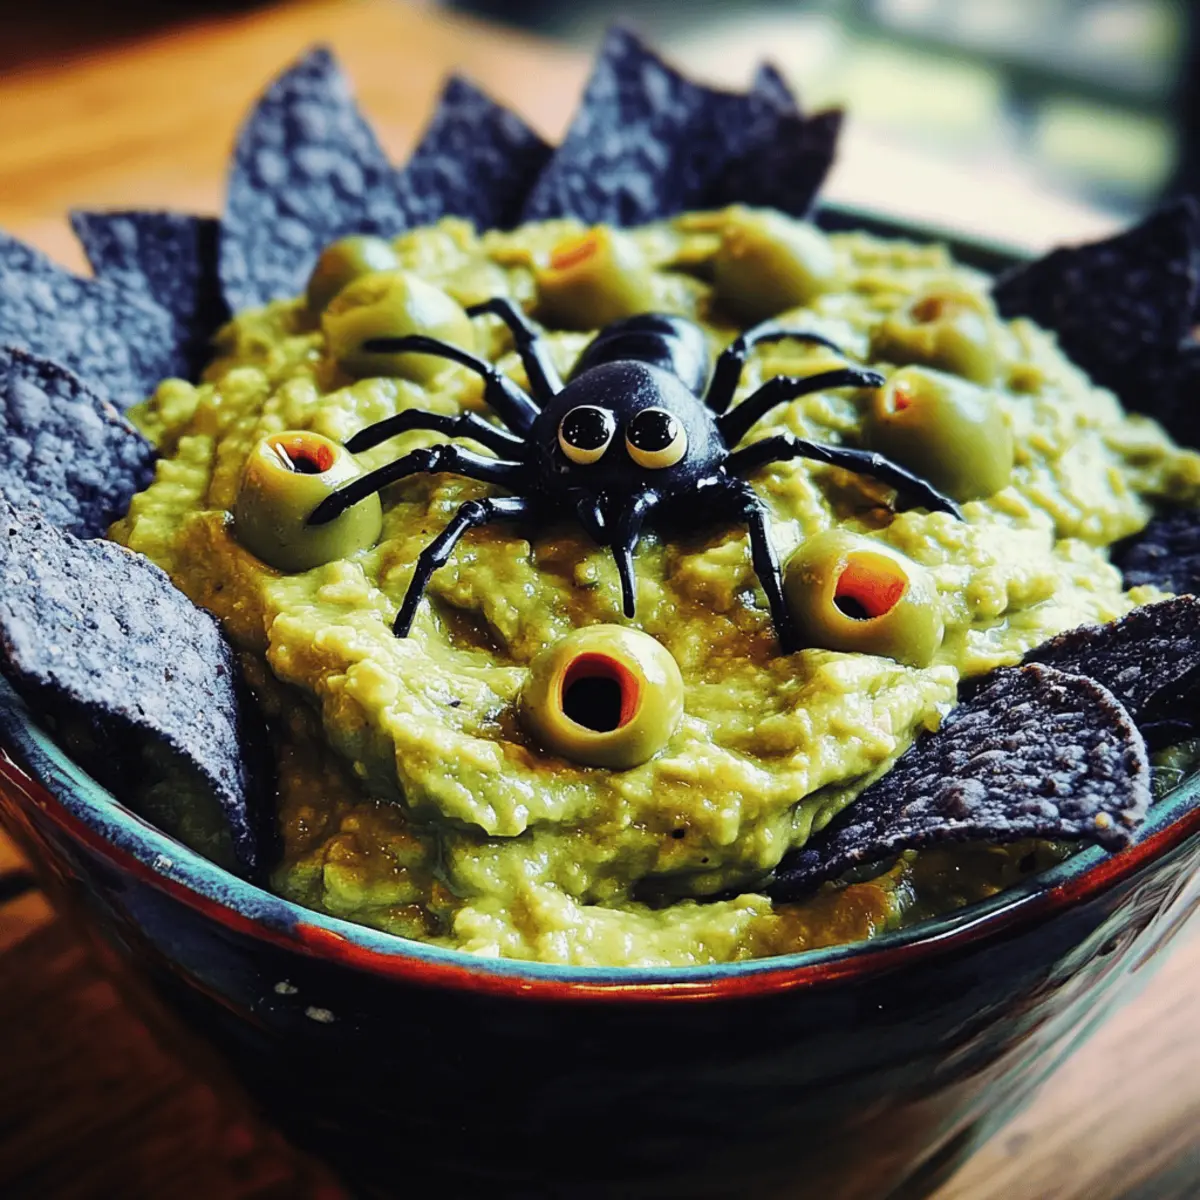
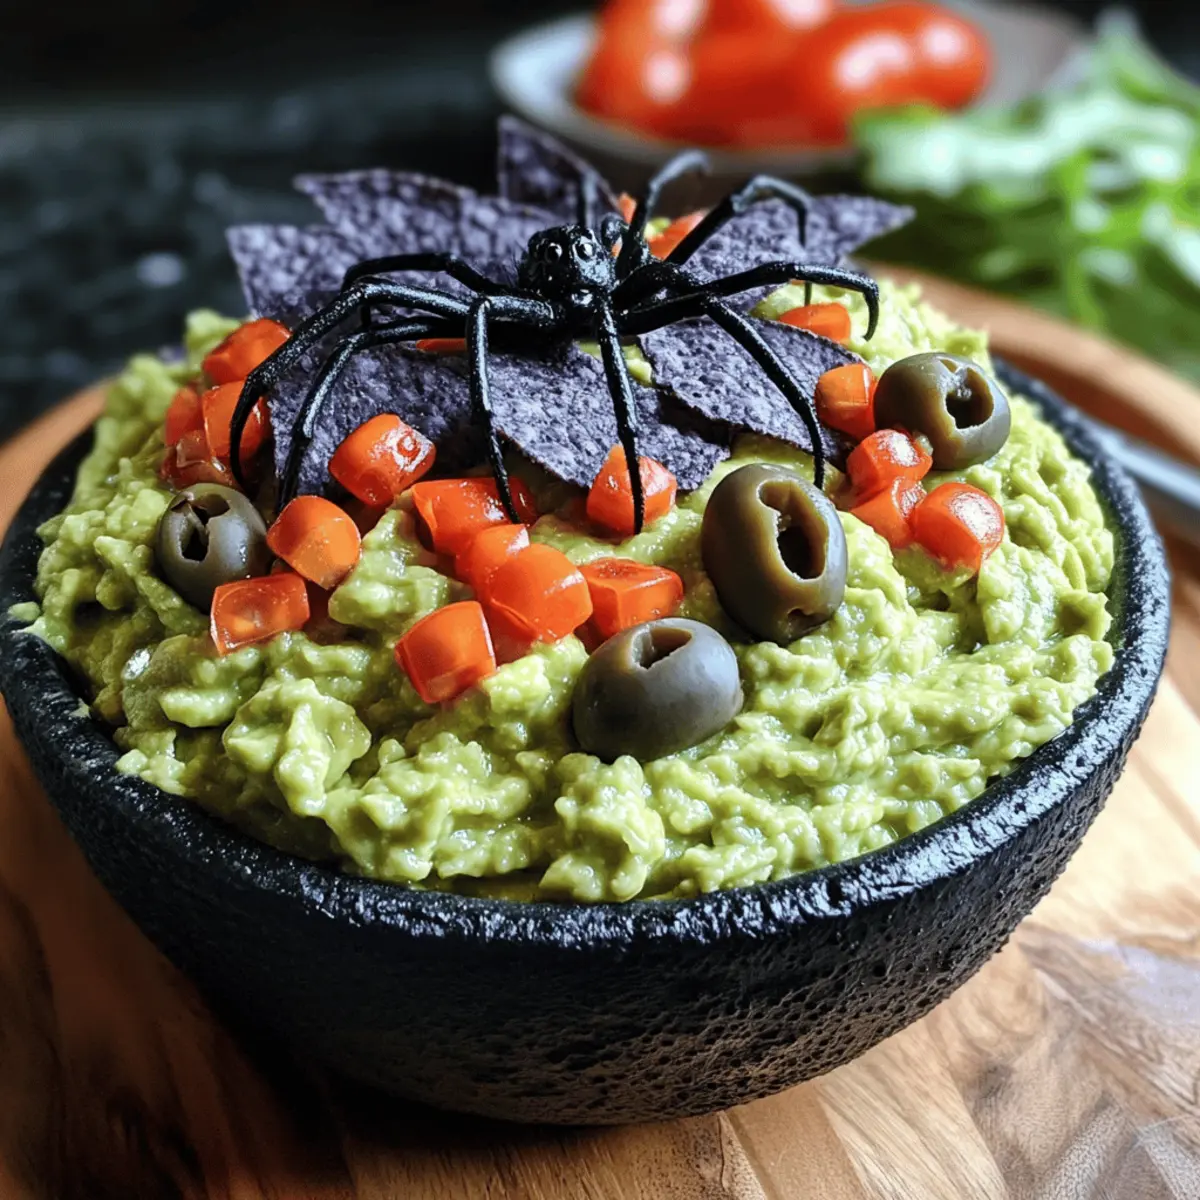
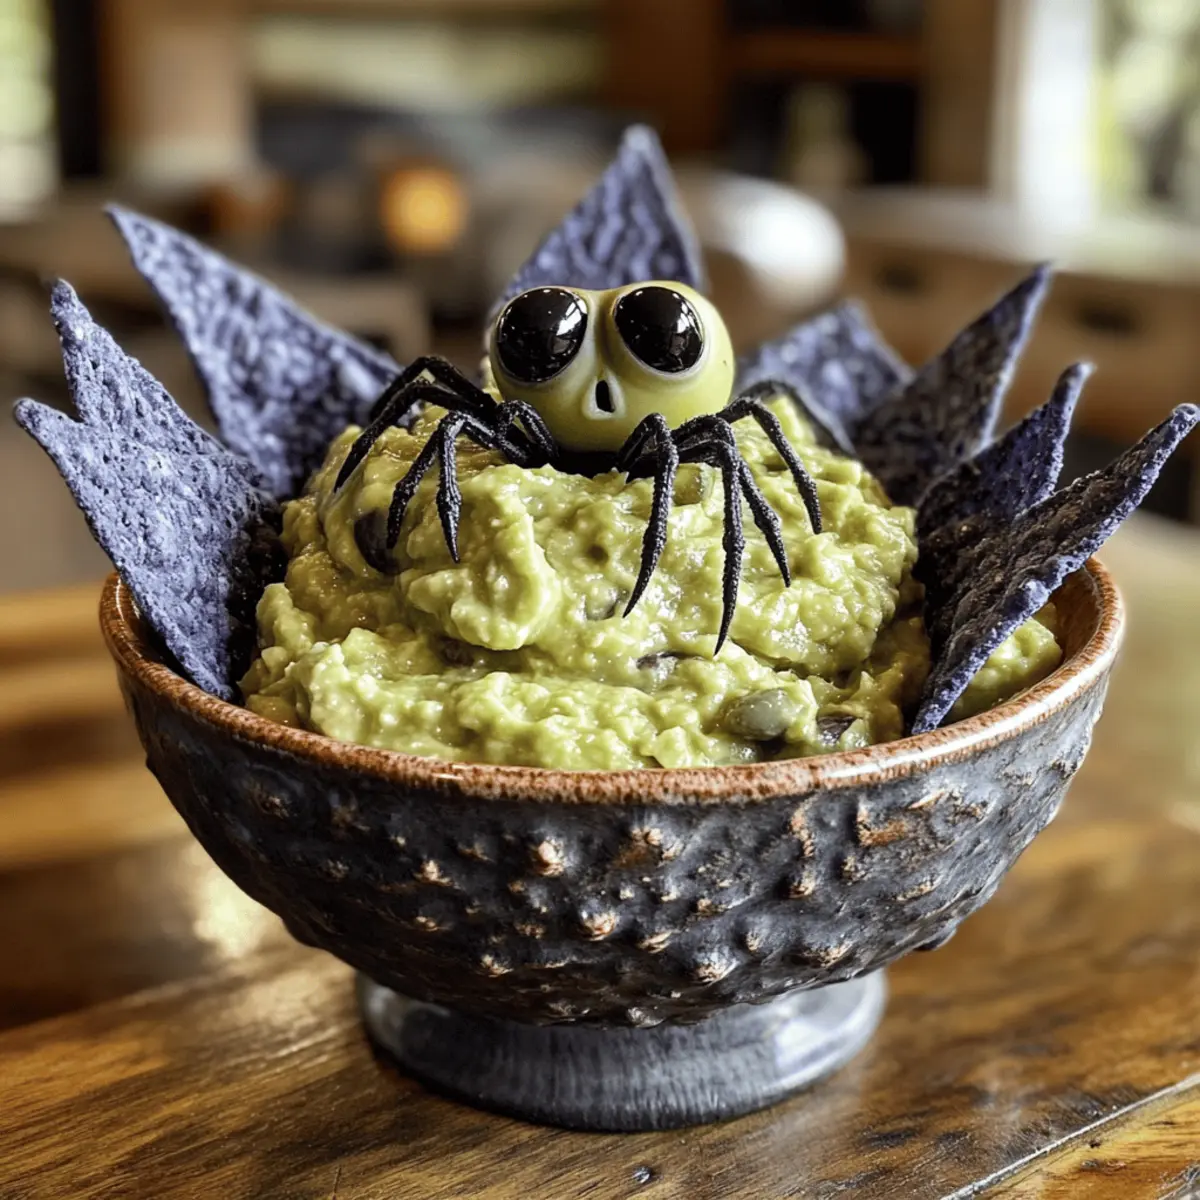
As the clock ticks closer to Halloween, I find myself daydreaming about spooky snacks that bring both delight and a little fright. This Swamp Guac with Creepy Crawler Chips emerges as the perfect festive dish, transforming the classic guacamole into an eerie sensation. The creamy avocados are magnificently dressed in a layer of vibrant, crushed blue corn chips, giving it the appearance of a swampy masterpiece. Not only is this recipe a crowd-pleaser that’s easy to whip up, but it also takes no baking skills—making it an ideal addition to any Halloween gathering. Trust me, the kids will love hunting for olive “spiders” on top as they dig in! What creative twists will you add to your very own “swamp” creation?

Why is this Swamp Guac a must-try?

Deliciously Easy: With no baking required, you’ll have this treat ready in no time! Simply mash avocados, mix in flavors, and layer for a spooky effect.

Colorful Presentation: The vibrant blue corn chips and olive spiders create an eye-catching dish that’s not just tasty but also fun to look at—perfect for Halloween festivities.

Versatile Party Favorite: Whether paired with corn chips, veggie sticks, or even homemade bread, it fits seamlessly into any menu. Try it alongside a Refreshing Cucumber Twist for a vibrant spread!

Crowd-Pleasing Fun: Kids and adults alike will love searching for creepy crawlers hidden among the delicious guacamole, making it the highlight of any gathering.

Flavor Boost: With creamy avocados and a touch of spices, every bite bursts with flavor, making it hard to resist. Customize with favorites like jalapeños or cherry tomatoes for an extra kick!

Swamp Guac with Creepy Crawler Chips Ingredients

For the Guacamole

  • Ripe Avocados – The base of the guacamole that adds creaminess; substitute with mashed green peas for a lighter option.
  • Lime Juice – Provides a tangy flavor and helps prevent browning; freshly squeezed is recommended for best taste.
  • Salt – Enhances the overall flavor; sea salt works wonderfully for a more robust taste.
  • Spices (like garlic powder and cumin) – Elevates the flavor profile; adjust according to preference, with fresh garlic for a bolder taste.

For the Crunchy Swamp Layer

  • Crushed Blue Corn Chips – Creates the swampy look and adds a crunchy texture; tortilla chips or homemade fried plantain chips can be used as alternatives.

For the Decor

  • Olives (Black or Green) – These create fun spider decorations; cherry tomatoes can be swapped in if olives aren’t your favorite.

This Swamp Guac with Creepy Crawler Chips is sure to be the star of your Halloween gathering!

Step‑by‑Step Instructions for Swamp Guac with Creepy Crawler Chips

Step 1: Mash the Avocados
Start by halving 2 ripe avocados, removing the pits, and scooping the flesh into a mixing bowl. Using a fork or potato masher, mash the avocados until smooth yet slightly chunky in texture—this should take about 2-3 minutes. Look for a vibrant green color, which indicates freshness and readiness for the next step.

Step 2: Blend in Flavorings
Next, stir in the juice of one lime and a pinch of salt into the mashed avocados, mixing thoroughly with a spatula. The lime juice not only adds a delightful tang but also helps keep the guacamole from browning. Continue blending for about 1 minute until everything is evenly combined, creating a flavorful base for your Swamp Guac.

Step 3: Add Your Spices
For an extra kick, sprinkle in your preferred spices, like garlic powder and cumin, to the avocado mix. Fold in the spices gently for another 1-2 minutes until they are well-distributed, enhancing the flavors of your guacamole. Take a moment to taste for seasoning—adjust with more salt or lime juice if desired.

Step 4: Prepare Your Platter
Transfer the flavorful guacamole onto a wide serving platter, spreading it out evenly to create a flat surface. Use a spatula to smooth the top, providing a nice backdrop for the next layer. Aim for a width that showcases your swampy creation, allowing the crushed chips to rest beautifully on top.

Step 5: Create the Swamp Effect
Generously scatter a layer of crushed blue corn chips over the guacamole, ensuring they cover the surface entirely. This not only gives the dish its signature swampy look but also adds an appealing crunch that balances the creamy avocado. Take a moment to admire the vibrant colors and textures before moving on to the decoration.

Step 6: Add Olive Spiders
Finally, slice black or green olives in half and arrange them on top of the guacamole to resemble creepy spiders. Position them strategically so they look like they’re crawling atop the swampy dip, adding a whimsical touch. Spend a minute getting creative with the spider placement to make your Swamp Guac not just delicious, but a delightful centerpiece.

Step 7: Serve and Enjoy
Serve your Swamp Guac with Creepy Crawler Chips immediately alongside additional corn chips or fresh vegetables for dipping. Set the platter on the table and watch as guests are drawn to its vibrant colors and fun design. If you need to prepare in advance, keep the guacamole covered tightly to prevent browning until ready to serve.

Make Ahead Options

These Swamp Guac with Creepy Crawler Chips are fantastic for busy home cooks! You can prepare the guacamole base up to 24 hours in advance by mashing the ripe avocados and mixing in lime juice and salt. To minimize browning, cover the surface tightly with plastic wrap, pressing it directly onto the guacamole. You can also crush the blue corn chips ahead of time; just store them in an airtight container to keep their crunchiness. When you’re ready to serve, simply layer the crushed chips over the guacamole, artfully arrange the olive spiders on top, and you’ll have a fun, spooky dip that’s just as delicious as when freshly made!

How to Store and Freeze Swamp Guac with Creepy Crawler Chips

Fridge: Store your Swamp Guac in an airtight container for up to 2 days. Before sealing, add a bit more lime juice on top to reduce browning.

Freezer: Although it’s best fresh, you can freeze the guacamole for up to 3 months. Transfer it to a freezer-safe container, leaving space for expansion; thaw in the fridge overnight before use.

Reheating: Since this dish is served cold, simply prepare to enjoy it fresh after thawing. Avoid refreezing once thawed.

Leftover Chips: Keep leftover crushed blue corn chips in a separate airtight bag to maintain their crunch; they’ll stay fresh for up to a week.

Expert Tips for Swamp Guac with Creepy Crawler Chips

  • Avocado Selection: Choose ripe avocados that yield slightly to pressure; unripe ones will be too firm, and overly soft ones can spoil quickly.

  • Smoother Texture: For a creamier guacamole, use a food processor instead of mashing by hand. This is especially helpful if you want a smoother finish for your Swamp Guac.

  • Prevent Browning: If you’re preparing ahead, press plastic wrap directly onto the surface of the guacamole before refrigerating; this minimizes air exposure and keeps it fresh longer.

  • Seasoning Balance: Start with a little salt and spice, then taste as you go. This helps you achieve the flavor balance that makes your Swamp Guac truly shine.

  • Creative Toppings: Don’t limit yourself to olives! Consider using sliced jalapeños or cherry tomatoes as alternative decorations for extra color and flavor in your spooky dip.

Swamp Guac with Creepy Crawler Chips Variations

Get ready to unleash your creativity and customize your Swamp Guac into something uniquely delicious!

  • Hot ‘n Spicy: Add diced jalapeños or hot sauce to your guac for a fiery twist that will delight heat lovers. Feel free to adjust the amount to suit your taste.

  • Vegan Delight: Substitute sour cream or yogurt with mashed, roasted garlic and a dash of smoked paprika for a creamy flavor without the dairy. This variation will surprise your guests and keep your dip vegan-friendly!

  • Chunky Tomato Addition: Fold in diced fresh tomatoes for a burst of sweetness and refreshing texture. This twist adds a seasonal touch that balances beautifully with the rich avocados.

  • Herb-Infused: Stir in fresh herbs like cilantro or chives for brightness and a delightful aroma. Just a handful can elevate the classic flavor profile to a whole new level.

  • Tangy Twist: Mix in a tablespoon of Greek yogurt for a creamy richness combined with tanginess. This added flavor not only enhances the guacamole but also offers a delightful creaminess.

  • Nutty & Crunchy: Top with toasted pumpkin seeds or sunflower seeds instead of chips for an unexpected crunch and a nutrition boost. These seeds add depth and an earthy flavor to your guacamole.

  • Tropical Flair: Add small chunks of fresh pineapple or mango for a sweet and savory contrast that tantalizes the taste buds. The fruit’s juiciness provides a refreshing break from the creaminess of the avocado.

  • Classic Touch: Incorporate a bit of finely diced red onion for a savory crunch. This classic addition gives your guacamole an extra layer of flavor that pairs well with the creamy texture.

Experiment with these variations to make your Swamp Guac as exciting as your Halloween gathering! And don’t forget to pair it with some of my other favorites, like Savory Zucchini Pancakes or a Tropical Chicken Pineapple for a delightful feast!

What to Serve with Swamp Guac with Creepy Crawler Chips

As Halloween approaches, pairing your spooky dip with delightful accompaniments will elevate your gathering into an unforgettable feast.

  • Veggie Platter: Crunchy carrot sticks and refreshing cucumber slices add a vibrant array of colors, providing a healthy balance to the creamy guacamole. Pairing fresh veggies with the swamp dip offers a refreshing contrast in textures.

  • Spooky Quesadillas: Crisp, cheesy quesadillas with a sprinkle of ghostly spices make for a fantastic bite. Cut into fun shapes, these will keep both kids and adults coming back for more!

  • Chilling Salsa: A zesty tomato salsa brightens up the flavor, complementing the richness of the guacamole perfectly. The fusion of fresh ingredients creates a flavorful experience that dances on the palate.

  • Freaky Finger Foods: Think mini sliders or ghost-shaped chicken nuggets—these fun little bites will charm your guests and keep the Halloween spirit alive as they indulge in their favorites!

  • Witch’s Brew Mocktails: Serve up refreshing, non-alcoholic drinks like sparkling apple cider with floating gummy worms for a whimsical touch. The sweetness will balance the savory elements wonderfully.

  • Hauntingly Good Nachos: Elevate the experience with loaded nachos topped with melted cheese, jalapeños, and a drizzle of sour cream. These will surely disappear fast alongside your swampy guacamole!

  • Chocolate-Dipped Pretzels: For dessert, contrast the savory with sweet treats. The salty pretzels coated in rich chocolate create an irresistible snack perfect for munching as the evening unfolds.

Embrace the festivities and let each pairings amplify the fun of your Swamp Guac with Creepy Crawler Chips!

Swamp Guac with Creepy Crawler Chips Recipe FAQs

How do I choose ripe avocados for the guacamole?
Absolutely! When selecting ripe avocados, look for ones that yield slightly to gentle pressure. They should be firm but not overly soft or have dark spots all over, which may indicate overripeness.

How can I store leftover guacamole?
Very! Place any leftover guacamole in an airtight container in the fridge. It will stay fresh for up to 2 days. To prevent browning, add a bit more lime juice on top before sealing it tightly.

Can I freeze the guacamole?
Certainly! For optimal freshness, you can freeze your Swamp Guac for up to 3 months. Just transfer it to a freezer-safe container, leaving a bit of space for expansion. When ready to use, thaw it overnight in the fridge.

What should I do if my guacamole turns brown?
Sometimes it happens! If your guacamole does brown, you can still enjoy it. Simply scrape off the top layer to reveal the greener guacamole underneath. To prevent this in the first place, press plastic wrap directly onto the surface before refrigerating.

Are there any dietary considerations for this recipe?
Indeed! This recipe is generally vegetarian and can be made vegan by ensuring the chips used don’t contain any dairy. If you’re serving guests with allergies, be aware of common allergens in chips or olives. Opt for cherry tomatoes as an olive substitute if necessary.

What can I do if I want a smoother guacamole texture?
Great question! If you’re aiming for a smoother guacamole, consider using a food processor instead of mashing by hand. Simply pulse the avocados and add your flavors, blending until you reach your desired consistency.

Swamp Guac with Creepy Crawler Chips

Swamp Guac with Creepy Crawler Chips for Spooky Fun Dips

Enjoy a spooky twist on guacamole with Swamp Guac and Creepy Crawler Chips, perfect for Halloween snacks.
Prep Time 10 minutes
Total Time 10 minutes
Servings: 6 dips
Course: Other
Cuisine: Mexican
Calories: 150

Ingredients
  

For the Guacamole
  • 2 ripe avocados Mash for creaminess
  • 1 tablespoon lime juice Freshly squeezed recommended
  • 1 teaspoon salt Adjust to taste
  • 1 teaspoon garlic powder Optional
  • 1 teaspoon cumin Optional
For the Crunchy Swamp Layer
  • 2 cups crushed blue corn chips For texture and appearance
For the Decor
  • 1 cup black or green olives For spider decorations

Equipment

  • mixing bowl
  • spatula
  • potato masher

Method
 

Step-by-Step Instructions
  1. Mash the avocados until smooth yet slightly chunky for 2-3 minutes.
  2. Blend in lime juice and salt into the mashed avocados, mixing thoroughly.
  3. Add spices like garlic powder and cumin, folding them into the mixture.
  4. Transfer the guacamole onto a serving platter and smooth the top.
  5. Generously scatter crushed blue corn chips over the guacamole.
  6. Slice olives in half and arrange them on top to resemble spiders.
  7. Serve immediately with corn chips or vegetables for dipping.

Notes

Consider using alternative decorations like sliced jalapeños or cherry tomatoes for extra flair.

Amazing Vegan Thanksgiving: A Feast of Flavorful Traditions

The aroma of roasted vegetables mingling with spices fills the air, instantly transporting me to the cozy corners of Thanksgiving past. This year, I’m thrilled to share my Amazing Vegan Thanksgiving Menu, a celebration of plant-based goodness that’s sure to impress everyone at the table—regardless of their dietary preferences. With two hearty mains, four delightful sides, and two indulgent desserts, this menu is not just comforting, but also incredibly easy to prepare. You’ll find that vegan cooking can be both satisfying and beautiful, leaving your guests eager to taste every colorful dish. As you gather around the table, imagine the joy of sharing these amazing flavors while embracing the spirit of the holiday. Curious to learn how to create this delightful feast? Let’s dive into the recipes that will elevate your Thanksgiving celebration!

Why is this Thanksgiving menu amazing?

Deliciously Balanced: Each dish in this amazing vegan Thanksgiving menu boasts rich flavors that tantalize the taste buds without compromising on nutrition.
Variety for Everyone: With two hearty mains and a colorful array of sides, there’s something here to please every palate—vegan or not!
Easy Preparation: Designed for home cooks, this menu simplifies the cooking process so you can spend more time with loved ones and less time in the kitchen.
Festive Presentation: Watch your table come alive with vibrant colors and inviting aromas that transform your Thanksgiving into a gourmet experience.
Comforting Classics: Enjoy beloved holiday flavors reimagined in a plant-based way, allowing you to embrace tradition without sacrificing taste.
Nutrient-Rich: Each recipe is loaded with wholesome ingredients, ensuring your feast is not just delicious but also health-conscious.

Amazing Vegan Thanksgiving Ingredients

Get ready to create a flavorful feast with these essential ingredients!

For the Savory Stout and Vegetable Pies

  • Mixed Vegetables – Chop seasonal veggies like carrots, peas, and potatoes for robust flavor.
  • Stout Beer – Adds depth and richness; choose a dark variety for a more intense taste.
  • Vegan Pie Crust – Look for pre-made options or make your own for the perfect flaky base.
  • Vegetable Broth – Use as a substitute for water to enhance the flavor in your filling.

For the Cauliflower Steaks

  • Cauliflower Head – Slice into thick pieces to roast nicely and absorb spices.
  • Olive Oil – Drizzle for added richness; avocado oil works well too.
  • Spices – Use a mix of smoked paprika and cumin for a flavorful kick.

For the Pumpkin Mousse Pie

  • Pumpkin Puree – The star of this dessert; use canned or homemade for freshness.
  • Coconut Cream – Provides a rich, creamy texture; chill beforehand for easy whipping.
  • Maple Syrup – Sweetens the mousse naturally; agave syrup can be substituted.

For the Roasted Apple and Root Vegetable Stuffing

  • Apples – Choose sweet varieties like Fuji or Honeycrisp to balance savory flavors.
  • Root Vegetables – Use a mix of carrots, parsnips, and potatoes for varied textures.
  • Vegetable Broth – Ensures the stuffing remains moist and flavorful; substitute as needed.

For the Creamy Mac and Cheese

  • Gnocchi – A delightful alternative to traditional pasta, offering a unique twist.
  • Cashews – Blend for a creamy cheese-like sauce; soak them beforehand for best results.
  • Nutritional Yeast – Adds a cheesy flavor, highlighting the deliciousness of this dish.

For the Brussels Sprouts with Coconut Bacon

  • Brussels Sprouts – Choose firm, bright green sprouts for the best roasting results.
  • Coconut Flakes – Offer a smoky flavor when cooked; feel free to substitute with regular bacon for non-vegan guests.
  • Balsamic Vinegar – Drizzle to enhance the sprouts’ natural sweetness and add tang.

With this ingredient list in hand, you’re all set to gather your loved ones and create an amazing vegan Thanksgiving feast that everyone will adore!

Step‑by‑Step Instructions for Amazing Vegan Thanksgiving

Step 1: Prepare the Savory Stout and Vegetable Pies
Begin by preheating your oven to 400°F (200°C). In a large pot, sauté a mix of chopped seasonal vegetables until tender, about 10 minutes, then add stout beer and vegetable broth for flavor. Fill your vegan pie crusts with this hearty mixture, ensuring they’re fully packed, and bake for 30-35 minutes until the pies are bubbling and golden brown on top.

Step 2: Roast the Cauliflower Steaks
While the pies are baking, slice a cauliflower head into thick steaks and place them on a baking tray. Drizzle with olive oil and sprinkle a blend of smoked paprika and cumin. Roast them in the oven for 20-25 minutes until they’re tender and golden, turning halfway through for even cooking. This delicious side will complement your Amazing Vegan Thanksgiving beautifully.

Step 3: Make the Roasted Apple and Root Vegetable Stuffing
In a large skillet, combine diced apples and a mix of seasonal root vegetables like carrots and parsnips with vegetable broth. Sauté over medium heat for 15 minutes until vegetables soften, absorbing all the flavors. Once the stuffing is nicely heated through, transfer to a baking dish and keep warm while you prepare the remaining dishes, allowing those savory flavors to meld.

Step 4: Prepare the Creamy Mac and Cheese
Cook the gnocchi according to the package instructions, typically 2-3 minutes in boiling water until they float. Meanwhile, blend soaked cashews with nutritional yeast, water, and seasonings to make a creamy sauce. Toss the gnocchi in the sauce, ensuring every piece is coated, and transfer to a baking dish. Bake at 375°F (190°C) for 15 minutes until bubbly and golden on top to complete this comforting dish.

Step 5: Roast the Brussels Sprouts with Coconut Bacon
Trim and halve your Brussels sprouts, then toss them with coconut flakes and a drizzle of balsamic vinegar. Place them on a baking sheet and roast at 400°F (200°C) for about 20 minutes, shaking the pan halfway through. The sprouts should be crispy and caramelized, creating a savory contrast to your Amazing Vegan Thanksgiving feast.

Step 6: Assemble the Pumpkin Mousse Pie
While everything is roasting, whip chilled coconut cream until fluffy and combine it gently with pumpkin puree and maple syrup. Pour this luxurious mousse into a pre-baked pie crust, smoothing the top with a spatula. Chill the pie in the refrigerator for at least 1 hour to set, ensuring a smooth and creamy slice when it’s time to indulge.

Step 7: Serve the Feast
Once all dishes are prepared, plate them beautifully for an enticing table display. Arrange the savory stout and vegetable pies, roasted cauliflower steaks, apple and root vegetable stuffing, creamy mac and cheese, and Brussels sprouts artfully around the pumpkin mousse pie. Showcase these vibrant colors and textures for your Amazing Vegan Thanksgiving, inviting everyone to gather and enjoy this delightful feast.

Expert Tips for Amazing Vegan Thanksgiving

  • Uniform Sizes: Ensure even roasting of vegetables by cutting them into uniform sizes. This promotes consistent cooking and enhances the overall texture of your dishes.

  • Taste as You Go: Always taste your dishes as you prepare them. Adjust spices and seasoning according to your preference to create a personalized flavor profile for your amazing vegan Thanksgiving.

  • Watch the Pies: Be cautious not to overbake the savory stout and vegetable pies. Aim for a golden crust; this will prevent dryness and keep the filling deliciously moist.

  • Prep Ahead: Consider making some components, like the pumpkin mousse, in advance. This allows flavors to develop and frees up time on the day of your celebration.

  • Creative Substitutions: Don’t hesitate to switch out ingredients based on availability or dietary restrictions. Use different vegetables for stuffing or alternative sweeteners for desserts without compromising flavor.

Storage Tips for Amazing Vegan Thanksgiving

  • Room Temperature: Leftovers can sit out for up to 2 hours after serving; beyond that, please refrigerate to ensure freshness and avoid spoilage.

  • Fridge: Store any remaining dishes in airtight containers for up to 4 days, keeping the vibrant flavors intact and ready for future meals.

  • Freezer: To preserve your amazing vegan Thanksgiving dishes longer, freeze in individual containers for up to 3 months. Ensure they’re well-sealed to prevent freezer burn.

  • Reheating: When ready to enjoy leftovers, reheat in the oven at 350°F (175°C) until warmed through. This helps revive the textures and flavors, especially for pies and casseroles.

Amazing Vegan Thanksgiving Variations

Feel free to explore these tantalizing tweaks that will make your vegan Thanksgiving feast even more personalized.

  • Gluten-Free: Use a gluten-free pie crust for the savory stout and vegetable pies to cater to gluten sensitivities.

  • Nut-Free: Swap out nuts in desserts for seeds like sunflower or pumpkin seeds to ensure everyone can enjoy the deliciousness.

  • Earthy Flavor Boost: Add mushrooms to the stuffing for an umami kick that enhances the savory filling and adds a delightful depth.

  • Creamy Alternative: Substitute cashews with silken tofu in the mac and cheese sauce for a different yet equally creamy texture, perfect for those avoiding nuts.

  • Spicy Twist: Sprinkle in crushed red pepper flakes or cayenne in the roasted cauliflower for a little heat that pairs beautifully with its sweetness.

  • Seasonal Vegetables: Use seasonal veggies like butternut squash or sweet potatoes instead of the root vegetables in the stuffing to celebrate fall produce.

  • Dairy-Free Desserts: For those who may crave a richer dessert, consider using coconut yogurt in place of coconut cream for the pumpkin mousse for additional creaminess.

  • Vegan Bacon Upgrade: If you’re feeling adventurous, try a homemade plant-based bacon recipe using eggplant, which can add a unique flavor to the Brussels sprouts alongside the coconut bacon.

By trying some of these variations, you can create your version of an amazing vegan Thanksgiving that reflects your tastes and dietary needs! Remember, cooking should always be a joyful expression of love and creativity. If you’re interested in more flavorful techniques, consider checking out my recipes for vegan sides or tips on plant-based desserts for inspiration!

What to Serve with The Most Amazing Vegan Thanksgiving Menu

Embrace the warmth of the holiday season with dishes that complement the vibrant flavors and comforting textures of your feast.

  • Cranberry Sauce: A tangy addition that brightens every bite and brings a refreshing contrast to savory dishes.
  • Quinoa Salad: Light and nourishing, this colorful salad adds a healthy crunch while harmonizing with the earthy flavors of your spread.
  • Garlic Bread: Soft and crispy with a fragrant aroma, garlic bread is perfect for soaking up the delicious juices from the hearty mains.
  • Green Bean Almondine: Tender green beans tossed with toasted almonds provide a delightful crunch that balances the soft textures of your meal.
  • Vegan Gravy: Rich and savory, this pourable sauce enhances almost any dish, providing an extra layer of flavor everyone will appreciate.
  • Pumpkin Spice Latte: Cozy up your gathering with this seasonal drink that embraces the essence of fall while keeping the vegan theme intact.
  • Chocolate Avocado Mousse: End your meal on a high note with this decadent dessert; it’s rich, creamy, and utterly satisfying without the guilt.
  • Herbal Tea: A soothing beverage that aids digestion after your hearty feast, offering a warm and comforting conclusion to your gathering.
  • Apple Crisp: Warm and aromatic, this dessert showcases the sweetness of apples and the crunch of oats, making it a lovely ending to your Amazing Vegan Thanksgiving.

Make Ahead Options

These Amazing Vegan Thanksgiving dishes are perfect for busy home cooks looking to save time! You can prep the savory stout and vegetable pies up to 24 hours in advance by assembling the pie filling and refrigerating it in the crust. For the roasted cauliflower steaks, slice and season them the day before, storing them in an airtight container to retain freshness. The pumpkin mousse can be made up to 3 days ahead; simply whip the cream and combine it with the pumpkin puree, then chill it in the fridge. Just before serving, bake the pies and roast the cauliflower for hot, delicious dishes that taste just as wonderful as if made fresh!

Amazing Vegan Thanksgiving Recipe FAQs

What kind of vegetables work best for the Savory Stout and Vegetable Pies?
Absolutely! Use a mix of your favorite seasonal vegetables such as carrots, peas, and potatoes for robust flavor. Aim for a variety of colors and textures to enhance your pies. If you’re gluten-free, you can substitute vegetable broth for stout beer for a flavorful filling without compromising on taste.

How should I store leftovers from my Amazing Vegan Thanksgiving feast?
Very important! Refrigerate leftover dishes in airtight containers for up to 4 days to keep them fresh. If you want to enjoy them later, freeze portions in individual containers for up to 3 months. This makes for easy meals down the road!

Can I freeze the Creamy Mac and Cheese? If so, how?
Of course! To freeze your Creamy Mac and Cheese, allow it to cool completely, then transfer it to a freezer-safe container. Make sure to seal it tightly to prevent freezer burn. When you’re ready to enjoy it, simply thaw it overnight in the fridge and reheat it in the oven at 350°F (175°C) until heated through, about 20-25 minutes.

What should I do if my pumpkin mousse didn’t set properly?
If your pumpkin mousse is too runny, it may not have had enough time to chill or the coconut cream wasn’t whipped enough. I recommend chilling it longer, and for the next attempt, make sure to whip the coconut cream until light and fluffy before combining with the pumpkin puree. You could also add a bit of cornstarch or chia seeds to help thicken it up if needed.

Are there any dietary considerations I should keep in mind for my Amazing Vegan Thanksgiving?
Absolutely! Make sure to check for any nut allergies, especially if you’re using cashews in the mac and cheese or desserts. For those with gluten sensitivities, opt for gluten-free pasta and ensure the pie crust is designed for gluten-free diets. You can also easily swap nuts for seeds in the desserts for those managing nut allergies, making this menu inclusive for everyone!

How can I customize my Roasted Apple and Root Vegetable Stuffing?
The more the merrier! Feel free to substitute any root vegetables based on seasonality or personal preference. Sweet potatoes, butternut squash, or even zucchini work beautifully. To vary flavors, consider adding herbs like thyme or rosemary, or even a handful of dried cranberries or nuts for added texture and flavor. Enjoy making it your own!

Amazing Vegan Thanksgiving

Amazing Vegan Thanksgiving: A Feast of Flavorful Traditions

Experience an Amazing Vegan Thanksgiving with a delightful menu filled with savory and sweet plant-based dishes.
Prep Time 1 hour
Cook Time 2 hours 15 minutes
Chilling Time 1 hour
Total Time 4 hours 15 minutes
Servings: 8 people
Course: Dinner
Cuisine: American, Vegan
Calories: 600

Ingredients
  

Savory Stout and Vegetable Pies
  • 3 cups Mixed Vegetables Chopped seasonal veggies like carrots, peas, and potatoes.
  • 1 cup Stout Beer Choose a dark variety for more intense taste.
  • 2 units Vegan Pie Crust Pre-made options or homemade.
  • 1 cup Vegetable Broth Enhances flavor in filling.
Cauliflower Steaks
  • 1 unit Cauliflower Head Slice into thick pieces.
  • 2 tablespoons Olive Oil Drizzle for richness.
  • 2 teaspoons Spices Mix of smoked paprika and cumin.
Pumpkin Mousse Pie
  • 1 can Pumpkin Puree Canned or homemade.
  • 1 cup Coconut Cream Chilled beforehand.
  • 1/2 cup Maple Syrup Natural sweetener.
Roasted Apple and Root Vegetable Stuffing
  • 2 units Apples Sweet varieties like Fuji or Honeycrisp.
  • 4 cups Root Vegetables Mix of carrots, parsnips, and potatoes.
  • 1 cup Vegetable Broth Keeps stuffing moist.
Creamy Mac and Cheese
  • 1 lb Gnocchi Alternative to traditional pasta.
  • 1 cup Cashews Soaked for creamy sauce.
  • 1/4 cup Nutritional Yeast Adds cheesy flavor.
Brussels Sprouts with Coconut Bacon
  • 1 lb Brussels Sprouts Firm, bright green.
  • 1 cup Coconut Flakes Optionally substitute with regular bacon.
  • 2 tablespoons Balsamic Vinegar Enhances sweetness.

Equipment

  • oven
  • Large pot
  • baking tray
  • Skillet
  • Blender
  • Baking Dish

Method
 

Savory Stout and Vegetable Pies
  1. Preheat oven to 400°F (200°C). Sauté chopped seasonal vegetables for 10 minutes. Add stout beer and vegetable broth. Fill vegan pie crusts and bake for 30-35 minutes.
Cauliflower Steaks
  1. Slice cauliflower head into thick steaks. Drizzle with olive oil and sprinkle with spices. Roast at 400°F (200°C) for 20-25 minutes.
Roasted Apple and Root Vegetable Stuffing
  1. Combine diced apples and root vegetables with vegetable broth. Sauté over medium heat for 15 minutes, then transfer to a baking dish.
Creamy Mac and Cheese
  1. Cook gnocchi according to package instructions. Blend soaked cashews, nutritional yeast, water, and seasonings. Toss gnocchi in sauce and bake at 375°F (190°C) for 15 minutes.
Brussels Sprouts with Coconut Bacon
  1. Trim and halve Brussels sprouts. Toss with coconut flakes and balsamic vinegar. Roast at 400°F (200°C) for about 20 minutes.
Pumpkin Mousse Pie
  1. Whip chilled coconut cream, combine with pumpkin puree and maple syrup. Pour into pre-baked pie crust and chill for at least 1 hour.
Serving the Feast
  1. Plate all dishes artfully for an enticing table display and invite guests to enjoy.

Notes

Make some components ahead of time for convenience. Adjust spices to personal preference.

Savory Stuffing Recipe for Your Cozy Thanksgiving Feast

As I opened my kitchen door, the aroma of herbs and bread filled the air, instantly transporting me back to my grandmother’s cozy home on Thanksgiving Day. This is the memory I cherish when making my Classic Traditional Thanksgiving Stuffing, a recipe that marries simplicity with heartfelt tradition. With just a handful of ingredients like day-old bread, buttery onions, and fresh herbs, this stuffing recipe proves that comfort food doesn’t have to be complicated. It’s not only a crowd-pleaser but also perfectly adaptable for make-ahead meals, allowing you to savor stress-free holiday prep. So, are you ready to bring the essence of home to your table this season?

Why Is This Stuffing Recipe Special?

Heartwarming Tradition: This classic Thanksgiving stuffing recipe captures the essence of family gatherings, blending nostalgia with modern simplicity.

Easy-to-Make: With just a few essential ingredients, you’ll find it easy to whip up even on a busy holiday morning.

Versatile Option: Feeling adventurous? You can easily customize this dish by swapping in different herbs or even using cornbread for a unique twist.

Crowd-Pleasing Flavor: The combination of fresh herbs and buttery onions delivers a savory flavor profile that will have everyone coming back for seconds!

Make-Ahead Friendly: Prep this stuffing ahead of time to alleviate stress on the big day—just assemble and pop it in the oven when you’re ready.

Don’t forget to pair it with your favorite sides, perhaps a warm bowl of Homemade Chicken Pot or a slice of Banana Bread Brownies for a complete holiday feast!

Stuffing Recipe Ingredients

For the Base
Unsalted Butter – Adds richness and moisture to the stuffing.
Day-Old White French Bread – Provides structure; must be dried to avoid mushiness. If fresh bread is used, toasting it first is essential.
Sweet Vidalia or Yellow Onion – Adds sweetness and flavor; finely diced for better integration.
Celery – Brings crunch and flavor; diced small for an even texture.

For the Herbs
Italian Flat-Leaf Parsley – Fresh herb for brightness; finely minced to release its flavor.
Fresh Sage Leaves – Essential for traditional flavor; finely minced for even distribution.
Fresh Rosemary – Adds an aromatic pine-like flavor; ensure it’s minced well after removing tough stems.
Fresh Thyme – Another herb that adds depth; minced to blend seamlessly.

For Seasoning
Salt – Enhances all flavors; adjust based on the saltiness of the broth used.
Pepper – Adds spice; tailor to your taste preference.

For Binding and Moisture
Low-Sodium Chicken Broth – Provides moisture and flavor; divided between mixing and baking.
Large Eggs – Act as a binding agent to keep the stuffing cohesive.

This stuffing recipe promises a warm, nostalgic flavor that will make your Thanksgiving feast a comforting delight!

Step‑by‑Step Instructions for Classic Traditional Thanksgiving Stuffing

Step 1: Prepare the Bread
Preheat your oven to 250°F (120°C). Spread the day-old white French bread cubes evenly on a baking sheet. Toast them for about 45 minutes, stirring halfway through, until they are dry and begin to look slightly golden. This drying step is crucial for achieving the right texture in your stuffing recipe, preventing it from being too soggy.

Step 2: Increase Oven Temperature
Once your bread cubes have dried, increase the oven temperature to 350°F (175°C). While the oven preheats, take a 9×13 inch baking dish and generously coat it with cooking spray to prevent sticking. This step is essential for ensuring your classic stuffing comes out easily and maintains its perfect shape during baking.

Step 3: Sauté the Vegetables
In a large skillet, melt ¾ cup of unsalted butter over medium heat. Add the finely diced sweet Vidalia onion and celery, sautéing for about 10 minutes until they are soft and translucent. Stir occasionally to prevent sticking and to develop the sweet, savory aroma that will infuse your stuffing recipe with flavor.

Step 4: Combine the Ingredients
In a large mixing bowl, combine the dried bread cubes with the sautéed onion and celery mixture. Add the finely minced herbs (parsley, sage, rosemary, thyme), salt, and pepper. Pour in 1¼ cups of low-sodium chicken broth, mixing everything gently but thoroughly until the bread is well-coated and begins to absorb the flavors.

Step 5: Prepare the Egg Mixture
In a separate bowl, whisk together the remaining low-sodium chicken broth with the large eggs until well combined. This mixture acts as a binding agent, ensuring that your stuffing recipe holds together beautifully. Pour the egg mixture over the bread mixture and fold it in gently, making sure all ingredients are fully integrated.

Step 6: Transfer to Baking Dish
Carefully transfer the stuffing mixture into your prepared baking dish, spreading it evenly. Dot the top with the remaining pieces of butter, which will melt and create a rich flavor formation during baking. Cover the dish tightly with aluminum foil to keep the moisture in as it cooks.

Step 7: Bake the Stuffing
Place the covered baking dish in the preheated oven and bake for 40 minutes. After this time, carefully remove the foil to allow for a crispy topping. Bake uncovered for an additional 40-45 minutes, or until the top turns a beautiful golden brown and a toothpick inserted in the center comes out clean. This delightful contrast of crispy and soft is what makes your classic Thanksgiving stuffing irresistible!

Expert Tips for the Best Stuffing Recipe

  • Bread Choice Matters: Use very dry day-old bread for the best texture. If using fresh bread, ensure to toast it to avoid a mushy stuffing.

  • Herb Freshness: Opt for fresh herbs whenever possible to elevate the flavor profile of your stuffing recipe. Dried herbs won’t yield the same aromatic experience.

  • Taste Test Before Baking: Always sample your mixture before baking. Adjust seasoning to ensure balanced flavors; different broths may impact saltiness.

  • Moisture Control: If preparing ahead, add extra broth before baking to maintain moisture and keep your stuffing from being dry on the big day.

  • Golden Top Tip: For a perfectly crispy topping, uncover the stuffing during the last 40-45 minutes of baking—this creates a delightful contrast with the soft interior.

Make Ahead Options

These Classic Traditional Thanksgiving Stuffing is perfect for meal prep! You can assemble the stuffing up to 24 hours in advance—simply prepare it without baking. Store the unbaked stuffing in the refrigerator, ensuring to cover it tightly with foil or plastic wrap to maintain moisture and prevent drying out. To keep the stuffing just as delicious, consider adding a splash of chicken broth before baking to ensure it remains moist. When you’re ready to serve, preheat your oven and bake the stuffing directly from the fridge, allowing an extra 10-15 minutes of baking time until it reaches that irresistible golden brown on top. Enjoy the joy of stress-free holiday prep with this time-saving option!

How to Store and Freeze Stuffing Recipe

Fridge: Store any leftover stuffing in an airtight container in the fridge for up to 5 days. Reheat gently in the oven or microwave, adding a splash of broth if needed.

Freezer: You can freeze your stuffing for up to 3 months. Place it in a freezer-safe container or zip-top bag, removing as much air as possible.

Thawing: When ready to enjoy, thaw the stuffing overnight in the fridge. Reheat directly from frozen or after thawing, ensuring it reaches an internal temperature of 165°F.

Make-Ahead: If making ahead of time, assemble the stuffing but do not bake it. Cover and refrigerate for up to 2 days or freeze for later use to keep the flavors fresh and vibrant.

Stuffing Recipe Variations & Substitutions

Don’t hesitate to get creative with this classic stuffing recipe and make it your own!

  • Herb Swap: Try using fresh dill or tarragon instead of sage for a unique herbal twist. Both herbs bring a delightful freshness!

  • Grain-Free: Substitute the bread with a mix of cauliflower rice and nut flour for a low-carb, gluten-free option. It’ll bring a lovely texture and flavor depth.

  • Nutty Addition: Fold in chopped walnuts or pecans for added crunch and a nutty flavor that’ll surprise your taste buds in each bite.

  • Sweet & Savory: Mix in some dried cranberries or chopped apples for a hint of sweetness that perfectly balances the savory notes of the dish.

  • Spicy Kick: Add a dash of cayenne pepper or finely chopped jalapeños for a spicy kick, perfect for those who love a bit of heat in their meal.

  • Cornbread Base: Swap the French bread for cornbread to create a sweeter, moist stuffing. It pairs wonderfully with turkey and brings Southern flair!

  • Vegetable Boost: Amp up the veggies by including diced carrots, mushrooms, or bell peppers. This not only adds flavor but also enhances the nutritional profile.

Don’t forget, this stuffing is also a delightful side alongside a hearty meal, such as a cozy bowl of Cabbage Carrot Patties or a slice of decadent Matcha Sponge Cake to round off your holiday feast!

What to Serve with Classic Traditional Thanksgiving Stuffing

A delightful Thanksgiving feast is more than just the stuffing; it’s about creating a symphony of flavors that warm the heart.

  • Roasted Turkey: The classic centerpiece, its savory juices bobbing with fresh herbs elevate the delicious flavors of the stuffing beautifully.

  • Cranberry Sauce: This tangy, sweet condiment cuts through the rich stuffing, providing a refreshing contrast that highlights your Thanksgiving meal.

  • Garlic Mashed Potatoes: Creamy and buttery, these mashed potatoes offer a smooth texture that complements the stuffing’s heartiness, making every bite a blissful experience.

  • Green Bean Almondine: The crispness of fresh green beans topped with toasted almonds adds a lovely crunch, balancing the soft stuffing perfectly.

  • Butternut Squash Soup: A warm bowl of creamy soup provides an inviting start to dinner, enhancing the cozy vibe while pairing nicely with your stuffing.

  • Apple Pie: End your meal on a sweet note with this iconic dessert; its warm spices harmonize with the stuffing, evoking the charm of holiday traditions.

  • Spiced Apple Cider: This comforting drink infuses your gathering with warmth, enhancing the home’s festive spirit and complementing the flavors of your meal.

Classic Traditional Thanksgiving Stuffing Recipe FAQs

How do I choose the right bread for this stuffing recipe?
Absolutely! Day-old white French bread is ideal because it has the perfect structure to absorb flavors without turning mushy. If you can only find fresh bread, toasting it in the oven at 250°F for about 45 minutes will help achieve the right texture before using it in your stuffing recipe.

How should I store leftover stuffing?
Very easy! Just place any leftover stuffing in an airtight container and store it in the fridge for up to 5 days. When you’re ready to eat, simply reheat it gently in the oven or microwave, adding a splash of broth if it feels a bit dry!

Can I freeze stuffing?
Absolutely! You can freeze your prepared stuffing for up to 3 months. Just transfer it to a freezer-safe container or zip-top bag, squeezing out as much air as possible to prevent freezer burn.

How do I reheat frozen stuffing?
When you’re ready to enjoy your frozen stuffing, thaw it overnight in the fridge. If you prefer, you can also reheat it directly from frozen—just make sure it reaches an internal temperature of 165°F. If it seems dry, add a little broth to keep it moist and flavorful!

What if my stuffing is too dry after baking?
Don’t worry! If you find your stuffing is a bit dry, simply add a bit of low-sodium chicken broth, mixing gently to incorporate. Avoid over-baking, which can create dryness. Consider removing the foil during the last 40-45 minutes of baking for a crispy golden top while ensuring the insides remain soft and buttery.

Is this stuffing recipe suitable for people with dietary restrictions?
Absolutely! To tweak this classic stuffing recipe for dietary needs, feel free to replace the chicken broth with a vegetable broth for a vegetarian option. Additionally, ensure your bread choice aligns with any allergen considerations, like gluten-free varieties, to cater to guests with specific dietary needs.

Stuffing Recipe

Savory Stuffing Recipe for Your Cozy Thanksgiving Feast

This stuffing recipe captures the essence of family gatherings, blending nostalgia with modern simplicity and making it a perfect addition to your Thanksgiving feast.
Prep Time 30 minutes
Cook Time 1 hour 20 minutes
Total Time 1 hour 50 minutes
Servings: 8 servings
Course: Dinner
Cuisine: American
Calories: 250

Ingredients
  

For the Base
  • ¾ cup Unsalted Butter Adds richness and moisture to the stuffing.
  • 1 loaf Day-Old White French Bread Must be dried to avoid mushiness.
  • 1 large Sweet Vidalia or Yellow Onion Adds sweetness; finely diced.
  • 2 stalks Celery Diced small for even texture.
For the Herbs
  • ¼ cup Italian Flat-Leaf Parsley Finely minced for brightness.
  • 2 tablespoons Fresh Sage Leaves Finely minced for traditional flavor.
  • 2 tablespoons Fresh Rosemary Minced well after removing tough stems.
  • 2 tablespoons Fresh Thyme Minced to blend seamlessly.
For Seasoning
  • 1 teaspoon Salt Adjust based on broth saltiness.
  • ½ teaspoon Pepper Tailor to taste preference.
For Binding and Moisture
  • 2 cups Low-Sodium Chicken Broth Divided between mixing and baking.
  • 2 large Eggs Act as a binding agent.

Equipment

  • Baking Dish
  • Skillet
  • mixing bowl
  • baking sheet

Method
 

Step-by-Step Instructions
  1. Preheat your oven to 250°F (120°C). Spread the bread cubes on a baking sheet. Toast for 45 minutes, stirring halfway through.
  2. Increase the oven temperature to 350°F (175°C). Coat a 9x13 inch baking dish with cooking spray.
  3. In a skillet, melt the butter over medium heat. Add onion and celery; sauté for 10 minutes until soft.
  4. In a mixing bowl, combine bread cubes with sautéed onion and celery, herbs, salt, and pepper. Mix in chicken broth.
  5. Whisk together remaining chicken broth and eggs. Pour over the bread mixture and fold gently.
  6. Transfer the mixture to the baking dish, dot with remaining butter, and cover with foil.
  7. Bake covered for 40 minutes. Remove foil and bake for an additional 40-45 minutes until golden brown.

Notes

For best results, use very dry day-old bread. Adjust seasoning to taste before baking, and consider adding extra broth to maintain moisture if preparing ahead.

Festive Funfetti Halloween Mini Cakes for Spooky Celebrations

As the leaves start to crisp and the air turns a tad cooler, I can’t help but get swept up in the magic of Halloween. This year, I’m bringing a fun twist to the festivities with my Funfetti Halloween Mini Cakes. These delightful little treats are not only cheerful with their colorful sprinkles, but they also pack an easy, vegetarian-friendly recipe into a bite-sized package! In just a few simple steps, you’ll have these sweet surprises ready to dazzle your friends and family, making them perfect for parties or a cozy night in. Plus, who doesn’t love a dessert that evokes a sense of nostalgia while being incredibly fun to customize? Ready to treat yourself to some spooky baking fun? Let’s dive in!

Why are Funfetti Halloween Mini Cakes special?

Whimsical, these mini cakes are a delightful blend of festive flavor and eye-catching colors, making them a crowd-pleaser at any gathering. Customizable, you can switch up the sprinkles or chocolate for a personal twist. Quick and easy, they come together in no time while providing a fun baking experience. Perfectly portioned, these treats are ideal for sharing at parties, school events, or cozy family movie nights. Want more festive inspiration? Check out my Savory Zucchini Pancakes or the delightful Mini Pancakes for more creative options!

Funfetti Halloween Mini Cakes Ingredients

For the Batter
Pillsbury™ Funfetti® Halloween Cake Mix – This provides both flavor and structure; feel free to use any vanilla or chocolate cake mix for alternatives.
Eggs – They help bind the ingredients together for a fluffy texture; make sure they’re large for the best results.
Water – A necessary addition to hydrate the batter; follow the box instructions for the right amount.
Oil – This adds moisture and keeps the cakes tender; vegetable or canola oil works great.

For the Decoration
Funfetti Halloween Sprinkles – They add a splash of color and festive fun; you can swap them out for regular sprinkles or even crushed candies for a twist.
12 oz White Chocolate Chips – Used for creating a smooth chocolate base that pairs beautifully with the mini cakes; try substituting with milk or dark chocolate if desired.

For the Molds
Silicone Halloween Cake Molds – These molds shape your mini cakes; while other molds can be used, results may vary so keep that in mind.

Step‑by‑Step Instructions for Funfetti Halloween Mini Cakes

Step 1: Preheat the Oven
Begin your Funfetti Halloween Mini Cakes by preheating your oven to 325°F (163°C). While it warms, prepare your silicone molds by spraying them generously with nonstick spray to prevent the cakes from sticking. This step ensures a smooth release later on, setting you up for success with your spooky treats.

Step 2: Mix the Batter
In a large mixing bowl, combine the Pillsbury™ Funfetti® Halloween Cake Mix with the required water, oil, and eggs according to the package directions. Use a whisk or electric mixer to blend the ingredients until the batter is smooth and well combined. Keep an eye out for any lumps, as you want a uniformly fluffy mixture.

Step 3: Fill the Molds
Carefully fill each cavity of your prepared silicone molds halfway with the cake batter. This allows room for the cakes to rise without overflowing while baking. Ensure even distribution for uniform mini cakes, and use a spatula to smooth over the tops if needed.

Step 4: Bake the Mini Cakes
Place the molds in the preheated oven and bake for 10 to 15 minutes. You’ll know the Funfetti Halloween Mini Cakes are ready when they turn lightly golden and a toothpick inserted into the center comes out clean. Keep a close eye as baking times can vary slightly based on your oven.

Step 5: Cool and Remove the Cakes
Once baked, remove the molds from the oven and allow them to cool completely on a wire rack. This cooling step is crucial; leaving them in the molds too long can cause them to break. Wait for at least 15-20 minutes before attempting to gently pop them out.

Step 6: Melt the Chocolate
While the cakes cool, melt 12 oz of white chocolate chips in a microwave-safe bowl. Heat in short bursts of 30 seconds, stirring frequently, until the chocolate is smooth and fully melted. Be careful not to overheat as the chocolate can seize.

Step 7: Decorate the Molds
Sprinkle a layer of Funfetti Halloween Sprinkles into the bottom of each mold, allowing for some festive flair. Next, layer the melted white chocolate over the sprinkles, filling the molds to create a delicious chocolate base for the mini cakes.

Step 8: Assemble the Mini Cakes
After the chocolate has been added, gently press each cooled cake into the chocolate layer, ensuring they sit evenly atop the sprinkles. This process helps to create a beautiful, integrated design where the chocolate and cake meet deliciously.

Step 9: Freeze for Firmness
Cover the molds with a plastic wrap and place them in the freezer for at least 2 hours. This will set the chocolate and help your Funfetti Halloween Mini Cakes maintain their shape, making them easy to serve once you’re ready to unveil your spooky treats.

Step 10: Serve and Enjoy
Once the cakes are frozen and set, carefully invert the molds to release the mini cakes. Gently tap or press on the molds to help them pop out, showcasing the beautiful chocolate bases. Your Funfetti Halloween Mini Cakes are now ready to charm family and friends at your spooky celebrations!

Funfetti Halloween Mini Cakes Variations

Get ready to unleash your creativity with these delightful variations on the Funfetti Halloween Mini Cakes for a truly personalized treat!

  • Dairy-Free: Substitute white chocolate with dairy-free chocolate chips for a vegan-friendly twist. The flavors will still shine through, ensuring everyone can enjoy these festive bites.

  • Chocolate Lovers: Use chocolate cake mix in place of Funfetti for a double chocolate experience. This rich combination is sure to please those with a sweet tooth.

  • Alternative Sprinkles: Swap out Halloween sprinkles for seasonal-themed sprinkles like fall leaves or even colorful candy corn! Each variation adds a festive flair perfect for Halloween.

  • Filling Surprise: Create a hidden surprise by filling the mini cakes with your favorite frosting before placing the chocolate base. This adds a delicious twist that’s both cute and unexpected.

  • Nutty Crunch: Add crushed nuts like pistachios or almonds to the batter for added texture and flavor. This gives your mini cakes a nice crunch and elevates their taste profile.

  • Spicy Kick: Incorporate a pinch of cinnamon or cayenne pepper into the chocolate layer for a slightly spicy surprise. This unconventional twist adds a warm depth that contrasts beautifully with the sweetness.

  • Layered Cakes: For an impressive look, bake the cakes in several layers and stack them. Each layer can be a different flavor or color, creating a fun and eye-catching display.

  • Flavored Chocolate: Transform your chocolate layer by adding a splash of peppermint or almond extract. These subtle flavors can perfectly complement the sweetness of the cake and take your mini treats to another level!

Bring these heartwarming variations to life, and enjoy creating spooky yet delightful surprises that your loved ones will cherish. For more inspiration, consider pairing your mini cakes with some delicious Mini Cheeseburger Breads for a fun Halloween spread, or add a twist to your breakfast with Mini Pancakes. Happy baking!

Storage Tips for Funfetti Halloween Mini Cakes

Fridge: Store your Funfetti Halloween Mini Cakes in an airtight container in the refrigerator for up to 4 days, keeping them fresh and moist.

Freezer: For longer storage, freeze individual mini cakes by placing them in a single layer in a freezer-safe container for up to a month. Wrap each in plastic wrap for added protection.

Reheating: If enjoying from frozen, let the cakes thaw in the fridge overnight and then warm them in the microwave for a few seconds to regain their soft texture before serving.

Room Temperature: If you’re serving them on the same day, you can keep the mini cakes at room temperature for about 2 hours before they need to be refrigerated.

What to Serve with Funfetti Halloween Mini Cakes

These delightful mini cakes are not only festive but also open the door to endless pairing possibilities that elevate your spooky gatherings.

  • Spooky Cocktails: A fun and colorful cocktail, like a Halloween-themed punch, adds festive flair and ties in beautifully with the vibrant colors of the cake.
  • Ghostly Marshmallow Treats: Light and fluffy, these add a whimsical touch and are fun to graze on between cake bites. Their sweetness perfectly complements the mini cakes.
  • Crispy Apple Slices: Fresh apple slices bring a crisp texture and a hint of tartness, contrasting nicely with the sweetness of the Funfetti Halloween Mini Cakes.
  • Chocolate Dipped Pretzels: The salty crunch pairs wonderfully with the soft texture of the cakes, providing a satisfying contrast while still feeling indulgent.
  • Pumpkin Spice Coffee: This cozy drink amplifies the seasonal flavors, creating a warm ambiance that’s ideal for enjoying these treats by a crackling fire.
  • Halloween-Themed Fruit Salad: A mix of colorful, juicy fruits makes for a refreshing side, lightening the overall sweetness while keeping the festive spirit alive.
  • Mini Candy Corn Cups: Bright and playful, they serve as a nostalgic nod to fall festivities and are sure to delight kids and adults alike.
  • Vanilla Ice Cream Scoop: A creamy scoop next to your mini cakes offers a deliciously indulgent combo, perfect for a cozy dessert experience.
  • Caramel Sauce Drizzle: Adding a drizzle of warm caramel over the cakes enhances their sweetness and adds a smooth, lovely finish.
  • Chocolate Milkshake: This indulgent treat brings a playful spirit that echoes the flavors of the Funfetti Halloween Mini Cakes, making it a favorite at gatherings.

Expert Tips for Funfetti Halloween Mini Cakes

  • Nonstick Essential: Always spray silicone molds with nonstick spray to prevent sticking. It’s the key to retaining the shape of your Funfetti Halloween Mini Cakes.

  • Cool Down Properly: Allow cakes to cool completely in the molds before removal. This prevents any breakage and ensures they maintain their delightful form.

  • Stirring Technique: Mix your batter until smooth, but avoid over-mixing. This keeps your mini cakes light and fluffy, which is crucial for a yummy texture.

  • Check Doneness: Test for doneness with a toothpick; it should come out clean. Be careful not to overbake, as it can dry out the cakes.

  • Creative Decorating: Feel free to experiment with different types of chocolate for decorating. A mix of white, milk, or dark chocolate adds a fun twist to your Funfetti Halloween Mini Cakes!

Make Ahead Options

These Funfetti Halloween Mini Cakes are perfect for busy cooks looking to save time on spooky celebrations! You can prepare the batter and fill the molds up to 24 hours in advance; simply refrigerate the filled molds covered with plastic wrap to keep them fresh. The cakes can also be baked ahead of time and stored in an airtight container in the refrigerator for up to 3 days. To finish, just melt the white chocolate, add the sprinkles, and assemble the cakes when you’re ready to serve. This prep-ahead approach ensures your mini cakes are just as delicious and festive without the last-minute rush!

Funfetti Halloween Mini Cakes Recipe FAQs

What ingredients should I use for the best Funfetti Halloween Mini Cakes?
Absolutely! For the best results, you should use Pillsbury™ Funfetti® Halloween Cake Mix, as it gives the cakes their festive flavor and structure. Don’t forget fresh eggs, water, and oil to hydrate and bind the batter. For decoration, Funfetti Halloween Sprinkles elevate the look and taste, while white chocolate chips create a delightful base. Feel free to swap the chocolate—milk or dark chocolate would work wonderfully too!

How should I store my Funfetti Halloween Mini Cakes?
Very! To keep your Funfetti Halloween Mini Cakes fresh, store them in an airtight container in the refrigerator for up to 4 days. This keeps them moist and tasty. If you have leftovers, freeze them! Wrap each mini cake in plastic wrap and place them in a single layer in a freezer-safe container for up to a month. They’ll be a delightful treat whenever the craving strikes.

Can I freeze Funfetti Halloween Mini Cakes?
Absolutely! To freeze, let the mini cakes cool completely first. Then wrap each one in plastic wrap tightly, ensuring no air can get in, and place them in a freezer-safe container. They can last for about a month in the freezer. When you’re ready to enjoy one, just thaw it in the refrigerator overnight and warm it in the microwave for a few seconds to refresh its soft texture.

What should I do if my mini cakes stick to the mold?
Very importantly! If your cakes tend to stick, it’s usually due to insufficient nonstick spray on the silicone molds. Make sure to spray them generously before adding the batter. Additionally, let the cakes cool completely before trying to remove them from the molds. If they still resist, try gently twisting the mold or using a butter knife to carefully release the edges.

Are Funfetti Halloween Mini Cakes safe for people with allergies?
Definitely! While these mini cakes are vegetarian, they do contain common allergens like eggs and wheat (from the cake mix). If you’re cooking for someone with allergies, consider using alternatives such as an egg replacer and gluten-free cake mix. Always double-check ingredient labels for hidden allergens, and feel free to get creative with add-ins and toppings that are safe for your guests!

Can I customize my Funfetti Halloween Mini Cakes?
Of course! The fun part of these cakes is the room for creativity. You can use different types of cake mixes if preferred—vanilla or chocolate work wonderfully. Add unique sprinkles, food coloring to the melting chocolate, or even a contrasting drizzle of chocolate on top for a festive pop. The more the merrier, so embrace your inner baker and make them your own!

Funfetti Halloween Mini Cakes

Festive Funfetti Halloween Mini Cakes for Spooky Celebrations

Enjoy these Funfetti Halloween Mini Cakes, perfect for festive gatherings and spooky celebrations!
Prep Time 15 minutes
Cook Time 15 minutes
Cooling Time 20 minutes
Total Time 50 minutes
Servings: 12 mini cakes
Course: Dessert
Cuisine: American
Calories: 120

Ingredients
  

For the Batter
  • 1 box Pillsbury™ Funfetti® Halloween Cake Mix
  • 3 large Eggs
  • 1 cup Water Follow the box instructions
  • 1/3 cup Oil Vegetable or canola oil
For the Decoration
  • 1 cup Funfetti Halloween Sprinkles Swap for regular sprinkles or crushed candies
  • 12 oz White Chocolate Chips Substitute with milk or dark chocolate if desired
For the Molds
  • Silicone Halloween Cake Molds Other molds can be used, results may vary

Equipment

  • Silicone Halloween Cake Molds

Method
 

Step-by-Step Instructions
  1. Preheat your oven to 325°F (163°C) and prepare your silicone molds by spraying them with nonstick spray.
  2. In a large mixing bowl, combine the cake mix, water, oil, and eggs. Mix until smooth and well combined.
  3. Fill each cavity of the prepared molds halfway with the cake batter.
  4. Bake in the preheated oven for 10 to 15 minutes until lightly golden and a toothpick inserted comes out clean.
  5. Remove from the oven and cool completely on a wire rack, waiting at least 15-20 minutes before removing from molds.
  6. Melt white chocolate chips in a microwave-safe bowl, heating in short bursts and stirring frequently until smooth.
  7. Sprinkle Funfetti Halloween Sprinkles into the bottom of each mold and layer with melted chocolate to create a base.
  8. Press each cooled cake into the chocolate layer, ensuring they sit evenly atop the sprinkles.
  9. Cover the molds with plastic wrap and freeze for at least 2 hours.
  10. Once frozen, invert the molds to release the mini cakes and enjoy your spooky treats!

Notes

For best results, always spray molds with nonstick spray and ensure cakes cool completely before removal to prevent breakage.

Decadent Chocolate Espresso Cinnamon Rolls You’ll Crave

The kitchen was filled with the enchanting aroma of fresh-baked goods, and I couldn’t help but smile when I caught a whiff of warm cinnamon and rich chocolate wafting through the air. That’s the magic of my Chocolate Espresso Cinnamon Rolls, a delightful fusion of classic breakfast pastry and gourmet indulgence. These rolls are not only quick to whip up, making them perfect for busy mornings, but they are also a show-stopping brunch option that will impress family and friends alike. With each bite, you’ll enjoy a soft, fluffy texture enveloping a gooey, espresso-infused chocolate filling that elevates a simple treat into something truly special. Are you ready to roll up your sleeves and bring a slice of heaven to your breakfast table?

Why are these rolls a must-try?

Decadent Flavor Explosion: Each bite of these Chocolate Espresso Cinnamon Rolls is a delightful blend of rich chocolate and coffee, providing a taste experience that coffee lovers will adore.

Easy to Make: With straightforward instructions, these rolls require minimal baking experience, making them perfect for anyone wanting to impress at brunch without stress.

Versatile Treat: Enjoy them as a decadent breakfast, or serve them at your next gathering alongside Coffee Chocolate Truffles for a dessert spread that’s sure to delight!

Perfect for Any Occasion: Whether it’s a casual weekend or a special celebration, these rolls elevate the moment with their irresistible aroma and flavor.

Make-Ahead Option: Prepare the dough in advance, allowing you to simply slice and bake in the morning for a fresh, hot treat.

Crowd-Pleaser: From kids to adults, everyone will be captivated by their gooey chocolate interior and soft, fluffy texture—making them a guaranteed hit!

Chocolate Espresso Cinnamon Rolls Ingredients

For the Dough

  • All-Purpose Flour – The foundation for the rolls; using bread flour will create a slightly denser texture.
  • Granulated Sugar – Sweetens the dough, balancing the rich flavors; feel free to substitute with brown sugar for a deeper taste.
  • Yeast – Leavens the dough, making it light and fluffy; check for freshness to ensure optimal rise.
  • Milk – Adds moisture and tenderness; whole milk is ideal, or try almond milk for a dairy-free option.
  • Butter – Infuses richness and flavor; use coconut oil for a dairy-free alternative.
  • Egg – Provides structure and enhances richness; substitute with a flax egg for a vegan version.

For the Filling

  • Espresso Powder – Intensifies the chocolate flavor; dissolve in hot water for a stronger coffee taste if desired.
  • Cocoa Powder – Contributes a rich chocolate flavor; Dutch-processed cocoa gives a milder taste.
  • Cinnamon – Adds warmth and spice; adjust the amount according to your personal preference.
  • Salt – Balances the sweetness; kosher salt is ideal for an even distribution in the dough.
  • Chocolate Chips – Provide delightful melty pockets of chocolate; a mix of dark and milk chocolate adds depth to the flavor.

For the Glaze

  • Powdered Sugar – Used for drizzling on top, providing a sweet finish; use fresh for the best consistency.
  • Milk – To thin the glaze to your preferred consistency, complementing the sweetness of the rolls.

These Chocolate Espresso Cinnamon Rolls are sure to be a show-stopper at your breakfast table! Enjoy the decadent flavors and delightful aroma as they bake, and savor each mouthwatering bite!

Step‑by‑Step Instructions for Chocolate Espresso Cinnamon Rolls

Step 1: Dough Preparation
In a large mixing bowl, combine 4 cups of all-purpose flour, ½ cup of granulated sugar, 2 teaspoons of yeast, and 1 teaspoon of salt. In a separate bowl, whisk together 1 cup of warm milk, ½ cup of melted butter, and 1 beaten egg. Pour the wet ingredients into the dry, mixing until a shaggy dough forms. Knead on a floured surface for about 5-7 minutes until smooth and elastic, then place in a greased bowl and cover. Let rise in a warm area for 1-1.5 hours, until doubled in size.

Step 2: Filling Preparation
While the dough rises, prepare the filling for your Chocolate Espresso Cinnamon Rolls. In a medium bowl, mix together ½ cup of cocoa powder, 2 tablespoons of espresso powder, ½ cup of granulated sugar, and 1 tablespoon of cinnamon until well combined. Once your dough has risen, turn it out onto a floured surface and roll it into a rectangle about 14×10 inches, ensuring it’s evenly thick.

Step 3: Assembling the Rolls
Spread ¼ cup of softened butter over the rolled-out dough, then evenly sprinkle the filling mixture across the surface, making sure to cover every inch. Add 1 cup of chocolate chips on top of the filling. Beginning at one long edge, tightly roll the dough into a log shape, sealing the edges as you go to keep the filling from spilling out.

Step 4: Rolling and Cutting
After rolling your dough log, use a sharp knife or dental floss to slice it into 12 equal pieces, about 1.5 inches wide. Place the rolls cut-side up in a greased 9×13-inch baking dish, ensuring they are snug but not overcrowded. Cover the dish with a towel and let the rolls rise for another 30-45 minutes until puffy and touching each other.

Step 5: Baking the Rolls
Preheat your oven to 350°F (175°C). Once the rolls have risen, place the baking dish in the center of the preheated oven and bake for approximately 25 minutes. Keep an eye on them, and look for a golden-brown top and a firm texture. Remove from the oven and allow them to cool in the baking dish for about 10 minutes.

Step 6: Glazing the Rolls
For the finishing touch, prepare the glaze while the rolls cool. In a small bowl, mix 1 cup of powdered sugar with 2-3 tablespoons of milk until smooth and pourable. Drizzle the glaze generously over the slightly cooled Chocolate Espresso Cinnamon Rolls, allowing it to set for a minute before serving. Enjoy the delightful fusion of flavors that these rolls bring to your breakfast table!

Expert Tips for Chocolate Espresso Cinnamon Rolls

  • Yeast Activation: Always bloom your yeast in warm milk to ensure it’s active. If your dough doesn’t rise, the yeast may be dead.

  • Avoid Over-Kneading: Knead the dough just until smooth and elastic; overworking can make the rolls tough rather than soft and fluffy.

  • Filling Balance: Don’t skimp on the filling mixture; evenly distribute for gooey chocolate pockets and a well-rounded flavor in your Chocolate Espresso Cinnamon Rolls.

  • Roll Tight: Tightly roll the dough to prevent filling from leaking during baking. This ensures that each roll is packed with flavor.

  • Perfect Glaze Consistency: Adjust the glaze with milk until you reach a pourable, yet thick consistency. Drizzling too early can make it runny and soak in.

How to Store and Freeze Chocolate Espresso Cinnamon Rolls

Room Temperature: Store the rolls in an airtight container at room temperature for up to 2-3 days to maintain their soft texture and delicious flavor.

Fridge: If you want to keep them longer, refrigerate the rolls for up to 1 week. Just remember to reheat them briefly in the microwave before serving for that freshly baked taste.

Freezer: For extended storage, freeze the rolls individually wrapped in plastic wrap and placed in a freezer bag. They can be stored for up to 2 months; just thaw and reheat when you’re ready to enjoy!

Reheating: To reheat, simply place rolls in the microwave for 15-20 seconds, or in a preheated oven at 350°F (175°C) for about 10 minutes. Your Chocolate Espresso Cinnamon Rolls will taste delightful!

Make Ahead Options

These Chocolate Espresso Cinnamon Rolls are perfect for busy mornings! You can prepare the dough up to 24 hours in advance by following the preparation steps up to rolling and cutting. Once you’ve sliced the rolls, place them in a greased baking dish, cover tightly with plastic wrap, and refrigerate overnight. This will keep them fresh and maintain their fluffy texture. In the morning, simply allow the rolls to rise for an additional 30-45 minutes at room temperature before baking. With this make-ahead option, you’ll have warm, gooey cinnamon rolls ready to enjoy with minimal morning effort.

Chocolate Espresso Cinnamon Rolls Variations

Feel free to mix it up and add your personal touch to these delightful rolls!

  • Whole Wheat Flour: Swap half of the all-purpose flour with whole wheat flour for added fiber and a nuttier taste.

  • Plant-Based Milk: Use almond or oat milk instead of dairy for a creamy, dairy-free twist that maintains the rolls’ moist texture.

  • Nutty Crunch: Add chopped walnuts or pecans to the filling for a satisfying crunch that complements the gooey chocolate beautifully.

  • Spice It Up: Experiment with flavors by adding a dash of nutmeg or cardamom to the cinnamon filling for an aromatic twist.

  • Gluten-Free Options: Substitute all-purpose flour with a 1:1 gluten-free flour blend for a delicious gluten-free version that everyone can enjoy.

  • Caramel Swirl: Drizzle melted caramel sauce over the filling before rolling for an extra decadent layer of sweetness.

  • Chocolate Variety: Mix dark chocolate chips with a splash of white chocolate chips for a rich and visually appealing filling that looks as good as it tastes.

  • Coffee Infusion: Instead of vanilla milk for the glaze, use brewed espresso for a delightful coffee kick that ties in perfectly with the flavors of the rolls.

And why not enjoy your Chocolate Espresso Cinnamon Rolls with a side of delightful Coffee Chocolate Truffles for an indulgent brunch experience?

What to Serve with Chocolate Espresso Cinnamon Rolls

Indulge in a sensational breakfast feast that complements the delightful flavors of your freshly baked rolls.

  • Fresh Fruit Salad: A vibrant mix of berries and citrus adds a refreshing contrast, balancing the sweetness of the rolls.

  • Creamy Scrambled Eggs: The fluffy texture and rich flavor of eggs create a savory balance, making for a satisfying meal.

  • Maple Bacon: Crispy and sweet, the smoky flavor of bacon pairs beautifully, cutting through the richness of the cinnamon rolls.

  • Iced Cold Brew Coffee: Elevate your brunch with a chilled coffee drink that brings out the espresso notes in the rolls.

  • Vanilla Yogurt Parfait: Layered with granola and fruit, this dish adds a creamy texture, creating a delightful bite alongside the rolls.

  • Chocolate Milkshake: Indulge your sweet tooth with a luscious shake that enhances the chocolate flavor in the rolls—perfect for a treat!

These pairings will transform your breakfast experience, creating a delicious spread that’s sure to impress family and friends alike.

Chocolate Espresso Cinnamon Rolls Recipe FAQs

How do I choose ripe ingredients for my Chocolate Espresso Cinnamon Rolls?
Absolutely! When selecting ingredients, use fresh, high-quality essentials for the best flavor. For milk, choose whole milk for creaminess; if using almond milk, ensure it’s unsweetened to keep sweetness balanced. Check the expiration dates on yeast packs to ensure they’re active and fresh for rising, and use unsalted butter for controlled seasoning.

What’s the best way to store my Chocolate Espresso Cinnamon Rolls, and how long do they last?
To keep your rolls fresh, store them in an airtight container at room temperature for 2-3 days. If you want them to last longer, refrigerate them in a sealed container for up to 1 week, and be sure to reheat gently in the microwave or oven for that warm, just-baked taste.

Can I freeze my Chocolate Espresso Cinnamon Rolls? If so, how?
Absolutely! To freeze, wrap each roll individually in plastic wrap, then place them in a freezer-safe bag. They can be stored for up to 2 months. When you’re ready to enjoy them, simply thaw overnight in the fridge, then reheat in the microwave for 15-20 seconds, or warm them in a preheated oven at 350°F (175°C) for about 10 minutes.

What should I do if my dough isn’t rising properly?
If your dough isn’t rising, it could be due to inactive yeast. Always bloom your yeast in warm milk (110°F/43°C) to ensure it’s active before combining it with dry ingredients. If the milk is too hot, it can kill the yeast, so aim for a comfortable warmth. If you suspect your yeast was old or inactive, it’s best to start over with a fresh pack.

Are there any dietary considerations I should keep in mind while making these rolls?
Very! If you have dietary restrictions, substitute regular milk with almond milk or oat milk for a dairy-free option. Additionally, you can use a flax egg (1 tablespoon ground flaxseed mixed with 2.5 tablespoons water) in place of the egg for a vegan alternative. Be cautious with chocolate chips as some may contain dairy; opt for dairy-free varieties if necessary.

Chocolate Espresso Cinnamon Rolls

Decadent Chocolate Espresso Cinnamon Rolls You’ll Crave

These Chocolate Espresso Cinnamon Rolls are a delightful fusion of rich chocolate, espresso, and cinnamon you'll crave.
Prep Time 1 hour
Cook Time 25 minutes
Rising Time 1 hour 30 minutes
Total Time 2 hours 55 minutes
Servings: 12 rolls
Course: Breakfast
Cuisine: American
Calories: 320

Ingredients
  

For the Dough
  • 4 cups All-Purpose Flour Using bread flour will create a slightly denser texture.
  • 0.5 cups Granulated Sugar Substitute with brown sugar for a deeper taste.
  • 2 teaspoons Yeast Check for freshness to ensure optimal rise.
  • 1 cup Milk Whole milk is ideal, or try almond milk for a dairy-free option.
  • 0.5 cups Butter Use coconut oil for a dairy-free alternative.
  • 1 large Egg Substitute with a flax egg for a vegan version.
For the Filling
  • 0.5 cups Espresso Powder Dissolve in hot water for a stronger coffee taste if desired.
  • 0.5 cups Cocoa Powder Dutch-processed cocoa gives a milder taste.
  • 1 tablespoon Cinnamon Adjust the amount according to your personal preference.
  • 1 teaspoon Salt Kosher salt is ideal for even distribution.
  • 1 cups Chocolate Chips A mix of dark and milk chocolate adds depth.
For the Glaze
  • 1 cups Powdered Sugar Use fresh for the best consistency.
  • 2-3 tablespoons Milk To thin the glaze to your preferred consistency.

Equipment

  • mixing bowl
  • Baking Dish
  • Rolling Pin
  • sharp knife
  • whisk

Method
 

Dough Preparation
  1. In a large mixing bowl, combine the all-purpose flour, granulated sugar, yeast, and salt. In a separate bowl, whisk together warm milk, melted butter, and beaten egg. Pour the wet ingredients into the dry, mixing until a shaggy dough forms. Knead on a floured surface for about 5-7 minutes until smooth and elastic, then place in a greased bowl and cover. Let rise in a warm area for 1-1.5 hours, until doubled in size.
  2. While the dough rises, prepare the filling by mixing cocoa powder, espresso powder, granulated sugar, and cinnamon until well combined. Once your dough has risen, roll it out into a rectangle about 14x10 inches.
  3. Spread softened butter over the rolled-out dough, then evenly sprinkle the filling mixture across. Add chocolate chips on top of the filling and tightly roll the dough into a log shape, sealing the edges.
  4. Use a sharp knife to slice the dough log into 12 equal pieces, about 1.5 inches wide. Place the rolls cut-side up in a greased baking dish, cover with a towel, and let rise for another 30-45 minutes.
  5. Preheat your oven to 350°F (175°C). Once the rolls have risen, bake for approximately 25 minutes until golden-brown. Allow cooling in the baking dish for about 10 minutes.
  6. Prepare the glaze by mixing powdered sugar with milk until smooth and pourable. Drizzle the glaze over the slightly cooled rolls, allowing it to set before serving.

Notes

These Chocolate Espresso Cinnamon Rolls can be made ahead and stored for later enjoyment. Follow storage tips for the best taste.

Miso-Marinated Black Cod: Your New Favorite Dinner Delight

As I stood in my kitchen, the rich aroma of miso wafted through the air, instantly transporting me to a bustling Tokyo sushi bar. It’s amazing how a simple ingredient can evoke such vivid memories. This Miso-Marinated Black Cod dish not only captures that essence but also turns it into an accessible weeknight dinner that feels like a special occasion. With its melt-in-your-mouth texture and umami-packed marinade, this recipe effortlessly marries sophistication and comfort. Plus, it’s a healthy choice that promises not only to please your palate but also to impress your loved ones around the dinner table. Curious about how this luxurious dish can transform your next meal? Let’s dive into the steps to create this masterpiece!

Why Is Miso-Marinated Black Cod Special?

Umami Explosion: The miso marinade infuses the black cod with rich, savory flavors that tantalize your taste buds.
Effortless Elegance: Perfect for both regular weeknight dinners and special occasions, this dish elevates simple cooking into gourmet territory.
Healthy Indulgence: Packed with protein and healthy fats, this recipe aligns with your wellness goals without sacrificing flavor.
Quick and Simple: With just a few ingredients and straightforward steps, you’ll spend minimal time in the kitchen, leaving you more time to enjoy your meal.
For delicious serving ideas, don’t forget to check out my suggestions for pairing with sides!

Miso-Marinated Black Cod Ingredients

For the Marinade

  • Sake – Essential for depth and to eliminate raw fish taste; don’t skip it!
  • Mirin – Adds a sweet note to the marinade; if you lack mirin, mix white wine with sugar.
  • White Miso Paste – The heart of the marinade, providing umami richness; use tahini as an alternative if necessary.
  • Granulated Sugar – Balances the savory and sweet flavors in the marinade; can adjust sweetness based on taste preference.

For the Black Cod

  • Black Cod Fillets – The star of the dish, known for its buttery richness; if unavailable, consider using salmon or Chilean sea bass.
  • Vegetable Oil – Ideal for searing; choose a neutral oil like canola or sunflower for best results.

Embrace the taste of Miso-Marinated Black Cod and bring a touch of Japan to your dinner table!

Step‑by‑Step Instructions for Miso-Marinated Black Cod

Step 1: Prepare Marinade
In a small saucepan, combine sake and mirin over medium heat, bringing the mixture to a boil for 1-2 minutes to evaporate the alcohol. Once bubbling, reduce the heat and whisk in the white miso paste, stirring constantly until it blends smoothly. Add granulated sugar, ensuring it dissolves completely, then allow the marinade to cool to room temperature.

Step 2: Marinate Fish
Take your black cod fillets and place them in a shallow dish, ensuring there is space between each piece. Pour the cooled miso marinade over the fish, making sure they’re fully covered. Cover the dish with plastic wrap and refrigerate for 24 to 48 hours; this longer marination time enhances the umami flavors in your Miso-Marinated Black Cod.

Step 3: Preheat Oven
When you’re ready to cook, preheat your oven to 400°F (200°C) to ensure it’s hot enough for optimal cooking. This temperature will help achieve that perfectly flaky texture while allowing the marinade to caramelize beautifully on the fish’s surface.

Step 4: Sear Fish
Remove the marinated black cod from the refrigerator and gently dab off any excess marinade with a paper towel. In a large skillet, heat a drizzle of vegetable oil over medium-high heat until shimmering. Carefully place the fish skin-side up in the skillet, searing for 2-3 minutes until golden brown.

Step 5: Bake
Once the fish is seared, carefully flip it over, skin-side down, and transfer the skillet to the preheated oven. Bake for 5-8 minutes, keeping an eye on it; the fish is done when it becomes opaque and flakes easily with a fork, indicating the perfect doneness for your Miso-Marinated Black Cod.

Step 6: Rest
After removing the skillet from the oven, let the Miso-Marinated Black Cod rest for a couple of minutes. This resting period allows the juices to redistribute, ensuring each bite remains moist and flavorful. Prepare your sides during this time, so everything is ready to serve together!

Storage Tips for Miso-Marinated Black Cod

Fridge: Store leftovers in an airtight container and consume within 2-3 days for optimal freshness and taste.

Freezer: For longer storage, freeze cooked Miso-Marinated Black Cod for up to 2 months. Wrap each portion tightly to avoid freezer burn.

Reheating: Thaw overnight in the fridge before reheating. Warm the fish gently in the oven at 350°F (175°C) until heated through, ensuring it’s juicy and flavorful.

Unused Marinade: If you have leftover marinade, refrigerate it and use within a week. Avoid storing it long-term as it’s best fresh.

What to Serve with Miso-Marinated Black Cod

Transform your meal into a delightful feast with these complementary sides that enhance the rich flavors of the black cod.

  • Steamed Jasmine Rice: The fluffy texture absorbs the savory marinade, creating a perfect base to soak up the fish’s juices.
  • Sautéed Bok Choy: This green side provides a fresh, crunchy contrast to the buttery fish, adding vibrant color and nutrients to your plate.
  • Pickled Vegetables: A tangy bite of pickles cut through the richness, refreshing your palate and balancing the dish’s umami notes.
  • Simple Cucumber Salad: Crisp cucumbers tossed in sesame oil bring a cool, refreshing element, characterizing a classic Japanese flavor balance.
  • Miso Soup: A warm bowl of miso soup makes for an authentic Japanese experience, pleasingly complementing your Miso-Marinated Black Cod with umami-rich goodness.
  • Sparkling Sake: Sip on a chilled glass of sparkling sake to elevate your dining experience with a refreshing effervescence that pairs wonderfully with the dish.
  • Sesame Roasted Asparagus: The nutty flavor of roasted asparagus enhances the fish, while the crunch provides a delightful textural contrast to the tender meat.
  • Tempura Vegetables: Lightly battered and fried, these veggies are both crispy and flavorful, making for an indulgent accompaniment to the rich black cod.
  • Mango Sorbet: End your meal on a sweet note; the fruity sorbet’s brightness cleanses the palate, leaving a lasting impression.
  • Green Tea: A warm cup of green tea is not only soothing but also aids digestion, rounding off your meal beautifully with its earthy notes.

Make Ahead Options

These Miso-Marinated Black Cod fillets are perfect for meal prep enthusiasts looking to save time during busy weeknights! You can prepare the marinade up to 48 hours in advance, ensuring the flavors develop beautifully. Simply combine the sake, mirin, miso, and sugar as directed, and refrigerate the mixture. Once ready, marinate the black cod, and it can stay in the fridge for about 24 to 48 hours; this not only enhances the umami flavor but also simplifies your cooking process. To serve, just sear and bake the fish as per the instructions, yielding a delicious meal with minimal last-minute effort. With these make-ahead tips, you can enjoy restaurant-quality Miso-Marinated Black Cod without the rush!

Miso-Marinated Black Cod Variations

Unlock the full potential of your Miso-Marinated Black Cod by customizing it to suit your taste and pantry.

  • Salmon Swap: Substitute black cod with salmon for a slightly different flavor while maintaining that buttery texture.
  • Chilean Sea Bass: This rich, flaky fish is an excellent alternative and is sure to impress with its delicate taste.
  • Sweetness Adjustment: Tweak the sugar in the marinade for a bolder or subtler sweetness, depending on your miso variety. Feel free to experiment until you find your personal favorite balance!
  • Citrus Zest: Incorporate a hint of citrus zest, like lemon or yuzu, into the marinade for a refreshing, bright note that complements the umami.
  • Herbed Delight: Add fresh herbs like cilantro or chives to garnish the dish right before serving; it will elevate the plate with a pop of freshness.
  • Spicy Kick: Mix in a touch of chili paste or flakes to the marinade for those who enjoy a little heat with their fish.
  • Broil Finish: After baking, use the broiler for a minute or two to achieve that caramelized, slightly charred finish for an even more restaurant-quality dish.
  • Flavorful Sides: Pair with pickled vegetables or a vibrant salad, as suggested in my serving ideas, to create a well-rounded meal.

Dive into these variations and make your Miso-Marinated Black Cod experience uniquely yours!

Expert Tips for Miso-Marinated Black Cod

  • Marinade Matters: Don’t rush the marinating process; allowing the black cod to soak in the miso mixture for 24-48 hours deepens the flavors.
  • Searing Success: Avoid overcrowding the pan when searing; give each fillet space for that perfect, golden crust without steaming the fish.
  • Visual Cues: Keep an eye on the fish while baking; once it turns opaque and flakes easily, it’s time to take it out.
  • Flavor Retention: Skip rinsing the fillets after marinating; this ensures all that delicious miso flavor stays on the fish.
  • Quality Ingredients: Use high-quality black cod for the best experience; its rich texture is essential to this Miso-Marinated Black Cod dish.

Miso-Marinated Black Cod Recipe FAQs

How do I choose the best black cod fillets?
Absolutely! Look for fresh black cod fillets that are firm and moist, with a shiny appearance. Avoid any fillets with dark spots or a fishy smell. If you can’t find black cod, salmon or Chilean sea bass are excellent substitutes.

How do I store leftovers of Miso-Marinated Black Cod?
You can store any leftovers in an airtight container in the refrigerator and enjoy them within 2-3 days. This will help maintain the fish’s buttery texture and delicious flavor. To further ensure freshness, you might place a piece of parchment paper over the fish before sealing.

Can I freeze Miso-Marinated Black Cod?
Yes, you can freeze your cooked Miso-Marinated Black Cod for up to 2 months. To do so, wrap each portion tightly in plastic wrap, then place it in a freezer-safe bag or container. When you’re ready to enjoy it, thaw overnight in the fridge, and gently reheat in the oven or skillet until warmed through.

What if my miso marinade doesn’t turn out right?
No worries! If your marinade is clumpy or too thick, try whisking it in over low heat until smooth. If you’re not satisfied with the taste, you can add a little more sugar for sweetness or extra mirin for depth. Remember, adjustments can be made until you get that perfect balance!

Is Miso-Marinated Black Cod safe for people with allergies?
Very! However, be mindful of common allergens. The main ingredients in this dish are fish, gluten (from the soy sauce in miso), and alcohol. Always check the labels for any additional ingredients or additives that could trigger allergies. If needed, you may consider using gluten-free miso paste.

How long should I marinate the fish for the best flavor?
I recommend marinating the fish for at least 24 hours, but if you can, aim for 48 hours. This extended time allows the black cod to absorb all those rich, umami flavors from the miso, resulting in a truly delightful dish that will impress everyone at your dinner table.

Miso-Marinated Black Cod

Miso-Marinated Black Cod: Your New Favorite Dinner Delight

Discover the umami-rich flavors of Miso-Marinated Black Cod, an accessible yet sophisticated dinner choice.
Prep Time 10 minutes
Cook Time 15 minutes
Marinating Time 20 hours
Total Time 20 hours 25 minutes
Servings: 4 servings
Course: Dinner
Cuisine: Japanese
Calories: 300

Ingredients
  

For the Marinade
  • 1 cup Sake Essential for depth.
  • 1/2 cup Mirin Adds a sweet note; substitute with white wine and sugar if needed.
  • 1/2 cup White Miso Paste Heart of the marinade, can substitute with tahini.
  • 3 tablespoons Granulated Sugar Adjust sweetness based on preference.
For the Black Cod
  • 4 fillets Black Cod Fillets If unavailable, can use salmon or Chilean sea bass.
  • 2 tablespoons Vegetable Oil Choose a neutral oil like canola or sunflower.

Equipment

  • Saucepan
  • Skillet
  • oven
  • plastic wrap

Method
 

Preparation Steps
  1. In a small saucepan, combine sake and mirin over medium heat, boiling for 1-2 minutes. Reduce heat, whisk in white miso paste until smooth, add sugar to dissolve, and cool.
  2. Place black cod fillets in a shallow dish, pour marinade over the fish, cover and refrigerate for 24-48 hours.
  3. Preheat the oven to 400°F (200°C) for optimal cooking.
  4. Remove fillets, dab off excess marinade. Heat vegetable oil in a large skillet over medium-high heat. Sear fish skin-side up for 2-3 minutes until golden.
  5. Flip the fillets skin-side down, transfer to the oven and bake for 5-8 minutes until fish is opaque and flakes easily.
  6. Let the fish rest for a couple of minutes before serving.

Notes

Allowing the black cod to soak in marinade for 24-48 hours will deepen flavors. Use high-quality black cod for the best results.

Spooktacular Halloween Bruschetta Appetizer for Easy Entertaining

As the shadows grow longer and the leaves begin to crunch beneath our feet, I can’t help but get excited for Halloween. This year, I’m ready to dazzle my friends with a Spooky Halloween Bruschetta Appetizer that not only looks hauntingly delightful but also delivers an unbeatable combination of flavors. Each bite showcases rich black pesto paired with sweet roasted tomatoes and adorable mozzarella skulls, making it a guaranteed hit at any gathering. This recipe is perfect for those busy weeknights or festive celebrations, allowing you to whip up a crowd-pleasing dish in no time. Plus, with easy substitutions available, you can tailor it to suit any dietary preference! So, are you ready to treat your taste buds and impress your guests with this spellbinding appetizer?

Why is This Bruschetta Recipe a Must-Try?

Irresistible Presentation: The spooky skulls made from mozzarella pearls bring a playful charm to your table.
Easy to Prepare: With simple ingredients and straightforward steps, even novice home cooks can shine!
Versatile Options: You can customize this Halloween Bruschetta Appetizer to fit various dietary needs, including vegan or gluten-free versions. Check out our Crunchy Cabbage Bruschettas for more delightful variations!
Flavor Explosion: The delightful blend of sweet roasted tomatoes and rich black pesto creates a taste sensation that’s nothing short of enchanting.
Quick to Assemble: Make components in advance and assemble just before serving—perfect for busy hosts!
Crowd-Pleasing Appeal: With its festive theme and delicious flavors, this dish is sure to be a highlight at any Halloween party!

Halloween Bruschetta Appetizer Ingredients

For the Bruschetta Topping
Cherry Tomatoes – Adds natural sweetness and acidity; substitute with any small, sweet tomato variety.
Olive Oil – Enhances flavor and aids in roasting; you can use avocado oil or melted butter as alternatives.
Salt & Pepper – Essential seasonings to elevate flavor; adjust to taste.
Red Pepper Flakes – Adds a spicy kick to balance sweetness; omit for a milder flavor.

For the Bread
Demi Baguette – Provides crunch and structure; swap with gluten-free bread for a gluten-free option.

For the Pesto
Basil Pesto – Forms the flavor base; for vegan versions, use a plant-based pesto.
Gel Food Coloring – Helps achieve black pesto for a spooky look; omit if desired; the dish still tastes delicious without it.

For the Decorative Touch
Fresh Mozzarella Pearls – Creates charming skull shapes; substitute with vegan mozzarella or crumbled feta.
Balsamic Glaze – Perfect for drizzling to enhance presentation; optional for serving.
Fresh Basil – Adds a hint of fresh flavor and makes for an attractive garnish; optional but highly recommended.

Whether for a spooky celebration or simply an exciting twist on a classic appetizer, this Halloween Bruschetta Appetizer is sure to be a delightful addition to your menu!

Step‑by‑Step Instructions for Halloween Bruschetta Appetizer

Step 1: Preheat the Oven and Prepare the Mozzarella
Begin by preheating your oven to 350°F (175°C). While it heats, arrange the silicone skull mold on a baking sheet. Place the fresh mozzarella pearls into the mold and bake for about 6–7 minutes, until they are slightly melted but not browned. Keep an eye on them to ensure they hold their shape and start to resemble playful skulls.

Step 2: Roast the Cherry Tomatoes
Once the mozzarella is done, increase the oven temperature to 475°F (245°C). On a parchment-lined baking sheet, halve the cherry tomatoes and lay them cut side down. Drizzle with olive oil, then season generously with salt, pepper, and a pinch of red pepper flakes. Roast for about 10–15 minutes until they are soft and caramelized, creating a lovely sweetness that pairs beautifully with the Halloween Bruschetta Appetizer.

Step 3: Toast the Demi Baguette
While the tomatoes roast, slice the demi baguette into ½-inch pieces. Arrange them on a separate baking sheet in a single layer. Toast the slices in the oven for about 8–10 minutes, or until they are golden and crisp but not overly browned. This step will provide the perfect base for your bruschetta and add delicious crunch.

Step 4: Prepare the Black Pesto
In a mixing bowl, combine the basil pesto with a few drops of gel food coloring, stirring until you achieve a rich black color. Adjust the amount of coloring gradually to get the desired darkness, creating that spooky aesthetic essential for your Halloween Bruschetta Appetizer. Set aside the black pesto for assembly.

Step 5: Finish toasting the Bread with Black Pesto
Once the baguette slices are toasted, take them out of the oven. Spread a generous layer of the black pesto over each slice of bread. Return the bruschetta to the oven and bake for another 8–10 minutes until the edges are crispy and the pesto has infused into the bread, enhancing the flavor profile.

Step 6: Assemble the Bruschetta
After the final toasting, it’s time to assemble your Halloween Bruschetta Appetizer. Top each pesto-smothered bruschetta slice with the roasted tomatoes and the mozzarella skulls. For a finishing touch, drizzle a little balsamic glaze over the top and scatter fresh basil as a delightful garnish, bringing color and flavor to your spooky dish.

Storage Tips for Halloween Bruschetta Appetizer

Room Temperature: Serve assembled bruschetta for optimal freshness, but if leftovers remain, keep at room temperature for no more than 2 hours.

Fridge: To store leftovers, cover tightly and refrigerate for up to 3 days. Reassemble for best flavor, as toasted bread may become soggy.

Freezer: For longer storage, freeze the pesto and roasted tomatoes separately in airtight containers for up to a month. Assemble fresh just before serving!

Reheating: If reheating, warm the toppings in the oven briefly until heated through, then assemble on freshly toasted bread for a delightful experience with your Halloween Bruschetta Appetizer.

What to Serve with Spooky Halloween Bruschetta Appetizer

Delight your guests with complementary dishes that enhance the festive flavors of your Halloween gathering.

  • Crispy Garlic Bread: Perfect crunchiness and flavor to contrast the soft and sweet bruschetta topping. A guaranteed crowd-pleaser!
  • Grilled Vegetable Platter: Colorful and charred veggies balance the richness of the bruschetta, adding a healthy and vibrant visual appeal.
  • Pumpkin Soup Shooters: Seasonal and creamy, these mini cups offer a warm contrast that embraces the Halloween spirit wonderfully.
  • Spiced Apple Cider: A warm, aromatic drink infused with cinnamon and cloves adds a cozy touch, rounding out your Halloween feast beautifully.
  • Cheesy Cauliflower Bites: Their creamy texture complements the bruschetta, while the cheesy goodness evokes the flavors of fall.
  • Chocolate-Covered Strawberries: These spooky treats can bring a sweet finish to a savory spread, surprising guests with their playful presentation.
  • Vampire Bite Cupcakes: Decorated with dripping red icing, these spooky treats are fun and indulgent, keeping the party festive!
  • Ghostly Meringue Cookies: Light-as-air and sweet, these whimsical cookies add a touch of delight, perfect for an enchanting end to the meal.

By serving a variety of these dishes alongside your Halloween Bruschetta Appetizer, you’ll create a memorable and delightful experience for your guests!

Make Ahead Options

These Halloween Bruschetta Appetizers are perfect for meal prep enthusiasts! You can prepare the roasted cherry tomatoes and black pesto up to 3 days in advance. Simply roast the tomatoes as directed and allow them to cool before storing them in an airtight container; this will maintain their sweetness. For the black pesto, mix the basil pesto with gel food coloring and refrigerate it in a sealed jar. When you’re ready to serve, simply toast the sliced demi baguette and assemble your bruschetta with the tomatoes and mozzarella skulls just before the party. This strategy saves you time, ensuring your Halloween gathering is both festive and less stressful!

Halloween Bruschetta Appetizer Variations

Feel free to get creative with this recipe and make it your own with these delightful twists!

  • Vegan Option: Substitute mozzarella pearls for crumbled vegan cheese to keep it plant-based without sacrificing flavor.

  • Cheese Swap: Try using creamy goat cheese instead of mozzarella for a tangy twist that complements the sweetness of the tomatoes.

  • Gluten-Free Alternative: Replace the demi baguette with gluten-free bread to ensure everyone can enjoy this spooky treat.

  • Herb Infusion: Mix in fresh herbs like thyme or oregano with the black pesto for added depth and fragrance. It elevates the dish in an exciting way!

  • Bonus Flavors: Add finely chopped olives or roasted red peppers to the mix for an exciting burst of flavor that brings new layers to each bite.

  • Extra Heat: If you love a spicy kick, sprinkle some jalapeño slices on top of the bruschetta before serving for an adventurous flavor combination.

  • Colorful Presentation: Swap out the black pesto for a vibrant red sun-dried tomato pesto for a visually striking alternative that retains the delicious flavor.

  • Crunchy Topping: Top the bruschetta with a sprinkle of toasted pine nuts or pumpkin seeds for a crunchy element that adds texture and visual appeal.

For additional serving ideas and flavor variations, check out our Crunchy Cabbage Bruschettas for even more delicious inspirations to elevate your entertaining game! Enjoy experimenting and creating your perfect Halloween Bruschetta Appetizer!

Expert Tips for Halloween Bruschetta Appetizer

Mozzarella Care: Be cautious not to overbake the mozzarella; it should be slightly melted, maintaining its playful skull shape without browning.

Oven Timing: Allow the mozzarella to cool for a couple of minutes in the molds before gently removing to prevent breakage and ensure they hold their shape.

Black Pesto Consistency: When mixing your basil pesto with gel food coloring, start with a small amount of color. Gradually increase until you achieve your desired spooky shade without overwhelming the original flavor.

Taste Test: Don’t forget to taste and adjust seasonings! The balance of salt and pepper can make a significant difference to the overall flavor of your Halloween Bruschetta Appetizer.

Prep Ahead: Prepare components like the black pesto and roasted tomatoes a day before your gathering. This makes assembly a breeze and keeps your bruschetta fresh and delightful!

Presentation Matters: For an extra touch, arrange your assembled bruschetta on a themed platter alongside Halloween-inspired garnishes. Enjoy the spooky fun!

Halloween Bruschetta Appetizer Recipe FAQs

What type of cherry tomatoes should I use for this recipe?
Absolutely! Any small, sweet tomato variety will do the trick, but I find that cherry or grape tomatoes work beautifully. Look for tomatoes that are firm and vibrant in color, avoiding any with dark spots or wrinkles.

How should I store leftover Halloween Bruschetta?
It’s best to store any leftovers by carefully covering them and refrigerating for up to 3 days. However, I recommend keeping the components separate—like the pesto and roasted tomatoes—from the bread. When ready to enjoy again, simply reassemble the bruschetta to prevent the toasted bread from becoming soggy.

Can I freeze the ingredients for later use?
Yes, you can! I often freeze the basil pesto and roasted tomatoes separately in airtight containers for up to a month. To do this, let the tomatoes cool completely, and then transfer them to a container. When you’re ready to use them, allow them to thaw in the fridge overnight before assembling your Halloween Bruschetta Appetizer fresh on toasted bread.

What if my mozzarella doesn’t retain its shape?
No worries! If your mozzarella skulls break, simply reshape them while still warm by gently pressing them back into the skull mold. If they melt too much, it might be useful to reduce baking time slightly next go-round. Just keep an eye on them to achieve that perfect melt!

Are there any dietary restrictions to consider with this appetizer?
Very! This Halloween Bruschetta Appetizer is naturally vegetarian, and you can easily make it vegan by opting for plant-based pesto and vegan mozzarella. Just be sure to double-check any pre-made products for allergens if you have guests with specific dietary needs. Always wonderful to have everyone included in the feast!

Do I need to prep anything in advance for this recipe?
Absolutely! To save time on the day of your gathering, I often prepare the black pesto and roast the tomatoes the day before. This way, all that’s left is a quick assembly, ensuring that you spend less time in the kitchen and more time enjoying the festivities!

Halloween Bruschetta Appetizer

Spooktacular Halloween Bruschetta Appetizer

This Halloween Bruschetta Appetizer features rich black pesto, sweet roasted tomatoes, and mozzarella skulls for a delightful treat.
Prep Time 20 minutes
Cook Time 25 minutes
Total Time 45 minutes
Servings: 6 pieces
Course: Other
Cuisine: American
Calories: 150

Ingredients
  

For the Bruschetta Topping
  • 2 cups Cherry Tomatoes Substitute with any small, sweet tomato variety
  • 2 tablespoons Olive Oil Can use avocado oil or melted butter as alternatives
  • to taste Salt
  • to taste Pepper
  • 1/2 teaspoon Red Pepper Flakes Omit for milder flavor
For the Bread
  • 1 Demi Baguette Demi Baguette Swap with gluten-free bread for a gluten-free option
For the Pesto
  • 1 cup Basil Pesto For vegan versions, use a plant-based pesto.
  • few drops Gel Food Coloring Omit if desired
For the Decorative Touch
  • 1 cup Fresh Mozzarella Pearls Substitute with vegan mozzarella or crumbled feta
  • to taste Balsamic Glaze Optional for serving
  • to taste Fresh Basil Optional but highly recommended for garnish

Equipment

  • oven
  • baking sheet
  • Silicone skull mold
  • parchment paper
  • mixing bowl

Method
 

Step-by-Step Instructions
  1. Preheat your oven to 350°F (175°C). Place the mozzarella pearls in the skull mold and bake for about 6-7 minutes until slightly melted.
  2. Increase the oven temperature to 475°F (245°C). Halve the cherry tomatoes and lay them cut side down on a parchment-lined baking sheet. Drizzle with olive oil and season with salt, pepper, and red pepper flakes. Roast for about 10-15 minutes until soft and caramelized.
  3. Slice the demi baguette into ½-inch pieces. Arrange on a baking sheet and toast for about 8-10 minutes until golden and crisp.
  4. In a mixing bowl, combine basil pesto with gel food coloring until you achieve a rich black color. Set aside.
  5. Spread black pesto over toasted baguette slices. Bake again for 8-10 minutes until edges are crispy.
  6. Assemble by topping each slice with roasted tomatoes and mozzarella skulls. Drizzle with balsamic glaze and garnish with fresh basil before serving.

Notes

For best presentation, serve assembled bruschetta on a themed platter and prepare components ahead of time for easy assembly.

Halloween Eyeball Jello Shots That Will Wow Your Guests

As I rummaged through my pantry, the Halloween spirit kicked in, and I stumbled upon a bag of gummy eyeballs. That’s when the idea struck me: why not create something delightfully creepy yet fun? Enter the Halloween Eyeball Jello Shots, a spooky treat that’s bound to thrill both kids and adults! With their jiggly, colorful appearance and playful character, these jello shots bring a festive flair to any gathering. They’re not just a crowd-pleaser but also a breeze to whip up, making them perfect for last-minute party planning. Whether you’re hosting a Halloween bash or just want to add an element of fun to lunchboxes, these little cups of joy are an absolute must-try. Ready to bring some whimsical creativity to your table? Let’s dive into the recipe!

Why Are Halloween Eyeball Jello Shots Amazing?

Unique Presentation: These jello shots feature gummy eyeballs that transform a simple dessert into a spooky masterpiece, perfect for any Halloween gathering.

Kid-Friendly Fun: They appeal to both adults and kids, making them a versatile treat that everyone will love.

Quick & Easy: With minimal prep time required, you can whip up these shots in no time, allowing you to spend more time enjoying the festivities.

Customizable Options: Feel free to experiment with flavors or use different candies to match your party theme, ensuring each batch is uniquely yours.

Great for Gatherings: These jello shots aren’t just a treat; they serve as a conversation starter, making your party memorable and fun! Plus, don’t forget to check out our tips for vegan options so everyone can join in on the fun!

Halloween Eyeball Jello Shots Ingredients

For the Jello Base

  • Gelatin – Essential for structure; sugar-free gelatin can be used for a lighter version.
  • Water – The base liquid; using flavored juice can really enhance the taste of your Halloween Eyeball Jello Shots.

For the Eyeball Topping

  • Gummy Eyeballs – Adds a spooky, playful element; alternatively, you can craft your own edible eyeballs with candy melts or icing.

For the Creamy Finish

  • Whipped Cream – Adds a delightful creaminess; don’t forget to swap for coconut whipped cream in vegan versions.

Step‑by‑Step Instructions for Halloween Eyeball Jello Shots

Step 1: Prepare Gelatin Mixture
In a mixing bowl, combine the gelatin with water according to the package instructions. Stir until completely dissolved, which usually takes about 2–3 minutes of vigorous mixing. You should see no granules remaining. For added flavor, consider using a fruit juice instead of water.

Step 2: Pour into Cups
Carefully pour the gelatin mixture into small serving cups or shot glasses, filling each about three-quarters full. While pouring, keep the cups steady to avoid spills. You will want to leave a little space at the top for the gummy eyeballs later. Aim for even distribution for a neat presentation.

Step 3: Insert Eyeballs
Once the mixture is poured, drop one gummy eyeball into each cup, gently pressing it down so that part of it is submerged. This playful addition enhances the spooky effect of your Halloween Eyeball Jello Shots. Ensure the eyeballs are evenly spaced to create a fun visual when they’re set.

Step 4: Chill to Set
Place the assembled cups in the refrigerator and chill for at least 4 hours, or until the gelatin is firm to the touch. They will be ready when there’s a smooth, wobbly texture, and the cups should feel solid with no liquid sloshing around. This step is crucial for perfect jello shots!

Step 5: Top and Serve
Just before serving, add a generous dollop of whipped cream on top of each jello shot for an extra creamy finish. This not only enhances the flavor but also adds a delicious contrast to the sweet gelatin. Garnish with sprinkles or more gumballs if desired, and serve immediately for maximum effect!

Make Ahead Options

These Halloween Eyeball Jello Shots are perfect for meal prep, allowing you to get a head start on your spooky celebrations! You can prepare the gelatin mixture and pour it into cups up to 3 days in advance, ensuring they are chilled and properly set in the refrigerator. Just before serving, place the gummy eyeballs into each cup (this keeps them fresh and prevents them from getting soggy) and add a dollop of whipped cream. To maintain quality, cover the jello shots while they chill to prevent them from drying out. With these make-ahead tips, you’ll have a fun and festive treat ready with minimal last-minute effort, making your Halloween gatherings a breeze!

Halloween Eyeball Jello Shots Variations

Feel free to let your creativity run wild with these spooky twists on the Halloween Eyeball Jello Shots!

  • Flavor Twist: Use different flavored gelatin like orange or grape to match your party theme, giving each shot a unique taste sensation.

  • Candy Swap: Replace gummy eyeballs with gummy worms or spooky-shaped candy for a different vibe, perfect for a creepy crawl party theme.

  • Vegan Delight: Opt for agar-agar instead of traditional gelatin for a plant-based version, and top with coconut whipped cream to keep it deliciously creamy.

  • Juice Boost: Swap plain water for flavored juice like apple or cranberry to enhance the flavor profile, creating a more vibrant and tasty treat.

  • Texture Variation: Add a dash of edible glitter to the mixture before chilling for a sparkling effect that catches the light and adds a festive touch.

  • Chilling Fun: For extra spookiness, freeze gummy eyeballs in ice cubes and use them in the jello shots. They’ll melt slightly and create a fun surprise!

  • Layered Effect: Create layered jello shots by preparing the gelatin in alternating colors. This adds visual appeal and takes your treats to the next spooky level!

  • Heat It Up: If you’re feeling adventurous, consider adding a few drops of hot sauce to the mix for a surprising kick that will have everyone guessing!

Don’t forget to keep these fun options in mind for your gatherings, and let your imagination soar with every colorful batch!

Expert Tips for Halloween Eyeball Jello Shots

  • Perfectly Set Gelatin: Measure water accurately and follow the gelatin package instructions for the best consistency in your Halloween Eyeball Jello Shots.

  • Flavor Enhancements: Swap plain water for flavored juice to elevate the taste and make the jello shots more exciting.

  • Gummy Eyeball Placement: Push the gummy eyeballs down gently into the mixture; this ensures they stay nestled in the jello and enhances presentation.

  • Vegan-Friendly Options: When using plant-based gelatin like agar-agar, consult the packaging for correct preparation and ratios to achieve optimal results.

  • Storage Tips: Cover the jello shots while they chill to prevent drying out, keeping them fresh for your guests to enjoy!

How to Store and Freeze Halloween Eyeball Jello Shots

  • Fridge: Store your Halloween Eyeball Jello Shots in the refrigerator for up to 3 days. Keep them covered with plastic wrap or a lid to maintain moisture and prevent odors from seeping in.

  • Make-Ahead: Feel free to prepare the jello shots a day or two in advance. Just ensure they’re well-covered in the fridge, allowing you more time to enjoy the party preparations!

  • Freezer: While not recommended, you can freeze them for up to 2 months. However, note that the texture may change, so enjoy fresh jello shots for the best experience!

  • Reheating: There’s no need to reheat; simply serve chilled. If stored properly, they’ll retain their fun jiggly texture and delightful appearance, making them a hit at your Halloween gathering!

What to Serve with Halloween Eyeball Jello Shots

These jiggly and whimsical treats deserve delicious companions that enhance the festive spirit of your gathering.

  • Spooky Fruit Salad: A colorful mix of seasonal fruits like oranges, grapes, and pomegranate seeds brings a fresh, sweet contrast to the gelatin’s sweetness.

  • Chilling Ghoul Punch: This fun, spooky beverage mixed with fruity flavors pairs perfectly with sweet jello shots. Add floating gummy worms for an added touch of whimsy!

  • Savory Cheese Platter: A selection of cheeses, crackers, and orange bell pepper “pumpkins” creates a delightful contrast to the sweetness and boosts the party vibe.

  • Creepy Cupcake Bites: Mini cupcakes decorated with eerie icing or candy toppings mirror the playful nature of the jello shots, appealing to both kids and adults.

  • Autumn Veggie Tray: Crunchy carrots, celery, and spooky-themed dips, like “witches’ brew” hummus, can counterbalance the sweetness with a healthy, crunchy option.

  • Chocolate Pudding Ghosts: These delightful little desserts topped with whipped cream “ghosts” add both fun and a rich chocolate flavor to your Halloween spread.

Perfectly paired, these options can elevate your Halloween Eyeball Jello Shots into a full, festive feast that will leave your guests raving!

Halloween Eyeball Jello Shots Recipe FAQs

What type of gelatin should I use for my Halloween Eyeball Jello Shots?
Absolutely! You can use regular gelatin for a classic texture or sugar-free gelatin if you’re looking for a lighter version. If you prefer a vegan option, I recommend using agar-agar. Just make sure to follow the package instructions for best results, as the ratios and setting times may vary.

How should I store my Halloween Eyeball Jello Shots?
Very simple! You can store your jello shots in the refrigerator for up to 3 days. Keep them covered with plastic wrap or a lid to maintain their moisture and prevent any odors from mixing in. This way, they’ll remain fresh and ready to impress your guests!

Can I freeze Halloween Eyeball Jello Shots?
While it’s not ideal, you can freeze your jello shots for up to 2 months. Keep in mind that the texture may change slightly upon thawing, losing its jiggly charm. If you decide to freeze them, just ensure they are well-sealed in an airtight container to prevent freezer burn.

What should I do if my gelatin doesn’t set properly?
If you find that your gelatin is not setting, it could be due to an imbalance in water to gelatin ratio. Make sure you’re measuring correctly! For best results, follow the exact package instructions, and stir the gelatin mixture thoroughly until fully dissolved. If using plant-based gelatin, be sure to consult the instructions specific to that product, as it often requires different cooking methods.

Are there any dietary considerations for making Halloween Eyeball Jello Shots?
Absolutely! To cater to different dietary needs, you can substitute regular gelatin with vegan-friendly agar-agar, and use coconut whipped cream instead of dairy whip for a wonderful dairy-free version. Always check for any allergies when choosing your gummy eyeballs and other candies, especially if children will be enjoying them.

Halloween Eyeball Jello Shots

Halloween Eyeball Jello Shots That Will Wow Your Guests

Create spooky Halloween Eyeball Jello Shots that are fun and easy, perfect for parties and gatherings.
Prep Time 15 minutes
Chilling Time 4 hours
Total Time 4 hours 15 minutes
Servings: 12 shots
Course: Dessert
Cuisine: American
Calories: 56

Ingredients
  

For the Jello Base
  • 1 packet Gelatin Sugar-free gelatin can be used for a lighter version.
  • 2 cups Water Using flavored juice can enhance the taste.
For the Eyeball Topping
  • 12 pieces Gummy Eyeballs Alternatively, use homemade edible eyeballs.
For the Creamy Finish
  • 1 cup Whipped Cream Use coconut whipped cream for vegan versions.

Equipment

  • mixing bowl
  • Measuring cups
  • Shot Glasses or Small Cups
  • whisk

Method
 

Step-by-Step Instructions
  1. Prepare Gelatin Mixture: In a mixing bowl, combine the gelatin with water according to the package instructions. Stir until completely dissolved, about 2–3 minutes.
  2. Pour into Cups: Carefully pour the gelatin mixture into small serving cups, filling each about three-quarters full.
  3. Insert Eyeballs: Drop one gummy eyeball into each cup, gently pressing it down so that part of it is submerged.
  4. Chill to Set: Place the cups in the refrigerator and chill for at least 4 hours until firm.
  5. Top and Serve: Add a dollop of whipped cream on top of each jello shot before serving.

Notes

Measure water accurately and follow gelatin instructions for the best results. For flavor, replace plain water with juice and cover shots while chilling to maintain moisture.

Turkish Eggs Delight: A Flavorful Twist on Breakfast Joy

On a recent Sunday morning, I found myself yearning for something a bit more exciting than my usual breakfast routine. Enter Turkish Eggs Delight, a magical dish that transforms the first meal of the day into an exquisite experience. This quick breakfast not only boasts high-protein poached eggs but envelops them in a creamy herbed yogurt that dances on the tastebuds. Combined with a fragrant drizzle of spiced butter, it offers the perfect balance of comfort and sophistication, ideal for impressing brunch guests or simply treating yourself. As I savored my first bite, I couldn’t help but think how perfectly it pairs with warm pita or crusty bread, making those quiet mornings feel like a grand culinary escape. Curious about how to whip up this elegant dish in your own kitchen? Let’s dive in!

Why Will You Love Turkish Eggs Delight?

Delightful flavor combination: The rich herbed yogurt paired with perfectly poached eggs transforms a simple breakfast into something extraordinary.

Quick and easy: Whipping up this dish requires minimal effort, making it ideal for busy mornings or spontaneous brunches.

Nutrient-rich meal: With about 18g of protein per serving, it’s a satisfying way to kickstart your day.

Versatile offerings: Feel free to adapt the recipe by adding crumbled feta or sautéed mushrooms from our Nutty Apricot Cookies variation ideas for a unique twist that tantalizes the palate.

Elegant presentation: Impress your guests with its beautiful layers and vibrant colors, turning breakfast into a delightful dining experience.

Cultural richness: Experience a taste of Turkey with this beloved dish that showcases the emphasis on fresh ingredients, perfect for those looking to explore new flavors.

Turkish Eggs Delight Ingredients

For the Herbed Yogurt
Whole Milk Greek Yogurt – Adds creaminess and tang; substitute with plain yogurt for a lighter version.
Extra Virgin Olive Oil – Enhances flavor and richness; use first cold-pressed for best quality.
Fresh Lemon Juice – Provides acidity to balance richness; fresh juice is preferred for optimal flavor.
Garlic – Minced for best flavor; can be omitted for a milder taste.
Fresh Dill – Classic herb complementing yogurt; substitute with chives or tarragon for different flavors.
Fresh Mint – Adds a refreshing note; can be replaced with parsley for a milder herb presence.
Kosher Salt – Balances flavors in the yogurt; use sea salt if preferred.

For the Poached Eggs
Large Eggs – Main protein source; ensure freshness for the best flavor.
Distilled White Vinegar – Helps set egg whites during poaching; can be replaced with a splash of lemon juice.

For the Spiced Butter
Unsalted Butter – Base for the spiced sauce; use grass-fed for richer flavor.
Aleppo Pepper – Provides mild heat and flavor; substitute with smoked paprika for smokiness.

This recipe for Turkish Eggs Delight is bound to elevate your breakfast routine!

Step‑by‑Step Instructions for Turkish Eggs Delight

Step 1: Prepare Herbed Yogurt
In a mixing bowl, combine 1 cup of whole milk Greek yogurt with 2 tablespoons of extra virgin olive oil, the juice of half a lemon, 1 minced garlic clove, 2 tablespoons of freshly chopped dill, and 2 tablespoons of fresh mint. Sprinkle in a pinch of kosher salt and mix everything thoroughly until smooth and creamy. This herbed yogurt base creates a luscious layer for your Turkish Eggs Delight.

Step 2: Poach Eggs
In a saucepan, bring about 3 inches of water and 1 tablespoon of distilled white vinegar to a gentle simmer over medium heat. Crack 2 large eggs into small ramekins, then gently slide the eggs into the simmering water. Poach the eggs for about 3 minutes, until the whites are set but the yolks remain runny. Remove the eggs carefully with a slotted spoon and let them drain while you prepare the sauce.

Step 3: Make Spiced Butter Sauce
In a skillet over medium heat, melt 2 tablespoons of unsalted butter until it foams gently. Once the butter has melted, add 1 teaspoon of Aleppo pepper, stirring it in for about 30 seconds until fragrant. Ensure the butter does not brown; this step infuses the butter with a warm flavor that will lavishly drizzle over your Turkish Eggs Delight.

Step 4: Assemble Dish
On a serving plate, spread a generous layer of herbed yogurt to create a base for your dish. Carefully place the poached eggs on top of the yogurt, ensuring they sit proudly. Drizzle the warm spiced butter sauce over the eggs, allowing it to cascade down. Garnish with additional fresh herbs for a pop of color and flavor, creating an inviting presentation for your delightful breakfast.

What to Serve with Turkish Eggs Delight

Transform your morning into a delightful feast with pairings that elevate this amazing dish.

  • Warm Pita Bread: Soft and fluffy, it’s perfect for scooping up the creamy herbed yogurt and yolks—each bite becomes a textural adventure.
  • Crispy Arugula Salad: A refreshing, peppery salad that cuts through the richness, adding a light crunch that will tantalize your taste buds. Toss in cherry tomatoes for a burst of sweetness.
  • Roasted Vegetables: A medley of seasonal veggies like bell peppers and zucchini adds roasted sweetness, complementing the flavors of Turkish Eggs Delight beautifully.
  • Herbed Couscous: Fluffy couscous flavored with fresh herbs can soak up the luscious spiced butter sauce, making each mouthful an explosion of flavors.
  • Sautéed Mushrooms: Earthy and savory, mushrooms add depth to the dish. They harmonize with the creamy yogurt, offering a gourmet touch to your breakfast plate.
  • Fresh Mint Tea: A soothing drink that enhances the refreshing elements of mint in the yogurt while balancing the richness of the eggs—perfect for a cozy brunch atmosphere.

Make Ahead Options

These Turkish Eggs Delight are perfect for busy home cooks looking to streamline their mornings! You can prepare the herbed yogurt up to 24 hours in advance and simply store it in an airtight container in the refrigerator to enhance the flavors. The poached eggs can also be made ahead and stored in a bowl of cold water in the fridge for up to 3 days; when ready to serve, simply reheat them in simmering water for a couple of minutes. By prepping in advance, you ensure a delicious breakfast awaits you with minimal fuss—just spread your herbed yogurt, top it with reheated poached eggs, and drizzle with spiced butter for a delightful experience that tastes just as fresh!

Expert Tips for Turkish Eggs Delight

  • Gentle Simmer: Maintaining a gentle simmer when poaching eggs prevents whites from dispersing. This ensures beautifully shaped poached eggs for your Turkish Eggs Delight.

  • Pre-Make Yogurt: Prepare the herbed yogurt a day ahead to enhance flavors. Doing so allows the herbs to infuse the yogurt, making it even more delicious.

  • Batch Cooking: If you’re serving a crowd, poach a maximum of two eggs at a time. This ensures even cooking and prevents overcrowding the pot.

  • Butter Care: Melt the unsalted butter slowly to avoid burning. Watch closely when adding Aleppo pepper; it cooks quickly and adds depth to the sauce.

  • Presentation Tip: For an elegant touch, swirl the herbed yogurt on the plate before adding the poached eggs. A little extra garnish, like fresh herbs, elevates the overall appearance of the Turkish Eggs Delight.

Turkish Eggs Delight Variations & Substitutions

Embrace your culinary creativity by modifying this delightful recipe to suit your taste and dietary needs.

  • Vegan Option: Replace Greek yogurt with creamy cashew cream for a delicious dairy-free twist that still provides luscious texture.

  • Cheesy Surprise: Add crumbled feta cheese on top for a salty kick that contrasts beautifully with the creamy yogurt.

  • Earthy Addition: Toss in sautéed mushrooms for a rich, earthy depth that complements the eggs beautifully and enhances the dish’s heartiness.

  • Bread Variety: Switch out standard toast for gourmet options like sourdough, naan, or even bagels, elevating your breakfast experience.

  • Crunch Factor: Top your Turkish Eggs with a sprinkle of toasted nuts for an unexpected crunch that adds texture and pleasing contrast.

  • Sweet Drizzle: For a hint of sweetness, drizzle with honey to balance the savory flavors of the herbed yogurt and spiced butter.

  • Herb Playground: Experiment by swapping mint for fresh basil or cilantro, giving your dish a fresh flair that brings a new flavor profile to the forefront.

  • Spicy Kick: For added heat, sprinkle crushed red pepper flakes over the top or increase the amount of Aleppo pepper for those who dare to spice things up.

Feel free to pair this elegant meal with a side of fresh arugula salad or some roasted vegetables for a colorful and nutritious brunch spread, just like how you might enjoy it with a warm serving of our Wholesome Oatmeal Fruit delight!

Storage Tips for Turkish Eggs Delight

  • Fridge: Store leftover Turkish Eggs in airtight containers for up to 2 days. Keep the herbed yogurt and poached eggs separate to maintain optimal texture.
  • Make-Ahead: You can prepare the herbed yogurt a day in advance. This not only saves time but also allows the flavors to meld beautifully.
  • Freezer: While it’s best to enjoy this dish fresh, poached eggs can be frozen for up to 3 months. Reheat directly from frozen by gently simmering in warm water.
  • Reheating: When reheating the poached eggs, place them in warm water for a few minutes to revive their silky texture without cooking further.

Turkish Eggs Delight Recipe FAQs

How do I choose the right yogurt for Turkish Eggs Delight?
Absolutely! For the best flavor and texture, I recommend using whole milk Greek yogurt. This will provide the creaminess and tang that makes the dish special. If you want a lighter option, plain yogurt can be used, but be aware that it will have a thinner consistency.

What’s the best way to store leftovers of Turkish Eggs Delight?
Very handy! Store leftover Turkish Eggs in airtight containers in the fridge for up to 2 days. It’s a good idea to keep the herbed yogurt and poached eggs separate to preserve their textures. This way, you’ll enjoy a delicious breakfast the next day!

Can I freeze leftovers of Turkish Eggs Delight?
Absolutely! If you’re looking to save some for later, poached eggs can be frozen for up to 3 months. To freeze, let the poached eggs cool, then place them in a freezer-safe container. When ready to enjoy, simply reheat them by placing the frozen eggs in warm water until heated through—it’s quick and keeps them from cooking further.

What if my poached eggs are not turning out right?
This is common, but don’t worry! If your poached eggs are spreading in the water, ensure you’re using a gentle simmer, not a rapid boil. Adding a teaspoon of vinegar to the water helps the egg whites set more quickly. If yolks are breaking, try cracking the eggs into ramekins first, then gently sliding them into the water to maintain their shape.

Is this recipe suitable for those with allergies or specific diets?
Yes, it can be! For dairy-free or vegan options, substitute Greek yogurt with cashew cream to keep the dish creamy without the dairy. Always check labels for any potential allergens, particularly with the yogurt and butter. If you have a sensitivity to garlic, feel free to omit it from the herbed yogurt.

Turkish Eggs Delight

Turkish Eggs Delight: A Flavorful Twist on Breakfast Joy

Turkish Eggs Delight is a high-protein breakfast featuring poached eggs enveloped in creamy herbed yogurt and spiced butter.
Prep Time 15 minutes
Cook Time 10 minutes
Total Time 25 minutes
Servings: 2 servings
Course: Breakfast
Cuisine: Turkish
Calories: 350

Ingredients
  

For the Herbed Yogurt
  • 1 cup whole milk Greek yogurt substitute with plain yogurt for a lighter version
  • 2 tablespoons extra virgin olive oil use first cold-pressed for best quality
  • 0.5 cups fresh lemon juice fresh juice is preferred for optimal flavor
  • 1 clove garlic minced for best flavor
  • 2 tablespoons fresh dill substitute with chives or tarragon for different flavors
  • 2 tablespoons fresh mint can be replaced with parsley for a milder herb presence
  • pinch kosher salt use sea salt if preferred
For the Poached Eggs
  • 2 large eggs ensure freshness for the best flavor
  • 1 tablespoon distilled white vinegar can be replaced with a splash of lemon juice
For the Spiced Butter
  • 2 tablespoons unsalted butter use grass-fed for richer flavor
  • 1 teaspoon Aleppo pepper substitute with smoked paprika for smokiness

Equipment

  • mixing bowl
  • Saucepan
  • Skillet
  • slotted spoon
  • ramekins
  • serving plate

Method
 

Step‑by‑Step Instructions for Turkish Eggs Delight
  1. In a mixing bowl, combine 1 cup of whole milk Greek yogurt with 2 tablespoons of extra virgin olive oil, the juice of half a lemon, 1 minced garlic clove, 2 tablespoons of freshly chopped dill, and 2 tablespoons of fresh mint. Sprinkle in a pinch of kosher salt and mix everything thoroughly until smooth and creamy.
  2. In a saucepan, bring about 3 inches of water and 1 tablespoon of distilled white vinegar to a gentle simmer over medium heat. Crack 2 large eggs into small ramekins, then gently slide the eggs into the simmering water. Poach the eggs for about 3 minutes, until the whites are set but the yolks remain runny.
  3. In a skillet over medium heat, melt 2 tablespoons of unsalted butter until it foams gently. Add 1 teaspoon of Aleppo pepper, stirring for about 30 seconds until fragrant.
  4. On a serving plate, spread a generous layer of herbed yogurt. Carefully place the poached eggs on top, drizzle with the warm spiced butter sauce, and garnish with fresh herbs.

Notes

Turkish Eggs Delight is a quick, nutrient-rich meal with delightful flavors, perfect for impressing brunch guests or enjoying a cozy morning at home.

Crispy Tahong: A Quick & Irresistible Seafood Treat

As I stood by the stove, the warm aroma of frying garlic filled the air, carrying me back to sun-soaked days at the beach. That’s when I first discovered Crispy Tahong—delicious deep-fried mussels that are not just a treat for the taste buds but a comfort for the soul. This dish is the perfect addition to your culinary repertoire, offering a quick 50-minute preparation that will delight both family and friends during casual gatherings or busy weeknight dinners. The golden, crunchy exterior hugs tender mussels inside, creating a delightful contrast that leaves you craving more. Plus, it’s a nutritious choice packed with protein and great for those looking to step away from fast food and toward homemade goodness. Ready to bring a taste of the Philippines into your kitchen? Let’s dive into making Crispy Tahong!

Why Choose Crispy Tahong Today?

Quick and Easy: With just a simple 50-minute preparation, you can whip up this delightful dish without breaking a sweat. Perfect for busy nights!
Irresistible Crunch: The satisfying, golden-brown coating gives way to juicy mussels, creating a wonderful texture that will impress your guests.
Nutritious Delight: Packed with high-quality protein and essential minerals, this dish is a deliciously healthy alternative to fast food.
Versatile Pairing: Serve it alongside a spicy vinegar dip or with rice for a hearty meal that everyone will love. Check out my tips for making Homemade French Sauce to elevate your dining experience!
Cultural Experience: Introduce your loved ones to a tasty slice of Filipino culture, making it a conversation starter and a treat for the taste buds.
Crowd-Pleasing: Whether at a gathering or a cozy night in, Crispy Tahong is sure to be a hit. Why not serve it with some Cheesy Fries for an unforgettable feast?

Crispy Tahong Ingredients

For the Batter

  • Mussels – Fresh or frozen mussels work beautifully; if using frozen, be sure to thaw them completely for the best texture.
  • Garlic – Fresh garlic is recommended for a robust flavor that elevates the dish.
  • All-Purpose Flour – This forms the backbone of the batter; consider gluten-free flour as a substitute for gluten-free options.
  • Cornstarch – This enhances the crispiness of the coating; you can also use potato starch for similar results.
  • Salt & Pepper – Essential for seasoning; feel free to adjust to your taste preferences.

For Frying

  • Oil – Vegetable oil is ideal for frying due to its high smoke point, ensuring that your mussels fry to a perfect golden brown.

This delicious Crispy Tahong recipe combines these simple ingredients to create a satisfying dish that’s perfect for any seafood lover!

Step‑by‑Step Instructions for Crispy Tahong

Step 1: Clean the Mussels
Begin by thoroughly rinsing the mussels under cold running water to remove any debris and sand. Use a stiff brush to scrub the shells and remove any beards. Once cleaned, pat them dry with a paper towel, ensuring they are free of excess moisture, as this will help the batter adhere better and enhance the crispiness of your Crispy Tahong.

Step 2: Prepare the Batter
In a mixing bowl, combine all-purpose flour, cornstarch, minced fresh garlic, salt, and pepper. Whisk the dry ingredients together until evenly mixed. The mixture should be a light, fluffy consistency that will cling to the mussels when you coat them. This batter will form the delightful crunchy exterior for your Crispy Tahong, adding both flavor and texture.

Step 3: Coat the Mussels
Take each cleaned mussel and dredge it in the prepared batter, ensuring it’s fully coated on all sides. Shake off any excess batter gently before placing them aside on a plate. This step is crucial for achieving that beautiful golden-brown crust. Repeat the process until all mussels are coated, forming the basis for your scrumptious Crispy Tahong.

Step 4: Heat the Oil
In a deep pan or skillet, pour in vegetable oil and heat it over medium heat until it reaches approximately 350°F (175°C). You can test if the oil is ready by dropping in a tiny bit of batter; it should sizzle and rise quickly to the surface. Preheating the oil properly ensures that the mussels will cook evenly and achieve that perfect crunch.

Step 5: Fry the Mussels
Carefully lower the coated mussels in batches into the hot oil, avoiding overcrowding to maintain the oil temperature. Fry them for about 3-5 minutes or until they turn a delightful golden brown and crispy on the outside. Keep an eye on them, turning occasionally with a slotted spoon for even cooking, which is key for making flawless Crispy Tahong.

Step 6: Drain Excess Oil
Once crispy and golden, remove the fried mussels from the oil using a slotted spoon. Transfer them to a plate lined with paper towels to absorb any excess oil, keeping them light and crispy. Allow them to cool slightly before serving, as this also helps enhance the texture. Your mouthwatering Crispy Tahong is now ready to be enjoyed!

Make Ahead Options

Crispy Tahong is a fantastic choice for meal prep, making busy weeknights a breeze! You can clean and thaw the mussels up to 24 hours in advance, storing them in the refrigerator to keep them fresh. Additionally, it’s best to prepare the batter (flour, cornstarch, garlic, salt, and pepper) and refrigerate it in an airtight container for convenient access. When you’re ready to indulge, simply dredge the mussels in the batter and fry them until golden brown. This ensures that your Crispy Tahong retains its delightful crunch and flavors, giving you restaurant-quality results with minimal effort!

What to Serve with Crispy Tahong?

As you savor the warm, golden delight of these deep-fried mussels, adding complementary dishes can elevate your meal to new heights.

  • Steamed Jasmine Rice: The fluffy rice serves as a perfect base, absorbing the savory flavors of Crispy Tahong and providing an ideal balance to the dish.

  • Spicy Vinegar Dip: A must-have! This tangy and spicy condiment enhances the seafood’s natural flavors, adding a delightful kick to each bite.

  • Crispy French Fries: Golden and crunchy, these fries add extra texture and indulgence, making for a comforting seafood feast that’s hard to resist.

  • Garlic Butter Broccolini: The slight bitterness of the broccolini, sautéed in garlic butter, offsets the richness of both the mussels and fries, offering a refreshing touch to each plate.

  • Mango Salad: Bright, sweet mangoes mixed with crisp vegetables create a refreshing contrast. The sweetness adds a beautiful balance, complementing the savoryness of Crispy Tahong.

  • Cold Beer or Lemonade: A chilled beer can enhance the whole experience, while fresh lemonade provides a zesty contrast, perfect for washing down those crispy morsels.

  • Fruit Sorbet: For dessert, a light fruit sorbet can cleanse the palate and provide a sweet note to end the meal beautifully.

These pairing suggestions create a well-rounded dining experience that celebrates the irresistible allure of Crispy Tahong!

How to Store and Freeze Crispy Tahong

Fridge: Store any leftover Crispy Tahong in an airtight container for up to 1-2 days. While refrigeration can keep the mussels safe, they may lose some of their crispy texture.

Freezer: For longer storage, freeze the batter-coated mussels (raw) in a single layer on a baking sheet before transferring them to an airtight freezer bag. They can be frozen for up to 3 months.

Reheating: When ready to enjoy, reheat leftover mussels in an air fryer or oven at 350°F (175°C) for about 10 minutes to restore their crunchiness. Avoid microwaving, as it can make the mussels soggy.

Freshness Tip: Enjoy Crispy Tahong freshly fried for the best taste and texture—nothing beats that satisfying crunch!

Expert Tips for Crispy Tahong

  • Oil Temperature: Ensure the oil is hot enough (around 350°F) before frying—this helps achieve maximum crispiness. Use a thermometer for accuracy.

  • Avoid Overcrowding: Fry the mussels in small batches to maintain the oil temperature. Overcrowding can lead to soggy Crispy Tahong.

  • Perfect Coating: Make sure to shake off excess batter after dredging. This ensures your mussels are well-coated but not overly thick—crisp perfection awaits!

  • Serve Immediately: For the best experience, serve your Crispy Tahong right after frying. They are best enjoyed fresh and hot with a spicy vinegar dip.

  • Experiment with Flavors: Feel free to add spices like paprika or herbs to the batter for a twist on the classic Crispy Tahong recipe.

Crispy Tahong: Fun Variations & Substitutions

Feel free to let your creativity shine and customize your Crispy Tahong to fit your taste buds or dietary needs!

  • Gluten-Free: Substitute all-purpose flour with a gluten-free blend to enjoy the same delicious crunch.
  • Spicy Kick: Add a teaspoon of cayenne or chili powder to the batter for an exciting heat that pairs perfectly with a spicy vinegar dip.
  • Herb-Infused: Mix in chopped fresh herbs like parsley or cilantro into the batter for a burst of fresh flavor that brightens the dish.
  • Extra Crunch: Incorporate crushed cornflakes or panko breadcrumbs into the batter for an even crunchier coating.
  • Lemon Zest: Grate some lemon zest into the batter to introduce a refreshing citrus note that will elevate the flavors of the mussels.
  • Stuffed Variation: For a fun twist, stuff each mussel with a small piece of cheese before battering and frying for a gooey surprise.
  • Seasoned Salt: Use garlic salt or seasoned salt in place of regular salt to impart additional flavor to the batter.
  • Vegetable Pancakes Side: Pair your Crispy Tahong with some Vegetable Pancakes for a satisfying and balanced meal full of texture and flavor.

Each variation adds a unique touch to this classic dish, making sure there’s always something new to savor!

Crispy Tahong Recipe FAQs

What type of mussels should I use for Crispy Tahong?
Absolutely! For Crispy Tahong, you can choose either fresh or frozen mussels. If you opt for frozen, make sure to thaw them completely before cooking to ensure a delicious texture. Fresh mussels are often preferred for their superior flavor.

How should I store leftover Crispy Tahong?
Very! If you have any leftovers, store them in an airtight container in the refrigerator for up to 1-2 days. While refrigeration keeps them safe, be aware that they may lose some of their delightful crispiness. For best results, they are best enjoyed immediately after frying.

Can I freeze Crispy Tahong?
Of course! To freeze, first coat your cleaned mussels in the batter and lay them in a single layer on a baking sheet. Freeze them until firm, then transfer the mussels to an airtight freezer bag. They will keep well for up to 3 months. When you’re ready to enjoy them, simply fry them directly from frozen—no need to thaw!

How can I reheat Crispy Tahong to maintain their texture?
Certainly! If you have leftover fried mussels, the best way to reheat them is in an air fryer or oven. Preheat your air fryer or oven to 350°F (175°C) and heat for about 10 minutes. This will help restore their crunchy exterior. Avoid microwaving them, as this can lead to a soggy texture.

Are there any dietary considerations for Crispy Tahong?
Yes! Keep in mind that mussels are a great source of protein and essential vitamins, but if you’re preparing this dish for someone with shellfish allergies, it’s best to avoid serving it. Additionally, those on gluten-free diets can substitute all-purpose flour with gluten-free flour to enjoy the crispy goodness of Crispy Tahong safely.

Crispy Tahong

Crispy Tahong: A Quick & Irresistible Seafood Treat

Crispy Tahong is a delightful deep-fried mussel dish that's quick to make and packed with flavor, perfect for any gathering.
Prep Time 50 minutes
Cook Time 10 minutes
Total Time 1 hour
Servings: 4 servings
Course: Dinner
Cuisine: Filipino
Calories: 200

Ingredients
  

For the Batter
  • 1 lb Mussels Fresh or frozen, thaw if frozen
  • 3 cloves Garlic Minced
  • 1 cup All-Purpose Flour Gluten-free flour can be used
  • 1/2 cup Cornstarch Can substitute with potato starch
  • 1 tsp Salt Adjust to taste
  • 1/2 tsp Pepper Adjust to taste
For Frying
  • 3 cups Oil Vegetable oil

Equipment

  • Deep pan or skillet
  • mixing bowl
  • slotted spoon

Method
 

Step-by-Step Instructions for Crispy Tahong
  1. Clean the mussels by rinsing them under cold running water to remove any debris and sand. Scrub the shells with a brush and dry them.
  2. Prepare the batter by mixing all-purpose flour, cornstarch, garlic, salt, and pepper until evenly combined.
  3. Coat each mussel in the batter, making sure to shake off excess batter.
  4. Heat the vegetable oil in a deep pan over medium heat until it reaches 350°F (175°C).
  5. Fry the mussels in small batches for about 3-5 minutes until they're golden brown and crispy.
  6. Remove the mussels from the oil and place them on paper towels to drain excess oil before serving.

Notes

For best results, serve immediately after frying and consider offering a spicy vinegar dip on the side.