Healthy Tahini Chocolate Balls for Guilt-Free Snacking

You know those moments when hunger strikes and all you want is something wholesome yet indulgent? Enter my No-Bake Tahini Chocolate Energy Balls. With just five simple ingredients, these delectable bites pack the rich, nutty flavor of tahini into a satisfyingly chewy treat that’s perfect for any time of day. Not only are they gluten-free and vegan, making them suitable for various dietary preferences, but they also require no baking—so you can whip them up in a flash! Whether you’re zipping out the door in the morning or in need of a post-workout pick-me-up, these energy balls are your new best friend. Curious about that irresistible combination of chocolate and tahini? Let’s dive into the delicious details!

Why are Tahini Chocolate Balls a Must-Try?

Guilty-Free Indulgence: These no-bake bites let you enjoy the decadence of chocolate without the guilt.
Minimal Ingredients: With just five simple components, preparation is a breeze, making them perfect for busy lifestyles.
Nutrient-Packed: Loaded with healthy fats from tahini and fiber from oat flour, these balls offer energy that keeps you fueled throughout the day.
Versatile Snacks: Whether you need a mid-afternoon boost or a quick on-the-go breakfast, these can easily fit into any routine.
Crowd-Pleasing Flavor: The delightful marriage of chocolate and tahini creates a unique taste that appeals to everyone, even those who are picky! Enjoy similar deliciousness with my Own Homemade Chocolate or try out the Nutty Chocolate Date recipe for another satisfying treat!

Tahini Chocolate Balls Ingredients

• Here’s everything you need to whip up delectable Tahini Chocolate Balls!

For the Energy Balls

  • Tahini – Adds healthy fats and a nutty flavor; opt for runny Lebanese tahini for the best taste and texture.
  • Maple Syrup – Acts as a natural sweetener that balances out the bitterness of tahini and cocoa; agave syrup or honey can be good substitutes.
  • Oat Flour – Provides structure and complex carbohydrates; ground oats can work in a pinch, but adjust liquids as needed.
  • Cocoa Powder – Contributes rich chocolate flavor and antioxidants; essential for that luscious chocolate taste.
  • Pinch of Salt – Enhances the overall flavor; though commonly used, it can be omitted if desired.

For Coating

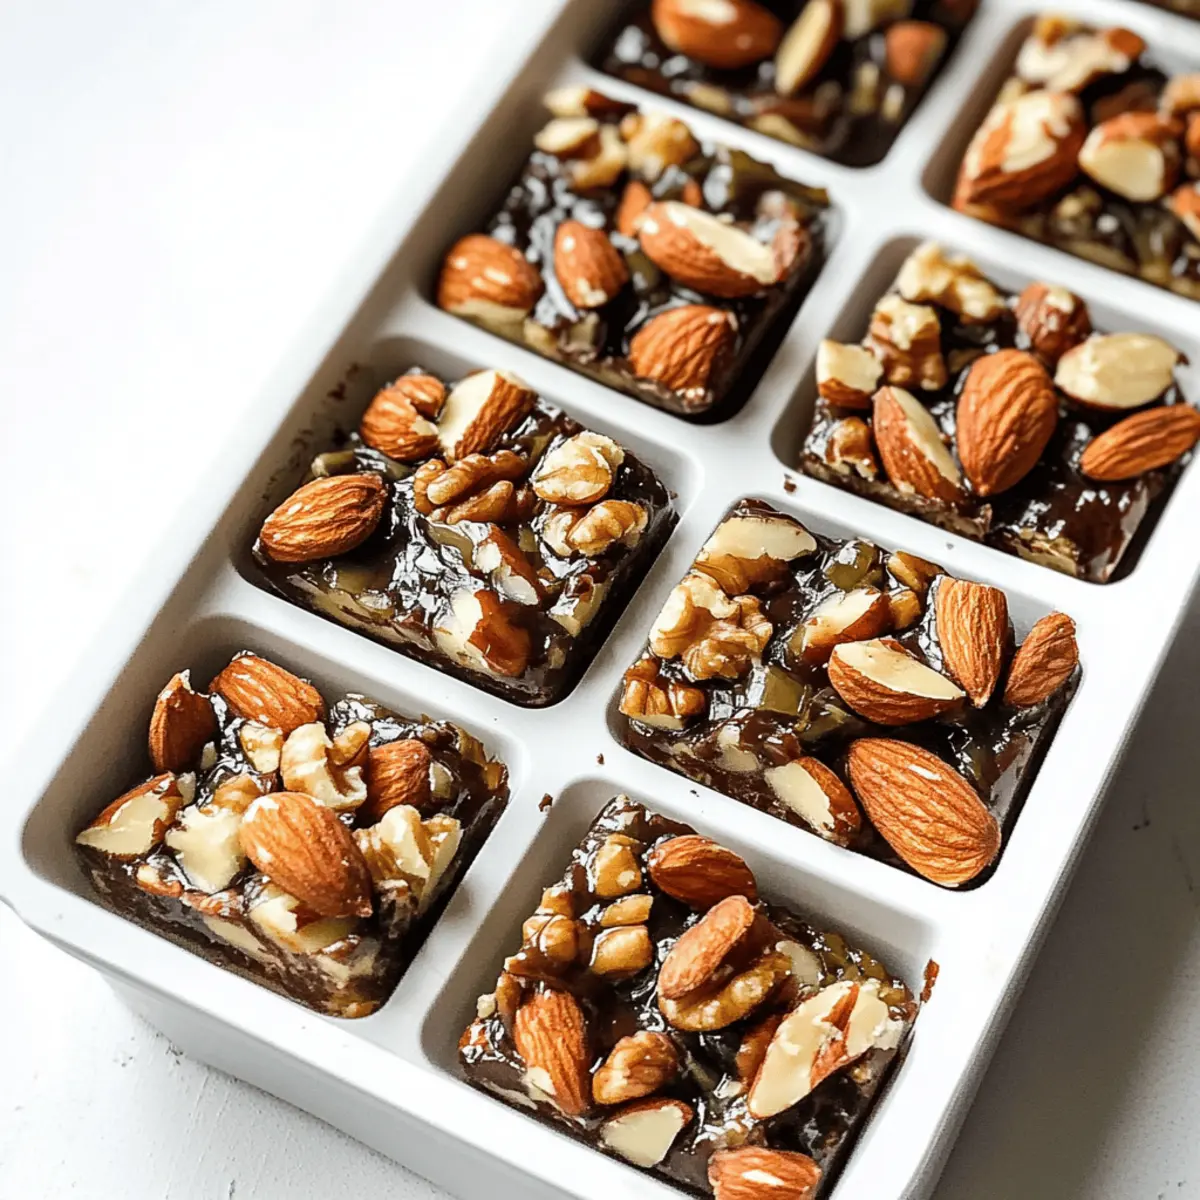
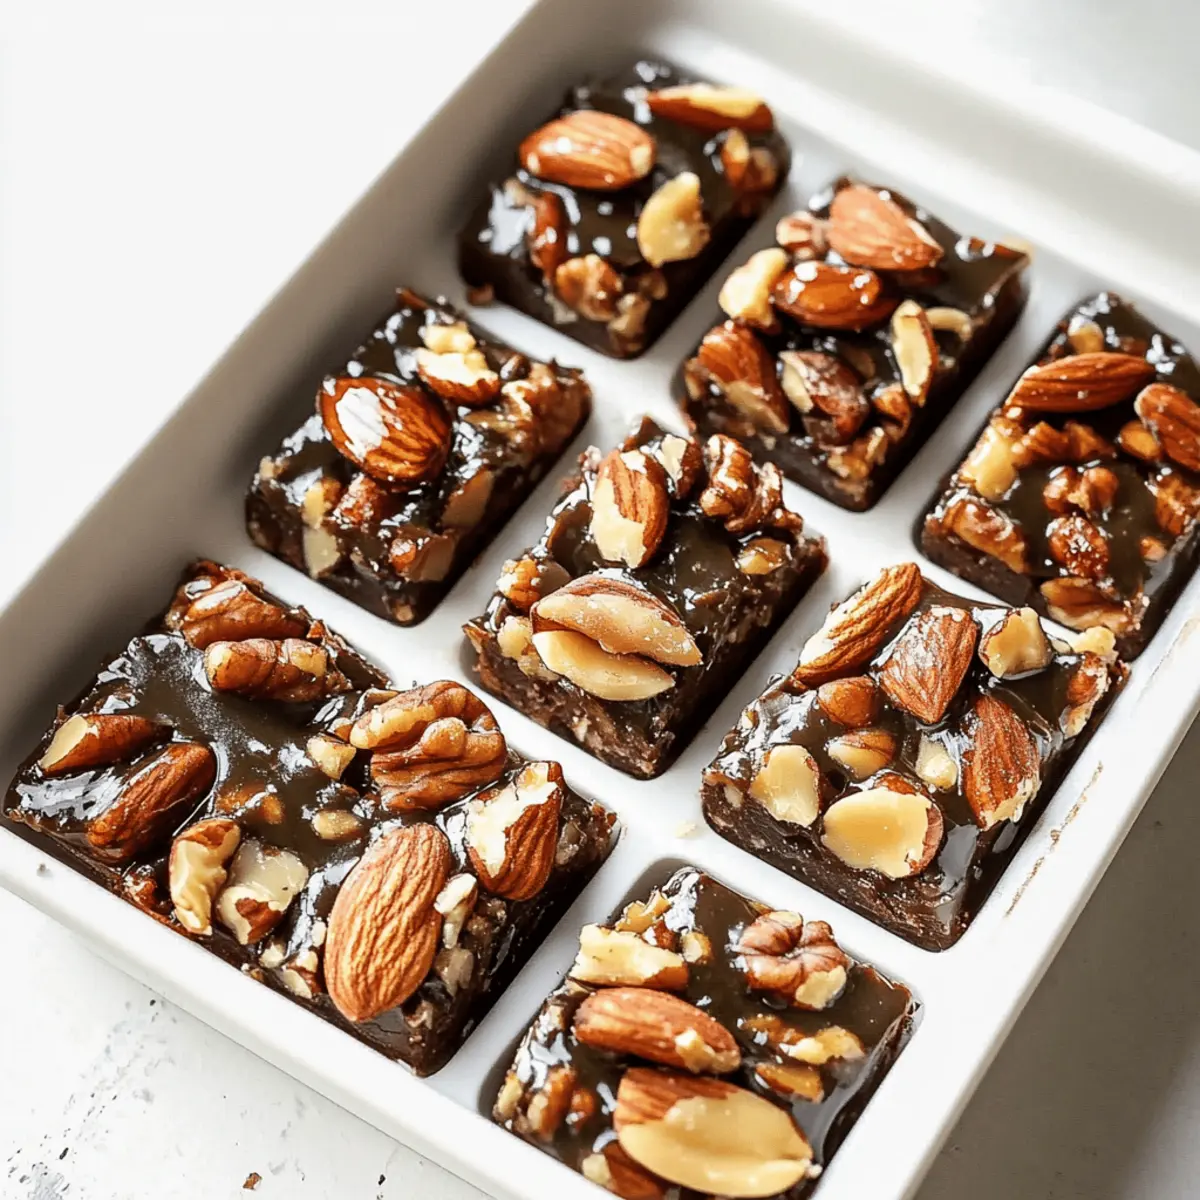
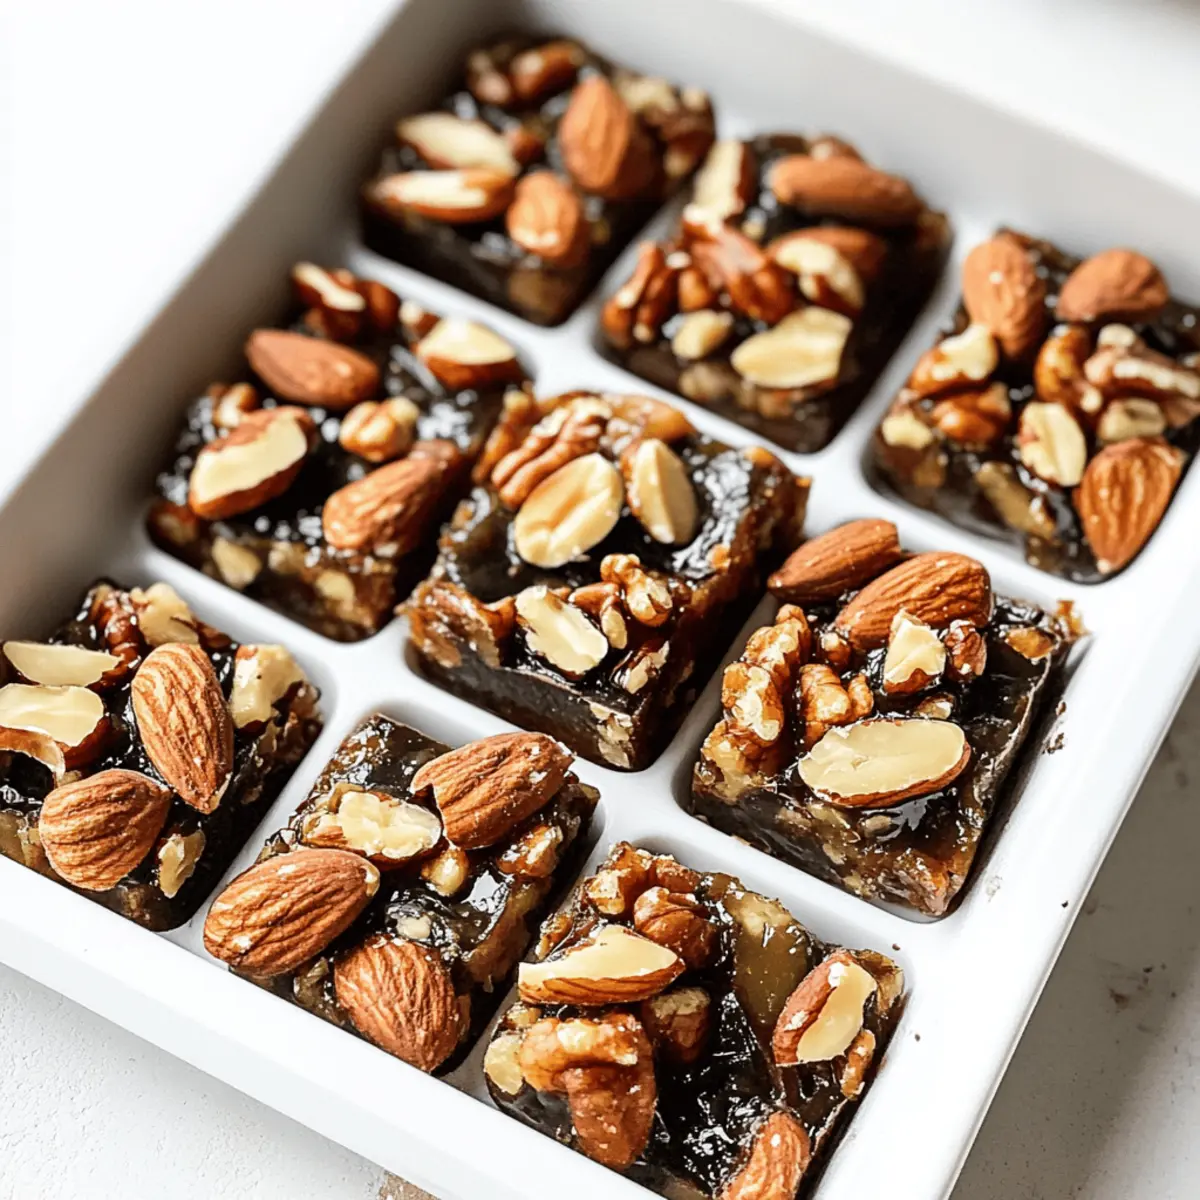
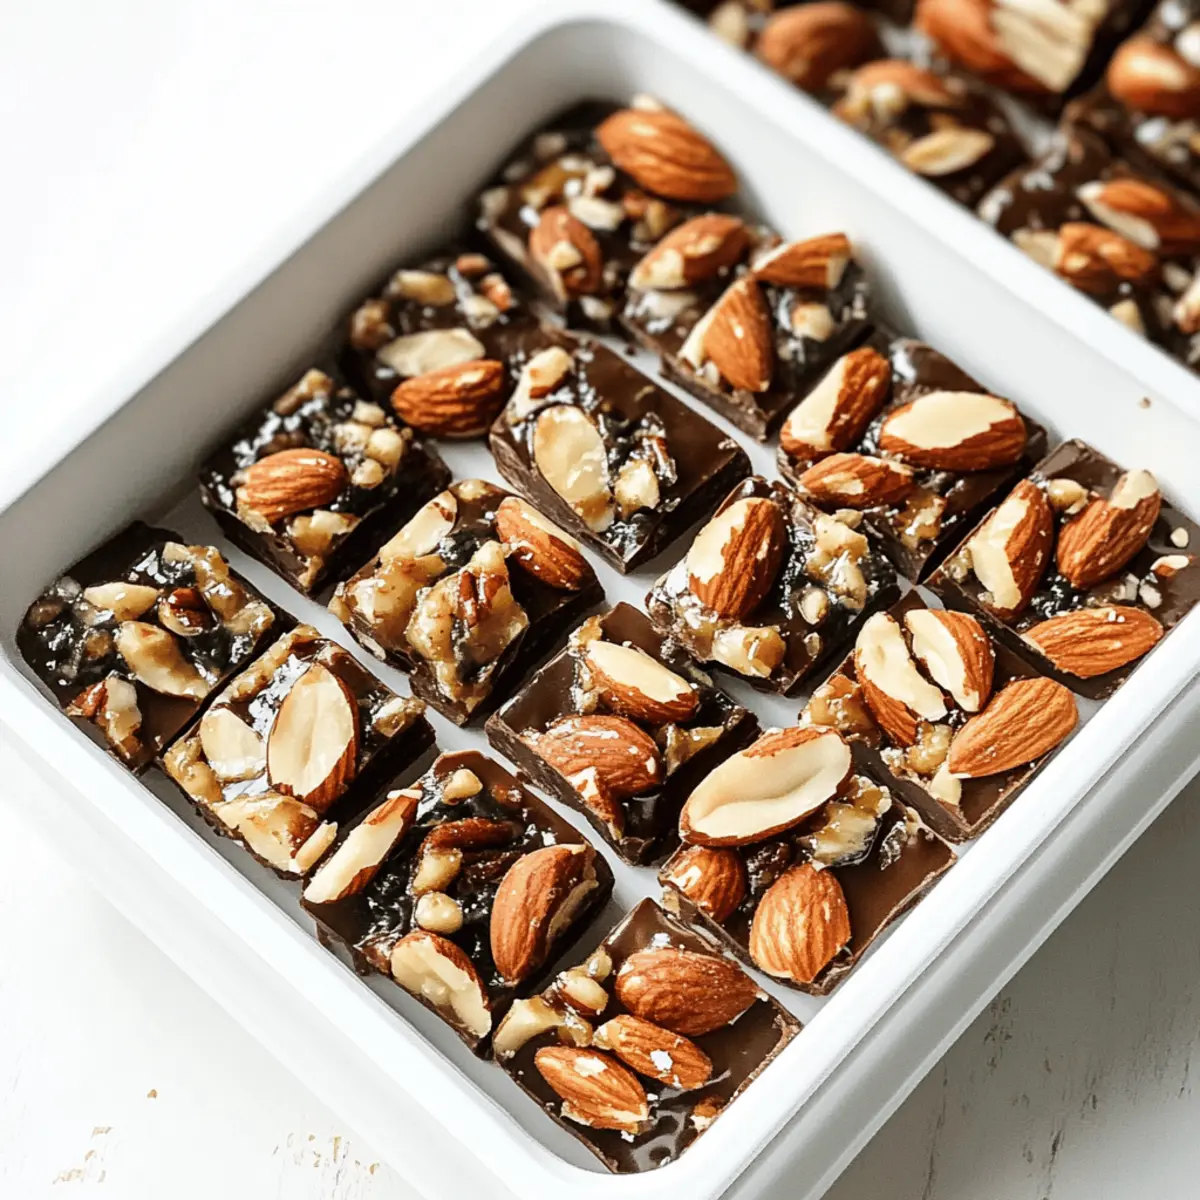
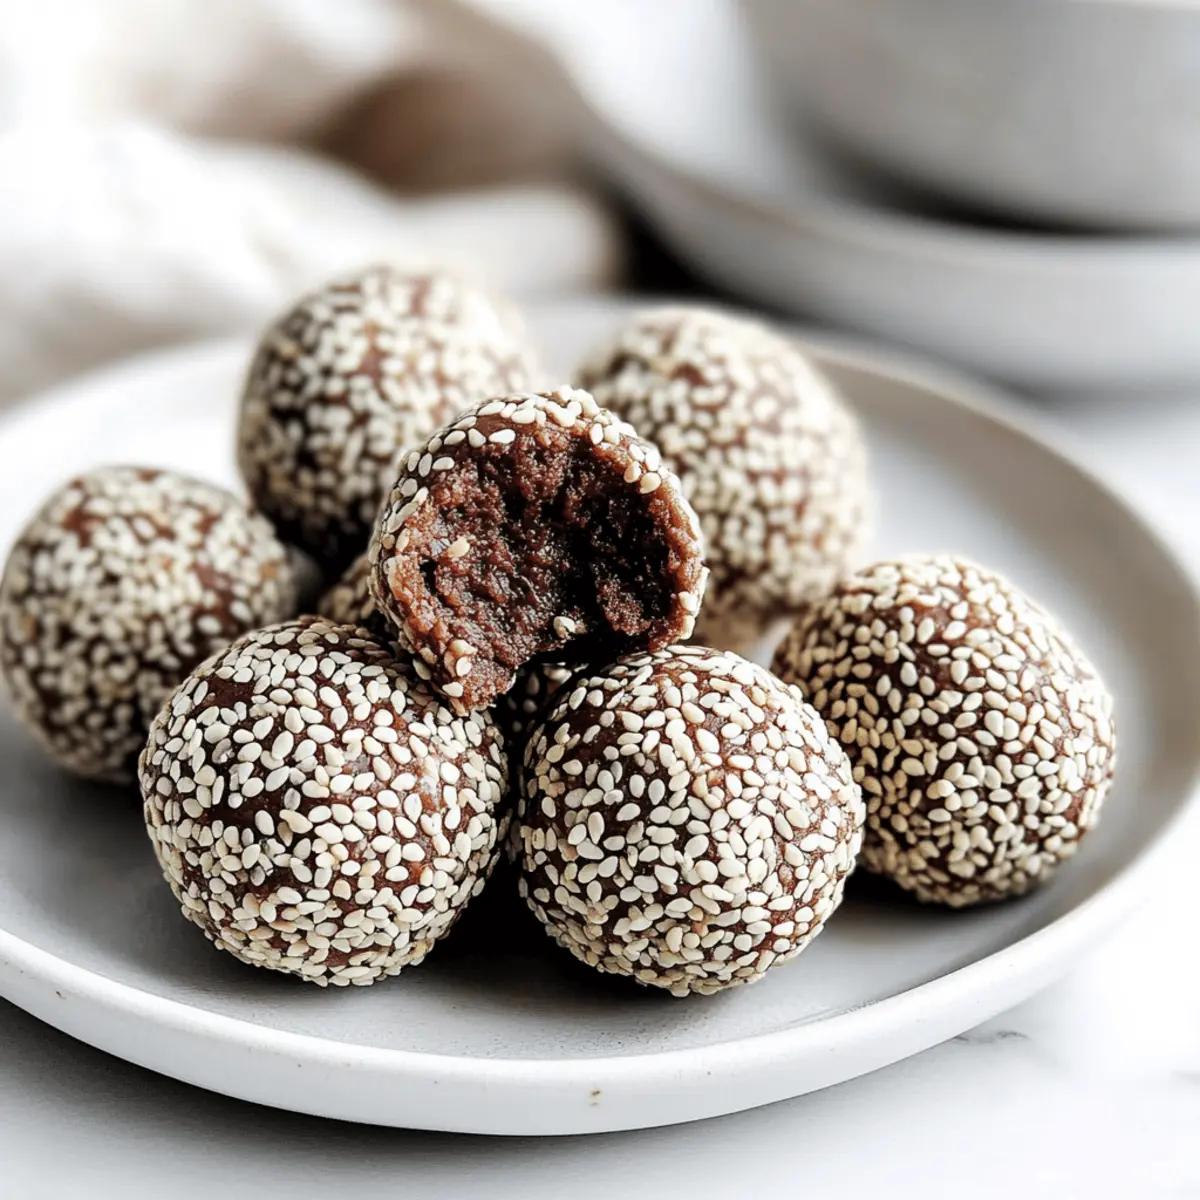
  • Sesame Seeds – Used for coating, adding both crunch and nuttiness; toasting them enhances their flavor and texture.

Step‑by‑Step Instructions for Tahini Chocolate Balls

Step 1: Toast Sesame Seeds (optional)
Begin by heating a dry skillet over medium heat. Add sesame seeds and toast them for about 2 minutes, stirring continuously until they turn a golden brown and become fragrant. Remove them from heat and let them cool completely while you prepare the rest of your ingredients for the Tahini Chocolate Balls.

Step 2: Mix Ingredients
In a medium bowl, combine the creamy tahini and maple syrup. Using a spatula or spoon, mix them together until you have a smooth and consistent mixture. This step ensures that the nutty flavor of tahini beautifully complements the sweetness of the maple syrup, creating a rich base for your energy balls.

Step 3: Incorporate Dry Ingredients
Now, add the oat flour, cocoa powder, and a pinch of salt to your tahini-maple mixture. Stir until everything is well combined and a dough forms. The dough should be thick and slightly sticky; if it’s too wet, you can add a touch more oat flour to achieve the right consistency for shaping your Tahini Chocolate Balls.

Step 4: Shape Balls
Using your hands, take portions of the dough and roll them into balls about the size of a tablespoon. Aim for 10-12 balls total. As you shape them, ensure they have a smooth surface for the best texture. This step not only shapes your treats but also activates their chewy texture, making each bite delightful.

Step 5: Coat
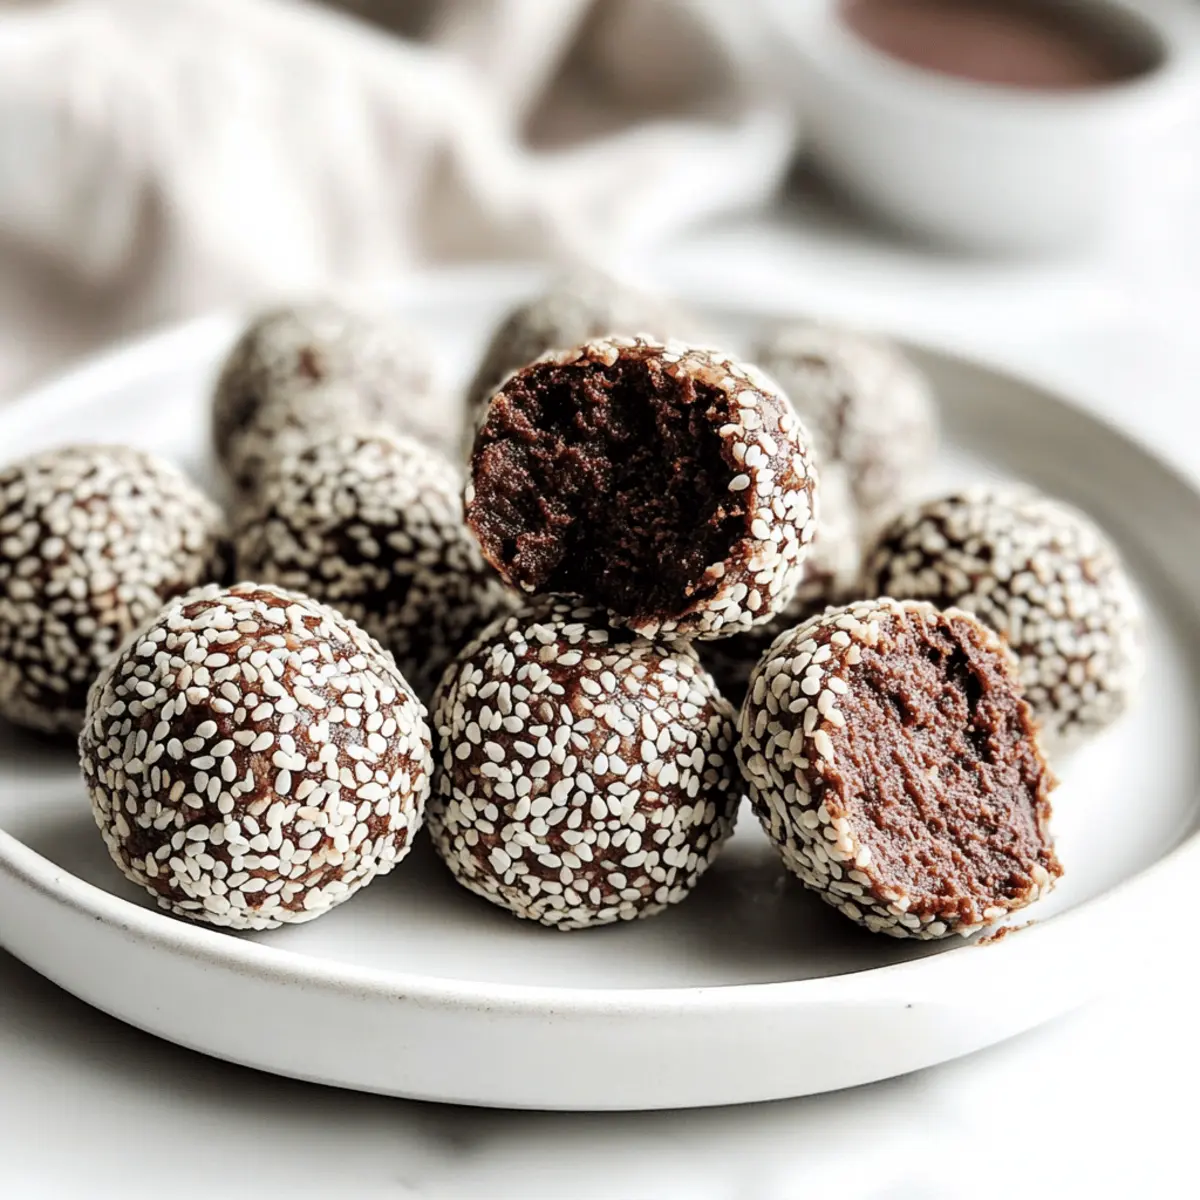
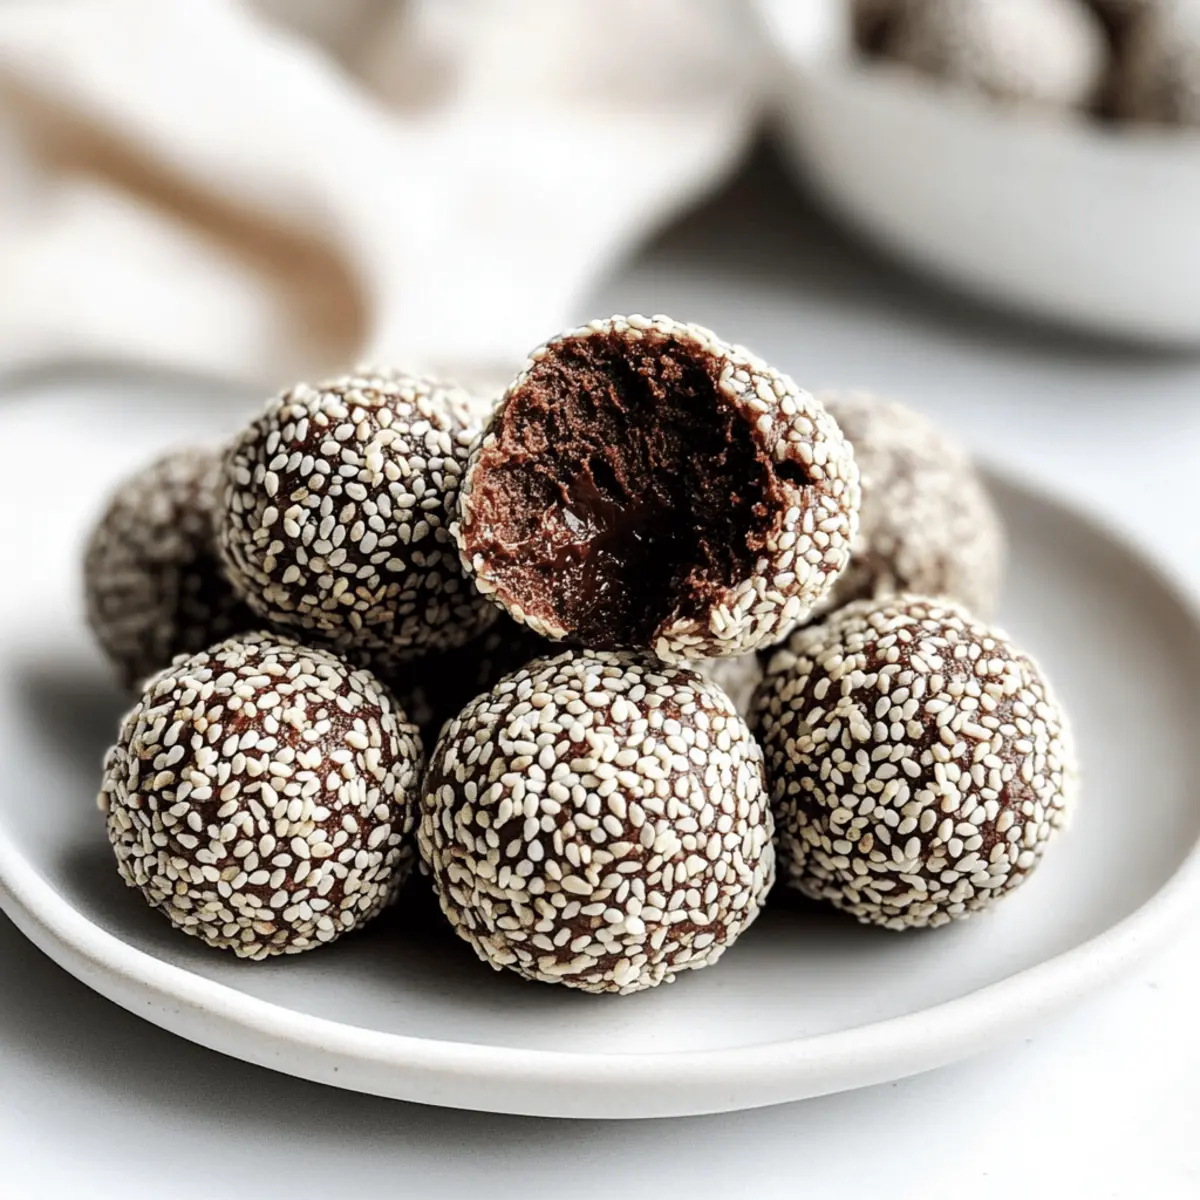
Take the toasted sesame seeds and spread them on a plate. Roll each formed ball in the sesame seeds until evenly coated, adding a wonderful crunch and nuttiness to your Tahini Chocolate Balls. Make sure to press gently so the seeds adhere well to the surface of the balls for the best flavor experience.

Step 6: Enjoy or Store
Your delicious Tahini Chocolate Balls are ready! You can enjoy them immediately for a quick snack, or store them in an airtight container. For a softer texture, keep them at room temperature; alternatively, refrigerate for up to 4 days for a firmer treat. These energy bites are perfect for on-the-go munching!

Make Ahead Options

These Tahini Chocolate Balls are perfect for meal prep enthusiasts! You can mix the base ingredients (tahini, maple syrup, oat flour, cocoa powder, and salt) up to 24 hours in advance and store the mixture in the fridge to let the flavors meld. When you’re ready to finish, simply roll the chilled dough into balls, coat them in sesame seeds, and enjoy! For even more convenience, you can shape and coat the balls ahead of time, refrigerating them for up to 4 days. Just remember to keep them in an airtight container to maintain their freshness and prevent drying out. With these make-ahead tips, you’ll have delectable, guilt-free snacks ready to go anytime!

Variations & Substitutions for Tahini Chocolate Balls

Get ready to explore delightful twists on your Tahini Chocolate Balls that’ll tickle your taste buds and suit your cravings!

  • Nut-Free: Use sunbutter instead of tahini for a nut-free version that maintains a creamy texture and rich flavor.
  • Sweetener Swap: Substitute maple syrup with agave nectar for a lighter sweetness; honey works if you’re not strictly vegan.
  • Crunchy Coating: Instead of sesame seeds, roll the balls in crushed nuts or coconut flakes for a different crunch and flavor profile.
  • Flavor Infusion: Add a teaspoon of vanilla extract for extra warmth and sweetness; it beautifully complements the chocolate and tahini.
  • Chocolate Chips: Mix in mini dark chocolate chips to boost the chocolatey goodness; they’ll melt slightly, adding a luscious texture.
  • Fruitiness: Toss in finely chopped dried figs or apricots; their natural sweetness and chewiness uplift each ball.
  • Spicy Kick: If you like a little heat, sprinkle a dash of cayenne pepper in the mixture; it creates an unexpected yet delightful contrast.
  • Protein Packed: Stir in a scoop of your favorite protein powder—any flavor pairs well, especially chocolate or vanilla!

Curious for more sweet inspirations? You may also enjoy my Coconut Chocolate Rolls or whip up some Coffee Chocolate Truffles for another layer of flavor!

Expert Tips for Tahini Chocolate Balls

  • Choose Quality Tahini: Use runny Lebanese tahini for the best flavor and consistency; thicker varieties may lead to dry, hard balls.
  • Adjust Sweetness: If you prefer sweeter energy balls, gradually add more maple syrup until tailored to your taste—avoid overdoing it!
  • Texture Control: For firmer balls, carefully increase the oat flour; too much liquid can result in a sticky mixture that won’t hold shape.
  • Experiment Freely: Feel free to incorporate extras like nuts, seeds, or dried fruits for unique textures and flavors in your Tahini Chocolate Balls.
  • Right Coating Techique: When rolling in sesame seeds, ensure each ball is evenly coated to enhance flavor and crunch with every bite.

What to Serve with No-Bake Tahini Chocolate Energy Balls

Imagine a delightful spread that perfectly complements the nutty sweetness of your tantalizing energy balls—a feast for all senses awaits!

  • Fresh Fruit Salad: A vibrant mix of seasonal fruits adds a refreshing contrast, enhancing the depth of flavors in your energy balls.

  • Almond Butter Toast: Savor warm, crusty bread topped with creamy almond butter for a rich, nutty companion that pairs beautifully.

  • Chilled Coconut Yogurt: This silky, dairy-free yogurt offers a cool, creamy texture that balances the rich chocolate, creating a satisfying contrast.

  • Matcha Green Tea: Enjoy a cozy cup of this earthy tea; its subtle bitterness complements the sweetness of the tahini and chocolate perfectly.

  • Homemade Granola: Crunchy, oat-based granola provides delightful texture and brings out the creaminess of tahini, making each bite irresistible.

  • Nutty Trail Mix: A handful of mixed nuts and seeds gives a satisfying crunch, enhancing the overall experience while adding extra nutrients to your snack.

  • Dark Chocolate Dipped Strawberries: Indulge in more chocolate with these luscious berries; their sweetness and acidity are a great contrast to your energy balls.

  • Date Smoothie: Blend ripe bananas, dates, and almond milk for a naturally sweet and creamy treat that mirrors the richness of your energy balls.

How to Store and Freeze Tahini Chocolate Balls

Room Temperature: Keep your Tahini Chocolate Balls in an airtight container for up to 3 days to enjoy a softer texture while snacking.

Fridge: Store the energy balls in the refrigerator for up to 4 days. This will help maintain their firmness and keep them fresh for on-the-go snacking.

Freezer: For longer storage, freeze the balls in a single layer, then transfer to a freezer-safe bag for up to 2 months. Thaw in the fridge before enjoying.

Reheating: If you prefer them warm, briefly microwave each ball for about 10-15 seconds to enhance their chocolatey flavor before eating.

Tahini Chocolate Balls Recipe FAQs

How do I pick ripe tahini?
Absolutely! Look for tahini that’s smooth and runny. The best option is to choose Lebanese tahini as it has a richer flavor. Avoid jars with dark spots or separation, which can indicate age or spoilage.

What’s the best way to store Tahini Chocolate Balls?
For optimal freshness, store your Tahini Chocolate Balls in an airtight container. At room temperature, they will last for about 3 days, providing a softer texture. If you prefer a firmer bite, refrigerate them for up to 4 days.

Can I freeze Tahini Chocolate Balls?
Yes! To freeze, lay the energy balls out in a single layer on a baking sheet and freeze for about an hour. Once frozen, transfer them to a freezer-safe bag. They can be stored for up to 3 months. When you’re ready to enjoy them, simply thaw them in the fridge before eating!

What should I do if my balls are too sticky?
No worries! If your Tahini Chocolate Balls turn out sticky, gradually incorporate more oat flour until you reach a manageable dough consistency. You can also chill the mixture for 30 minutes to help it firm up before shaping.

Are Tahini Chocolate Balls safe for pets or allergies?
These energy balls are not suitable for pets, particularly due to the high sugar content from maple syrup. If you’re allergic to sesame or nuts, you may want to skip this recipe or replace tahini with sunflower seed butter, especially for a nut-free alternative.

How can I enhance the flavor of my Tahini Chocolate Balls?
The more the merrier! You can experiment by adding a pinch of cinnamon or cardamom to the mix for warmth. Additionally, consider mixing in chopped dried fruits like dates or cranberries for a delightful sweetness and texture contrast.

Tahini Chocolate Balls

Healthy Tahini Chocolate Balls for Guilt-Free Snacking

Indulge in these no-bake Tahini Chocolate Balls, perfect for guilt-free snacking. They are vegan and gluten-free, packing a rich tahini flavor into a nutritious treat.
Prep Time 15 minutes
Total Time 15 minutes
Servings: 10 balls
Course: Dessert
Cuisine: Vegan
Calories: 120

Ingredients
  

For the Energy Balls
  • 1 cup Tahini Opt for runny Lebanese tahini for best taste
  • 1/4 cup Maple Syrup Agave syrup or honey can be substitutes
  • 1 cup Oat Flour Ground oats can work in a pinch
  • 1/2 cup Cocoa Powder Essential for that rich chocolate flavor
  • 1 pinch Salt Enhances overall flavor, can be omitted
For Coating
  • 1/4 cup Sesame Seeds Toast for enhanced flavor and texture

Equipment

  • Skillet
  • Medium bowl
  • spatula

Method
 

Step-by-Step Instructions
  1. Toast Sesame Seeds (optional): Heat a dry skillet over medium heat. Add sesame seeds and toast for about 2 minutes until golden brown and fragrant.
  2. Mix Ingredients: Combine tahini and maple syrup in a medium bowl until smooth.
  3. Incorporate Dry Ingredients: Add oat flour, cocoa powder, and pinch of salt. Stir until well combined and a thick dough forms.
  4. Shape Balls: Roll portions of dough into 10-12 balls, aiming for a smooth surface.
  5. Coat: Roll balls in toasted sesame seeds until evenly coated.
  6. Enjoy or Store: Enjoy immediately or store in an airtight container at room temperature or in the fridge.

Notes

For firmer balls, increase oat flour. Experiment with additional ingredients such as nuts or dried fruits.

Irresistibly Crispy Fried Meatballs: A Flavorful Twist

“Can you hear that sizzle? As soon as I drop these Fried Meatballs—Romanian chiftele—into the hot oil, the kitchen comes alive with an irresistible aroma, pulling everyone closer. These golden bites are not just food; they’re a celebration of flavors passed down through generations, marrying ground meat with fragrant herbs. Perfect as appetizers for family feasts or casual snacks, their crispy exterior hides a juicy, tender interior that’s sure to impress even the fussiest eaters. Plus, they’re easy to whip up and can be customized with different meats or gluten-free options, making them a versatile addition to any meal plan. Ready to dive into this cozy culinary tradition that’s bound to bring smiles and satisfaction around your table?”

Why Are These Meatballs So Special?

Savoriness: The blend of rich meats and fresh herbs makes these meatballs explode with flavor in every bite.

Crispy Texture: Achieve that perfect crunch on the outside, while keeping the inside juicy and tender.

Versatile Creation: Easily swap ground pork for chicken or turkey, allowing you to cater to various tastes and dietary needs.

Easy to Prepare: With simple ingredients and straightforward steps, you’ll have these delicious treats ready in no time—perfect for busy weeknights or gatherings.

Family Favorite: These meatballs are a hit with both kids and adults, making them an ideal choice for family dinners or get-togethers. Looking for a companion dish? Check out my Spaghetti Homemade Meatballs for a complete culinary experience!

Fried Meatballs Ingredients

  • For the Meatball Mixture
    Ground Pork – The main protein source that offers richness; feel free to substitute with beef, chicken, or turkey for a custom twist.
    Chopped Green Onions – Adds flavor and a lovely crunch; if unavailable, you can use regular onions instead.
    Chopped Green Garlic – Provides aromatic depth; garlic cloves work as a suitable alternative—use around 8 for the same punch.
    Fresh Parsley – Brings a fresh burst of flavor and vibrant color; cilantro makes a delightful substitute if desired.
    Fresh Dill – Adds a unique, aromatic flavor; if you don’t have fresh dill, dried dill can be used—just be careful to use less.
    Eggs – Binds the mixture together; consider using flaxseed meal mixed with water as an egg replacement if needed.
    Hardened Bread – Acts as a moisture source and binding agent; for a gluten-free option, substitute with gluten-free breadcrumbs or bread.
    Salt and Pepper – Essential for seasoning; taste and adjust according to your preference.

  • For Coating and Cooking
    Flour – Creates a crispy crust on the outside; chickpea or rice flour can be used for a gluten-free option.
    Vegetable Oil – Needed for frying, adding richness; use any high-heat oil like canola or sunflower to achieve the best results.

Dive into creating these Fried Meatballs that will undoubtedly delight everyone at your table!

Step‑by‑Step Instructions for Delicious Fried Meatballs (Romanian Chiftele)

Step 1: Prep the Bread
Begin by soaking the hardened bread in water or milk for about 5 minutes until it’s thoroughly soft. Squeeze out any excess moisture before proceeding. This crucial step ensures the fried meatballs have a moist and tender texture, creating the perfect foundation for your chiftele.

Step 2: Mix the Ingredients
In a large bowl, combine the ground pork, chopped green onions, green garlic, fresh parsley, dill, salt, pepper, and eggs. Crumble the prepped bread into the mixture. Using your hands, mix everything together thoroughly until it’s well combined, with no dry spots left, creating a flavorful meatball mixture that is ready to be shaped.

Step 3: Form Meatballs
Scoop spoonfuls of the meat mixture and roll them into balls, roughly the size of a golf ball. Dredge each meatball lightly in flour to coat them evenly, which will help achieve a crispy crust when frying. Shape the edges smoothly to ensure uniform cooking, making these fried meatballs look appealing and professional.

Step 4: Heat the Oil
In several large frying pans, heat enough vegetable oil over medium-high heat to cover the bottom generously. Allow the oil to heat for about 5 minutes, or until shimmering, indicating it’s hot enough to fry the meatballs. It’s essential for the oil to be properly heated to achieve that delightful crispy exterior when you drop in your chiftele.

Step 5: Fry the Meatballs
Carefully place the meatballs into the hot oil, ensuring to leave space between them to avoid overcrowding. Fry for about 3-4 minutes per side, turning them gently with a spatula until they’re golden brown and crispy. Keep an eye on them, as the enticing aroma and color will let you know they’re nearing perfection.

Step 6: Drain the Excess Oil
Once the meatballs are beautifully golden and cooked through, transfer them to a platter lined with paper towels. This will help absorb any excess oil, ensuring your fried meatballs remain crispy and not greasy. Allow them to drain for a minute while you prepare to serve them warm or allow them to cool completely for later.

Step 7: Serve
Enjoy your fried meatballs (Romanian chiftele) immediately while hot, paired with fresh bread and vegetables, or serve them as delightful appetizers at your next gathering. If you prefer, you can also refrigerate any leftovers in an airtight container to savor their deliciousness later.

Fried Meatballs Variations & Substitutions

Explore endless possibilities to make these fried meatballs your own and tantalize your taste buds!

  • Gluten-Free: Substitute hardened bread with gluten-free breadcrumbs or gluten-free bread to cater to dietary needs without sacrificing flavor.
  • Different Meats: Swap ground pork for beef, chicken, or turkey for a custom twist that suits your family’s preferences perfectly. Each option brings its unique flavor to the table!
  • Herb Enhancements: Experiment with different herbs, such as thyme or oregano, to add a new dimension of flavor that complements the meat beautifully.
  • Cheesy Delight: Add in grated cheese like parmesan or feta to the meatball mixture for a delightful burst of flavor and extra moisture.
  • Spicy Kick: Mix in some cayenne pepper or crushed red pepper flakes for those who enjoy an extra kick in their bites—perfect for spice lovers!
  • Vegetable Boost: Chop and incorporate finely grated zucchini or carrots into the mixture for added nutrition and moisture, truly elevating the traditional recipe!
  • Savory Additions: Toss in some cooked bacon bits for a smoky flavor that will take your meatballs to new heights, delighting all those who dive in.
  • Saucy Pairing: Consider serving them in a rich tomato sauce for a comforting meal reminiscent of hearty Italian dishes. For a complete culinary experience, why not try them alongside Spaghetti Homemade Meatballs?

These nifty twists not only add variety but also keep your meals exciting and tailored to your family’s tastes!

Storage Tips for Fried Meatballs

Fridge: store leftover fried meatballs in an airtight container for up to 3 days. This keeps them fresh while maintaining their deliciousness.

Freezer: for longer storage, freeze the chiftele in a single layer on a baking sheet until firm, then transfer them to a freezer-safe bag for up to 3 months.

Reheating: when ready to enjoy, gently reheat in a preheated oven at 350°F (175°C) for about 15-20 minutes or until heated through, preserving their crispy texture.

Wrapping: wrap any unserved meatballs well before refrigerating or freezing to prevent moisture loss and freezer burn, ensuring they taste just as delightful when you’re ready to eat them again.

What to Serve with Delicious Fried Meatballs (Romanian Chiftele)

Looking to create a complete meal that pairs beautifully with these crispy, savory bites?

  • Crispy Green Salad: Fresh greens drizzled with a tangy vinaigrette provide a refreshing contrast, balancing the richness of the meatballs.

  • Creamy Mashed Potatoes: These buttery, smooth potatoes soak up any flavorful juices, offering a delightful comfort food twist that enhances every bite.

  • Roasted Vegetables: A medley of seasonal vegetables brings sweetness and texture, complementing the savory profile of the fried meatballs beautifully.

  • Homemade Tomato Sauce: Simmered with herbs and spices, a vibrant sauce brings a zesty touch, perfect for dipping your meatballs in or served over pasta.

  • Crusty Bread: Freshly baked or toasted, this rustic side is wonderful for mopping up juices, making each bite a savory experience to savor.

  • Savory Yogurt Dip: A cool, herbed yogurt dip introduces a creamy contrast that enhances the flavors of the meatballs while refreshing the palate.

  • Polenta: Smooth, creamy polenta adds a delightful corn flavor; it’s a comforting base that pairs well with the meatballs.

  • Wine Pairing: A light red wine like Pinot Noir or a refreshing white like Sauvignon Blanc complements the savory meat with their acidity and fruitiness.

Expert Tips for Fried Meatballs

  • Hot Oil Is Key: Ensure the oil is properly heated before frying; it should shimmer. This creates a crispy crust while keeping the meatballs juicy inside.

  • Avoid Overcrowding: Fry meatballs in batches to prevent them from steaming, which can result in uneven cooking and soggy textures.

  • Perfectly Formed: Shape the meatballs evenly for consistent cooking. Use wet hands to prevent the mixture from sticking, ensuring they hold together well.

  • Flavor Boost: For extra zest, add grated cheese or spices like paprika to the mixture. Don’t be afraid to experiment! This helps customize your Fried Meatballs.

  • Storage Solutions: Refrigerate leftover meatballs in an airtight container for up to 3 days. They can also be frozen for longer preservation; just reheat gently!

  • Adaptable Ingredients: Feel free to swap out ground pork with beef, chicken, or turkey to suit your family’s preferences or dietary needs without losing flavor!

Make Ahead Options

Making these Fried Meatballs ahead of time is a brilliant way to save yourself time during busy weeknights! You can prepare the meatball mixture up to 24 hours in advance; simply mix all the ingredients, shape into balls, and cover tightly before refrigerating. This allows the flavors to meld beautifully. Another option is to fry the meatballs and then refrigerate them in an airtight container for up to 3 days. To maintain their crispy texture, reheat them in a hot oven for about 10-15 minutes before serving. With these make-ahead tips, you’ll enjoy restaurant-quality Fried Meatballs with minimal effort on the day of your gathering!

Fried Meatballs (Romanian Chiftele) Recipe FAQs

How do I choose the right ground meat for the meatballs?
Absolutely! While traditional chiftele are made with ground pork for its richness, you can use ground beef, chicken, or turkey as well. Choose grass-fed meats for enhanced flavor and texture, and make sure it’s finely ground to achieve that juicy tenderness.

What is the best way to store leftover fried meatballs?
Very! For optimal freshness, store your fried meatballs in an airtight container in the refrigerator for up to 3 days. Just be sure to let them cool completely before sealing to avoid moisture buildup. If you notice any dark spots or off smells, it’s best to discard them.

Can I freeze these meatballs, and if so, how?
Certainly! To freeze your chiftele, first arrange the cooked meatballs in a single layer on a baking sheet and place them in the freezer until firm (about 1-2 hours). Then, transfer them to a freezer-safe bag, removing as much air as possible. They can be frozen for up to 3 months. When you’re ready to enjoy, simply reheat them in the oven to maintain their delicious crispiness.

What if my meatball mixture is too wet or crumbly?
That’s a great question! If your mixture feels too wet, try adding a bit more crumbled bread or breadcrumbs to absorb the excess moisture. For a crumblier mix, lightly wet your hands while shaping the meatballs to help them hold together better. If they’re still falling apart, an extra egg or a flaxseed meal-water mix can act as a binding agent.

Are there any dietary considerations I should be aware of?
Definitely! If you’re catering to gluten-free diets, you can easily swap out the hardened bread for gluten-free breadcrumbs or gluten-free bread. Additionally, if anyone has egg allergies, the flaxseed meal option mentioned before is a wonderful alternative. Always double-check labels for any hidden allergens that might be present in packaged products!

How long can I wait to eat the meatballs after cooking?
You’ll want to enjoy your fried meatballs while they’re still warm and crispy! However, if you have leftovers, they can stay fresh in the fridge for about 3 days. If served immediately, they are perfect as appetizers or casual snacks at gatherings, and you can also cool them completely and refrigerate for later enjoyment.

Fried Meatballs

Irresistibly Crispy Fried Meatballs: A Flavorful Twist

Enjoy the irresistible flavor and crispy texture of these Fried Meatballs, perfect for any meal.
Prep Time 15 minutes
Cook Time 20 minutes
Total Time 35 minutes
Servings: 4 meatballs
Course: Dinner
Cuisine: Romanian
Calories: 200

Ingredients
  

For the Meatball Mixture
  • 1 pound Ground Pork Can substitute with beef, chicken, or turkey
  • 1 cup Chopped Green Onions Use regular onions if unavailable
  • 1 cup Chopped Green Garlic Around 8 garlic cloves can be used
  • 1 cup Fresh Parsley Cilantro works as a substitute
  • 1 cup Fresh Dill Dried dill can be used in lesser amounts
  • 2 large Eggs Flaxseed meal mixed with water can replace
  • 2 cups Hardened Bread Use gluten-free breadcrumbs for a gluten-free option
  • to taste tsp Salt Essential for seasoning
  • to taste tsp Pepper Essential for seasoning
For Coating and Cooking
  • 1 cup Flour Chickpea or rice flour for a gluten-free option
  • as needed cup Vegetable Oil Use high-heat oil like canola or sunflower

Equipment

  • Frying pan
  • mixing bowl

Method
 

Step‑by‑Step Instructions for Delicious Fried Meatballs
  1. Begin by soaking the hardened bread in water or milk for about 5 minutes until it's thoroughly soft. Squeeze out any excess moisture before proceeding.
  2. In a large bowl, combine the ground pork, chopped green onions, green garlic, fresh parsley, dill, salt, pepper, and eggs. Crumble the prepped bread into the mixture.
  3. Scoop spoonfuls of the meat mixture and roll them into balls, roughly the size of a golf ball. Dredge each meatball lightly in flour to coat them evenly.
  4. In several large frying pans, heat enough vegetable oil over medium-high heat to cover the bottom generously.
  5. Carefully place the meatballs into the hot oil and fry for about 3-4 minutes per side until golden brown and crispy.
  6. Once the meatballs are cooked through and golden, transfer them to a platter lined with paper towels to absorb excess oil.
  7. Enjoy your fried meatballs immediately while hot, paired with fresh bread and vegetables.

Notes

These meatballs can be customized with different meats or gluten-free options. Refrigerate leftovers in an airtight container for up to 3 days or freeze for up to 3 months.

Savory Senegalese Chicken with Sweet Caramelized Onions

As I walked through the vibrant markets of Dakar, the air was filled with the enticing aroma of grilled meats and spices that beckoned me to explore Senegalese cuisine. That day, I discovered the soul-warming magic of Poulet Yassa, an authentic Senegalese chicken dish that’s as simple to prepare as it is extraordinary in flavor. This recipe features tender chicken marinated in a tangy blend of garlic, lemon juice, and Dijon mustard, making it a perfect choice for those who love an easy chicken recipe. Not only is Poulet Yassa gluten-free and keto-friendly, but it’s also a delightful way to bring the heart of West Africa into your kitchen. Ready for a culinary adventure that’ll have everyone asking for seconds? Let’s dive in!

Why is Poulet Yassa a Must-Try?

Vibrant Flavor Profile: The combination of tangy lemon, savory garlic, and sweet caramelized onions creates a rich depth that transports your taste buds straight to Senegal.
Easy Preparation: With simple steps and ingredients, this dish is perfect for busy weeknights or weekend get-togethers.
Healthy Twist: Being gluten-free and keto-friendly, this recipe fits seamlessly into your health-conscious lifestyle.
Cultural Experience: Cook a standout recipe that opens the door to the vibrant world of African cuisine without leaving your kitchen. Serve alongside Homemade Chicken Rolls for a complete meal!
Crowd-Pleasing Appeal: Whether for a family dinner or a potluck, this dish is sure to impress your guests and have them coming back for more.

Senegalese Chicken Ingredients

• Discover the essentials for an authentic Poulet Yassa experience.

For the Chicken Marinade

  • Chicken Thighs – Tender and flavorful; you can substitute these with chicken breasts if preferred.
  • Garlic – Enhances depth; if you’re in a pinch, garlic powder (1/2 teaspoon per clove) will do the trick.
  • Lemon Juice – Brightens up the dish; fresh lemon is best, but bottled works as well.
  • Dijon Mustard – Adds a tangy kick; consider whole-grain or spicy brown mustard for a different twist.
  • Cayenne Pepper – Provides a spicy note; adjust to your heat preference or omit for a milder flavor.
  • Salt – Essential for flavor; always adjust to taste.

For Cooking

  • Olive Oil – Adds richness; feel free to swap with vegetable or avocado oil if necessary.
  • Onions – Bring sweetness and base flavor; thinly slice yellow or white onions for perfect caramelization.
  • Chicken Broth – Keeps the dish moist and flavorful; low-sodium store-bought or homemade chicken broth is recommended.
  • Smoked Paprika – Delivers color and smokiness; regular paprika can be used for a milder taste.
  • Bouillon Powder – Optional flavor enhancer; skip this if using enough chicken broth.

Experience the warmth of West African cuisine with this easy chicken recipe!

Step‑by‑Step Instructions for Senegalese Chicken

Step 1: Prepare the Chicken and Marinade
Start by thoroughly washing and drying your chicken thighs. In a large bowl, combine the chicken with minced garlic, sliced onions, lemon juice, Dijon mustard, cayenne pepper, and salt. Ensure the chicken is fully coated with the marinade. Cover the bowl and refrigerate for at least 2 hours, or overnight for maximum flavor, allowing the spices to penetrate the meat.

Step 2: Remove Chicken and Reserve Marinade
Once marinated, take the chicken out of the fridge and remove it from the marinade, scraping off any excess. Set aside the reserved marinade, as it will be used later. This step allows the chicken to develop a nice crust while cooking, enhancing the overall taste of your Senegalese Chicken.

Step 3: Brown the Chicken
Heat 3 tablespoons of olive oil in a large skillet over medium-high heat. Once hot, carefully add the marinated chicken thighs to the skillet. Brown the chicken for about 4-5 minutes on each side until golden. The sizzling sound indicates it’s time to flip! Once browned, transfer the chicken to a plate and lower the heat to medium.

Step 4: Caramelize the Onions
In the same skillet, add the sliced onions and cook them. Pour in the reserved marinade to infuse flavor into the mixture. Sauté for around 5 minutes, stirring occasionally, until the onions become soft and golden. This caramelization step enhances the sweetness and depth of your Senegalese Chicken.

Step 5: Combine and Cook
Return the browned chicken thighs back into the skillet. Add chicken broth to the mixture, ensuring the chicken is partially submerged in the liquid. Cover with a lid and simmer on low heat for 15-20 minutes, until the chicken is fully cooked and reaches an internal temperature of 165°F (75°C). You’ll know it’s done when the chicken is juicy and tender.

Step 6: Final Seasoning and Serve
Taste the sauce and adjust the seasoning with additional salt if needed. Once everything is well combined and deliciously aromatic, serve your Poulet Yassa over jasmine rice or with a side of low-carb alternatives like cauliflower rice. Enjoy the rich flavors and warmth of this Senegalese Chicken dish with your family and friends!

Senegalese Chicken Variations & Substitutions

Feel free to mix things up! Each twist will help you discover new flavor dimensions in your Poulet Yassa.

  • Gluten-Free: Use tamari instead of soy sauce in place of bouillon powder for a gluten-free flavor boost.
  • Herb-Infused: Incorporate fresh thyme or bay leaves while cooking for a fragrant profile that elevates the dish.
  • Vegetarian Option: Swap chicken with eggplant or mushrooms for a satisfying vegetarian adaptation; marinate and cook just like the chicken.
  • Heat Adjust: Add more cayenne or a splash of hot sauce to ramp up the spice level for those who crave heat.
  • Smoky Flavor: Instead of smoked paprika, try a touch of chipotle powder for a smokier finish; it pairs beautifully with the caramelized onions.
  • Coconut Cream: For a tropical twist, stir in some coconut cream during the last few minutes of cooking; it adds richness and a hint of sweetness.
  • Zesty Kick: Replace lemon juice with lime juice if you’re in the mood for a zesty alternative, adding an exciting twist to the traditional flavor.
  • Pickled Veggies: Serve with a side of pickled onions or cucumber for a tangy crunch that complements the savory chicken beautifully.

For more complementary side dishes, try serving alongside homemade chicken rolls or jasmine rice to round out your meal with heartwarming flavors. Enjoy!

Make Ahead Options

Poulet Yassa is a fantastic recipe for meal prep that can save you time during busy weekdays! You can marinate the chicken for up to 24 hours in advance. Simply combine the chicken thighs, garlic, onions, lemon juice, Dijon mustard, and spices in a bowl, cover it, and refrigerate. The onions can also be sliced and stored separately in the fridge for up to 3 days to keep them fresh. To maintain the quality, ensure the chicken is sealed well to prevent any odors. When ready to serve, simply sauté the marinated chicken and onions as instructed, add the broth, and let it simmer. You’ll be enjoying tender and flavorful Senegalese Chicken with minimal evening preparation!

What to Serve with Poulet Yassa?

Imagine a table filled with colors and aromas that complement the savory goodness of your Senegalese chicken.

  • Jasmine Rice: Perfectly fluffy and fragrant, it absorbs the delicious sauce while providing a light base for the rich flavors.
  • Cauliflower Rice: A low-carb alternative that offers a pleasant nutty flavor, making it an excellent partner for the dish’s spices.
  • Fresh Green Salad: Crisp greens tossed with a zesty vinaigrette add crunch and freshness, balancing the savory richness of the chicken.
  • Plantains: Sweet and caramelized, fried plantains introduce a delightful contrast to the tanginess of the chicken sauce. These are sure to please even the pickiest of eaters!
  • Steamed Vegetables: A medley of green beans, carrots, and zucchini adds a colorful and nutritious touch while keeping the meal light and wholesome.
  • Homemade Bread: A crusty bread is ideal for soaking up the sauce, transforming every bite into a comforting experience that feels like home.
  • Minted Yogurt Sauce: A cooling sauce made with yogurt and mint brightens the dish, providing a refreshing contrast to the warm spices.
  • Iced Hibiscus Tea: A fruity and floral drink that pairs beautifully with the savory flavors, soothing the palate while enhancing the meal.

These delicious accompaniments will turn your Poulet Yassa into a complete and memorable meal that everyone will adore!

How to Store and Freeze Senegalese Chicken

Fridge: Store leftovers in airtight containers for up to 3 days. Make sure the chicken is completely cooled before sealing to maintain freshness.

Freezer: Poulet Yassa freezes well for up to 6 months. Portion it into freezer-safe containers, ensuring there’s a little space for expansion as it freezes.

Reheating: To reheat, gently warm the chicken on the stove over low heat. Add a splash of chicken broth to keep it moist and flavorful.

Safety Tip: Always ensure that the Senegalese Chicken is heated thoroughly to an internal temperature of 165°F (75°C) before serving.

Expert Tips for Senegalese Chicken

  • Perfect Marinade: Allow the chicken to marinate overnight for the best flavor infusion; it makes a world of difference!
  • Golden Brown: Ensure your chicken is well-browned on both sides to create a delicious flavor base and avoid steaming.
  • Onion Sweetness: For extra caramelization, slice the onions thinly and stir frequently for even cooking.
  • Adjust Heat: Feel free to modify the cayenne pepper to your spice preference. If you prefer a milder dish, you can omit it altogether.
  • Flavor Boost: Using low-sodium chicken broth will enhance flavor without adding too much salt, making your Senegalese Chicken healthier.

Poulet Yassa Recipe FAQs

What type of chicken is best for Poulet Yassa?
Absolutely! Chicken thighs are ideal for this dish as they provide tenderness and rich flavor. However, chicken breasts can be used as a lighter alternative if preferred.

How do I store leftover Poulet Yassa?
You can store leftovers in airtight containers in the fridge for up to 3 days. Be sure the chicken is completely cooled before sealing it to keep it fresh!

Can I freeze Poulet Yassa?
Very! Poulet Yassa freezes well for up to 6 months. To freeze, portion it into freezer-safe containers or bags, leaving some space for expansion. When ready to enjoy, simply thaw in the refrigerator overnight and reheat gently on the stove.

What if I can’t find Dijon mustard?
No worries! You can substitute Dijon mustard with whole-grain mustard or even spicy brown mustard for a different flavor twist. If those aren’t available, regular mustard works too—just adjust the quantity to your taste.

Are there any dietary considerations for Poulet Yassa?
Indeed! This delicious Senegalese Chicken recipe is gluten-free and keto-friendly, fitting nicely into both dietary lifestyles. Just ensure that any broth or other ingredients used are labeled gluten-free if that’s a concern.

How do I know when the chicken is fully cooked?
To ensure your Poulet Yassa is perfectly cooked, use a meat thermometer to check the chicken’s internal temperature. It should reach 165°F (75°C). You’ll notice the chicken is juicy and no longer pink inside, ensuring a delightful meal for you and your loved ones!

Senegalese Chicken

Savory Senegalese Chicken with Sweet Caramelized Onions

Indulge in this easy Senegalese Chicken recipe with tender marinated chicken, tangy lemon, and sweet caramelized onions.
Prep Time 2 hours
Cook Time 30 minutes
Total Time 2 hours 30 minutes
Servings: 4 servings
Course: Chicken
Cuisine: Senegalese
Calories: 450

Ingredients
  

Chicken Marinade
  • 4 pieces Chicken Thighs Substitute with chicken breasts if preferred.
  • 4 cloves Garlic Minced; garlic powder can be used in a pinch.
  • 1/4 cup Lemon Juice Fresh is best, but bottled works too.
  • 2 tablespoons Dijon Mustard Whole-grain or spicy brown can be used.
  • 1 teaspoon Cayenne Pepper Adjust to heat preference; can omit.
  • 1 teaspoon Salt Adjust to taste.
Cooking Ingredients
  • 3 tablespoons Olive Oil Can swap with vegetable or avocado oil.
  • 2 pieces Onions Thinly sliced yellow or white onions.
  • 1 cup Chicken Broth Low-sodium store-bought or homemade recommended.
  • 1 teaspoon Smoked Paprika Regular paprika can be used.
  • 1 teaspoon Bouillon Powder Optional; skip if using enough chicken broth.

Equipment

  • large bowl
  • large skillet

Method
 

Preparation
  1. Wash and dry chicken thighs. Combine with minced garlic, sliced onions, lemon juice, Dijon mustard, cayenne pepper, and salt in a bowl. Coat the chicken thoroughly with the marinade. Cover and refrigerate for at least 2 hours or overnight.
  2. Remove the chicken from the marinade, scraping off excess. Set aside reserved marinade for later.
  3. Heat olive oil in a skillet over medium-high heat. Add marinated chicken thighs and brown for 4-5 minutes on each side until golden. Transfer to a plate and reduce heat to medium.
  4. In the same skillet, add sliced onions and reserved marinade. Sauté for around 5 minutes until onions become soft and golden.
  5. Return the browned chicken to the skillet, add chicken broth, cover, and simmer on low heat for 15-20 minutes until chicken is fully cooked and tender.
  6. Taste the sauce and adjust the seasoning with more salt if needed. Serve over jasmine rice or with low-carb alternatives.

Notes

Marinate overnight for better flavor. Ensure chicken is well-browned to avoid steaming. Adjust cayenne for spice preference.

Irresistible Dark Chocolate Nut Squares for Guilt-Free Snacking

The aroma of freshly baked nut squares wafts through my kitchen, instantly lifting my spirits as the day winds down. These Dark Chocolate Nut Squares are more than just a snack; they offer a deliciously satisfying crunch that feels indulgent without the guilt. Perfect for the health-conscious, this recipe is not only dairy-free and gluten-free, but it’s also a breeze to whip up—making it the ideal treat for those moments when you crave something sweet. Whether you’re enjoying them as a midday pick-me-up or a luscious dessert, these squares are packed with nutrients and can be customized with your favorite nuts and seeds. Ready to discover how simple it is to create this delightful and wholesome snack? Let’s dive in!

Why Are Dark Chocolate Nut Squares Irresistible?

Simplicity Meets Flavor: These squares require minimal effort but deliver maximum taste, making them perfect for both novice and experienced bakers.
Customizable Delight: Feel free to swap in your favorite nuts or seeds, letting you create a unique treat every time.
Guilt-Free Indulgence: With a dairy-free and gluten-free hallmark, they provide a healthy alternative to traditional snacks.
Perfect Snack Anytime: Whether as a quick energy boost or a satisfying dessert alongside a scoop of dairy-free ice cream, they fit any occasion.
Nutritious and Delicious: Packed with heart-healthy fats and protein, you can enjoy your snack without compromise. For more healthful inspiration, check out our Nutty Chocolate Date and Creamy Coconut Chocolate Rolls recipes!

Dark Chocolate Nut Squares Ingredients

For the Base

  • Almonds – Adds texture and healthy fats; you can substitute with walnuts or hazelnuts for a flavor twist.
  • Cashews – Provides creaminess and essential nutrients; Brazil nuts can be swapped for a different taste.
  • Pecans – Offers a deep nutty flavor; replace with macadamia nuts for added richness.
  • Pumpkin seeds – Contributes crunch and additional nutrients like magnesium; sunflower seeds work as a substitute.
  • Chia seeds – Adds omega-3 fatty acids and fiber; flax seeds can be used instead for similar benefits.

For the Sweetness

  • Maple syrup – Acts as a natural sweetener and binding agent; honey or agave syrup can be used as alternatives.
  • Salt – Enhances the overall flavor; a pinch of sea salt is recommended for balance.

For the Topping

  • Dark chocolate – Introduces richness and antioxidants; feel free to use semi-sweet or milk chocolate as a sweeter alternative.

These Dark Chocolate Nut Squares are known for their delightful combination of flavors and textures, making them a fulfilling and nutritious snack!

Step-by-Step Instructions for Dark Chocolate Nut Squares

Step 1: Preheat the Oven
Begin by preheating your oven to 180°C (350°F). This ensures a consistent baking temperature for your Dark Chocolate Nut Squares. While the oven warms up, gather your ingredients and prepare your baking dish by lining it with parchment paper or using silicone molds for easy removal later.

Step 2: Combine the Dry Ingredients
In a spacious mixing bowl, combine the almonds, cashews, pecans, pumpkin seeds, chia seeds, and a pinch of salt. Stir together until everything is evenly distributed. The mixture should be colorful and crunchy, showcasing the variety of nuts and seeds. Ensure all dry ingredients are well-blended to create texture and flavor harmony.

Step 3: Add the Sweetness
Drizzle maple syrup over the nut mixture in the bowl, and using a sturdy spoon or spatula, mix everything thoroughly. The syrup should coat the nuts and seeds evenly, binding them together. This step takes about 2-3 minutes. You want the mixture to come together without being overly sticky, anticipating a delightful crunch in your Dark Chocolate Nut Squares.

Step 4: Press the Mixture into the Dish
Transfer the nut mixture into your prepared baking dish or silicone molds. Press it down firmly using your hands or the back of a spatula to create an even, compact layer. This helps the squares hold their shape once baked. Ensure the surface is smooth and level, which also enhances the overall presentation of your finished Dark Chocolate Nut Squares.

Step 5: Bake to Perfection
Place the baking dish in the preheated oven and bake for 20-25 minutes. Keep an eye on them; you’ll know they’re ready when the edges turn a golden brown, and the aroma of roasting nuts fills your kitchen. Avoid overbaking to maintain that characteristic crunch.

Step 6: Cool Completely
Once baked, remove your Dark Chocolate Nut Squares from the oven and let them cool in the pan for about 10-15 minutes. Afterward, transfer them to a wire rack to cool completely. This step is crucial, as they will firm up as they cool, making cutting easier without crumbling.

Step 7: Melt the Dark Chocolate
While the nut squares cool, melt your dark chocolate. You can do this in a microwave-safe bowl in short bursts (about 30 seconds), stirring in between until fully melted and smooth. Alternatively, use a double boiler on your stovetop. A silky and luscious chocolate drizzle will elevate the flavor of your Dark Chocolate Nut Squares beautifully.

Step 8: Drizzle or Dip
Once the nut squares have cooled completely, you can either drizzle or dip them into the melted dark chocolate. Use a fork or spoon to coat each square or simply dip the bottom into the chocolate for a luscious layer. Lay them on parchment paper to cool and set. The chocolate should have a glossy finish when fully set.

Step 9: Refrigerate to Set
Place the chocolate-coated squares in the refrigerator for about 30 minutes, allowing the chocolate to harden. This ensures clean separation when you cut them. The contrast of the firm chocolate with the crunchy nuts creates a delightful texture perfect for snacking, making your Dark Chocolate Nut Squares a true treat.

How to Store and Freeze Dark Chocolate Nut Squares

  • Room Temperature: Store your Dark Chocolate Nut Squares in an airtight container at room temperature for up to 1 week. Keep them in a cool, dry place away from direct sunlight to retain freshness.
  • Fridge: For extended freshness, you can place them in the refrigerator where they will last for up to 2 weeks. Just ensure they are sealed tightly to prevent moisture from affecting their texture.
  • Freezer: If you wish to keep them longer, freeze your nut squares in an airtight container for up to 3 months. Freeze in a single layer, and separate with parchment paper to prevent sticking.
  • Reheating: When ready to enjoy, thaw in the fridge for a few hours or at room temperature for 30 minutes before serving. Enjoy them cold or let them warm slightly for a delightful treat!

Dark Chocolate Nut Squares Variations

Feel free to explore these creative twists, and make these nut squares truly your own!

  • Nut Swap: Replace almonds with walnuts or hazelnuts for a new depth of flavor. Each nut brings its own character, enhancing the overall taste profile wonderfully.

  • Creamy Cashews: Use Brazil nuts instead of cashews for a richer, creamier texture. This substitution will add a decadent touch that you’ll adore in every bite!

  • Pecan Perfection: Swap out pecans for macadamia nuts to sneak in a divine buttery flavor. You’ll be amazed at how this small change can elevate your squares to an extraordinary level!

  • Sunflower Crunch: Use sunflower seeds instead of pumpkin seeds to enjoy a crunchier texture. The nutty flavor pairs beautifully with the dark chocolate, creating a delightful contrast.

  • Flax Seed Boost: Substitute chia seeds with flax seeds for a different source of omega-3 fatty acids. It’s an easy swap that doesn’t sacrifice any nutritional benefits!

  • Sweeten It Up: Use honey or agave syrup in place of maple syrup for alternative sweetness options. Each option adds its distinctive flavor to the squares, so find what resonates with your taste buds!

  • Add Some Heat: For a spicy kick, sprinkle in a dash of cayenne pepper or cinnamon into the nut mixture. This surprising touch will awaken your senses and create an exciting blend!

  • Fruitful Addition: Toss in some dried cranberries or raisins for a touch of natural sweetness. These fruity bites will not only enhance flavor but add a lovely chewiness, making each square a delightful adventure!

For even more inspiration, check out our Crunchy Nut Seed and Easy Coffee Chocolate Truffles recipes!

Expert Tips for Dark Chocolate Nut Squares

  • Even Coating: Ensure all nuts are evenly coated with maple syrup. This step is crucial for consistent flavor and texture throughout your Dark Chocolate Nut Squares.

  • Watch the Timer: Monitor your baking time closely; overbaking can lead to a less crunchy texture. Aim for a golden-brown finish to retain the perfect crunch.

  • Let It Cool: Allow the squares to cool completely before cutting. This step is essential for achieving clean edges and preventing crumbling.

  • Perfectly Melted Chocolate: When melting dark chocolate, avoid high heat. Instead, use short bursts in the microwave or a double boiler for a silky finish without burning.

  • Experiment with Flavors: Feel free to swap in different nuts and seeds based on what you have. Personalizing your Dark Chocolate Nut Squares can lead to delightful new flavor combinations!

What to Serve with Dark Chocolate Nut Squares?

Indulging in dark chocolate nut squares opens a world of complementary flavors and textures that can transform your snack time into a delightful experience.

  • Fresh Fruit Salad: Juicy berries or citrus fruits add brightness and a refreshing contrast, enhancing the richness of the squares.
  • Dairy-Free Ice Cream: A scoop of your favorite dairy-free ice cream pairs beautifully, creating a creamy balance to the crunchy squares.
  • Nutty Yogurt Parfait: Layer with coconut yogurt, fresh fruits, and sprinkle of granola for a nourishing and delicious breakfast or snack.
  • Herbal Tea: A warm cup of chamomile or mint tea provides a soothing contrast, perfect for winding down with a sweet treat.
  • Green Smoothie: A vibrant green smoothie with spinach and banana complements the rich flavors while packing in nutrients.
  • Almond Milk: Sip on chilled almond milk to enhance the nutty profile of the squares; it’s a refreshing and healthy option.
  • Chocolate-Dipped Strawberries: For an elevated dessert moment, serve chocolate-dipped strawberries alongside. Their sweetness beautifully complements the nuttiness.
  • Oatmeal Bowl: Serve with a bowl of oatmeal topped with sliced bananas and a drizzle of maple syrup for a wholesome breakfast option.
  • Coconut Chia Seed Pudding: This creamy, tropical treat adds a luscious texture alongside the crunch of the nut squares, enhancing your snack game.

Make Ahead Options

These Dark Chocolate Nut Squares are perfect for meal prep, allowing you to enjoy a delicious and healthy snack with ease! You can combine the dry ingredients (nuts, seeds, and salt) up to 3 days in advance and store them in an airtight container to maintain their freshness. Additionally, you can prepare the entire batch, bake the squares, and refrigerate them for up to 5 days before drizzling with chocolate. When you’re ready to serve, simply melt the chocolate and coat the squares as instructed. This prep-ahead strategy saves time during busy weeks while ensuring your squares remain just as delightful and crunchy!

Dark Chocolate Nut Squares Recipe FAQs

How do I choose the right nuts for my Dark Chocolate Nut Squares?
Absolutely! I recommend using fresh, raw or roasted nuts without added oils or flavors to enhance the taste. Look for nuts that are firm and free of dark spots or signs of rancidity. If you’re substituting, stick to similar-sized nuts to ensure even baking; for example, swap almonds for walnuts or pecans for macadamia nuts.

How should I store my Dark Chocolate Nut Squares for freshness?
Very good question! Store your Dark Chocolate Nut Squares in an airtight container at room temperature for up to 1 week. For longer-lasting freshness, keep them in the refrigerator for up to 2 weeks. Just be sure they’re sealed tightly to prevent moisture and maintain that delightful crunch.

Can I freeze Dark Chocolate Nut Squares? If so, how?
Of course! Freezing is a great option for longer storage. Place your cooled squares in an airtight container, separating layers with parchment paper to prevent sticking. They can be frozen for up to 3 months. When you’re ready to enjoy them, simply thaw in the fridge for a few hours or let them sit at room temperature for about 30 minutes.

What should I do if my nut squares are too crumbly?
If you find that your Dark Chocolate Nut Squares are crumbly, it might be due to not enough binding from the maple syrup. Next time, ensure the nut mixture is evenly coated with syrup, and consider adding an additional tablespoon if needed. Press the mixture firmly into the baking dish to help them hold together better during baking.

Are Dark Chocolate Nut Squares safe for people with nut allergies?
It’s good to be cautious! Since this recipe is primarily nut-based, it’s not suitable for individuals with nut allergies. However, you can create a completely nut-free version by substituting nuts with seeds like sunflower seeds or pumpkin seeds. Just ensure your toppings, like chocolate, are also free from cross-contamination.

Can I adjust the sweetness in my Dark Chocolate Nut Squares?
Absolutely! If you prefer a less sweet treat, you can reduce the maple syrup by a tablespoon or two without any compromise to texture. Furthermore, consider using dark chocolate that has a higher cacao content, which tends to be less sweet. Enjoy experimenting to find your perfect balance!

Dark Chocolate Nut Squares

Irresistible Dark Chocolate Nut Squares for Guilt-Free Snacking

These Dark Chocolate Nut Squares offer a deliciously satisfying crunch without guilt, making them perfect for health-conscious snacking.
Prep Time 15 minutes
Cook Time 25 minutes
Cooling Time 15 minutes
Total Time 55 minutes
Servings: 16 squares
Course: Dessert
Cuisine: Dairy-Free, Gluten-Free
Calories: 150

Ingredients
  

For the Base
  • 1 cup Almonds May substitute with walnuts or hazelnuts.
  • 1 cup Cashews Brazil nuts can be swapped for a different taste.
  • 1 cup Pecans Replace with macadamia nuts for added richness.
  • 1/2 cup Pumpkin seeds Sunflower seeds work as a substitute.
  • 1/4 cup Chia seeds Flax seeds can be used instead.
For the Sweetness
  • 1/2 cup Maple syrup Honey or agave syrup can be used as alternatives.
  • 1 pinch Salt A pinch of sea salt is recommended.
For the Topping
  • 1 cup Dark chocolate Use semi-sweet or milk chocolate as a sweeter alternative.

Equipment

  • mixing bowl
  • Baking Dish
  • parchment paper
  • Microwave

Method
 

Step-by-Step Instructions
  1. Preheat your oven to 180°C (350°F). Prepare your baking dish with parchment paper or silicone molds.
  2. Combine almonds, cashews, pecans, pumpkin seeds, chia seeds, and salt in a mixing bowl. Stir until evenly mixed.
  3. Drizzle maple syrup over the nut mixture and mix until everything is thoroughly combined.
  4. Press the mixture into the prepared baking dish to create an even layer.
  5. Bake for 20-25 minutes until edges turn golden brown. Keep an eye to avoid overbaking.
  6. Let the squares cool in the pan for 10-15 minutes, then transfer to a wire rack to cool completely.
  7. Melt dark chocolate in a microwave or double boiler until smooth.
  8. Once cooled, drizzle or dip the nut squares into the melted chocolate and lay on parchment paper to set.
  9. Refrigerate the chocolate-coated squares for about 30 minutes to allow the chocolate to harden.

Notes

Store in an airtight container at room temperature for up to 1 week, or refrigerate for up to 2 weeks. Freeze for longer storage.

Creamy Mushroom Pâté to Elevate Your Charcuterie Game

“Wow, you’ve got to try this!” I overheard a friend exclaim during a cozy gathering as she presented her latest homemade delight. That delight was none other than a luscious Mushroom Pâté, and it quickly won over everyone’s hearts. This creamy vegetarian spread isn’t just about satisfying taste buds; it transforms any charcuterie board into a showstopper. With its rich earthy flavors and smooth texture, it’s perfect for casual entertaining or special occasions alike. Plus, the best part—it comes together in a snap, allowing you more time to savor those precious moments with friends and family. So, whether you’re a seasoned home-chef or just starting out, this Mushroom Pâté promises to be your new go-to appetizer. Curiosity piqued? Let’s dive into how to create this irresistible treat!

Why is Mushroom Pâté a Must-Try?

Versatile: This Mushroom Pâté isn’t just a party appetizer; it’s an all-rounder! You can serve it as a spread or a dip, making it perfect for any occasion. Easy to Make: Even beginner cooks can whip this up in no time, with simple ingredients that come together effortlessly. Flavorful: The combination of earthy mushrooms, fresh herbs, and creamy cheese delivers a robust taste that will impress your guests. Perfect Pairing: Ideal for charcuterie boards alongside your favorite cheeses, olives, and crispy crostini. For more delicious ideas, check out this Savory Potato Mushroom recipe! Make-Ahead: Prepare ahead and store in the fridge, freeing you up for other preparations. This pâté truly elevates your entertaining game!

Mushroom Pâté Ingredients

For the Pâté

  • Cremini Mushrooms – These are the stars of the show that give the pâté its deep, savory flavor; feel free to swap with other mushrooms like portobello for a different twist.
  • Medium Onion – Adds a touch of sweetness and depth; chop finely for even blending into the mixture.
  • Unsalted Butter – Essential for achieving that creamy, rich texture; remember to use unsalted to control the overall taste.
  • Garlic – Infuses a lovely aroma and flavor; fresh garlic is ideal, but minced works too for convenience.
  • Dry Sherry – Imparts layers of flavor and a hint of sweetness; substitute with white wine or vegetable broth if you prefer an alcohol-free option.
  • Salt – A key ingredient for enhancing the flavor; adjust this to your taste and the types of mushrooms used.
  • Black Pepper – Offers a gentle heat; always opt for freshly cracked for the best flavor profile.
  • Cream Cheese – This gives the pâté its signature creamy texture; let it come to room temperature for easy mixing.
  • Eggs – Help bind the mixture; they are crucial for maintaining the structure of the pâté.
  • Chopped Spinach – Adds a nutritious boost and a pop of color; sautéed kale or Swiss chard can be used as a tasty alternative.
  • Chopped Walnuts – Introduces a delightful crunch and nutty flavor; feel free to use pecans or hazelnuts for a different taste.
  • Tarragon or Parsley – Fresh herbs elevate the flavor; tarragon provides a unique twist while parsley brings brightness.

Let your creativity be your guide and enjoy the delicious journey of making this Mushroom Pâté!

Step‑by‑Step Instructions for Creamy Vegetarian Mushroom Pâté

Step 1: Sauté Aromatics
In a large skillet, melt 2 tablespoons of unsalted butter over medium heat. Add 1 medium onion, finely chopped, and sauté for about 4-5 minutes until it turns translucent and fragrant, stirring occasionally to prevent browning. This flavorful base sets the stage for your creamy Mushroom Pâté.

Step 2: Cook Mushrooms and Garlic
Add 8 ounces of finely chopped cremini mushrooms and 2 cloves of minced garlic to the skillet. Cook for an additional 5 minutes, stirring frequently, until the mushrooms sweat and soften, releasing their earthy aroma. The mixture should appear tender and well-blended, ensuring a smooth texture in the final pâté.

Step 3: Add Sherry and Seasonings
Pour in ¼ cup of dry sherry along with ½ teaspoon of salt and ¼ teaspoon of freshly cracked black pepper. Continue to cook for about 10 minutes until the mushrooms are fully tender and the liquid has mostly evaporated. Remove from heat, and transfer the mixture to a bowl to cool slightly, enhancing the flavors for your Mushroom Pâté.

Step 4: Preheat Oven
While the mushroom mixture cools, preheat your oven to 350°F (175°C). This temperature is perfect for baking your pâté evenly, allowing it to set properly while maintaining a creamy texture. Have a loaf pan ready and lightly buttered for the next step.

Step 5: Prepare Creamy Base
In a mixing bowl, combine 8 ounces of room-temperature cream cheese, 2 beaten eggs, 1 cup of chopped spinach, and ½ cup of finely chopped walnuts. Mix well with a spatula until you achieve a homogenous blend, ensuring the cream cheese is fully incorporated for that characteristic creamy Mushroom Pâté texture.

Step 6: Combine Mixtures
Gently fold the cooled mushroom mixture into the cream cheese blend until evenly combined. The colors and textures should meld together, creating a lovely mix that captures the heartiness of mushrooms and the creaminess of the cheese, key components of your Mushroom Pâté.

Step 7: Transfer to Loaf Pan
Carefully pour the combined mixture into the prepared loaf pan, smoothing the top with a spatula for an even finish. Cover the pan tightly with aluminum foil to trap moisture during baking, which helps keep your Mushroom Pâté creamy and delightful.

Step 8: Create Bain-Marie
Place your loaf pan in a larger baking dish filled with boiling water, creating a bain-marie. This method allows for gentle cooking, ensuring that the Mushroom Pâté cooks evenly and stays moist. Bake in the preheated oven for 1 hour and 15 minutes until the center is set.

Step 9: Cool and Serve
Once baked, carefully remove the loaf pan from the water bath. Let it cool for at least 30 minutes at room temperature before chilling it in the refrigerator. This allows the pâté to firm up, making it easier to slice. Once chilled, invert on a plate and it’s ready to serve as a stunning addition to your charcuterie board.

Expert Tips for Mushroom Pâté

  • Finely Chopped Mushrooms: Ensure the mushrooms are finely chopped for a smooth texture in your Mushroom Pâté. A food processor can help achieve this easily.

  • Chill Thoroughly: Allow the pâté to chill completely in the fridge before slicing. This helps it firm up and makes for cleaner cuts.

  • Flavor Variation: Feel free to experiment with different mushroom varieties or herbs like thyme for unique flavor profiles.

  • Avoid Overcooking: Be careful not to overcook the mushroom mixture; it should be tender but not mushy to maintain a delicious, earthy flavor.

  • Presentation Matters: Serve with an array of accompaniments like sliced baguette, olives, and various cheeses for a beautifully styled charcuterie board that impresses your guests.

Make Ahead Options

These Mushroom Pâtés are perfect for meal prep enthusiasts looking to save time on busy weeknights! You can prepare the mushroom mixture (steps 1-3) up to 24 hours in advance, allowing the flavors to meld beautifully. Store it in an airtight container in the refrigerator to maintain freshness. The creamy base (steps 4-6) can also be prepped ahead and stored in a separate container for up to 3 days. When ready to finish, simply combine the cooled mushroom mixture and creamy base, pour it into the loaf pan, and bake as directed. This way, you’ll have a delightful homemade Mushroom Pâté ready to impress your guests with minimal effort!

How to Store and Freeze Mushroom Pâté

Fridge: Store your mushroom pâté tightly wrapped in plastic wrap or an airtight container for up to 5 days. This keeps it fresh and ready for any impromptu gatherings!

Freezer: You can freeze mushroom pâté for up to 3 months. Wrap it tightly in foil or use a freezer-safe container to maintain its creamy texture when thawed.

Thawing: To enjoy frozen mushroom pâté, transfer it to the fridge overnight to thaw, then let it come to room temperature before serving for the best flavor and texture.

Reheating: Although it’s best served chilled, you can gently reheat slices in the microwave for about 10-15 seconds, just to take the chill off, without losing its lovely creaminess.

Mushroom Pâté Variations & Substitutions

Customize your Mushroom Pâté to your heart’s delight and enjoy new flavors and textures that awaken the senses with every bite!

  • Mushroom Swap: Opt for shiitake or portobello mushrooms for a richer and more robust flavor.
  • Herbal Burst: Add fresh thyme or basil to your mixture for a fragrant twist that elevates the general taste.
  • Nut-Free: Replace chopped walnuts with sunflower seeds for a crunch without the nuts, perfectly accommodating allergies.
  • Dairy-Free: Use a vegan cream cheese alternative combined with cashew cream for a decadent dairy-free version that everyone will love.
  • Spicy Kick: Stir in a teaspoon of smoked paprika or red pepper flakes for an extra layer of heat, perfect for those who crave a little spice in their life.
  • Veggie Boost: Consider adding finely chopped roasted red peppers or sun-dried tomatoes for added sweetness and a pop of color.

If you’re feeling adventurous, why not experiment with some savory additions to create a unique twist? You might love the vibrant flavors of adding sautéed leeks or even a bit of truffle oil for a luxurious touch. Don’t forget to check out this mouthwatering Savory Potato Mushroom recipe for inspiration on other delicious uses of mushrooms!

What to Serve with Creamy Vegetarian Mushroom Pâté

Elevate your appetizer game by adding some delightful accompaniments that perfectly balance the rich, creamy flavors of this Mushroom Pâté.

  • Crispy Crostini: The perfect canvas for mushroom pâté, crunchy crostini contrasts beautifully with the smooth spread, enhancing each bite.
  • Savory Olives: A mix of green and black olives adds a briny punch that brightens the pâté’s earthiness while offering varying textures.
  • Tangy Goat Cheese: Soft, tangy goat cheese pairs well, providing a creamy layer of flavor that complements the mushroom’s depth without overpowering it.
  • Fresh Vegetable Crudités: Crisp veggies like carrots and bell peppers bring freshness and crunch, balancing the richness of the pâté for a well-rounded snack.
  • Herbed Flatbread: Lightly toasted flatbread adds a soft chewiness, perfect for scooping up the pâté and its vibrant accompaniments.
  • Sweet Fig Jam: A touch of sweetness from fig jam creates a delightful contrast, enhancing the dish’s flavor profile with its aromatic notes.
  • Sparkling White Wine: The effervescence cuts through the creaminess of the pâté, making each sip as refreshing as it is delightful.
  • Dark Chocolate Mousse: For dessert, serve slices of rich dark chocolate mousse to end the evening on a high note, offering a luxurious finish to your meal.

These pairings are sure to make your Mushroom Pâté shine at your next gathering!

Mushroom Pâté Recipe FAQs

What type of mushrooms should I use for the best flavor?
Absolutely! While cremini mushrooms are the star of this Mushroom Pâté, you can experiment with other varieties like portobello, shiitake, or even wild mushrooms. Each type brings its unique flavor profile, so feel free to mix and match based on your preference!

How should I store leftover Mushroom Pâté?
Very! To store your Mushroom Pâté, wrap it tightly in plastic wrap or place it in an airtight container. It will keep fresh in the refrigerator for up to 5 days, ensuring you have this creamy delight available for quick snacks or gatherings.

Can I freeze Mushroom Pâté for later use?
Absolutely! You can freeze your Mushroom Pâté for up to 3 months. To do this, wrap it tightly in aluminum foil or store it in a freezer-safe container. When you’re ready to enjoy it, transfer it to the refrigerator to thaw overnight for the best texture.

What if my Mushroom Pâté doesn’t set properly?
No worries! If your Mushroom Pâté doesn’t set, it could be due to undercooking or not chilling long enough. You can return it to the oven at 350°F (175°C) for an additional 15-20 minutes, then allow it to cool completely in the fridge. For the best results, ensure it’s tightly covered during the chilling process.

Is this Mushroom Pâté suitable for people with nut allergies?
Great question! If you or your guests have nut allergies, you can omit the chopped walnuts or substitute them with sunflower seeds, which provide a similar crunch without the nut concerns. Always double-check ingredient labels to be sure.

How long can I keep the pâté in the freezer?
You can keep your Mushroom Pâté in the freezer for up to 3 months. Make sure it’s well-wrapped to preserve its creamy texture. When you’re ready to enjoy it, thaw it in the fridge overnight, and then let it sit at room temperature for about 15-30 minutes before serving for the best flavor.

Mushroom Pâté

Creamy Mushroom Pâté to Elevate Your Charcuterie Game

This creamy Mushroom Pâté is a versatile, easy-to-make vegetarian spread that elevates any charcuterie board.
Prep Time 15 minutes
Cook Time 1 hour 15 minutes
Chilling Time 30 minutes
Total Time 2 hours
Servings: 8 slices
Course: Other
Cuisine: Vegetarian
Calories: 150

Ingredients
  

For the Pâté
  • 8 ounces Cremini Mushrooms Can swap with other mushrooms like portobello.
  • 1 medium Onion Finely chopped.
  • 2 tablespoons Unsalted Butter Use unsalted to control taste.
  • 2 cloves Garlic Minced.
  • 1/4 cup Dry Sherry Can substitute with white wine or vegetable broth.
  • 1/2 teaspoon Salt Adjust to taste.
  • 1/4 teaspoon Black Pepper Freshly cracked.
  • 8 ounces Cream Cheese Room temperature.
  • 1 cup Chopped Spinach Sautéed kale or Swiss chard can be substitutes.
  • 1/2 cup Chopped Walnuts Pecans or hazelnuts can be used.
  • Tarragon or Parsley Fresh Herbs Elevates flavor.

Equipment

  • large skillet
  • mixing bowl
  • Loaf pan
  • spatula
  • Baking Dish

Method
 

Step‑by‑Step Instructions
  1. In a large skillet, melt 2 tablespoons of unsalted butter over medium heat. Add 1 medium onion, finely chopped, and sauté for about 4-5 minutes until it turns translucent and fragrant.
  2. Add 8 ounces of finely chopped cremini mushrooms and 2 cloves of minced garlic to the skillet. Cook for an additional 5 minutes, stirring frequently.
  3. Pour in 1/4 cup of dry sherry along with 1/2 teaspoon of salt and 1/4 teaspoon of freshly cracked black pepper. Cook for about 10 minutes until the mushrooms are fully tender.
  4. While the mushroom mixture cools, preheat your oven to 350°F (175°C) and prepare a loaf pan.
  5. In a mixing bowl, combine 8 ounces of cream cheese, 2 beaten eggs, 1 cup of chopped spinach, and 1/2 cup of finely chopped walnuts. Mix well.
  6. Gently fold the cooled mushroom mixture into the cream cheese blend until evenly combined.
  7. Carefully pour the mixture into the prepared loaf pan, smoothing the top.
  8. Place your loaf pan in a larger baking dish filled with boiling water and bake in the preheated oven for 1 hour and 15 minutes.
  9. Let it cool for at least 30 minutes at room temperature before placing it in the refrigerator.

Notes

Store mushroom pâté tightly wrapped in plastic wrap or an airtight container for up to 5 days. Can freeze for up to 3 months.

Delicious Stuffed Fried Pickles That Will Wow Your Guests

As the aroma of sizzling batter fills the kitchen, my taste buds tingle with anticipation for these amazing Stuffed Fried Pickles. This mouthwatering appetizer beautifully marries crunchy dill pickles with creamy mozzarella and savory ham, creating the ultimate game day snack or a hit at any casual gathering. Not only are they easy to whip up, but they also offer a delightful twist on traditional pub food that ensures your friends will keep coming back for more. Plus, they can easily be modified with different cheeses or spices to suit your taste preferences—it’s like a little ticket to comfort and excitement in every bite! Ready to add some zing to your next party? Let’s dive into this crispy adventure!

Why Are Stuffed Fried Pickles Irresistible?

Irresistible Crunch: The golden, crispy exterior perfectly contrasts with a melty interior, delivering a textural delight that’s simply addictive.
Flavor Explosion: Combining salty ham and creamy mozzarella with tangy pickles guarantees a balance of flavors that caters to every palate.
Easy-to-Make: Don’t worry if you’re not a pro chef! This recipe is designed for home cooks of all skill levels, making it a breeze to whip up.
Versatile Treat: Feel free to switch ingredients and tailor the stuffing to your taste; consider herb cream cheese for a fresh twist!
Crowd-Pleaser: Perfect for game days and gatherings, these bites are sure to be the stars of your appetizer table and will have everyone coming back for seconds!
For more delicious snack ideas, check out our post on Beer Battered Fried Stuffed Pickles that takes this classic to new heights!

Stuffed Fried Pickles Ingredients

Here’s everything you need to whip up these amazing Stuffed Fried Pickles!

For the Pickles
Dill Pickles – Choose large, firm pickles for easier stuffing and a satisfying crunch.

For the Filling
Mozzarella Cheese – This creamy cheese is the highlight; substitute with cheddar for extra flavor.
Ham – Adds savory depth; turkey can be a lighter alternative.

For the Coating
All-Purpose Flour – Essential for structure; a key player in achieving crispiness.
Eggs (beaten) – Ensures everything sticks together nicely; don’t skip this step!
Panko Breadcrumbs – Produces a light and crispy golden crust; you can use traditional breadcrumbs if preferred.

For Frying
Oil (for frying) – Choose vegetable or canola oil for high smoke points and great frying results.

For Dipping
Spicy Mayonnaise – Gives these pickles a delightful kick; ranch or aioli can be fun alternatives.

Step‑by‑Step Instructions for Stuffed Fried Pickles

Step 1: Prepare the Pickles
Start by slicing off the ends of each large dill pickle, using a sharp knife for precision. Then, carefully hollow out the inside with an apple corer or a small spoon to create enough space for the delicious stuffing. This step is crucial for the perfect Stuffed Fried Pickles, ensuring each bite has the right balance of crunch and flavor.

Step 2: Assemble the Filling
Take a slice of mozzarella cheese and roll it tightly with a slice of ham, forming a compact bundle. Gently stuff this cheesy ham roll into the hollowed pickles, pressing down lightly to ensure they fit snugly. Once filled, slice these stuffed pickles into ¼-inch thick rounds, making them easy to coat and ready for frying.

Step 3: Coat the Pickles
Prepare three separate shallow dishes: one with all-purpose flour, another with beaten eggs, and the last with panko breadcrumbs. Take each stuffed pickle slice and first dip it into the flour, ensuring it’s fully coated. Next, move it to the egg wash, allowing the excess to drip off, and finally, coat it with panko until it’s evenly covered. This crisp coating will make for irresistible Stuffed Fried Pickles.

Step 4: Heat the Oil
In a large, deep skillet or frying pan, pour enough vegetable or canola oil to reach about 2 inches in depth. Heat the oil over medium-high heat until it reaches 375°F (190°C); you can test this by dropping a small piece of bread in the oil—it should sizzle and turn golden brown. Proper oil temperature is key for achieving that perfect crispy texture.

Step 5: Fry the Pickles
Carefully place a few coated pickle slices into the hot oil without overcrowding, allowing them to fry for about 1–2 minutes. Watch for a golden-brown color on the exterior; this indicates they are perfectly crispy on the outside while remaining cheesy and melty on the inside. Use a slotted spoon to flip them halfway through frying for even cooking.

Step 6: Drain and Serve
Once the pickle slices are golden brown and crispy, remove them from the oil and place them on a plate lined with paper towels to drain any excess oil. This helps keep your Stuffed Fried Pickles from becoming soggy. Serve them hot, paired with spicy mayonnaise or your favorite dipping sauce to enhance the flavorful crunch.

What to Serve with Stuffed Fried Pickles

As you savor the crispy, cheesy goodness of stuffed fried pickles, it’s time to consider delicious additions that elevate your snack experience.

  • Buffalo Chicken Wings: The spicy, tangy flavors of buffalo chicken wings create a perfect balance alongside the tang of pickles, making every bite intriguing. Imagine enjoying the heat of the wings paired with the cool, creamy richness of the pickles—pure bliss!

  • Fresh Garden Salad: Packed with crisp vegetables and a light vinaigrette, a garden salad adds a refreshing contrast to the rich and savory stuffed fried pickles. Each bite of salad offers a fresh crunch that brightens the palate delightfully.

  • Mini Sliders: Juicy beef or turkey sliders topped with melted cheese and zesty condiments make for a hearty companion. The size is perfect for pairing alongside each pickle slice, creating a fun and interactive plate for your guests.

  • Cheesy Garlic Bread: Warm, gooey, cheesy garlic bread lends a comforting element to your spread. The richness from the cheese and butter beautifully complements the zesty notes of the pickles. Plus, it’s great for dipping into any leftover mayonnaise!

  • Crispy French Fries: A nostalgic classic, crispy fries seasoned with salt and served with a side of ketchup or aioli provide a beloved side option. Their satisfying crunch mirrors the fried pickles’ texture, creating a fun and flavorful combo.

  • Craft Beer: A refreshing craft beer, especially an IPA or pale ale, can enhance the flavor of your stuffed fried pickles, cutting through the richness and balancing the snack well. The carbonation adds a delightful note to each bite!

  • Chocolate Chip Cookies: For a sweet finish, consider serving warm chocolate chip cookies. The rich, gooey chocolate complements the tangy and savory flavor of the pickles, offering a delightful contrast that rounds out your meal splendidly.

  • Spicy Nachos: Layered with cheese, jalapeños, and served with a side of salsa, spicy nachos can enhance your snack time. The bold flavors provide a perfect kick alongside the unique tang of fried pickles, keeping the excitement alive on your palate!

Storage Tips for Stuffed Fried Pickles

  • Fridge: Store leftover Stuffed Fried Pickles in an airtight container in the fridge for up to 2 days to maintain their flavor and texture.

  • Freezer: For longer storage, freeze the un-fried stuffed pickles on a baking sheet until solid, then transfer them to a freezer-safe bag for up to 3 months.

  • Reheating: To restore crispiness, reheat fried pickles in the oven at 350°F (175°C) for about 10 minutes before serving. Avoid microwaving as it may result in sogginess.

  • Serving Fresh: While leftovers are tasty, Stuffed Fried Pickles are best enjoyed hot and fresh to fully appreciate their delightful crunch!

Make Ahead Options

Preparing Stuffed Fried Pickles ahead of time is a fantastic way to save time and ensure you’re ready for your next gathering! You can hollow out the pickles and assemble the cheese and ham filling up to 24 hours in advance. Simply store the stuffed pickles in an airtight container in the refrigerator to maintain their freshness. When you’re ready to fry, take the pickles out, coat them in flour, egg, and panko, and fry them for that golden, crispy exterior. This method not only streamlines your cooking process but ensures your appetizers are just as delicious when served fresh!

Stuffed Fried Pickles: Creative Variations

Feel free to tailor your Stuffed Fried Pickles and make them truly your own with these fun twists and substitutions!

  • Cheese Swap: Replace mozzarella with cheddar or pepper jack for a sharper flavor adventure. These changes add a delightful kick that’ll surprise your taste buds!

  • Herbed Cream Cheese: Substitute traditional cheese with herb-infused cream cheese for an elegant touch. It’s like a flavor explosion with each bite, making them perfect for fancy gatherings.

  • Jalapeño Boost: Add diced jalapeños to the stuffing for a spicy kick! This variation brings out a burst of heat that balances beautifully with pickles’ tang.

  • Veggie Delight: Try stuffing with a mix of spinach and feta for a vegetarian option. This delightful twist offers a Mediterranean flair that’s simply irresistible!

  • Bacon Add-In: Crumble crispy bacon bits into your filling for a smoky flavor that takes these bites up a notch. Just imagine the delicious aroma filling your kitchen!

  • Beer Battered Version: Take a cue from pub classics and dip the pickles in a beer batter before frying. This creates an extra crispy shell – perfect for a cozy game night!

  • Sweet and Spicy: Mix in a drizzle of honey or sriracha into your dipping sauce. This adds a delightful contrast to the salty and savory flavors in your pickles.

  • Baked Option: For a healthier twist, bake your stuffed pickles at 425°F for 15-20 minutes instead of frying. They will still be delicious with plenty of crunch, keeping you guilt-free!

For more inspiration, you might love trying our take on the delightful Fried Cheesy Pickles — a twist that’s sure to excite your palate!

Expert Tips for Stuffed Fried Pickles

  • Pickle Selection: Choose large, firm dill pickles for easier stuffing and a satisfying crunch. Smaller or softer pickles may lead to a mushy texture.
  • Oil Temperature: Always ensure your oil reaches 375°F (190°C) before frying. If the oil is not hot enough, your Stuffed Fried Pickles will absorb too much oil and become greasy.
  • Don’t Overcrowd: Avoid placing too many pickle slices in the oil at once to maintain the temperature. Overcrowding can lead to uneven cooking and a soggy coating.
  • Double Coating Option: For an extra crispy texture, consider double-coating your pickles by repeating the flour, egg, and panko steps before frying.
  • Baking Alternative: If you’re looking for a healthier twist, try baking your Stuffed Fried Pickles at 425°F for 15-20 minutes instead of frying.

Stuffed Fried Pickles Recipe FAQs

How do I choose the best pickles for stuffing?
Absolutely! Look for large, firm dill pickles, as these will hold their shape better and provide that satisfying crunch you’re after. When pickles are too soft or small, they can be more challenging to hollow out and stuff without breaking, leading to less than ideal results.

How long can I store stuffed fried pickles in the fridge?
I often recommend enjoying your Stuffed Fried Pickles fresh, but if you have leftovers, store them in an airtight container in the fridge for up to 2 days. Be sure to reheat them in the oven, so they regain their crispy texture before serving!

Can I freeze stuffed fried pickles? If so, how?
Yes, you can! To freeze your un-fried stuffed pickles, place them on a baking sheet in a single layer and freeze until solid. Afterward, transfer them to a freezer-safe bag or container. They can be kept in the freezer for up to 3 months. When you’re ready to fry them, there’s no need to thaw; simply fry them for a couple of extra minutes!

What should I do if my fried pickles turn out soggy or greasy?
The main culprits are improper oil temperature and overcrowding in the frying pan. Ensure your oil reaches 375°F (190°C) before starting; using a thermometer helps! Fry in small batches to keep the temperature consistent. If they still come out greasy, you can also try doubling the coating process or consider baking them instead for a lighter alternative.

Are there any dietary considerations for using this recipe?
Definitely! If you’re concerned about allergies, be aware that this recipe contains gluten and dairy from the flour and cheese. For gluten-free options, you can substitute the all-purpose flour with a gluten-free blend and use gluten-free breadcrumbs. I suggest checking ingredients if you’re serving friends with dietary restrictions, just to be safe.

Can I bake these stuffed fried pickles instead of frying them?
Very! For a healthier twist, baking is a great alternative. Preheat your oven to 425°F (220°C) and arrange the coated pickles on a parchment-lined baking sheet. Bake for 15-20 minutes or until they turn golden brown. Just keep an eye on them to ensure they get that crunchy texture you love!

Stuffed Fried Pickles

Delicious Stuffed Fried Pickles That Will Wow Your Guests

Enjoy these Stuffed Fried Pickles, a crunchy and flavorful appetizer perfect for gatherings.
Prep Time 20 minutes
Cook Time 10 minutes
Total Time 30 minutes
Servings: 4 servings
Course: Other
Cuisine: American
Calories: 250

Ingredients
  

For the Pickles
  • 4 large Dill Pickles Choose large, firm pickles for easier stuffing
For the Filling
  • 8 ounces Mozzarella Cheese Substitute with cheddar for extra flavor
  • 4 slices Ham Adds savory depth; turkey can be used as an alternative
For the Coating
  • 1 cup All-Purpose Flour Essential for structure
  • 2 large Eggs (beaten) Ensures everything sticks together nicely
  • 1 cup Panko Breadcrumbs Produces a light and crispy crust
For Frying
  • 2 inches Oil Choose vegetable or canola oil for frying
For Dipping
  • 1/2 cup Spicy Mayonnaise Can use ranch or aioli as alternatives

Equipment

  • deep skillet or frying pan

Method
 

Step-by-Step Instructions
  1. Slice off the ends of each large dill pickle, then carefully hollow out the inside to create space for stuffing.
  2. Roll a slice of mozzarella cheese tightly with a slice of ham, and stuff it into the hollowed pickles.
  3. Prepare three dishes with flour, beaten eggs, and panko breadcrumbs, then coat each stuffed pickle slice.
  4. Heat oil in a skillet to 375°F (190°C). Test with a piece of bread; it should sizzle.
  5. Fry coated pickle slices for about 1–2 minutes until golden brown, flipping halfway through.
  6. Remove from oil and drain on paper towels to keep crispy. Serve hot with spicy mayonnaise.

Notes

For extra crispy pickles, consider double-coating and frying in batches to maintain oil temperature.

Irresistible Chocolate Croissant Breakfast Bake Delight

As I sat in the kitchen this morning, the aroma of warm, flaky croissants filled the air, instantly transporting me to a quaint Parisian café. This Decadent Chocolate Croissant Breakfast Bake is a delightful way to start your day, merging the elegance of pastries with the heartiness of a comforting casserole. The best part? It’s incredibly easy to make—perfect for busy weekends or unexpected guests. Not only does this breakfast bake offer a delicious indulgence that turns a simple meal into an occasion, but it also allows you to whip up a crowd-pleasing dish that everyone will adore. Ready to transform breakfast into a sweet celebration? Let’s dive into this delightful recipe!

Why is this breakfast bake irresistible?

Decadent Layers: This Chocolate Croissant Breakfast Bake features buttery, flaky croissants soaked in a rich custard, ensuring every bite is a delight.

Simple Preparation: With easy-to-source ingredients and minimal prep time, you’ll have a stunning dish hot from the oven that’s perfect for brunch or special occasions.

Crowd-Pleasing Flavor: Packed with melted chocolate goodness, this bake is sure to impress family and guests alike—just like our Heavenly No-Bake Cake.

Customizable Options: Tailor the recipe to your liking by adding different chocolate types or mix-ins such as fruits and nuts to keep things fresh and exciting!

Make-Ahead Friendly: Prep it the night before for a hassle-free morning, allowing you to savor every moment—just like with our Nutty Chocolate Date Cookies.

Indulgent Treat: This dish embodies comfort food at its finest, turning breakfast into a real celebration that will leave everyone smiling!

Chocolate Croissant Breakfast Bake Ingredients

For the Bake

  • Croissants – Use day-old croissants for optimal absorption of the custard.
  • Semi-Sweet Chocolate Chips – Provides melted richness and sweetness; substitute with dark chocolate for a more intense flavor.
  • Whole Milk – Creates a creamy custard base; can be swapped with almond milk for a lighter version.
  • Eggs – Binds the custard, ensuring a cohesive texture; no egg substitute is recommended due to structural necessity.
  • Granulated Sugar – Adds sweetness to the custard; you can reduce the amount for a less sweet dish or substitute with coconut sugar for a healthier option.
  • Vanilla Extract – Enhances overall flavor; consider using vanilla bean for a more complex taste.
  • Salt – Balances sweetness and enhances flavors.

For the Topping

  • Powdered Sugar – Dusting for serving; optional but recommended for presentation.
  • Fresh Berries or Whipped Cream – Optional toppings to complement the rich flavors and add freshness.

This delightful Chocolate Croissant Breakfast Bake turns any morning into a special occasion!

Step‑by‑Step Instructions for Chocolate Croissant Breakfast Bake

Step 1: Preheat Oven
Begin by preheating your oven to 350°F (175°C). While the oven warms up, take a moment to lightly grease a 9×13-inch baking dish with cooking spray or butter, ensuring a non-stick surface for your decadent chocolate croissant breakfast bake.

Step 2: Layer Croissants and Chocolate
Next, cut your day-old croissants into bite-sized pieces and evenly arrange them in the greased baking dish. Sprinkle semi-sweet chocolate chips generously throughout the layers, allowing the melted chocolate to intersperse with the flaky croissant pieces, creating a delightful surprise in every bite.

Step 3: Make Custard
In a large mixing bowl, whisk together whole milk, eggs, granulated sugar, vanilla extract, and a pinch of salt. Mix until the ingredients are thoroughly combined and the sugar dissolves, creating a creamy custard base. This luscious blend will infuse the croissants with rich flavor.

Step 4: Soak Croissants
Carefully pour the custard mixture over the arranged croissants, making sure to cover them evenly. Employ a gentle touch as you press down each piece slightly with a spatula to ensure they soak up the custard. This step is crucial to achieving a perfectly moist chocolate croissant breakfast bake.

Step 5: Let Sit
Allow the assembled dish to sit for 10-15 minutes. This soaking time is optional, but it enhances the absorption of the custard into the croissants, resulting in a more flavorful and cohesive texture throughout the bake.

Step 6: Bake
Place the dish in the preheated oven and bake uncovered for 45–50 minutes. Keep a watchful eye on the bake; it’s ready when the top is golden brown and a toothpick inserted in the center comes out with only a few moist crumbs. If necessary, tent the dish with foil toward the end to prevent over-browning.

Step 7: Serve
Once baked to perfection, remove the chocolate croissant breakfast bake from the oven and let it cool for a few minutes. Before serving, dust the top with powdered sugar for a charming finish. This bake is best enjoyed warm, garnished with fresh berries or a dollop of whipped cream for an indulgent touch!

Storage Tips for Chocolate Croissant Breakfast Bake

Room Temperature: Store leftovers at room temperature for up to 1 day, covered with a clean kitchen towel to maintain texture.

Fridge: For longer storage, refrigerate in an airtight container for up to 3 days. This helps retain its rich flavors while preventing spoilage.

Freezer: If you want to extend the life of your chocolate croissant breakfast bake, wrap individual portions snugly in plastic wrap and foil, then freeze for up to 2 months.

Reheating: Reheat individual slices in the microwave for about 20-30 seconds or in the oven at 350°F (175°C) for 10-15 minutes until warmed through. Enjoy this indulgent treat fresh!

Expert Tips for Chocolate Croissant Breakfast Bake

  • Use Day-Old Croissants: They absorb custard better without getting too soggy. Fresh croissants may result in a less cohesive bake.

  • Allow Soak Time: Don’t skip the 10-15 minutes for the croissants to soak in the custard; it’s essential for even texture and maximum flavor.

  • Watch the Bake Time: Keep an eye on the dish as it bakes. The golden top is your cue that it’s done—avoid pulling it out too early to prevent a runny texture.

  • Customize Mix-Ins: Experiment by adding nuts, different chocolate types, or fruit like bananas for a unique twist on your chocolate croissant breakfast bake.

  • Serve Warm: Enjoy the best flavors and textures when served fresh from the oven, topped with powdered sugar and your favorite fruits or cream.

Chocolate Croissant Breakfast Bake Variations

Feel free to get creative with this recipe and elevate your breakfast bake experience!

  • Mocha Twist: Add 1 tablespoon of espresso powder to the custard for an invigorating coffee flavor that complements the chocolate beautifully. The rich mocha notes will awaken your tastebuds and bring a lovely depth to this dish.

  • Nutty Crunch: Toss in a half cup of chopped walnuts or pecans alongside the chocolate chips for a satisfying crunch. This delightful addition will give your bake a wonderful texture contrast while enhancing the flavor profile.

  • Banana Bliss: Layer in slices of ripe bananas before pouring the custard over the croissants. This fruity twist adds a sweet and comforting touch, reminiscent of a beloved banana cream dessert.

  • Berry Burst: Mix in a cup of fresh raspberries or blueberries for a pop of color and tartness! These berries will bring a refreshing balance to the richness of the chocolate, making each bite even more delightful.

  • Dairy-Free Delight: Substitute whole milk with almond or oat milk, and use dairy-free chocolate chips for a delicious, lactose-free option. This variation retains the indulgence while accommodating dietary preferences.

  • Coconut Cream: Add a sprinkle of shredded coconut to the top before baking for a tropical flair. The coconut will toast nicely, adding a hint of sweetness and chewiness that pairs wonderfully with chocolate.

  • Spicy Kick: Incorporate a pinch of cayenne pepper or cinnamon in the custard for a surprising heat that enhances the chocolate flavor. This unique twist will intrigue and excite your guests, leaving them wanting more!

  • Caramel Drizzle: Drizzle caramel sauce over the top just before serving for an added layer of sweetness. This luscious topping will elevate your Chocolate Croissant Breakfast Bake, making it a truly indulgent treat.

With these variations, you can easily put your own spin on the classic Chocolate Croissant Breakfast Bake. And if you’re looking for more delicious recipes, check out our Vegetable Bake with Cheese and Cream for a savory option, or indulge in Coconut Chocolate Rolls for another sweet delight!

Make Ahead Options

These Chocolate Croissant Breakfast Bakes are perfect for busy mornings and can be prepped in advance to save you time! You can assemble the entire dish up to 24 hours ahead of time; simply complete steps 1 to 5 before covering it tightly with plastic wrap and refrigerating. This method allows the croissants to absorb the custard overnight, infusing the dish with delicious flavor. When you’re ready to enjoy, just take it out of the fridge and bake as directed in step 6, adding an extra 5-10 minutes to the baking time if it’s still cool. This way, you’ll have a warm, indulgent breakfast with minimal morning effort—all while maintaining that rich, delightful taste!

What to Serve with Decadent Chocolate Croissant Breakfast Bake

Transform your breakfast bake into a full feast with these delicious pairings that will delight every palate.

  • Fresh Fruit Salad: A vibrant mix of seasonal berries and citrus adds a refreshing contrast to the rich chocolate flavors.
  • Creamy Scrambled Eggs: Light and fluffy, these eggs provide a perfect savory element that balances the sweetness of the bake.
  • Caramelized Bacon: The sweet, smoky flavors of caramelized bacon create a savory-sweet harmony that makes every bite irresistible.
  • Strong Coffee: A robust cup of coffee elevates the whole experience, enhancing the chocolate notes while complementing the pastry’s richness.
  • Yogurt Parfait: Layered with granola and fresh fruit, this creamy parfait adds texture and balance to your indulgent breakfast.
  • Vanilla Ice Cream: For an indulgent twist, serve warm slices with a scoop of creamy vanilla ice cream for a blissful dessert option.
  • Maple Syrup Drizzle: A light drizzle of maple syrup adds a touch of sweetness and enhances the overall flavor experience.
  • Chai Latte: The warm spices of a chai latte bring a comforting warmth to your breakfast table, completing the meal beautifully.

Chocolate Croissant Breakfast Bake Recipe FAQs

What type of croissants should I use?
I recommend using day-old croissants for the best texture! They absorb the custard beautifully without becoming too soggy, giving you that ideal creamy texture you crave. Fresh croissants can be a bit too flaky and might not hold together as well.

How do I store leftovers?
Store your Chocolate Croissant Breakfast Bake at room temperature, covered with a clean kitchen towel, for up to 1 day. For longer freshness, transfer it to an airtight container and refrigerate for up to 3 days. This way, you can enjoy those delicious flavors even after your first serving!

Can I freeze this breakfast bake?
Absolutely! To freeze, wrap individual portions snugly in plastic wrap followed by foil to prevent freezer burn. You can enjoy it for up to 2 months. Just remember to label it with the date for easy reference!

What if my bake turns out too dry?
If your chocolate croissant breakfast bake comes out dry, it’s likely due to overbaking. I suggest keeping an eye on it during the last few minutes; when the top is golden brown and a toothpick comes out with only a few moist crumbs, it’s just perfect! If you’d like, you can add a little extra custard mixture before baking to help with moisture.

Is this recipe suitable for dietary restrictions?
The recipe contains dairy and gluten, so it’s not recommended for those with allergies or strict dietary needs without modifications. You could try substituting whole milk with almond milk and using gluten-free croissants, but keep in mind that the texture may vary slightly. Always check the ingredient labels to ensure safety for any allergies.

Can I prepare it the night before?
Yes, you can make this Chocolate Croissant Breakfast Bake the night before! Assemble everything in the baking dish and cover it tightly. Just pop it in the oven the next morning, and you’ll have a warm, indulgent breakfast ready in no time!

Chocolate Croissant Breakfast Bake

Irresistible Chocolate Croissant Breakfast Bake Delight

This Chocolate Croissant Breakfast Bake combines buttery croissants with rich chocolate, making it an ideal breakfast treat for special occasions.
Prep Time 15 minutes
Cook Time 50 minutes
Soaking Time 15 minutes
Total Time 1 hour 20 minutes
Servings: 8 slices
Course: Breakfast
Cuisine: French
Calories: 320

Ingredients
  

For the Bake
  • 6 pieces Croissants Use day-old croissants for optimal absorption of the custard.
  • 1 cup Semi-Sweet Chocolate Chips Substitute with dark chocolate for a more intense flavor.
  • 2 cups Whole Milk Can be swapped with almond milk for a lighter version.
  • 4 pieces Eggs No egg substitute recommended due to structural necessity.
  • 1/2 cup Granulated Sugar Can reduce for a less sweet dish or substitute with coconut sugar.
  • 1 teaspoon Vanilla Extract Consider using vanilla bean for a more complex taste.
  • 1 pinch Salt Balances sweetness and enhances flavors.
For the Topping
  • 1/4 cup Powdered Sugar Optional but recommended for presentation.
  • Fresh Berries or Whipped Cream Optional toppings to complement the rich flavors.

Equipment

  • 9x13-inch baking dish
  • mixing bowl
  • whisk

Method
 

Step‑by‑Step Instructions
  1. Preheat your oven to 350°F (175°C) and lightly grease a 9×13-inch baking dish.
  2. Cut day-old croissants into bite-sized pieces and arrange them in the greased baking dish. Sprinkle chocolate chips throughout.
  3. In a large mixing bowl, whisk together milk, eggs, sugar, vanilla extract, and salt until entirely combined.
  4. Pour the custard mixture over the croissants, ensuring even coverage, and press down gently to soak.
  5. Allow the dish to sit for 10-15 minutes to enhance flavor absorption.
  6. Place the dish in the preheated oven and bake uncovered for 45-50 minutes until golden brown.
  7. Let the bake cool for a few minutes, then dust with powdered sugar and serve warm.

Notes

This Chocolate Croissant Breakfast Bake is perfect for brunch or special occasions. Consider adding nuts or fruits for variations.

Lemon Raspberry Madeleines That Melt in Your Mouth

On a sunny afternoon, I found myself in the kitchen, craving something special that would brighten my day. That’s when I stumbled upon the idea of Lemon Raspberry Madeleines. These delicate French treats perfectly combine the zesty punch of lemon with the sweet burst of fresh raspberries, creating a dessert that is light, buttery, and utterly irresistible. Not only are they a delightful addition to your afternoon tea, but they also come together in no time, making them a quick and easy option for when you want to indulge without a fuss. Imagine savoring one of these airy delights, each bite melting in your mouth as the flavors dance together—pure bliss! Ready to transform your baking routine and impress your friends? Let’s dive into this recipe!

Why are Lemon Raspberry Madeleines so special?

Light and Airy: These madeleines are a heavenly treat, boasting a texture that’s both delicate and fluffy, making them perfect for any occasion.

Bursting with Flavor: The sweet raspberries paired with zesty lemon creates a delightful flavor explosion that will awaken your taste buds.

Effortless Elegance: Impress your guests with this sophisticated dessert that comes together in a breeze—ideal for a quick afternoon tea or a spontaneous gathering.

Versatile Delight: Enjoy these madeleines with a cup of tea, or serve alongside a scoop of vanilla ice cream for an indulgent dessert experience.

Quick to Prepare: With simple ingredients and minimal prep time, you can whip up a batch in no time, allowing you to focus on what truly matters—enjoying delicious moments with loved ones!

For a complementary afternoon treat, consider pairing these madeleines with a refreshing Cabbage Cucumber Salad.

Lemon Raspberry Madeleines Ingredients

For the Batter

  • All-purpose flour – Provides structure to the madeleines; for gluten-free options, substitute with a gluten-free flour blend.
  • Baking powder – Ensures the madeleines rise perfectly, keeping them light and airy.
  • Salt – Enhances flavor; consider using sea salt for a touch of sophistication.
  • Large eggs – Essential for binding and moisture; don’t forget to let them reach room temperature for easier mixing.
  • Granulated sugar – Sweetens the batter while contributing to its texture; brown sugar can add a caramel note.
  • Vanilla extract – Infuses a warm aroma; almond extract makes a delightful alternative.
  • Lemon zest – Adds a vibrant citrus flavor; you can increase the zest for a stronger lemon kick.
  • Fresh lemon juice – Brightens the flavor profile; in a pinch, bottled lemon juice works too.
  • Unsalted butter (melted) – Gives richness and moisture; for a lighter version, swap half with Greek yogurt.
  • Fresh raspberries (finely chopped) – Provides sweetness and stunning color; avoid frozen ones to maintain texture.
  • Powdered sugar – Perfect for dusting, adding an enchanting finish to your madeleines.

Experience the delight of Lemon Raspberry Madeleines with these simple yet crucial ingredients that make them shine!

Step‑by‑Step Instructions for Lemon Raspberry Madeleines

Step 1: Preheat and Prepare the Pan
Begin by preheating your oven to 375°F (190°C) to get it just right for baking. While the oven warms up, generously grease your madeleine pan with melted butter or non-stick spray. This will ensure that your Lemon Raspberry Madeleines come out easily and maintain their beautiful shell shape.

Step 2: Combine Dry Ingredients
In a medium bowl, whisk together 1 cup of all-purpose flour, 1 teaspoon of baking powder, and a pinch of salt until well blended. This dry mixture forms the foundation of your madeleines. Set it aside as you prepare the wet ingredients, ensuring all your components are ready to make the batter effortlessly.

Step 3: Beat Eggs and Sugar
In a separate large bowl, beat together 2 large eggs and ¾ cup of granulated sugar using an electric mixer. Continue mixing for about 3-4 minutes, or until the mixture becomes pale, thick, and ribbons softly when lifted. This step infuses air into the batter and is crucial for creating those airy Lemon Raspberry Madeleines.

Step 4: Add Flavorful Ingredients
Gently stir in 1 teaspoon of vanilla extract, 1 tablespoon of lemon zest, and 2 tablespoons of fresh lemon juice into the egg mixture. The aromas of lemon and vanilla will fill your kitchen, adding a wonderful depth to the flavor profile of your madeleines.

Step 5: Incorporate Dry Ingredients
Now, carefully fold the dry ingredients into the wet mixture using a spatula. Be gentle to avoid overmixing—stop as soon as the flour is just incorporated. This folding technique is important for maintaining the light texture that Lemon Raspberry Madeleines are known for.

Step 6: Fold in Melted Butter
Gradually pour in ½ cup of melted unsalted butter while gently folding the batter. You want to ensure it’s mixed thoroughly without losing the airiness. This butter brings richness to your madeleines, enhancing their light yet indulgent character.

Step 7: Add Raspberries
Gently fold in ½ cup of finely chopped fresh raspberries into the batter. Take care not to smash the raspberries too much to keep those lovely bursts of flavor intact. Each madeleine will have a delectable, fruity surprise waiting inside!

Step 8: Fill the Molds
Spoon the batter into the prepared madeleine molds, filling each one about ¾ full. This allows room for the madeleines to rise beautifully in the oven. Make sure the batter is evenly distributed for consistent baking and that classic madeleine shape.

Step 9: Bake Perfectly
Place the filled molds in the preheated oven and bake for 10-12 minutes. You’ll know they are ready when the edges turn golden and they spring back when lightly pressed. Enjoy the aromatic experience wafting from the oven during this baking time!

Step 10: Cool and Dust
Remove the madeleines from the oven and let them cool in the pan for about 2 minutes. Carefully transfer them to a wire rack to cool completely. Once cooled, dust the madeleines with powdered sugar to give them a charming finish, ready to serve alongside your favorite tea!

Make Ahead Options

These Lemon Raspberry Madeleines are perfect for busy home cooks looking to save time without sacrificing flavor! You can prepare the batter up to 24 hours in advance by mixing all the wet ingredients and dry ingredients separately and then refrigerating them. For best results, chill the batter for at least 30 minutes before baking, as this enhances fluffiness and shape. Fresh raspberries can also be chopped ahead of time to streamline your prep process. When you’re ready to bake, simply allow the batter to come to room temperature, fold in the raspberries, and fill the molds before baking. With this make-ahead strategy, you’ll be enjoying delicious, homemade treats with minimal effort!

Expert Tips for Lemon Raspberry Madeleines

  • Chill the Batter: Refrigerate your batter for at least 30 minutes before baking. This helps develop a firmer shape and enhances fluffiness in your madeleines.

  • Don’t Overmix: Gently fold the ingredients together to avoid deflating the batter. Overmixing can lead to denser, less airy Lemon Raspberry Madeleines.

  • Fresh is Best: Always use fresh raspberries for the best texture and flavor. Frozen raspberries release excess moisture, which can impact the final product.

  • Monitor Baking Time: Keep an eye on your madeleines as they bake. Each oven is different, and you want them perfectly golden without overbaking.

  • Use Room Temperature Eggs: Ensure your eggs are at room temperature for better incorporation into the batter. This creates a more cohesive mixture and a lighter outcome.

  • Experiment with Zest: Feel free to add extra lemon zest if you prefer a more pronounced lemon flavor. It brings an extra zing to your delicious treats!

What to Serve with Lemon Raspberry Madeleines?

Imagine the delightful array of flavors and textures that can elevate your experience with these airy French treats.

  • Earl Grey Tea: The bergamot notes in Earl Grey perfectly complement the zesty lemon, making it a lovely pairing for afternoon enjoyment.
  • Chamomile Tea: This soothing herbal tea adds a calming balance to the tartness of raspberries, enhancing a tranquil tea time.
  • Vanilla Ice Cream: A scoop of creamy ice cream alongside the warm madeleines creates a luscious contrast, perfect for an indulgent dessert.
  • Lemon Curd: Serve a dollop of bright lemon curd with your madeleines for an extra zing of lemon flavor that elevates each bite.
  • Crisp Cabbage Cucumber Salad: This refreshing salad adds a crunchy texture and a lightness that balances the sweetness of the madeleines.
  • Sparkling Water with Mint: A fizzy drink with mint adds a refreshing kick, perfect for cleansing your palate between bites of the buttery madeleines.
  • Fresh Berries: A bowl of assorted fresh berries provides a complementary burst of sweetness, enhancing the fruity notes of the madeleines.
  • Almond Biscotti: For a crunchy contrast, serve alongside almond biscotti; the flavors of almond harmonize beautifully with lemon and raspberry.
  • Limoncello Spritz: This light cocktail provides a delightful citrusy reminder of the madeleines’ flavors while adding celebratory flair to your gathering.
  • Chocolate Sauce: A warm drizzle of dark chocolate not only adds sweetness but also enriches the flavor profile with its deep, decadent notes.

How to Store and Freeze Lemon Raspberry Madeleines

Room Temperature: Store madeleines in an airtight container at room temperature for up to 3 days to maintain their light texture. Enjoy them fresh for the best taste!

Fridge: If you want them to last longer, keep the madeleines in the fridge for up to a week. Bring them back to room temperature before serving for that just-baked feel.

Freezer: For longer storage, freeze the madeleines in a sealed plastic bag for up to two months. Thaw in a cool, dry place to ensure they don’t become soggy.

Reheating: To refresh your madeleines, lightly warm them in the microwave for 10-15 seconds or place them in a preheated oven at 350°F (175°C) for a few minutes. Enjoy the delightful Lemon Raspberry Madeleines as if they were just baked!

Lemon Raspberry Madeleines Variations & Substitutions

Feel free to get creative and tailor these madeleines to your taste preferences!

  • Gluten-Free: Use a gluten-free flour blend instead of all-purpose flour for a delicious gluten-free treat.

  • Berry Mix: Combine fresh raspberries with blueberries or chopped strawberries for a colorful and fruity twist.

  • Dairy-Free: Replace butter with coconut oil or a dairy-free margarine to create a delightful dairy-free version.

  • Sugar Alternatives: Swap granulated sugar with maple syrup or coconut sugar for a different sweetening option—experiment with flavors!

  • Citrus Burst: Enhance the citrus zing by adding additional lemon zest or incorporating orange zest into the batter for a different flavor profile.

  • Lemon Glaze: Drizzle a simple lemon glaze made from powdered sugar and lemon juice over the cooled madeleines for an extra touch of sweetness and a shiny finish.

  • Herbal Infusion: Infuse the batter with a hint of fresh rosemary or basil to introduce an aromatic twist that complements the citrus and berry flavors beautifully.

For further delightful ideas, consider pairing your madeleines with a light and refreshing Cabbage Cucumber Salad or indulge in a slice of Sumptuous Lemon Caramel for a sweet contrast!

Lemon Raspberry Madeleines Recipe FAQs

What type of flour is best for Lemon Raspberry Madeleines?
For the best texture, I recommend using all-purpose flour as it provides the right structure. If you need a gluten-free option, opt for a gluten-free flour blend, ensuring it’s suitable for baking.

How should I store my madeleines?
Store your madeleines in an airtight container at room temperature for up to 3 days. This method keeps them light and fluffy. If you’d like them to last longer, they can be refrigerated for up to a week—just remember to bring them back to room temperature before enjoying!

Can I freeze Lemon Raspberry Madeleines?
Absolutely! You can freeze madeleines in a sealed plastic bag for up to two months. To freeze, place the cooled madeleines in a single layer to prevent sticking, then transfer to a bag. To enjoy, simply thaw in a cool, dry place before savoring their delightful flavors.

What if my batter seems too thick?
If your batter appears too thick, it might be due to overmixing or using cold eggs. Make sure to mix just until combined and use room temperature eggs for better incorporation. If it still seems thick, add a tablespoon of milk or water to loosen it up.

Are there any dietary considerations for Lemon Raspberry Madeleines?
While the primary ingredients are generally safe for most diets, it’s always a good idea to check for allergies, especially to eggs or gluten. If you have dietary restrictions, you can substitute the unsalted butter for Greek yogurt and use gluten-free flour. For vegan options, consider egg replacements like flax eggs or aquafaba.

How can I enhance the lemon flavor in my madeleines?
If you wish for a more pronounced lemon flavor, feel free to add extra lemon zest to the batter. Additionally, incorporating a drizzle of lemon glaze over the cooled madeleines can elevate the citrusy essence even further. Enjoy experimenting!

Lemon Raspberry Madeleines

Lemon Raspberry Madeleines That Melt in Your Mouth

Lemon Raspberry Madeleines combine zesty lemon and sweet raspberries in a light, airy dessert perfect for any occasion.
Prep Time 15 minutes
Cook Time 12 minutes
Chill Time 30 minutes
Total Time 57 minutes
Servings: 12 madeleines
Course: Dessert
Cuisine: French
Calories: 120

Ingredients
  

Batter Ingredients
  • 1 cup all-purpose flour Substitute with gluten-free flour blend for gluten-free options.
  • 1 teaspoon baking powder Ensures the madeleines rise perfectly.
  • a pinch salt Consider using sea salt for a touch of sophistication.
  • 2 large eggs Bring to room temperature before mixing.
  • ¾ cup granulated sugar Brown sugar can add a caramel note.
  • 1 teaspoon vanilla extract Almond extract is a delightful alternative.
  • 1 tablespoon lemon zest Increase for a stronger lemon kick.
  • 2 tablespoons fresh lemon juice Bottled lemon juice works in a pinch.
  • ½ cup unsalted butter (melted) Swap half with Greek yogurt for a lighter version.
  • ½ cup fresh raspberries (finely chopped) Avoid frozen ones to maintain texture.

Equipment

  • madeleine pan

Method
 

Baking Instructions
  1. Preheat your oven to 375°F (190°C) and grease your madeleine pan with melted butter or non-stick spray.
  2. In a medium bowl, whisk together the flour, baking powder, and a pinch of salt. Set aside.
  3. In a large bowl, beat together eggs and sugar for about 3-4 minutes until pale and thick.
  4. Gently stir in vanilla extract, lemon zest, and fresh lemon juice into the egg mixture.
  5. Carefully fold the dry mixture into the wet mixture until just incorporated.
  6. Gradually fold in the melted butter to maintain the airy texture.
  7. Gently fold in the finely chopped raspberries.
  8. Spoon the batter into the molds, filling each about ¾ full.
  9. Bake for 10-12 minutes until golden and springy.
  10. Let cool for 2 minutes, then transfer to a wire rack and dust with powdered sugar.

Notes

Refrigerate the batter for at least 30 minutes before baking for a firmer shape and enhanced fluffiness.

Philly Cheesesteak Pizza: Ultimate Comfort Food Delight

As I rolled out the dough and inhaled the aroma of sizzling garlic, I was reminded of evenings spent with friends, sharing laughter and hearty bites of comfort food. Today, I’m thrilled to share my version of Philly Cheesesteak Pizza, a delicious fusion that effortlessly marries the cherished flavors of a classic sandwich with a crispy pizza crust. This easy pizza recipe not only boasts a savory filling of tender steak and gooey provolone but is also a fantastic choice for weeknight dinners or casual get-togethers. Plus, it’s versatile enough to accommodate any palate, from meat lovers to veggie enthusiasts. How about transforming your dinner plans with this mouthwatering delight tonight? Let’s dive into the recipe!

Why is this pizza a must-try?

Unmatched Comfort: This Philly Cheesesteak Pizza brings your favorite sandwich flavors to life in a delightful pizza form.

Satisfying Simplicity: With straightforward steps and easy-to-find ingredients, you can whip up this dish without fuss.

Crowd Pleaser: Perfect for family dinners or game nights, this recipe is sure to impress friends and family alike.

Versatile Options: Mix it up by adding your favorite veggies or experimentation with different cheeses, making every bite a new experience.

Quick Cook Time: Enjoy the delicious warmth of homemade pizza in under an hour, getting you back to relaxation sooner!

Enhance your meal with a side of handy Zucchini Oatmeal Pizza to keep the comfort food vibes going!

Philly Cheesesteak Pizza Ingredients

For the Pizza Base
Pizza Dough – Use homemade or store-bought for a quick start to your Philly Cheesesteak Pizza.

For the Filling
Thinly Sliced Steak – Ribeye or sirloin work best for a tender, flavorful bite.
Provolone Cheese – This cheese melts beautifully, but feel free to substitute with a mozzarella blend for a different taste.
Caramelized Onions – Sweet and savory, they add depth; Vidalia or yellow onions are ideal.
Green Peppers (optional) – They bring a fresh crunch; omit or swap with mushrooms or jalapeños for variety.

For the Sauce
Garlic White Sauce – A luscious blend of butter, flour, milk, and Parmesan that elevates your pizza’s flavor.

Now that you have the ingredients, gather your friends and family for a cozy night in, ready to indulge in this unforgettable Philly Cheesesteak Pizza!

Step‑by‑Step Instructions for Philly Cheesesteak Pizza

Step 1: Prepare the Dough
Begin by preheating your oven to 475°F (245°C). Roll out your pizza dough on a floured surface to your desired thickness, ensuring it’s uniform for even baking. Transfer the rolled dough to a pizza stone or a baking sheet lined with parchment paper for easy cleanup. This forms the sturdy base for your Philly Cheesesteak Pizza.

Step 2: Sauté the Vegetables
In a skillet over medium heat, add a drizzle of olive oil and toss in thinly sliced onions, cooking them until they are golden and caramelized, about 10–15 minutes. If you’re including green peppers, add them halfway through to ensure they are tender yet crisp. The sweet aroma will signal that these flavorful toppings are ready to enhance your pizza.

Step 3: Cook the Steak
Using the same skillet, increase the heat to high, and add the thinly sliced steak, seasoned with salt and pepper. Sear the steak for about 3–5 minutes, ensuring it’s browned but not overcooked, as it will continue cooking in the oven. Once done, transfer the steak to a plate and let it rest while preparing the sauce.

Step 4: Make the Garlic White Sauce
In a medium saucepan, melt 2 tablespoons of butter over low heat. Whisk in 2 tablespoons of flour to create a roux, stirring continuously for about 2 minutes. Gradually add in 1 cup of milk, whisking until the mixture thickens. Stir in 1/4 cup of grated Parmesan cheese until it melts smoothly, transforming into a creamy garlic white sauce that will elevate your Philly Cheesesteak Pizza.

Step 5: Assemble the Pizza
Spread the garlic white sauce evenly over the rolled-out pizza dough, allowing it to reach the edges. Layer the sautéed vegetables, beef, and generous portions of provolone cheese on top. The vibrant colors and melt-in-your-mouth textures will bring your pizza to life, inviting everyone to gather around and share in the deliciousness.

Step 6: Bake the Pizza
Place the assembled pizza in the preheated oven and bake for 12–15 minutes, or until the crust is golden brown and the cheese is perfectly bubbly and slightly browned. Keep an eye on it to avoid any burning, as you want that enticingly crispy finish. The smell wafting through your home will be irresistible!

Step 7: Serve & Enjoy
Once baked, remove the pizza from the oven and let it cool for a couple of minutes before slicing. Use a sharp pizza cutter for clean cuts. Serve hot, garnished with fresh herbs like parsley or oregano if desired, and enjoy your homemade Philly Cheesesteak Pizza that’s bursting with comforting flavors.

What to Serve with Philly Cheesesteak Pizza

Transform your meal into a comforting feast with these delightful pairings that enhance every bite of your pizza.

  • Crispy Garlic Bread: Perfect for dipping in sauce, this bread adds crunch and a garlic punch that complements the pizza’s richness.

  • Fresh Garden Salad: A medley of greens and vibrant veggies brings freshness to balance the hearty pizza, making each bite feel lighter.

  • Roasted Veggies: Caramelized carrots and Brussels sprouts add a sweet, earthy element that harmonizes with the savory steak and cheese.

  • Creamy Coleslaw: The cool, tangy crunch of coleslaw provides a refreshing contrast to the warm, indulgent pizza, enhancing the overall dining experience.

  • Potato Wedges: These crispy, seasoned bites offer a comfort food classic that pairs beautifully with the rich flavors of your cheesesteak pizza.

  • Craft Beer: A hoppy IPA or light lager can cut through the richness, providing a refreshing sip that enhances the savory notes of the pizza.

  • Chocolate Chip Cookies: End your meal on a sweet note with warm, gooey cookies that echo the comfort food theme—a delightful finish to your evening!

Storage Tips for Philly Cheesesteak Pizza

Room Temperature: Allow the pizza to cool completely before storing it. Leftovers can sit out for no longer than 2 hours to ensure safety.

Fridge: Store the leftover Philly Cheesesteak Pizza in an airtight container in the refrigerator for up to 3 days. This keeps it fresh and ready for reheating.

Freezer: For longer storage, wrap slices tightly in plastic wrap and place them in a freezer-safe bag. They can be frozen for up to 2 months without losing flavor.

Reheating: When you’re ready to enjoy your leftovers, reheat in the oven at 350°F (175°C) for 10–15 minutes to restore that crispy crust and melty cheese.

Make Ahead Options

These Philly Cheesesteak Pizza ingredients can be prepped in advance to make your meal prep seamless! You can sauté the onions and any optional green peppers up to 3 days ahead and store them in an airtight container in the refrigerator. Additionally, cook the steak and prepare the garlic white sauce up to 24 hours in advance. To maintain quality, keep each component separate until you’re ready to assemble; this prevents the crust from getting soggy. When you’re ready to enjoy this delicious pizza, simply follow the assembly instructions and bake as directed. This way, you get that fresh, comforting taste with all the time-saving benefits, perfect for a busy weeknight!

Philly Cheesesteak Pizza Variations

Feel free to get creative with your Philly Cheesesteak Pizza! Customizing it allows you to embrace flavors that reflect your taste buds.

  • Whole Wheat Crust: Swap the traditional dough for whole wheat crust to add a nutty flavor and extra fiber, making your pizza heartier.

  • Grilled Chicken: For a lighter alternative, use grilled chicken instead of steak. This provides a delicious protein boost and keeps it fresh!

  • Mushrooms: Incorporate sautéed mushrooms to deepen the flavor profile. Their earthy taste pairs beautifully with the savory steak.

  • Jalapeños: If you’re craving some heat, sprinkle sliced jalapeños on top before baking to add a spicy kick that complements the richness.

  • Vegetarian Twist: Use plant-based steak alternatives and load up on veggies like bell peppers, zucchini, and spinach to make a satisfying vegetarian pizza.

Why not also consider pairing this comfort dish with a delightful Bread Pizza for a fun variety? You’ll enjoy experiencing different textures and flavors together!

  • Cheese Blends: Experiment with different cheeses like sharp cheddar or mozzarella for a unique twist. Mixing cheeses creates a melt-in-your-mouth experience that will leave everyone wanting more!

  • BBQ Flair: Drizzle barbecue sauce over the toppings before baking for a sweet and tangy element that amplifies your cheesesteak’s flavors, making it a crowd favorite.

Expert Tips for Philly Cheesesteak Pizza

Pre-cook the Steak: Ensure the steak is lightly browned before adding it to the pizza; this prevents overcooking during baking, enhancing flavor.

Watch the Oven Temperature: A preheated oven is crucial for a crispy crust. Set it to 475°F (245°C) and avoid opening the door too often.

Experiment with Cheeses: While provolone is traditional, try mixing mozzarella or sharp cheddar for a unique take on your Philly Cheesesteak Pizza.

Caramelize Onions Properly: Take your time with the onions; slow cooking brings out their sweetness and richness, elevating your toppings.

Avoid Soggy Crust: Ensure the sauce isn’t overly wet and bake the pizza on a pizza stone or directly on the oven rack for better airflow.

Add Herbs for Flavor: Fresh herbs like basil or oregano sprinkled on top right before serving enhance freshness and aroma, making every bite delightful!

Philly Cheesesteak Pizza Recipe FAQs

What type of steak is best for Philly Cheesesteak Pizza?
For the most tender and flavorful results, I recommend using thinly sliced ribeye or sirloin steaks. They cook quickly and retain their juiciness on the pizza. If you can’t find ribeye, flank steak is another great option!

How should I store leftover Philly Cheesesteak Pizza?
Make sure to let the pizza cool completely before storing it. Place it in an airtight container and store it in the refrigerator for up to 3 days. If you need to store it longer, you can freeze slices wrapped tightly in plastic wrap and placed in a freezer-safe bag for up to 2 months.

Can I freeze Philly Cheesesteak Pizza?
Absolutely! To freeze, first let the pizza cool down. Then, wrap individual slices in plastic wrap and put them in a freezer-safe zip-top bag. For the best texture, try to consume the frozen pizza within 2 months. When you’re ready to enjoy, reheat it in the oven for that crispy crust!

What should I do if my pizza crust turns out soggy?
If your crust ends up soggy, it might be due to too much sauce or baking at a low temperature. To prevent this, ensure your garlic white sauce isn’t overly wet, and bake the pizza at a high temperature of 475°F (245°C). You can also try baking the crust for a few minutes before adding toppings to firm it up!

Are there any dietary considerations for this recipe?
This Philly Cheesesteak Pizza contains ingredients like cheese and steak, which may not be suitable for those with lactose intolerance or specific dietary restrictions. You can easily adapt the recipe to be dairy-free by using plant-based cheese alternatives and opting for grilled chicken or a vegetarian substitute to make it friendly for meatless diets.

What alternatives can I use for the pizza dough?
If you’re looking for a healthier twist, consider using whole wheat or cauliflower crust instead of traditional pizza dough. These alternatives can cater to different dietary needs while still providing a delicious base for your Philly Cheesesteak Pizza!

Philly Cheesesteak Pizza

Philly Cheesesteak Pizza: Ultimate Comfort Food Delight

This Philly Cheesesteak Pizza combines classic sandwich flavors with a crispy pizza crust, making it the ultimate comfort food.
Prep Time 15 minutes
Cook Time 20 minutes
Total Time 35 minutes
Servings: 4 slices
Course: Dinner
Cuisine: American
Calories: 400

Ingredients
  

For the Pizza Base
  • 1 batch Pizza Dough homemade or store-bought
For the Filling
  • 12 oz Thinly Sliced Steak Ribeye or sirloin preferred
  • 8 oz Provolone Cheese or substitute with mozzarella blend
  • 1 cup Caramelized Onions Vidalia or yellow onions are ideal
  • 1 cup Green Peppers optional; can substitute with mushrooms or jalapeños
For the Sauce
  • 2 tbsp Butter for the sauce
  • 2 tbsp Flour for the roux
  • 1 cup Milk for the sauce
  • 1/4 cup Grated Parmesan Cheese for the sauce

Equipment

  • Skillet
  • Saucepan
  • Pizza stone or baking sheet

Method
 

Step‑by‑Step Instructions
  1. Preheat your oven to 475°F (245°C). Roll out your pizza dough on a floured surface.
  2. In a skillet over medium heat, add olive oil and cook thinly sliced onions until caramelized, about 10–15 minutes.
  3. Increase the heat to high and sear the thinly sliced steak in the same skillet for about 3–5 minutes.
  4. In a saucepan, melt butter and whisk in flour to create a roux. Gradually add milk, stirring until thickened. Stir in Parmesan.
  5. Spread the garlic white sauce over the dough, layer with sautéed vegetables, steak, and provolone cheese.
  6. Bake the assembled pizza for 12–15 minutes until the crust is golden brown and cheese is bubbly.
  7. Let it cool a couple of minutes before slicing. Garnish with fresh herbs if desired before serving.

Notes

For best results, pre-cook the steak and ensure a preheated oven for a crispy crust. Fresh herbs can enhance flavor.

Crispy Air Fryer Tortellini – Quick, Delicious Snack Idea!

Snagging a crunchy snack that doesn’t take forever to prepare can feel like a small victory, and that’s exactly what you’ll get with this Air Fryer Crispy Tortellini! Whipping up a batch only takes about 20 minutes, making it an ideal option for busy weeknights or unexpected guests. This dish is not only a breeze to make but also versatile; imagine customizing it with your favorite seasonings and dipping sauces! Perfect as an appetizer or just a delightful treat on its own, these tortellini are a healthier alternative to frying, offering all the crunch without the guilt. Are you ready to discover how simple it is to transform your pasta into a crispy sensation? Let’s dive in!

Why Will You Love This Recipe?

Quick Preparation: With just 20 minutes needed, you can enjoy delicious Air Fryer Crispy Tortellini without sacrificing your time.
Endless Customization: Adjust flavors with your favorite seasonings or try different dips, like marinara or pesto, for a unique twist!
Healthier Alternative: Enjoy that crispy texture without the guilt of deep frying, making this recipe a fantastic snack option.
Perfect for Gatherings: Impress friends and family with this crowd-pleasing appetizer that’s sure to disappear!
Elevate your snack game even further with delightful treats like Mini Beef Pies or Crispy Vegetable Pancakes when you’re looking to add variety to your spread.

Air Fryer Crispy Tortellini Ingredients

Get ready to gather what you need for this deliciously crispy treat!

For the Tortellini

  • Tortellini – The base of the dish; frozen works beautifully and saves time.

For the Coating

  • Olive Oil – Helps achieve that delightful crispy texture; avocado oil is a great alternative for a unique flavor.
  • Italian Seasoning – Adds a wonderful herbaceous note; feel free to swap it with a mix of oregano, basil, and thyme if desired.
  • Garlic Powder – Brings savory depth; use fresh minced garlic if you prefer a stronger taste.
  • Salt – Essential for enhancing flavors; adjust to personal preference.
  • Black Pepper – Provides a necessary kick; freshly cracked pepper adds extra zing!

For the Crunchy Finish

  • Grated Parmesan Cheese – Creates a cheesy, crispy crust; for a dairy-free option, try using nutritional yeast.
  • Crushed Red Pepper Flakes – Optional for those who like a hint of heat; omit for milder flavor.

Now you have everything you need to make wonderfully crispy Air Fryer Crispy Tortellini!

Step‑by‑Step Instructions for Air Fryer Crispy Tortellini

Step 1: Preheat the Air Fryer
Begin by preheating your air fryer to 400°F (200°C) for about 5 minutes. This crucial step ensures that your Air Fryer Crispy Tortellini will cook evenly and achieve that delightful crunch. While it’s heating up, you can prepare the tortellini, making this a seamless process.

Step 2: Prepare the Tortellini
In a large mixing bowl, combine your tortellini with a drizzle of olive oil, Italian seasoning, garlic powder, salt, and black pepper. Toss the mixture well until the tortellini are fully coated with the herbs and oil, resulting in a flavorful base. This coating will give each piece that perfect crispy texture once cooked.

Step 3: Add the Cheese
Next, sprinkle in the grated Parmesan cheese and mix thoroughly to ensure it’s evenly distributed over the tortellini. This cheesy layer is essential for achieving that deliciously crunchy outer texture while cooking. Keep mixing until every tortellini is enveloped in cheesy goodness and seasoned perfectly.

Step 4: Arrange in the Air Fryer
Carefully place the coated tortellini in a single layer in the air fryer basket, making sure to avoid overcrowding. This allows the hot air to circulate freely, ensuring that all sides of the tortellini get crispy. Depending on the size of your air fryer, you may need to cook in batches for optimal results.

Step 5: Cook for Crispiness
Set the air fryer to cook for 8-10 minutes, shaking the basket halfway through to promote even browning. Pay close attention as they cook; you’ll be looking for a beautiful golden color and that satisfying crunch that defines Air Fryer Crispy Tortellini. Adjust the cooking time if needed, based on your specific air fryer model and desired crispiness.

Step 6: Serve and Enjoy
Once cooked to perfection, carefully remove the tortellini from the air fryer and let them cool for a minute before serving. These delightful bites are best enjoyed hot and can be paired with your favorite dipping sauce, such as marinara or pesto. Dive into the crispy sensation and savor every delicious bite!

Expert Tips for Air Fryer Crispy Tortellini

  • Even Coating: Make sure your tortellini are thoroughly coated in olive oil and seasonings for maximum flavor and that perfect crispiness.

  • Avoid Overcrowding: Cook in batches if necessary; overcrowding the air fryer basket prevents proper air circulation, which is key for achieving crunchy tortellini.

  • Cooking Time Adjustment: Monitor the color and texture; if using frozen tortellini, add a couple of minutes to the cooking time for the best results.

  • Don’t Skip the Cheese: The grated Parmesan cheese creates that irresistible crunchy crust, so don’t skimp on it for your Air Fryer Crispy Tortellini!

  • Experiment with Dips: Pair your crispy bites with various dipping sauces like marinara, pesto, or ranch to elevate the flavor experience!

Air Fryer Crispy Tortellini Variations

Feel free to let your culinary creativity shine by customizing this delightful recipe!

  • Gluten-Free: Use gluten-free tortellini made from chickpeas or lentils for a delicious swap that accommodates dietary needs. You won’t even miss the original!
  • Cheese Variations: Try crumbled feta or shredded mozzarella for a different flavor experience; each adds a unique richness to your crispy bites.
  • Spice It Up: Add a pinch of cayenne or hot sauce to the seasoning mix for a kick! It’s perfect for those who love an extra zing in every bite.
  • Herbal Twist: Swap Italian seasoning for a mix of fresh herbs like basil, rosemary, or thyme. This brings a fresh garden taste to the dish that’s irresistible!
  • Savory Swaps: If you’re seeking a lighter option, substitute the grated Parmesan with nutritional yeast for a dairy-free yet cheesy flavor profile.
  • Dipping Sauces: Offer an array of dipping sauces such as spicy marinara, zesty ranch, or tangy pesto to truly elevate your tasting experience!
  • Crunchier Coating: For an added crunch, toss the tortellini in crushed cornflakes before air frying; it creates a delightful texture that’s sure to please!
  • Sweet Heat: Experiment with a sprinkle of cinnamon and sugar to create a sweet and spicy balance; serve with a creamy dip for an unexpected twist!

These variations are sure to keep your Air Fryer Crispy Tortellini exciting! Pair them with delightful options like Homemade Crispy French Sauce or serve alongside Cheesy Fries for a fun, mixed snack platter.

Make Ahead Options

These Air Fryer Crispy Tortellini are perfect for meal prep enthusiasts! You can easily prepare the tortellini up to 24 hours in advance by tossing them with olive oil, seasonings, and grated Parmesan, then refrigerate them in an airtight container. This not only saves time but also allows the flavors to meld beautifully. When you’re ready to enjoy, simply place the prepped tortellini in the air fryer basket and cook for 8-10 minutes at 400°F (200°C), shaking the basket halfway through for that irresistible crispiness. Rest assured, they’ll come out just as delicious, giving you a quick and satisfying snack with minimal effort!

What to Serve with Air Fryer Crispy Tortellini?

Elevate your snacking experience with delicious pairings that beautifully complement the crunch and flavor of these irresistible bites.

  • Savory Marinara Sauce: A classic dipping option that adds a tangy contrast to the crispy tortellini. It’s like a warm hug for your taste buds!

  • Creamy Pesto Dip: Earthy basil flavor meets nutty richness, creating a delightful spread that highlights the Italian essence of tortellini. Perfect for an extra layer of flavor!

  • Garlicky Aioli: This smooth, garlicky goodness is a match made in heaven, enhancing your crispy tortellini’s savory notes while adding a depth of flavor that’s simply unforgettable.

  • Zesty Lemon Garlic Pasta Salad: A refreshing side that provides zest and crunch. This salad is light yet fulfilling, pairing perfectly with the rich flavors of the tortellini.

  • Roasted Seasonal Vegetables: A medley of colorful veggies adds texture and nutrition to your meal. The caramelization brings out their natural sweetness, making every bite a delightful contrast.

  • Crispy Caesar Salad: A classic option that offers crisp greens with a flavorful Caesar dressing. The crunchy croutons harmonize beautifully with the tortellini’s texture.

  • Fruit-Infused Sparkling Water: Refreshing and light with a hint of sweetness, the effervescence of fruit sparkling water cleanses the palate beautifully after each tempting bite.

  • Chocolate Lava Cake: For dessert, indulge in a rich chocolate lava cake. The warm, gooey center offers a wonderful end to your crispy snacks, satisfying every sweet tooth!

Storage Tips for Air Fryer Crispy Tortellini

Room Temperature: Enjoy your Air Fryer Crispy Tortellini fresh for the best texture; however, if left out, consume within 2 hours to ensure safety.

Fridge: Store leftovers in an airtight container in the refrigerator for up to 2 days. Make sure they cool completely before sealing to prevent moisture buildup.

Freezer: Freeze your cooked tortellini by spreading them out on a baking sheet until firm, then transfer to a sealed bag for up to 1 month.

Reheating: To reheat, place the tortellini back in the air fryer at 350°F (175°C) for 5-7 minutes to regain their crunch and warmth.

Air Fryer Crispy Tortellini Recipe FAQs

What type of tortellini should I use?
Absolutely! You can use any tortellini for this recipe, including fresh, refrigerated, or frozen options. Frozen tortellini works beautifully and saves time since it requires no cooking beforehand. Just make sure to increase the cooking time by a couple of minutes for frozen varieties.

How should I store leftovers?
Store any leftover Air Fryer Crispy Tortellini in an airtight container in the refrigerator for up to 2 days. Allow them to cool completely before sealing to prevent moisture buildup. When you’re ready to enjoy them again, reheating in the air fryer for about 5-7 minutes at 350°F (175°C) helps regain their crunch.

Can I freeze crispy tortellini?
Yes! To freeze, spread your cooked tortellini on a baking sheet in a single layer and freeze until they’re firm, about 1-2 hours. Then you can transfer them to a freezer-safe bag or container for up to 1 month. When reheating, throw them back in the air fryer at 350°F (175°C) for about 5-7 minutes to re-crisp them.

What should I do if my tortellini is not crispy?
If your Air Fryer Crispy Tortellini isn’t as crispy as you’d like, there are a couple of troubleshooting steps you can take. First, ensure you’re not overcrowding the air fryer basket, as this can hinder airflow. Try shaking the basket halfway through cooking to promote even crispiness. Lastly, make sure they’re properly coated in oil and seasoning, which helps achieve that delightful crunch.

Are there any dietary considerations I should keep in mind?
Very! This recipe is vegetarian-friendly, but if you’re accommodating dietary restrictions, consider using gluten-free tortellini made from chickpeas or lentils. If there are dairy allergies, substitute grated Parmesan with nutritional yeast for a dairy-free option. Always double-check ingredient labels to ensure they meet any specific dietary needs.

What dipping sauces pair well with crispy tortellini?
You have so many options! I highly recommend classic marinara or pesto for a flavorful kick, but you can also offer ranch dressing, spicy aioli, or even a zesty garlic dip. The more, the merrier! Experimenting with different sauces adds variety and excitement to your crispy snack experience.

Air Fryer Crispy Tortellini

Crispy Air Fryer Tortellini – Quick, Delicious Snack Idea!

Enjoy a quick and delicious snack with Air Fryer Crispy Tortellini, ready in just 20 minutes.
Prep Time 10 minutes
Cook Time 10 minutes
Total Time 20 minutes
Servings: 4 appetizers
Course: Other
Cuisine: Italian
Calories: 250

Ingredients
  

For the Tortellini
  • 1 pound Frozen Tortellini The base of the dish; frozen works beautifully and saves time.
For the Coating
  • 2 tablespoons Olive Oil Helps achieve that delightful crispy texture; avocado oil is a great alternative.
  • 1 tablespoon Italian Seasoning Adds a wonderful herbaceous note; feel free to swap it with oregano, basil, and thyme.
  • 1 teaspoon Garlic Powder Brings savory depth; use fresh minced garlic for a stronger taste.
  • 1 teaspoon Salt Essential for enhancing flavors; adjust to personal preference.
  • 1/2 teaspoon Black Pepper Provides a necessary kick; freshly cracked adds extra zing!
For the Crunchy Finish
  • 1/4 cup Grated Parmesan Cheese Creates a cheesy, crispy crust; for dairy-free, use nutritional yeast.
  • 1/2 teaspoon Crushed Red Pepper Flakes Optional for those who like a hint of heat.

Equipment

  • Air Fryer

Method
 

Step-by-Step Instructions
  1. Preheat your air fryer to 400°F (200°C) for about 5 minutes.
  2. In a large bowl, combine frozen tortellini with olive oil, Italian seasoning, garlic powder, salt, and black pepper.
  3. Sprinkle in the grated Parmesan cheese and mix to ensure an even coating.
  4. Place the coated tortellini in a single layer in the air fryer basket, avoiding overcrowding.
  5. Cook for 8-10 minutes, shaking the basket halfway through.
  6. Carefully remove the tortellini and let cool for a minute before serving.

Notes

Pair with dipping sauces like marinara or pesto for an enhanced flavor experience.