Crispy Rice Salad With Veggies for a Crunchy Delight

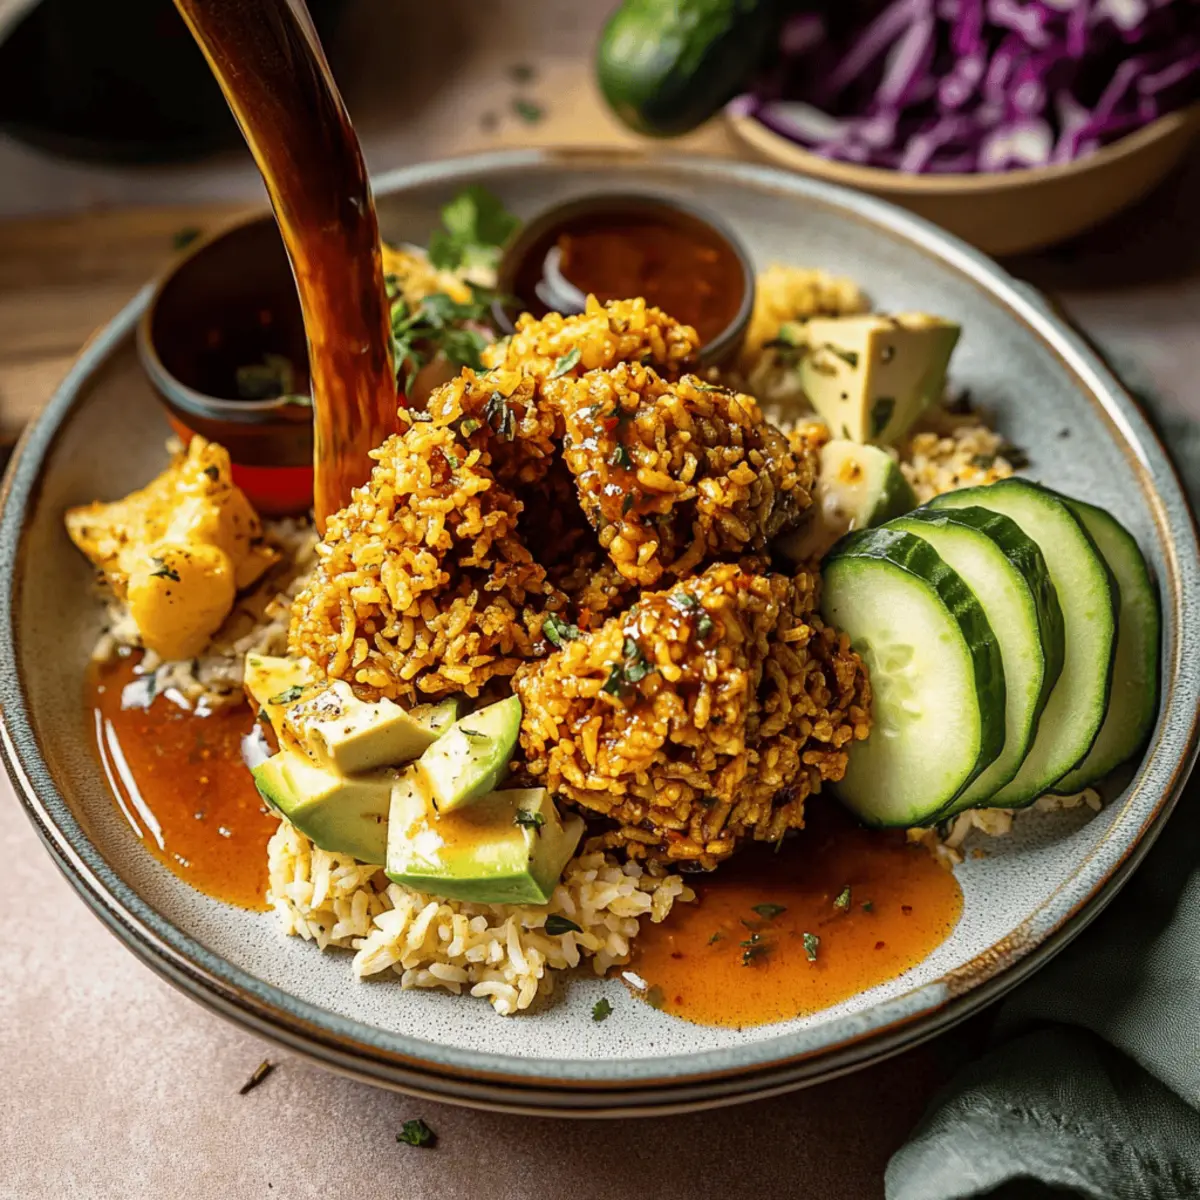
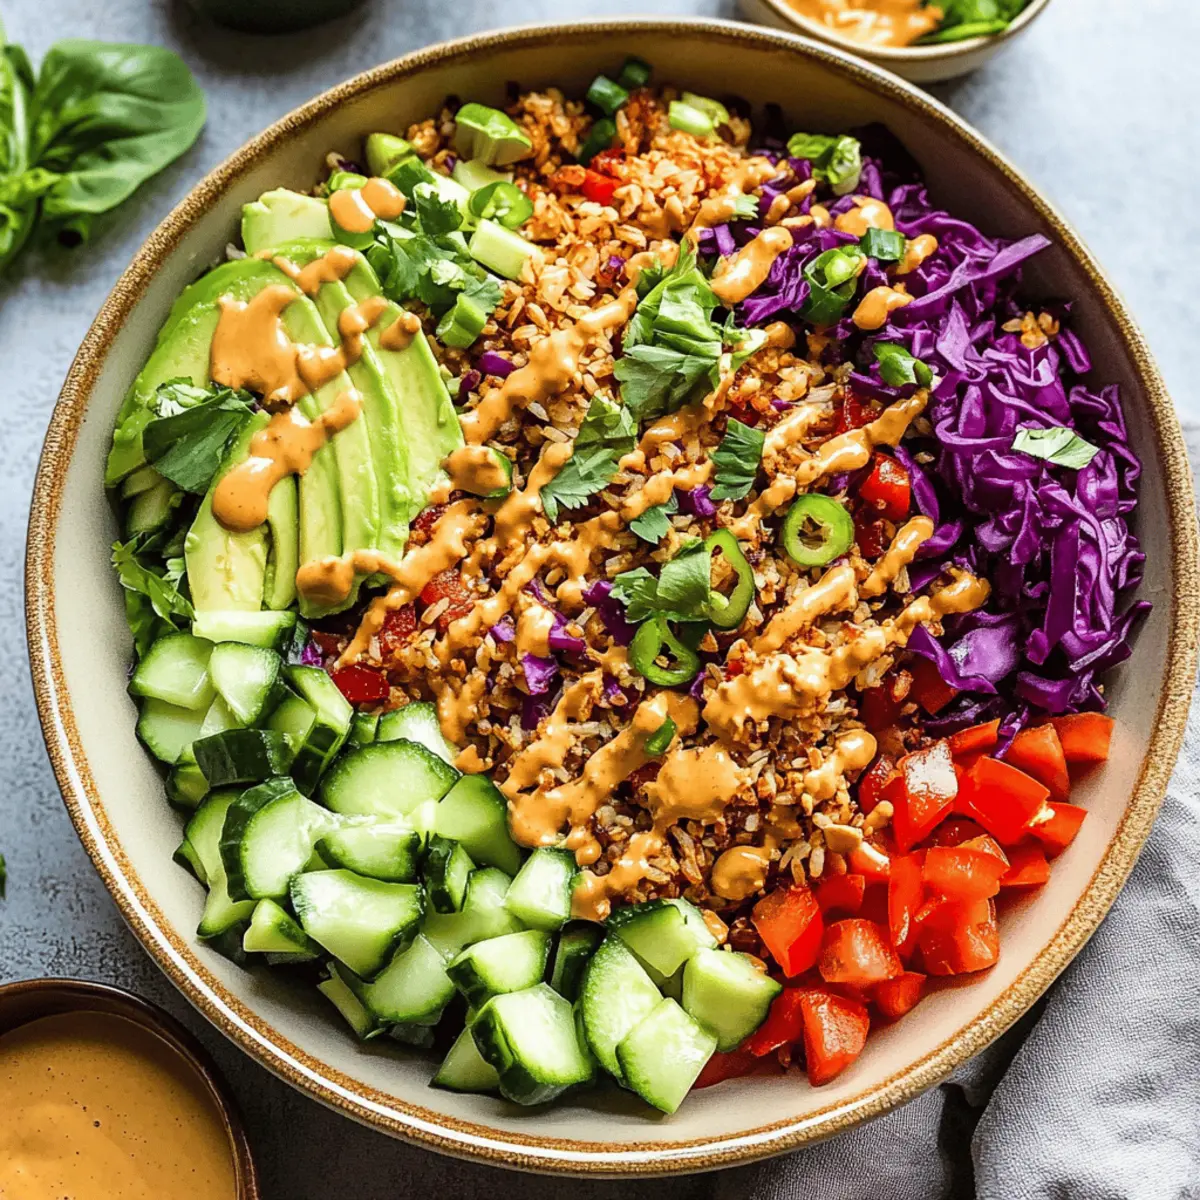
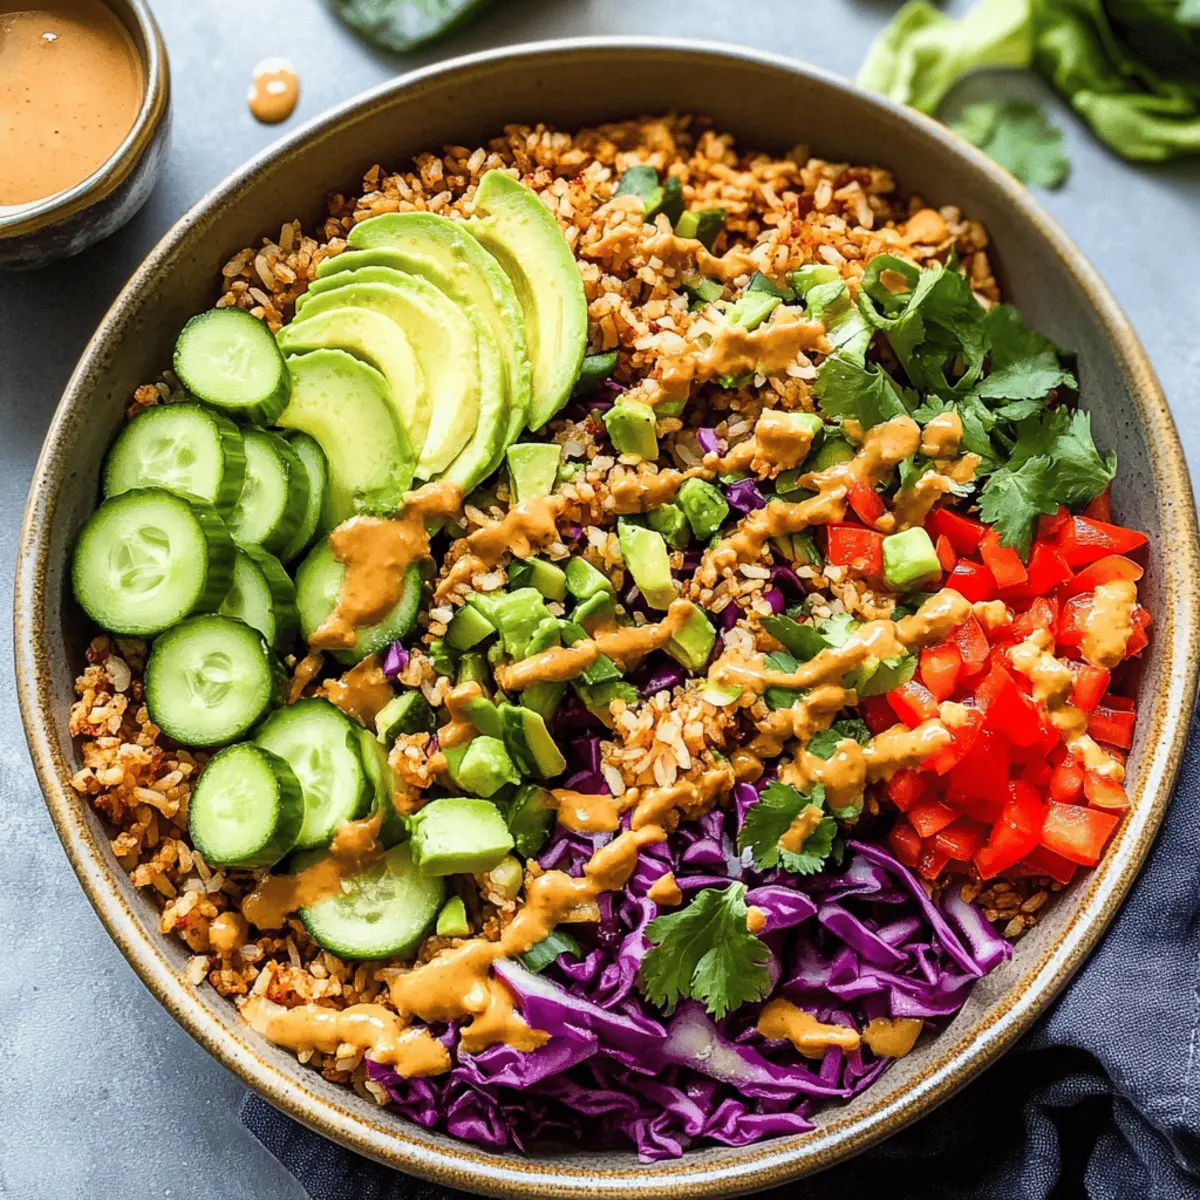
“Did you catch the latest food trend?” I overheard a friend saying as she scrolled through her feed, eyes lighting up at the new salad sensation. That’s right, folks—this isn’t your ordinary leafy green dish! Enter the Vegan Crispy Rice Salad With Crunchy Veggies, a wholesome masterpiece that’s both satisfying and packed with vibrant flavor. The texture of the crispy rice combined with refreshing, crunchy vegetables creates a beautiful dance of taste in every bite. This dish prioritizes your busy schedule too; it’s perfect for meal prepping and will have even the staunchest salad skeptics reaching for seconds. Curious about how to bring this refreshing twist to your table? Let’s dive in!

Why is this salad a must-try?

Vibrant Flavors: Each bite bursts with a delightful mixture of Asian-inspired flavors, from zesty lime to savory soy sauce.
Crispy Texture: The baked rice provides a satisfying crunch that contrasts perfectly with the fresh veggies, making every mouthful exciting.
Easy Customization: With endless variations for vegetables and dressings, you can tailor this salad to suit your taste, just like in my Cucumber Carrot Salad.
Meal Prep Ready: Designed to be made ahead of time, this dish can simplify your busy week—simply store, serve, and enjoy!
Crowd-Pleaser: Even non-salad lovers will find themselves reaching for this crunchy delight, proving that healthy eating can be both fun and satisfying.

Crispy Rice Salad With Veggies Ingredients

For the Salad Base
Pre-cooked rice – Any day-old rice works best for achieving that perfect crunch.
Mini cucumbers – Freshness and crunch can be enhanced by using varieties like Persian or English cucumbers.
Avocados – Adds creaminess and healthy fats; consider more edamame if omitting for allergies.
Red bell pepper – Sweetness and vibrant color enhance the visual appeal; any sweet pepper can be used.
Green onions – Offers a mild onion flavor; shallots make a great substitute if preferred.
Red cabbage – Provides crunch and a pop of color; green cabbage or shredded kale are good alternatives.
Unsalted peanuts – Introduces a crunchy element; for a nut-free version, sunflower seeds work well.
Edamame – A protein source that also adds texture; peas or chickpeas are great substitutes as well.
Fresh basil & cilantro – Aromatic and refreshing; parsley or mint can be swapped if desired.

For the Dressing
Peanut butter – Delivers richness to the dressing; sunflower seed butter serves as an excellent nut-free option.
Olive oil – Acts as the base for the dressing; other vegetable oils can be satisfactory substitutes.
Soy sauce – Provides umami and saltiness; use tamari for a gluten-free variation.
Rice vinegar – Balances the acidity in dressing; apple cider vinegar may work as an alternative.
Garlic – Adds aromatic flavor; consider garlic powder if whole garlic is not available.
Ginger – Contributes warmth and spice; ground ginger is a quick substitute if you’re in a pinch.
Maple syrup – Sweetens the dressing to balance flavors; agave syrup makes a lovely alternative.
Chili garlic sauce – Adds heat and depth; adjust the amount based on your spice preference.
Chili crunch oil – Elevates the flavor with a spicy crunch; use regular olive oil for a milder mix.
Lime – Provides acidity and brightness; feel free to use lemon as a substitute in a pinch.

This Crispy Rice Salad With Veggies is not only delicious but allows you to explore endless varieties, making it an enjoyable addition to your meal rotation!

Step‑by‑Step Instructions for Crispy Rice Salad With Veggies

Step 1: Preheat the Oven
Begin by preheating your oven to 400°F (200°C). This temperature is crucial for ensuring the rice achieves that perfect crispy texture when baked. While the oven warms up, gather your baking sheet and line it with parchment paper for easy cleanup.

Step 2: Prepare the Rice Mixture
In a large mixing bowl, combine your cooled pre-cooked rice with chili garlic sauce, chili crunch oil, sesame oil, soy sauce, and the zest and juice of one lime. Stir thoroughly to coat each grain evenly, creating a delicious base for your Crispy Rice Salad With Veggies.

Step 3: Bake the Rice
Spread the seasoned rice mixture evenly onto the prepared baking sheet. Bake in your preheated oven for 25 to 35 minutes, keeping an eye on it towards the end. You’re looking for a golden-brown color and a crunchy texture; the rice should be crispy but not burned.

Step 4: Chop the Vegetables
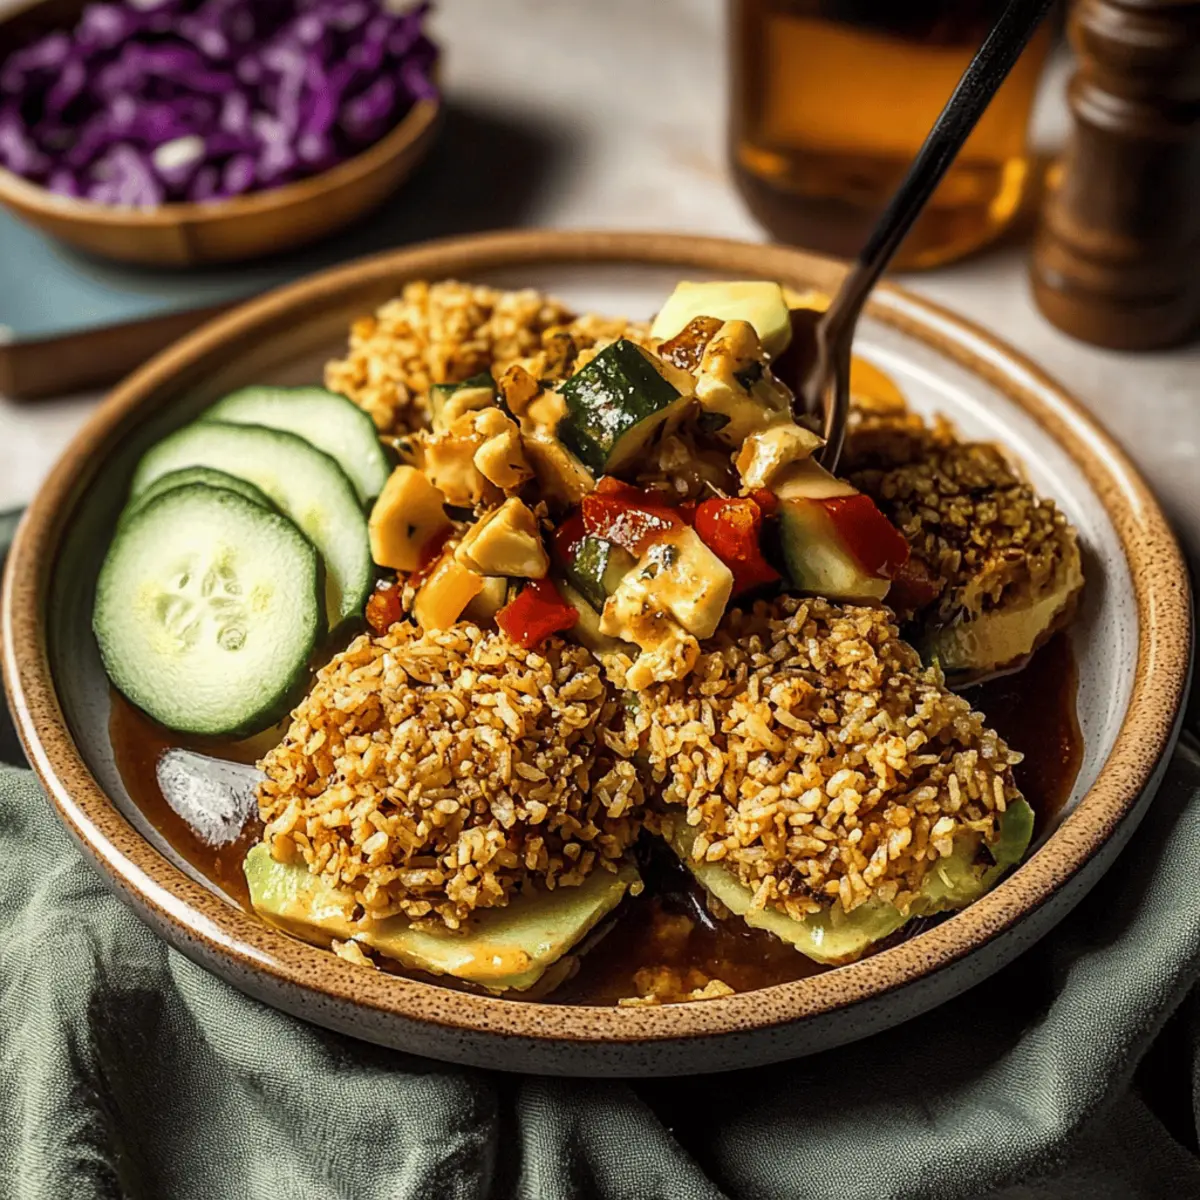
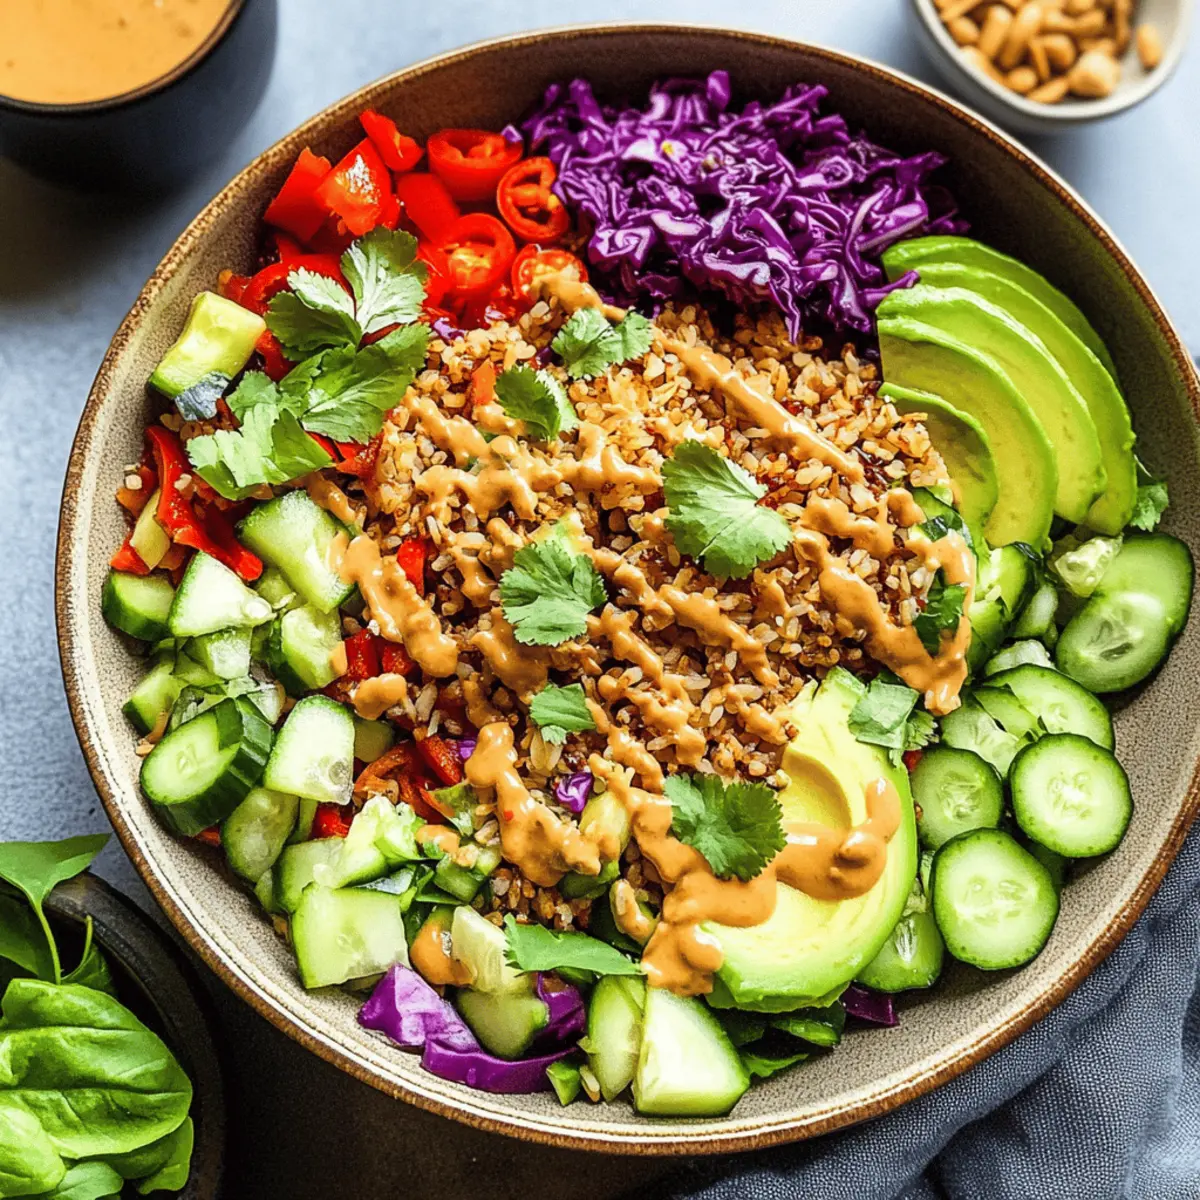
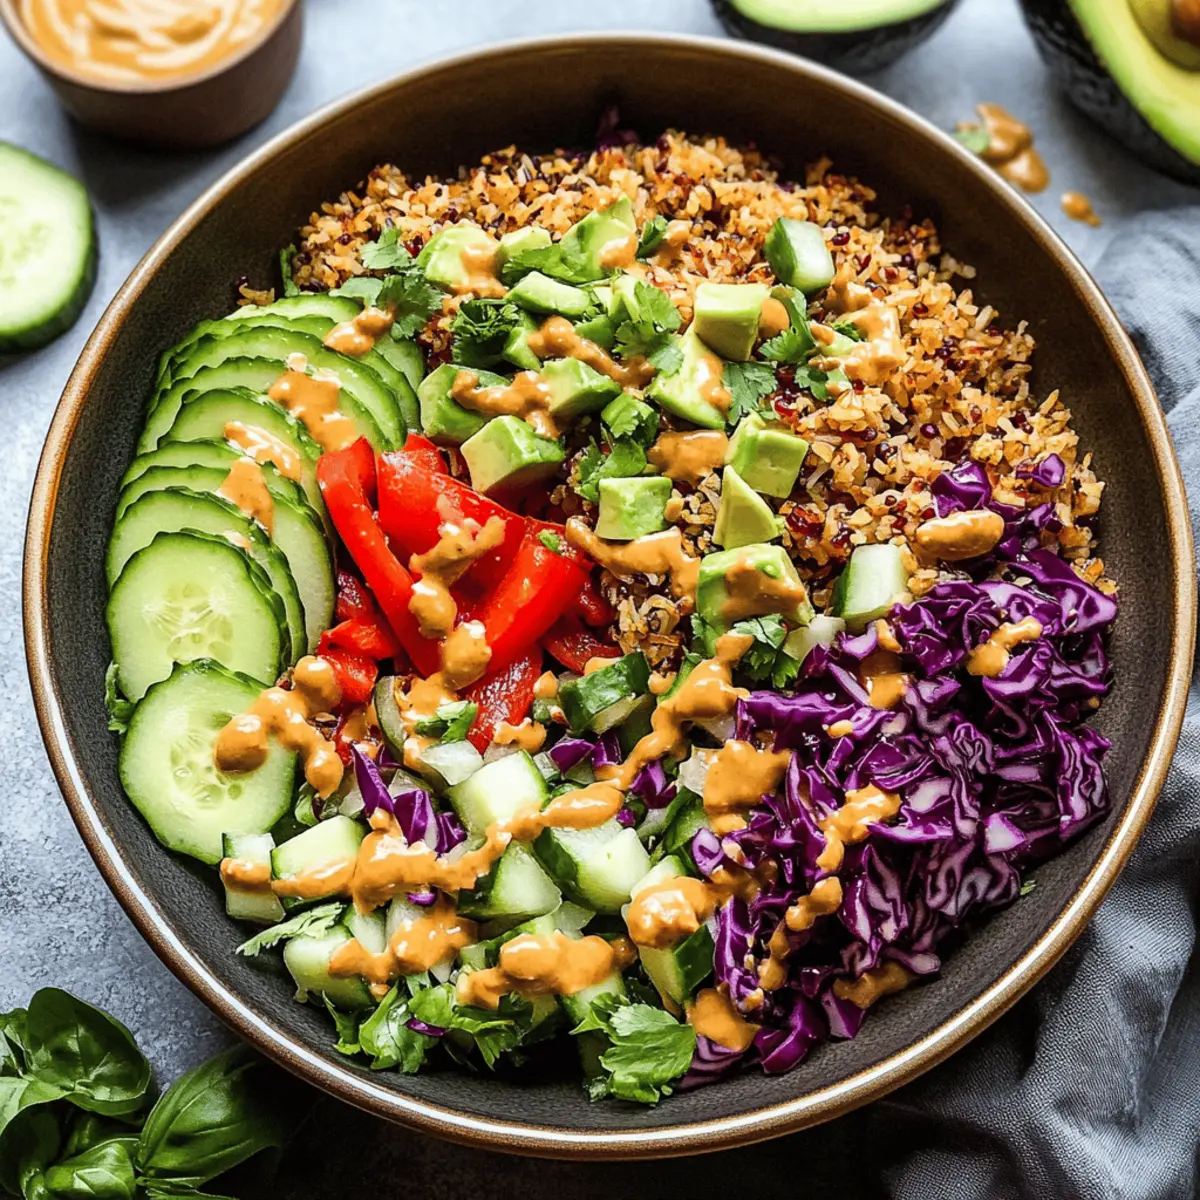
While the rice is baking, prepare your fresh vegetables. In a large bowl, combine diced mini cucumbers, cubed avocados, chopped red bell pepper, sliced green onions, shredded red cabbage, and unsalted peanuts. Toss them well to ensure an even distribution of flavors in your Crispy Rice Salad.

Step 5: Make the Dressing
In a blender or a mixing bowl, blend together peanut butter, olive oil, rice vinegar, minced garlic, lime juice, toasted sesame oil, soy sauce, maple syrup, and fresh ginger. Mix until smooth and creamy, creating a delightful dressing that will enhance your Crispy Rice Salad With Veggies.

Step 6: Assemble the Salad
Once your rice is crispy and has cooled for a few minutes, add it to the bowl with the vegetable mixture. Pour the creamy dressing over the top and toss everything together gently until thoroughly combined. Each bite should be a delightful fusion of textures and flavors!

Step 7: Serve and Enjoy
Your Crispy Rice Salad With Veggies is now ready to serve! Enjoy it immediately as a satisfying main dish, or store it in the fridge for meal prep. For best results, add fresh avocado just before serving to maintain its creamy texture.

Expert Tips for Crispy Rice Salad

  • Cool the Rice: Ensure the rice is completely cooled before baking. This prevents steaming and helps achieve maximum crispiness in your Crispy Rice Salad With Veggies.

  • Watch the Bake Time: Keep an eye on the rice as it bakes. 25-35 minutes is ideal, but ovens vary; you want a golden color without burning.

  • Customize Your Crunch: Feel free to adjust your vegetable choices based on what you have at hand. Mix and match to keep your Crispy Rice Salad fresh and exciting!

  • Save the Dressing: For best flavor, add the dressing right before serving. This keeps your salad from becoming soggy during storage.

  • Fresh Ingredients are Key: Use the freshest vegetables you can find to enhance flavor and texture. Fresh ingredients ignite the vibrant appeal of your salad!

Crispy Rice Salad With Veggies Variations

Feel free to get creative with your salad—these tasty twists make it uniquely yours!

  • Quinoa Swap: Replace rice with cooked quinoa for added protein and texture. It’s a delightful alternative that elevates the dish!

  • Fruit Addition: For a touch of sweetness, toss in diced mango or pineapple. The juicy fruit adds a refreshing contrast to the crunch.

  • Spicy Kick: If you enjoy heat, blend in some sliced jalapeños or a sprinkle of red pepper flakes for an extra zing. It’s a fantastic way to awaken your taste buds!

  • Nut-free Version: Substitute unsalted peanuts with sunflower seeds for a nut-free delight. This maintains the crunch without any allergens!

  • Dressing Twist: Swap the peanut dressing for a tahini-based solution for a creamy, nutty flavor that’s equally satisfying and plant-based. Drizzle some over roasted veggies for a wholesome touch.

  • Vegetable Variety: Utilize seasonal vegetables like zucchini or snap peas to keep things interesting. This way, you’re always embracing freshness in your salad.

  • Herb Boost: Add fresh mint or dill alongside cilantro and basil for a vibrant herbal depth. It brings an aromatic flair that’s simply irresistible!

  • Protein Punch: Incorporate chickpeas or lentils for added protein and heartiness. This will transform your salad into a sustaining meal that’s perfect for lunch or dinner.

Don’t forget—the options are virtually endless! Explore more ways to elevate your salad by checking out my Cabbage Carrot Apple or the flavorful Sizzling Rice Wrapped for more inspiration!

How to Store and Freeze Crispy Rice Salad With Veggies

Fridge: Store any leftovers in an airtight container, and they’ll stay fresh for up to 5 days. Remember to keep the dressing separate until you’re ready to enjoy it for optimal texture.

Freezer: This salad is best enjoyed fresh, but if you have an excess, you can freeze the baked rice separately for up to 2 months. Just reheat until crispy and toss it with fresh veggies and dressing upon serving.

Room Temperature: If serving at a gathering, keep the salad out for no longer than 2 hours to ensure food safety. The sooner it goes back into the fridge, the better!

Reheating: For the crispiest results, reheat the baked rice at 400°F (200°C) for about 10 minutes before mixing it back into the salad. Enjoy the delightful crunch of your Crispy Rice Salad With Veggies!

What to Serve with Crispy Rice Salad With Veggies

Elevate your dining experience by pairing this delightful salad with comforting, mouthwatering side dishes that seamlessly complement its vibrant flavors.

  • Grilled Tofu Skewers: Marinated and grilled, these skewers add a tasty protein element that enhances the salad’s texture and makes for a satisfying main course.

  • Soba Noodles: Lightly dressed in a sesame sauce, these noodles provide a lovely contrast to the salad’s crunch, creating a harmonious balance on your plate.

  • Miso Soup: A warm, savory broth adds a soothing touch to your meal, enriching the overall experience while echoing the Asian-inspired flavors of the salad.

  • Tempura Vegetables: The light, crispy batter and fresh veggies pair beautifully with the salad’s crunch, adding layers of flavor and delight with every bite.

  • Asian Slaw: A zesty mix of cabbage, carrots, and a tangy dressing complements the salad’s freshness while providing a crunchy, refreshing contrast.

  • Coconut Rice: Creamy and subtly sweet, this rice dish creates a fulfilling base that balances the salad’s bold flavors and sharpness.

  • Chilled Green Tea: This refreshing drink not only cools down your palate but also complements the salad’s zesty notes with its earthy undertones.

  • Mango Sticky Rice: For dessert, this classic Asian-inspired treat offers a sweet ending to your meal, with the creaminess of coconut and the tropical flavor of mango tantalizing your taste buds.

  • Pickled Vegetables: Tangy and vibrant, these add a burst of acidity that beautifully offsets the richness of the dressing, enhancing each mouthful.

Make Ahead Options

This Vegan Crispy Rice Salad With Crunchy Veggies is a fantastic dish to prepare in advance, saving you precious time during a busy week. You can bake the crispy rice up to 24 hours ahead and store it in an airtight container to maintain its crunchy texture. Additionally, chop and combine the fresh vegetables (excluding avocado) up to 3 days before serving—this allows the vibrant flavors to meld beautifully. Just remember to keep the dressing separate until you’re ready to serve, ensuring everything remains fresh and delightful. When you’re ready to enjoy, simply toss the crispy rice, veggies, and dressing together, and savor the taste of a delicious homemade meal with minimal effort!

Crispy Rice Salad With Veggies Recipe FAQs

What type of rice should I use for this salad?
Absolutely! Using day-old rice works best for achieving that perfect crunch in your Crispy Rice Salad With Veggies. Freshly cooked rice tends to be too moist, which prevents it from crisping up nicely in the oven.

How should I store leftovers from the Crispy Rice Salad?
Store any leftover salad in an airtight container in the refrigerator, and it will remain fresh for up to 3 to 5 days. To maintain the texture, keep the salad dressing separate and add it just before serving.

Can I freeze Crispy Rice Salad With Veggies?
Yes, you can! To freeze the baked rice, spread it on a baking sheet, let it cool completely, then transfer it to an airtight container or freezer bag. It will stay good for up to 2 months. When you’re ready to enjoy it, simply reheat the rice in the oven at 400°F (200°C) for about 10 minutes to restore its crispy texture before mixing it with fresh veggies and dressing.

What should I do if my baked rice isn’t crispy enough?
If your rice isn’t crispy as desired, try spreading it out in a thinner layer on the baking sheet next time. Baking it for a bit longer can also help; just keep an eye on it to avoid burning. Additionally, ensuring the rice is completely cooled before baking helps achieve that delightful crunch you’re looking for!

Are there any dietary considerations for this salad?
Very! This Crispy Rice Salad With Veggies is naturally vegan and gluten-free if you use tamari instead of soy sauce. If you’re accommodating allergies, you can swap out peanuts for sunflower seeds to make it nut-free. Always check the ingredient labels to ensure they’re safe for everyone at your table.

How can I customize the vegetables in my salad?
The more the merrier! Feel free to mix and match the vegetables based on your preferences or what’s in season. You can add shredded carrots, diced mango for sweetness, or even some chopped kale for a different texture—let your creativity shine with every delightful bite!

Crispy Rice Salad With Veggies

Crispy Rice Salad With Veggies for a Crunchy Delight

Try this Crispy Rice Salad With Veggies for a delicious, satisfying dish that combines textures and flavors in every bite.
Prep Time 15 minutes
Cook Time 35 minutes
Cooling Time 5 minutes
Total Time 55 minutes
Servings: 4 servings
Course: Lunch
Cuisine: Asian
Calories: 220

Ingredients
  

For the Salad Base
  • 3 cups Pre-cooked rice Day-old rice works best.
  • 2 pieces Mini cucumbers Persian or English varieties are great.
  • 1 medium Avocado Consider more edamame if allergic.
  • 1 medium Red bell pepper
  • 3 pieces Green onions Shallots can be substituted.
  • 2 cups Red cabbage Green cabbage or shredded kale are alternatives.
  • 1/2 cup Unsalted peanuts Sunflower seeds can be used for nut-free.
  • 1 cup Edamame Peas or chickpeas are good substitutes.
  • 1/4 cup Fresh basil Cilantro can also be added.
For the Dressing
  • 1/4 cup Peanut butter Sunflower seed butter for nut-free.
  • 2 tablespoons Olive oil Other vegetable oils are fine.
  • 2 tablespoons Soy sauce Use tamari for gluten-free.
  • 1 tablespoon Rice vinegar Apple cider vinegar can work.
  • 2 cloves Garlic Garlic powder can be an alternative.
  • 1 teaspoon Ginger Ground ginger can be used.
  • 1 tablespoon Maple syrup Agave syrup is a good substitute.
  • 1 tablespoon Chili garlic sauce Adjust based on spice preference.
  • 1 tablespoon Chili crunch oil Regular olive oil can be used for milder flavor.
  • 1 medium Lime Lemon can be used as substitute.

Equipment

  • oven
  • baking sheet
  • mixing bowl
  • Blender

Method
 

Step‑by‑Step Instructions
  1. Preheat your oven to 400°F (200°C) and prepare a baking sheet lined with parchment paper.
  2. In a large mixing bowl, combine cooled pre-cooked rice with chili garlic sauce, chili crunch oil, soy sauce, and lime juice.
  3. Spread the seasoned rice mixture onto the baking sheet and bake for 25 to 35 minutes until golden brown.
  4. While the rice bakes, chop the vegetables and mix them in a large bowl.
  5. Blend the dressing ingredients until smooth and creamy.
  6. Once the rice is crispy, mix it with the vegetables and pour the dressing over, tossing gently.
  7. Serve immediately, or store in the fridge, adding fresh avocado just before serving.

Notes

For best flavor, add the dressing right before serving to maintain texture. Use the freshest vegetables available for optimal results.

Mozzarella Stuffed Rosemary Parmesan Soft Pretzels Bliss

The aroma of freshly baked bread wafting through my kitchen always brings a sense of nostalgia, transporting me back to carefree days spent exploring local markets. Today, I’m excited to share my take on that beloved, soft snack with a twist: Mozzarella Stuffed Rosemary Parmesan Soft Pretzels! These delightful treats boast a golden, chewy exterior and a gooey, cheesy center that completely redefine comfort food. Perfect for impressing guests or simply indulging yourself, they are surprisingly easy to make and a fantastic way to elevate your appetizer game. There’s something oh-so-satisfying about crafting these pretzels from scratch—whether you’re hosting a movie night or just craving a warm snack. Plus, they’re easily customizable with your favorite ingredients, making them a versatile delight. So, ready to dive into this delicious dough-making adventure? Let’s get started!

Why are these pretzels a must-try?

Irresistible aroma: The combination of fresh rosemary and melting mozzarella creates a mouthwatering scent that will have everyone flocking to the kitchen.
Gourmet twist: Elevate your snack game with these pretzels that add sophistication to a classic recipe.
Customizable: Feel free to experiment with different cheeses or herbs, like thyme or garlic powder, to suit your taste.
Perfectly chewy texture: Achieve that iconic soft pretzel consistency—golden on the outside and delightfully chewy on the inside.
Quick and easy: With straightforward instructions, you’ll be enjoying fresh pretzels in no time! For more delicious twists, check out my Zucchini Potato Mozzarella recipe for a veggie-packed treat!

Mozzarella Stuffed Rosemary Parmesan Soft Pretzels Ingredients

For the Pretzel Dough

  • 4 cups all-purpose flour – Provides the structure and base for the pretzels. Note: Can substitute with gluten-free flour blend.
  • 1 packet (2 ¼ teaspoons) instant yeast – Acts as a leavening agent, helping the dough rise. No substitutions needed.
  • 1 ½ teaspoons salt – Enhances flavor and controls yeast activity. Essential for taste.
  • 1 tablespoon sugar – Feeds the yeast for better rise and adds a touch of sweetness. Can reduce or omit based on preference.
  • 1 ½ cups warm water (110°F) – Activates the yeast. Ensure the temperature is correct; too hot can kill yeast.

For Boiling

  • ¼ cup baking soda – Used for boiling pretzels to give that distinctive chewy crust. No substitutions.

For the Topping

  • ¼ cup unsalted butter (melted) – Adds richness and flavor, brushed on before baking. Substitute with oil if dairy-free.
  • 1 tablespoon fresh rosemary (chopped) – Adds a fragrant, herbal flavor. Can substitute with 1 teaspoon dried rosemary.
  • ½ cup grated Parmesan cheese – Provides a salty depth and complements the mozzarella. Any hard cheese can be used.

For the Cheesy Filling

  • 8 ounces mozzarella cheese (cut into 1-inch cubes) – The gooey, melty filling. Can use other cheeses like cheddar or gouda for a different flavor.

Step‑by‑Step Instructions for Mozzarella Stuffed Rosemary Parmesan Soft Pretzels

Step 1: Prepare Dough
In a mixing bowl, combine 1 ½ cups of warm water (110°F) with 1 packet of instant yeast and 1 tablespoon of sugar. Let the mixture sit for about 5-10 minutes until it becomes frothy. Meanwhile, in another bowl, whisk together 4 cups of all-purpose flour and 1 ½ teaspoons of salt. Gradually pour the yeast mixture into the flour, mixing until a dough forms. Knead the dough for about 5 minutes using a stand mixer or 8 minutes by hand until it is smooth and elastic.

Step 2: Add Flavors
Once your dough is kneaded, gently incorporate 1 tablespoon of chopped fresh rosemary and ½ cup of grated Parmesan cheese into the mixture, ensuring even distribution. Shape the dough into a ball and place it in a greased bowl, covering it with a clean kitchen towel. Allow it to rise in a warm place for about 1 hour or until the dough has doubled in size.

Step 3: Shape Pretzels
Preheat your oven to 425°F (220°C) to get ready for baking the Mozzarella Stuffed Rosemary Parmesan Soft Pretzels. After the dough has risen, punch it down to release the air. Divide the dough into 8 equal pieces and flatten each piece into a disc. Place a 1-inch cube of mozzarella cheese in the center, fold the dough over the cheese, seal it, and shape the dough into a pretzel twist.

Step 4: Boil
In a large pot, bring 4 cups of water to a rolling boil. Carefully add in ¼ cup of baking soda, watching as it bubbles. Gently drop each shaped pretzel into the boiling water, boiling them for 30 seconds each. Use a slotted spoon to remove the pretzels and let them drain on a paper towel, ensuring they’re not soggy before baking.

Step 5: Bake
Line a baking sheet with parchment paper and arrange the boiled pretzels on it, giving them some space. Brush each pretzel generously with ¼ cup of melted unsalted butter and sprinkle with sea salt to taste. Bake the pretzels in the preheated oven for 12-15 minutes or until they turn a beautiful golden brown, giving you that perfect combination of flavors in your Mozzarella Stuffed Rosemary Parmesan Soft Pretzels.

Make Ahead Options

These Mozzarella Stuffed Rosemary Parmesan Soft Pretzels are perfect for meal prep enthusiasts! You can prepare the dough up to 24 hours in advance—simply mix and knead the dough, then let it rise as usual. After shaping your pretzels, you can place them on a baking sheet, cover with plastic wrap, and refrigerate. To maintain quality, remember to boil them just before baking; this ensures that their texture remains chewy and delicious. When you’re ready to serve, simply boil the pretzels for 30 seconds and bake as directed, providing you with warm, gooey treats that are just as delightful as when freshly made!

What to Serve with Mozzarella Stuffed Rosemary Parmesan Soft Pretzels

Imagine hosting an evening of laughter and storytelling with friends, as the aroma of warm, cheesy pretzels fills your home, inviting everyone to indulge and relax.

  • Tangy Mustard Dip: The sharpness of mustard is a classic pairing that cuts through the richness of gooey mozzarella, enhancing every bite.

  • Marinara Sauce: This savory tomato sauce offers a delightful contrast, providing a bright acidity that complements the soft pretzels beautifully. Dip each warm pretzel for a comforting snack experience.

  • Cheesy Queso: Creamy and loaded with flavor, queso adds a fun, indulgent twist to your pretzel feast. It’s perfect for those looking to elevate their snacking game.

  • Fresh Vegetable Platter: Crisp and crunchy veggies like carrots, bell peppers, and cucumbers add a refreshing crunch that balances the soft, chewy pretzels wonderfully.

  • Herb-Infused Olive Oil: Dip your pretzels in some high-quality olive oil infused with herbs for an elegant touch. The richness and flavor will elevate your tasting experience.

  • Chilled White Wine: A crisp Sauvignon Blanc or a light Pinot Grigio pairs perfectly, complementing the buttery flavors of the pretzel while refreshing your palate.

  • Garlic Butter: Brush or dip your pretzels in garlic-infused melted butter for an added layer of flavor—rich, savory, and simply irresistible.

  • Fruit Chutney: A sweet and tangy fruit chutney can act as a fruity counterbalance, enhancing the overall flavor profile for a delightful surprise.

  • Chocolate Dip: For those who enjoy a dessert twist, a warm chocolate dip can be an exciting finish for your pretzel experience—sweet, gooey, and fun!

Mozzarella Stuffed Rosemary Parmesan Soft Pretzels Variations

Customize your pretzel experience with these exciting twists that add a personal touch to your warm, cheesy treats!

  • Gluten-Free: Substitute all-purpose flour with a gluten-free blend, ensuring a delightful spin for gluten-sensitive friends.
  • Herbed Delight: Incorporate a mix of fresh herbs like thyme or oregano into the dough for an aromatic boost.
  • Cheese Swap: Try different cheese fillings, such as cheddar or gouda, for a unique flavor twist that keeps everyone guessing!
  • Spicy Kick: Mix in a dash of red pepper flakes or chili powder to the dough for a subtle heat that awakens the taste buds.
  • Sweet Version: Transform these into a dessert treat by filling with sweetened cream cheese or chocolate instead of mozzarella.
  • Oven-Free Option: Make boiled dumplings instead. Boil the dough, then sauté in a pan with butter and garlic—deliciously different!
  • Dipping Sauce: Serve with homemade honey mustard or a zesty marinara for an additional layer of flavor that elevates each bite.
  • Different Shapes: Instead of classic pretzel twists, shape the dough into bite-sized balls for an easy, shareable snack perfect for gatherings.

Feel free to let your culinary creativity flow! If you’re interested in more warm delights, you might enjoy my Easy Soft Milk Bread or the refreshing Tropical Pineapple Soft treat for a sunny dessert!

Expert Tips for Mozzarella Stuffed Rosemary Parmesan Soft Pretzels

  • Perfect Water Temperature: Ensure your water is warm—not boiling—when activating the yeast; too hot can kill it, affecting the dough rise.
  • Fresh vs. Dried Herbs: For the best flavor, opt for fresh rosemary. If you have only dried herbs on hand, use them sparingly as they are more concentrated.
  • Sealing the Cheese: Take extra care to seal the dough around the mozzarella, preventing it from leaking out during boiling and baking.
  • Boiling Technique: Don’t rush the boiling step! Each pretzel should be boiled for 30 seconds to achieve that iconic chewy crust.
  • Experiment with Fillings: While this recipe features mozzarella, feel free to mix and match different cheeses or herbs to create your ultimate version of these pretzels.
  • Storage Tips: To keep your Mozzarella Stuffed Rosemary Parmesan Soft Pretzels fresh, store leftovers in an airtight container for up to 2 days or freeze for longer preservation; simply reheat in the oven.

How to Store and Freeze Mozzarella Stuffed Rosemary Parmesan Soft Pretzels

Room Temperature: Keep leftover pretzels in an airtight container at room temperature for up to 2 days to maintain their delicious chewiness.

Fridge: If you prefer, you can store them in the fridge for up to 5 days, but be mindful that they may lose some of their lovely texture.

Freezer: For longer storage, freeze unbaked pretzels after boiling for up to 3 months. Bake directly from frozen, adding a couple of extra minutes to the baking time for perfect results.

Reheating: To enjoy your pretzels later, reheat in the oven at 350°F (175°C) for 5-10 minutes, ensuring they regain their warm, gooey center and delightful crispness.

Mozzarella Stuffed Rosemary Parmesan Soft Pretzels Recipe FAQs

How do I choose the right rosemary for my pretzels?
Absolutely! For the best flavor, look for fresh rosemary with vibrant green leaves; it should be fragrant and pliable. Avoid those with dry or brown spots, as they might be past their prime. Dried rosemary can work in a pinch, but use about one teaspoon as it’s more concentrated.

What’s the best way to store leftover pretzels?
Very! To keep your Mozzarella Stuffed Rosemary Parmesan Soft Pretzels fresh, store them in an airtight container at room temperature for up to 2 days. If you prefer, you can refrigerate them for up to 5 days, although this may affect their lovely texture. Reheat in the oven for the best results!

Can I freeze my pretzels, and how do I do it?
Absolutely! To freeze unbaked pretzels, first boil them for 30 seconds, then place them on a baking sheet in a single layer to freeze until solid. Transfer them to a freezer-safe bag or container for up to 3 months. When you’re ready to enjoy them, bake directly from frozen, just adding 2-3 extra minutes to the baking time.

Can I make these pretzels gluten-free?
Of course! You can substitute the all-purpose flour with a gluten-free flour blend that works as a 1:1 replacement. Make sure to follow the instructions for gluten-free baking directly, as it often differs slightly from regular flour. This way, everyone can enjoy these delightful snacks!

What if my dough doesn’t rise?
Very! If your dough doesn’t rise, check the yeast’s freshness; if it’s old, it might not activate properly. Ensure your warm water temperature is around 110°F—not too hot or too cold. If all else fails, try placing the dough in a warmer spot or covering it with a warm towel to encourage rising.

Are there any dietary considerations for these pretzels?
Yes, indeed! While the recipe is vegetarian-friendly, those with dairy allergies can swap the butter for a plant-based oil and use a dairy-free cheese alternative. Always check your ingredients to ensure they meet your dietary needs, and feel free to customize the cheese filling to suit your preference.

Mozzarella Stuffed Rosemary Parmesan Soft Pretzels

Mozzarella Stuffed Rosemary Parmesan Soft Pretzels Bliss

Delightful Mozzarella Stuffed Rosemary Parmesan Soft Pretzels with a golden chewy exterior and gooey cheese center, perfect for impressing guests.
Prep Time 15 minutes
Cook Time 15 minutes
Rise Time 1 hour
Total Time 1 hour 30 minutes
Servings: 8 pretzels
Course: Snack
Cuisine: American
Calories: 250

Ingredients
  

For the Pretzel Dough
  • 4 cups all-purpose flour Can substitute with gluten-free flour blend.
  • 1 packet (2 ¼ teaspoons) instant yeast No substitutions needed.
  • 1 ½ teaspoons salt Essential for taste.
  • 1 tablespoon sugar Can reduce or omit based on preference.
  • 1 ½ cups warm water (110°F) Ensure the temperature is correct; too hot can kill yeast.
For Boiling
  • ¼ cup baking soda No substitutions.
For the Topping
  • ¼ cup unsalted butter (melted) Substitute with oil if dairy-free.
  • 1 tablespoon fresh rosemary (chopped) Can substitute with 1 teaspoon dried rosemary.
  • ½ cup grated Parmesan cheese Any hard cheese can be used.
For the Cheesy Filling
  • 8 ounces mozzarella cheese (cut into 1-inch cubes) Can use other cheeses like cheddar or gouda for a different flavor.

Equipment

  • mixing bowl
  • Stand mixer
  • slotted spoon
  • baking sheet
  • pot

Method
 

Step-by-Step Instructions
  1. In a mixing bowl, combine 1 ½ cups of warm water (110°F) with 1 packet of instant yeast and 1 tablespoon of sugar. Let the mixture sit for about 5-10 minutes until it becomes frothy. Meanwhile, in another bowl, whisk together 4 cups of all-purpose flour and 1 ½ teaspoons of salt. Gradually pour the yeast mixture into the flour, mixing until a dough forms. Knead the dough for about 5 minutes using a stand mixer or 8 minutes by hand until it is smooth and elastic.
  2. Once your dough is kneaded, gently incorporate 1 tablespoon of chopped fresh rosemary and ½ cup of grated Parmesan cheese into the mixture, ensuring even distribution. Shape the dough into a ball and place it in a greased bowl, covering it with a clean kitchen towel. Allow it to rise in a warm place for about 1 hour or until the dough has doubled in size.
  3. Preheat your oven to 425°F (220°C) to get ready for baking the Mozzarella Stuffed Rosemary Parmesan Soft Pretzels. After the dough has risen, punch it down to release the air. Divide the dough into 8 equal pieces and flatten each piece into a disc. Place a 1-inch cube of mozzarella cheese in the center, fold the dough over the cheese, seal it, and shape the dough into a pretzel twist.
  4. In a large pot, bring 4 cups of water to a rolling boil. Carefully add in ¼ cup of baking soda, watching as it bubbles. Gently drop each shaped pretzel into the boiling water, boiling them for 30 seconds each. Use a slotted spoon to remove the pretzels and let them drain on a paper towel, ensuring they’re not soggy before baking.
  5. Line a baking sheet with parchment paper and arrange the boiled pretzels on it, giving them some space. Brush each pretzel generously with ¼ cup of melted unsalted butter and sprinkle with sea salt to taste. Bake the pretzels in the preheated oven for 12-15 minutes or until they turn a beautiful golden brown, giving you that perfect combination of flavors in your Mozzarella Stuffed Rosemary Parmesan Soft Pretzels.

Notes

Store leftovers in an airtight container at room temperature for up to 2 days, or freeze for longer preservation; simply reheat in the oven.

Refreshing Grapefruit Pie Recipe for a Sweet-Tangy Treat

As I sifted through my pantry one sunny afternoon, the vibrant pink grapefruits caught my eye, whispering promises of zesty delights. That’s when I decided it was high time to create a Grapefruit Pie Recipe that beautifully blends tangy citrus with creamy decadent goodness. This dessert not only elevates your culinary repertoire but also requires minimal prep time, making it the perfect treat for surprise guests or a satisfying end to a weeknight dinner. With its crunchy graham cracker crust and luscious filling, every bite is a delightful dance of sweet and tangy flavors that will leave you craving just one more slice. Are you ready to indulge in a refreshing twist on classic desserts?

Grapefruit Pie Recipe

Why is Grapefruit Pie the Ultimate Dessert?

Refreshing and unique, this grapefruit pie recipe offers a delightful twist on traditional desserts. Easy to prepare, you’ll impress your friends and family with minimal effort. Zesty flavor comes from fresh grapefruit juice, balancing perfectly with the creamy filling. Versatile enough to serve at any gathering, it’s a crowd-pleaser that simply shines. For a wholesome experience, consider pairing it with homemade whipped cream, just like in our delicious Matcha Sponge Cake or our rich Banana Bread Brownies.

Grapefruit Pie Ingredients

• Treat yourself to this delightful grapefruit pie recipe with these easy-to-find ingredients.

For the Filling

  • Sweetened Condensed Milk – This is essential for creating a creamy, luscious custard that embodies the pie’s rich flavor.
  • Fresh Grapefruit Juice – Freshly squeezed juice provides the vibrant tartness integral to the pie’s refreshing taste; avoid using store-bought options.
  • Granulated Sugar – This balances the pie’s tangy citrus; feel free to adjust the amount based on your sweetness preference.
  • Egg Yolks – Vital for structure and richness, they contribute to the overall flavor; remember, no substitutes with egg whites!

For the Crust

  • Graham Cracker Crust – This delightful crunchy base pairs beautifully with the smooth filling; consider a homemade version for an extra touch!

Step‑by‑Step Instructions for Grapefruit Pie Recipe

Step 1: Preheat the Oven
Begin by preheating your oven to 325°F (163°C). This ensures a perfect baking temperature for the grapefruit pie. While the oven heats up, gather your ingredients and equipment, including a mixing bowl and a baking sheet, to streamline your preparation process.

Step 2: Prepare the Grapefruit Juice
Juice two large grapefruits to yield about one cup of fresh grapefruit juice. Using freshly squeezed juice is key to achieving that bold citrus flavor in your grapefruit pie. To enhance the taste, strain the juice through a sieve to remove any seeds or pulp, ensuring a smooth filling.

Step 3: Beat the Egg Yolks
In a medium bowl, beat the egg yolks until they become light and fluffy, about 2-3 minutes. Gradually incorporate the sweetened condensed milk and granulated sugar into the yolks. Mix until fully combined and smooth, creating a rich custard base for your grapefruit pie recipe.

Step 4: Combine the Mixtures
Slowly add the strained grapefruit juice into the egg mixture, whisking gently until all ingredients are well blended. You should achieve a vibrant, creamy mixture that boasts both tang and sweetness, perfect for filling your pie. Take a moment to appreciate the delightful color and aroma!

Step 5: Pour into the Crust
Place your graham cracker crust on a baking sheet for stability, then pour the grapefruit filling into the crust. Ensure an even distribution, and watch for any air bubbles as you fill. This step is crucial for a smooth texture in your finished grapefruit pie.

Step 6: Bake the Pie
Carefully place the baking sheet in the preheated oven and bake for approximately 25 minutes. The filling should be set but still slightly wobbly in the center — this indicates a creamy, luscious texture is on its way. Keep an eye on it to avoid overbaking!

Step 7: Cool and Refrigerate
Once baked, remove the grapefruit pie from the oven and allow it to cool at room temperature for about 30 minutes. After cooling, it’s important to refrigerate the pie for at least 3 hours or overnight, helping it firm up and develop rich flavors before serving.

Step 8: Serve and Garnish
When ready to serve your refreshing grapefruit pie, cut into slices and plate them with a dollop of whipped cream. For an extra touch, garnish with thin grapefruit slices or zest for added flair. This pie will certainly make a striking statement at your dessert table!

Grapefruit Pie Recipe

How to Store and Freeze Grapefruit Pie

Fridge: Keep the grapefruit pie in an airtight container in the refrigerator for up to 3 days. This preserves its creamy texture and refreshing tang.

Freezer: For longer storage, wrap the pie tightly in plastic wrap and then aluminum foil before placing it in the freezer. It can last for up to one month.

Thawing: When you’re ready to enjoy your grapefruit pie again, simply transfer it to the refrigerator and thaw overnight for the best flavor and texture.

Reheating: While it’s best served cold, you can bring it to room temperature for a softer texture. Avoid reheating the pie in the oven to maintain its integrity.

Make Ahead Options

These grapefruit pie recipes are perfect for busy home cooks looking to save time during the week! You can prepare the filling and refrigerate it for up to 24 hours in advance, allowing the flavors to meld beautifully. To do this, simply make the custard filling and pour it into the prepared graham cracker crust, then cover tightly with plastic wrap to prevent drying. When you’re ready to bake, simply remove the wrap and pop it in the oven. After baking, let it cool for about 30 minutes before refrigerating for at least 3 hours or overnight to achieve that perfect chilled texture. Rest assured, this preparation method ensures your grapefruit pie is just as delicious and refreshing!

Expert Tips for Grapefruit Pie Recipe

  • Avoid Soggy Crust: Blind-baking your graham cracker crust ensures it holds up against the creamy filling without getting soggy.
  • Whip It Right: For the best homemade whipped cream, whip heavy cream until soft peaks form, adding confectioners’ sugar for sweetness.
  • Chill Thoroughly: Always refrigerate your grapefruit pie for at least three hours to firm up the filling and enhance its flavor.
  • Fresh Juice Matters: Use freshly squeezed grapefruit juice for a vibrant flavor; store-bought juice can lead to a less tangy result.
  • Experiment with Toppings: Consider adding shaved white chocolate or grapefruit zest to elevate the pie’s presentation and flavor complexity.

Grapefruit Pie Recipe Variations

Feel free to get creative with this grapefruit pie recipe and make it your own in delightful ways!

  • Homemade Crust:
    Swap the store-bought graham cracker crust for a homemade one. Combine crushed graham crackers, melted butter, and sugar for an extra special touch!
  • Citrus Burst:
    Add a splash of orange or lemon juice along with grapefruit juice for a more complex citrus flavor. This twist will enhance the pie with a brighter aroma.
  • Dairy-Free:
    Replace sweetened condensed milk with coconut milk or almond milk to make this pie dairy-free. The coconut will lend a tropical flair to the tangy filling.
  • Flavorful Zest:
    Incorporate some grated grapefruit or lemon zest into the filling. This will elevate the citrus notes and give your pie a beautiful burst of flavor.
  • Nutty Crunch:
    For added texture, mix chopped nuts like pecans or almonds into the crust. Their crunchiness will provide a delightful contrast to the creamy filling, adding a gourmet flair.
  • Decadent Toppings:
    Top with shaved white chocolate or a drizzle of dark chocolate for an irresistible finish. Pair it with some homemade whipped cream, just like in our Easy Homemade Creamy Pastry for a richer dessert experience.
  • Extra Sweetness:
    If you love sweeter desserts, sprinkle some powdered sugar on top before serving. This delightful touch will illuminate the pie’s beautiful presentation and make every bite even more indulgent.
  • Spicy Kick:
    For those who enjoy heat, try adding a pinch of cayenne pepper or chili powder into the filling. This surprising hint of spice contrasts nicely with the pie’s sweetness and citrusy tang.

What to Serve with Grapefruit Pie

Elevate your grapefruit pie experience with delightful pairings that harmonize beautifully with its sweet-tangy flavors.

  • Fresh Whipped Cream: A dollop of homemade whipped cream adds a light, airy texture that perfectly balances the creamy custard filling. It’s a classic complement that everyone loves.
  • Mint Sprigs: Garnish with vibrant mint leaves for a pop of freshness and color. The cooling notes of mint beautifully enhance the zesty citrus notes in the pie.
  • Coconut Ice Cream: Scoop of creamy coconut ice cream offers a sweet, tropical contrast that lingers on the palate. The smooth texture nicely complements the pie’s crunchy crust.
  • Chilled White Wine: A glass of chilled Sauvignon Blanc or Riesling showcases crisp acidity that matches the pie’s tang. It turns dessert into an elegant occasion!
  • Grapefruit Sorbet: Serve grapefruit sorbet alongside for an extra burst of citrus goodness. This refreshing treat echoes the flavors of the pie while adding a delightful icy texture.
  • Chocolate Shavings: Sprinkle dark chocolate shavings on top of each slice to add a rich, decadent touch. The bittersweet chocolate melds beautifully with the pie’s flavorful layers.
  • Pistachio Crumble: A crunchy pistachio crumble or nut topping provides a delightful contrast and adds an unexpected yet complementary nutty flavor to each bite.
  • Herbal Tea: Pair with a warm cup of chamomile or mint tea for a cozy finish. These soothing flavors wrap up your meal perfectly, enhancing the grapefruit notes.
Grapefruit Pie Recipe

Grapefruit Pie Recipe FAQs

What ripeness should the grapefruits be for the pie?
Absolutely, you want to select grapefruits that are firm with smooth skin, free of dark spots or discoloration. The fruit should feel heavy for its size, which indicates juiciness. Freshness is key for vibrant flavor, so if possible, choose grapefruits that are in season for the best taste!

How should I store leftover grapefruit pie?
To keep your scrumptious grapefruit pie fresh, store it in an airtight container in the refrigerator for up to 3 days. Make sure it’s well-sealed to prevent it from absorbing any odors from the fridge. If you have concerns about keeping the crust crisp, you can loosely cover it with plastic wrap.

Can I freeze grapefruit pie?
Yes, you can! To freeze, wrap the pie tightly in plastic wrap and then in aluminum foil. This double-wrapping helps prevent freezer burn. The grapefruit pie can be frozen for up to one month—just remember to thaw it in the fridge overnight before serving for the best texture!

What should I do if my crust becomes soggy?
To avoid a soggy crust, consider blind-baking it before adding the filling. Pre-bake the graham cracker crust in your preheated oven at 325°F (163°C) for about 10 minutes, or until it’s golden and firm. Let it cool before adding the custard, ensuring it maintains its crunch even with the creamy filling.

Is there any concern about sugar for dietary restrictions?
Indeed! Since sweetened condensed milk significantly contributes to the sugar content of this grapefruit pie, those watching their sugar intake should be mindful. Consider using a sugar-free sweetened condensed milk alternative or reducing the amount of sugar in the recipe if needed. Always check for allergies as well, especially if serving to guests!

How can I enhance the flavor of the pie?
For an extra flavor boost, you can add a teaspoon of grapefruit zest to the filling for a more intense citrus note. Additionally, consider garnishing the pie with fresh grapefruit slices or shaved white chocolate for a beautiful, decadent presentation that’s sure to impress!

Grapefruit Pie Recipe

Refreshing Grapefruit Pie Recipe for a Sweet-Tangy Treat

This Grapefruit Pie Recipe offers a perfect blend of sweet and tangy flavors, making it a delightful dessert choice.
Prep Time 15 minutes
Cook Time 25 minutes
Chilling Time 3 hours
Total Time 3 hours 40 minutes
Servings: 8 slices
Course: Dessert
Cuisine: American
Calories: 250

Ingredients
  

For the Filling
  • 1 can Sweetened Condensed Milk
  • 1 cup Fresh Grapefruit Juice Juice from about two large grapefruits
  • 1/2 cup Granulated Sugar Adjust to taste
  • 4 Egg Yolks No substitutes with egg whites!
For the Crust
  • 1 pre-made Graham Cracker Crust Homemade is recommended for extra touch

Equipment

  • oven
  • mixing bowl
  • baking sheet
  • Sieve

Method
 

Step‑by‑Step Instructions
  1. Preheat your oven to 325°F (163°C).
  2. Juice two large grapefruits to yield about one cup of fresh juice, then strain it.
  3. In a medium bowl, beat the egg yolks until light and fluffy, then mix in the sweetened condensed milk and granulated sugar until smooth.
  4. Slowly add the strained grapefruit juice into the egg mixture, whisking until well blended.
  5. Pour the grapefruit filling into the graham cracker crust.
  6. Bake for approximately 25 minutes until filling is set but still slightly wobbly in the center.
  7. Cool at room temperature for about 30 minutes, then refrigerate for at least 3 hours or overnight.
  8. Serve slices with whipped cream and garnish with thin grapefruit slices or zest.

Notes

Make sure to use freshly squeezed grapefruit juice for the best flavor. Blind-bake the crust to avoid sogginess. Refrigerate thoroughly before serving.

Vegan Chicken and Waffles: A Comforting Twist for All

The first crunch of that crispy rice is enough to send my taste buds into a delighted frenzy! This Crispy Rice Salad with Asian Veggies not only boasts a rainbow of colors but also stellar textures that will surprise you. The best part? It’s completely vegan and perfect for meal prep, meaning that you can whip up a batch and enjoy it throughout the week. With just a few simple ingredients, this quick recipe provides a refreshing spin on traditional salads by ditching the greens for a satisfying crunch. Whether you’re looking for a light lunch or a side dish to impress your dinner guests, this crispy rice salad is bound to become a staple in your kitchen. Curious about what other surprises await between those layers of flavor? Let’s dive in!

Why is this salad a game changer?

Flavor Explosion: The combination of crispy rice, creamy avocado, and vibrant veggies creates a delightful medley that dances on your palate.
Customizable: Feel free to swap in your favorite vegetables and herbs, making this salad as unique as you are!
Meal Prep Friendly: Prepare it ahead of time and enjoy a delicious, nourishing meal throughout the week.
Vegan and Light: This salad is plant-based, making it a guilt-free option for any meal, while still packing a nutritional punch.
No Greens Needed: Say goodbye to traditional leafy salads; this recipe substitutes crunch and color for a refreshing twist. If you’re a fan of cool salads, you might also enjoy my Cucumber Carrot Salad.

Crispy Rice Salad Ingredients

For the Salad
Pre-cooked Rice – Provides a crunchy base; feel free to use leftover rice or any grain of your choice.
Chili Garlic Sauce – Adds a kick of heat and depth; adjust according to your spice preference or swap with sriracha if desired.
Chili Crunch Oil – Infuses an extra layer of flavor and crunch; can be substituted with your favorite chili oil.
Sesame Oil – Delivers a nutty essence; olive oil can be used for a more neutral flavor if necessary.
Soy Sauce – Offers umami richness; opt for tamari to keep it gluten-free.
Lime – Contributes acid and brightness; lemon can be a delightful substitute.
Mini Cucumbers – Adds delightful crunch; regular cucumbers or bell peppers work well too.
Avocados – Provides creaminess; swap with hummus for a different texture experience.
Red Bell Pepper – Brings sweetness and visual appeal; green pepper makes a decent alternative.
Green Onions – Enhances the fresh taste; shallots can be used instead for variation.
Red Cabbage – Offers a delightful crunch; consider using green cabbage or kale as substitutes.
Unsalted Peanuts – Adds protein and crunch; sunflower seeds can replace them in nut-free diets.
Edamame – Boosts protein and texture; chickpeas can be a wonderful alternative.
Fresh Basil and Cilantro – Introduce herby freshness; parsley or mint are lovely alternatives.

For the Dressing
Peanut Butter – Serves as the creamy base for the dressing; almond butter provides a different flavor if preferred.
Olive Oil – Combines beautifully to create richness; use any neutral oil if olive oil isn’t available.
Rice Vinegar – Adds tanginess that balances flavors; substitute with apple cider vinegar if needed.
Garlic – Invites an aromatic touch; adjust to taste for a milder flavor.
Ginger – Provides a spicy warmth; fresh ginger works best but ground ginger can be used in a pinch.
Maple Syrup – Sweetens the dressing; agave nectar or honey can work as substitutes.

This vegan crispy rice salad will surely refresh your meal prep routine!

Step‑by‑Step Instructions for Crispy Rice Salad with Asian Veggies

Step 1: Prepare Crispy Rice
Preheat your oven to 400°F (200°C). In a mixing bowl, combine pre-cooked rice with chili garlic sauce, chili crunch oil, sesame oil, soy sauce, lime zest, and half of the lime juice. Spread this flavorful mixture evenly onto a baking sheet and bake for 25-35 minutes, until the rice becomes perfectly crunchy and golden.

Step 2: Mix Salad Ingredients
While the rice is baking, take a large bowl and add mini cucumbers, diced avocados, chopped red bell pepper, sliced green onions, shredded red cabbage, peanuts, edamame, along with fresh basil and cilantro. Toss all the ingredients together until they are well combined, creating a vibrant mix of colorful veggies that will add crunch to your Crispy Rice Salad.

Step 3: Make Dressing
In a blender, add peanut butter, olive oil, rice vinegar, minced garlic, the remaining lime juice, toasted sesame oil, soy sauce, maple syrup, and grated ginger. Blend until smooth and creamy, ensuring that all components are well incorporated. This delicious dressing will elevate the flavors of your salad.

Step 4: Combine
Once the crispy rice is done, allow it to cool for a few minutes to retain its texture. Add the cooled rice to the salad bowl filled with mixed vegetables. Drizzle the prepared dressing over the top and gently toss everything together until it is evenly coated with the rich, savory dressing, creating a deliciously filling Crispy Rice Salad.

Expert Tips for Crispy Rice Salad

  • Cool the Rice: Allow crispy rice to cool before adding it to the salad. This keeps it crunchy instead of soggy.
  • Use Room Temperature Rice: For the best crunch, ensure your pre-cooked rice is at room temperature before mixing it with the other ingredients.
  • Experiment with Veggies: Feel free to mix in your favorite vegetables or herbs! This salad is versatile and can cater to your personal taste.
  • Adjust Spice Level: Customize the heat by adjusting the amount of chili garlic sauce. For milder flavor, use less or substitute with a different sauce.
  • Storage Tip: Store the components separately to maintain the crispy texture of the rice. Combine just before serving for optimal freshness.
  • Nut-Free Option: Use sunflower seeds instead of peanuts if you’re craving a nut-free salad. It’s a tasty way to avoid allergens while enjoying a flavorful vegan meal.

Make Ahead Options

These Crispy Rice Salad with Asian Veggies are perfect for meal prep enthusiasts! You can prepare the crispy rice up to 24 hours ahead of time by baking it and then allowing it to cool completely before storing it in an airtight container in the refrigerator. The salad ingredients, such as mini cucumbers, avocados, and red bell pepper, can also be chopped and stored separately for up to 3 days to maintain freshness. When ready to serve, simply combine the cooled crispy rice with the prepped salad ingredients and drizzle the dressing over it. This way, you’ll have a delightful, colorful meal ready with minimal effort, making weeknight dinners a breeze!

What to Serve with Crispy Rice Salad with Asian Veggies

This delightful dish is perfect for any occasion, bringing vibrant textures and flavors to create a complete meal experience.

  • Creamy Avocado Toast: The rich creaminess of avocado toast complements the crunchiness of the salad, adding a satisfying contrast.

  • Tangy Cucumber Pickles: These pickles introduce a refreshing tang that enhances the salad’s flavors while providing a pleasing crunch.

  • Tofu Satay Skewers: Grilled tofu skewers add a hearty protein element, creating balance and variety to your meal. They are simply perfect for dipping!

  • Quinoa Pilaf: Nutty and fluffy quinoa pilaf rounds out the meal, offering additional nutrients and a delightful chew that pairs beautifully.

  • Lemonade Spritzer: This refreshing drink infuses a zesty brightness, cleansing your palate between bites and amplifying the freshness of the salad.

  • Mango Coconut Chia Pudding: A light dessert of mango chia pudding offers a sweet finish, with creaminess that echoes the avocado while introducing tropical flavors.

  • Sesame Roasted Brussels Sprouts: Their earthy flavor and crispy texture will add depth and deliciousness to your dining experience; a side dish that simply cannot be missed!

  • Minted Green Tea: This fragrant drink provides a soothing conclusion, bringing together the meal’s vibrant notes with its cool, refreshing flavor.

Variations & Substitutions for Crispy Rice Salad

Feel free to get creative and customize your Crispy Rice Salad to match your taste buds and dietary needs!

  • Grain Swap: Substitute pre-cooked rice with quinoa or farro for a different texture and added nutrition. Each grain brings its own unique flavor and makes the dish even heartier.

  • Herb Alterations: Use fresh dill or tarragon in place of basil and cilantro for a refreshing twist. These herbs can elevate the overall flavor profile beautifully!

  • Creamy Alternatives: Replace avocado with a dollop of coconut yogurt for a tangy creaminess, perfect for those looking for a lighter alternative.

  • Vegan Chicken Boost: Add pieces of vegan chicken for extra protein and a meaty texture. This can easily make your salad more filling and satisfying.

  • Sweet Crunch: Toss in some shredded carrots or diced apples for a hint of sweetness that contrasts nicely with the savory elements. It’s a delightful surprise in every bite!

  • Spicy Kick: If you love some heat, consider adding sliced jalapeños or a drizzle of your favorite hot sauce. A little extra spice can truly enhance the flavor experience.

  • Nut-Free Delight: Use pumpkin seeds instead of peanuts for a nut-free yet still crunchy alternative. They’re packed with nutrients and add a delightful crunch!

  • Fruit Fusion: Include fruits like mango or diced pineapple as a sweet contrast to the savory ingredients. This added layer of sweetness can transform your salad into a tropical delight!

Enjoy experimenting to find your perfect combination, just like my Savory Chicken and Cheesy Potato Drumsticks or even a refreshing addition like a Cabbage Apple Salad!

How to Store and Freeze Crispy Rice Salad

Fridge: Store the assembled Crispy Rice Salad in an airtight container for up to 3 days. Keep the crispy rice separate until serving to maintain its texture.

Prep Ahead: For meal prep, you can store the salad components (veggies and dressing) separately in the fridge for up to 5 days. Combine just before enjoying for maximum freshness.

Freezer: While it’s best to enjoy the salad fresh, leftover components can be frozen for up to 2 months. Thaw before recombining to avoid sogginess.

Reheating: If you have leftover crispy rice, warm it briefly in an oven at 350°F (175°C) for about 10 minutes to restore its crunchiness.

Crispy Rice Salad with Asian Veggies Recipe FAQs

How do I select the best rice for this salad?
Absolutely! For this recipe, I recommend using pre-cooked rice that is slightly dried out; it helps achieve that perfect crunch. Leftover rice works wonderfully too, as long as it’s been cooled properly. You can use jasmine or basmati rice, but do avoid overly moist rice to prevent a soggy salad.

What is the best way to store leftovers of the salad?
You can store the assembled Crispy Rice Salad in an airtight container in the refrigerator for up to 3 days. To keep the crispy rice crunchy, it’s best to store it separately from the veggies and dressing. Prep the salad components ahead of time, placing them in the fridge for up to 5 days, and combine just before serving.

Can I freeze the salad components?
Certainly! While it’s ideal to enjoy the salad fresh, you can freeze leftover components for up to 2 months. Keep the crispy rice, veggies, and dressing in separate containers to prevent sogginess upon thawing. To use, simply thaw in the refrigerator overnight and combine them before serving.

What should I do if my crispy rice isn’t crunchy enough?
No worries! If your rice doesn’t turn out crunchy, the problem might be humidity or moisture levels. Try reducing the amount of sauce or mixing in some room-temperature rice before baking, and ensure your oven is preheated properly. If reheating leftover crispy rice, warm it briefly in an oven at 350°F (175°C) for about 10 minutes to help restore its texture.

Is there a vegan substitute for nuts in this recipe?
Yes! For nut-free options, simply substitute unsalted peanuts with sunflower seeds or pumpkin seeds for added crunch. They’re a fantastic alternative that still provides protein without the allergens.

Can I adjust the spice level in the dressing?
Very much so! You can easily tailor the spice level by adjusting the amount of chili garlic sauce to your preference. For a milder flavor, use less or even replace it with a milder sauce; sriracha is a great option if you want to keep some heat without it being overwhelming!

Vegan “Chicken” and Waffles

Vegan Chicken and Waffles: A Comforting Twist for All

This Vegan Chicken and Waffles recipe is a delicious and comforting twist on a classic dish, perfect for enjoying any time of the day!
Prep Time 30 minutes
Cook Time 35 minutes
Total Time 1 hour 5 minutes
Servings: 4 servings
Course: Breakfast
Cuisine: Vegan
Calories: 350

Ingredients
  

For the Salad
  • 3 cups Pre-cooked Rice Feel free to use leftover rice or any grain of your choice.
  • 2 tablespoons Chili Garlic Sauce Adjust according to your spice preference or swap with sriracha if desired.
  • 1 tablespoon Chili Crunch Oil Can be substituted with your favorite chili oil.
  • 1 tablespoon Sesame Oil Olive oil can be used for a more neutral flavor if necessary.
  • 3 tablespoons Soy Sauce Opt for tamari to keep it gluten-free.
  • 1 each Lime Lime zest and juice needed.
  • 2 each Mini Cucumbers Regular cucumbers or bell peppers work well too.
  • 2 each Avocados Swap with hummus for a different texture experience.
  • 1 each Red Bell Pepper Green pepper makes a decent alternative.
  • 4 each Green Onions Shallots can be used for variation.
  • 2 cups Red Cabbage Consider using green cabbage or kale as substitutes.
  • 1 cup Unsalted Peanuts Sunflower seeds can replace them in nut-free diets.
  • 1 cup Edamame Chickpeas can be a wonderful alternative.
  • 1/4 cup Fresh Basil Introduce herby freshness.
  • 1/4 cup Fresh Cilantro Parsley or mint are lovely alternatives.
For the Dressing
  • 1/2 cup Peanut Butter Almond butter provides a different flavor if preferred.
  • 1/4 cup Olive Oil Use any neutral oil if olive oil isn’t available.
  • 1/4 cup Rice Vinegar Substitute with apple cider vinegar if needed.
  • 2 cloves Garlic Adjust to taste for a milder flavor.
  • 1 teaspoon Ginger Fresh ginger works best but ground ginger can be used in a pinch.
  • 2 tablespoons Maple Syrup Agave nectar or honey can work as substitutes.

Equipment

  • oven
  • mixing bowl
  • baking sheet
  • Blender

Method
 

Preparation Steps
  1. Preheat your oven to 400°F (200°C). In a mixing bowl, combine pre-cooked rice with chili garlic sauce, chili crunch oil, sesame oil, soy sauce, lime zest, and half of the lime juice. Spread this flavorful mixture evenly onto a baking sheet and bake for 25-35 minutes, until the rice becomes perfectly crunchy and golden.
  2. While the rice is baking, take a large bowl and add mini cucumbers, diced avocados, chopped red bell pepper, sliced green onions, shredded red cabbage, peanuts, edamame, along with fresh basil and cilantro. Toss all the ingredients together until they are well combined.
  3. In a blender, add peanut butter, olive oil, rice vinegar, minced garlic, the remaining lime juice, toasted sesame oil, soy sauce, maple syrup, and grated ginger. Blend until smooth and creamy.
  4. Once the crispy rice is done, allow it to cool for a few minutes. Add the cooled rice to the salad bowl filled with mixed vegetables. Drizzle the prepared dressing over the top and gently toss everything together until it is evenly coated.

Notes

Store the components separately to maintain the crispy texture of the rice. Combine just before serving for optimal freshness.

Casserole Dish with Nonstick: Effortless Tex-Mex Comfort!

As I pulled the bubbling casserole from the oven, the aroma of Tex-Mex spices filled my kitchen, instantly brightening my spirits. You know those busy weeknights when cooking feels like a chore? That’s precisely why I crafted this Fajita Chicken Casserole. This dish allows you to create a hearty, family-friendly meal in no time, melding tender chicken and vibrant veggies under a blanket of gooey cheese and fluffy rice. What’s even better? Not only is it incredibly easy to prepare, but it also proves to be a delightful crowd-pleaser that everyone will love. So, are you ready to dive into this comforting casserole dish with nonstick magic? Let’s bring some warmth and flavor to our tables!

Why Choose a Nonstick Casserole Dish?

Effortless Cleanup: Using a casserole dish with nonstick properties means less scrubbing and more time enjoying your meal.

Perfectly Cooked: This dish ensures even cooking, keeping those juicy chicken bites and tender veggies just the way you love them.

Family-Friendly: The creamy, cheesy goodness of this Fajita Chicken Casserole is bound to impress both kids and adults alike, transforming an ordinary weeknight dinner into a family feast.

Versatile Ingredients: Feel free to mix and match your ingredients—swap in leftover proteins or different veggies, just like you would with a refreshing Cucumber Carrot Salad.

Satisfyingly Hearty: Rich flavors wrapped in fluffy rice create a heartwarming dish that’s reminiscent of those classic comfort meals.

Casserole Dish with Nonstick Ingredients

For the Chicken Mixture
Shredded Chicken – Provides protein and substance; use rotisserie chicken for convenience.
Instant Rice – Serves as the base while absorbing flavors; pre-cooked long-grain rice can speed up cooking time.
Cream of Chicken Soup – Adds creaminess and moisture; opt for gluten-free if needed.
Sour Cream – Contributes tang and richness; Greek yogurt makes a tasty, lighter substitute.
Frozen Onion and Bell Pepper Blend – Offers a quick veggie mix without the chopping hassle; fresh veggies can add more flavor.
Undrained Diced Tomatoes with Green Chilies – Provides moisture and a mild kick; choose roasted tomatoes for deeper flavor.
Chicken Broth – Enhances flavor and moisture; feel free to substitute with vegetable broth.
Fajita Seasoning – Delivers that signature Tex-Mex flavor; adjust spice as desired with more seasoning or jalapeños.
Shredded Cheese – Melts beautifully on top; use your favorite cheese for a gooey finish.

For the Topping
Remaining Shredded Cheese – Sprinkle on top for that irresistible golden, bubbly crust.

This casserole dish with nonstick features all the necessary ingredients to create a crowd-pleasing meal that’s both easy to prepare and delightful to share!

Step‑by‑Step Instructions for Fajita Chicken Casserole

Step 1: Preheat and Prepare
Begin by preheating your oven to 350°F (175°C). While the oven warms, lightly coat a 9×13-inch casserole dish with nonstick cooking spray to ensure effortless serving later. This step is crucial as it helps the creamy texture of the Fajita Chicken Casserole to release easily after baking.

Step 2: Combine Ingredients
In a large mixing bowl, combine shredded chicken, instant rice, cream of chicken soup, sour cream, frozen onion and bell pepper blend, undrained diced tomatoes with green chilies, chicken broth, and fajita seasoning. Stir all the ingredients together until well mixed and evenly combined, ensuring each element is coated with the creamy mixture.

Step 3: Assemble the Casserole
Spoon the flavorful mixture into your prepared casserole dish, spreading it evenly throughout. Ensure that the rice and chicken are evenly distributed so each bite of the Fajita Chicken Casserole is balanced with creamy goodness and tender veggies. This step builds a solid foundation for your dish.

Step 4: Cover and Bake
Once assembled, cover the casserole dish tightly with aluminum foil. Place it in the preheated oven and bake for 35 minutes. This step allows the casserole to steam, keeping it moist and tender as it begins to meld together beautifully. You’ll know it’s ready when the edges begin to bubble slightly.

Step 5: Add Cheese and Finish Baking
After 35 minutes, carefully remove the foil and sprinkle the remaining shredded cheese evenly over the top of the casserole. Return the dish to the oven, uncovered, and bake for an additional 10 minutes. The cheese should melt, becoming bubbly and golden, creating an inviting crust that adds to the overall texture of the Fajita Chicken Casserole.

Step 6: Garnish and Serve
Once fully baked, take the casserole out of the oven and let it cool for a few minutes. Finally, garnish with freshly chopped cilantro and green onions for a burst of color and freshness. Serve warm, and watch the smiles as everyone gathers around to enjoy this comforting casserole dish with nonstick convenience!

Make Ahead Options

These Fajita Chicken Casserole make-ahead tips are perfect for busy home cooks looking to save time during the week! You can prepare the entire casserole up to 24 hours in advance by assembling all the ingredients in the casserole dish but holding off on the final cheese topping. Cover tightly and refrigerate, then when ready to bake, simply sprinkle the cheese on top and follow the original baking instructions. For optimal quality, keep the casserole in the refrigerator no longer than 3 days to prevent moisture loss. You’ll still enjoy that creamy, cheesy goodness straight from the oven with minimal effort, making weeknight dinners a breeze!

Casserole Dish with Nonstick Variations

Feel free to get creative with this recipe and give it your personal twist!

  • Protein Swap: Use ground beef or turkey instead of chicken to create a hearty variation that’s equally delicious.
    Mixing things up with different proteins can reinvigorate your family meal repertoire, while still keeping the essence of this comforting dish intact.

  • Vegetable Boost: Add in corn or black beans for extra fiber and color. This not only enhances the nutrition but also adds delightful textures to each bite.
    Picture the vibrant veggies melding within the casserole, creating a symphony of flavors that reflects the joy of home cooking.

  • Cheese Change: Swap the cheese for smoked Gouda for a rich, inviting flavor twist.
    This mini-adventure in cheese can elevate your casserole experience, wrapping your taste buds in a creamy embrace.

  • Spice It Up: Toss in chopped jalapeños if you desire a little extra heat.
    A touch of heat can spark excitement on the palate, making the meal even more memorable.

  • Herb Infusion: Try adding fresh herbs like cilantro or parsley for a refreshing dash of freshness.
    Fresh herbs can bring brightness to the flavors, making your casserole dish feel light and lively.

  • Grain Alteration: Substitute quinoa for the instant rice for a protein-packed alternative.
    This simple switch welcomes a different texture, adding nutty notes to the classic feel of your favorite casserole.

  • Creamy Variation: Use avocados in place of sour cream for a unique, creamy twist perfect for those seeking a vegan option.
    This adds a vibrant creaminess with a healthy kick, seamlessly blending with the dish’s core flavors.

  • Freezer-Friendly: Prepare extra servings for the freezer, and come back to this comforting meal whenever you need a cozy night in.
    Having pre-prepared meals on hand can save precious time on busy evenings, letting warmth and flavor linger at your table longer.

Feel free to explore these options and let your Fajita Chicken Casserole shine in new lights! If you’re curious about other easy dishes, consider trying out a delightful Savory Zucchini Pancakes for a delectable twist!

Expert Tips for Fajita Chicken Casserole

Nonstick Necessity: Always use a casserole dish with nonstick properties to prevent sticking and ensure easy serving without losing any delicious bits.

Mix It Well: Take the time to mix all ingredients thoroughly; uneven mixing can lead to some bites being bland. Ensure every scoop is packed with flavor.

Monitor Baking Time: Keep an eye on the baking time, as ovens can vary. If using pre-cooked rice, reduce baking time slightly to avoid overcooking.

Garnish for Freshness: Adding fresh cilantro and green onions just before serving not only brightens the dish visually but also enhances the flavor profile.

Store Smartly: For leftovers, let the casserole cool before refrigeration to maintain moisture. This casserole dish with nonstick will help keep serving easy for days.

What to Serve with Fajita Chicken Casserole

Each comforting bite is best enjoyed alongside delicious sides that elevate your meal to new levels!

  • Crispy Tortilla Chips: These add a delightful crunch, perfect for scooping up that creamy casserole. Their crispy texture balances the soft, gooey dish beautifully.
  • Fresh Green Salad: A light, zesty salad with a vinaigrette cuts through the richness, while the freshness of greens complements the cooked flavors wonderfully.
  • Steamed Corn on the Cob: Sweet corn adds a pop of color and flavor, offering a sweet contrast to the savory casserole. It’s a classic side that appeals to the whole family.
  • Mexican Street Corn: Grilled corn slathered in creamy sauce and spices brings a vibrant and flavorful side that pairs perfectly with Tex-Mex entrees.
  • Roasted Vegetables: A mix of seasonal veggies caramelized to perfection enhances the dish with additional textures and flavors, making your meal feel more rounded.
  • Zesty Lime Rice: Light and fragrant, this rice not only complements the casserole but also heightens the Tex-Mex experience with its fresh notes.
  • Avocado Salsa: Creamy avocado salsa adds a soothing element, while its zesty flavors enliven the casserole. It’s a delicious way to get those fresh tastes onto your plate!
  • Chilled Black Bean Salad: A refreshing cold dish with black beans, corn, and diced peppers brings protein and zest, making it a nutritious, colorful addition that pairs smoothly with the warmth of the casserole.
  • Margaritas: For a fun twist, a chilled margarita elevates the meal, delivering a refreshing zing that pairs excellently with the casserole’s flavors.
  • Chocolate Flan: For dessert, consider this silky treat that balances sweetness with a mild caramel flavor, rounding off your Tex-Mex feast wonderfully.

How to Store and Freeze Fajita Chicken Casserole

Fridge: Store leftover Fajita Chicken Casserole in an airtight container for up to 4 days. The flavors improve after a day, making it a delicious option for quick meals.

Freezer: For longer storage, slice the casserole into portions and wrap them tightly or place them in airtight containers. It can be frozen for up to 3 months.

Reheating: To reheat, thaw overnight in the fridge if frozen. Heat in the microwave or oven, adding a splash of chicken broth to keep it moist and prevent drying out.

Freshness Check: Always check for any signs of spoilage before consuming leftovers, especially if stored in the refrigerator for longer than a couple of days.

Fajita Chicken Casserole Recipe FAQs

What kind of chicken should I use for the casserole?
Absolutely! You can use shredded chicken from a rotisserie for convenience, or cook your chicken from scratch. If using raw chicken, consider poaching or pan-searing it first. Just ensure it’s fully cooked before mixing it with the other ingredients.

How should I store leftover Fajita Chicken Casserole?
Store leftover casserole in an airtight container and refrigerate for up to 4 days. The flavors tend to deepen and improve after a day in the fridge, adding to the overall deliciousness. Just make sure it’s cooled to room temperature before placing it in the refrigerator.

Can I freeze this casserole?
Yes, you can! To freeze, slice your casserole into individual portions and wrap them tightly in plastic wrap or place them in airtight containers. It can be frozen for up to 3 months. When ready to reheat, remove from the freezer and thaw overnight in the fridge for best results.

What should I do if my casserole comes out dry?
If you find your casserole is dry, don’t worry! This can happen if it’s overbaked or too much liquid evaporated during cooking. Try adding a splash of chicken broth when reheating; it will help restore moisture and make your casserole creamy again. If you’re using pre-cooked rice, reduce the baking time slightly to prevent this from happening.

Are there any dietary considerations for this recipe?
Very! This Fajita Chicken Casserole can be made gluten-free by using a gluten-free cream of chicken soup and ensuring the fajita seasoning is also gluten-free. If you’re cooking for pets, it’s best to avoid any onion or garlic, which can be harmful to them. Always check for allergens in packaged ingredients as well.

How can I ensure my casserole cooks evenly?
To keep everything evenly cooked, it’s important to mix your ingredients thoroughly and avoid clumping. Once you’ve assembled your casserole, make sure it’s spread out evenly in the dish. You might even want to give it a gentle shake or tap to settle everything before covering and baking. This leads to a delicious dish with every bite full of flavor!

casserole dish with nonstick

Casserole Dish with Nonstick: Effortless Tex-Mex Comfort!

This casserole dish with nonstick ensures an effortless Tex-Mex meal with creamy layers of chicken, cheese, and rice that everyone will love.
Prep Time 15 minutes
Cook Time 45 minutes
Total Time 1 hour
Servings: 6 servings
Course: Dinner
Cuisine: Tex-Mex
Calories: 450

Ingredients
  

For the Chicken Mixture
  • 3 cups shredded chicken use rotisserie chicken for convenience
  • 1 cup instant rice pre-cooked long-grain rice can speed up cooking time
  • 1 can cream of chicken soup opt for gluten-free if needed
  • 1 cup sour cream Greek yogurt makes a tasty, lighter substitute
  • 1 bag frozen onion and bell pepper blend fresh veggies can add more flavor
  • 1 can undrained diced tomatoes with green chilies choose roasted tomatoes for deeper flavor
  • 1 cup chicken broth feel free to substitute with vegetable broth
  • 2 tablespoons fajita seasoning adjust spice as desired with more seasoning or jalapeños
  • 2 cups shredded cheese use your favorite cheese for a gooey finish
For the Topping
  • 1 cup remaining shredded cheese sprinkle on top for that irresistible golden, bubbly crust

Equipment

  • 9x13-inch casserole dish
  • mixing bowl
  • Aluminum Foil

Method
 

Step-by-Step Instructions for Fajita Chicken Casserole
  1. Preheat your oven to 350°F (175°C). Lightly coat a 9×13-inch casserole dish with nonstick cooking spray.
  2. In a large mixing bowl, combine shredded chicken, instant rice, cream of chicken soup, sour cream, frozen onion and bell pepper blend, undrained diced tomatoes with green chilies, chicken broth, and fajita seasoning. Stir until well mixed.
  3. Spoon the mixture into your prepared casserole dish, spreading it evenly throughout.
  4. Cover the casserole dish tightly with aluminum foil and bake for 35 minutes.
  5. After 35 minutes, remove the foil and sprinkle the remaining shredded cheese evenly over the top. Bake uncovered for an additional 10 minutes.
  6. Take the casserole out of the oven, let it cool for a few minutes, and garnish with freshly chopped cilantro and green onions before serving.

Notes

Always use a casserole dish with nonstick properties for easy serving and to prevent sticking. Monitor baking time closely based on your oven's performance.

Moist Carrot Apple Zucchini Bread That Will Melt in Your Mouth

The aroma wafting from the oven was enough to create a delightful commotion in my kitchen. I couldn’t help but marvel at the magical transformation of humble ingredients into a loaf of Moist Carrot Apple Zucchini Bread, a perfect balance of sweetness and spice. This recipe not only provides a wholesome alternative to fast food but also ensures you have a healthy, crowd-pleasing snack ready in no time. Best of all, it’s vegetarian-friendly, with potential gluten-free options to cater to everyone at your table. Whether enjoyed as a comforting breakfast or paired with your afternoon coffee, this bread is a delightful treat that will make your spirit sing. Are you ready to dive into the heartwarming world of homemade baking?

Why is This Bread So Irresistible?

Moisture and Flavor: This Carrot Apple Zucchini Bread boasts an incredible moist texture, enhanced by a medley of warm spices that tickle your taste buds.

Versatile Delight: Perfect as a breakfast or snack, it caters to various diets with potential gluten-free adaptations.

Effortless Baking: With simple, wholesome ingredients, you’ll whip this up in no time, transforming any afternoon into a cozy baking experience.

Crowd-Pleasing Treat: Its rich aroma and delightful blend of flavors make it a surefire hit for gatherings—a treat everyone will love!

Boost your flavor game by trying variations like adding nuts, or check out our Zucchini Carrot Savory for more inspired combos. Every slice of this bread is a delicious journey worth taking!

Carrot Apple Zucchini Bread Ingredients

For the Batter
All-Purpose Flour – Structure for the bread; substitute with a gluten-free blend for a gluten-free version.
Salt – Enhances flavor and is essential for balanced taste.
Baking Powder & Baking Soda – Leavening agents crucial for proper rise in the bread.
Cinnamon, Cloves, Nutmeg – Warm spices that add depth and aromatic notes, making the bread irresistible.
Granulated Sugar – Provides sweetness and moisture; reduce by 1/4 to 1/2 cup for a less sweet loaf.
Melted Butter – Adds moisture and richness; can be replaced with vegetable oil for a dairy-free option.
Eggs – A binding agent vital for the structure; for a vegan alternative, consider using flax eggs.
Orange Juice – Adds acidity and sweetness; fresh zest can enhance flavor even further.
Vanilla Extract – Acts as a flavor enhancer, essential for deepening the bread’s taste.
Zucchini (shredded) – Contributes moisture and texture; no need to peel, just ensure it’s well-drained.
Carrots (shredded) – Adds natural sweetness and moisture; a box grater works best for shredding.
Apple (diced) – Brings sweetness and juiciness; any firm variety can be substituted based on preference.
Chopped Pecans – Offers crunch and flavor; can be omitted or replaced with walnuts if desired.

For the Glaze
Cream Cheese – Provides a creamy base for the glaze; soften before whipping for smooth consistency.
Butter – Adds richness to the glaze; be sure to use softened butter for easy mixing.
Powdered Sugar – Sweetens and thickens the glaze; adjust amount for desired sweetness.
Orange Juice – Helps achieve a smooth glaze consistency while adding a hint of zesty flavor.

Step‑by‑Step Instructions for Carrot Apple Zucchini Bread

Step 1: Preheat the Oven
Begin your baking adventure by preheating your oven to 350°F (175°C). While the oven warms up, grab two 8×4 inch loaf pans and grease them generously with butter or cooking spray to ensure a smooth release of your delicious Carrot Apple Zucchini Bread later on.

Step 2: Prepare the Vegetables
Next, shred the zucchini and carrots using a box grater, ensuring they are finely shredded. Once shredded, gather the zucchini and carrots in a clean kitchen towel, twist, and squeeze gently to remove excess moisture. This step is crucial to prevent any sogginess in your loaf, ensuring a perfect texture.

Step 3: Mix the Dry Ingredients
In a large mixing bowl, whisk together the all-purpose flour, salt, baking powder, baking soda, cinnamon, cloves, and nutmeg. This mixture will serve as the foundation for your moist Carrot Apple Zucchini Bread, blending the flavors and creating a warm, inviting aroma as they come together. Set this bowl aside for now.

Step 4: Combine Wet Ingredients
In a separate bowl, whisk the melted butter and granulated sugar until the mixture is glossy and well-combined, taking about 2-3 minutes. Then, add the eggs, orange juice, and vanilla extract to this mixture, continuing to whisk until everything is fully incorporated and you can see small bubbles forming on the surface.

Step 5: Bring It All Together
Carefully fold the wet ingredients into the dry ingredients using a spatula. Mix gently, ensuring not to overmix—just until no dry flour remains visible. Then, lovingly fold in the well-drained zucchini, carrots, diced apple, and chopped pecans, allowing all these wonderful ingredients to join together harmoniously in a vibrant mix.

Step 6: Fill the Loaf Pans
Evenly divide the batter between the two prepared loaf pans, smoothing the tops with the back of a spatula for an even rise. Watch as the colorful mixture fills the pans, and take a moment to appreciate the delightful blend of vegetables and fruits waiting to transform in the oven.

Step 7: Bake to Perfection
Place the loaf pans in the center of your preheated oven and bake for 55-60 minutes. Look for a beautiful golden-brown top and insert a toothpick into the center; it should come out clean or with a few moist crumbs. This is the sign of a perfectly baked Carrot Apple Zucchini Bread, ready to cool.

Step 8: Cool the Bread
Once baked, remove the loaves from the oven and let them cool in the pans for about 15 minutes. This step allows the bread to settle before transferring it to a wire rack. Carefully turn the pans upside down and gently tap; the loaves should slide out beautifully, revealing their golden crust.

Step 9: Prepare the Cream Cheese Glaze
While the bread cools, prepare the luscious cream cheese glaze. In a mixing bowl, whip together softened cream cheese and butter until smooth. Gradually add powdered sugar and orange juice until you reach a creamy, pourable consistency, ensuring that all ingredients are combined fully.

Step 10: Glaze and Serve
Once the Carrot Apple Zucchini Bread has cooled completely, drizzle or spread the cream cheese glaze generously over the top of each loaf. For an extra touch of sweetness, consider garnishing with a sprinkle of powdered sugar or additional chopped nuts. Now it’s ready to slice and share!

Expert Tips for Carrot Apple Zucchini Bread

Moisture Control: Ensure zucchini and carrots are well-drained to avoid a soggy loaf; gently squeeze them in a towel before mixing.

Gentle Mixing: Avoid overmixing the batter; this keeps the Carrot Apple Zucchini Bread light and fluffy, ensuring the perfect texture.

Bake Smart: Always bake in the center of the oven for even heat distribution, and check doneness with a toothpick inserted in the center; it should come out clean.

Flavor Boost: Feel free to experiment with add-ins like raisins or chocolate chips for a delightful twist that personalizes your bread.

Storage Tips: Keep the bread wrapped in plastic wrap or foil; it stays fresh for up to 3 days at room temperature, or refrigerate for up to a week.

Make Ahead Options

These moist Carrot Apple Zucchini Bread loaves are perfect for meal prep enthusiasts! You can prepare the batter up to 24 hours in advance, storing it in the refrigerator to keep the flavors fresh. Just remember to drain the zucchini and carrots thoroughly before mixing to maintain the perfect texture. If you’d like, you can also bake the loaves ahead and store them unglazed. Wrapped tightly, they will stay fresh for up to 3 days at room temperature or can be refrigerated for a week. When ready to enjoy, simply glaze the bread and let it sit at room temperature for about 30 minutes before serving to ensure it’s just as delicious!

How to Store and Freeze Carrot Apple Zucchini Bread

Room Temperature: Keep the bread wrapped in plastic wrap or foil for up to 3 days; this helps maintain its moisture and flavor.

Fridge: If you wish to store it longer, place the wrapped bread in the refrigerator for up to a week, ensuring it stays fresh and ready to enjoy.

Freezer: For extended storage, freeze unglazed loaves by wrapping them tightly in plastic wrap and then aluminum foil; they can last up to 3 months without losing flavor.

Reheating: When ready to enjoy, thaw overnight in the fridge and reheat slices in the microwave for a quick warm-up, or gently toast to revive its deliciously moist texture.

What to Serve with Moist Carrot Apple Zucchini Bread

This delightful bread is perfect for creating a memorable meal that evokes warmth and comfort.

  • Creamy Yogurt: A dollop of tangy yogurt enhances the bread’s sweetness while adding a creamy texture to each bite. Pairing it with fresh berries creates a heavenly contrast.
  • Fresh Fruit Salad: The brightness of seasonal fruits, like strawberries and oranges, complements the spices in the bread, enhancing its vibrant flavors and adding a refreshing crunch.
  • Espresso or Coffee: Enjoying a slice with a rich cup of espresso or freshly brewed coffee elevates the experience, with warm notes balancing the sweetness of the bread beautifully.
  • Light Green Salad: A simple salad tossed with a zesty vinaigrette can cut through the bread’s rich flavors, providing a refreshing counterpoint to its sweetness and moisture.
  • Cheese Platter: Rich, creamy cheeses like brie or goat cheese pair surprisingly well, as their tanginess plays against the bread’s sweetness and adds a sophisticated touch to your meal.
  • Chai Tea: The warm spices in chai tea echo the bread’s flavor profile, creating a heartwarming experience that entices the senses and wraps you in comfort.
  • Vanilla Ice Cream: For a fun dessert twist, serve a warm slice with a scoop of vanilla ice cream. The melting ice cream mingling with the warm bread creates a deliciously indulgent experience.
  • Maple Syrup Drizzle: Elevate your morning by drizzling pure maple syrup over a slice. The sweetness of the syrup enhances the natural flavors of the bread while adding a delightful hint of decadence.

Carrot Apple Zucchini Bread Variations

Feel free to get creative with this delightful recipe and customize it to your taste and dietary preferences.

  • Gluten-Free: Use a gluten-free flour blend to make this bread friendly for celiac or gluten-sensitive folks. It will still be moist and delicious!

  • Dairy-Free: Substitute vegetable oil for melted butter, and enjoy a dairy-free version that retains all the delightful moisture.

  • Vegan: Replace eggs with flax eggs (1 tablespoon ground flaxseed mixed with 2.5 tablespoons water per egg) for a plant-based delight. This twist keeps the structure while maintaining that beloved fluffy texture.

  • Fruit Variations: Swap out the apples for mashed bananas or pears for a delightful fruity twist. Each fruit brings its unique sweetness and flavor, adding to the overall experience.

  • Nutty Surprise: Try adding chopped walnuts or pistachios instead of pecans for a different nutty flavor and crunch. Nuts not only provide texture but enhance the wholesome feel of the bread.

  • Muffin Conversion: If you prefer portion control, bake the batter in muffin tins for perfectly sized treats that are easy to grab on the go.

  • Spice It Up: Play with different spices! A pinch of cardamom or a dash of ginger can bring exciting new depths of flavor to the bread.

For more tasty ideas, why not explore our wonderful Rustic Apple Walnut Oat Porridge or check out our Cabbage Carrot Apple salad for a refreshing side?

Carrot Apple Zucchini Bread Recipe FAQs

How do I select the best zucchini and carrots for my bread?
Absolutely! When picking zucchini, look for firm ones that are free of dark spots or blemishes. For carrots, choose those that are bright orange, firm, and have smooth skin. Fresh, well-drained vegetables will ensure your Carrot Apple Zucchini Bread remains moist and flavorful.

What is the best way to store leftovers?
Very! For short-term storage, wrap the bread in plastic wrap or foil and keep it at room temperature for up to 3 days. If you’d like to extend its shelf life, refrigerate it in the same way to enjoy it for up to a week.

Can I freeze my Carrot Apple Zucchini Bread?
Certainly! To freeze, wrap the unglazed loaves tightly in plastic wrap and then in aluminum foil to prevent freezer burn. They can last up to 3 months this way. When you’re ready to enjoy, simply thaw overnight in the refrigerator and reheat slices in the microwave to revive that delightful moisture.

What should I do if my bread turns out too dry?
No worries! If you find your loaf is on the dry side, ensure you’re measuring your flour accurately. You can also add a little more shredded zucchini or apples next time to boost moisture. Additionally, avoid overbaking; always start checking for doneness a few minutes before the suggested baking time.

Can I make this recipe vegan or gluten-free?
Sure! For a vegan version of your Carrot Apple Zucchini Bread, substitute the eggs with flax eggs (1 tablespoon of ground flaxseed mixed with 2.5 tablespoons of water equals one egg). For gluten-free, I recommend using a gluten-free flour blend and checking that all other ingredients are certified gluten-free. Enjoy baking sans worries!

What if I have nut allergies—can I omit the nuts?
Absolutely! If you or your guests have nut allergies, you can simply leave out the chopped pecans or walnuts. The bread will still be delicious and moist without them. You can also consider adding seeds like sunflower or pumpkin seeds for a bit of crunch without the nuts.

Carrot Apple Zucchini Bread

Moist Carrot Apple Zucchini Bread That Will Melt in Your Mouth

A delightful Carrot Apple Zucchini Bread recipe that balances sweetness and spice, perfect for breakfast or snacking.
Prep Time 20 minutes
Cook Time 1 hour
Cooling Time 15 minutes
Total Time 1 hour 35 minutes
Servings: 12 slices
Course: Breakfast
Cuisine: American
Calories: 200

Ingredients
  

For the Batter
  • 2 cups All-Purpose Flour Substitute with gluten-free blend for gluten-free option.
  • 1 tsp Salt Enhances flavor.
  • 1 tsp Baking Powder Leavening agent.
  • 1 tsp Baking Soda Leavening agent.
  • 1 tsp Cinnamon Warm spice.
  • 1/2 tsp Cloves Warm spice.
  • 1/2 tsp Nutmeg Warm spice.
  • 1 cup Granulated Sugar Reduce by 1/4 to 1/2 cup for less sweetness.
  • 1/2 cup Melted Butter Can be replaced with vegetable oil for dairy-free option.
  • 2 large Eggs Binding agent; can use flax eggs for vegan.
  • 1/2 cup Orange Juice Adds acidity and sweetness.
  • 1 tsp Vanilla Extract Flavor enhancer.
  • 1 cup Zucchini Shredded and well drained.
  • 1 cup Carrots Shredded.
  • 1 cup Apple Diced; any firm variety.
  • 1/2 cup Chopped Pecans Can be omitted or replaced with walnuts.
For the Glaze
  • 4 oz Cream Cheese Soften before whipping.
  • 2 tbsp Butter Softened for easy mixing.
  • 1 cup Powdered Sugar Adjust for desired sweetness.
  • 1 tbsp Orange Juice Adds zesty flavor.

Equipment

  • Loaf pans
  • mixing bowls
  • whisk
  • spatula
  • box grater

Method
 

Instructions
  1. Preheat the oven to 350°F (175°C) and grease two 8x4 inch loaf pans.
  2. Shred the zucchini and carrots, then squeeze out excess moisture using a kitchen towel.
  3. In a mixing bowl, whisk together the flour, salt, baking powder, baking soda, cinnamon, cloves, and nutmeg.
  4. In another bowl, whisk melted butter with sugar, then add eggs, orange juice, and vanilla.
  5. Fold the wet ingredients into the dry ingredients, then mix in zucchini, carrots, apple, and pecans.
  6. Divide the batter evenly between the prepared loaf pans.
  7. Bake for 55-60 minutes until golden brown and a toothpick comes out clean.
  8. Cool in the pans for 15 minutes, then remove from pans and place on a wire rack.
  9. For the glaze, whip cream cheese and butter, then mix in powdered sugar and orange juice.
  10. Once the bread is cool, glaze and serve.

Notes

Ensure zucchini and carrots are well-drained to avoid a soggy loaf. Store wrapped for freshness.

Delicious Yaki Udon: Quick Vegan Twist for Weeknight Dinners

As I sat down to enjoy a steaming bowl of vibrant Yaki Udon, the warm aroma wafting through the air instantly transported me to the bustling streets of Tokyo. This quick vegan version, packed with crisp vegetables and hearty tofu, offers a delightful balance of textures and flavors while being ready in just 15 minutes! It’s the perfect way to satisfy those cravings for homemade comfort food without losing precious time in the kitchen. Whether you’re looking to use up leftover veggies or simply in need of a quick meal during a busy weeknight, this Yaki Udon is your answer. Are you ready to whip up a bowl of fresh, savory goodness? Let’s dive into this delicious recipe together!

Why Choose This Vegan Yaki Udon?

Quick Preparation: This dish comes together in just 15 minutes, making it ideal for busy weeknights or spontaneous meals.

Flavor Explosion: The combination of soy sauce, rice vinegar, and a hint of sweetness from ketchup creates a savory sauce that perfectly coats each noodle.

Nutritious Choices: Packed with colorful veggies and protein-rich tofu, this Yaki Udon is not only healthy but also satisfying.

Versatile Ingredients: Easily adapt the recipe to whatever vegetables you have on hand, ensuring you can clean out your fridge while enjoying a delicious meal.

Crowd-Pleaser: Whether cooking for yourself or entertaining friends, this dish is sure to impress with its vibrant colors and bold flavors. Serve it alongside miso soup or a fresh salad for a complete meal!

Yaki Udon Ingredients

For the Noodles
Udon noodles – The foundation of this dish, instant fresh or frozen Sanuki udon provides the best texture.

For the Sauce
Soy sauce – The star of the savory profile; adjust based on your taste preference.
Rice vinegar – Creates a wonderful acidity that balances the sweetness; optional but recommended.
Tomato ketchup – Adds a unique hint of sweetness for a surprising depth of flavor.
Sugar – Use to balance flavors; feel free to adjust based on your preference.
Vegetarian mushroom oyster sauce – Enhances umami; can be substituted with another stir-fry sauce or more soy sauce.

For the Protein
Extra firm tofu – Pressed and sliced for the best texture and protein source; pan-fry until golden for enhanced flavor.

For the Vegetables
White onion – Brings sweetness and aroma when sautéed.
Dried shiitake mushrooms – Provides a deep umami taste when rehydrated; fresh mushrooms are a good alternative.
Carrot – Adds sweetness and a vibrant pop of color; cut it thinly for quick cooking.
Bell pepper – Offers crunch and sweetness; any color works beautifully.
Cabbage – Enhances the texture while adding volume to the dish.

For Seasoning
Ground black pepper – A simple addition to enhance all the flavors.

For Garnish
Chopped scallions – Adds fresh flavor and a pop of green.
Sesame seeds – Provides a nice crunch and nutty taste.
Shichimi Togarashi – A spice blend to sprinkle on top for an extra kick of flavor; completely optional.

This delightful Yaki Udon is not just a meal; it’s an experience bursting with flavors, textures, and homemade goodness! Give it a try and enjoy the journey!

Step‑by‑Step Instructions for Quick Vegan Yaki Udon with Tofu and Vegetables

Step 1: Prep the Mushrooms
Begin by soaking dried shiitake mushrooms in boiling water for about 15 minutes until rehydrated and tender. After soaking, remove them from the water, squeeze out excess moisture, and slice them thinly. This step will enhance the umami flavor in your Quick Vegan Yaki Udon while ensuring the mushrooms are ready to be stir-fried.

Step 2: Cook the Tofu
Heat a tablespoon of neutral oil in a large pan over medium-high heat. Add the pre-pressed and sliced extra firm tofu, and pan-fry for about 5-7 minutes until golden brown on all sides. Stir frequently to prevent sticking. Once crisp, season the tofu lightly with salt and transfer it to a plate, allowing the flavors to meld while you continue with the recipe.

Step 3: Make the Sauce
In a medium bowl, whisk together 3 tablespoons of soy sauce, 1 tablespoon of rice vinegar, 2 tablespoons of ketchup, 1 tablespoon of sugar, and 1 tablespoon of vegetarian mushroom oyster sauce until well combined. This savory sauce is essential for your Quick Vegan Yaki Udon, providing a delicious balance of sweet and tangy flavors to coat your stir-fried ingredients.

Step 4: Prepare the Udon
If using instant udon noodles, soak them in hot water for about 5 minutes, or as directed on the package, until tender but still chewy. Drain and set aside. For frozen udon, microwave the noodles for 2-3 minutes until they’re heated through, then rinse them under cool water and drain. This will skip the need for boiling and keeps the noodles chewy.

Step 5: Sauté Vegetables
In the same pan used for the tofu, add a splash more oil and heat over medium-high heat. Sauté the sliced white onion for about 2-3 minutes until it becomes translucent and tender. Then add the sliced carrots, bell pepper, and rehydrated shiitake mushrooms, cooking for another 3-4 minutes. Add a small splash of water as needed to help cook the vegetables without steaming.

Step 6: Add Remaining Veggies
Once the previous vegetables are sautéed to your liking, mix in the chopped cabbage and green onions. Continue stir-frying for an additional 2 minutes, allowing the vegetables to soften slightly while developing a bit of brown color for flavor. This layering of veggies in your Quick Vegan Yaki Udon contributes to the overall texture and visual appeal of the dish.

Step 7: Combine and Finish
Now, it’s time to bring your Quick Vegan Yaki Udon together! Add the prepared udon noodles to the pan with the sautéed vegetables and pour the prepared sauce over them. Gently toss everything together for about 2-3 minutes, ensuring the noodles absorb the delicious flavors from the sauce—look for a glossy finish that indicates the dish is ready to be served.

Step 8: Garnish and Serve
To finish off your Yaki Udon, serve it hot in bowls sprinkled with sesame seeds and Shichimi Togarashi for an extra touch of flavor and presentation. Feel free to accentuate it with additional chopped scallions for a fresh, vibrant look. Your Quick Vegan Yaki Udon is now ready to be enjoyed as a comforting, homemade meal!

How to Store and Freeze Yaki Udon

Room Temperature: Consume Yaki Udon immediately after cooking for the best flavor and texture. Leave it at room temperature for no more than 2 hours.

Fridge: Store leftover Yaki Udon in an airtight container for up to 2 days. The noodles may absorb the sauce, but you can refresh them with a splash of water when reheating.

Freezer: For longer storage, freeze Yaki Udon in a freezer-safe container for up to 1 month. To reheat, let it thaw overnight in the fridge and then microwave or stir-fry until heated through.

Reheating: When reheating, add a bit of water or vegetable broth to revive the sauce and prevent the noodles from drying out, ensuring your Yaki Udon remains delicious!

Make Ahead Options

These Quick Vegan Yaki Udon are perfect for meal prep enthusiasts! You can prepare the tofu and chop the vegetables up to 3 days in advance, storing them separately in airtight containers in the fridge to maintain freshness. Additionally, the sauce can be mixed ahead of time and refrigerated for up to 5 days. This allows the flavors to meld beautifully! When you’re ready to enjoy your Yaki Udon, simply sauté the prepared ingredients, add the cooked udon noodles and sauce, and stir until heated through—offering restaurant-quality results with minimal effort on busy weeknights.

What to Serve with Quick Vegan Yaki Udon?

Savor the vibrant flavors of your bowl of Yaki Udon alongside these delightful companions for a complete meal experience.

  • Miso Soup: A warm bowl of miso soup adds a comforting, savory element that perfectly complements the rich flavors of Yaki Udon.
  • Crispy Spring Rolls: Crunchy on the outside, filled with fresh vegetables and herbs, these rolls offer a great texture contrast while keeping the Asian theme intact.
  • Fresh Green Salad: A crisp salad dressed in a light sesame vinaigrette provides a refreshing palate cleanser between the hearty bites of noodles.
  • Sautéed Bok Choy: Lightly cooked bok choy lends a tender, slightly crunchy addition that pairs seamlessly with the chewy noodles, enhancing the meal’s nutritional profile.
  • Pickled Vegetables: The acidity and crunch of pickled veggies create a delightful contrast, enhancing the umami flavors in your Yaki Udon.
  • Chilled Sake: A glass of chilled sake can elevate your dining experience, its subtle notes blending beautifully with the umami-rich noodles.
  • Fruit Salad: A light, refreshing fruit salad serves as a fantastic dessert, offering a sweet and vibrant finish that cleanses the palate.
  • Steamed Edamame: These protein-packed pods are a fantastic finger food that adds a fun, nutritious side to your meal, perfect for sharing.
  • Green Tea: A warm cup of green tea complements the entire meal, offering a calming finish that rounds out your Asian-inspired feast.

Tips for the Best Yaki Udon

  • Choose Fresh Noodles: Opt for instant fresh or frozen Sanuki udon for the best texture. Chewy noodles are essential for a delightful Yaki Udon experience.

  • Don’t Overcrowd: Stir-frying requires space! Avoid overcrowding the pan to prevent steaming vegetables—cook in batches if necessary for even frying.

  • Timing is Key: Add vegetables in stages based on cooking time. Softer vegetables should be added later to maintain some crispness for a balanced texture.

  • Adjust Seasoning: Taste and adjust the sauce ingredients as you stir-fry; finding the right balance of salty, sweet, and umami makes all the difference in your Yaki Udon.

  • Let It Rest: After combining, allow the Udon to sit for a minute in the pan so the noodles can soak up the sauce for optimal flavor absorption.

Yaki Udon: Fun Variations & Substitutions

Feel free to add your own personal touch to this recipe and unleash your creative culinary side!

  • Protein Swap: Try tempeh or seitan for a different texture and flavor profile while keeping it vegan.
  • Veggie Boost: Add zucchini, broccoli, or snap peas to your dish for extra nutrition and vibrant colors.
  • Heat it Up: Incorporate chili flakes or replace Shichimi Togarashi with your favorite spicy sauce to tailor the heat level.
  • Flavorful Fungi: Mix in fresh shiitake or portobello mushrooms for a different, robust umami flavor that changes the experience.
  • Nutty Twist: Top with peanut or almond butter for a deliciously creamy sauce, adding a whole new depth of flavor to your noodles.
  • Gluten-Free Version: Swap regular udon for rice noodles or zucchini noodles, ensuring everyone can enjoy this dish.
  • Citrus Zing: A squeeze of fresh lime or lemon juice before serving can brighten the dish while enhancing its flavors.
  • Fermented Fun: Add a bit of kimchi on the side for a tangy, probiotic kick that pairs beautifully with the savory notes of Yaki Udon.

These variations can transform your Quick Vegan Yaki Udon into a personal masterpiece. Looking for more delicious ways to enjoy Asian cuisine? Try pairing it with a refreshing Japanese cucumber salad or savoring a bowl of miso soup on the side!

Quick Vegan Yaki Udon Recipe FAQs

How do I choose the best udon noodles for my Yaki Udon?
Absolutely! For the best texture and chewiness, I recommend using instant fresh or frozen Sanuki udon noodles. Look for udon that is thick and smooth—this will ensure you get that delightful bite in every mouthful.

How should I store leftover Yaki Udon?
Very simply! Store your leftover Yaki Udon in an airtight container in the fridge for up to 2 days. Keep in mind that the noodles may absorb some of the sauce during storage, but you can easily revive them with a splash of water when reheating.

Can I freeze Yaki Udon for later?
Yes, you can! To freeze Yaki Udon, transfer it into a freezer-safe container and store it for up to 1 month. When you’re ready to enjoy it again, let it thaw overnight in the fridge. Then, simply reheat in the microwave or pan-fry it until heated through, adding a bit of water or vegetable broth to prevent the noodles from drying out.

What if my vegetables turn out mushy?
If your vegetables end up mushy, don’t fret! This can often happen due to a few reasons: using too much liquid or cooking them for too long. To avoid this, try adding your softer vegetables later in the cooking process and limit the use of water. If you find this happens often, cut your vegetables thicker so they can retain more texture during cooking.

Are there any dietary considerations for Yaki Udon?
Certainly! This vegan recipe contains tofu, which is excellent for protein. However, for those with soy allergies, you can substitute the tofu with tempeh or a different protein source like seitan or chickpeas. Always check ingredient labels for other allergens, especially if you’re including sauces like soy sauce and vegetarian oyster sauce.

How do I know if my shiitake mushrooms are fresh?
To ensure you’re using good quality shiitake mushrooms, look for ones that are firm and plump with a rich, earthy aroma. If you see any dark spots or a slimy texture, they may have gone bad. I recommend storing them in a paper bag in the fridge, where they can last for up to 3 to 4 days.

Yaki Udon

Delicious Yaki Udon: Quick Vegan Twist for Weeknight Dinners

Quick vegan Yaki Udon packed with crisp vegetables and hearty tofu for delicious weeknight dinners.
Prep Time 15 minutes
Total Time 15 minutes
Servings: 2 bowls
Course: Dinner
Cuisine: Japanese
Calories: 350

Ingredients
  

For the Noodles
  • 200 grams Udon noodles instant fresh or frozen Sanuki udon preferred
For the Sauce
  • 3 tablespoons Soy sauce adjust based on taste
  • 1 tablespoon Rice vinegar optional but recommended
  • 2 tablespoons Tomato ketchup
  • 1 tablespoon Sugar adjust based on preference
  • 1 tablespoon Vegetarian mushroom oyster sauce can substitute with another stir-fry sauce
For the Protein
  • 200 grams Extra firm tofu pressed and sliced
For the Vegetables
  • 1 White onion sliced
  • 50 grams Dried shiitake mushrooms rehydrated
  • 1 medium Carrot sliced thinly
  • 1 Bell pepper any color, sliced
  • 100 grams Cabbage chopped
For Seasoning
  • 1 dash Ground black pepper
For Garnish
  • 2 tablespoons Chopped scallions
  • 1 tablespoon Sesame seeds
  • 1 teaspoon Shichimi Togarashi optional

Equipment

  • large pan
  • Medium bowl
  • Measuring spoons

Method
 

Step‑by‑Step Instructions
  1. Soak dried shiitake mushrooms in boiling water for 15 minutes until rehydrated. Squeeze out excess moisture and slice.
  2. Heat oil in a large pan. Add sliced tofu and pan-fry for 5-7 minutes until golden brown. Season lightly with salt.
  3. In a medium bowl, whisk together soy sauce, rice vinegar, ketchup, sugar, and mushroom oyster sauce until combined.
  4. Soak udon noodles in hot water for 5 minutes or microwave frozen udon for 2-3 minutes until tender. Drain.
  5. In the same pan, add more oil and sauté sliced onion for 2-3 minutes until translucent. Add carrots, bell pepper, and shiitake mushrooms, cooking for another 3-4 minutes.
  6. Mix in chopped cabbage and scallions, stir-frying for 2 more minutes to soften veggies and develop color.
  7. Combine udon noodles with sautéed vegetables and pour sauce over. Toss for 2-3 minutes until well mixed and glossy.
  8. Serve hot garnished with sesame seeds and Shichimi Togarashi. Enjoy your Yaki Udon!

Notes

Best served fresh. Adjust seasoning for personal taste. Can be enjoyed with miso soup or a salad.

Creamy Roasted Garlic Cheddar Cauliflower Soup You’ll Love

As I stood by the stove, the inviting aroma of roasted garlic danced through my kitchen, transporting me back to chilly afternoons spent savoring warm, comforting meals. That’s when I knew it was time to whip up a batch of my creamy Roasted Garlic Cheddar Cauliflower Soup. This easy recipe shines with velvety cauliflower blended to perfection, mingling beautifully with the sharp cheddar cheese that melts into each spoonful. Not only is it a delightful comfort food that can warm your heart, but it’s also a veggie-packed, gluten-free option that even non-vegetarians will crave. Plus, it requires no cream or flour, making it a healthier twist on classic soups. Are you ready to indulge in a bowl of this wholesome goodness? Let’s dive into the recipe and discover the secret to achieving soup perfection!

Why is this soup a must-try?

Creamy Comfort: Each spoonful of this Roasted Garlic Cheddar Cauliflower Soup is a warm hug on a cold day. Healthier Twist: It’s guilt-free, using cauliflower instead of cream for that rich texture. Quick and Easy: Needing just under an hour, this recipe is perfect for busy weeknights. Endless Variations: Try it vegan with dairy-free cheese or add in your favorite veggies like carrots for extra nutrition! Pair it with some Garlic Butter French fries for a complete meal. Restaurant-Quality: Impress family and friends with a dish that feels gourmet yet is incredibly simple to make!

Roasted Garlic Cheddar Cauliflower Soup Ingredients

For the Soup Base
Cauliflower – Use one large head for about 4-5 cups of florets, forming the creamy base of the soup.
Olive Oil – 3 tablespoons, divided—adds richness and enhances the flavor of roasted ingredients.
Yellow Onion – 1 medium, diced—provides a savory foundation for the soup.
Garlic – 1 whole head, roasted until soft—brings a sweet depth of flavor that complements the cheddar.
Vegetable Broth – 4 cups; opt for chicken broth for a non-vegetarian alternative, ensuring the soup is comforting.

For the Flavor Boost
Salt and Pepper – Use to taste throughout preparation for perfect seasoning.
Sharp Cheddar Cheese – 1 heaping cup, shredded; this cheese adds the creamy richness and tang that elevates the soup.

For Garnishing
Green Onions – Sliced for a fresh, vibrant garnish that adds a pop of color and flavor.
Additional Cheddar – Sprinkle more for an extra cheesy touch!
Croutons or Toasted Sourdough – Serve alongside for a delightful crunch with every bite.

Create a comforting bowl of Roasted Garlic Cheddar Cauliflower Soup that’s perfect for chilly days!

Step‑by‑Step Instructions for Roasted Garlic Cheddar Cauliflower Soup

Step 1: Preheat and Prepare
Begin by preheating your oven to 400°F (200°C) and lining a baking sheet with parchment paper. While the oven heats up, wash and cut the cauliflower into florets, then toss them in a bowl with 1-2 tablespoons of olive oil, ensuring they’re well coated. Don’t forget to season with salt and pepper for a flavor boost!

Step 2: Roast Garlic
To prepare the garlic, slice off the top of a whole head, drizzle it with olive oil, and wrap it in foil. Place the garlic and the seasoned cauliflower florets on the prepared baking sheet. The cozy aromas of the Roasted Garlic Cheddar Cauliflower Soup will soon fill your kitchen as everything roasts together for 30-35 minutes, flipping the cauliflower halfway until golden brown and tender.

Step 3: Sauté the Onion
While your vegetables are roasting, heat 1 tablespoon of olive oil in a large pot over medium heat. Add the diced onion, sautéeing for about 5-8 minutes until they become translucent and fragrant. This savory base will enhance the depth of flavors, perfectly complementing your upcoming creamy Roasted Garlic Cheddar Cauliflower Soup.

Step 4: Blend the Soup
After the cauliflower and garlic are roasted to perfection, carefully squeeze the softened garlic out of its skin into a blender. Add the roasted cauliflower, sautéed onions, 4 cups of vegetable broth, and additional salt and pepper to taste. Blend until smooth and creamy, achieving a velvety texture that will make your soup irresistible.

Step 5: Simmer and Stir in Cheese
Return the blended mixture to the pot over low heat, bringing it to a gentle simmer. Slowly stir in 1 heaping cup of shredded sharp cheddar cheese, allowing it to melt seamlessly into the soup. The rich flavor of the cheese will make each spoonful of your Roasted Garlic Cheddar Cauliflower Soup comforting and satisfying.

Step 6: Final Touches and Serve
Taste your soup and adjust the seasoning if necessary, adding more salt or pepper if desired. To serve, ladle the creamy soup into bowls, garnishing with sliced green onions and a sprinkle of extra cheddar. Pair with croutons or toasted sourdough on the side for a delightful crunch, completing your heartwarming meal!

Storage Tips for Roasted Garlic Cheddar Cauliflower Soup

Fridge: Store your soup in an airtight container for up to 3 days. Allow it to cool before sealing to retain the creamy texture.

Freezer: For longer storage, freeze the soup in individual portions for up to 3 months. Make sure to leave some room for expansion in the container.

Reheating: Reheat on the stovetop over low heat, adding a splash of broth or water if the soup thickens too much after freezing. Enjoy the warmth of your Roasted Garlic Cheddar Cauliflower Soup!

Variations & Substitutions for Roasted Garlic Cheddar Cauliflower Soup

Feel free to tweak this comforting soup to suit your taste and dietary needs—there are so many delicious possibilities!

  • Vegan Option: Substitute sharp cheddar with dairy-free cheese to create a creamy, plant-based version that everyone can enjoy. Experience a wonderfully rich flavor without sacrificing comfort!

  • Add Extra Vegetables: Toss in other favorites like carrots or celery for a nutritional boost and added texture. Consider incorporating seasonal veggies for a fresh twist!

  • Herb Infusion: Experiment with spices like cumin or thyme for a unique flavor profile. A bit of fresh basil can also add a delightful aromatic touch to this comforting soup.

  • Spicy Kick: If you love heat, add a pinch of cayenne pepper or red pepper flakes to taste. This will elevate each spoonful with a delightful spiciness!

  • Root Veggies: Replace some of the cauliflower with potatoes or sweet potatoes for a different texture and slight sweetness that’s equally delightful!

  • Creamier Texture: For an ultra-smooth finish, mix in a cup of milk or a non-dairy alternative in place of some broth. The creamy richness will take the soup to another level!

  • Flavor Boost: Incorporate a handful of roasted garlic cloves from another recipe, such as Honey Garlic Slow cooked dish, adding a rich burst of flavor that enhances the soup beautifully.

  • Nutty Crunch: For those who enjoy a delightful contrast, try adding toasted pumpkin seeds or crushed nuts on top for a satisfying crunch!

Regardless of the variations you choose, this Roasted Garlic Cheddar Cauliflower Soup will surely delight and warm your heart!

What to Serve with Creamy Roasted Garlic Cheddar Cauliflower Soup

Elevate your dining experience with these delightful pairings that will make your heart sing!

  • Crusty Sourdough Bread: The perfect vehicle for the creamy soup, its chewy texture and crusty exterior provide a satisfying contrast. Dip it generously into your soup for a truly comforting bite.

  • Garlic Butter French Fries: Crispy, golden fries drizzled with garlic butter echo the flavors of the soup while offering a delightful crunch, making your meal feel indulgent and fun.

  • Simple Garden Salad: A refreshing medley of greens and vegetables adds a bright and crunchy element that balances the rich creaminess of the soup.

  • Cheddar Croutons: These add an extra layer of cheesy goodness. Homemade, buttery croutons bring delightful texture and flavor, enhancing your soup experience.

  • Herbed Couscous: Light and fluffy, herbed couscous brings a delicate touch to your meal, allowing the bold flavors of the soup to shine while adding a grainy texture.

  • Sparkling Water with Lemon: This refreshing drink cleanses the palate and lightens the meal with vibrant citrus notes, making it a delightful accompaniment for your comforting bowl of soup.

  • Roasted Brussels Sprouts: These caramelized veggies have a crispy exterior and tender inside, bringing a contrasting texture that pairs beautifully with the creamy soup.

  • Apple Crisp: Finish off your meal with a dessert that has a hint of sweetness and a crunchy topping. The warm flavors of apple and cinnamon create a cozy ending to your soup journey.

Expert Tips for Roasted Garlic Cheddar Cauliflower Soup

  • Roast Quality: Ensure you roast the garlic and cauliflower until golden brown for a deeper flavor; under-roasting can leave them bland.

  • Balancing Texture: If you prefer a super creamy texture, blend longer and add a little more broth for the perfect consistency, maintaining the essence of the Roasted Garlic Cheddar Cauliflower Soup.

  • Seasoning Smart: Taste as you go! Adjust salt and pepper throughout the cooking process to really elevate the flavors, making sure each bowl is perfectly seasoned.

  • Cheese Quality: Use high-quality sharp cheddar for the best flavor; it melts beautifully and gives the soup that luxurious, comforting taste everyone loves.

  • Storage Solutions: If you have leftovers, store them in an airtight container in the fridge. Reheat gently on the stovetop, adding a splash of broth to regain its creamy texture.

Make Ahead Options

Prepare your creamy Roasted Garlic Cheddar Cauliflower Soup in advance to save precious time on busy weeknights! You can roast the cauliflower and garlic up to 24 hours ahead, letting them cool completely before storing in an airtight container in the refrigerator. The sautéed onion can also be prepped ahead and stored separately for freshness. When you’re ready to enjoy your soup, simply blend the roasted veggies with the broth, reheat in a pot, and stir in the sharp cheddar until melted. This way, you’ll have a comforting bowl of soup that’s just as delicious as when you first made it—perfect for those chilly evenings!

Roasted Garlic Cheddar Cauliflower Soup Recipe FAQs

How do I choose the perfect cauliflower?
Absolutely! When selecting cauliflower, look for a head that’s firm, tightly packed, and free from bruises or dark spots. A good cauliflower should be a bright white color, with the leaves still green. Avoid any that are showing signs of yellowing or soft spots, which indicate age. Freshness matters for that creamy texture in your soup!

What’s the best way to store leftover soup?
Very! To store your Roasted Garlic Cheddar Cauliflower Soup, let it cool completely before transferring it into an airtight container. It can be kept in the refrigerator for up to 3 days. If it thickens, just add a splash of broth or water when reheating to bring back that comforting creaminess!

Can this soup be frozen for later?
Absolutely! You can freeze your soup in individual portions for up to 3 months. When freezing, leave a little space in the container to allow for expansion. When you’re ready to enjoy a bowl again, let it thaw overnight in the fridge, then gently reheat on the stovetop, adding some broth if needed.

What if my soup turns out too thick or chunky?
No worries! If your soup is too thick, simply stir in additional vegetable broth or water until you reach your desired consistency. If you find it chunkier than expected, give it another blend for a smoother texture. Remember, it’s all about personal preference, so adjust to make it just right for you!

Is this soup safe for those with dairy allergies?
Very! While the recipe contains sharp cheddar cheese, there are amazing alternatives available. For a dairy-free version of your Roasted Garlic Cheddar Cauliflower Soup, simply replace the cheddar with a dairy-free cheese or nutritional yeast for added flavor. Always check labels to ensure they’re allergy-friendly.

How long can I keep this soup in the fridge after making?
Of course! When stored in an airtight container, your Roasted Garlic Cheddar Cauliflower Soup will stay delicious in the fridge for up to 3 days. Just remember to let it cool completely before sealing it up to keep that velvety texture intact!

Roasted Garlic Cheddar Cauliflower Soup

Creamy Roasted Garlic Cheddar Cauliflower Soup You'll Love

A delightful Roasted Garlic Cheddar Cauliflower Soup that is veggie-packed, gluten-free, and requires no cream or flour.
Prep Time 15 minutes
Cook Time 35 minutes
Total Time 50 minutes
Servings: 4 bowls
Course: Dinner
Cuisine: American
Calories: 300

Ingredients
  

For the Soup Base
  • 1 head Cauliflower large head for about 4-5 cups of florets
  • 3 tablespoons Olive Oil divided
  • 1 medium Yellow Onion diced
  • 1 head Garlic roasted until soft
  • 4 cups Vegetable Broth or chicken broth for non-vegetarian option
For the Flavor Boost
  • Salt to taste
  • Pepper to taste
  • 1 cup Sharp Cheddar Cheese shredded
For Garnishing
  • Green Onions sliced
  • Additional Cheddar for sprinkling
  • Croutons or Toasted Sourdough to serve alongside

Equipment

  • oven
  • baking sheet
  • parchment paper
  • Large pot
  • Blender

Method
 

Step-by-Step Instructions
  1. Preheat your oven to 400°F (200°C) and line a baking sheet with parchment paper. Wash and cut the cauliflower into florets, then toss them in a bowl with 1-2 tablespoons of olive oil, ensuring they're well coated. Season with salt and pepper.
  2. Slice off the top of a whole head of garlic, drizzle it with olive oil, and wrap it in foil. Place the garlic and seasoned cauliflower florets on the prepared baking sheet. Roast together for 30-35 minutes, flipping halfway until golden brown and tender.
  3. In a large pot, heat 1 tablespoon of olive oil over medium heat. Add the diced onion, sautéing for about 5-8 minutes until translucent and fragrant.
  4. Squeeze the softened garlic out of its skin into a blender. Add the roasted cauliflower, sautéed onions, vegetable broth, and additional salt and pepper to taste. Blend until smooth and creamy.
  5. Return the blended mixture to the pot over low heat, simmer and stir in the shredded sharp cheddar cheese until melted.
  6. Taste and adjust seasoning if necessary. Serve the soup in bowls, garnished with sliced green onions and extra cheddar, alongside croutons or toasted sourdough.

Notes

For best results, use high-quality sharp cheddar cheese and adjust seasoning as you cook to elevate flavors.

Crispy Air-Fried Chickpea Poppers for Healthy Snack Cravings

As the air fryer hums softly, I can already taste the crispy goodness about to unfold. These Crispy Air-Fried Chickpea Poppers are more than just a snack; they’re a quick and easy way to redefine munchies with a healthy twist. Whether you’re hosting a last-minute gathering or simply craving something satisfying after a long day, this recipe delivers in under 30 minutes. Packed with protein and fiber, these delightful poppers cater to both vegan and gluten-free diets, proving that wholesome snacking doesn’t have to be boring. Plus, the best part? You can customize them with your favorite spices or herbs for a personal touch! What unique flavors will you add to your batch?

Why Try Air-Fried Chickpea Poppers?

Healthier Snack Alternative: These poppers pack a protein punch while being completely vegan and gluten-free, ensuring everyone can enjoy them guilt-free.

Quick Preparation: Ready in under 30 minutes, they’re perfect for those busy weeknights or surprise guests.

Flavor Versatility: With options to customize coatings and spices like paprika or cayenne, you can easily match them to your taste preferences.

Easy Cleanup: Cooking in an air fryer means less mess than traditional frying, making your snacking experience even sweeter.

Crowd-Pleaser: Whether served at parties or family dinners, these poppers are an instant hit that turns snacking into a celebration—serve them with a side of hummus or tzatziki for the ultimate treat!

Air-Fried Chickpea Poppers Ingredients

• Let’s get cooking! Here’s everything you’ll need for these delightful snacks.

For the Base

  • Chickpeas (Garbanzo Beans) – The star ingredient packed with protein and fiber; you can swap in dried chickpeas, but they will require soaking and cooking first.
  • Olive Oil (or Avocado Oil) – Essential for adding richness and achieving that crispy exterior; feel free to use any high-heat oil if you prefer.

For the Seasoning

  • Paprika – Infuses a lovely smoky flavor and vibrant color; there’s no direct substitute, but chili powder adds a great kick if you like heat.
  • Garlic Powder – Brings depth and warmth; fresh garlic works too, just be mindful it can change the cooking time.
  • Onion Powder – Offers savory notes; for a fresher take, use finely diced onion instead or omit if you wish.
  • Salt – Elevates all the flavors; kosher or sea salt works wonderfully, depending on your preference.
  • Black Pepper – Introduces mild heat; for a more subtle taste, swap it for white pepper.
  • (Optional) Cayenne Pepper or Chili Powder – For those who crave a little extra spice; adjust according to your taste buds.
  • (Optional) Dried Herbs (like Oregano, Thyme, or Rosemary) – Adds aromatic flavors; fresh herbs can work too, just be cautious with the amounts.

Now that you have your ingredients ready, let’s get popping! These Air-Fried Chickpea Poppers promise to be a deliciously healthy addition to your snack rotation.

Step‑by‑Step Instructions for Air-Fried Chickpea Poppers

Step 1: Prepare the Chickpeas
Begin by draining and rinsing one can of chickpeas under cool water. Gently pat them dry using a clean kitchen towel or paper towels until they are thoroughly dried. This step is crucial for achieving that delightful crispiness once they’re air-fried. Taking the time now will reward you with a satisfyingly crunchy texture later!

Step 2: Season the Chickpeas
In a large mixing bowl, toss the dried chickpeas with a drizzle of olive oil and your chosen spices, including paprika, garlic powder, onion powder, salt, and black pepper. Use your hands or a spatula to ensure each chickpea is evenly coated with the seasoning blend. The goal is to cover every surface, so the flavors infuse beautifully during the air-frying process.

Step 3: Preheat Your Air Fryer
While you season the chickpeas, preheat your air fryer to 375°F (190°C). Allow it to warm up for about 5 minutes. This ensures that the chickpeas start cooking immediately upon entry, promoting a crispy exterior. A properly preheated air fryer makes a significant difference in achieving that perfect crunch for your Air-Fried Chickpea Poppers.

Step 4: Air Fry the Chickpeas
Carefully place the seasoned chickpeas in the air fryer basket, spreading them out in a single layer for even cooking. Air fry them for 12-15 minutes, shaking the basket halfway through to promote uniform crispiness. Keep an eye on them, and look for a golden-brown hue as the ideal sign of doneness, ensuring a delightful crunch.

Step 5: Check for Crispiness
Once the timer goes off, check the poppers to confirm they have reached your desired level of crispiness. If they need a little more time, return them to the air fryer for an additional 2-3 minutes, checking frequently. The goal is to have them crunchy on the outside but still tender on the inside, truly embodying the essence of these Air-Fried Chickpea Poppers.

Step 6: Cool and Serve
After achieving that perfect golden color, remove the air-fried chickpea poppers from the basket and let them cool for a few minutes. This resting period allows them to firm up even more. Once slightly cooled, serve them warm as a satisfying snack, perhaps with a side of hummus or tzatziki for some added delight. Enjoy your wholesome creation!

Air-Fried Chickpea Poppers Variations

Customize your Air-Fried Chickpea Poppers with these tasty twists and swaps that let your culinary creativity shine!

  • Cheesy Twist: Toss cooked poppers with grated Parmesan for an extra indulge-worthy layer of flavor.

  • Vegan Cheese: Sprinkle nutritional yeast over warm poppers for a cheesy, dairy-free option that brings a delightful umami kick.

  • Sweet Spice: Add a dusting of cinnamon and a touch of sugar post-cooking for a unique sweet and savory snack.

  • Nutty Texture: Coat chickpeas with sesame seeds before air frying to achieve a delightful crunch and nutty flavor.

  • Herb-Infused: Mix in fresh or dried herbs like rosemary or thyme to elevate the aroma and enrich every bite with nature’s goodness.

  • Kick of Heat: For the spice lovers, add a dash of cayenne pepper or your favorite hot sauce before cooking to get those taste buds dancing.

  • Curry Flavor: Stir in curry powder for an exotic twist that pairs beautifully with a tangy yogurt dip.

  • Asian-Inspired: Use soy sauce and ginger to season for a sweet and salty balance, giving your poppers a delicious Asian-inspired flair.

With these delightful variations, you’re sure to discover new favorites and make flavor memories while snacking. Enjoy experimenting and remember, each tweak can make your popping journey even more exciting! Want more ideas? Check out how to pair your snacks with dips like tzatziki or spicy aioli for a refreshing experience!

Make Ahead Options

These Crispy Air-Fried Chickpea Poppers are ideal for meal prep aficionados seeking quick, healthy snacks! You can season and refrigerate the chickpeas up to 24 hours in advance, ensuring they’re packed with flavor when it’s time to cook. Simply drain, rinse, and dry the chickpeas, then toss them with olive oil and your chosen spices. Store them in an airtight container in the refrigerator to preserve their freshness. When you’re ready to enjoy your poppers, just preheat the air fryer and cook as directed; they’ll be just as delicious and crispy! This approach saves you time on busy weeknights, allowing you to serve a delightful snack without the hassle.

Expert Tips for Air-Fried Chickpea Poppers

  • Dry Chickpeas Well: Ensure your chickpeas are thoroughly dried after rinsing. Excess moisture leads to sogginess instead of crispiness.

  • Don’t Overcrowd: Cook in batches if necessary. Overcrowding the air fryer basket can result in uneven cooking and less crispiness for your Air-Fried Chickpea Poppers.

  • Light Oil Coating: Use just a drizzle of olive oil to keep them light and healthy. Too much oil may prevent them from achieving that perfect crunch.

  • Customize Your Spices: Feel free to experiment with different spice blends or herbs; just remember to balance flavors and not overpower the natural taste of the chickpeas.

  • Serve Fresh: For the best texture, enjoy the poppers right after cooking. If you have leftovers, reheat them in the air fryer for a few minutes to restore crunchiness.

How to Store and Freeze Air-Fried Chickpea Poppers

Room Temperature: Keep any leftover Air-Fried Chickpea Poppers at room temperature for up to 2 hours. For best taste, consume them while they’re still warm and crispy.

Fridge: Store poppers in an airtight container in the fridge for up to 3 days. To retain some crunchiness, avoid covering them tightly while they cool to prevent moisture buildup.

Freezer: For longer storage, freeze the cooled poppers in a single layer on a baking sheet, then transfer them to a freezer-safe container after they are fully frozen. They can last for up to 2 months.

Reheating: To reheat, place the frozen Air-Fried Chickpea Poppers back in the air fryer at 375°F (190°C) for about 5-7 minutes until crispy, ensuring they’re deliciously warm again!

What to Serve with Crispy Air-Fried Chickpea Poppers

Elevate your snacking experience by finding the perfect companions for these delightful poppers, turning them into a full-flavored feast.

  • Creamy Hummus: A classic pairing that adds a smooth texture and rich flavor, enhancing the crunchy poppers perfectly.
  • Spicy Tzatziki: This refreshing yogurt dip with cucumber and mint livens up the palate and complements the savory chickpeas.

Enjoy these poppers with complementary flavors for a balanced meal. It’s a burst of textures and tastes that will have everyone reaching for more!

  • Fresh Garden Salad: Bright greens and crisp vegetables provide a refreshing contrast, lightening up the snack experience.
  • Roasted Veggies: Seasoned and caramelized, they add depth and a hearty touch, making for a satisfying combination.
  • Avocado Toast: The creamy richness of avocado brings a delightful creaminess that pairs harmoniously with the chickpeas.
  • Pita Chips: Their crunch mirrors the poppers, and they’re perfect for dipping into sauces, bringing added fun to your snack table.
  • Sparkling Lemonade: This zesty drink refreshes your taste buds and balances the savory flavors, making it perfect for gatherings.
  • Dark Chocolate Squares: For a sweet note post-snack, rich dark chocolate pairs surprisingly well, creating a satisfying end to your meal!

Air-Fried Chickpea Poppers Recipe FAQs

How do I select the best chickpeas?
Absolutely! When choosing chickpeas, look for canned options that are firm and free from dark spots or dents on the can. If using dried chickpeas, ensure they are free from cracks and signs of moisture. If they seem too old or shriveled, they may not cook evenly.

What’s the best way to store leftover chickpea poppers?
Store your Air-Fried Chickpea Poppers in an airtight container in the refrigerator for up to 3 days. To maintain their crispiness, let them cool completely before placing them in the container and avoid sealing them too tightly initially, as this can trap moisture and make them soggy.

Can I freeze Air-Fried Chickpea Poppers?
Yes, indeed! To freeze, allow the cooled chickpea poppers to sit in a single layer on a baking sheet until fully frozen, about 1-2 hours. Then, transfer them into a freezer-safe bag or container. They can be stored for up to 2 months. When ready to enjoy, reheat them in your air fryer for about 5-7 minutes at 375°F (190°C) until crisp.

What if my poppers aren’t crispy enough?
No problem! If your Air-Fried Chickpea Poppers turn out soft, they may need more drying before seasoning or perhaps a longer cooking time. Ensure they are thoroughly dried after rinsing. Cook them for an extra 2-3 minutes if not crispy, checking frequently to prevent burning.

Are these chickpea poppers safe for pets or people with food allergies?
It’s important to be cautious! These poppers are made from chickpeas, which are generally safe for dogs (in moderation). However, avoid offering seasoned chickpea poppers to pets, as spices and salt can be harmful. Always check for specific allergies when serving to guests, and consider a simple batch without spices for those who may have sensitivities.

Can I customize the flavors of my chickpea poppers?
Very much so! Feel free to experiment with different spice blends to suit your palate. You could try adding taco seasoning for a zesty flair, or even cinnamon and sugar for a sweet twist. The more you play with the flavors, the more delightful your Air-Fried Chickpea Poppers will become!

Air-Fried Chickpea Poppers

Crispy Air-Fried Chickpea Poppers for Healthy Snack Cravings

These Crispy Air-Fried Chickpea Poppers are a healthy snack alternative packed with protein and flavor, perfect for all diets.
Prep Time 10 minutes
Cook Time 15 minutes
Cooling Time 5 minutes
Total Time 30 minutes
Servings: 4 poppers
Course: Other
Cuisine: Vegan
Calories: 150

Ingredients
  

For the Base
  • 1 can Chickpeas (Garbanzo Beans) Drained and rinsed
  • 1 tablespoon Olive Oil (or Avocado Oil) For coating
For the Seasoning
  • 1 teaspoon Paprika For smoky flavor
  • 1 teaspoon Garlic Powder Or fresh garlic
  • 1 teaspoon Onion Powder Or finely diced onion
  • 0.5 teaspoon Salt To taste
  • 0.5 teaspoon Black Pepper Or white pepper
  • 0.5 teaspoon (Optional) Cayenne Pepper or Chili Powder To taste
  • 1 teaspoon (Optional) Dried Herbs (like Oregano, Thyme, or Rosemary) To taste

Equipment

  • Air Fryer

Method
 

Step-by-Step Instructions
  1. Prepare the Chickpeas: Drain and rinse one can of chickpeas, then pat them dry.
  2. Season the Chickpeas: Toss chickpeas with olive oil and spices until evenly coated.
  3. Preheat Your Air Fryer: Preheat air fryer to 375°F (190°C) for about 5 minutes.
  4. Air Fry the Chickpeas: Place seasoned chickpeas in the basket and cook for 12-15 minutes, shaking halfway.
  5. Check for Crispiness: Ensure chickpeas are crispy; add 2-3 minutes if necessary.
  6. Cool and Serve: Remove from air fryer, let cool slightly, then serve warm.

Notes

These poppers can be enjoyed with a side of hummus or tzatziki for extra flavor. Customize with your favorite spices.

Mummy Mozzarella Sticks: Spookily Good Halloween Snack

As I rummaged through my pantry, I stumbled upon a couple of forgotten mozzarella sticks and a tube of crescent rolls. Instantly, a lightbulb went off—why not create the spookiest and most fun-to-eat appetizer for Halloween? Enter my Mummy Mozzarella Sticks! These delightful bites are not just a treat for the taste buds, but they’re also a hit at any gathering, combining the perfect balance of gooey cheese and flaky pastry. With easy prep and minimal ingredients, you can whip up a batch in no time, making it perfect for both kids and adults who want to ditch fast food in favor of homemade fun. Ready to make your Halloween gathering memorable? Let’s get wrapping!

Why are Mummy Mozzarella Sticks a must-try?

Ghoulish Fun: These Mummy Mozzarella Sticks bring a festive flair to your Halloween festivities, making them not only delicious but also a conversation starter.

Easy to Make: With minimal ingredients and straightforward steps, you’ll find that they come together effortlessly, perfect for busy schedules.

Versatile Variations: Feel free to experiment with different cheeses and seasoning blends to suit your taste, or try using whole-wheat crescent rolls for a healthier twist.

Crowd-Pleasing Appeal: They’re a guaranteed hit with both kids and adults, making them an ideal addition to your party spread. For a complete menu, pair them with Savory Chicken Drumsticks or some light and tasty Zucchini Potato Mozzarella.

Delicious Texture: The crispy, flaky exterior hides a gooey, melted center that delights the palate, ensuring every bite is packed with flavor and fun!

Mummy Mozzarella Sticks Ingredients

For the Cheese Filling

  • 8 Mozzarella String Cheese Sticks – These are the star of the show; their melty goodness makes each bite irresistible.

For the Dough

  • 2 (8 oz.) Refrigerated Crescent Rolls – They provide a light, flaky exterior; you can switch it up with whole-wheat dough for a healthier option.

For Decoration

  • 16 Candy Eyes – These add the finishing spooky touch; colorful candy eyes can be a fun alternative for a vibrant look.

Step‑by‑Step Instructions for Mummy Mozzarella Sticks

Step 1: Freeze the Cheese
Begin by placing the mozzarella string cheese sticks in the freezer for about 2 to 4 hours. This helps them maintain their shape during baking, ensuring a perfectly gooey interior once cooked. While the cheese freezes, you can prepare your baking equipment for the next steps, making the process smooth and efficient.

Step 2: Preheat the Oven
Preheat your oven to 375°F (190°C). This allows the temperature to rise while you prepare the crescent dough, ensuring your Mummy Mozzarella Sticks bake evenly and achieve a golden brown finish. A preheated oven is key to getting that delightful, crispy texture that everyone loves.

Step 3: Prepare the Dough
Unroll one tube of refrigerated crescent dough on a clean surface, taking a moment to press the seams together. This forms a solid rectangle, handy for wrapping. Next, using a sharp knife or kitchen scissors, cut the dough into thin strips, about 1/2 inch wide. These strips will be used to create the mummy’s bandages around the cheese sticks.

Step 4: Wrap the Mozzarella Sticks
Take a frozen mozzarella stick and start wrapping it with the dough strips, overlapping slightly to mimic mummy bandages. Make sure to cover the cheese completely, sealing the edges tightly to prevent any leaks during baking. Repeat this process with all the cheese sticks, ensuring they all look wonderfully spooky.

Step 5: Brush with Egg Wash
Place your wrapped Mummy Mozzarella Sticks onto a parchment-lined baking sheet, giving them some space in between. In a small bowl, beat an egg white until frothy, then lightly brush the dough with the egg wash. This step adds a beautiful golden sheen during baking. It’s the secret to making your appetizers look as good as they taste!

Step 6: Chill Before Baking
Once brushed, pop the baking sheet into the refrigerator for at least 30 minutes. Chilling helps the dough maintain its structure and ensures a crispier outcome once baked. While they chill, you can prepare any dipping sauces or sides you’d like to serve alongside your Mummy Mozzarella Sticks.

Step 7: Bake to Perfection
Transfer your chilled baking sheet into the preheated oven and bake the Mummy Mozzarella Sticks for about 10 minutes. Keep an eye on them, and look for a golden brown color on the dough for a visual cue that they’re done. The smell will be irresistible, filling your kitchen with festive aromas!

Step 8: Add the Spooky Eyes
Once your Mummy Mozzarella Sticks are golden and crispy, carefully remove them from the oven. While they are still warm, gently press two candy eyes onto each stick for that fun and spooky finishing touch. Your Mummy Mozzarella Sticks are now ready to amaze your guests!

Mummy Mozzarella Sticks Variations

Feel free to make these spooky bites even more delightful by customizing them to your taste!

  • Cheese Swaps: Use cheddar or pepper jack for a spicier flavor, adding a delightful kick to your Mummy Mozzarella Sticks.

  • Homemade Dough: Try making your own dough from scratch for a truly fresh taste. It can elevate your mummies to gourmet status!

  • Herbed Dough: Enhance the flavor by adding garlic powder or Italian seasoning to the dough before wrapping for an aromatic twist.

  • Veggie Surprise: Insert a piece of jalapeño or spinach inside each cheese stick before wrapping for a flavorful surprise! The heat from jalapeños complements the gooey cheese beautifully.

  • Different Shapes: Instead of traditional mummies, cut the cheese sticks into smaller pieces for bite-sized treats or use cookie cutters to form fun shapes.

  • Spicy Option: Add red pepper flakes to the dough for a surprising heat that will make these sticks irresistible to spice lovers!

For an exciting side, you might pair these with flavorful Savory Chicken Drumsticks or a light and crispy batch of Zucchini Potato Mozzarella.

Expert Tips for Mummy Mozzarella Sticks

Freeze the Cheese: Make sure to freeze mozzarella sticks thoroughly for at least 2 hours, preventing them from melting too fast during baking.

Seal Edges Well: Press the dough edges firmly to avoid any cheese leakage while they bake. A sealed mummy means maximum gooey cheese!

Use Creative Wrapping: Get playful with your dough strips; create different bandage patterns for a charmingly spooky look.

Monitor Baking Time: Ovens can vary widely in temperature. Check your Mummy Mozzarella Sticks a couple of minutes early to achieve that perfect golden-brown finish.

Experiment with Cheese: Don’t hesitate to try different cheese options like pepper jack or gouda for a unique twist on flavor in your Mummy Mozzarella Sticks!

Storage Tips for Mummy Mozzarella Sticks

Fridge: Store any leftover Mummy Mozzarella Sticks in an airtight container for up to 3 days. This keeps them fresh and ready for tasty snacking!

Freezer: For long-term storage, freeze the baked Mummy Mozzarella Sticks for up to 2 months. Place them in a single layer in a freezer bag to avoid sticking.

Reheating: To enjoy frozen Mummy Mozzarella Sticks, reheat them in a preheated oven at 350°F (175°C) for about 10-15 minutes until heated through, ensuring the cheese stays gooey.

Make Ahead Options

These Mummy Mozzarella Sticks are a fantastic meal prep solution for busy Halloween gatherings! You can prepare the sticks by wrapping the frozen mozzarella with crescent dough and storing them in the refrigerator for up to 24 hours before baking. Simply lay them on a parchment-lined tray, cover with plastic wrap, and refrigerate until you’re ready to bake. To ensure the best quality, avoid brushing with egg wash until just before baking to maintain their crispy exterior. When you’re ready to serve, brush with egg wash, bake for about 10 minutes at 375°F (190°C), and then add the candy eyes for that spooky touch. Enjoy the time-saving convenience without compromising on fun and flavor!

What to Serve with Mummy Mozzarella Sticks?

Elevate your Halloween festivities with these delightful appetizers by complementing them with a variety of delicious sides and dips.

  • Marinara Sauce: A classic pairing that offers a tangy contrast to the cheesy richness of the Mummy Mozzarella Sticks, enhancing each bite.
  • Garlic Bread: The crunchy, buttery goodness of garlic bread perfectly balances the gooey texture and adds an extra layer of flavor.
  • Caesar Salad: A crisp, refreshing salad brings a touch of freshness, making the meal feel lighter while satisfying your health cravings.
  • Stuffed Peppers: These savory bites can be filled with rice and spices, providing a hearty accompaniment that pairs wonderfully with gooey cheese.
  • Crispy Veggie Platter: Serve fresh carrot sticks, cucumber slices, and bell pepper strips for a colorful and crunchy contrast to the warm mummies.
  • Pumpkin Spice Latte: Embrace the fall season with a warm drink that adds a cozy and inviting feel to your Halloween gathering. For a fun twist, consider a spiced apple cider to bring out the festive spirit.
  • Spooky Cupcakes: Finish your meal with a mimicked mummy design on cupcakes, offering a sweet treat that echoes the Halloween theme.
  • Chili Cheese Dip: A creamy and spiced dip can heighten the flavor profile while providing a delightful contrast to the crispy exterior of your Mummy Mozzarella Sticks.

Mummy Mozzarella Sticks Recipe FAQs

How do I select the best mozzarella sticks for this recipe?
Absolutely! When choosing mozzarella sticks, look for fresh, high-quality options that are firm and free from dark spots. Avoid any that feel overly soft or have visible moisture, as these may not melt well during baking.

How should I store leftover Mummy Mozzarella Sticks?
Leftover Mummy Mozzarella Sticks can be stored in an airtight container in the refrigerator for up to 3 days. Make sure they’re completely cooled before sealing to prevent condensation. You can also wrap each stick in foil to keep them extra fresh and enjoyable!

Can I freeze Mummy Mozzarella Sticks?
Yes, you can! To freeze cooked Mummy Mozzarella Sticks, allow them to cool completely, then place them in a single layer in a freezer-safe bag or airtight container. They can be stored for up to 2 months. For the best reheat results, it’s recommended to bake them from frozen at 350°F (175°C) for about 10-15 minutes until heated through.

What if my mozzarella sticks leak cheese while baking?
If you find cheese oozing out during baking, it’s likely due to the dough not being sealed properly. Ensure the dough edges are pressed firmly together around the cheese sticks, and consider wrapping them a bit tighter to prevent leaks. Try freezing the cheese longer, too, as this helps it maintain its shape during the baking process.

Can I make these Mummy Mozzarella Sticks gluten-free or dairy-free?
Absolutely! For gluten-free options, use gluten-free puff pastry or carefully selected dough. You can also substitute the mozzarella with dairy-free cheese alternatives such as cashew cheese or almond-based products. Make sure to check for any allergens if you’re preparing these for guests with dietary restrictions.

How can I enhance the flavor of my Mummy Mozzarella Sticks?
The more the merrier! You can enhance the flavor by sprinkling Italian seasoning, garlic powder, or even a dash of red pepper flakes onto the dough strips before wrapping. This added spice will give a delightful flavor boost that pairs beautifully with the gooey cheese inside!

Mummy Mozzarella Sticks

Mummy Mozzarella Sticks: Spookily Good Halloween Snack

Create spookily fun Mummy Mozzarella Sticks, a delightful Halloween snack that combines gooey cheese and flaky pastry.
Prep Time 30 minutes
Cook Time 10 minutes
Chilling Time 30 minutes
Total Time 1 hour 10 minutes
Servings: 8 sticks
Course: Other
Cuisine: American
Calories: 150

Ingredients
  

For the Cheese Filling
  • 8 sticks Mozzarella String Cheese The star of the show; melty goodness makes each bite irresistible.
For the Dough
  • 2 (8 oz.) Refrigerated Crescent Rolls Provides a light, flaky exterior.
For Decoration
  • 16 pieces Candy Eyes Add a finishing spooky touch.

Equipment

  • oven
  • baking sheet
  • Refrigerator
  • Knife
  • Small bowl

Method
 

Step-by-Step Instructions
  1. Begin by placing the mozzarella string cheese sticks in the freezer for about 2 to 4 hours.
  2. Preheat your oven to 375°F (190°C).
  3. Unroll one tube of refrigerated crescent dough on a clean surface, pressing the seams together to form a solid rectangle.
  4. Cut the dough into thin strips, about 1/2 inch wide, to create the mummy's bandages.
  5. Wrap each frozen mozzarella stick with the dough strips, overlapping slightly and sealing the edges tightly.
  6. Place wrapped sticks on a parchment-lined baking sheet, and brush them with an egg white wash.
  7. Chill the baking sheet in the refrigerator for at least 30 minutes.
  8. Bake in the preheated oven for about 10 minutes or until golden brown.
  9. Remove from the oven and press two candy eyes onto each warm mozzarella stick.

Notes

For best results, freeze mozzarella sticks thoroughly and seal the dough edges well to avoid cheese leakage.