Italian Drunken Noodles: A Delicious Chef’s Twist at Home

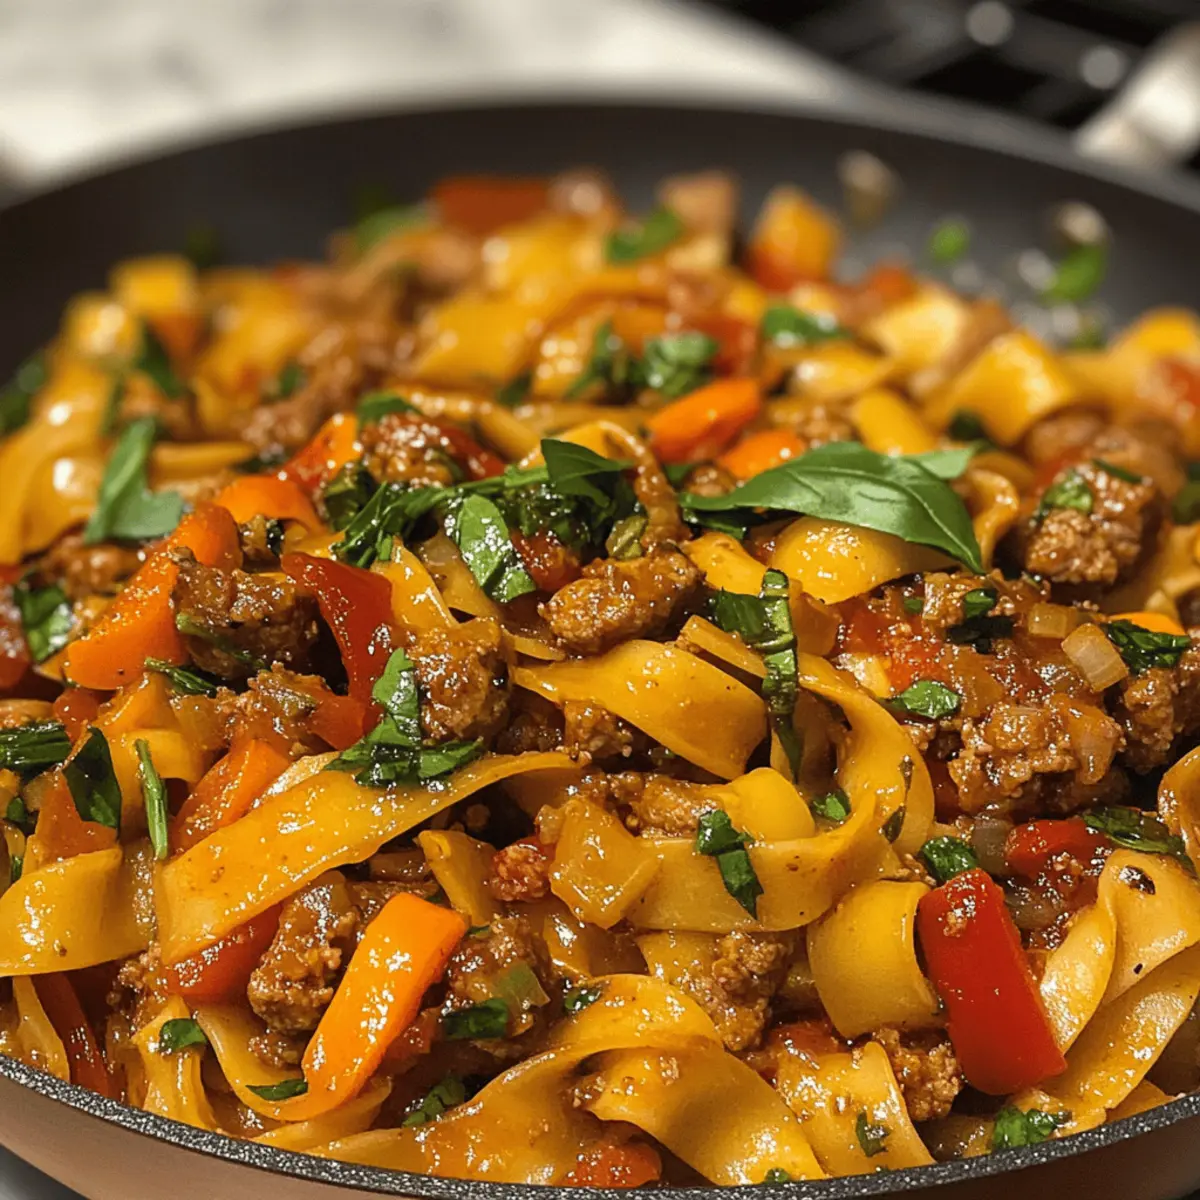
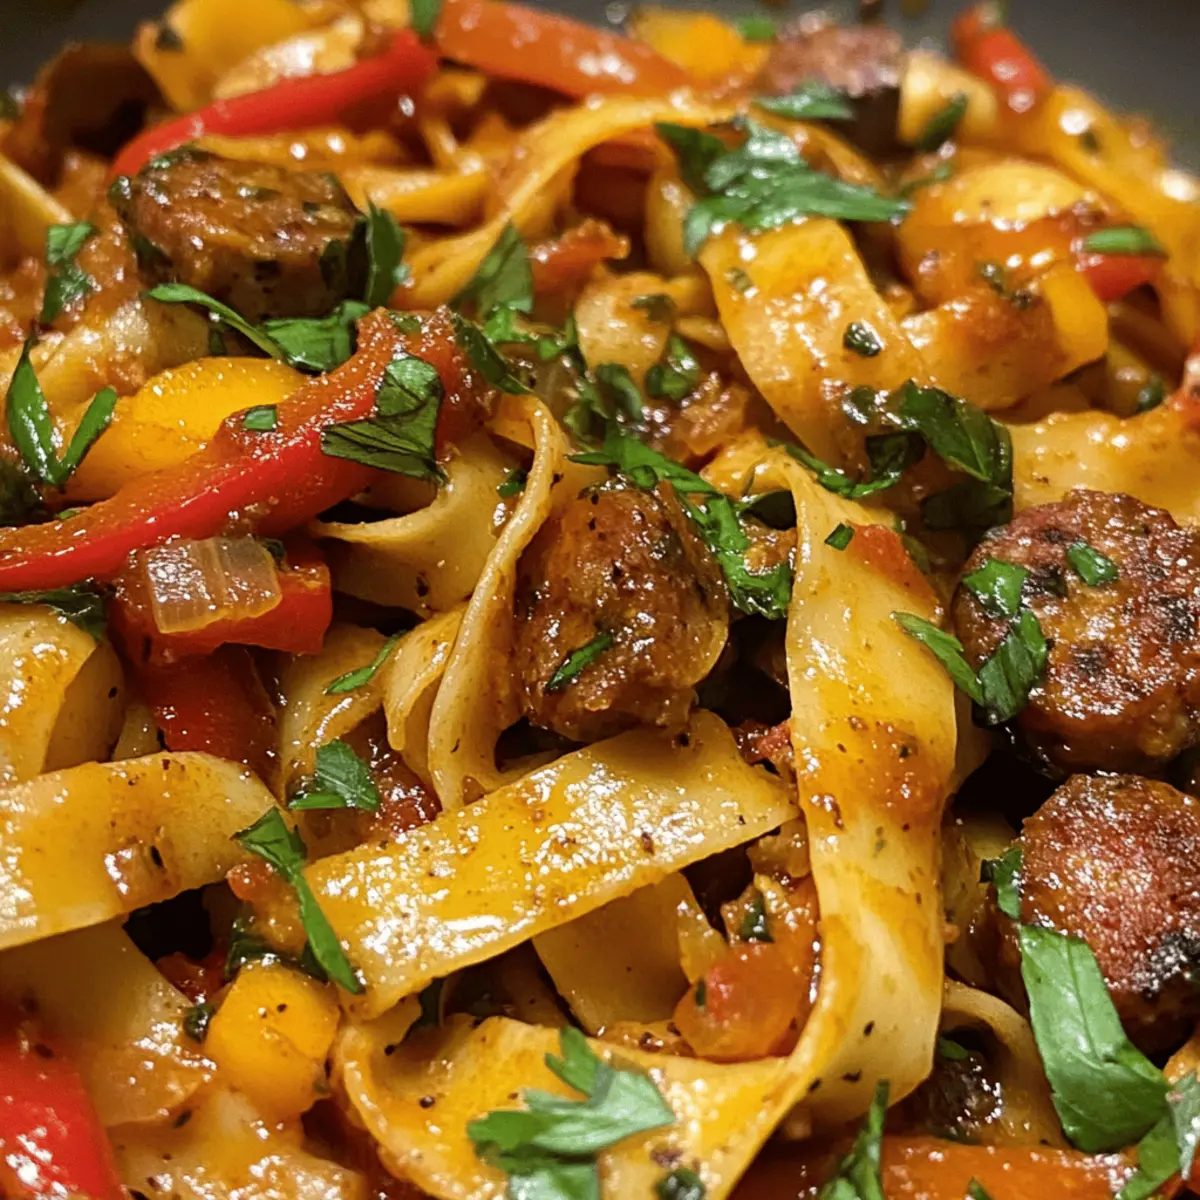
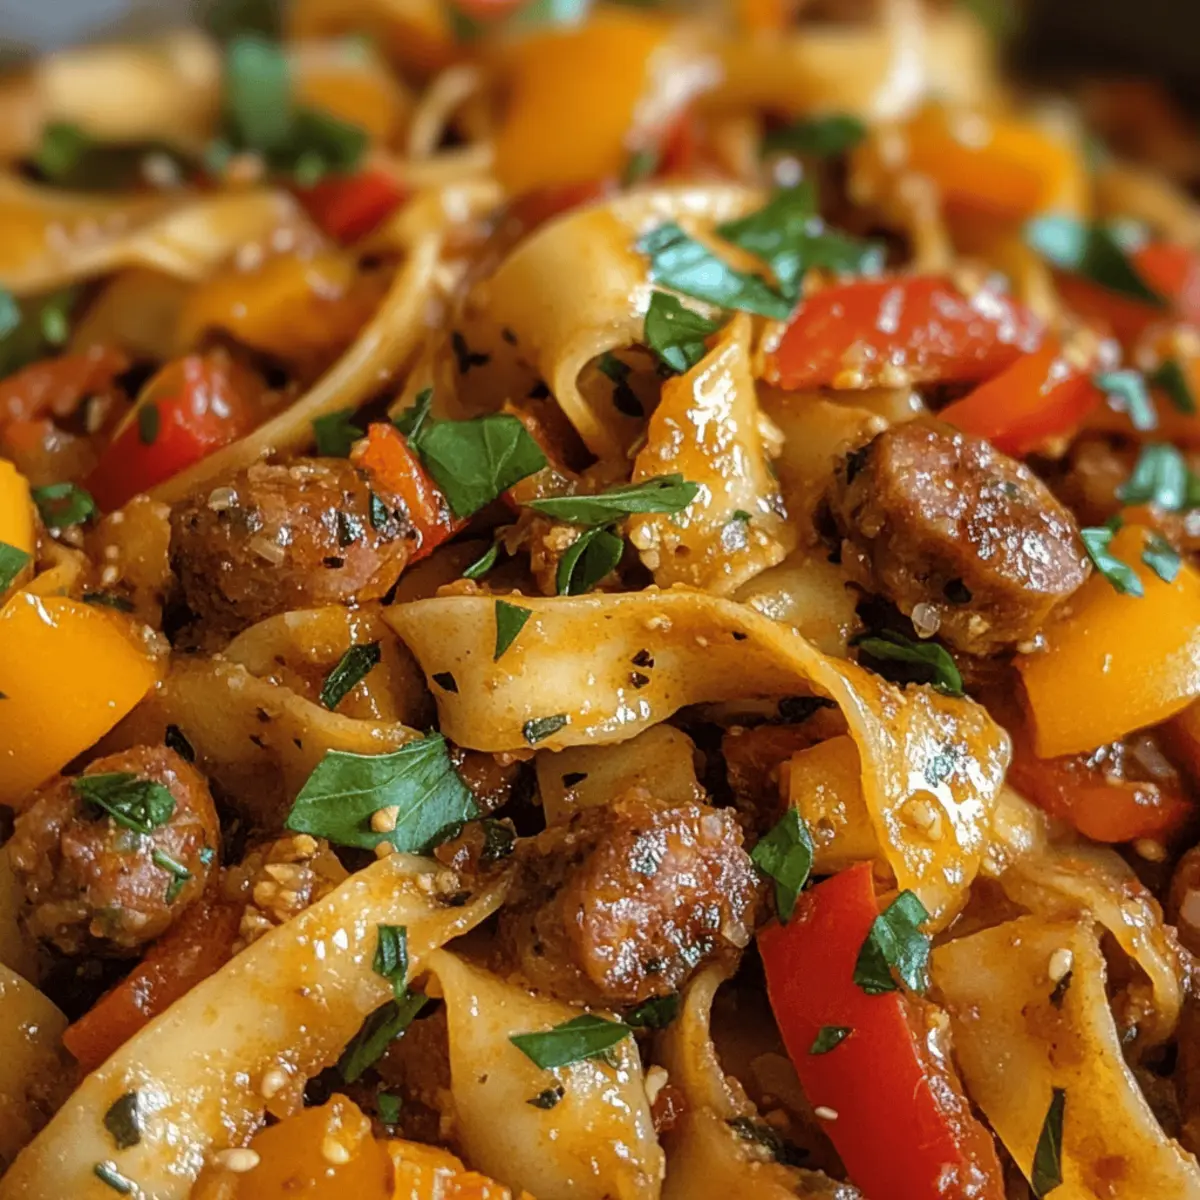
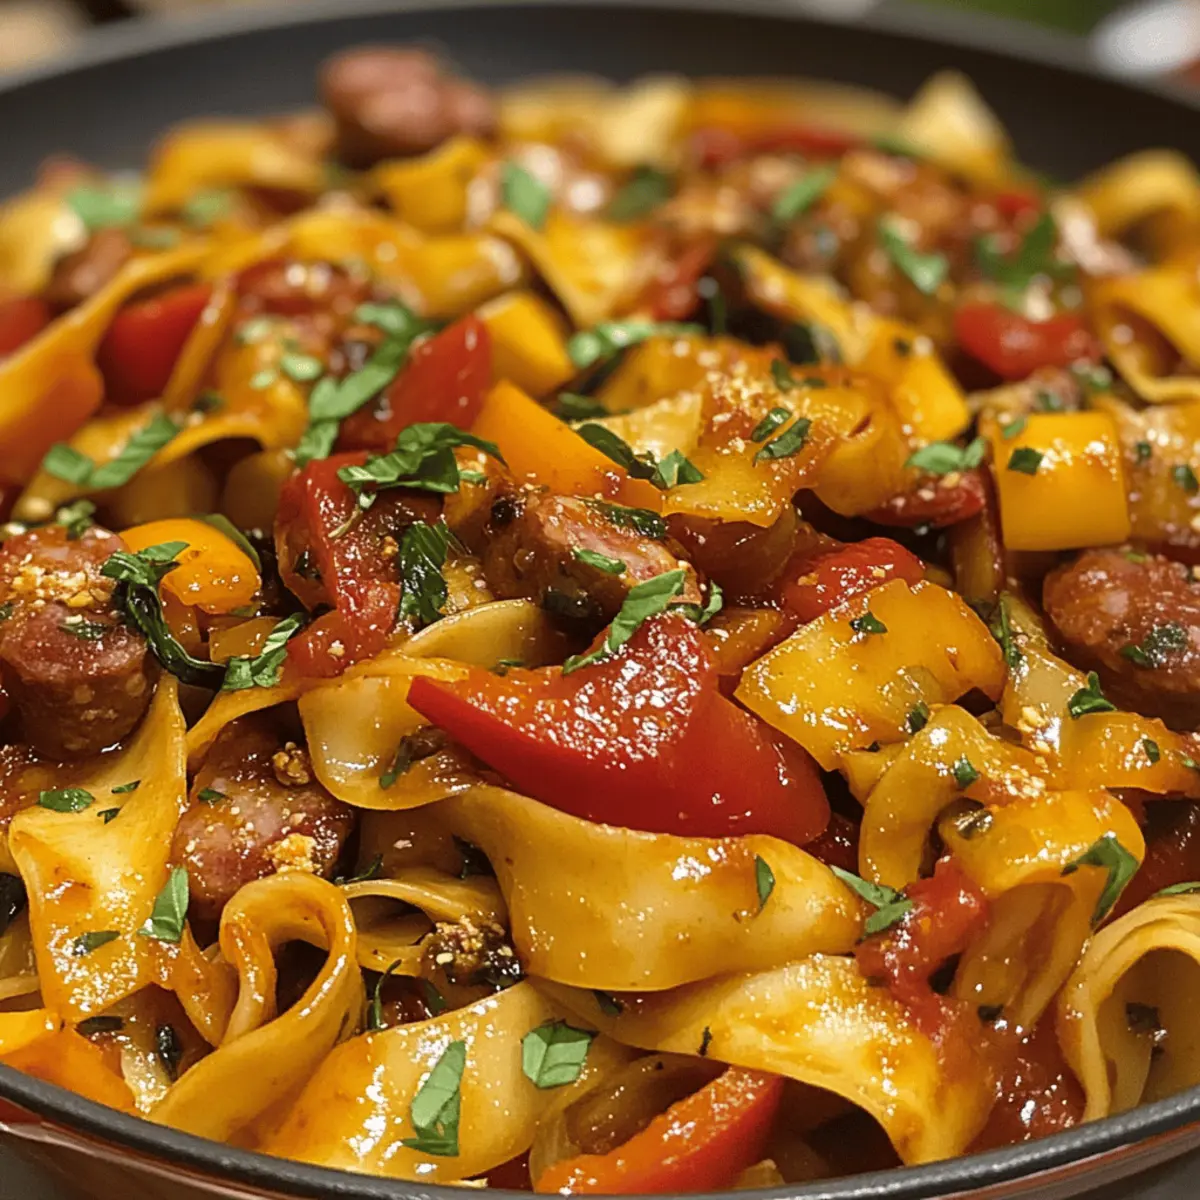
As I stood in my kitchen, a medley of the inviting aromas from my pantry caught my attention—spicy Italian sausage, vibrant bell peppers, and the earthy scent of fresh basil beckoning me to create something special. Enter my Best Ever Italian Drunken Noodles, a delightful fusion that brilliantly marries the boldness of Thai noodles with the richness of Italian flavors. What makes this dish truly irresistible is not just its quick prep time—perfect for busy weeknights—but also the way it transforms simple ingredients into a spectacular meal that will impress friends and family alike. Are you ready to savor every bite of this culinary adventure? Let’s dive in and explore how to create this flavor-packed dish together!

Why Are These Drunken Noodles Magical?

Irresistible Flavor Fusion: This dish brings together spicy Italian sausage and aromatic Thai herbs for an unforgettable taste adventure.

Quick and Easy: Perfect for busy nights, these noodles can be whipped up in under 30 minutes, making them a go-to weeknight family meal.

Customizable Delight: Whether you’re a meat lover or vegetarian, this versatile recipe allows for delicious adaptations like using grilled veggies in place of sausage or switching to gluten-free pasta.

Crowd-Pleasing Comfort: Serve these vibrant noodles at your next gathering, and watch them disappear in no time—everyone will be coming back for seconds!

Fresh Ingredients euphoria: Packed with fresh bell peppers and basil, the colors alone will brighten your table and appetite. For more hearty meals, check out my recipe for mushroom risotto that complements this dish beautifully!

Italian Drunken Noodles Ingredients

For the Noodles
Pappardelle Noodles (8 oz., uncooked) – The perfect base for this delicious dish; try gluten-free pasta if needed.

For the Sauce
Spicy Italian Sausage – Adds savory richness; be sure to check for gluten-free options in the package.
Olive Oil – Essential for sautéing; you can substitute with any cooking oil you prefer.
Garlic (4 cloves, pressed) – Fresh garlic provides the best aroma and flavor; don’t skimp on this!
Onion (1 large, quartered and sliced thinly) – Sweetens the sauce; yellow or sweet onions are great choices.
White Wine (½ cup, e.g., Chardonnay) – Enriches the sauce; vegetable or chicken broth works as a non-alcoholic alternative.
Diced Tomatoes (1 can, 28 oz., with juice) – Forms the flavorful base; fire-roasted tomatoes enhance the taste.
Italian Seasoning (1 tsp) – Adds herby depth; feel free to mix oregano and thyme as a substitute.
Salt (1 ½ tsp) – Enhances all the wonderful flavors in your Italian drunken noodles.
Cracked Black Pepper (½ tsp) – Introduces a hint of spice; adjust to your taste preferences.

For the Veggies
Red, Orange, and Yellow Bell Peppers (1 each, cored and thinly sliced) – Add color and sweetness; any variety will work wonderfully.
Fresh Basil Leaves (¼ cup, julienned, divided use) – Brightens the dish with an aromatic kick; swap with fresh parsley if desired.
Flat-leaf Parsley (2 tbsp, chopped) – Adds a layer of freshness; cilantro can also be used for a tasty twist.

Feel free to gather these ingredients as we embark on this culinary journey making the Italian Drunken Noodles! You’ll be creating a dish that delights every palate at your table.

Step‑by‑Step Instructions for https://nodashofgluten.com/italian-drunken-noodle/

Step 1: Cook the Noodles
Begin by bringing a large pot of salted water to a rolling boil. Add the uncooked pappardelle noodles and cook according to the package instructions, usually around 8-10 minutes, until al dente. Drain the noodles and toss them with a drizzle of olive oil to keep them from sticking while you prepare the rest of the Italian Drunken Noodles.

Step 2: Brown the Sausage
In a large skillet over medium heat, pour in about 2 tablespoons of olive oil, allowing it to heat up. Crumble the spicy Italian sausage into the skillet, cooking for approximately 5-7 minutes until browned and fully cooked, making sure to turn it for even browning. Once done, remove the sausage from the skillet and set it aside, leaving any rendered fat in the pan.

Step 3: Sauté the Vegetables
Utilizing the sausage drippings in the skillet, add the sliced onions and sauté for about 5 minutes until they become soft and caramelized. Next, add the thinly sliced red, orange, and yellow bell peppers, and continue cooking for another 3-4 minutes until they are golden and tender. Stir in the pressed garlic and cook for an additional minute until fragrant, enhancing the flavor of your Italian Drunken Noodles.

Step 4: Make the Sauce
Pour in ½ cup of white wine and bring it to a gentle simmer, allowing it to reduce by half for about 2-3 minutes. This will concentrate the flavors beautifully. Next, add the can of diced tomatoes along with their juices into the skillet, and season with salt, cracked black pepper, and Italian seasoning. Simmer the mixture for about 5 minutes, allowing everything to meld together into a rich sauce.

Step 5: Combine
Return the cooked Italian sausage to the skillet along with half of the julienned basil and chopped parsley. Gently toss in the cooked pappardelle noodles, ensuring that every strand is coated in the flavorful sauce. Continue to toss everything together for another couple of minutes, blending the ingredients well and allowing the noodles to warm through thoroughly.

Step 6: Serve
Divide the Italian Drunken Noodles into serving bowls, and garnish with the remaining fresh basil and a sprinkle of chopped parsley for a vibrant touch. For an extra indulgent finish, consider adding grated Parmesan cheese or a drizzle of olive oil. Enjoy each delicious bite of this fusion dish that brings both Italian and Thai flavors to your table!

Expert Tips for Italian Drunken Noodles

  • Use Fresh Ingredients: Fresh garlic and vibrant bell peppers make a huge difference in flavor. Avoid using stale ingredients for the best taste in your Italian drunken noodles.

  • Don’t Overcook the Noodles: Ensure your pappardelle noodles are cooked al dente. Overcooking can lead to mushy noodles that won’t hold up in the sauce.

  • Sauté Wisely: Use the sausage drippings to sauté the vegetables for added flavor. This step enhances the rich taste of the Italian drunken noodles and prevents food from sticking.

  • Adjust Wine for Taste: If avoiding alcohol, chicken or vegetable broth is a great substitute, but add a splash of lemon juice to keep the sauce bright and flavorful.

  • Mix in Herbs Last: Add the fresh basil and parsley toward the end of cooking to preserve their vibrant color and aromatic qualities. Too early can lead to wilted herbs in your dish.

Make Ahead Options

These Italian Drunken Noodles are perfect for those busy weeknights when you want a delicious meal with minimal hassle! You can prepare the sauce up to 24 hours in advance, allowing the flavors to deepen beautifully. Just cook the sausage and sauté the vegetables as per the instructions, then cool the sauce and refrigerate it in an airtight container. The cooked pappardelle noodles can also be made ahead and stored separately; toss them in a little olive oil to prevent sticking. When you’re ready to serve, simply reheat the sauce in a pan and warm the noodles, tossing them together to achieve that delightful harmony of flavors that makes this dish so comforting and enjoyable!

Italian Drunken Noodles: Fun Variations

Feel free to play with flavors and ingredients in these Italian Drunken Noodles to create your own signature dish!

  • Vegetarian Version: Omit the sausage and replace it with a colorful mix of grilled vegetables or your favorite plant-based protein. This swap brings a fresh, vibrant taste to the dish, perfect for meatless meals.

  • Gluten-Free: Use gluten-free pappardelle or any wide gluten-free pasta to make this dish suitable for those avoiding gluten. It maintains the hearty feel of traditional noodles while keeping everyone included at the table.

  • Spicy Kick: If you love heat, consider adding crushed red pepper flakes or sliced fresh chilies for an additional zing. You can adjust the spice level based on your family’s preferences.

  • Creamy Twist: Stir in a dollop of cream or a splash of coconut milk at the end for a rich, creamy sauce. This variation adds a luscious texture that pairs beautifully with the savory elements of the dish.

  • Herb Explosion: Boost the freshness by adding more herbs like oregano or thyme alongside the basil. This not only enhances flavor but also gives a delightful aroma, inviting everyone to dig in!

  • Citrusy Brightness: Squeeze in some fresh lemon juice just before serving. This brightens the overall flavor, balancing the richness of the sausage and wine in the sauce.

  • Umami Boost: Incorporate mushrooms, such as shiitake or cremini, for an earthy depth of flavor. They elevate the umami character, making the dish even more satisfying and filling.

For another wholesome recipe, try making a delightful mushroom risotto that pairs incredibly well with these Italian Drunken Noodles! Happy cooking!

How to Store and Freeze Italian Drunken Noodles

Fridge: Place leftovers in an airtight container and store for up to 3 days. Reheat gently in a skillet with a splash of broth to revive the flavors.

Freezer: To freeze, portion the noodles in airtight freezer bags before placing them in the freezer. They can be stored for up to 2 months; thaw in the fridge overnight before reheating.

Reheating: Reheat frozen Italian Drunken Noodles in a saucepan over low heat, adding a bit of water or broth to help steam the noodles back to life without drying them out.

Wrap and Seal: For best results during freezing, ensure the noodles are tightly wrapped or sealed to prevent freezer burn, preserving their delicious taste.

What to Serve with Italian Drunken Noodles

Experience the joy of a complete meal by pairing these Italian Drunken Noodles with delightful accompaniments that enhance the flavors and textures of this unique dish.

  • Garlic Knots: Soft, buttery, and herbed, these knots add a delightful touch of classic Italian flavors that perfectly complement the richness of the noodles.

  • Zesty Salad: A refreshing side salad with mixed greens, cherry tomatoes, and a tangy vinaigrette offers a crisp contrast to the hearty noodles.

  • Roasted Vegetables: Tossed in olive oil and Italian herbs, roasted veggies bring a wonderful texture and earthy notes that beautifully balance the savory sauce.

  • Crusty Bread: Perfect for soaking up the delicious sauce, a warm baguette or rustic Italian bread adds comforting flavors to the meal.

  • Lemonade Spritzers: A light, fizzy beverage infused with fresh lemon can refresh your palate, enhancing the savory depth of the Italian Drunken Noodles.

  • Tiramisu: End your meal with this classic Italian dessert. Its creamy, coffee-soaked layers provide a sweet and luxurious finish to the dining experience.

  • Grilled Asparagus: Lightly charred and seasoned, grilled asparagus not only adds an element of freshness but also complements the rich flavors of the dish.

  • Parmesan Cheese: Offering a sprinkle of freshly grated Parmesan on top adds an extra layer of umami flavor that takes your dish to new heights.

Italian Drunken Noodles Recipe FAQs

How do I select the right ingredients for Italian Drunken Noodles?
Absolutely! When choosing spicy Italian sausage, look for ones that are fresh with a vibrant color and no dark spots. If gluten-free, check the label to ensure it meets your needs. Fresh bell peppers should be firm with shiny skin, and if you’re opting for garlic, the more pungent the better!

What’s the best way to store leftovers of Italian Drunken Noodles?
Leftovers can be stored in an airtight container in the refrigerator for up to 3 days. I recommend reheating gently in a skillet with a splash of broth to maintain flavor and prevent the noodles from sticking together.

Can I freeze Italian Drunken Noodles?
Very! To freeze, portion your Italian Drunken Noodles into airtight freezer bags, ensuring they are well sealed to prevent freezer burn. They can be stored in the freezer for up to 2 months. When you’re ready to enjoy, thaw overnight in the fridge, and reheat in a saucepan on low heat, adding a splash of broth to help revive the dish’s flavors.

What should I do if my sauce is too runny?
No worries! If your sauce ends up a bit too runny, simply let it simmer over medium heat for a few extra minutes to reduce and thicken it. Stir frequently to prevent sticking. Alternatively, you can mix a little cornstarch with cold water to form a slurry, then stir it into the sauce as it simmers to thicken it up quickly.

Can my pets eat Italian Drunken Noodles?
I recommend keeping this dish away from your pets. The spicy and seasoned ingredients, particularly garlic and onion, can be harmful to pets. Instead, treat them to some plain cooked chicken or veggies without seasoning!

What alternatives can I use for dietary restrictions?
If you prefer vegetarian Italian Drunken Noodles, simply omit the sausage and replace it with grilled zucchini or mushrooms for a delightful twist. For gluten-free options, pappardelle made from brown rice or chickpea flour works wonderfully, ensuring everyone gets to enjoy this flavorful dish!

https://nodashofgluten.com/italian-drunken-noodle/

Italian Drunken Noodles: A Delicious Chef’s Twist at Home

Experience the irresistible fusion of flavors in Italian Drunken Noodles, a delightful dish that marries Thai noodles with Italian ingredients.
Prep Time 10 minutes
Cook Time 20 minutes
Total Time 30 minutes
Servings: 4 servings
Course: Dinner
Cuisine: Italian, Thai
Calories: 450

Ingredients
  

For the Noodles
  • 8 oz Pappardelle Noodles Uncooked, try gluten-free pasta if needed.
For the Sauce
  • 1 lb Spicy Italian Sausage Check for gluten-free options.
  • 2 tbsp Olive Oil Can substitute with any cooking oil.
  • 4 cloves Garlic Pressed.
  • 1 large Onion Quartered and sliced thinly.
  • 0.5 cup White Wine E.g., Chardonnay.
  • 1 can (28 oz) Diced Tomatoes With juice, fire-roasted enhance taste.
  • 1 tsp Italian Seasoning Feel free to mix oregano and thyme.
  • 1.5 tsp Salt
  • 0.5 tsp Cracked Black Pepper Adjust to taste.
For the Veggies
  • 1 each Red Bell Pepper Cored and thinly sliced.
  • 1 each Orange Bell Pepper Cored and thinly sliced.
  • 1 each Yellow Bell Pepper Cored and thinly sliced.
  • 0.25 cup Fresh Basil Leaves Julienned, divided use.
  • 2 tbsp Flat-leaf Parsley Chopped.

Equipment

  • Large pot
  • large skillet
  • mixing spoon

Method
 

Cooking Steps
  1. Cook the noodles according to the package instructions in a large pot of salted boiling water for 8-10 minutes until al dente. Drain and toss with olive oil.
  2. In a skillet, heat 2 tablespoons of olive oil. Crumble and brown spicy Italian sausage for 5-7 minutes. Remove and set aside.
  3. In the same skillet, sauté sliced onions for 5 minutes until soft. Add sliced bell peppers; cook 3-4 minutes. Stir in garlic and cook for 1 minute.
  4. Pour in the white wine, bring to a simmer, and reduce for 2-3 minutes. Add diced tomatoes, salt, black pepper, and Italian seasoning. Simmer for 5 minutes.
  5. Return sausage to the skillet, add half of the basil and parsley. Toss in the cooked noodles until well combined.
  6. Serve in bowls, garnished with remaining basil and parsley. Optionally add grated Parmesan cheese or a drizzle of olive oil.

Notes

Using fresh ingredients greatly enhances the flavors in this dish. Do not overcook the noodles for optimal texture.

Irresistible Chinese Chicken on Stick: A Flavorful Delight

With the smoky aroma of a bustling Hong Kong street market wafting through my kitchen, I couldn’t wait to grill up some delicious Chinese Chicken on a Stick. This recipe brings together the enticing flavors of soy, honey, and sesame oil, creating a dish that’s not only quick to prepare but also perfect for a satisfying weeknight dinner. The beauty of these skewers lies in their versatility—whether you’re hosting a lively gathering or simply looking to elevate your dinner routine, they’ll impress without causing stress. Plus, they’re gluten-free friendly, accommodating various diets while delighting your taste buds. Are you ready to experience a delightful twist on your dinner menu? Let’s dive in and get grilling!

Why is Chinese Chicken on a Stick Amazing?

Flavorful and Fun: With its perfect blend of sweet and savory, this dish transports you straight to the vibrant streets of Hong Kong.

Quick Preparation: You’ll whip these skewers up in no time, making them an ideal option for busy weeknights. Marinate the chicken in advance, and the grilling takes just minutes!

Versatile Choices: Whether you’re craving traditional chicken or want to swap in tofu or shrimp, this recipe adapts beautifully to your preferences.

Crowd-Pleaser: Serving these skewers at gatherings is sure to impress guests, who will love the unique flavors and charming presentation.

Gluten-Free Option: With simple substitutes for soy sauce, you can easily cater to guests with dietary restrictions, ensuring everyone enjoys this delicious treat.

Are you seeking more delightful chicken recipes? Check out our Savory Chicken Drumsticks or Honey Chili Chicken for more inspiration!

Chinese Chicken on a Stick Ingredients

• Get ready to grill up some deliciousness!

For the Marinade

  • Chicken Breast or Tenders – The main protein; use boneless chicken thighs for a juicier bite.
  • Sesame Oil – Provides a rich, nutty flavor; olive oil can be substituted if needed.
  • Soy Sauce – Gives that savory depth; tamari or coconut aminos work for a gluten-free option.
  • Honey – Naturally sweetens and balances the marinade; maple syrup is a great vegan alternative.
  • Rice Wine Vinegar – Adds brightness; apple cider vinegar can work in a pinch.
  • Granulated Garlic – Enhances the flavor profile; fresh minced garlic can substitute if you prefer.
  • Ginger Powder – Delivers warmth and spice; fresh ginger is an even better choice—just use half the amount.
  • White Pepper – Offers subtle heat; black pepper can be a good alternative for a different flavor.

For Serving

  • Sliced Green Onions – Adds a fresh touch and vibrant color on top of your skewers.

With these fabulous ingredients, your Chinese Chicken on a Stick will be transforming your weeknight meals into something truly special! Ready to get grilling?

Step‑by‑Step Instructions for Chinese Chicken on Stick

Step 1: Prepare Chicken
Begin by cutting the chicken breast or tenders into bite-sized pieces, aiming for ½ inch cubes for even cooking. Place the pieces into a bowl or a zip-top bag, ensuring there’s enough space for the marinade to coat every piece, setting the stage for a flavorful Chinese Chicken on Stick.

Step 2: Make Marinade
In a separate bowl, whisk together the sesame oil, soy sauce, honey, rice wine vinegar, granulated garlic, ginger powder, and white pepper until well combined. Pour this luscious marinade over the chicken, ensuring all pieces are thoroughly coated. Cover the bowl or seal the bag, and refrigerate for 1 to 2 hours to allow the flavors to meld beautifully.

Step 3: Prep Skewers
While the chicken marinates, soak wooden skewers in water for 10 to 15 minutes. This step is crucial to prevent the skewers from burning when placed on the grill, ensuring your Chinese Chicken on Stick comes out perfectly without any unpleasant charred bits.

Step 4: Assemble Skewers
After the marinating time, remove the chicken from the refrigerator. Begin threading the marinated chicken onto the soaked skewers, ensuring there is some space between each piece to allow for even cooking and a delightful presentation. Prepare a plate to catch any drips as you work.

Step 5: Preheat Grill
Preheat your grill to a medium-high heat, aiming for about 400°F (200°C). This temperature will help caramelize the chicken nicely, creating that irresistible flavor. Ensure the grill grates are clean and lightly oiled to prevent sticking, setting the stage for your delicious Chinese Chicken on Stick.

Step 6: Grill Chicken
Place the assembled skewers on the hot grill and cook for 7 to 8 minutes on one side. Flip the skewers and continue grilling for another 7 to 8 minutes, until the chicken is golden and the internal temperature reaches 165°F (74°C). This will ensure juicy, tender chicken that’s bursting with flavor.

Step 7: Garnish & Serve
Once cooked, carefully remove the chicken skewers from the grill. Sprinkle with freshly sliced green onions or sesame seeds for a burst of freshness and color. Serve the Chinese Chicken on Stick hot, delighting your family or guests with a savory and visually appealing dish that’s sure to impress!

Make Ahead Options

These Chinese Chicken on a Stick skewers are perfect for meal prep enthusiasts! You can marinate the chicken up to 24 hours in advance, allowing for deeper flavor development. Simply cut the chicken into bite-sized pieces, whisk together the marinade, and soak the chicken overnight in the refrigerator. Additionally, the skewers can be assembled a few hours before grilling, ensuring all the flavors are infused. When you’re ready to enjoy, just grill them as instructed for a meal that’s just as delicious as if you made it fresh. This makes dinnertime stress-free and perfect for busy weeknights!

Storage Tips for Chinese Chicken on a Stick

Fridge: Store leftover Chinese Chicken on a Stick in an airtight container for up to 3 days to maintain freshness.

Freezer: For longer storage, freeze the skewers before grilling. Wrap each skewer tightly in plastic wrap and store in a freezer bag for up to 2 months.

Reheating: When ready to enjoy, thaw the skewers in the fridge overnight. Reheat in the oven at 350°F (175°C) for about 10-15 minutes or until warmed through, ensuring they do not dry out.

Airtight Storage: Always make sure to store your skewers properly to lock in the flavor, especially after marinating.

What to Serve With Chinese Chicken on a Stick

Imagine a vibrant spread that perfectly complements the smoky aroma of your grilled skewers, turning dinner into a delightful banquet.

  • Steamed Jasmine Rice: The fluffy grains soak up the marinade’s flavors and provide a soft contrast to the skewers.
  • Crispy Asian Cucumber Salad: This refreshing salad adds a crisp crunch, balancing the savory notes of chicken with its tangy dressing. Refreshing and light, it’s a symphony of textures.
  • Grilled Vegetables: Seasonal veggies like zucchini, bell peppers, and asparagus can be grilled alongside, enhancing the meal’s smokiness while adding vibrant color.
  • Soy Sauce Dipping Sauce: A simple blend of soy sauce, minced garlic, and a touch of honey creates a savory dip that enhances the flavor profile of the skewers.
  • Sesame Noodles: Twirl this delightful dish alongside your chicken for a harmonious blend of flavors that echoes the Asian inspiration of the meal.
  • Sparkling Ginger Lemonade: This refreshing drink brings a zesty pop that cleanses the palate, perfectly complementing the sweetness and umami of the chicken.

With these delicious pairings, your Chinese Chicken on a Stick will take center stage at your table, turning any meal into an unforgettable experience!

Expert Tips for Chinese Chicken on Stick

  • Marinade Time Matters: Allowing the chicken to marinate for 1-2 hours helps enhance the flavors in your Chinese Chicken on Stick, creating a truly delicious dish.

  • Soak the Skewers: Always soak your wooden skewers for at least 10 minutes before grilling. This prevents them from burning and ensures perfect skewers!

  • Watch the Grill Temp: Make sure your grill stays around 400°F (200°C). Too hot can lead to charred outsides and raw insides; monitor for perfect cooking.

  • Check Doneness: Using a meat thermometer is essential. The chicken should reach an internal temperature of 165°F (74°C) for safety and juiciness.

  • Experiment with Veggies: Feel free to add bell peppers, onions, or zucchini to the skewers for a colorful and nutritious addition to your Chinese Chicken on Stick.

Chinese Chicken on Stick Variations

Feel free to unleash your creativity and personalize this recipe to suit your tastes and dietary needs!

  • Dairy-Free: Replace honey with agave syrup for a full vegan-friendly option.
  • Gluten-Free: Swap soy sauce with tamari or coconut aminos to enjoy without worry.
  • Protein Twist: Try using shrimp or tofu for a delightful change of pace. Both options bring their own unique textures and flavors!
  • Veggie Addition: Add bell peppers, onions, or zucchini to your skewers for an extra burst of color and nutrients. Grilled veggies pair beautifully with the savory chicken.
  • Change the Marinade: Switch the flavor profile by using teriyaki or spicy chili sauce. Each variation brings a new adventure to your palate!
  • Herbs & Spices: Sprinkle in some fresh herbs like cilantro or basil for a refreshing twist that elevates the overall dish.
  • Extra Heat: For those who love spice, add crushed red pepper flakes to the marinade for a subtle kick that will awaken your taste buds.
  • Sweet & Savory: Mix in some pineapple chunks to the skewers before grilling for a delightful combination of sweet and savory that complements the chicken perfectly.

As you explore these variations in your kitchen, you might also want to try serving this delightful dish alongside fresh cucumber salad or grilled vegetables for a complete meal. For more inspiration, check out our Homemade Chicken Pot and Tropical Chicken Pineapple recipes!

Chinese Chicken on a Stick Recipe FAQs

How do I select the best chicken for this recipe?
Absolutely! For the most tender and juicy results, I recommend using boneless, skinless chicken breasts or tenders. If you’re looking for a richer flavor, boneless chicken thighs are a fantastic alternative. Just ensure the chicken is fresh with no dark spots, as this indicates freshness.

What’s the best way to store leftovers?
Very! After enjoying your delicious skewers, place the leftovers in an airtight container in the refrigerator. They will stay fresh for up to 3 days. Be sure to allow them to cool completely before sealing to prevent moisture buildup, which can lead to sogginess.

Can I freeze Chinese Chicken on a Stick?
You can! For longer-term storage, freeze the skewers before grilling. Wrap each skewer tightly in plastic wrap and then place them in a freezer bag, where they can last for up to 2 months. When you’re ready to enjoy them, thaw them in the fridge overnight, then grill as directed.

What do I do if the chicken is overcooked?
Don’t worry; it happens! If you accidentally overcook the chicken, you can improve the texture by serving it with a sauce or homemade glaze to add moisture. Also, make sure to monitor the grill temperature closely to avoid drying out the chicken in the first place.

Are there any dietary considerations I should be aware of?
Definitely! This recipe is easily adaptable for gluten-free diets by using tamari or coconut aminos instead of soy sauce. Always check with guests about any allergies, especially to the honey or sesame oil, and have alternative sweeteners or oils ready.

Can I use different marinades or vegetables in my skewers?
Absolutely! The more the merrier! Feel free to experiment with different marinade flavors like teriyaki or spicy chili for an extra kick. You can also add vegetables like bell peppers, zucchini, or onions to the skewers for a colorful and nutritious twist on your Chinese Chicken on a Stick Recipe FAQs!

Chinese Chicken on Stick

Irresistible Chinese Chicken on Stick: A Flavorful Delight

Indulge in Chinese Chicken on Stick, a smoky and savory dish perfect for a quick weeknight dinner.
Prep Time 30 minutes
Cook Time 16 minutes
Marinating Time 2 hours
Total Time 2 hours 46 minutes
Servings: 4 skewers
Course: Chicken
Cuisine: Chinese
Calories: 250

Ingredients
  

Marinade Ingredients
  • 1 lb Chicken Breast or Tenders Use boneless thighs for juiciness.
  • 2 tbsp Sesame Oil
  • 1/4 cup Soy Sauce Use tamari for gluten-free.
  • 2 tbsp Honey Maple syrup can be used as vegan option.
  • 2 tbsp Rice Wine Vinegar Apple cider vinegar can substitute.
  • 1 tbsp Granulated Garlic Fresh minced garlic can substitute.
  • 1 tbsp Ginger Powder Use half the amount of fresh ginger.
  • 1 tsp White Pepper Black pepper is a good alternative.
For Serving
  • 2 stalks Sliced Green Onions For garnish.

Equipment

  • grill
  • mixing bowl
  • Skewers
  • Zip-top bag

Method
 

Cooking Instructions
  1. Prepare Chicken: Cut chicken into ½ inch cubes and place in a bowl or zip-top bag.
  2. Make Marinade: Whisk sesame oil, soy sauce, honey, rice wine vinegar, garlic, ginger, and white pepper. Pour over chicken and refrigerate for 1-2 hours.
  3. Prep Skewers: Soak wooden skewers in water for 10-15 minutes to prevent burning.
  4. Assemble Skewers: Thread marinated chicken onto skewers with space between pieces.
  5. Preheat Grill: Set grill to medium-high heat (400°F/200°C) and clean lightly oiled grates.
  6. Grill Chicken: Cook skewers for 7-8 minutes per side, until golden and internal temp at 165°F (74°C).
  7. Garnish & Serve: Remove from grill, garnish with green onions or sesame seeds, and serve hot.

Notes

Allows marination for flavor. Soak skewers to prevent burning. Monitor grill temperature closely for even cooking.

Toasted Marshmallow Strawberries: A Sweet Summer Indulgence

With the sweet smell of summer in the air, there’s nothing quite like the joy of indulging in a classic campfire treat right from your kitchen. Just imagine juicy, ripe strawberries coated in a fluffy layer of toasted marshmallow, a delightful combination that takes you back to sun-soaked evenings. My recipe for Toasted Marshmallow Strawberries is not only a quick and easy dessert, but it’s also a surefire way to impress your friends and family at gatherings. This treat is perfect for those who love a playful twist on fruit, marrying the nostalgic flavors of roasting marshmallows over an open flame with the fresh taste of summer berries. With just a few ingredients, you’ll create a visually stunning and utterly delicious dessert. Are you ready to dive into this simple yet delightful recipe? Let’s get started!

Why are Toasted Marshmallow Strawberries irresistible?

Quick Dessert: Whipping up these treats is a breeze, perfect for last-minute cravings or unexpected guests.

Nostalgic Flavor: The campfire essence takes you on a trip down memory lane, merging childhood with gourmet flair.

Crowd-Pleasing: Ideal for summer parties, they’ll wow both kids and adults alike, making you the star of any gathering.

Customizable Delight: Drizzle with chocolate or try different fruits for endless variations to suit every palate.

Low-Calorie Indulgence: With only 36 calories per serving, you can indulge guilt-free without skimping on flavor! Explore how to make this even more exciting with options like fruit variations and fun toppings. Enjoy!

Ingredients for Toasted Marshmallow Strawberries

For the Strawberries
Fresh Strawberries – Choose ripe, plump berries for optimal sweetness and juiciness.

For the Marshmallow Coating
Marshmallow Fluff – This fluffy delight creates that classic toasted layer; soften it for easy dipping.

Optional Topping
Chocolate Sauce – A delicious drizzle adds richness and can be swapped for caramel or peanut butter for variety.

Get ready to indulge in the delightful flavors of Toasted Marshmallow Strawberries, a treat that brings summer right to your plate!

Step‑by‑Step Instructions for Toasted Marshmallow Strawberries

Step 1: Prep Strawberries
Start by washing the fresh strawberries thoroughly under cool running water. Once clean, gently dry them with a paper towel to remove excess moisture, as this will help the marshmallow fluff adhere better. Carefully insert a skewer into the stem end of each strawberry, ensuring they are stable and ready for dipping.

Step 2: Prepare Marshmallow Fluff
To soften the marshmallow fluff for easy dipping, place it in a microwave-safe bowl and heat it in the microwave for about 15 seconds. Remove the bowl and stir the fluff until it’s smooth and creamy. This thick, gooey texture is perfect for coating the strawberries, making sure each one gets an even layer of deliciousness.

Step 3: Coat Strawberries
With the prepared marshmallow fluff, take each strawberry skewered on its stick and dip it into the fluff. Twist the strawberry gently as you pull it out to ensure it’s fully coated in a thick layer of marshmallow. The visual appeal of each strawberry will enhance, as they should look fluffy and covered from top to bottom.

Step 4: Toast Marshmallow
Now comes the fun part! Using a butane torch set to a low heat, carefully toast the marshmallow on each strawberry. Keep the flame a few inches away and move it in small circles, allowing the marshmallow to caramelize and turn golden brown. This process will take about 15 to 30 seconds per strawberry, creating that classic toasted look and flavor.

Step 5: Serve
Once the marshmallows are beautifully toasted, it’s time to serve your Toasted Marshmallow Strawberries! Arrange them on a platter, adding a drizzle of chocolate sauce over the top if you wish for an extra special touch. Enjoy these delightful, sweet treats immediately for the best flavor and texture, sharing them with friends and family, or savoring them yourself.

Make Ahead Options

Toasted Marshmallow Strawberries are a fantastic choice for meal prep, allowing you to savor this delightful treat even on the busiest days! You can wash and skewer the strawberries up to 24 hours in advance; just refrigerate them in an airtight container to keep them fresh. Prepare the marshmallow fluff and store it separately, ensuring it remains smooth by covering it tightly to prevent drying. When you’re ready to indulge, simply reheat the fluff in the microwave for about 15 seconds to soften, dip the chilled strawberries, and toast them just before serving. This way, you’ll enjoy the same delectable taste and texture with minimal effort!

Toasted Marshmallow Strawberries Variations & Substitutions

Embrace your creativity in the kitchen and customize these delightful strawberries to suit your taste buds!

  • Chocolate Drizzle: Add a rich layer of melted chocolate on top for an extra treat. Dark or milk chocolate works beautifully here.
  • Coconut Flakes: Sprinkle toasted coconut on the marshmallow before serving, adding a tropical flair that’s sure to transport you to the beach.
  • Fruit Twists: Swap strawberries for other fruits like bananas or pineapple. Each piece will caramelize beautifully, bringing new flavors to the party.
  • Nutty Crunch: Top with crushed nuts like almonds or pecans after toasting for a satisfying crunch that contrasts with the soft marshmallow.
  • Spiced Sweetness: Add a dash of cinnamon or nutmeg to the marshmallow fluff before dipping to introduce a warm spicing element that enhances the flavor.
  • Caramel Sauce: Drizzle caramel sauce instead of chocolate for a sweet and salty balance that will leave your taste buds dancing.
  • Peanut Butter: For a nutty twist, drizzle or dip the marshmallows in creamy peanut butter before toasting, creating a deliciously unique flavor combination.
  • Chili Heat: If you enjoy a little heat, sprinkle a pinch of chili powder on the toasted marshmallow for a surprising and delightful kick.

These variations not only enhance the flavor but also add an exciting twist to your Toasted Marshmallow Strawberries. They are perfect for summer gatherings, BBQs, or simply indulging in a sweet moment. Explore the joy of homemade treats, and don’t forget to check out my ideas on fruit variations for fresh inspirations! Enjoy!

What to Serve with Toasted Marshmallow Strawberries?

As you prepare to delight in your toasted marshmallow strawberries, consider these scrumptious pairings to create a memorable summer feast.

  • Vanilla Ice Cream: Creamy and rich, it balances the sweet, toasted marshmallow with a cool indulgence. Serve alongside for a decadent treat!
  • Chocolate Dipped Pretzels: The sweetness of chocolate meets the salty crunch of pretzels, adding delightful contrast to the fruity flavor of the strawberries. A fun hand-held snack!
  • Fresh Mint Leaves: Bright, aromatic mint adds a refreshing touch, enhancing the strawberries’ natural sweetness while providing a vibrant color contrast for presentation.
  • Sparkling Lemonade: Effervescent and zesty, this citrus drink complements the rich flavors of the strawberries, invigorating your palate with each sip. Perfect for summer gatherings!
  • Grilled Peaches: The warm, caramelized flavor of grilled peaches mirrors the toasted marshmallows beautifully, creating an unforgettable fruit duo. Serve warm on a platter!
  • Mini Cheesecake Bites: Rich and creamy, these little goodies provide a creamy counterpart to your fruity dessert, adding an elegant touch to a playful treat.
  • S’mores Bark: Embrace the campfire theme! This rich chocolate bark with graham crackers balances the fruitiness of the strawberries, making for a nostalgic dessert spread.
  • Rosemary Lemonade Spritzers: Both refreshing and unique, the herbal notes of rosemary elevate the sweet marshmallow flavors while offering a delightful twist at your gathering.
  • Chocolate-Covered Almonds: The crunch of almond paired with the sweetness of chocolate adds extra texture that beautifully complements the soft marshmallow strawberries. Indulge while snacking!

With these additions, your Toasted Marshmallow Strawberries will shine even brighter at any gathering, turning an ordinary get-together into a sensational celebration!

Expert Tips for Toasted Marshmallow Strawberries

Perfect Strawberries: Choose ripe, firm strawberries for the best flavor and texture. A fresh batch makes all the difference when preparing these toasted marshmallow strawberries.

Softened Fluff: Microwave the marshmallow fluff only briefly to avoid melting it too much. A soft, but not runny, consistency ensures even coating and easy handling.

Toasting Technique: Hold the torch a few inches away from the strawberries while toasting. This prevents burning and allows a beautifully caramelized surface—a little patience goes a long way!

Keep Dry: Make sure your strawberries are thoroughly dried before coating. Moisture can prevent the marshmallow from sticking, leaving you with uneven coverage.

Experiment with Toppings: After toasting, try adding fun toppings like chopped nuts or graham cracker crumbs. This can elevate the flavor profile and add delicious crunch to your toasted marshmallow strawberries.

Storage Tips for Toasted Marshmallow Strawberries

Fridge: Store in an airtight container lined with parchment paper for up to 1 day. This helps maintain freshness, although the texture may slightly soften over time.

Best Enjoyed Fresh: For the most delightful experience, serve Toasted Marshmallow Strawberries immediately after toasting. The contrast of the warm, caramelized marshmallow and cool strawberry is truly unbeatable.

Reheating: If necessary, you can reheat for 5 seconds in the microwave to soften a bit, but the marshmallow will lose its crunchy texture, so consume promptly.

Avoid Freezing: These delightful strawberries are best enjoyed fresh; freezing can adversely affect their flavor and texture.

Toasted Marshmallow Strawberries Recipe FAQs

What kind of strawberries should I use for Toasted Marshmallow Strawberries?
Absolutely! Choose ripe, plump strawberries that are firm yet slightly yielding to touch. Look for vibrant red color and a fresh green cap. Avoid strawberries with dark spots or wrinkles, as these may indicate overripeness. Freshness is key, and in-season strawberries often provide the best flavor.

How long do Toasted Marshmallow Strawberries last in storage?
Very! You can store your Toasted Marshmallow Strawberries in an airtight container lined with parchment paper in the refrigerator for up to 1 day. However, they are best enjoyed fresh, as the marshmallow coating may begin to soften, losing that delightful crunch. For the ultimate flavor experience, serve them right after toasting!

Can I freeze Toasted Marshmallow Strawberries?
I often make desserts that are suitable for freezing, but unfortunately, Toasted Marshmallow Strawberries aren’t one of them. Freezing can negatively impact both the texture and flavor of the strawberries and marshmallow coating. It’s best to stick to enjoying these treats fresh or store any leftover plain strawberries in the freezer separately.

What are some common issues when making these strawberries?
Absolutely, some common issues include the marshmallow not adhering to the strawberries. To avoid this, ensure the strawberries are thoroughly dried before dipping. If the marshmallow fluff is too thick, heat it a tad longer in the microwave but do avoid making it runny. Additionally, hold the butane torch a few inches away from the marshmallow to prevent burning while ensuring even caramelization.

Are there any dietary considerations for Toasted Marshmallow Strawberries?
Yes! If you’re serving these to guests, be mindful of allergies. Marshmallow fluff typically contains egg whites, which may not suit those with egg allergies. For a vegan alternative, you can look for egg-free marshmallow fluff. Furthermore, always be cautious when serving sweets to young children, especially those with food allergies, and anyone with dietary restrictions.

Toasted Marshmallow Strawberries

Toasted Marshmallow Strawberries: A Sweet Summer Indulgence

Toasted Marshmallow Strawberries are a delightful summer treat combining juicy strawberries and fluffy toasted marshmallow.
Prep Time 15 minutes
Cook Time 5 minutes
Total Time 20 minutes
Servings: 4 servings
Course: Dessert
Cuisine: American
Calories: 36

Ingredients
  

For the Strawberries
  • 16 ounces Fresh Strawberries Choose ripe, plump berries for optimal sweetness and juiciness.
For the Marshmallow Coating
  • 7 ounces Marshmallow Fluff Soften it for easy dipping.
Optional Topping
  • 0.5 cup Chocolate Sauce Can be swapped for caramel or peanut butter.

Equipment

  • Microwave
  • Butane Torch
  • Skewers
  • microwave-safe bowl

Method
 

Step-by-Step Instructions
  1. Start by washing the fresh strawberries thoroughly under cool running water. Gently dry them with a paper towel.
  2. To soften the marshmallow fluff, microwave it for about 15 seconds and stir until smooth and creamy.
  3. Dip each strawberry into the marshmallow fluff, twisting gently to ensure even coating.
  4. Using a butane torch, carefully toast the marshmallow on each strawberry until golden brown, about 15 to 30 seconds.
  5. Arrange the toasted strawberries on a platter and drizzle with chocolate sauce if desired. Serve immediately.

Notes

These are best enjoyed fresh; freezing is not recommended as it affects texture and flavor.

Indulge in Pumpkin Apple Three Cheese Mac and Cheese Bliss

As the leaves turn golden and the air fills with the scent of cinnamon, there’s no better time to cozy up with a dish that combines the best flavors of fall. Enter my Pumpkin Apple Three Cheese Mac and Cheese—a delightful medley of creamy macaroni, savory pumpkin, and sweet apple, all enveloped in a blend of three amazing cheeses. This recipe comes together quickly, making it perfect for busy weeknights or as a showstopping centerpiece for your next dinner gathering. Plus, it’s vegetarian-friendly, ensuring that everyone at the table will feel satisfied and happy. Ready to dive into a bowl of ooey-gooey comfort food that warms the soul? Let’s get cooking!

Why You’ll Love This Mac and Cheese

Comforting Warmth: This dish brings the cozy vibes of fall right to your kitchen, with a perfect blend of pumpkin and apples creating a delightful flavor harmony.

Cheesy Goodness: The three cheese combination offers rich flavor and a creamy texture that will have everyone coming back for seconds.

Quick Preparation: Whip this up in a flash—ideal for those busy weeknights when you crave homemade goodness without the fuss.

Versatile Dish: Have fun with it! Substitute apples for pears or add crispy bacon for a heartier meal while still keeping it vegetarian if you choose.

Crowd Pleaser: Perfect for family gatherings or dinner parties, your friends will rave about this delightful twist on a classic dish and be begging for the recipe!

Join the fun and pair it with a side of Crisp Cabbage Apple for a refreshing crunch that complements this creamy mac!

Pumpkin Apple Three Cheese Mac and Cheese Ingredients

For the Pasta
Uncooked macaroni elbow pasta – the essential base that provides delightful texture to this comforting dish.

For the Sauce
Pumpkin puree – adds creaminess and a seasonal flavor; butternut squash puree is a great substitute.
Gruyere cheddar cheese – melts beautifully, bringing a nutty richness; swap with a mix of sharp cheddar and Jarlsberg if needed.
Gorgonzola cheese – lends a bold, sharp flavor; consider using feta for a milder alternative.
Parmesan cheese – adds depth and umami, with freshly grated being preferred for optimal taste.
Heavy cream – ensures a rich, creamy texture; half-and-half can lighten things up.

For the Topping
Bread crumbs – creates a crunchy crust that contrasts deliciously with the creamy mac; panko is ideal for extra crunch.
Additional cheddar – sprinkle on top for that cheesy crust everyone loves.

For the Flavor
Apples (cut into 1-inch chunks) – introduce a sweet contrast to the savory flavors; tart varieties like Granny Smith shine here.
Rosemary – imparts a fresh, aromatic herb flavor (fresh is best!).
Salt – enhances the overall flavor balance; don’t skip this!
Pepper – adds a kick of spice; adjust based on your preference.
Cinnamon – complements the sweetness of both apples and pumpkin, adding warmth to the dish.
Nutmeg – enhances the fall flavors; use judiciously if you prefer a milder spice.
Olive oil – ideal for sautéing the apples; butter works beautifully too!

Feel free to explore this delightful Pumpkin Apple Three Cheese Mac and Cheese recipe, and let each bite transport you to a cozy autumn evening.

Step‑by‑Step Instructions for Pumpkin Apple Three Cheese Mac and Cheese

Step 1: Boil the Pasta
Begin by bringing a large pot of salted water to a rolling boil over high heat. Once boiling, add the uncooked macaroni elbow pasta and cook according to package instructions until al dente, about 6-8 minutes. The pasta should be firm yet tender; strain and rinse under cold water to stop the cooking process. Set aside while you prepare the cheese sauce.

Step 2: Prepare the Cheese Sauce
In a medium saucepan over low heat, pour in the heavy cream and allow it to warm gently, ensuring not to boil it. Gradually mix in the Gruyere, Gorgonzola, and Parmesan cheese along with the pumpkin puree. Stir continuously until the cheeses melt and form a smooth, creamy sauce, roughly 5-7 minutes. Once fully combined, remove from heat and combine with the macaroni.

Step 3: Sauté the Apples
In a skillet, heat a tablespoon of olive oil over medium heat. Add the apple chunks to the pan and sauté for about 4-5 minutes until they become tender and slightly caramelized. Season the apples with salt, pepper, cinnamon, and nutmeg, stirring well to ensure the flavors marry. Once done, fold the sautéed apples into the macaroni and cheese mixture.

Step 4: Assemble the Dish
Preheat your oven to 350°F (175°C). Lightly coat a baking dish with olive oil or cooking spray to prevent sticking. Pour the macaroni mixture into the prepared baking dish, spreading it evenly. Top with breadcrumbs and additional cheddar cheese for that irresistible cheesy crust. Sprinkle finely chopped rosemary over the top for an aromatic touch.

Step 5: Bake Until Golden
Place the baking dish in the preheated oven and bake for 15-20 minutes, or until the top is golden brown and bubbly. You’ll know it’s ready when the cheese is melted and the breadcrumbs are crispy. Remove from the oven and let it cool for a few minutes before serving to allow the flavors to settle. Enjoy your delightful Pumpkin Apple Three Cheese Mac and Cheese!

What to Serve with Pumpkin Apple Three Cheese Mac and Cheese

Indulging in a bowl of creamy mac and cheese is a delight on its own, but pairing it with the right sides elevates the entire meal experience.

  • Crisp Green Salad: Fresh greens with a tangy vinaigrette create a lovely contrast to the rich flavors of the mac and cheese, adding balance to your plate.

  • Garlic Bread: Crunchy and buttery garlic bread is the perfect sidekick, making every bite even more comforting and satisfying.

  • Roasted Brussels Sprouts: These tender, caramelized beauties bring a crispy texture and earthy flavor that perfectly complements the sweetness of the pumpkin and apple.

  • Honey-Glazed Carrots: Sweet, roasted carrots enhance the fall flavor profile with their natural sweetness while providing a vibrant burst of color.

  • Warm Apple Cider: A glass of warm apple cider spiced with cinnamon ties in beautifully with the dish, reinforcing the seasonal vibes.

  • Pumpkin Spice Muffins: For a sweet concluding note, these muffins offer a delightful way to keep the pumpkin theme alive while tempting your taste buds with their fluffy texture.

Enhance your dining experience with these thoughtful pairings and savor the lovely warmth of a fall-inspired meal!

Expert Tips for Pumpkin Apple Three Cheese Mac and Cheese

  • Make Ahead Magic: Prepare the cheese and pasta mixture a day in advance to save time. Just refrigerate and bake before serving.

  • Even Melting: To avoid scorching, keep the heat low while adding cheese to the heavy cream. Stir continuously for a smooth texture.

  • Fresh Is Best: Always use freshly grated cheeses for optimal melting and flavor in your Pumpkin Apple Three Cheese Mac and Cheese.

  • Taste Test As You Go: Adjust seasoning for personal preference. Experiment with salt, pepper, and spices like nutmeg or cinnamon—everyone enjoys different levels of flavor!

  • Perfect for Variations: Don’t hesitate to swap out ingredients based on what you have on hand, like using pears instead of apples for a unique twist!

How to Store and Freeze Pumpkin Apple Three Cheese Mac and Cheese

Fridge: Store leftovers in an airtight container for up to 3 days. Reheat in the oven or microwave, adding a splash of cream to maintain creaminess.

Freezer: Freeze portions in freezer-safe containers for up to 2 months. To reheat, thaw overnight in the fridge and bake at 350°F until heated through.

Room Temperature: Avoid leaving this dish out for more than 2 hours to prevent spoilage. It’s best enjoyed fresh!

Make Ahead: Prepare the mixture in advance and refrigerate it, then bake just before serving to enjoy a fresh and delicious Pumpkin Apple Three Cheese Mac and Cheese.

Make Ahead Options

These Pumpkin Apple Three Cheese Mac and Cheese are perfect for busy home cooks looking to save time! You can prepare the entire macaroni and cheese mixture up to 24 hours in advance. Simply cook the pasta, make the cheese sauce, and sauté the apples, then combine everything in your baking dish. Cover the dish tightly and refrigerate it overnight. To maintain that creamy texture and rich flavor, avoid adding the breadcrumbs until just before baking. When ready to serve, sprinkle the breadcrumbs and additional cheddar on top and bake at 350°F for 15-20 minutes until golden and bubbly. This way, you’ll have a delicious, comforting meal with minimal effort on the day you need it!

Pumpkin Apple Three Cheese Mac and Cheese Variations

Feel free to get creative with this recipe and customize it to suit your taste and dietary needs.

  • Pears Instead of Apples: Swap out apples for ripe pears for a softer texture and sweet flavor, perfect for seasonal variation.
  • Bacon Boost: Add crispy cooked bacon or sausage for a flavorful protein boost—this savory addition wonderfully complements the sweetness.
  • Different Cheeses: Experiment with cheese varieties like mozzarella for a milder flavor or feta for a tangy twist, offering a new taste experience.
  • Gluten-Free Pasta: Substitute regular macaroni with gluten-free pasta to make this dish suitable for gluten-sensitive pals without compromising on taste!
  • Add Greens: Toss in wilted spinach or kale to incorporate more veggies; this adds a pop of color and nutrition to your creamy mac.
  • Spicy Kick: For those who love heat, sprinkle some crushed red pepper flakes on top for an exciting flavor contrast that pairs surprisingly well!
  • Vegan Style: Use plant-based cheeses and nut milk in place of heavy cream for a vegan twist that’s just as comforting and delicious.
  • Extra Crunch: Top with crushed nuts or seeds in addition to the breadcrumbs; this adds delightful texture and a nutty flavor to every bite.

Feel inspired? Enhance your meal with a refreshing side of Crisp Cabbage Apple to balance the richness of this delightful dish. Or explore Savory Beef Bacon Cheese for a hearty addition that complements the season. Enjoy experimenting with this Pumpkin Apple Three Cheese Mac and Cheese!

Pumpkin Apple Three Cheese Mac and Cheese Recipe FAQs

How do I choose the best apples for this dish?
Absolutely! For the perfect contrast, I recommend using tart apples like Granny Smith. Their tartness beautifully complements the savory flavors of the cheese and pumpkin. Avoid overly soft or mealy apples, as they’ll become mushy when cooked.

How should I store leftover Pumpkin Apple Three Cheese Mac and Cheese?
To store your delightful dish, place any leftovers in an airtight container in the fridge for up to 3 days. When you’re ready to enjoy it again, simply reheat it in the oven at 350°F for about 10-15 minutes, adding a splash of cream to get that creamy texture back!

Can I freeze Pumpkin Apple Three Cheese Mac and Cheese?
Yes! You can freeze this scrumptious mac and cheese for up to 2 months. Here’s how:

  1. Allow the dish to cool completely.
  2. Portion it into freezer-safe containers or wrap tightly in plastic wrap.
  3. Label it with the date for easy tracking.
    To reheat, thaw overnight in the fridge and bake it at 350°F until heated through and bubbly, about 25-30 minutes.

What if my cheese sauce doesn’t seem to thicken properly?
Very! If your cheese sauce is too runny, try these steps:

  1. Lower the heat and stir continuously; this encourages the cheese to melt smoothly without separating.
  2. If it’s still too thin, mix a tablespoon of cornstarch with a splash of cold water to create a slurry, and whisk it into the sauce while heating until thickened.
    Remember, patience is key in achieving that creamy texture!

Can this Pumpkin Apple Three Cheese Mac and Cheese be made vegan?
Definitely! You can create a vegan version by:

  • Using dairy-free cheeses (like cashew or almond-based) and non-dairy cream such as coconut cream or cashew cream.
  • Replace the pasta with gluten-free or whole-grain varieties.
  • Be sure to incorporate spices like nutritional yeast for a cheesy flavor without the dairy. Enjoy experimenting with flavors while keeping it plant-based!
Pumpkin Apple Three Cheese Mac and Cheese

Indulge in Pumpkin Apple Three Cheese Mac and Cheese Bliss

Enjoy the rich flavors of Pumpkin Apple Three Cheese Mac and Cheese, a perfect fall dish.
Prep Time 20 minutes
Cook Time 30 minutes
Cooling Time 5 minutes
Total Time 55 minutes
Servings: 4 servings
Course: Dinner
Cuisine: American
Calories: 625

Ingredients
  

For the Pasta
  • 8 oz uncooked macaroni elbow pasta essential base that provides delightful texture
For the Sauce
  • 1 cup pumpkin puree or butternut squash puree as substitute
  • 1 cup Gruyere cheddar cheese or a mix of sharp cheddar and Jarlsberg
  • 1/2 cup Gorgonzola cheese or feta for a milder alternative
  • 1/2 cup Parmesan cheese freshly grated is preferred
  • 1 cup heavy cream or half-and-half
For the Topping
  • 1 cup bread crumbs panko is ideal for extra crunch
  • 1/2 cup additional cheddar to sprinkle on top
For the Flavor
  • 1 cup apples cut into 1-inch chunks, tart varieties like Granny Smith work well
  • 1 tbsp olive oil for sautéing apples
  • 1 tsp rosemary fresh is best
  • 1 tsp salt
  • 1/2 tsp pepper
  • 1/2 tsp cinnamon
  • 1/4 tsp nutmeg use judiciously

Equipment

  • Large pot
  • Medium saucepan
  • Skillet
  • Baking Dish

Method
 

Preparation Steps
  1. Boil a large pot of salted water and cook the macaroni elbow pasta until al dente. Strain and rinse under cold water.
  2. Warm heavy cream in a medium saucepan, then mix in Gruyere, Gorgonzola, Parmesan, and pumpkin puree until smooth.
  3. Sauté apple chunks in olive oil until tender and caramelized, seasoning with salt, pepper, cinnamon, and nutmeg.
  4. Preheat the oven to 350°F. Combine macaroni and cheese sauce, pour into a baking dish, top with breadcrumbs and additional cheddar.
  5. Bake for 15-20 minutes until the top is golden brown and bubbly. Cool for a few minutes before serving.

Notes

This recipe can be made ahead of time. Store leftovers in an airtight container for up to 3 days, or freeze for up to 2 months.

Cranberry Apple Coleslaw: Crunchy, Creamy, and Refreshing Delight

As I tossed together vibrant shreds of green cabbage and the sweet crunch of Honeycrisp apples, I couldn’t help but feel giddy about my latest creation: Cranberry Apple Coleslaw. This seasonal delight, bursting with cheerful colors, is not just a salad—it’s a celebration of fresh flavors and textures. Perfect for summer barbecues or as a colorful side dish, this coleslaw is quick to whip up, ensuring you spend less time in the kitchen and more time enjoying good company. Plus, it’s a healthy option that even picky eaters will love! So, whether you’re looking to impress at a potluck or simply elevate your weeknight dinners, this recipe is sure to leave everyone asking for seconds. Ready to dive into a delicious and refreshing twist on classic coleslaw?

Why is Cranberry Apple Coleslaw a Must-Try?

Bright, Flavorful Fusion: The combination of tangy cranberries and sweet apples creates an exciting burst of flavor that your taste buds will adore.

Easy Preparation: You only need a few minutes and simple ingredients to create this vibrant dish, making it a fantastic option for those busy days.

Healthy & Refreshing: This coleslaw is packed with fresh veggies and fruits, offering a guilt-free side that’s both nutritious and satisfying.

Versatile Pairing: Perfect with grilled chicken, pork sandwiches, or even as a topping for tacos, this coleslaw complements a wide range of meals.

Ideal for Any Occasion: Whether it’s a summer barbecue or a holiday feast, this dish garners compliments and seconds from everyone at the table, much like my Crisp Cabbage Apple and Apple Oatmeal Cookies.

Cranberry Apple Coleslaw Ingredients

For the Coleslaw

  • Green Cabbage – finely shredded, forms the crunchy base (about 6 cups).
  • Apples (Honeycrisp or Fuji) – adds sweetness and balances the tang; consider substituting with tart Granny Smith if desired.
  • Dried Cranberries – lends a chewy texture and sweetness; fresh cranberries are a vibrant seasonal alternative.
  • Chopped Walnuts or Pecans (optional) – adds nutty flavor and crunch; sunflower seeds work as a nut-free option.
  • Chopped Fresh Parsley – introduces a fresh herbal note; cilantro can be used as a substitute or omitted if preferred.

For the Dressing

  • Mayonnaise – serves as the creamy dressing base; Greek yogurt is a lighter substitute.
  • Apple Cider Vinegar – gives the dressing its tanginess; white wine vinegar can be a good alternative.
  • Honey or Maple Syrup – sweetens the dressing to balance flavors; adjust based on your sweetness preference.
  • Dijon Mustard – provides depth and a slight kick; yellow mustard is a suitable backup in a pinch.
  • Celery Seeds – contributes an earthy flavor; feel free to omit if not available.
  • Salt and Black Pepper – enhances overall flavor; add to taste for the perfect finish.

This Cranberry Apple Coleslaw is your ticket to a refreshing, healthy side that everyone will rave about!

Step‑by‑Step Instructions for Cranberry Apple Coleslaw

Step 1: Shred the Cabbage
Begin by finely shredding about 6 cups of green cabbage using a sharp knife or a mandoline for even pieces. Place the shredded cabbage into a large mixing bowl, ensuring there’s enough room to add other ingredients. The cabbage should appear crisp and fresh, providing the foundational crunch for your Cranberry Apple Coleslaw.

Step 2: Prepare the Apples
Core and dice 2-3 Honeycrisp or Fuji apples into small, bite-sized pieces, leaving the skins on for added color and nutrients. Add the diced apples directly to the cabbage in the mixing bowl, creating a delightful contrast of sweetness and texture. Toss them gently to combine and prevent browning.

Step 3: Add Cranberries and Nuts
Sprinkle in a generous handful of dried cranberries, enhancing the coleslaw with their chewy sweetness. If you’re incorporating them, also add chopped walnuts or pecans for extra crunch. Gently mix these ingredients together with a spatula, ensuring that the cranberries and nuts are evenly distributed throughout the cabbage and apples.

Step 4: Whisk the Dressing
In a separate bowl, combine 1 cup of mayonnaise, 2 tablespoons of apple cider vinegar, 1-2 tablespoons of honey (or maple syrup), 1 tablespoon of Dijon mustard, and half a teaspoon of celery seeds. Whisk these ingredients together until the dressing is smooth and creamy, with no lumps remaining. This dressing will give your Cranberry Apple Coleslaw its tangy and sweet character.

Step 5: Combine Everything
Pour the creamy dressing over the cabbage mixture in the larger bowl, using a spatula to gently toss everything together. Ensure that each bit of cabbage, apple, and cranberry is generously coated in the dressing. This step is crucial for achieving that harmonious blend of flavors in your coleslaw.

Step 6: Chill and Meld Flavors
Cover the bowl with a lid or plastic wrap and refrigerate the coleslaw for at least 30 minutes, but aiming for 1 hour is ideal. Allowing it to chill not only cools the dish but also helps the flavors meld beautifully, making every bite taste even better when served.

Step 7: Final Adjustments
Before serving your Cranberry Apple Coleslaw, give it a quick taste test. You may want to adjust the seasoning with more salt, pepper, or a dash of extra vinegar depending on your preference. After ensuring the flavors are just right, serve the coleslaw chilled, ready to be enjoyed at your next gathering!

Expert Tips for the Best Cranberry Apple Coleslaw

  • Crisp Cabbage: Use freshly shredded cabbage for the best crunch and texture. Pre-packaged varieties may wilt faster, impacting freshness.

  • Balanced Sweetness: Adjust the amount of honey or maple syrup based on your taste preferences. Less sweet apples, like Granny Smith, may need more sweetness in the dressing.

  • Chill Time: Refrigerate the coleslaw for at least 30 minutes, ideally an hour, to allow flavors to blend. Avoid serving immediately to get the full flavor experience.

  • Mix-in Variations: Feel free to customize with additional ingredients like shredded carrots or bell peppers. But don’t overwhelm the cabbage, keeping the focus on the cranberry and apple flavors.

  • Don’t Over-Dress: If making in advance, consider holding back some dressing until serving time. This prevents the cabbage from wilting and keeps it crunchy.

Variations & Substitutions for Cranberry Apple Coleslaw

Feel free to get creative and tailor this recipe to suit your taste buds!

  • Nut-Free: Substitute chopped walnuts or pecans with sunflower seeds or pumpkin seeds for a delightful crunch without the nuts.

  • Vegan Option: Swap mayo for a plant-based alternative or use a creamy avocado dressing for a healthy twist that’s still rich and satisfying.

  • Extra Crunch: Add shredded carrots or sliced bell peppers for vibrant color and additional nutrition, giving your coleslaw a lively texture contrast.

  • Fruit Switch-Up: Try replacing apples with pears or even adding grapes for a different sweet note. Each variation will add its own charm to the coleslaw!

  • Creamy Greek Surprise: Use Greek yogurt entirely or partially instead of mayonnaise to lighten up the dressing while still keeping it creamy.

  • Herbal Twist: Instead of parsley, try fresh cilantro or dill for a unique flavor profile that brings freshness to the forefront of your coleslaw.

  • Spicy Kick: For those who like heat, toss in a pinch of cayenne pepper or a few slices of jalapeños to bring a zesty bite to your dish.

  • Dressing Alternatives: If apple cider vinegar isn’t your favorite, feel free to use lemon juice or balsamic vinegar for a different tang that can elevate the dish.

With these variations, you’ll find the perfect combination that suits your palate. Enjoy experimenting with flavors as you whip up this vibrant coleslaw! For more delicious ideas, check out my Tropical Chicken Pineapple or explore my take on the delightful Cabbage Carrot Apple salad!

Storage Tips for Cranberry Apple Coleslaw

Fridge: Store any leftover Cranberry Apple Coleslaw in an airtight container for up to 3 days to maintain freshness and prevent sogginess.

Make-Ahead: Prepare the coleslaw a day ahead of time for optimal flavor; just keep the dressing separate until you’re ready to serve to keep the cabbage crisp.

Freezer: It’s not recommended to freeze this coleslaw as the texture may become mushy upon thawing due to the high water content in cabbage and apples.

Reheating: Serve chilled directly from the fridge; if needed, adjust seasonings before serving to refresh the flavors.

What to Serve with Cranberry Apple Coleslaw?

Elevate your meal with vibrant sides that perfectly complement the refreshing crunch of coleslaw.

  • Grilled Chicken: The smoky flavors of grilled chicken pair effortlessly with the sweet and tangy notes in the coleslaw, enhancing both dishes. A perfect choice for sunny outdoor gatherings!
  • Pulled Pork Sandwiches: The richness of pulled pork contrasts beautifully with the zesty crunch of coleslaw, creating a delightful balance of flavors and textures. A true crowd-pleaser!
  • Baked Salmon: Serve with cranberry apple coleslaw for a refreshing bite alongside tender, flaky fish. The citrusy dressing lifts the dish, making it feel light and sophisticated.
  • Quinoa Salad: A nutritious, protein-packed quinoa salad adds an earthy element that complements the fruity notes of the coleslaw. Combine them for a wholesome meal that’s visually appealing!
  • Corn on the Cob: Sweet, buttery corn on the cob is a summer staple that pairs wonderfully with the tangy coleslaw, providing a delightful crunch and sweetness.
  • Lemonade or Iced Tea: Refreshing drinks like homemade lemonade or iced tea brighten the meal, balancing the flavors with their citrusy notes while keeping the occasion light and festive.
  • Fruit Salad: A colorful fruit salad can enhance the freshness of the coleslaw. Use seasonal fruits to create a sweet counterpoint to the tangy tones of your dish.
  • Chocolate Chip Cookies: For a sweet finish, serve chocolate chip cookies for dessert. Their warm, gooey goodness creates a lovely contrast after enjoying the coleslaw.

Make Ahead Options

These Cranberry Apple Coleslaw delights are perfect for meal prep enthusiasts! You can prepare the shredded cabbage and diced apples up to 24 hours in advance, just be sure to toss the apples in a little lemon juice to prevent browning. The dressing can be mixed ahead and stored in the refrigerator for up to 3 days; just keep it separate until you’re ready to serve to maintain the cabbage’s crunchiness. When it’s time to enjoy your coleslaw, combine the prepped ingredients and dressing, give it a good toss, and you’ll have a vibrant side that saves you time while still tasting just as delicious!

Cranberry Apple Coleslaw Recipe FAQs

How do I select the best apples for this coleslaw?
Absolutely! Choose crunchy apples like Honeycrisp or Fuji for their sweetness and texture. If you’re looking for a tart contrast, Granny Smith apples are a perfect substitute. Make sure the apples are firm and free from dark spots; they should be bright and shiny for the best flavor.

How should I store leftover Cranberry Apple Coleslaw?
Store any leftovers in an airtight container in the refrigerator for up to 3 days. This helps preserve the crunchiness of the cabbage and the freshness of the apples, ensuring you can enjoy this delicious side dish after originally making it.

Can I make this coleslaw ahead of time?
Yes, indeed! You can prepare the coleslaw a day in advance to enhance the flavor. However, I recommend keeping the dressing separate until just before serving. This way, the cabbage remains crisp and retains its fantastic texture, avoiding that soggy fate that can often occur.

Is it possible to freeze Cranberry Apple Coleslaw?
It’s not recommended to freeze this coleslaw. The texture of cabbage and apples can become mushy when thawed due to their high water content. If you’re looking for convenience, simply prep and store it in the fridge so it’s ready to serve fresh when you need it!

What can I do if my coleslaw seems too sweet?
If your coleslaw leans on the sweet side, consider adding a splash more of apple cider vinegar to balance the flavors. You might also incorporate a pinch of salt to enhance the overall taste profile. Adjusting by mixing in more shredded cabbage can dilute the sweetness while maintaining a nice crunch.

Are there any dietary considerations for this coleslaw?
Definitely! This coleslaw is vegetarian and can be made vegan by substituting the mayonnaise with a plant-based option like vegan mayo or Greek yogurt. Additionally, if anyone has nut allergies, simply omit the nuts or swap in sunflower seeds for a nut-free option that still adds crunch.

Cranberry Apple Coleslaw

Cranberry Apple Coleslaw: Crunchy, Creamy, and Refreshing Delight

Cranberry Apple Coleslaw is a vibrant and healthy side dish perfect for any gathering.
Prep Time 15 minutes
Chill Time 30 minutes
Total Time 45 minutes
Servings: 6 cups
Course: Lunch
Calories: 150

Ingredients
  

For the Coleslaw
  • 6 cups Green Cabbage finely shredded
  • 2-3 pieces Apples (Honeycrisp or Fuji) diced
  • 1 cup Dried Cranberries
  • 1/2 cup Chopped Walnuts or Pecans optional
  • 1/4 cup Chopped Fresh Parsley or cilantro
For the Dressing
  • 1 cup Mayonnaise or Greek yogurt
  • 2 tablespoons Apple Cider Vinegar or white wine vinegar
  • 1-2 tablespoons Honey or Maple Syrup to taste
  • 1 tablespoon Dijon Mustard
  • 0.5 teaspoon Celery Seeds optional
  • Salt to taste
  • Black Pepper to taste

Equipment

  • mixing bowl
  • sharp knife
  • mandoline
  • whisk

Method
 

Step-by-Step Instructions
  1. Begin by finely shredding about 6 cups of green cabbage using a sharp knife or a mandoline for even pieces. Place the shredded cabbage into a large mixing bowl.
  2. Core and dice 2-3 Honeycrisp or Fuji apples into small, bite-sized pieces, leaving the skins on. Add the diced apples directly to the cabbage in the mixing bowl.
  3. Sprinkle in a generous handful of dried cranberries. If incorporating, also add chopped walnuts or pecans for extra crunch. Gently mix these ingredients.
  4. In a separate bowl, combine 1 cup of mayonnaise, 2 tablespoons of apple cider vinegar, 1-2 tablespoons of honey (or maple syrup), 1 tablespoon of Dijon mustard, and half a teaspoon of celery seeds. Whisk until smooth.
  5. Pour the creamy dressing over the cabbage mixture, using a spatula to gently toss everything together.
  6. Cover the bowl and refrigerate the coleslaw for at least 30 minutes, aiming for 1 hour to allow flavors to meld.
  7. Before serving, taste and adjust seasoning with more salt, pepper, or vinegar if needed, then serve chilled.

Notes

For best results, use freshly shredded cabbage and allow coleslaw to chill before serving.

Sausage Egg and Cheese Breakfast Roll-Ups for Busy Mornings

As I flipped through my recipe book on a busy morning, the familiar scent of sizzling sausage whisked me back to lazy brunches with friends. The recipe for Sausage Egg and Cheese Breakfast Roll-Ups caught my eye, promising a quick and satisfying meal to kickstart the day. This delightful breakfast is not only high in protein but also meal-prep friendly, ensuring you can savor a wholesome feast even on the most hectic mornings. Wrapped in a golden tortilla, each roll-up is customizable to fit any dietary preference, making it an absolute crowd-pleaser for your family or guests. Are you ready to transform your breakfast routine with these irresistible roll-ups?

Why Choose Sausage Egg and Cheese Roll-Ups?

Convenience: Perfect for busy mornings, these roll-ups are quick to prepare and can be made ahead for stress-free meals!

High-Protein: Packed with savory sausage, fluffy eggs, and melting cheese, they’re a satisfying and nutritious breakfast option.

Customizable: Switch up ingredients like cheese or add your favorite veggies to cater to dietary needs and tastes, such as with a Savory Cheese Egg twist!

Crowd-Pleaser: Kids and adults alike can’t resist these tasty wraps, perfect for family breakfasts or brunch gatherings.

Texture Contrast: Enjoy the irresistible combination of crispy on the outside and gooey on the inside, reminiscent of a breakfast burrito experience.

Meal Prep Friendly: Make a big batch and freeze for up to two months—ideal for those hectic mornings when you don’t want to sacrifice flavor for speed!

Sausage Egg and Cheese Breakfast Roll-Ups Ingredients

For the Roll-Ups
Sausage – Provides savory protein; consider turkey sausage for a leaner option.
Eggs – Supplies protein and nutrients for a filling breakfast; egg whites work for a lower-calorie choice.
Cheese – Adds creaminess and flavor; cheddar or pepper jack melt best, while pre-shredded cheese can be avoided.
Tortillas – Serves as the wrapping, offering energy through carbs; whole-grain or almond flour tortillas enhance fiber and accommodate gluten-free diets.
Butter (for brushing) – Enhances crispiness and flavor of the roll-ups; omit for a delightful dairy-free version.
Salt and Pepper – Essential for seasoning; feel free to add spices like garlic or smoked paprika for a flavor boost.

For Serving
Salsa or Sour Cream – Provides a zesty dip that complements the roll-ups beautifully; ideal for a refreshing finishing touch.
Fresh Fruit Salad – A sweet contrast to the savory roll-ups, adding a burst of freshness to your breakfast table.

Step‑by‑Step Instructions for Sausage Egg and Cheese Breakfast Roll-Ups

Step 1: Preheat the Oven
Begin by preheating your oven to 375°F (190°C) to ensure it reaches the ideal temperature while you prepare the ingredients. This is crucial for achieving that perfectly crisp exterior you’re looking for in your Sausage Egg and Cheese Breakfast Roll-Ups. A reliable oven thermometer can help ensure accuracy.

Step 2: Cook the Sausage
In a skillet over medium heat, add your sausage, breaking it apart with a spatula into small crumbles. Cook the sausage for about 5-7 minutes, stirring occasionally, until it’s golden brown and cooked through. Once ready, drain any excess grease to keep your dish healthy and flavorful.

Step 3: Scramble the Eggs
In a bowl, whisk together the eggs with a splash of milk, salt, and pepper until light and fluffy. Reduce the heat to low and pour the egg mixture into the same skillet, stirring gently. Cook for approximately 3-4 minutes, until the eggs are just set but still soft, ensuring a creamy texture for your roll-ups.

Step 4: Assemble the Roll-Ups
Lay out the tortillas on a clean surface and evenly distribute the scrambled eggs and cooked sausage among them. Sprinkle with cheese of your choice, then roll the tortillas tightly, tucking in the sides as you go to secure the filling. This step is key for keeping the Sausage Egg and Cheese Breakfast Roll-Ups intact during baking.

Step 5: Prepare for Baking
Place the roll-ups seam-side down on a baking sheet lined with parchment paper. This helps prevent sticking and makes for easy clean-up. Melt some butter and gently brush it over the tops of the roll-ups, enhancing their crispiness and flavor as they bake in the oven.

Step 6: Bake the Roll-Ups
Insert the baking sheet into the preheated oven and bake the roll-ups for 12-15 minutes. They should turn a beautiful golden brown color and become crispy. Keep an eye on them to avoid over-browning and ensure they reach that delightful crunch that pairs perfectly with the gooey interior.

Step 7: Serve and Enjoy
Once baked, remove the roll-ups from the oven and let them cool for a couple of minutes. Serve warm with salsa or sour cream for dipping, and consider pairing with a fresh fruit salad for a balanced breakfast. These Sausage Egg and Cheese Breakfast Roll-Ups are perfect for starting your day off right!

What to Serve with Sausage Egg and Cheese Breakfast Roll-Ups

Imagine the delightful crunch of a fresh breakfast spread that complements your warm, cheesy roll-ups, creating a morning feast.

  • Crispy Hash Browns: Perfectly golden hash browns add a satisfying crunch and provide the ideal sidekick for your roll-ups’ creamy filling.
  • Fresh Fruit Salad: A medley of juicy berries, melons, and citrus balances out the savory flavors, infusing your plate with vibrant freshness.
  • Creamy Salsa Verde: This zesty salsa offers a tangy kick, enhancing the roll-ups’ flavors and elevating your dipping experience.
  • Savory Breakfast Burrito: For an indulgent twist, serve with a hearty breakfast burrito filled with beans and veggies to round out your morning.
  • Homemade Yogurt Parfait: Layered with granola and fresh fruit, this light dessert adds a sweet contrast and encourages a healthy start to your day.
  • Bubble Tea: Enjoy a refreshing bubble tea or iced coffee to sip alongside your meal, bringing a delightful and energizing break to your morning routine.
  • Nutty Granola Bars: These chewy delights can serve as an easy grab-and-go option for an extra protein boost during those hectic mornings.
  • Vanilla Latte: The smooth, creamy flavors of a vanilla latte pair beautifully with the savory roll-ups, creating a cozy breakfast moment you can savor.
  • Chocolate Chip Muffins: For a decadent addition, warm muffins studded with chocolate chips provide a sweet finish to your delightful breakfast spread.

Make Ahead Options

These Sausage Egg and Cheese Breakfast Roll-Ups are perfect for meal prep enthusiasts looking to save time on busy mornings! You can prepare the sausage and scramble the eggs up to 24 hours in advance, storing them separately in airtight containers in the refrigerator to maintain freshness. Additionally, you can assemble the roll-ups entirely and refrigerate them up to 3 days before baking. To prevent sogginess, ensure the roll-ups are tightly wrapped and brush them lightly with butter just before baking. When you’re ready to enjoy, simply preheat the oven and bake the roll-ups for 12-15 minutes until crispy and golden. These simple prep steps will ensure your breakfast is both delicious and stress-free!

Sausage Egg and Cheese Breakfast Roll-Ups Variations

Feel free to get creative and personalize your roll-ups with these delightful variations!

  • Spicy Twist: Add chorizo instead of sausage for a flavorful kick and a hint of heat. You can pair this with a dollop of salsa for an extra burst of flavor!

  • Veggie Delight: Toss in diced bell peppers, onions, or spinach for a colorful, crunchy filling. Adding veggies not only boosts nutrition but also enhances the texture of your breakfast.

  • Cheese Swap: Experiment with different cheeses like smoked gouda or tangy feta for a unique taste profile. Each cheese brings its own character, ensuring no two roll-ups are the same!

  • Herb Infusion: Mix in fresh herbs like chopped chives or cilantro with your eggs. This aromatic addition will brighten your roll-ups and create an inviting breakfast experience.

  • Low-Carb Version: Use lettuce wraps instead of tortillas for a low-carb meal that doesn’t skimp on flavor. The crisp lettuce provides a refreshing contrast to the hearty filling.

  • Dairy-Free Delight: Swap traditional cheese with cashew cheese or nutritional yeast for a dairy-free option. This keeps the meal creamy while catering to dietary restrictions.

  • Breakfast Burrito Style: Wrap the ingredients in whole wheat or low-carb tortillas for a hearty breakfast burrito effect. This dance of flavors and textures will surely satisfy your morning cravings.

  • Sweet and Savory: For a fun twist, incorporate a small amount of maple syrup in the egg mixture for a sweet glaze alongside the savory sausage. Serve with fruit for a balanced breakfast!

Looking for more ideas? You can check out some delicious accompaniments like Savory Cheese Egg or have a go at Stovetop Cheese Green for even more culinary inspiration!

How to Store and Freeze Sausage Egg and Cheese Breakfast Roll-Ups

Fridge: Place cooled roll-ups in an airtight container and store for up to 3 days. Reheat in the microwave or oven for a quick breakfast option.

Freezer: Wrap individual roll-ups tightly in plastic wrap and then in aluminum foil, storing them in a freezer-safe bag for up to 2 months. To reheat, bake from frozen at 375°F until heated through, approximately 20-25 minutes.

Reheating: For the crispest texture, heat roll-ups in the oven instead of the microwave. A quick 5 minutes in a preheated oven will restore their delightful crunch.

Assembly Tip: Ensure the filling is completely cooled before storing to prevent sogginess in the tortillas, ensuring your Sausage Egg and Cheese Breakfast Roll-Ups retain their deliciousness!

Expert Tips for Sausage Egg and Cheese Roll-Ups

  • Prevent Sogginess: Let the cooked sausage and eggs cool slightly before assembling to keep the tortillas crisp.
  • Butter Brush: Lightly brush tortillas with melted butter for optimal crispiness; too much can make them overly greasy.
  • Avoid Overfilling: Don’t overstuff the roll-ups, as this can make rolling difficult and lead to bursting during baking.
  • Use Fresh Ingredients: Opt for fresh sausage and eggs for richer flavor; pre-packaged options can lack zest.
  • Consider Air-Frying: For an extra-crisp finish, try air-frying the roll-ups for a delightful crunch without excess oil.
  • Customize Wisely: Feel free to get creative with fillings while keeping a balance in flavors to ensure the Sausage Egg and Cheese Breakfast Roll-Ups remain satisfying.

Sausage Egg and Cheese Breakfast Roll-Ups Recipe FAQs

What type of sausage is best for these roll-ups?
You can use any type of sausage you prefer, whether it’s pork, turkey, or even chicken sausage for a leaner option. I often suggest using breakfast sausage links or patties, but if you’re looking for something with a little kick, try spicy Italian or chorizo for added flavor!

How do I store leftover roll-ups?
Store any leftover Sausage Egg and Cheese Breakfast Roll-Ups in an airtight container in the refrigerator for up to 3 days. When you’re ready to enjoy them again, simply reheat either in the microwave for about 1-2 minutes or bake them in a preheated oven at 375°F for 5-10 minutes until warm.

Can I freeze the roll-ups?
Absolutely! To freeze your Sausage Egg and Cheese Breakfast Roll-Ups, first let them cool completely. Then, wrap each roll-up tightly in plastic wrap, followed by aluminum foil, and place them in a freezer-safe bag. They can be frozen for up to 2 months. When you’re ready to eat, bake from frozen at 375°F for 20-25 minutes or until warmed through.

What should I do if the tortillas keep tearing while rolling?
If your tortillas are tearing, they may be too dry or cold. Try warming them slightly in the microwave for about 15-20 seconds to make them more pliable, or use a thinner tortilla that rolls easier. Also, don’t overfill them; keeping the filling moderate will help you roll them without any issues.

Are these roll-ups suitable for a gluten-free diet?
Yes! You can easily make Sausage Egg and Cheese Breakfast Roll-Ups gluten-free by using corn or almond flour tortillas. Just check the labels on your sausage and cheese as well to ensure they don’t contain any gluten. This way, everyone can enjoy this hearty breakfast without worry!

What are some good fillings to customize these roll-ups?
There are countless possibilities for customizing these roll-ups! You could add sautéed vegetables like bell peppers, onions, or spinach for extra nutrition. If you love spicy flavors, consider incorporating jalapeños or using pepper jack cheese. Additionally, for a smoky twist, try adding crumbled bacon or smoked sausage. The more the merrier!

Sausage Egg and Cheese Breakfast Roll-Ups

Sausage Egg and Cheese Breakfast Roll-Ups for Busy Mornings

Savor high-protein Sausage Egg and Cheese Breakfast Roll-Ups, perfect for busy mornings and customizable to fit any taste.
Prep Time 15 minutes
Cook Time 25 minutes
Cooling Time 2 minutes
Total Time 42 minutes
Servings: 4 roll-ups
Course: Breakfast
Cuisine: American
Calories: 300

Ingredients
  

For the Roll-Ups
  • 1 lb Sausage Consider turkey sausage for a leaner option.
  • 6 large Eggs Egg whites can be used for lower-calorie choice.
  • 1 cup Cheese Cheddar or pepper jack melt best.
  • 4 large Tortillas Whole-grain or almond flour enhance fiber.
  • 2 tbsp Butter For brushing, omit for dairy-free.
  • 1 tsp Salt Adjust seasoning to taste.
  • 1 tsp Pepper Feel free to add spices.
For Serving
  • 1 cup Salsa or Sour Cream Ideal for dipping.
  • 2 cups Fresh Fruit Salad Adds a sweet contrast.

Equipment

  • Skillet
  • oven
  • whisk
  • baking sheet
  • parchment paper
  • spatula

Method
 

Step-by-Step Instructions
  1. Preheat your oven to 375°F (190°C).
  2. In a skillet over medium heat, cook the sausage for 5-7 minutes until golden brown.
  3. Whisk eggs with milk, salt, and pepper. Cook in the skillet until just set.
  4. Assemble the roll-ups with tortillas, sausage, eggs, and cheese. Roll tightly.
  5. Place seam-side down on a baking sheet lined with parchment paper.
  6. Brush with melted butter and bake for 12-15 minutes until golden and crispy.
  7. Serve warm with salsa or sour cream and fresh fruit salad.

Notes

These roll-ups can be made ahead and frozen for up to two months for quick breakfasts. Let the ingredients cool before assembling to prevent sogginess.

Halloween Pumpkin Cookie Cake: A Chewy, Festive Delight

As Halloween approaches, I’m reminded of the delightful smells wafting from the kitchen, but this year, I’m taking those memories a step further with my Easy Halloween Pumpkin Cookie Cake. It’s a whimsical dessert that’s not only soft and chewy but also super quick to whip up, allowing me to spend more time enjoying the festivities with loved ones. Whether you’re planning a spooky gathering or just craving a seasonal sweet, this cookie cake is a must-have. Plus, it offers a gluten-free option for those with dietary preferences, ensuring everyone can indulge in its festive charm. So, are you ready to turn your kitchen into a pumpkin patch of deliciousness? Let’s get started!

Why is this Cookie Cake a Must-Try?

Quick and Easy: This Halloween Pumpkin Cookie Cake is a breeze to make, perfect for busy schedules while staying festive.

Chewy Delight: Enjoy an irresistibly soft and chewy texture that rivals any bakery treat.

Versatile Options: With both a classic and gluten-free version available, everyone can savor this seasonal delight.

Fun to Decorate: Get creative with simple decorations like M&M’s for a spooky pumpkin face! It’s a fantastic way to involve kids in the kitchen.

Impressive Presentation: The festive shape makes it a standout centerpiece for any Halloween gathering! Discover more easy festive ideas like the Nutty Vanilla Cake or a charming Sky Jelly Cake.

Halloween Pumpkin Cookie Cake Ingredients

• Dive into the festive baking fun with these key ingredients for your Halloween Pumpkin Cookie Cake!

  • For the Cookie Cake

  • Unsalted Butter (½ cup) – Provides richness and tenderness; remember to melt it beforehand for best results.

  • Granulated Sugar (¼ cup) – Adds sweetness and assists in the cake’s lovely rise.

  • Light Brown Sugar (½ cup) – Contributes moisture and a deeper, caramel-like flavor.

  • Large Egg (1) – Acts as a binding agent, giving structure to the cake.

  • Vanilla Extract (1 ½ teaspoons) – Enhances the overall flavor profile beautifully.

  • Baking Soda (½ teaspoon) – Helps the cake rise and achieve its delightful fluffiness.

  • Baking Powder (¼ teaspoon) – Works in harmony with baking soda for perfect leavening.

  • Salt (¼ teaspoon) – Balances out the sweetness and elevates other flavors.

  • All-Purpose Flour (1 ½ cups) – Provides structure; for a gluten-free option, substitute with gluten-free flour.

  • Semi-Sweet Chocolate Chips (1 cup) – Adds rich chocolate pockets; consider chopping half for the batter and leaving the rest whole for visual appeal.

  • For the Orange Frosting

  • Unsalted Butter (½ cup) – Forms the creamy base of the frosting; make sure it’s softened.

  • Powdered Sugar (1 ½ cups) – Gives sweetness and structure; essential for a well-balanced frosting.

  • Vanilla Extract (1 ½ teaspoons) – Adds flavor to complement the cookie cake.

  • Milk (2-4 tablespoons) – Use to adjust frosting’s consistency according to your preference.

  • Wilton Orange Food Coloring (10 drops) – Achieve that festive pumpkin hue to delight everyone.

  • For Decoration

  • M&M’s or Chocolate Chips – Use as fun, decorative elements to create a whimsical pumpkin face on your cake.

This Halloween Pumpkin Cookie Cake will not only bring joy to your taste buds but also to your festive gatherings!

Step‑by‑Step Instructions for Easy Halloween Pumpkin Cookie Cake

Step 1: Preheat the Oven
Begin by preheating your oven to 350°F (175°C). This ensures your Easy Halloween Pumpkin Cookie Cake bakes evenly and achieves that perfect chewy texture. While the oven warms, you can prepare your ingredients, making sure to melt the unsalted butter in a microwave-safe bowl until it’s just liquid but not boiling.

Step 2: Mix the Sugars and Butter
In a mixing bowl, combine the melted unsalted butter with granulated sugar and light brown sugar. Use a whisk or electric mixer to blend these ingredients together until fully combined and creamy, which should take about 2 minutes. The mixture will become lighter in color, signaling it’s ready for the next step.

Step 3: Add Egg and Vanilla
Crack one large egg into the sugar mixture along with the vanilla extract. Mix thoroughly until the egg is well incorporated and the batter appears smooth and shiny, which will take about 1 minute. This step helps bind the cookie cake together, creating a lovely structure.

Step 4: Incorporate Dry Ingredients
Sprinkle the baking soda, baking powder, and salt over the mixture, then stir gently to combine. Gradually add the all-purpose flour, mixing just until no visible flour remains. This dough will be slightly thick and sticky, perfect for our Halloween Pumpkin Cookie Cake.

Step 5: Fold in Chocolate Chips
Next, fold in the chopped semi-sweet chocolate chips, reserving half of the chips for decoration. Use a spatula to gently incorporate the chips into the dough, ensuring they are evenly distributed. The chocolate chips will provide delightful pockets of flavor in each bite of your cake.

Step 6: Prepare the Cake Pan
Grease an 11-inch cookie cake pan with cooking spray or line it with parchment paper for easy removal. Press the dough evenly into the pan, smoothing the top with a spatula for a nice surface. Make sure it’s spread evenly, as it will help the cookie cake bake uniformly.

Step 7: Bake the Cookie Cake
Place the pan in the preheated oven and bake for 12-14 minutes. You’ll know it’s ready when the edges are lightly golden, while the center is still soft. This slight underbaking is key for achieving that chewy texture characteristic of the Easy Halloween Pumpkin Cookie Cake.

Step 8: Cool and Remove from Pan
Once baked, remove the pan from the oven and let it cool on a wire rack for about 10 minutes. Carefully run a knife along the edges, then invert the cake onto the rack to cool completely. This ensures your cookie cake is easy to frost without breaking.

Step 9: Make the Orange Frosting
In a clean bowl, beat the softened unsalted butter until creamy. Gradually add the powdered sugar, continuing to mix until combined. Add the vanilla extract and milk while adjusting the consistency. Incorporate Wilton orange food coloring until you achieve a vibrant pumpkin hue for your frosting.

Step 10: Frost the Cookie Cake
Once the cake is completely cool, use a spatula to spread the orange frosting evenly over the top. Get creative! Leave some areas slightly thicker for a beautiful finish, and prepare to apply your decorations next. This will turn your Easy Halloween Pumpkin Cookie Cake into a festive centerpiece.

Step 11: Decorate with M&M’s
Finally, adorn your frosted cake with the reserved M&M’s or chocolate chips. Arrange them to create a whimsical pumpkin face. Ensure the “m” side is facing down for a neat look, bringing out the fun spirit of Halloween in every slice of your cookie cake.

Expert Tips for Halloween Pumpkin Cookie Cake

  • Watch Your Bake Time: Avoid overbaking; for that perfect chewy texture, pull it out just as the edges turn golden brown.
  • Parchment Paper Magic: Line the pan with parchment paper for effortless removal of your Halloween Pumpkin Cookie Cake without damage.
  • Egg Temperature Matters: Use room temperature eggs for better incorporation into the batter, ensuring a smoother mixture.
  • Decorating Fun: Place M&M’s with the “m” side down for a cleaner, more visually appealing decoration on your cake.
  • Don’t Skip the Chill: Allow the cake to cool completely before frosting to prevent the frosting from melting and sliding off.
  • Make Ahead: If preparing in advance, leave your cookie cake unfrosted until just before serving to maintain its moistness.

What to Serve with Easy Halloween Pumpkin Cookie Cake

Elevate your Halloween gathering with delightful sides and beverages that perfectly complement this whimsical dessert.

  • Vanilla Ice Cream: A scoop of creamy vanilla ice cream tempers the sweetness of the cookie cake and adds a delightful contrast in temperature.

  • Whipped Cream: Light, fluffy whipped cream adds a touch of elegance and pairs beautifully with the rich chocolate chips. It makes every bite feel festive!

  • Caramel Sauce: A drizzle of warm caramel brings a rich, buttery sweetness, enhancing the pumpkin flavor of the cake. Serve it on the side for dipping!

  • Autumn Salad: A tangy autumn salad with nuts, apples, and a light vinaigrette refreshes the palate while adding a beautiful crunch to your dessert spread.

  • Spiced Cider: Warm spiced cider creates a cozy atmosphere and complements the fall flavors, reinforcing the seasonal theme on your dessert table.

  • Pumpkin Spice Latte: For a warm drink that’s synonymous with fall, serve up pumpkin spice lattes to delight your guests and keep those autumn vibes flowing.

  • Chocolate-covered Pretzels: The salty crunch of chocolate-covered pretzels provides an addictive and fun texture that pairs wonderfully with the chewy cookie cake.

Perfectly balancing sweet and savory, these pairings will make your Halloween celebration memorable!

Make Ahead Options

These Easy Halloween Pumpkin Cookie Cakes are perfect for busy home cooks looking to save time! You can prepare the cookie cake dough up to 24 hours in advance by mixing all the wet and dry ingredients together, then cover and refrigerate it. When you’re ready to bake, simply let the dough sit at room temperature for about 30 minutes before pressing it into the pan and baking it. Alternatively, you can bake the cookie cake a day ahead, cool it completely, and store it unfrosted in an airtight container for up to 3 days. Just frost it with the orange frosting before serving to keep that delightful chewy texture intact—this ensures your Halloween Pumpkin Cookie Cake is just as delicious as if freshly made!

How to Store and Freeze Halloween Pumpkin Cookie Cake

  • Room Temperature: Keep the cookie cake in an airtight container at room temperature for up to 3 days to maintain its delightful texture and flavor.
  • Fridge: If you’re using cream cheese in your frosting, store the decorated cake in the fridge. It will stay fresh for about 5 days.
  • Freezer: Wrap the unfrosted cookie cake tightly in plastic wrap, then in aluminum foil, and freeze for up to 3 months. Thaw in the fridge overnight before frosting.
  • Reheating: To enjoy your Halloween Pumpkin Cookie Cake warm, microwave individual slices for about 10-15 seconds, just until warm and chewy—perfect for those cozy fall nights!

Halloween Pumpkin Cookie Cake Variations

Feel free to unleash your creativity and explore these delightful twists on the Halloween Pumpkin Cookie Cake!

  • Gluten-Free: Substitute all-purpose flour with gluten-free flour for a similar texture without sacrificing flavor. It’s perfect for friends with dietary needs.

  • Nutty Twist: For a delightful nutty flavor, swap all-purpose flour with almond flour. This adds a richer taste that pairs beautifully with the sweetness of chocolate.

  • Seasonal Spice: Add 1 teaspoon of pumpkin pie spice or a dash of cinnamon to the batter for that warm autumn flavor. It gives every bite an inviting warmth.

  • White Chocolate Fun: Replace semi-sweet chocolate chips with white chocolate chips for a sweeter option. The contrast of colors is a beautiful addition to your Halloween spread.

  • Colorful Decor: Use different colors of frosting or candies to create a rainbow of spooky faces. It’s a fun way to get kids involved while decorating!

  • Pumpkin Puree: Mix in ½ cup of pumpkin puree into your batter for added moisture and a hint of pumpkin flavor. It’s a perfect seasonal touch that enhances the festive theme.

  • Peanut Butter Swirl: Swirl in some creamy or chunky peanut butter into the batter before baking. The blend of flavors is a delightful surprise in every slice.

  • Extra Crunch: Add chopped nuts or toasted coconut for a crunchy texture. It provides a delightful contrast to the soft chewiness of the cookie cake.

If you’re looking for more festive ideas, don’t miss out on other sweet treats like the charming Sky Jelly Cake or the indulgent Blueberry and Cream Cheese Cake! Enjoy experimenting in the kitchen!

Halloween Pumpkin Cookie Cake Recipe FAQs

How do I choose ripe ingredients for my Halloween Pumpkin Cookie Cake?
Absolutely! For the best results, ensure your unsalted butter is fresh and at room temperature for easy mixing. The egg should also be at room temperature for better incorporation into the batter. When selecting sugars, check for any lumps or moisture, particularly in brown sugar, as this affects texture. Using high-quality semi-sweet chocolate chips will enhance the flavor of your cookie cake.

How should I store my Halloween Pumpkin Cookie Cake?
Very well! To keep your cookie cake fresh, store it in an airtight container at room temperature for up to 3 days. If you’ve frosted it with cream cheese, it’s best to refrigerate, where it can last about 5 days. Just be sure to cover it well to avoid drying out.

Can I freeze my Halloween Pumpkin Cookie Cake?
Absolutely! To freeze, wrap the unfrosted cookie cake tightly in plastic wrap followed by aluminum foil. This will keep it fresh for up to 3 months. When you’re ready to enjoy it, simply thaw it in the fridge overnight. If you want to enjoy it warm, microwave individual slices for about 10-15 seconds.

What should I do if my cookie cake turns out too dry?
No worries! If you find your cookie cake on the dry side, it may have been overbaked. For next time, keep a close eye on the baking time; pulling it out when it’s just golden on the edges will yield a perfectly chewy cake. If using gluten-free flour, some blends may absorb more moisture, so you might want to add an extra tablespoon of liquid next time to enhance the texture.

Are there any dietary considerations I should know?
Definitely! This Halloween Pumpkin Cookie Cake is adaptable for various dietary needs. For a gluten-free version, simply substitute the all-purpose flour with a gluten-free blend that measures 1:1. If you’re concerned about allergies, be mindful of the chocolate chips, as they may contain allergens like soy or dairy. Always double-check labels, especially if serving to guests with dietary restrictions.

Can I decorate my cookie cake differently to suit different occasions?
The more, the merrier! While M&M’s give a cute Halloween face, you can easily switch things up. For a Thanksgiving feel, consider using pecans or caramel drizzle instead of traditional decorations. Adding seasonal sprinkles or colorful candies can also make it versatile for various festivities throughout the year!

Halloween Pumpkin Cookie Cake

Halloween Pumpkin Cookie Cake: A Chewy, Festive Delight

Delight in this Halloween Pumpkin Cookie Cake, a chewy, festive dessert perfect for gatherings and dietary preferences.
Prep Time 20 minutes
Cook Time 14 minutes
Cooling Time 10 minutes
Total Time 44 minutes
Servings: 12 slices
Course: Dessert
Cuisine: American
Calories: 250

Ingredients
  

For the Cookie Cake
  • ½ cup Unsalted Butter Melted beforehand for best results.
  • ¼ cup Granulated Sugar
  • ½ cup Light Brown Sugar Contributes moisture and flavor.
  • 1 Large Egg Acts as a binding agent.
  • 1 ½ teaspoons Vanilla Extract
  • ½ teaspoon Baking Soda
  • ¼ teaspoon Baking Powder
  • ¼ teaspoon Salt
  • 1 ½ cups All-Purpose Flour Substitute with gluten-free flour for gluten-free option.
  • 1 cup Semi-Sweet Chocolate Chips Chop half for batter, leave the rest whole.
For the Orange Frosting
  • ½ cup Unsalted Butter Softened.
  • 1 ½ cups Powdered Sugar
  • 1 ½ teaspoons Vanilla Extract
  • 2-4 tablespoons Milk Adjust consistency to preference.
  • 10 drops Wilton Orange Food Coloring For festive hue.
For Decoration
  • M&M’s or Chocolate Chips Use for decorating the cake.

Equipment

  • mixing bowl
  • whisk or electric mixer
  • spatula
  • cookie cake pan
  • Wire rack

Method
 

Bake the Cake
  1. Preheat your oven to 350°F (175°C). Melt the unsalted butter.
  2. Mix melted butter with granulated sugar and light brown sugar until creamy.
  3. Add the egg and vanilla extract, mix until smooth.
  4. Sprinkle baking soda, baking powder, and salt; stir gently. Gradually add flour until just combined.
  5. Fold in half of the chocolate chips. Prepare the cake pan.
  6. Press dough into the pan and bake for 12-14 minutes.
  7. Cool on a wire rack for 10 minutes before removing from the pan.
Make and Apply Frosting
  1. Beat softened butter until creamy. Gradually mix in powdered sugar, then add vanilla and milk to adjust consistency.
  2. Incorporate food coloring until achieving desired hue.
  3. Frost the cooled cookie cake evenly.
Decorate
  1. Decorate with reserved M&M’s or chocolate chips to create a pumpkin face.

Notes

Ensure the cake cools completely before frosting to prevent melting.

Delicious Caramel Apple Witch Broomsticks for Easy Halloween Fun

As Halloween approaches, I can’t help but reminisce about the craft projects that filled my childhood with joy and sticky fingers. It’s that same whimsical spirit that inspired these delightful Caramel Apple Witch Broomsticks. This no-bake treat is perfect for parties or a fun night in, combining the crunch of tart apples with the sweet indulgence of gooey caramel and rich chocolate. Not only are these broomsticks visually striking, but they’re also incredibly easy to whip up in just minutes using the microwave. You can customize them to suit your personal taste or décor! Ready to cast a delicious spell in your kitchen? Let’s create some enchanting treats together!

Why Are These Broomsticks So Fun?

Whimsical Delight: These Caramel Apple Witch Broomsticks are a playful twist on a classic treat, bringing a charming Halloween vibe to any gathering.

No-Bake Simplicity: With no baking required, you can make these in minutes, making them a perfect last-minute addition to your holiday celebrations.

Customizable Treats: Get creative with your decorating! Swap in different chocolate types or even use colored melts to match your party theme, just like in my Crisp Cabbage Apple recipe.

Kid-Friendly Fun: These broomsticks are not only delicious but also safe for kids to help create, adding a fun and interactive element to your Halloween festivities.

Crowd-Pleasing Appeal: The combination of crunchy apples and caramel is sure to enchant guests of all ages, making them the highlight of any Halloween event.

Get ready to enchant your guests with these unique treats that bring a smile to every face!

Caramel Apple Witch Broomsticks Ingredients

For the Broomsticks

  • Mini Apples – Choose varieties like Rockit or Cosmic Crisps for the perfect balance of tartness and crunch.
  • Kraft Caramels – These provide the classic chewy coating; feel free to substitute with any similar caramel brand.
  • Milk Chocolate Chips – Ideal for piping broomstick “bristles,” but consider using dark chocolate or colored candy melts for a fun twist.

For Melting

  • Water – Essential for achieving smooth and creamy melted caramels; no substitutes needed.

For Decorating

  • Fondant (Purple, Yellow, or Orange) – Optional for adding a decorative touch to your broomsticks; icing or melted chocolate also works as a substitute.

Each of these ingredients plays a crucial role in creating your Caramel Apple Witch Broomsticks, making them a delightful centerpiece for your Halloween festivities!

Step‑by‑Step Instructions for Caramel Apple Witch Broomsticks

Step 1: Prepare the Apples
Wash and dry your mini apples thoroughly, ensuring they are clean and free from any wax. Carefully remove the stems, making it easier to insert twigs later. Choose firm, crisp apples like Rockit or Cosmic Crisps for the best balance of tartness and crunch in your Caramel Apple Witch Broomsticks.

Step 2: Insert the Sticks
Take small twigs or sticks and push them firmly into the center of each apple, creating a sturdy handle. Ensure the twigs are secure and protrude about 2-3 inches above the apples for an authentic broomstick appearance. This step is essential for the whimsical presentation of your Halloween treats.

Step 3: Melt the Caramels
In a microwave-safe bowl, combine the unwrapped Kraft caramels with a tablespoon of water. Microwave the mixture in 1-minute intervals, stirring in between, until completely melted and smooth, which will take about 2 minutes total. This gooey caramel will coat your apples beautifully.

Step 4: Dip the Apples
Once the caramels are melted, dip each apple into the molten caramel, making sure to coat them evenly. Hold the apple upside down to let any excess caramel drip off before placing it on a parchment-lined baking sheet. The glossy finish of the caramel will create the perfect outer layer for your Caramel Apple Witch Broomsticks.

Step 5: Allow to Set
Let the caramel coat cool and harden for about 10 minutes at room temperature. For quicker results, place the baking sheet in the freezer for 5-10 minutes. This will ensure that your caramel hardens more quickly, creating a satisfying crunch when bitten into.

Step 6: Melt the Chocolate
While the apples set, melt the milk chocolate chips in a microwave-safe bowl. Heat in 30-second intervals, stirring until the chocolate is smooth and fully melted. This chocolate will be used for piping broomstick “bristles” and adding decorative touches to your Caramel Apple Witch Broomsticks.

Step 7: Pipe the Bristles
Transfer the melted chocolate to a piping bag or a plastic zip-top bag with the corner snipped. Pipe the melted chocolate onto the top of each apple in a broomstick bristle design, creating intricate patterns that resemble broom bristles. Get creative and have fun with this decorating step!

Step 8: Decorate with Fondant
If you’re using fondant for extra flair, take small pieces of colored fondant and wrap them around the top where the apple meets the stick. This decoration will enhance the whimsical appearance of your Caramel Apple Witch Broomsticks. Allow any decorations to set at room temperature for a few minutes before serving.

Step 9: Serve and Enjoy
Once the decorations have set, your Caramel Apple Witch Broomsticks are ready to delight your guests! Serve them as a striking centerpiece at your Halloween gatherings. These no-bake treats are not only visually appealing but also incredibly tasty, charming everyone who takes a bite.

Make Ahead Options

These Caramel Apple Witch Broomsticks are perfect for busy home cooks looking to save time! You can prepare the mini apples with twigs inserted up to 24 hours in advance—just refrigerate them to maintain freshness. The caramel can also be melted ahead of time and stored in an airtight container in the refrigerator for up to 3 days. When you’re ready to finish, simply reheat the caramel gently in the microwave to restore its smooth consistency. Coat the apples just before serving to ensure the caramel stays sticky and delicious. With these make-ahead tips, you’ll have delightful treats ready to cast a spell on your Halloween gatherings with minimal last-minute effort!

Expert Tips for Caramel Apple Witch Broomsticks

  • Smooth Caramel: Ensure the caramel mixture is completely smooth before dipping to prevent clumping; this helps with an even coating on your broomsticks.
  • Narrow Bowl Trick: Use a narrow bowl for melting caramel, making it easier to dip the apples fully without wasting any caramel.
  • Chill for Crispy Coating: Don’t skip the chilling step! Allow the caramel to harden in the fridge or freezer for a perfectly crunchy finish on your Caramel Apple Witch Broomsticks.
  • Decorative Variations: Get creative! Use different colored chocolates or sprinkles to customize your broomsticks for various themes or guests’ preferences.
  • Kid-Friendly Activity: Invite children to help with decorating the broomsticks, making it a delightful bonding activity during Halloween prep.

Storage Tips for Caramel Apple Witch Broomsticks

Airtight Container: Store your Caramel Apple Witch Broomsticks in an airtight container at room temperature to maintain their delicious crunch for up to 2 days.

Refrigeration: If you want to keep them a bit longer, you can refrigerate the broomsticks, but consume within 2 days for best flavor and texture.

Freezing: It’s not recommended to freeze these treats, as the caramel may become too hard and the apples could lose their crispness.

Reheating: If the caramel softens, let them sit at room temperature for a bit to regain their chewy texture before serving.

Caramel Apple Witch Broomsticks Variations

Feel free to sprinkle your own creativity into this recipe! These variations will make your caramel apple broomsticks even more delightful and unique.

  • Colorful Chocolates: Swap milk chocolate chips for white chocolate or colorful candy melts for a vibrant treat.
  • Fruity Twist: Try using mini candy-coated apples instead of real apples to amp up the fun flavor.
  • Pretzel Rod Handles: For a crunchier texture, replace the sticks with pretzel rods, providing a delightful twist to each bite.
  • Nuts Galore: Sprinkle chopped nuts or crushed candy on top of the caramel for added texture and flavor. This gives a nice earthy taste that complements the sweetness.
  • Flavored Caramels: Use flavored caramels, like sea salt or vanilla, for a twist that adds delicious variety to this whimsical treat!
  • Spooky Sprinkles: Make them even more festive by topping the chocolate with Halloween-themed sprinkles — think ghosts or bats over your bristles!
  • Darker Chocolate: Use dark chocolate for a richer depth of flavor, contrasting beautifully with the sweetness of the caramel.
  • Chocolate-Covered Strawberries: Instead of apples, dip strawberries in caramel and decorate them like broomsticks for a fruitier explosion of flavor reminiscent of a fall harvest.

Let your imagination run wild with these charming alternatives, and consult these delightful inspirations like the Crisp Cabbage Apple or Easy Yummy Apple Pie to keep the festive treats growing!

What to Serve with No Bake Caramel Apple Witch Broomsticks

As Halloween festivities fill the air with excitement, pair your broomsticks with treats and sides that complement their sweet, sticky charm.

  • Spooky Cheese Platter: A selection of sharp cheeses balances the sweetness of the broomsticks, adding a savory touch that guests will love.

  • Pumpkin Spice Cupcakes: These moist, spiced desserts echo the flavors of fall, creating a delightful contrast to the chewy apples and caramel.

  • Crispy Corn Chips: The crunch of corn chips offers a satisfying texture and a salty contrast to the sweetness of your broomsticks.

  • Ghostly Fruit Salad: A medley of seasonal fruits like pomegranate, oranges, and cranberries brightens the table, providing a refreshing balance to sweet treats.

  • Mulled Apple Cider: Warm, spiced apple cider enhances the fall vibes and rounds out the indulgence of your Halloween gathering.

  • Chocolate Dipped Pretzels: Sweet and salty pretzels coated in chocolate echo the broomsticks’ flavors while adding a fun, crunchy element to your dessert spread.

  • Candy Corn Marshmallow Mix: This sweet and colorful combination captures the essence of Halloween and is perfect for topping off your spooky snack buffet.

Caramel Apple Witch Broomsticks Recipe FAQs

What type of apples work best for Caramel Apple Witch Broomsticks?
Absolutely! I recommend using mini varieties like Rockit or Cosmic Crisps for their perfect balance of tartness and crunch. Look for apples that are firm and free from dark spots or blemishes to ensure they hold up well when coated in caramel.

How should I store the Caramel Apple Witch Broomsticks?
To keep your delicious broomsticks fresh, store them in an airtight container at room temperature for up to 2 days. If you prefer to refrigerate them, enjoy them within the same timeframe for the best flavor and texture. Avoid freezing, as this can make the caramel too hard and affect the apples’ crispness.

Can I freeze the Caramel Apple Witch Broomsticks?
I don’t recommend freezing these treats, as the texture can change significantly. If you do end up with leftovers, it’s best to keep them in the fridge or at room temperature for a couple of days. If the caramel softens, just let them sit out for a bit to regain their chewiness.

What if my caramel is clumping while melting?
No worries! If your caramel mixture clumps, it might be too thick or heated too quickly. Try adding an extra splash of water to help it melt uniformly. Melt the caramels in 1-minute intervals, stirring between each to ensure an even consistency without burning.

Are these broomsticks safe for kids to eat?
Yes, indeed! The ingredients are kid-friendly, but always be cautious with children under three due to the potential choking hazard posed by whole apples, especially with the sticks involved. If allergies are a concern, ensure to check the labels on the caramels and chocolate for any common allergens.

Can I customize the decorations on my broomsticks?
Very! Get creative by using different types of chocolate or even colorful candy melts for an eye-catching twist. You can also add sprinkles or edible glitter for extra sparkle. Have fun with the decorating—there’s no right or wrong way to make your broomsticks uniquely yours!

Caramel Apple Witch Broomsticks

Delicious Caramel Apple Witch Broomsticks for Easy Halloween Fun

Magical and playful Caramel Apple Witch Broomsticks make for a whimsical Halloween treat that combines tart apples and sweet caramel.
Prep Time 10 minutes
Cook Time 2 minutes
Cooling Time 10 minutes
Total Time 22 minutes
Servings: 12 broomsticks
Course: Dessert
Cuisine: American
Calories: 150

Ingredients
  

For the Broomsticks
  • 12 mini Mini Apples Rockit or Cosmic Crisps recommended
  • 14 oz Kraft Caramels or any similar caramel brand
  • 1 cup Milk Chocolate Chips substitute with dark chocolate or colored candy melts if desired
For Melting
  • 1 tablespoon Water for melting caramels
For Decorating
  • Fondant (Purple, Yellow, or Orange) optional; icing or melted chocolate also works

Equipment

  • microwave-safe bowl
  • Piping bag

Method
 

Step‑by‑Step Instructions
  1. Wash and dry your mini apples thoroughly, ensuring they are clean and free from any wax. Remove the stems carefully.
  2. Take small twigs or sticks and insert them into the center of each apple to create handles.
  3. In a microwave-safe bowl, combine the unwrapped Kraft caramels and water. Microwave in 1-minute intervals until melted.
  4. Dip each apple into the melted caramel, ensuring an even coat, then place on a parchment-lined baking sheet.
  5. Let the caramel coat cool and harden for about 10 minutes, or chill in the freezer for quicker results.
  6. Melt the milk chocolate chips in a microwave-safe bowl, heating in 30-second intervals until smooth.
  7. Transfer the melted chocolate to a piping bag and pipe bristle designs on each apple.
  8. If using fondant, wrap small pieces around where the apple meets the stick for decoration.
  9. Serve once decorations have set, and enjoy your enchanting treats!

Notes

Store in an airtight container at room temperature for up to 2 days for best flavor and crunch.

Hawaiian Butter Mochi with Ube: A Chewy Tropical Treat

One bite of Hawaiian Butter Mochi with Ube takes me straight to a sun-soaked island paradise, where the waves gently kiss the shore. This gluten-free dessert is not just a treat; it’s a tropical adventure wrapped in chewy bliss. The combination of sweet rice flour and rich ube creates a texture that’s delightfully soft and satisfying, making it the perfect dessert for any occasion. Plus, it’s incredibly easy and quick to whip up, so you can impress your friends and family without spending hours in the kitchen. Whether you’re seeking a comforting night in or a standout dish for your next potluck, this Hawaiian Butter Mochi is sure to elevate your dessert game. Are you ready to dive into this vibrant experience?

Why is Hawaiian Butter Mochi Irresistible?

Chewy Texture: The signature soft and chewy texture of Hawaiian Butter Mochi with Ube is simply addictive, leaving you wanting more with each bite.

Tropical Flavor: Bursting with the rich, sweet flavor of ube, this delightful dessert takes you on a tropical vacation without leaving your kitchen.

Quick and Easy: With minimal prep time, you can whip up this gluten-free treat easily, even on a busy weeknight.

Crowd-Pleaser: Perfect for gatherings, potlucks, or simply indulging at home, this dessert is sure to impress your friends and family.

Versatile Pairings: Serve it warm or at room temperature, and consider pairing it with a scoop of ice cream or fresh fruit for a refreshing contrast. Check out our Garlic Butter French fries for a savory side!

Hawaiian Butter Mochi Ingredients

• Unlock the secrets to this delightful dessert with these essential ingredients.

For the Mochi Base

  • Sweet Rice Flour (Mochi Flour) – Essential for that signature chewy texture; no substitutions recommended.
  • Granulated Sugar – Adds the perfect amount of sweetness; try coconut sugar for a richer flavor.
  • Baking Powder – Aids in leavening for that light and tender texture; make sure it’s fresh!
  • Salt – Enhances the overall flavor; fine sea salt works best for even mixing.

For the Creaminess

  • Coconut Milk – Brings a wonderful tropical flair; substitute with almond or full-fat dairy milk if needed.
  • Whole Milk – Adds moisture and richness; feel free to use any milk, dairy or non-dairy.
  • Unsalted Butter (Melted) – Infuses richness and buttery flavor; coconut oil is a great dairy-free option.

For Flavor and Color

  • Ube Puree or Extract – Provides that nostalgic ube flavor and beautiful color; sweet potato puree or matcha can also work well.
  • Eggs – Essential for structure and moisture; for a vegan twist, try flax eggs or aquafaba.
  • Vanilla Extract – Enhances the overall taste; swap for almond extract to change things up.

Now that you have all the ingredients lined up, you’re just a few steps away from enjoying this Hawaiin Butter Mochi with Ube! Prepare for a flavor experience that truly transports you to paradise.

Step‑by‑Step Instructions for Hawaiian Butter Mochi with Ube

Step 1: Preheat Your Oven
Begin by preheating your oven to 350°F (175°C). While the oven heats, prepare a 9×13 inch baking dish by greasing it with a little butter or cooking spray to ensure easy removal of the mochi later. This is a crucial step to achieve the perfect texture for your Hawaiian Butter Mochi with Ube.

Step 2: Mix Dry Ingredients
In a large mixing bowl, whisk together 2 cups of sweet rice flour, 1 cup of granulated sugar, 1 tablespoon of baking powder, and a pinch of salt until well combined. This ensures even distribution of the leavening agent and eliminates clumps. The mixture should be light and fluffy, setting a solid base for your mochi.

Step 3: Combine Wet Ingredients
In a separate bowl, pour in 1 cup of coconut milk, followed by 1 cup of whole milk, and ½ cup of melted unsalted butter. To this, add 1 cup of ube puree or extract, 2 large eggs, and 1 teaspoon of vanilla extract. Stir these wet ingredients together until the mixture is smooth and creamy, free of lumps, which will contribute to the creamy texture of the Hawaiian Butter Mochi.

Step 4: Incorporate Dry with Wet Ingredients
Slowly add the wet mixture to the bowl with the dry ingredients. Gently fold the two together until just combined; be cautious not to overmix, as that can affect the chewy texture of your Hawaiian Butter Mochi with Ube. A few small lumps are perfectly fine—this is the key to achieving that delightful chewiness.

Step 5: Pour and Spread the Batter
Carefully pour the mochi batter into the greased baking dish, using a spatula to spread it evenly. This ensures uniform baking and a beautifully cooked top once it emerges from the oven. At this point, you’ll start to see the rich color of the ube beginning to shine through—such a treat for the eyes!

Step 6: Bake to Perfection
Place the baking dish in your preheated oven and bake for 45-50 minutes. You’ll know it’s done when the top turns a lovely golden brown and a toothpick inserted in the center comes out clean. The aroma that fills your kitchen during baking is simply irresistible, heralding the delicious Hawaiian Butter Mochi with Ube that awaits.

Step 7: Cool and Slice
Once baked, remove the dish from the oven and let it cool in the pan for about 10 minutes. This cooling step is essential for easier slicing. Afterward, cut the mochi into squares or rectangles, and let them cool further if you prefer. Serving them warm or at room temperature enhances that delightful chewy texture, making every bite a blissful experience.

Make Ahead Options

These Hawaiian Butter Mochi with Ube are perfect for busy weeknights or gatherings! You can prepare the batter up to 24 hours in advance by mixing the dry and wet ingredients separately, then combining them just before baking. Store the mixed batter in the refrigerator, ensuring it’s covered tightly to maintain moisture and prevent any drying out. Alternatively, you can bake the mochi and allow it to cool completely, then store it in an airtight container for 3-4 days at room temperature or up to a week in the fridge. When ready to serve, slice into squares and enjoy them warm or at room temperature for that irresistible chewy texture, just as delicious as when freshly baked!

How to Store and Freeze Hawaiian Butter Mochi with Ube

Room Temperature: Store in an airtight container for up to 3-4 days to keep the Hawaiian Butter Mochi moist and chewy.

Fridge: For longer freshness, refrigerate the mochi in a sealed container for up to a week; it may firm up slightly but can be revived with gentle reheating.

Freezer: Wrap cut squares tightly in plastic wrap and freeze for up to three months. To enjoy them again, simply thaw at room temperature before serving.

Reheating: To bring back that delightful chewiness, warm individual pieces in the microwave for 10-15 seconds or until just warmed through.

What to Serve with Hawaiian Butter Mochi with Ube

Indulging in Hawaiian Butter Mochi with Ube opens the door to a world of exquisite pairings that can elevate this tropical delight into a truly unforgettable meal.

  • Coconut Ice Cream: The creamy sweetness of coconut ice cream offers a delightful contrast to the chewy texture of the mochi, creating a blissful bite every time.

  • Fresh Tropical Fruits: Sliced mango, pineapple, and berries add a refreshing burst of flavor, enhancing the tropical experience and balancing the richness of the dessert.

  • Matcha Tea: The earthy bitterness of matcha provides a perfect counterpoint to the sweetness of the mochi, making each sip a pleasant complement to your dessert.

  • Chocolate Drizzle: A light drizzle of melted dark chocolate adds decadence, harmonizing beautifully with the ube’s natural sweetness for a richer flavor profile.

  • Toasted Coconut Flakes: Sprinkle toasted coconut on top for added crunch and a hint of nuttiness that pairs wonderfully with the tropical notes of the mochi.

  • Fruit-Dipped Yogurt: Serve small bowls of Greek yogurt topped with honey and fresh fruit for a tangy contrast that enhances the overall dessert experience.

  • Lemonade or Iced Tea: These refreshing beverages provide a delightful zest and balance, cutting through the richness of the mochi for a refreshing palate cleanser.

  • Chocolate-Covered Almonds: Their crunchy texture and nutty flavor add an exciting element, enhancing the overall experience with each tasty bite alongside the mochi.

  • Espresso or Coffee: The robust flavors of coffee provide a cozy companion, making this combo a perfect option for a cozy dessert moment after dinner.

Expert Tips for Hawaiian Butter Mochi

Mixing Method: Avoid Overmixing: Stir the batter until just combined; a few lumps will ensure the perfect chewy texture in your Hawaiian Butter Mochi with Ube.

Oven Watch: Keep an Eye on Baking: Baking times may vary; watch for a golden brown top and perform a toothpick test for doneness.

Flavor Boost: Spice It Up: For added richness, consider incorporating a pinch of cinnamon or nutmeg into the batter for a delightful twist.

Ingredient Freshness: Use Fresh Ingredients: Ensure your baking powder is fresh to achieve optimal leavening for light and tender mochi.

Cool Down: Be Patient: Allow the mochi to cool in the pan for about 10 minutes before slicing for easier handling and an improved texture.

Hawaiian Butter Mochi with Ube Variations

Feel free to unleash your creativity in the kitchen by customizing this already delightful dessert in ways that excite your taste buds.

  • Coconut Sugar: Swap granulated sugar for coconut sugar to enhance the flavor with deeper caramel notes that beautifully complement the ube.

  • Almond Milk: If you prefer a nutty twist, substitute coconut milk with almond milk for a different yet deliciously creamy base.

  • Dairy-Free Version: Replace the unsalted butter with coconut oil for a fully dairy-free dessert that still retains that rich taste.

  • Matcha Variance: Use matcha powder instead of ube for a vibrant green version that adds earthy notes while still being irresistibly chewy.

  • Flavor Extracts: Experiment with different extracts like almond, coconut, or even hazelnut to elevate the flavors and create a unique sensation.

  • Nutty Crunch: Top with chopped nuts or shredded coconut before baking to introduce a delightful crunchy texture against the chewy base.

  • Chili Powder: For those who enjoy a twist of heat, try adding a sprinkle of chili powder into the batter for a surprising kick that balances well with the sweetness.

  • Fresh Fruits: Serve with a side of tropical fruits like mango or pineapple to add a fresh burst of flavor and enhance the island vibes of this dish.

Each variation can take your Hawaiian Butter Mochi with Ube to new heights, making it even more memorable for your family or guests. And if you’re in the mood for savory, consider pairing it with some delightful Garlic Butter French fries or a refreshing Cucumber Salad with a Twist. Happy cooking!

Hawaiian Butter Mochi with Ube Recipe FAQs

What type of sweet rice flour should I use?
Absolutely, for making Hawaiian Butter Mochi with Ube, you need to use sweet rice flour, also known as mochi flour. This ingredient is essential as it gives the mochi its signature chewy texture. Avoid using regular rice flour, as it will not provide the same results.

How should I store leftover Hawaiian Butter Mochi?
To keep your Hawaiian Butter Mochi delicious and moist, store it in an airtight container at room temperature for 3-4 days. If you want to extend its shelf life, place it in the fridge for up to a week. Just note that the mochi may firm up a little, but you can easily bring back its delightful texture with gentle reheating.

Can I freeze Hawaiian Butter Mochi?
Absolutely! You can freeze your cut squares of Hawaiian Butter Mochi with Ube. Just wrap them tightly in plastic wrap to prevent freezer burn and store them in a freezer-safe bag for up to three months. When you’re ready to enjoy them, simply thaw at room temperature or pop them in the microwave for 10-15 seconds for that soft, chewy goodness once again.

How can I troubleshoot if my mochi didn’t turn out well?
If your Hawaiian Butter Mochi is too dense or hasn’t baked properly, the problem might be in the mixing process or baking time. Ensure you mixed the batter just until combined; overmixing can lead to a tougher texture. Additionally, keep an eye on your baking time, as ovens can vary. If necessary, do the toothpick test to check doneness.

Is Hawaiian Butter Mochi suitable for people with allergies?
Make sure to check all labels and ingredients for allergies, especially if you’re serving guests. While Hawaiian Butter Mochi is generally gluten-free (thanks to sweet rice flour), it does contain eggs and dairy. For a vegan option, you can use flax eggs and coconut oil instead of butter. Always communicate with your guests to ensure their dietary needs are met!

What is the best way to serve Hawaiian Butter Mochi?
For the ultimate enjoyment, serve the Hawaiian Butter Mochi either warm or at room temperature. You can enhance its tropical flavor by pairing it with a scoop of vanilla ice cream or a drizzle of coconut cream. Feel free to get creative with toppings, such as toasted coconut or fresh fruits, to elevate this delightful dessert even further!

Hawaiian Butter Mochi with Ube

Hawaiian Butter Mochi with Ube: A Chewy Tropical Treat

Hawaiian Butter Mochi with Ube is a delightful gluten-free dessert that transports you to a tropical paradise with its chewy texture and rich ube flavor.
Prep Time 15 minutes
Cook Time 50 minutes
Cooling Time 10 minutes
Total Time 1 hour 15 minutes
Servings: 12 slices
Course: Dessert
Cuisine: Hawaiian
Calories: 160

Ingredients
  

For the Mochi Base
  • 2 cups Sweet Rice Flour (Mochi Flour) Essential for that signature chewy texture; no substitutions recommended.
  • 1 cup Granulated Sugar Adds the perfect amount of sweetness; try coconut sugar for a richer flavor.
  • 1 tablespoon Baking Powder Aids in leavening for that light and tender texture; make sure it's fresh!
  • 1 pinch Salt Enhances the overall flavor; fine sea salt works best for even mixing.
For the Creaminess
  • 1 cup Coconut Milk Brings a wonderful tropical flair; substitute with almond or full-fat dairy milk if needed.
  • 1 cup Whole Milk Adds moisture and richness; feel free to use any milk, dairy or non-dairy.
  • ½ cup Unsalted Butter (Melted) Infuses richness and buttery flavor; coconut oil is a great dairy-free option.
For Flavor and Color
  • 1 cup Ube Puree or Extract Provides that nostalgic ube flavor and beautiful color; sweet potato puree or matcha can also work well.
  • 2 large Eggs Essential for structure and moisture; for a vegan twist, try flax eggs or aquafaba.
  • 1 teaspoon Vanilla Extract Enhances the overall taste; swap for almond extract to change things up.

Equipment

  • 9x13-inch baking dish
  • mixing bowls
  • whisk
  • spatula

Method
 

Step-by-Step Instructions for Hawaiian Butter Mochi with Ube
  1. Preheat your oven to 350°F (175°C) and prepare a 9x13 inch baking dish by greasing it with butter or cooking spray.
  2. In a large mixing bowl, whisk together sweet rice flour, granulated sugar, baking powder, and salt until well combined.
  3. In a separate bowl, combine coconut milk, whole milk, melted unsalted butter, ube puree, eggs, and vanilla extract. Stir until smooth.
  4. Slowly add the wet mixture to the dry ingredients and gently fold until just combined.
  5. Carefully pour the mochi batter into the greased baking dish, spreading it evenly.
  6. Bake in the preheated oven for 45-50 minutes until the top is golden brown and a toothpick comes out clean.
  7. Allow the mochi to cool in the pan for about 10 minutes, then slice into squares or rectangles.

Notes

This Hawaiian Butter Mochi with Ube can be served warm or at room temperature for the best texture. Consider pairing it with ice cream or fresh fruit for an extra treat.

Creamy Coconut Cream Pie Dip: No-Bake Summer Bliss

The sun-drenched afternoons of summer have a way of sparking cravings for something light and indulgent. That’s where my No-Bake Coconut Cream Pie Dip comes into play—a quick and sweet summer treat that will have everyone returning for more. With only six easy-peasy ingredients and a prep time of just ten minutes, this delightful dip captures the essence of a classic dessert without the fuss of an oven. It’s creamy, rich, and gluten-free, making it an all-around crowd-pleaser for your next gathering. Whether you’re lounging by the pool or hosting a backyard barbeque, this dip is the perfect complement to warm weather fun. So, are you ready to dive into a refreshing tropical twist that promises to brighten your day?

Why is this dip the ultimate summer treat?

Quick and Easy: With just six ingredients and a prep time of 10 minutes, this Coconut Cream Pie Dip is effortlessly assembled. Irresistible Coconut Flavor: The sweetened coconut flakes and creamy pudding blend together beautifully, delivering a tropical taste that transports you straight to the beach. No Baking Required: Say goodbye to heating the oven; this dip is perfect for those hot summer days. Crowd-Pleasing Delight: Whether served with graham crackers, Nilla Wafers, or fresh banana slices, it’s a versatile treat that will have guests coming back for seconds—and thirds! So, if you’re enjoying summer gatherings, you might also love making the Cream Puffs Vanilla or a refreshing Blueberry Cream Cheese.

Coconut Cream Pie Dip Ingredients

• Get ready for a sweet treat!

For the Dip

  • Instant Coconut Cream Jell-O Pudding – Provides the base flavor and sweetness; if coconut is unavailable, you can use vanilla pudding as a substitute.
  • Whole Milk – Activates the pudding mix for a creamy texture; for a dairy-free option, consider swapping with coconut milk.
  • Cream Cheese (softened) – Adds richness and stability to the dip; ensure it’s softened for easy mixing; you can also replace it with dairy-free cream cheese for a vegan version.
  • Powdered Sugar – Sweetens the dip and gives it a smooth texture; feel free to adjust the amount based on your preference for sweetness.
  • Cool Whip (thawed) – Provides lightness and a whipped texture; if you prefer, use homemade whipped cream for an extra touch.
  • Sweetened Coconut Flakes – Enhances the coconut flavor and adds chewiness; for extra texture, consider using toasted coconut flakes as a topping.

For Serving

  • Graham Crackers, Nilla Wafers, or Banana Slices – These tasty dippers add a crunchy contrast and complete the experience of enjoying your Coconut Cream Pie Dip.

Step‑by‑Step Instructions for Coconut Cream Pie Dip

Step 1: Prepare Pudding
In a large mixing bowl, whisk together the instant coconut cream pudding mix and whole milk, blending for about 2 minutes until the mixture thickens into a creamy consistency. You’ll know it’s ready when it holds a thick shape and has a smooth texture that invites you to take a taste!

Step 2: Mix Cream Cheese
In a separate bowl, beat the softened cream cheese and powdered sugar together using an electric mixer on medium speed. Continue mixing for about 3-4 minutes until the mixture becomes light and fluffy. This mixture should be smooth without any lumps, creating a perfect base for your Coconut Cream Pie Dip.

Step 3: Combine Mixtures
Now it’s time to bring everything together! Gently fold the Cool Whip into your cream cheese mixture until well combined, ensuring to keep it light and airy. Next, add in the sweetened coconut flakes, folding them in to create a delightful texture and enhance the coconut flavor throughout your dip.

Step 4: Chill
Combine the thick pudding mixture with the folded Cool Whip mixture, stirring gently until everything is well integrated. Transfer the combined Coconut Cream Pie Dip into a serving bowl and cover it with plastic wrap. Chill in the refrigerator for at least 1-2 hours to allow the flavors to meld beautifully and the dip to firm up.

Step 5: Serve
Once chilled to perfection, it’s time to serve your Coconut Cream Pie Dip! Remove it from the refrigerator, and if desired, top with toasted coconut flakes for added flavor and crunch. Offer alongside graham crackers, Nilla Wafers, or fresh banana slices for a delightful dipping experience that will have everyone coming back for more!

Coconut Cream Pie Dip: Customization Ideas

Feel free to make this dip your own with these fun and exciting variations!

  • Dairy-Free: Use coconut milk and dairy-free cream cheese for a deliciously creamy, vegan-friendly option.
  • Pineapple Twist: Add crushed pineapple for a burst of tropical flavor that complements the coconut beautifully.
  • Nutty Aroma: A splash of almond extract will elevate your dip with a warm, inviting scent and flavor.
  • Fruit Fusion: Top with fresh strawberries or mango for a delightful fruit contrast to the richness of the dip.
  • Chocolate Surprise: Stir in chocolate chips for an indulgent twist that adds a delightful crunch, delivering a yummy surprise in every bite.
  • Toasty Texture: For an added crunch, sprinkle toasted coconut flakes on top before serving to enhance both texture and flavor.
  • Sweetness Control: Adjust the powdered sugar based on your sweetness preference; go easy for a more refreshing bite!
  • Inspire More Dippers: Serve with pretzels for a sweet-salty compromise, or try it with your favorite cookies for an extra special treat.

If you’re in the mood for something else, indulge in delightful Cream Puffs Vanilla or try a light Milky Coconut Cheese alongside your dip!

Expert Tips for Coconut Cream Pie Dip

  • Softened Cream Cheese: Make sure your cream cheese is at room temperature to avoid lumps in your dip for a silky texture.
  • Chill Time: Allow the dip to chill for at least 1-2 hours; this step is crucial for letting flavors meld and achieving the right consistency.
  • Ingredient Quality: Use high-quality ingredients like fresh Cool Whip and sweetened coconut flakes to enhance the richness of your Coconut Cream Pie Dip.
  • Taste Test: Adjust the powdered sugar according to your sweetness preference; a little tasting during preparation can make all the difference!
  • Serving Options: Feel free to get creative with dippers! Fresh fruits, cookies, or even pretzels can elevate your dip experience.

What to Serve with Coconut Cream Pie Dip

Elevate your summer gatherings with delightful pairings that enhance the creamy richness of this luscious dip.

  • Graham Crackers: These classic dippers provide a crunchy contrast, complementing the dip’s smooth texture beautifully. Their subtle sweetness makes each bite even more enjoyable.

  • Nilla Wafers: Their light, buttery flavor perfectly matches the tropical essence of the dip, making every scoop a sweet adventure.

  • Fresh Banana Slices: The natural sweetness and creaminess of bananas add a fresh twist, making for a colorful and nutritious option that everyone will love.

  • Toasted Coconut Flakes: Sprinkle these on top for added crunch. Their toasty aroma intensifies the coconut flavor, turning this dip into a tropical delight.

  • Chocolate Chips: For a sweet surprise, serve with mini chocolate chips. Their rich flavor adds depth and a hint of decadence to your dipping experience.

  • Pineapple Chunks: Fresh pineapple brings a juicy, tangy sweetness that beautifully balances the creamy dip, enhancing the tropical vibes.

  • Sparkling Water: Serve with a refreshing sparkling water for a light drink option. Flavored varieties, like coconut or pineapple, harmonize beautifully with the dip.

  • Pineapple Coconut Smoothie: This fruity beverage creates a delightful pairing, echoing the flavors of the dip and enhancing the tropical experience at your gathering.

  • Chilled White Wine: A light, fruity white wine like Riesling or Sauvignon Blanc pairs perfectly with the dip’s sweetness, making for a sophisticated adult treat.

These pairings not only enhance the flavors of your Coconut Cream Pie Dip but also create an unforgettable summer feast.

Storage Tips for Coconut Cream Pie Dip

  • Fridge: Store any leftover Coconut Cream Pie Dip in an airtight container for up to 4 days. This keeps it fresh and creamy for your next indulgent snack!
  • Make-Ahead: Prep the dip a day in advance and chill it to let the flavors develop. Just keep it covered in the fridge until you’re ready to serve.
  • Avoid Freezing: It’s best not to freeze the dip. The texture may change upon thawing, which could affect that delightful creaminess you love.
  • Reheating: If you attempt to warm the dip, do so gently in the microwave at low power. However, it’s best enjoyed cold straight from the fridge!

Make Ahead Options

Preparing the Coconut Cream Pie Dip ahead of time is a fantastic way to save time and reduce stress during busy gatherings! You can mix the dip up to 24 hours in advance and store it in an airtight container in the refrigerator, which helps the flavors meld beautifully. To maintain its delightful texture, allow the dip to chill for at least 1-2 hours before serving. When you’re ready to enjoy it, simply give the dip a good stir, and if desired, top it with toasted coconut flakes to add a fresh crunch. This way, you’ll have a delicious dessert ready to impress your guests with minimal effort!

Coconut Cream Pie Dip Recipe FAQs

What type of pudding mix should I use for the dip?
You’ll want to use instant Coconut Cream Jell-O pudding mix for the best flavor and texture. If coconut isn’t available, vanilla pudding can be a delightful substitute. This flexibility ensures you can still enjoy a creamy dip, no matter what’s in your pantry.

How long can I store leftovers and how should I do it?
Absolutely! Store any leftover Coconut Cream Pie Dip in an airtight container in the refrigerator for up to 4 days. This method preserves its creamy texture, making it perfect for snacking later. Ensure it’s well-sealed to prevent it from absorbing other flavors in the fridge.

Can I freeze Coconut Cream Pie Dip?
It’s best not to freeze this dip as it may alter the desirable texture when thawed. If planning ahead, I suggest making it a day in advance and chilling it in the fridge, which allows the flavors to meld beautifully without sacrificing that creamy consistency.

What should I do if my dip is too runny?
If your Coconut Cream Pie Dip turns out runny, it might be due to not mixing the pudding thoroughly with the milk or insufficient chilling time. To remedy this, try chilling it for a longer duration (1-2 hours) until it firms up. If it’s still not thick enough, you can gently fold in more powdered sugar or a bit more cool whip to adjust the texture.

Are there any dietary considerations for this dip?
Yes, for those with dietary restrictions, the dip is gluten-free, and you can make it dairy-free by using coconut milk and dairy-free cream cheese. If you’re concerned about allergies, always check the labels on your ingredients, especially the Cool Whip and any dippers you choose, to ensure they’re safe for everyone.

Coconut Cream Pie Dip

Creamy Coconut Cream Pie Dip: No-Bake Summer Bliss

Indulge in this refreshing Coconut Cream Pie Dip, a quick and easy no-bake dessert perfect for summer gatherings.
Prep Time 10 minutes
Chilling Time 2 hours
Total Time 2 hours 10 minutes
Servings: 8 servings
Course: Dessert
Cuisine: American
Calories: 200

Ingredients
  

For the Dip
  • 1 box Instant Coconut Cream Jell-O Pudding if coconut is unavailable, substitute with vanilla pudding
  • 1 cup Whole Milk for a dairy-free option, swap with coconut milk
  • 8 oz Cream Cheese (softened) ensure it's softened for easy mixing; can use dairy-free cream cheese for a vegan version
  • 1 cup Powdered Sugar adjust amount based on preference for sweetness
  • 8 oz Cool Whip (thawed) or use homemade whipped cream for an extra touch
  • 1 cup Sweetened Coconut Flakes for extra texture, use toasted coconut flakes as a topping
For Serving
  • 1 package Graham Crackers
  • 1 package Nilla Wafers
  • 2 medium Banana Slices

Equipment

  • mixing bowl
  • electric mixer
  • whisk
  • plastic wrap

Method
 

Step-by-Step Instructions
  1. In a large mixing bowl, whisk together the instant coconut cream pudding mix and whole milk for about 2 minutes until thick and creamy.
  2. In a separate bowl, beat the softened cream cheese and powdered sugar with an electric mixer on medium speed for 3-4 minutes until light and fluffy.
  3. Gently fold the Cool Whip into the cream cheese mixture until combined, then fold in the sweetened coconut flakes.
  4. Combine the thick pudding mixture with the Cool Whip mixture, stirring gently. Transfer to a serving bowl, cover with plastic wrap, and chill in the refrigerator for at least 1-2 hours.
  5. Serve chilled, optionally topped with toasted coconut flakes, alongside graham crackers, Nilla Wafers, or banana slices.

Notes

Ensure cream cheese is at room temperature to avoid lumps. Taste test and adjust powdered sugar for preferred sweetness. Store leftovers in an airtight container for up to 4 days.