Delicious French Macarons: Your Easy Guide to Baking Joy

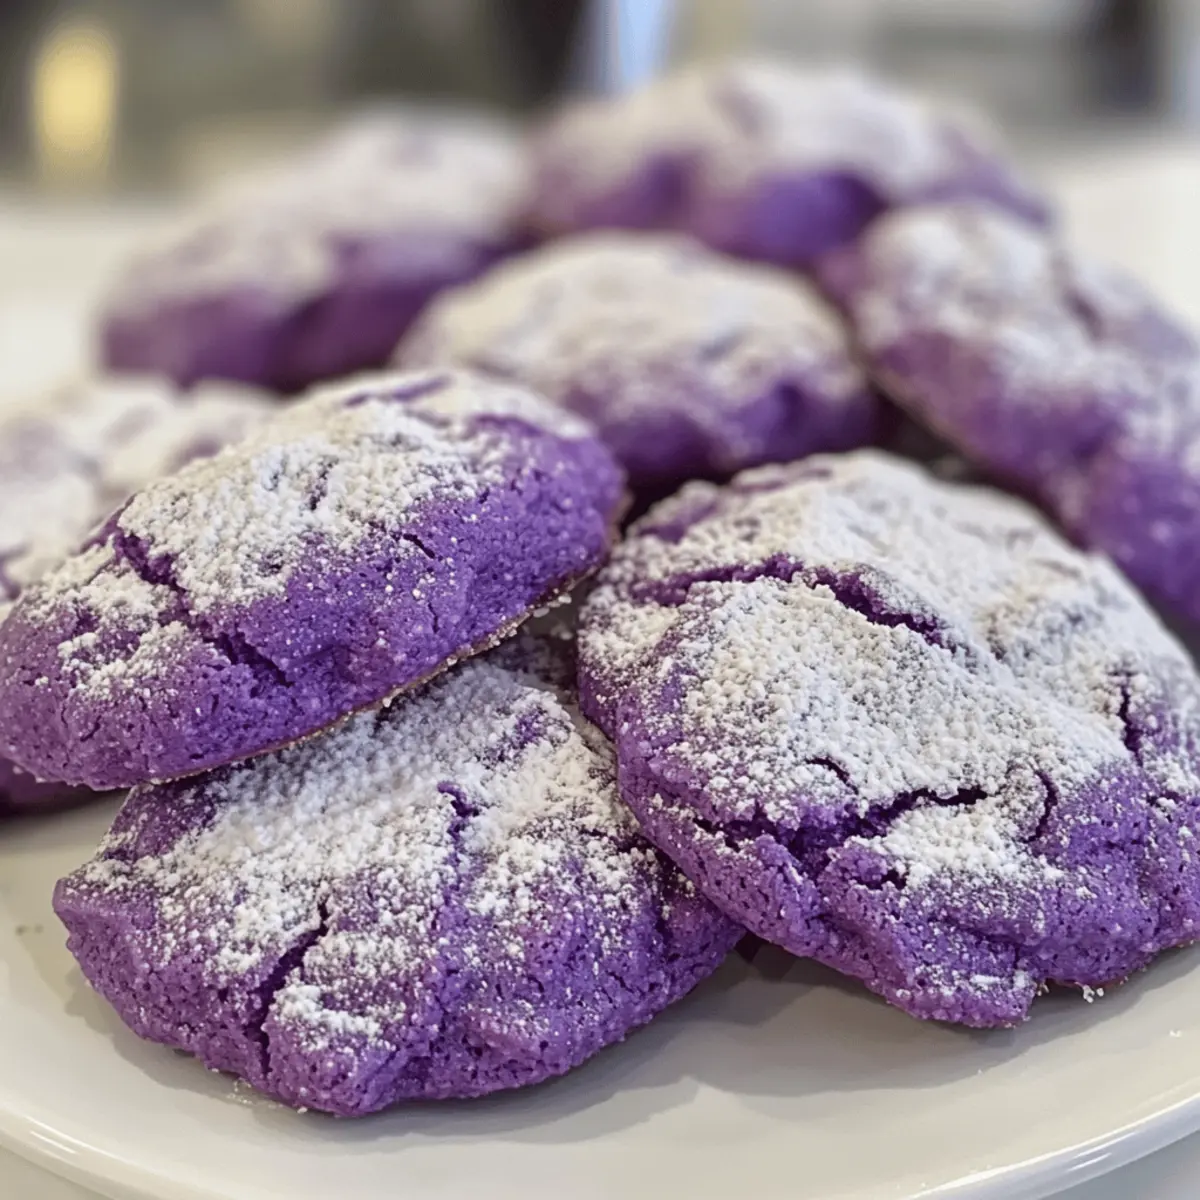
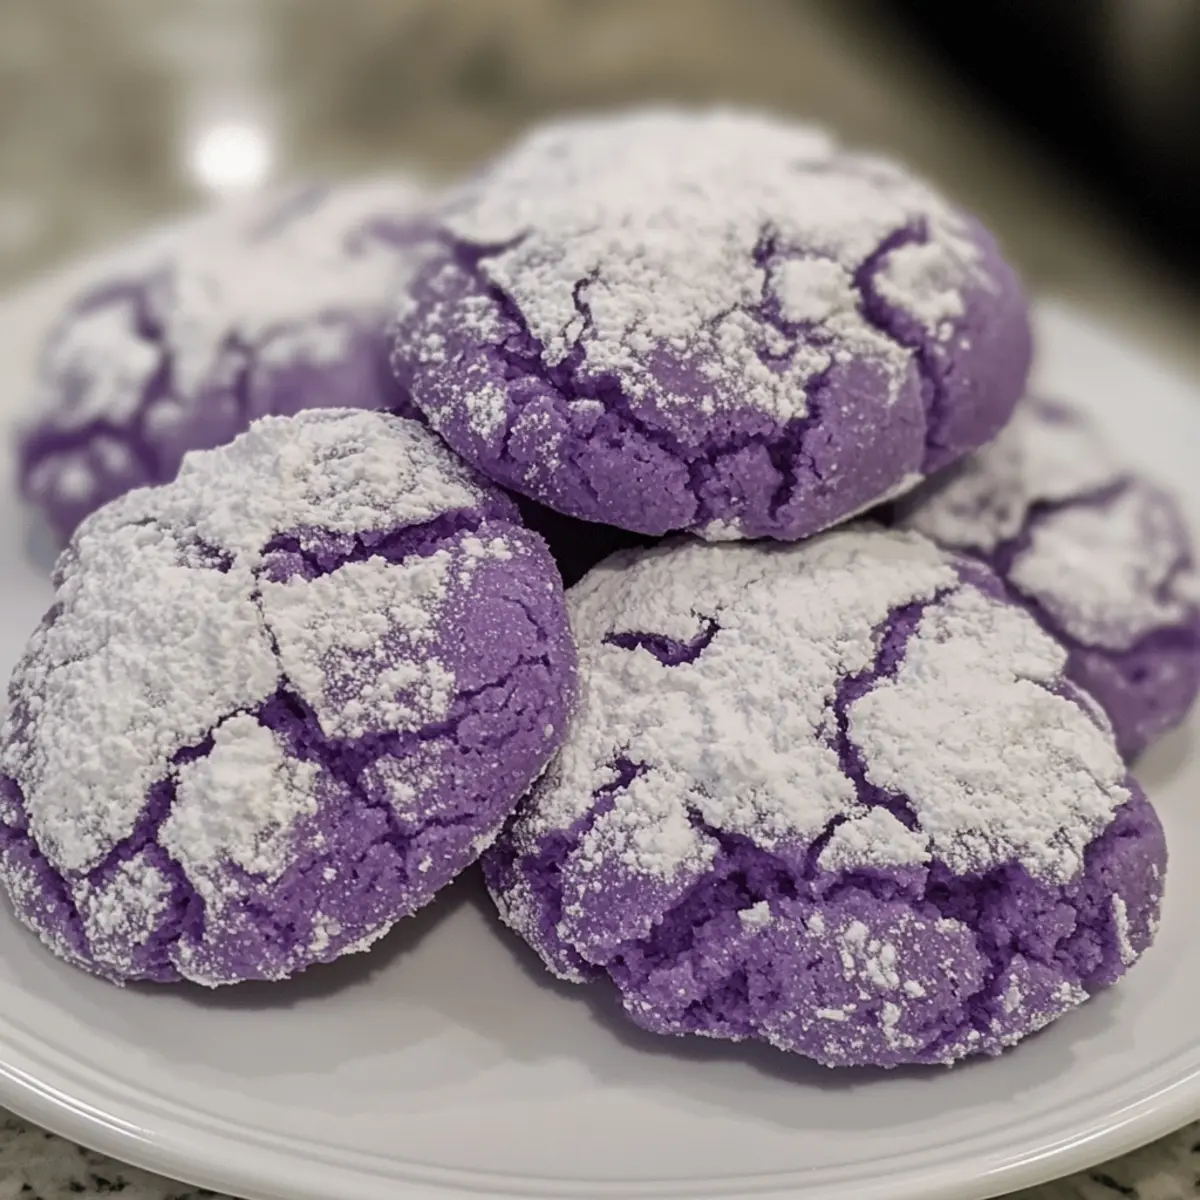
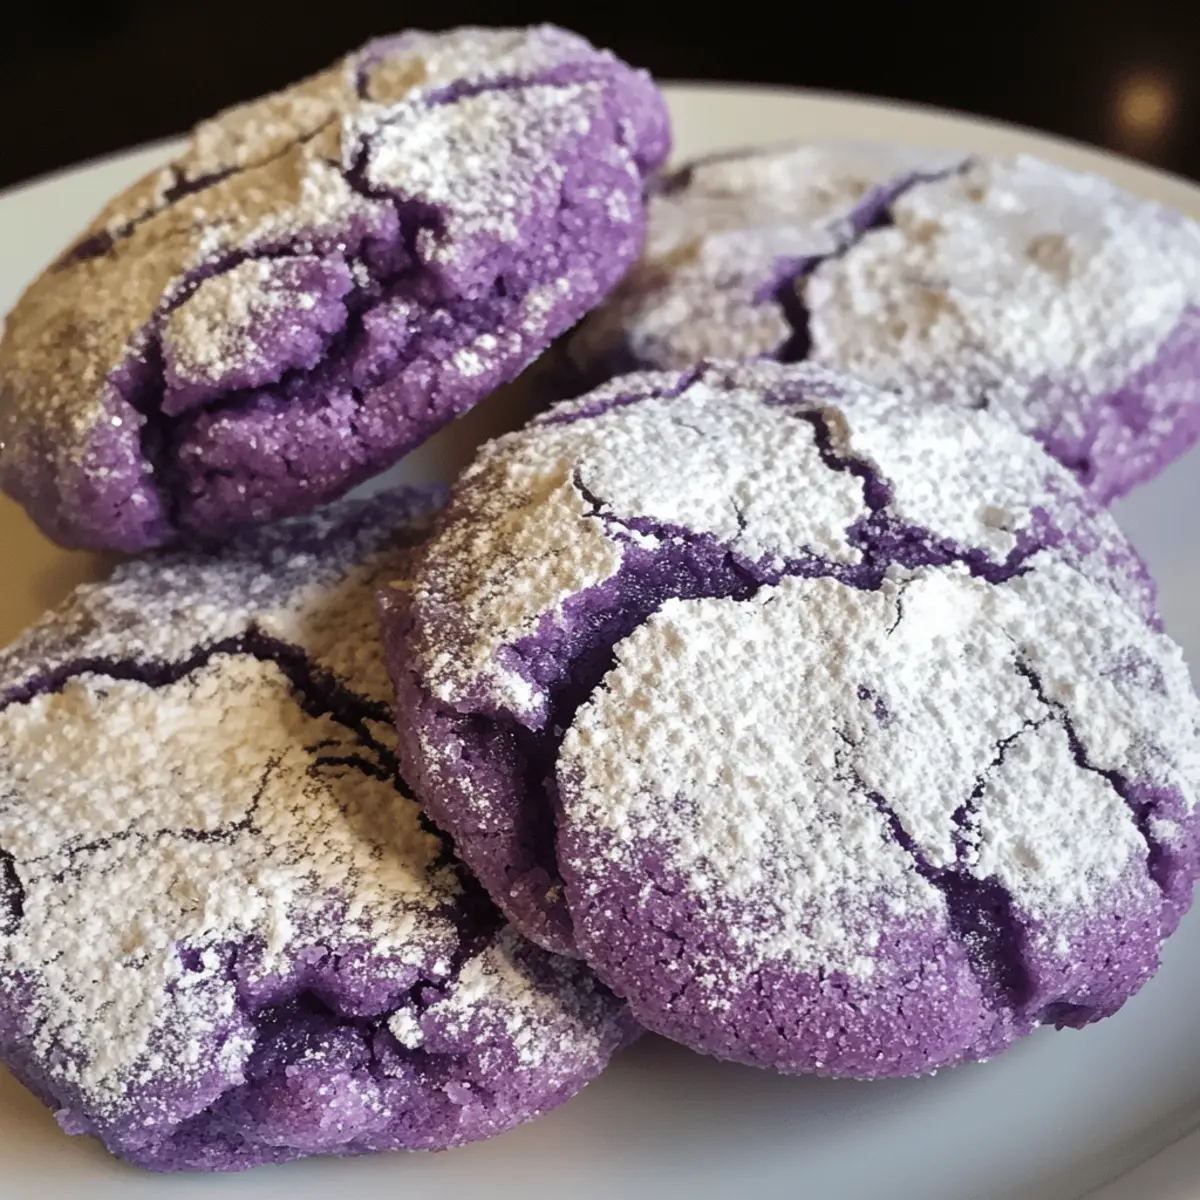
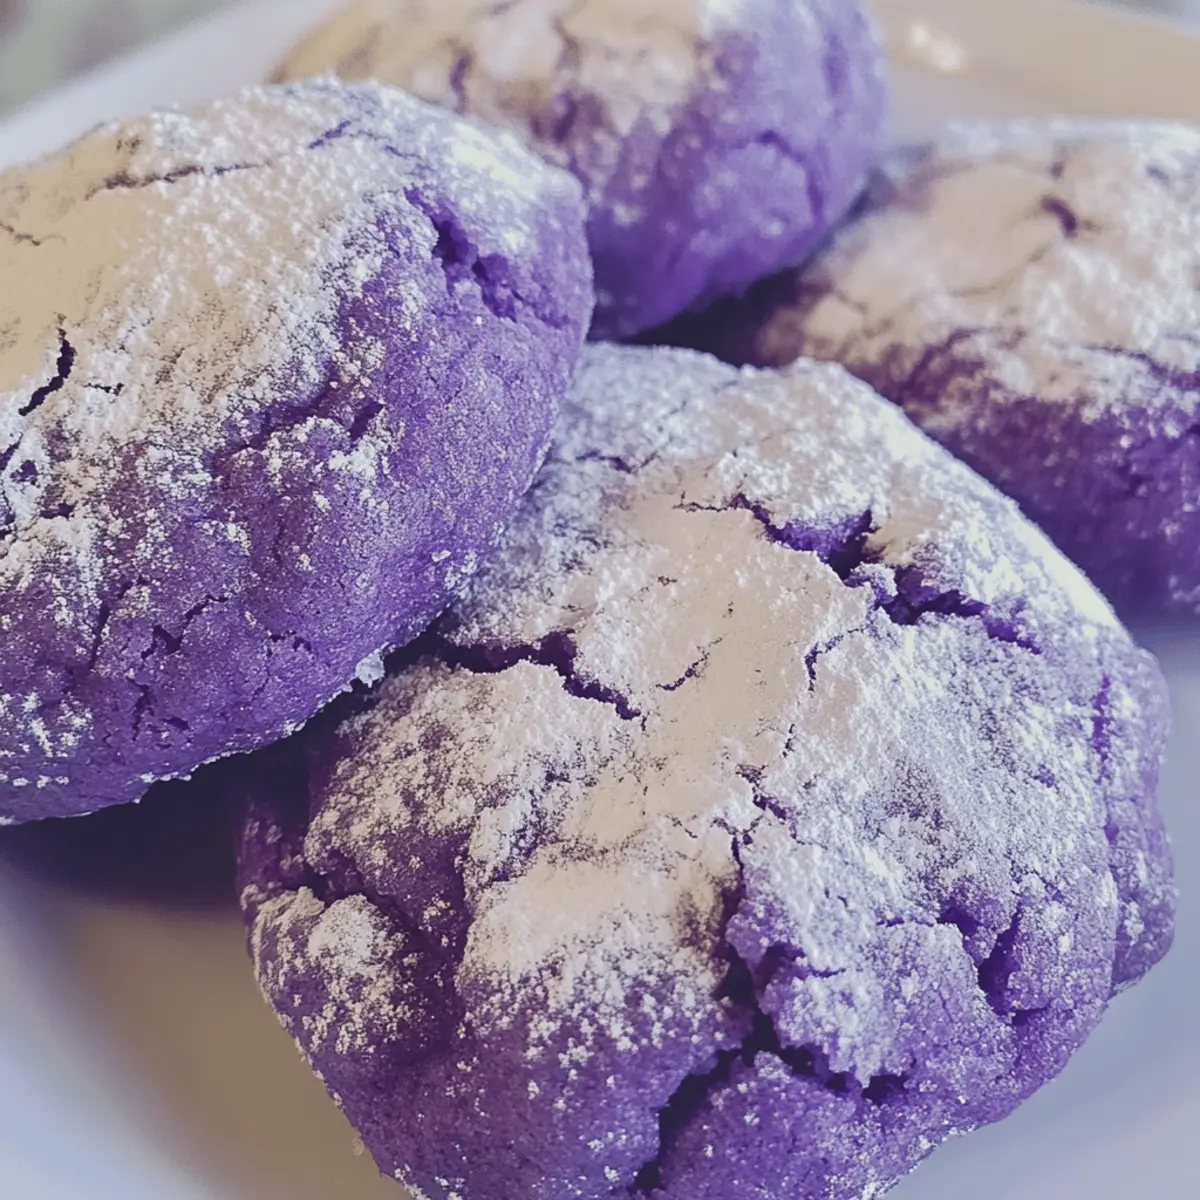
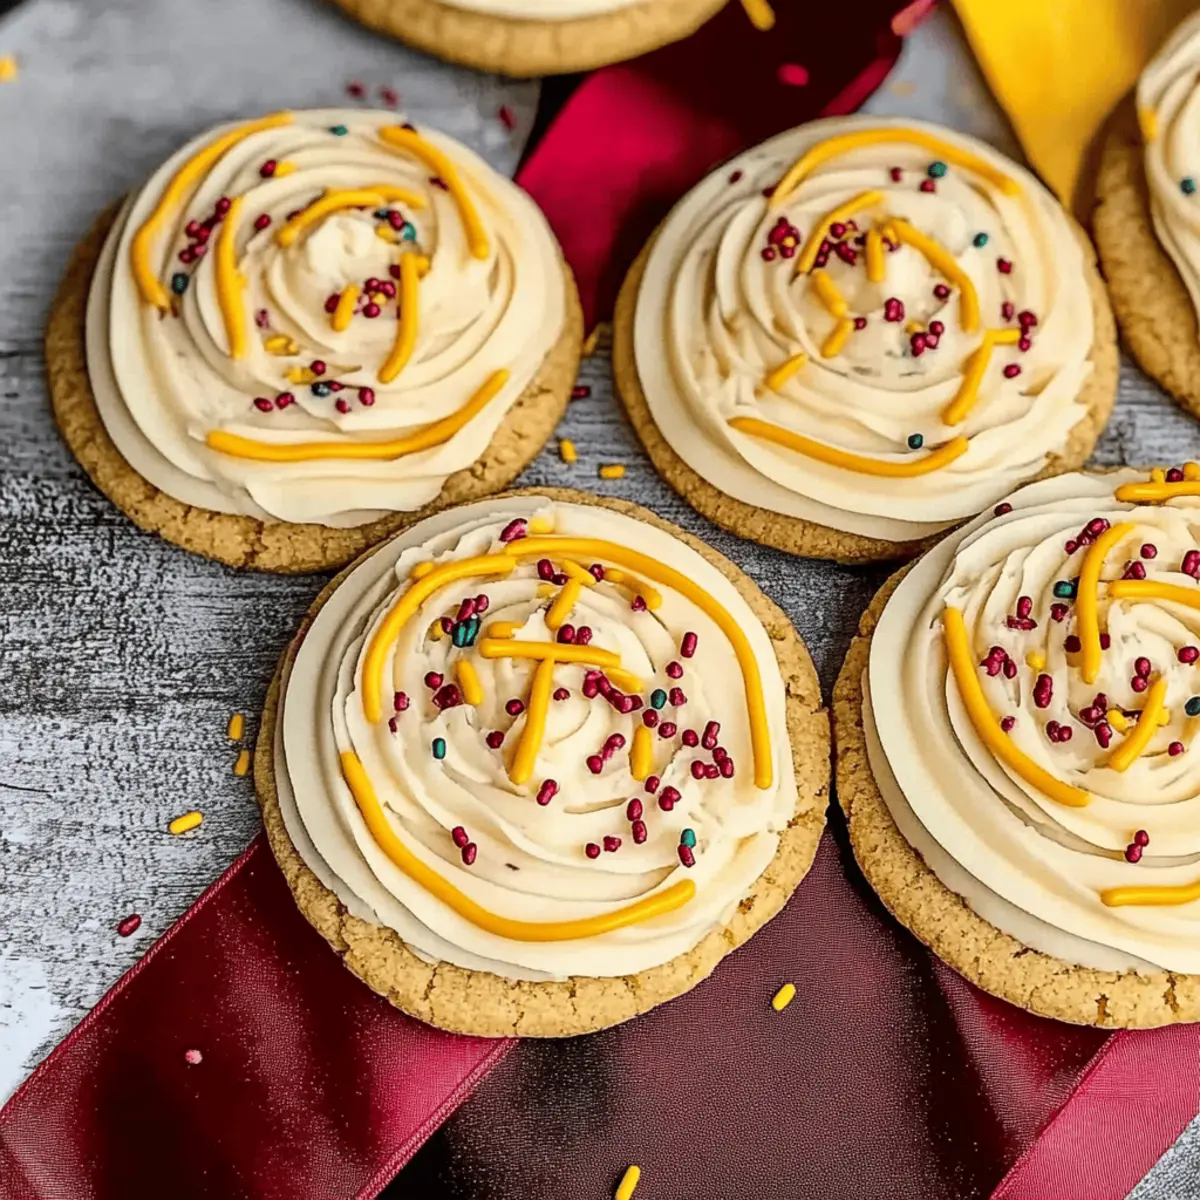
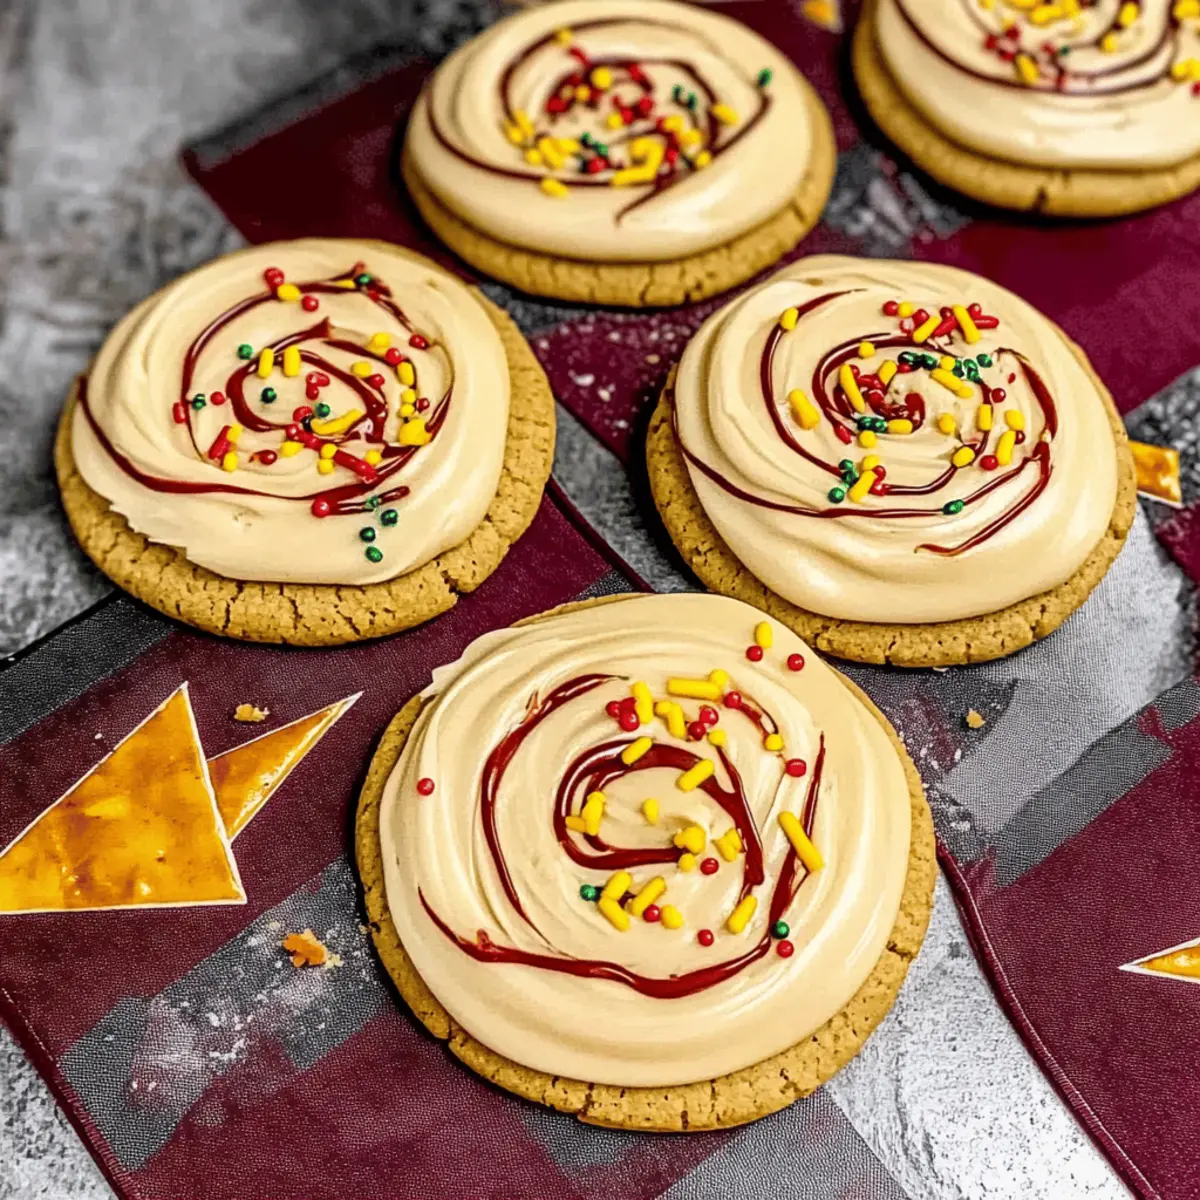
As I stood in my kitchen, the sweet scent of almond flour wafting through the air, I couldn’t help but smile at the colorful array of French macarons I had just finished. These delightful little cookies aren’t just beautiful; they’re surprisingly simple to make and perfect for any occasion. This recipe for french macarons is all about creating those light, airy shells with customizable fillings that can transform an ordinary dessert into an extraordinary one. Not only does this treat impress friends and family, but the process of making them can be a joyful escape from the daily grind. Whether you’re serving them for tea or surprising a loved one, these beginner-friendly macarons will surely elevate your dessert game. So, are you ready to master the art of macaron-making? Let’s dive in!

Why Are French Macarons So Special?

Delicate Texture: The outside is crisp, while the inside remains chewy, creating a delightful contrast that melts in your mouth.

Customizable Fillings: With options ranging from luscious chocolate ganache to fruity jams, these macarons can be tailored to suit any palate.

Beginner-Friendly: This recipe takes you step-by-step through the process, making it easy even for novice bakers to achieve a stunning result.

Impressive Treat: Presenting these elegant cookies at gatherings will showcase your baking skills and charm your guests.

Fun to Make: The process can be a creative outlet—watching the batter transform into perfect little circles is truly rewarding.

For even more delightful variations, check out my Homemade French Fries recipe to pair with your sweet treats or try a savory twist with Garlic Butter French Fries.

French Macaron Ingredients

• Let’s gather the essentials to create delightful French macarons.

For the Shells

  • Almond Flour – This is the star ingredient, providing the signature flavor and texture of the macarons, so opt for fine almond flour for the best results.
  • Powdered Sugar – Sweetens and helps create that smooth, glossy finish essential for a perfect macaron shell.
  • Egg Whites – Vital for building structure; let them sit at room temperature to enhance their stability.
  • Granulated Sugar – Boosts sweetness and helps stabilize the whipped egg whites, resulting in a sturdier meringue.
  • Cream of Tartar (optional) – A helpful stabilizer that can prevent the egg whites from collapsing, especially for beginners.

For the Filling

  • Butter – The base for your buttercream filling; feel free to get creative by adding vanilla, chocolate, or fruity flavorings to suit your taste.

Now you’re ready to take the plunge into the world of French macarons, where the journey is as delightful as the destination!

Step‑by‑Step Instructions for Beginner-Friendly French Macarons

Step 1: Prepare the Dry Ingredients
Start by sifting 120g of almond flour and 230g of powdered sugar together in a bowl. This removes clumps and ensures a silky smooth batter for your French macarons. Take a moment to enjoy the lovely aroma of the almond flour as you work. Set aside when well combined.

Step 2: Whisk Egg Whites
In a clean, dry mixing bowl, add 100g of room-temperature egg whites. Begin whipping at medium speed until they become frothy, approximately 2 minutes. Gradually add 30g of granulated sugar and a pinch of cream of tartar. Continue whisking until stiff peaks form, taking around 5-7 minutes. The meringue should hold its shape and be shiny.

Step 3: Combine Mixtures
Gently fold the sifted dry ingredients into the whipped egg whites using a spatula. Aim for a smooth, glossy batter with a lava-like consistency. Be careful not to deflate the meringue; this step is crucial for achieving the perfect texture in your French macarons. The mixture should flow easily off the spatula.

Step 4: Pipe Shells
Transfer the macaron batter into a piping bag fitted with a round tip. On a parchment-lined baking sheet, pipe uniform circles, about 1.5 inches in diameter, leaving space between each. This step is essential for the iconic shape of your French macarons. Tap the baking sheet gently on the counter to release air bubbles.

Step 5: Rest
Allow the piped shells to rest at room temperature for 30 to 60 minutes. You’ll know they’re ready when the surface is dry to the touch and no longer sticky. This resting period helps form the skin, which is key to achieving the classic foot of your macarons. Enjoy the anticipation while they dry!

Step 6: Bake
Preheat your oven to 300°F (150°C). Once resting is complete, place the macarons in the oven and bake for 12-16 minutes. The shells should rise slightly and have a smooth surface with a foot. Keep a close eye on them, and rotate the baking sheet halfway through for even baking.

Step 7: Cool and Fill
After baking, remove the macaron shells from the oven and let them cool completely on the baking sheet for about 10 minutes. Once cooled, gently lift the shells off the parchment paper. Pair them up and fill each with your choice of buttercream filling, then let the filled macarons rest in the fridge for at least 30 minutes before serving to enhance their flavor and texture.

French Macarons: Fun Variations

Feel free to personalize your French macarons to suit your unique tastes and dietary needs, adding delightful twists to every batch!

  • Nut-Free: Substitute almond flour with sunflower seed flour for nut-free macarons without sacrificing flavor.

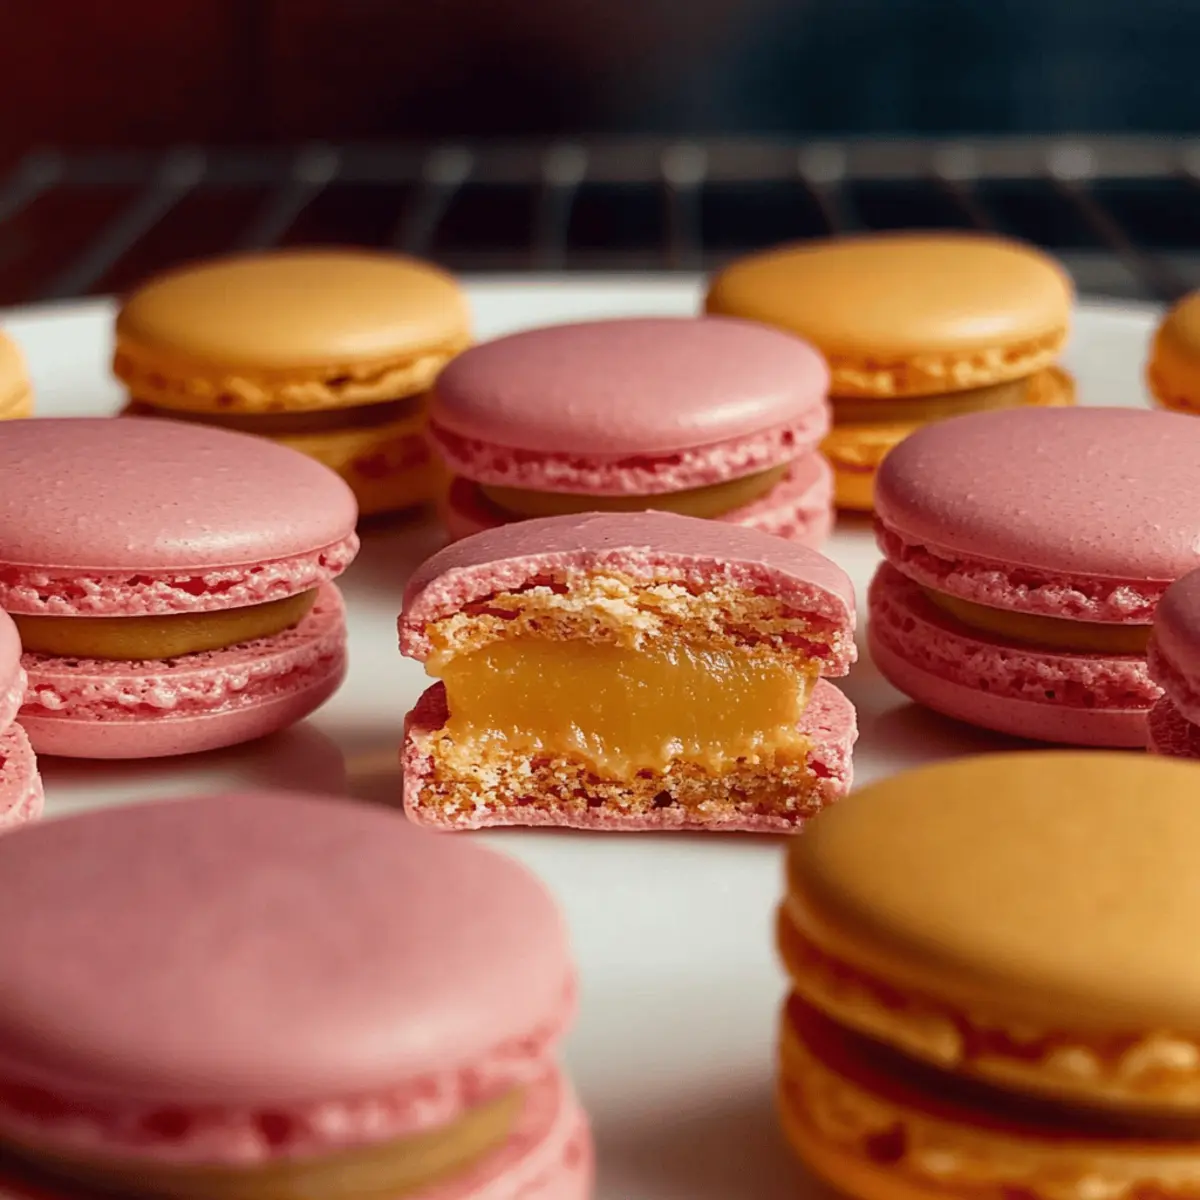
  • Colorful Shells: Add gel food coloring to the batter to create vibrant shells that match any occasion’s theme.

  • Chocolate Lovers: Incorporate cocoa powder into the dry ingredients for a rich chocolate base and pair with a decadent chocolate ganache filling.

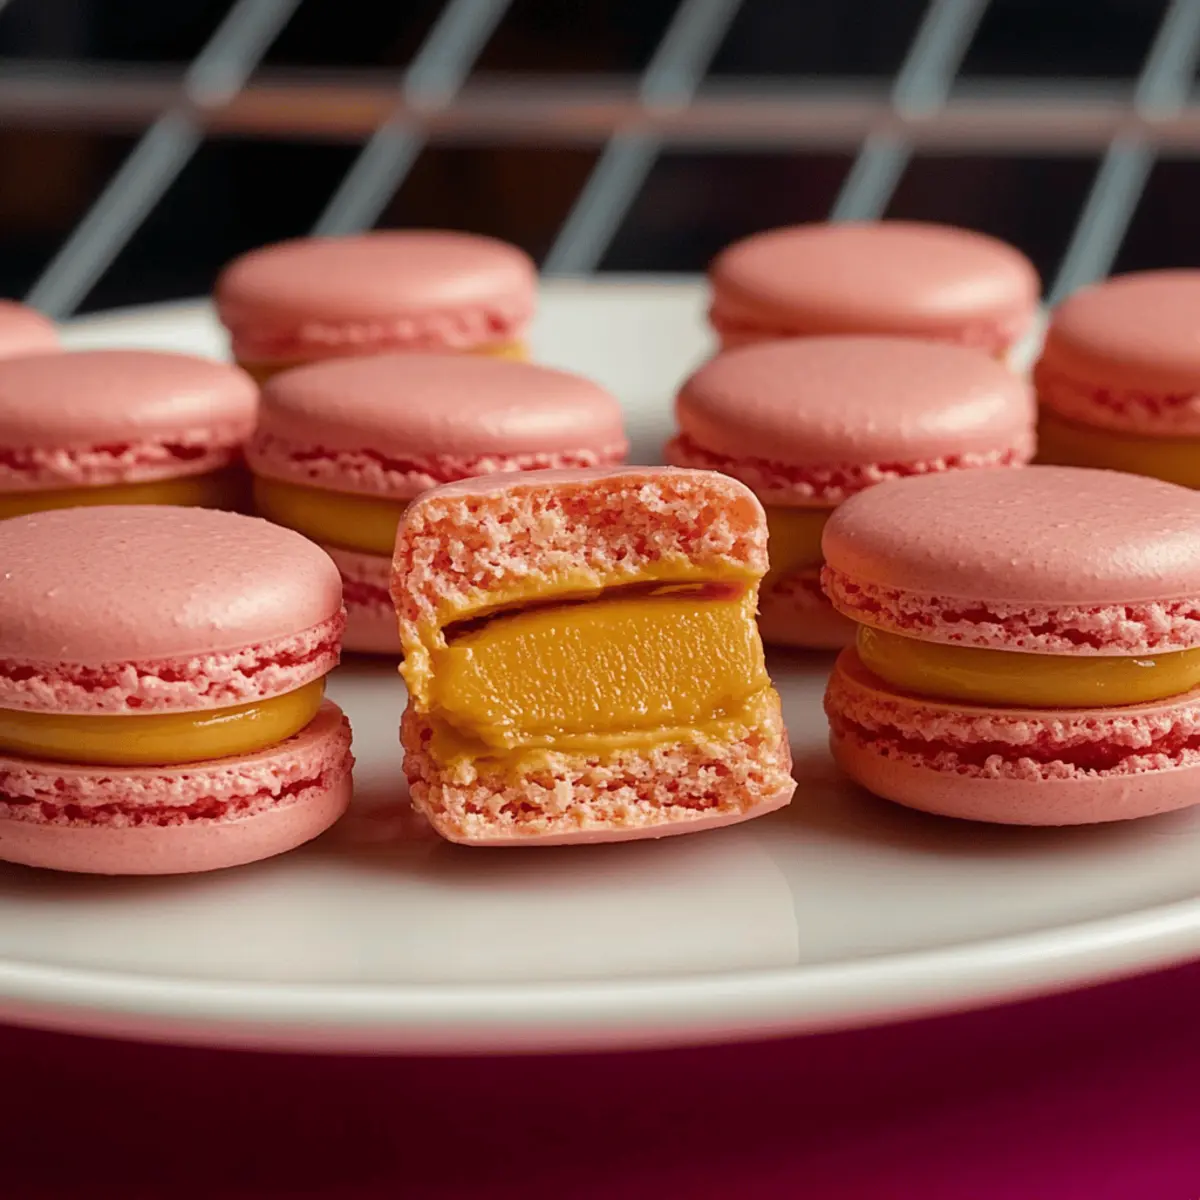
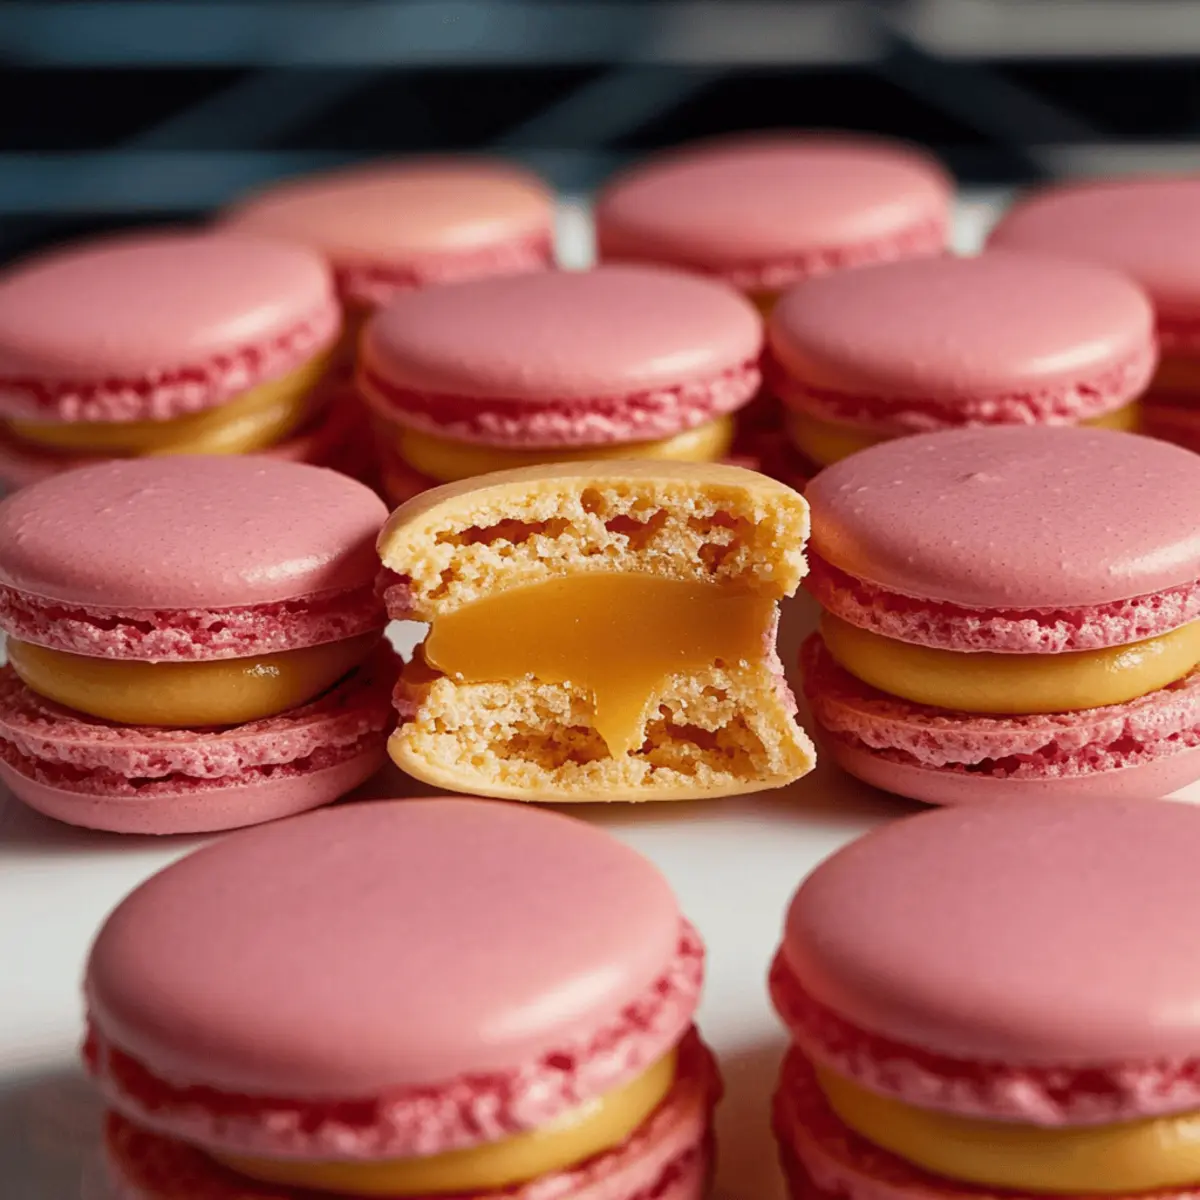
  • Fruity Twist: Swap the buttercream for homemade fruit jams like raspberry or lemon curd, adding a tangy delight to each bite.

  • Spice it Up: For unexpected warmth, mix in a dash of cinnamon or cardamom into the batter for a fragrant kick reminiscent of cozy treats.

  • Savory Blend: Experiment with savory elements such as cheese or herbs in your filling, offering a unique take on the traditional sweet macaron.

  • Classic Vanilla: Add vanilla bean paste to the batter and filling for a timeless recipe upgrade that enhances the overall flavor beautifully.

For even more delightful bites, why not check out my tips for making a delectable Garlic Butter French Fries side or try a savory twist on fries to balance the sweetness of your macarons with my Homemade French Fries recipe?

Expert Tips for French Macarons

  • Use Fine Almond Flour: Choose fine almond flour instead of almond meal for a smoother batter and a more appealing texture in your French macarons.

  • Room Temperature Eggs: Always use room-temperature egg whites as they whip better, resulting in a more stable meringue and ultimately perfect macaron shells.

  • Patience is Key: Allow the piped macarons to rest until their surface is dry before baking. This step prevents cracking and ensures that they form the iconic foot.

  • Check Oven Temperature: An oven thermometer is your best friend! Accurate temperatures are crucial; even slight variations can cause cracks or hollow shells.

  • Gentle Folding Technique: When combining dry ingredients with whipped egg whites, fold gently to maintain the airiness. Over-mixing can lead to flat macarons.

  • Cool Completely: Allow the shells to cool completely before filling. This prevents the buttercream from melting and ensures a better flavor melding in each delightful French macaron.

Make Ahead Options

These French macarons are a fantastic option for meal prep enthusiasts! You can prep the macaron shells up to 24 hours in advance. Simply prepare the batter, pipe the shells onto your baking sheet, and store them in the refrigerator uncovered. Once you’re ready to bake, allow the shells to rest for 30-60 minutes at room temperature before popping them into the oven. For the filling, you can make your buttercream up to 3 days ahead and store it in an airtight container in the fridge. When it’s time to indulge, simply fill your cool macaron shells with the buttercream, let them rest in the fridge for an additional 30 minutes to meld the flavors, and enjoy your delightful treats that are just as delicious as freshly made!

How to Store and Freeze French Macarons

Fridge: Store filled French macarons in an airtight container in the refrigerator for up to 1 week. This helps retain their texture while allowing flavors to meld beautifully.

Freezer: For longer storage, freeze unfilled macaron shells in a single layer, then transfer to an airtight container for up to 3 months. Thaw at room temperature before filling.

Airtight Container: Always ensure the macaron container is airtight to prevent moisture loss, which can lead to a chewy texture instead of the desired crisp bite.

Reheating: If you’ve frozen filled macarons, allow them to thaw in the fridge and serve cold for an enhanced taste experience.

What to Serve with Beginner-Friendly French Macarons?

Enjoying your exquisite French macarons can be even more delightful when you pair them with the perfect accompaniments.

  • Earl Grey Tea: The floral notes and hints of bergamot in Earl Grey beautifully complement the sweetness of the macarons, providing a sophisticated touch.
  • Fresh Berries: Juicy strawberries or raspberries offer a tart contrast to the sweetness, enhancing the overall flavor experience. Just imagine the lively burst of flavor with each bite!
  • Light Lemonade: A refreshing glass of homemade lemonade can cleanse the palate and balance the sweetness, making each macaron even more enjoyable.
  • Chocolate Ganache Dip: Adding a rich chocolate ganache dip creates a gourmet twist, allowing for a creamy and indulgent experience. This simple addition makes every bite more decadent.
  • Vanilla Ice Cream: Serve a scoop of velvety vanilla ice cream alongside your macarons for a delightful dessert contrast that’s both creamy and sweet.
  • Sparkling Wine: A glass of bubbly adds a celebratory feel, enhancing your treat and making any occasion feel special. The effervescence lifts the sweetness beautifully!
  • Chocolate-Covered Strawberries: Pairing your macarons with these luscious treats elevates any dessert platter, pleasing both the eyes and the palate.
  • Fruit Sorbet: Dive into a refreshing scoop of fruit sorbet; its ice-cold texture is a perfect contrast to the chewy consistency of the macarons.
  • Mocha Coffee: A warm cup of mocha brings a lovely chocolatey flavor that harmonizes perfectly with the sweet and nutty profile of the macarons.
  • Pastry Cream: A dollop of creamy pastry filling offers a delightful addition, making every macaron taste even more luxurious!

These pairings will surely elevate your dessert experience and create beautiful memories with each bite!

French Macarons Recipe FAQs

What type of almond flour should I use for French macarons?
Absolutely! Use fine almond flour instead of almond meal for the best results. Fine almond flour has a smoother texture, which helps create the light, airy macaron shells we all adore. Avoid almond meal, as it can yield a coarser batter that may not rise as beautifully.

How should I store my French macarons?
You should store filled French macarons in an airtight container in the refrigerator for up to 1 week. This maintains their lovely texture while allowing the flavors to meld together beautifully. Make sure the lid seals tightly to keep moisture at bay, ensuring every bite remains delightful!

Can I freeze French macarons, and if so, how?
Yes, you can! To freeze unfilled macaron shells, place them in a single layer on a baking sheet and freeze them for about 1-2 hours. Once frozen solid, transfer them to an airtight container, separating the layers with parchment paper, and they can last for up to 3 months. When ready to enjoy, simply thaw at room temperature before filling!

What can I do if my macaron shells crack while baking?
If you encounter cracked shells, it’s often due to two factors: under-mixing the batter or not allowing the piped macarons to rest long enough before baking. Make sure to fold the dry ingredients into the egg whites gently until just combined to retain airiness. Additionally, ensure that your piped shells rest at room temperature for 30-60 minutes until their surfaces are dry to the touch; this helps form the necessary skin to prevent cracking.

Are French macarons suitable for individuals with nut allergies?
No, French macarons contain almond flour, which is derived from nuts, so they are not safe for those with nut allergies. However, if you’re looking for a nut-free alternative, you might try using ground sunflower seeds as a substitute for almond flour, but the texture and flavor will vary. Always check for cross-contamination if allergies are a concern!

French Macarons

Delicious French Macarons: Your Easy Guide to Baking Joy

Learn to create delightful French macarons with this easy guide; perfect for any occasion.
Prep Time 45 minutes
Cook Time 15 minutes
Resting Time 1 hour
Total Time 2 hours
Servings: 12 macarons
Course: Dessert
Cuisine: French
Calories: 90

Ingredients
  

For the Shells
  • 120 g Almond Flour Opt for fine almond flour for best results.
  • 230 g Powdered Sugar Essential for a smooth finish.
  • 100 g Egg Whites Let sit at room temperature for stability.
  • 30 g Granulated Sugar Stabilizes the whipped egg whites.
  • 1/4 tsp Cream of Tartar Optional stabilizer.
For the Filling
  • 100 g Butter Base for your buttercream filling.

Equipment

  • mixing bowl
  • whisk
  • Piping bag
  • Round piping tip
  • baking sheet
  • parchment paper

Method
 

Step-by-Step Instructions
  1. Sift the almond flour and powdered sugar together in a bowl and set aside.
  2. Whisk the egg whites in a mixing bowl until frothy. Gradually add granulated sugar and cream of tartar, whisking until stiff peaks form.
  3. Gently fold the sifted dry ingredients into the egg whites until the mixture flows easily off the spatula.
  4. Pipe uniform circles on a parchment-lined baking sheet and tap the baking sheet to release air bubbles.
  5. Let the piped shells rest for 30 to 60 minutes until the surface is dry to the touch.
  6. Preheat the oven to 300°F (150°C) and bake the macarons for 12-16 minutes.
  7. Cool the shells on the baking sheet for 10 minutes before filling them with your choice of buttercream.

Notes

Store filled macarons in an airtight container in the fridge for up to 1 week. Freeze unfilled shells for up to 3 months.

Get Ready to Indulge in Irresistible Purple Crinkle Cookies

As I pulled the cookies from the oven, an enchanting aroma filled my kitchen, wrapping me in a warm embrace. these Purple Crinkle Cookies are not just visually stunning with their vibrant hue; they deliver a delightful twist of flavor thanks to the unique essence of ube, or purple yam. Perfect for both festive gatherings and cozy afternoons at home, these cookies offer a quick way to impress your friends and family, all while satisfying that craving for homemade comfort. With a soft and airy texture, each bite reveals the moist, sweet crumble that begs to be shared (or savored solo!). Ready to explore the secrets behind this delightful recipe? Let’s dive in!

Why are Purple Crinkle Cookies a must-try?

Irresistible Color: With their stunning purple hue, these cookies are sure to grab attention and spark conversations at any gathering.

Unique Flavor Twist: The ube essence provides a delightful twist, setting these cookies apart from regular treats.

Simple Steps: With a straightforward recipe and minimal ingredients, even beginner bakers can master these delicious bites.

Crowd-Pleasing Appeal: Perfect for parties, they pair beautifully with coffee or tea, making them a hit with friends and family.

Versatile Variations: Feel free to experiment by adding chocolate chips or substituting ube for grape flavoring for a refreshing change. For more cookie inspiration, don’t miss my Nutty Apricot Cookies or Chocolate Date Cookies.

Baking these Purple Crinkle Cookies promises a delightful and satisfying experience that you’ll love to share!

Purple Crinkle Cookies Ingredients

• For those eager to bake these vibrant treats, here’s what you need!

For the Dough

  • All-Purpose Flour (2 cups/250g) – Provides structure and body; can substitute with gluten-free flour blends.
  • Baking Powder (1 ½ tsp) – Acts as a leavening agent to achieve the perfect light texture; ensure freshness for the best results.
  • Salt (¼ tsp) – Enhances the flavor balance, crucial even in sweet recipes.
  • Unsalted Butter (½ cup/115g, softened) – Contributes moisture and richness; use margarine or coconut oil for a dairy-free option.
  • Granulated Sugar (1 cup/200g) – Adds sweetness and affects cookie texture; brown sugar can be used for a deeper flavor.
  • Large Eggs (2) – Binds ingredients and adds richness, no substitutes suggested.
  • Vanilla Extract (1 tsp) – Adds aromatic sweetness; opt for pure extract for the best flavor.
  • Ube Extract (1 ½ tsp) or Purple Food Coloring + Flavoring – Provides the unique color and subtle sweetness that make these cookies special.
  • Whole Milk (½ cup/120ml) – Ensures a rich, creamy dough; lower-fat options are acceptable in small amounts.

For Dusting

  • Powdered Sugar (½ cup/60g) – Finishing coating for a sweet, snowy exterior; adjust the quantity to achieve your desired thickness.
  • Cornstarch (2 tbsp, optional) – For a thicker coating if desired; omit for a lighter finish.

Gather these ingredients and get ready to create your enchanting Purple Crinkle Cookies that will add color and joy to any occasion!

Step‑by‑Step Instructions for Purple Crinkle Cookies

Step 1: Prepare Dough
In a medium bowl, whisk together 2 cups of all-purpose flour, 1 ½ teaspoons of baking powder, and ¼ teaspoon of salt until well-combined. In a separate large bowl, cream together ½ cup of softened unsalted butter and 1 cup of granulated sugar until light and fluffy, about 3-4 minutes. Add 2 large eggs, one at a time, mixing well after each addition, then incorporate 1 teaspoon of vanilla extract and 1 ½ teaspoons of ube extract. Gradually mix in the dry ingredients along with ½ cup of whole milk until a soft dough forms.

Step 2: Chill Dough
Next, cover the dough tightly with plastic wrap, ensuring no air pockets remain. Refrigerate for at least 2 hours, or overnight if you have the time, which helps the Purple Crinkle Cookies maintain their shape while baking. When the dough is firm to the touch and easily holds its shape, it’s ready to be rolled into cookie balls.

Step 3: Preheat & Shape
Preheat your oven to 350°F (175°C) and line your baking sheets with parchment paper, ensuring easy release later. Once your dough is chilled, scoop out portions into tablespoon-sized balls. Roll each ball between your palms, then coat generously in a mixture of ½ cup powdered sugar and 2 tablespoons of cornstarch for that signature snowy exterior.

Step 4: Bake Cookies
Arrange the coated dough balls on the prepared baking sheets, spacing them about 2 inches apart to allow room for spreading. Bake in the preheated oven for 12-14 minutes, or until the tops start to crack and the edges are set. Be careful not to overbake; you want the centers to remain soft for that delightful chewy texture.

Step 5: Cool Cookies
Once baked, allow the cookies to cool on the baking sheets for about 5 minutes. You’ll notice the cracks have deepened, enhancing the visual charm of your Purple Crinkle Cookies. After they’ve cooled slightly, transfer them gently to wire racks to cool completely and allow the flavors to develop further.

Expert Tips for Purple Crinkle Cookies

  • Chill the Dough: Refrigerating the dough is essential to prevent spreading during baking, ensuring the cookies hold their beautiful shape.

  • Monitor Baking Time: Remove the cookies from the oven when edges are set but centers are still soft; this guarantees that melt-in-your-mouth texture.

  • Proper Coating: Don’t skimp on the powdered sugar and cornstarch mixture—an ample coating results in that iconic crackled finish and sweet exterior.

  • Ingredient Freshness: Always ensure your baking powder is fresh for optimal rise; stale ingredients can lead to dense cookies instead of light and airy.

  • Flavor Adjustments: If opting for grape flavoring instead of ube extract, start with a little and adjust gradually to avoid overpowering the cookie’s sweetness.

Baking these Purple Crinkle Cookies is not only a visual treat but also a delicious one!

What to Serve with Purple Crinkle Cookies

As you indulge in these vibrant treats, imagine the delightful flavors they could be paired with to create a memorable meal experience.

  • Rich Coffee: The bold flavors of a dark roast coffee perfectly complement the sweet, tender bite of the cookies, enhancing their ube essence.

  • Vanilla Ice Cream: A scoop of creamy vanilla ice cream adds a cooling contrast that makes the warm, soft cookies even more enjoyable. Blissful!

  • Fruit Salad: A refreshing mix of seasonal fruits brings a bright, fresh balance to the rich cookies, harmonizing textures and flavors beautifully.

  • Chocolate Milk: The sweet, chocolaty drink offers a comforting retro feel and heightens the sweetness of the cookies, making them irresistible for all ages.

  • Coconut Whipped Cream: Adding lightness and a hint of tropical flavor, this luscious cream amplifies the cookies’ unique twist and makes them feel even more special.

  • Chai Tea: The warm spices in chai tea provide a lovely contrast to the sweetness of the cookies, creating a comforting and inviting pairing perfect for cozy evenings.

  • Ice-Cold Lemonade: A zesty, refreshing glass of lemonade cuts through the sweetness and perfectly balances the richness of the cookies, making it a delightful duo.

  • Chocolate Dipped Strawberries: Juicy berries dipped in rich chocolate bring a sweet yet tart freshness, creating a stunning visual and taste pairing with the cookies.

  • Milkshake: A thick, creamy milkshake adds indulgence and is a nostalgic treat that will remind you of childhood, bringing back memories with every bite.

Step outside the ordinary and explore these delightful pairings to elevate your Purple Crinkle Cookie experience!

How to Store and Freeze Purple Crinkle Cookies

Room Temperature: Store cookies in an airtight container at room temperature for up to 3 days to maintain their softness and flavor.

Fridge: If you prefer, keep the cookies in the fridge for up to a week, but be sure to let them sit at room temperature before serving for the best texture.

Freezer: To freeze, place the cookies in a single layer on a baking sheet until firm, then transfer to a freezer-safe bag or container. They can be frozen for up to 3 months.

Reheating: For a warm treat, reheat frozen cookies in the microwave for about 15 seconds, or bake them from frozen at 350°F (175°C) for 5-7 minutes. Enjoy your delightful Purple Crinkle Cookies!

Purple Crinkle Cookies Variations & Substitutions

Feel free to let your creativity shine by customizing these enchanting cookies to match your taste preferences and pantry staples!

  • Dairy-Free: Substitute the unsalted butter with coconut oil or margarine for a delightful dairy-free version. The coconut adds a lovely hint of tropical flavor.

  • Gluten-Free: Use a gluten-free all-purpose flour blend in place of traditional flour. Many blends work beautifully, keeping the cookies just as soft and satisfying.

  • Less Sugar: For a lighter treat, reduce granulated sugar by ¼ cup and substitute with applesauce or mashed bananas, offering natural sweetness and added moisture.

  • Flavor Burst: Swap ube extract with grape flavoring for a fruity twist. This gives your cookies a refreshing new taste that’s just as vibrant.

  • Chewy Chocolate: Add in ½ cup of chocolate chips for a delightful chocolatey surprise that perfectly complements the purple hue.

  • Textural Twist: Mix in ½ cup of shredded coconut for a tropical texture that adds a fun chewiness to each bite.

  • Icing Drizzle: Once cooled, drizzle a simple glaze made from powdered sugar and lemon juice over the cookies for a zesty contrast to the sweetness.

  • Condensed Milk Cookies: Replace half of the milk with condensed milk for a richer, denser cookie with a caramel-like sweetness.

These Purple Crinkle Cookies are a delightful canvas for inspiration! Whether you’re in the mood for something tropical or indulgently sweet, these variations let you create something unique for every occasion. For more cookie ideas, check out my delicious German Style Cookies and Banana Seed Cookies. Happy baking!

Make Ahead Options

These Purple Crinkle Cookies are a dream for meal prep enthusiasts! You can prepare the cookie dough up to 24 hours in advance by following all the steps right up to chilling. Simply cover the dough tightly with plastic wrap, ensuring there are no air pockets to prevent drying out. When you’re ready to bake, preheat the oven and roll the chilled dough into balls just before coating them in the powdered sugar and cornstarch mixture. This method not only saves you time on busy days but also preserves the cookies’ delightful texture and vibrant color, making them just as delicious as when freshly baked. Enjoy the ease of popping these colorful treats in the oven with minimal last-minute effort!

Purple Crinkle Cookies Recipe FAQs

What type of ube extract should I use?
I recommend using pure ube extract for the best flavor and color in your Purple Crinkle Cookies. If ube extract isn’t available, you can also use purple food coloring combined with a grape flavoring, just be sure to start with a small amount and adjust to taste!

How do I store purple crinkle cookies to keep them fresh?
To maintain their delightful softness, store your cookies in an airtight container at room temperature for up to 3 days. If you’d like, you can also refrigerate them for up to a week, but be sure to let them sit out for a few minutes before enjoying to bring back their cozy texture.

Can I freeze purple crinkle cookies?
Absolutely! To freeze your cookies, first place them in a single layer on a baking sheet and freeze until solid. Then, transfer the cookies to a freezer-safe bag or container. They will keep well for up to 3 months. When you’re ready to enjoy them, simply reheat in the microwave for about 15 seconds or bake from frozen at 350°F (175°C) for 5-7 minutes.

What should I do if my dough is too sticky?
If you find your dough is too sticky to handle, it’s perfectly normal! You can chill it for an additional 30 minutes to 1 hour to help firm it up. You may also sprinkle a little flour on your hands while rolling the dough balls to prevent sticking. Remember, the dough should be soft but manageable!

Can I change any ingredients for dietary preferences?
Certainly! If you’re looking for a dairy-free option, you can substitute the unsalted butter with margarine or coconut oil. Additionally, if you need a gluten-free version, simply use a gluten-free flour blend. The flavor may change slightly, but they’ll still be delicious!

Purple Crinkle Cookies

Get Ready to Indulge in Irresistible Purple Crinkle Cookies

These Purple Crinkle Cookies are visually stunning and deliver a delightful twist of flavor thanks to the unique essence of ube.
Prep Time 30 minutes
Cook Time 14 minutes
Chilling Time 2 hours
Total Time 2 hours 44 minutes
Servings: 24 cookies
Course: Dessert
Cuisine: Filipino
Calories: 120

Ingredients
  

For the Dough
  • 2 cups All-Purpose Flour can substitute with gluten-free flour blends
  • 1.5 tsp Baking Powder ensure freshness for the best results
  • 0.25 tsp Salt enhances flavor balance
  • 0.5 cup Unsalted Butter use margarine or coconut oil for a dairy-free option
  • 1 cup Granulated Sugar brown sugar can be used for deeper flavor
  • 2 Large Eggs no substitutes suggested
  • 1 tsp Vanilla Extract opt for pure extract for best flavor
  • 1.5 tsp Ube Extract or Purple Food Coloring + Flavoring
  • 0.5 cup Whole Milk lower-fat options are acceptable
For Dusting
  • 0.5 cup Powdered Sugar adjust to achieve desired thickness
  • 2 tbsp Cornstarch optional for thicker coating

Equipment

  • mixing bowls
  • whisk
  • Baking sheets
  • parchment paper
  • plastic wrap
  • oven

Method
 

Step-by-Step Instructions
  1. In a medium bowl, whisk together the flour, baking powder, and salt until well-combined. In a separate large bowl, cream together the butter and sugar until light and fluffy, about 3-4 minutes. Add the eggs one at a time, mixing well after each addition. Incorporate the vanilla and ube extracts, then gradually mix in the dry ingredients and milk until a soft dough forms.
  2. Cover the dough tightly with plastic wrap, refrigerate for at least 2 hours, or overnight if possible.
  3. Preheat your oven to 350°F (175°C) and line baking sheets with parchment paper. Scoop portions of chilled dough into tablespoon-sized balls, roll them in a mixture of powdered sugar and cornstarch.
  4. Arrange the coated dough balls on the prepared baking sheets, spacing them about 2 inches apart. Bake for 12-14 minutes, until the tops start to crack and edges are set.
  5. Allow the cookies to cool on the baking sheets for about 5 minutes before transferring to wire racks to cool completely.

Notes

Refrigerating the dough is key to prevent spreading. Remove from oven when edges are set but centers are still soft for chewiness.

Cranberry Turkey Grilled Cheese: The Ultimate Comfort Bite

As I stood at the kitchen counter, the aroma of roasted turkey mingled with the sweet tang of cranberry sauce wafting from last week’s Thanksgiving feast filled the air, tugging at my heart. What could be better than transforming those beloved leftovers into a delightful treat? Enter the Cranberry Turkey Grilled Cheese—a sandwich that takes comfort food to a whole new level. This recipe isn’t just about repurposing what you have; it’s a quick, irresistible way to create a warm, gooey masterpiece that your loved ones will beg for. With its golden-brown exterior and savory sweetness, it’s perfect for busy weeknights or a cozy lunch. Curious about how to whip up this delectable delight? Let’s dive right in!

Why is this sandwich a must-try?

Ultimate Comfort Food: The Cranberry Turkey Grilled Cheese epitomizes comfort, blending savory turkey and tangy cranberries into a cozy masterpiece.
Quick and Easy: Perfect for busy weeknights, this recipe comes together in just minutes, making it ideal for a scrumptious lunch or dinner.
Crowd-Pleasing: It’s a guaranteed hit, appealing to everyone’s taste buds while creatively using Thanksgiving leftovers.
Versatile Additions: Feel free to mix in some spinach or swap cheeses—each variation offers a new twist, just like our Savory Vegetable Cheese Pancakes that make the most out of simple ingredients.
Irresistibly Gooey: With a meltingly delicious provolone that adds creaminess, every bite is an indulgent experience you won’t forget!

Dive into a sandwich that’s not just food, but a warm hug on a plate!

Cranberry Turkey Grilled Cheese Ingredients

Here’s everything you need to create this irresistible, comfort-filled sandwich.

For the Bread

  • Bread – Use freshly baked French or sourdough for the best flavor and texture.

For the Filling

  • Turkey – Leftover roasted turkey adds delicious protein and depth to each bite.
  • Cranberries – Use leftover cranberry sauce for a sweet and tangy kick, or fresh cranberries cooked down.
  • Provolone Cheese – Melting beautifully, this cheese adds creaminess; consider mozzarella or gouda as alternatives if desired.

For Grilling

  • Butter or Mayo – Ensures a golden, crispy exterior; try mayonnaise for an extra layer of flavor.

Transform your Thanksgiving leftovers with this cranberry turkey grilled cheese that promises to delight every palate!

Step‑by‑Step Instructions for cranberry turkey grilled cheese

Step 1: Prepare Ingredients
Start by gathering your ingredients: leftover roasted turkey, cranberry sauce, provolone cheese, and freshly baked French or sourdough bread. Lay everything out on your countertop for easy access as you create this delicious cranberry turkey grilled cheese. Having all your ingredients at hand ensures a smooth and enjoyable cooking process, making it easier to refashion those delightful Thanksgiving leftovers.

Step 2: Assemble Sandwich
Begin layering your sandwich by placing a generous slice of provolone cheese on one piece of bread. Next, add a hearty portion of turkey followed by a spread of cranberry sauce. Top it all off with another slice of provolone cheese for that melty goodness before covering with the second slice of bread. Push down gently to ensure the ingredients stick together, creating a solid foundation for grilling.

Step 3: Grill Sandwich
Heat a non-stick skillet over medium heat and add a teaspoon of butter or mayo. Once the skillet is warm, place the assembled cranberry turkey grilled cheese in the pan. Grill each side for 3-4 minutes until the bread turns golden brown and crispy, and the cheese begins to melt. Keep a close eye to prevent burning, adjusting the heat as necessary for a perfect grill.

Step 4: Serve
Once both sides of your sandwich are beautifully golden and the cheese is gooey, gently remove it from the skillet. Place it on a cutting board and let it rest for a minute before slicing it in half. This cranberry turkey grilled cheese sandwich is now ready to be served warm, showcasing the perfect blend of savory turkey and sweet cranberries that’s sure to delight your taste buds!

Expert Tips for Cranberry Turkey Grilled Cheese

  • Quality Ingredients: Choose high-quality block provolone cheese over pre-sliced for better flavor and melt. Freshly baked bread also enhances taste.
  • Avoid Burning: Keep the skillet on medium heat. Watch closely to prevent burning while ensuring the cheese melts perfectly inside your cranberry turkey grilled cheese.
  • Customize Wisely: Feel free to add spinach or apple slices for a crunch, but ensure they complement rather than overpower the turkey and cranberry balance.
  • Perfectly Grilled: Lightly spread butter or mayo on the outer sides of the bread for a crispy crust, but avoid overloading to keep the sandwich from getting greasy.
  • Use Leftovers Creatively: Don’t hesitate to use any leftover turkey and cranberry sauce; they contribute to that cozy, comforting vibe this sandwich is all about!

Cranberry Turkey Grilled Cheese Variations

Feel free to get creative and personalize your sandwich with these delightful twists to enhance your cranberry turkey grilled cheese experience!

  • Sweet Apple Slices: Add thin slices of apple for a refreshing crunch and natural sweetness that complements the turkey and cranberries.

  • Cheese Swap: Use sharp cheddar instead of provolone for a bolder, more robust flavor that pairs beautifully with the sweet tartness of the cranberries. The sharper bite will excite your taste buds!

  • Greens Galore: Sneak in some baby spinach or arugula for an extra layer of fresh flavor and a pop of color. This not only adds nutrition but also brings a delightful texture to each bite.

  • Herbed Butter: Instead of plain butter, mix in some garlic powder or fresh herbs like rosemary before grilling your sandwich for an aromatic twist that elevates the entire dish.

  • Spicy Kick: Add a splash of your favorite hot sauce or sliced jalapeños for a zesty heat that contrasts with the sweetness of the cranberry. This unexpected layer of flavor will delight adventurous palates!

  • Savory Mushroom: Incorporate sautéed mushrooms to deepen the umami flavor of your sandwich. Their earthy taste pairs so well with turkey and cheese, creating a rich, satisfying bite.

  • Creamy Spin: Try adding a layer of cream cheese or goat cheese to enhance creaminess and offer a tangy twist. This will make your grilled cheese even more indulgent!

Enhance your sandwich journey further with our delicious ideas like the Savory Cheese Egg or savor the unique flavors in our Vegetable Bake with Cheese and Cream that show just how fun cooking can be!

Make Ahead Options

These Cranberry Turkey Grilled Cheese sandwiches are perfect for meal prep, saving you valuable time on busy weeknights! You can assemble the sandwiches and refrigerate them for up to 24 hours. To maintain quality, layer your turkey, cranberry sauce, and provolone cheese between two slices of bread, then wrap them tightly in plastic wrap or place them in an airtight container. Just before serving, preheat your skillet over medium heat, spread butter or mayo on the outside, and grill each sandwich for about 3-4 minutes per side until golden brown and the cheese is gooey. This way, you’ll enjoy a delicious, homemade cranberry turkey grilled cheese with minimal effort right when hunger strikes!

How to Store and Freeze Cranberry Turkey Grilled Cheese

Fridge: Store leftovers in an airtight container for up to 2 days. Reheat on a skillet to regain that delightful crispiness.

Freezer: For longer storage, wrap the sandwich tightly in plastic wrap and then in aluminum foil before freezing for up to 1 month.

Reheating: When ready to enjoy, thaw in the fridge overnight, then reheat on a skillet for 4-5 minutes per side until heated through and crispy.

Tip: To maintain the best texture, avoid microwaving, as it may lead to a soggy sandwich; the cranberry turkey grilled cheese deserves that perfect crisp!

What to Serve with Cranberry Turkey Grilled Cheese

Elevate your meal with sides that perfectly complement the warm, gooey goodness of your sandwich.

  • Tomato Basil Soup: The classic pairing! Its tangy flavor and creamy texture balance the sweetness of the cranberries wonderfully.
  • Mixed Greens Salad: A light and fresh salad adds a crunchy contrast, enhancing the sandwich’s richness with vibrant vegetables and a zesty vinaigrette.
  • Sweet Potato Fries: Crispy and slightly sweet, they provide a delightful crunch that pairs beautifully with the savory turkey and creamy cheese.
  • Cranberry Sauce Dip: For those who love a sweet and tangy touch, a small bowl of warm cranberry sauce enhances the experience without overpowering the flavors.
  • Pickle Platter: The bright acidity of dill pickles offers a refreshing contrast, cutting through the richness of the cheese and turkey in every bite.
  • Chilled White Wine: A glass of Chardonnay or Sauvignon Blanc brings a refreshing acidity that works well with the savory flavors of the sandwich.
  • Apple Slices: Crunchy, juicy slices of apple offer an extra sweet and crisp element that pairs excellently with the turkey and cranberries.
  • Pumpkin Spice Latte: For a cozy vibe, this warm fall favorite provides a comforting sip that harmonizes with the holiday flavors in your meal.
  • Butternut Squash Soup: Creamy and slightly sweet, this seasonal soup serves as a warm, comforting companion that perfectly complements the grilled cheese.
  • Chocolate Chip Cookies: Finish your meal on a sweet note with these warm, gooey delights—an unforgettable dessert contrast to the savory sandwich.

Cranberry Turkey Grilled Cheese Recipe FAQs

What type of bread is best for this sandwich?
Absolutely! For the best flavor and texture, I recommend using freshly baked breads like French or sourdough. They provide a sturdy foundation for the fillings and create a delightful crisp when grilled. Plus, their subtle flavors perfectly complement the savory turkey and sweet cranberries.

How should I store leftover cranberry turkey grilled cheese?
Very good question! Store any leftover sandwiches in an airtight container in the refrigerator for up to 2 days. When you’re ready to enjoy them again, reheat them on a skillet to restore that delicious crunch on the outside.

Can I freeze cranberry turkey grilled cheese?
Yes, you can freeze your sandwiches! To do so, wrap the assembled sandwich tightly in plastic wrap, then in aluminum foil to prevent freezer burn. It can be frozen for up to 1 month. When you want to enjoy it, let it thaw in the refrigerator overnight, and then reheat in a skillet over medium heat for about 4-5 minutes per side until heated through and crispy.

What do I do if my cheese isn’t melting properly?
If your cheese isn’t melting well, ensure that your skillet is at medium heat, not high. You might also want to cover the skillet with a lid while grilling to trap heat and aid in melting the cheese. Sometimes, using freshly grated cheese instead of pre-sliced can make a big difference in melt quality!

Can I use turkey that isn’t leftover?
Absolutely! While leftover turkey is perfect for this sandwich, you can certainly use freshly cooked turkey or even deli-sliced turkey. Just be sure to season it well for that desired depth of flavor that will meld beautifully with the cranberries and cheese.

What should I know about seasoning for dietary restrictions?
If you or someone around you has allergies, it’s a great idea to check for any ingredient sensitivities. For a gluten-free option, use gluten-free bread; and for dairy-free preferences, you can substitute the provolone cheese with a dairy-free cheese alternative. Always feel free to customize to suit your dietary needs while enjoying this comforting cranberry turkey grilled cheese!

cranberry turkey grilled cheese

Cranberry Turkey Grilled Cheese: The Ultimate Comfort Bite

Transform Thanksgiving leftovers into a delicious cranberry turkey grilled cheese that’s quick and irresistible.
Prep Time 10 minutes
Cook Time 8 minutes
Resting Time 1 minute
Total Time 19 minutes
Servings: 2 sandwiches
Course: Lunch
Cuisine: American
Calories: 400

Ingredients
  

For the Bread
  • 2 slices French or sourdough bread Use freshly baked for best flavor and texture
For the Filling
  • 4 oz leftover roasted turkey Adds delicious protein
  • 2 tbsp cranberry sauce For a sweet and tangy kick
  • 2 slices provolone cheese Consider mozzarella or gouda as alternatives
For Grilling
  • 1 tbsp butter or mayo Ensures a golden, crispy exterior

Equipment

  • Non-Stick Skillet

Method
 

Step-by-Step Instructions
  1. Start by gathering your ingredients: turkey, cranberry sauce, provolone cheese, and bread. Lay them out for easy access.
  2. Layer the sandwich by placing provolone on one slice of bread, followed by turkey and cranberry sauce. Add another slice of provolone and top with the second slice of bread.
  3. Heat a skillet over medium heat and add butter or mayo. Place the sandwich in the pan and grill each side for 3-4 minutes until golden brown and the cheese melts.
  4. Remove from the skillet, let it rest for a minute, and then slice in half before serving.

Notes

Use high-quality ingredients and watch the heat to avoid burning while ensuring the cheese melts perfectly.

Grilled Baby Octopus with Nuoc Cham for a Flavorful Twist

As I stood by the grill, the tantalizing scent of smoky goodness wafted through the air, mingling with the fresh marinade clinging to the baby octopus. This Grilled Baby Octopus with Nuoc Cham is not just an appetizer; it’s a culinary adventure that transports you straight to the vibrant streets of Vietnam. Perfectly tender and infused with the zesty essence of the spicy dipping sauce, it promises a delightful experience for seafood lovers. The best part? It’s incredibly easy to prepare, making it an impressive addition to your next gathering without the usual stress of complex dishes. Ready to wow your guests with a taste of adventure? Let’s dive into this delightful recipe!

Why Try Grilled Baby Octopus?

Unforgettable Flavor: The smoky aroma and zesty Nuoc Cham create a tantalizing fusion that your taste buds will crave.

Easy Preparation: With just a few simple steps, you can impress your guests without the fuss—perfect for home chefs at any level.

Texture Delight: Enjoy the balance of tender octopus with a charred exterior, making each bite a savory experience.

Versatile Dipping Sauce: The Nuoc Cham isn’t just for octopus. Use it on grilled meats, veggies, or even as a salad dressing for added zing!

Crowd-Pleasing Appetizer: This dish is a guaranteed hit for parties, appealing to adventurous eaters and classic palates alike.

Don’t forget to explore our refreshing cucumber and carrot salad for a perfect sidekick to your grilled octopus!

Grilled Baby Octopus with Nuoc Cham Ingredients

For the Octopus
Baby Octopus – Fresh seafood element; ensure they’re cleaned and heads discarded for the best results.
Lemon Juice – Adds acidity and brightness; use fresh lemon for the most vibrant flavor.
Garlic – Provides aromatic depth; minced garlic gives an intense flavor punch.
Olive Oil – Essential for marinating and grilling; enhances both flavor and moisture.
Red Pepper Flakes – Introduces the perfect amount of heat; adjust based on your spice tolerance.
Kosher Salt & Pepper – Basic seasoning to enhance all flavors; fine sea salt is a good substitute.

For the Nuoc Cham Sauce
Fish Sauce – Salty umami base; crucial for authentic flavor, so don’t skip this ingredient.
Sugar – Balances the saltiness of fish sauce; using brown sugar adds a richer taste.
Water – Dilutes the sauce; warm water helps dissolve the sugar effectively.
Lime Juice – Brings additional acidity and freshness; lemon can serve as a good substitute.
Chili Pepper – Adds heat and flavor; fresh Thai chilies are highly recommended for authenticity.

Step‑by‑Step Instructions for Grilled Baby Octopus with Nuoc Cham

Step 1: Prepare the Octopus
Start by bringing a pot of salted water to a boil. Add the baby octopus and cook for just 1 minute; this quick blanching will tenderize them beautifully. Once done, remove the octopus with a slotted spoon and let them drain well. This initial step is crucial for achieving the tender texture in your Grilled Baby Octopus with Nuoc Cham.

Step 2: Marinate the Octopus
In a large mixing bowl, combine the drained octopus with fresh lemon juice, minced garlic, olive oil, red pepper flakes, kosher salt, and pepper. Toss everything together thoroughly to coat each piece evenly. Cover the bowl with plastic wrap and refrigerate the mixture for at least 2 hours; this marinade process infuses the octopus with vibrant flavors, enhancing your grilled dish.

Step 3: Prepare the Nuoc Cham Sauce
While the octopus marinates, whip up the Nuoc Cham sauce. In a bowl, whisk together fish sauce, sugar, warm water, fresh lime juice, and sliced chili pepper. Adjust the seasoning to your taste, balancing the saltiness and sweetness. This versatile dipping sauce will perfectly complement the smoky grilled baby octopus, so set it aside to let the flavors meld.

Step 4: Preheat the Grill
As the marinating time nears its end, preheat your grill to medium-high heat. Ensure the grates are clean and lightly oiled to prevent sticking. This step helps achieve those beautiful char marks on your Grilled Baby Octopus, enhancing both flavor and presentation.

Step 5: Grill the Octopus
Once the grill is hot, place the marinated octopus on the grates. Grill them for about 3-4 minutes, turning occasionally for even cooking, until they develop a slight char and are heated through. You’ll know they’re ready when they are tender to the touch and beautifully caramelized, elevating your dish.

Step 6: Serve with Nuoc Cham
After grilling, remove the octopus from the grill and transfer them to a serving platter. Drizzle generously with the freshly prepared Nuoc Cham sauce. This final touch not only enhances the flavors but also adds a vibrant presentation, making your Grilled Baby Octopus with Nuoc Cham an eye-catching and delicious appetizer for any gathering.

How to Store and Freeze Grilled Baby Octopus

Fridge: Keep the marinated baby octopus in an airtight container for up to 2 days before grilling. It’s best enjoyed fresh, but these tips help maintain its flavor.

Freezer: If you’ve grilled the baby octopus and have leftovers, they can be frozen for up to 2 months. Make sure to cool them completely before sealing in a freezer-safe bag to prevent freezer burn.

Nuoc Cham Storage: The Nuoc Cham can be stored in the refrigerator for up to 3 weeks. Keep it in an airtight container, and give it a good shake before using, as the ingredients may settle.

Reheating: Reheat grilled baby octopus gently in a skillet over low heat or in the microwave briefly, ensuring not to overcook it. Pair it with fresh Nuoc Cham for maximum impact!

Make Ahead Options

These Grilled Baby Octopus with Nuoc Cham are perfect for busy weeknights or entertaining! You can marinate the octopus up to 24 hours in advance; just follow the marinating instructions and store them in an airtight container in the refrigerator to keep them tender and flavorful. Additionally, the Nuoc Cham sauce can be made ahead and refrigerated for up to 3 weeks, allowing the flavors to develop even more. When you’re ready to serve, simply grill the marinated octopus for a quick 3-4 minutes until beautifully charred. This strategic prep allows you to enjoy deliciously grilled octopus with minimal effort, making dinner a breeze!

Grilled Baby Octopus with Nuoc Cham Variations

Feel free to get creative with this dish and customize it to your taste buds’ delight!

  • Calamari Swap: Replace baby octopus with calamari for a different texture. Tender calamari can provide a wonderful twist while maintaining the delicious flavor.
  • Herbed Nuoc Cham: Add fresh herbs like cilantro or mint to the Nuoc Cham for a refreshing lift. This twist introduces a vibrant green color and enhances the sauce’s aromatic profile.
  • Spicy Kick: For adventurous eaters, throw in extra chili flakes or fresh Thai chilies into the marinade. This will raise the heat level and make those flavor profiles pop even more!
  • Citrus Twist: Swap lime juice for orange juice in the Nuoc Cham. The sweet citrusy notes add a unique freshness that pairs beautifully with grilled seafood.
  • Crunchy Toppings: Top the finished dish with toasted peanuts or sesame seeds for an added crunch. This texture contrast complements the tender octopus perfectly!
  • Grilled Accompaniments: Serve alongside grilled veggies or a fresh salad, like a refreshing cucumber and carrot salad, to elevate your meal further.
  • Saturated Sauce: Experiment with adding extra sugar to the Nuoc Cham for a sweeter version that can balance better with high acidity seafood. Adjust to your liking for that perfect match!
  • Bready Delight: Pair this dish with crusty artisanal bread, perfect for dipping in the flavorful Nuoc Cham, and to soak up every delicious drop of that spicy sauce.

These variations and substitutions allow you to explore different flavor profiles and enhance your culinary experience with this delightful seafood dish! Don’t hesitate to make it your own!

Expert Tips for Grilled Baby Octopus

  • Cooking Time: Keep an eye on the grilling time; overcooking can lead to a rubbery texture. Aim for 3-4 minutes to achieve tenderness.
  • Fresh Ingredients: Always opt for fresh baby octopus and use freshly squeezed lemon juice for the best flavor in your grilled baby octopus with Nuoc Cham.
  • Marination Magic: Allow a minimum of 2 hours for marination; this is key to infusing flavors thoroughly. Overnight marination yields even better results!
  • Heat Control: Preheat your grill properly to medium-high; this ensures a good sear while cooking the octopus evenly.
  • Flavor Adjustments: Taste your Nuoc Cham after mixing and adjust sweetness or spice levels according to your preference; every palate is different!

What to Serve with Grilled Baby Octopus with Nuoc Cham

Pair the smoky, tender octopus with delightful sides that elevate your meal experience.

  • Crispy Rice Cakes: Crunchy on the outside, these cakes offer a delightful contrast to the tender octopus, enhancing each bite.

  • Asian Slaw: A vibrant mix of cabbage and carrots, drizzled with a sesame dressing adds freshness and a crisp texture, balancing the rich flavors of the octopus.

  • Grilled Vegetable Skewers: Seasonal vegetables like zucchini, bell peppers, and cherry tomatoes, grilled to perfection complement the smoky notes while bringing out natural sweetness.

  • Coconut Jasmine Rice: Creamy and aromatic, the rice serves as a perfect base to soak up the Nuoc Cham, making every bite a flavorful affair.

  • Thai Basil Lemonade: Refreshing and slightly sweet, this vibrant beverage contrasts beautifully with the spicy octopus, quenching your thirst while enhancing the meal’s overall experience.

  • Mango Sticky Rice: This sweet dessert perfectly rounds out the meal, blending tropical sweetness with creamy coconut that washes away any heat from the main dish.

Grilled Baby Octopus with Nuoc Cham Recipe FAQs

How do I select fresh baby octopus?
When choosing baby octopus, look for those that are shiny and firm with a vibrant color. Avoid any with dark spots or a slimy texture, which may indicate they are past their prime. Freshness is crucial for achieving that tender, delectable bite in your Grilled Baby Octopus with Nuoc Cham.

What’s the best way to store leftover grilled octopus?
Store any leftover grilled baby octopus in an airtight container in the refrigerator. It will stay fresh for up to 2 days. If you plan to keep it longer, consider freezing it instead. Just ensure it cools completely before transferring it to a freezer-safe bag, allowing for maximum preservation without freezer burn.

Can I freeze marinated baby octopus?
Absolutely! If you have marinated baby octopus and want to store it for later, you can freeze it. Place the marinated octopus in a freezer-safe bag, remove as much air as possible, and freeze for up to 2 months. When you’re ready to cook, thaw it in the refrigerator overnight before grilling.

What should I do if my octopus is rubbery?
If your grilled octopus turns out rubbery, it may be due to overcooking. Octopus needs just a few minutes on the grill—typically 3-4 minutes—to become tender and lightly charred. Next time, closely monitor the cooking time to ensure a perfect texture.

Is Nuoc Cham safe for people with seafood allergies?
Nuoc Cham contains fish sauce, which can pose issues for those with seafood allergies. If you’re serving guests with allergies, consider making a vegetarian or different dipping sauce tailored to their needs, like a zesty lime vinaigrette without any fish products.

Grilled Baby Octopus with Nuoc Cham

Grilled Baby Octopus with Nuoc Cham for a Flavorful Twist

Grilled Baby Octopus with Nuoc Cham is a flavorful adventure that brings the taste of Vietnam to your table, perfect for seafood lovers.
Prep Time 15 minutes
Cook Time 10 minutes
Marination Time 2 hours
Total Time 2 hours 25 minutes
Servings: 4 servings
Course: Dinner
Cuisine: Vietnamese
Calories: 200

Ingredients
  

For the Octopus
  • 1 lb Baby Octopus Fresh seafood element; ensure they're cleaned and heads discarded for the best results.
  • 2 tbsp Lemon Juice Adds acidity and brightness; use fresh lemon for the most vibrant flavor.
  • 3 cloves Garlic Provides aromatic depth; minced garlic gives an intense flavor punch.
  • 2 tbsp Olive Oil Essential for marinating and grilling; enhances both flavor and moisture.
  • 1 tsp Red Pepper Flakes Introduces the perfect amount of heat; adjust based on your spice tolerance.
  • 1 tsp Kosher Salt Basic seasoning to enhance all flavors; fine sea salt is a good substitute.
  • 1 tsp Pepper Basic seasoning to enhance all flavors.
For the Nuoc Cham Sauce
  • 3 tbsp Fish Sauce Salty umami base; crucial for authentic flavor.
  • 1 tbsp Sugar Balances the saltiness of fish sauce; brown sugar adds a richer taste.
  • 3 tbsp Water Dilutes the sauce; warm water helps dissolve the sugar.
  • 2 tbsp Lime Juice Brings additional acidity and freshness; lemon can serve as a substitute.
  • 1 medium Chili Pepper Adds heat and flavor; fresh Thai chilies are recommended.

Equipment

  • grill
  • mixing bowl
  • pot
  • slotted spoon

Method
 

Step-by-Step Instructions
  1. Start by bringing a pot of salted water to a boil. Add the baby octopus and cook for just 1 minute; this quick blanching will tenderize them beautifully. Once done, remove the octopus with a slotted spoon and let them drain well.
  2. In a large mixing bowl, combine the drained octopus with fresh lemon juice, minced garlic, olive oil, red pepper flakes, kosher salt, and pepper. Toss everything together thoroughly to coat each piece evenly. Cover the bowl with plastic wrap and refrigerate for at least 2 hours.
  3. While the octopus marinates, prepare the Nuoc Cham sauce by whisking together fish sauce, sugar, warm water, fresh lime juice, and sliced chili pepper. Adjust seasoning to taste.
  4. Preheat your grill to medium-high heat and ensure the grates are clean and lightly oiled.
  5. Once the grill is hot, place the marinated octopus on the grates. Grill them for about 3-4 minutes, turning occasionally until they develop a slight char and are heated through.
  6. After grilling, remove the octopus from the grill and transfer to a serving platter. Drizzle with the Nuoc Cham sauce.

Notes

Ensure to marinate the octopus for at least 2 hours for the best flavor infusion. Grill carefully to avoid overcooking, which can lead to rubbery texture.

Magical Butterbeer Cookies That Will Enchant Your Taste Buds

Just the other day, I overheard my neighbor excitedly chatting about a magical feast inspired by the Wizarding World, and it sparked a sweet idea! I couldn’t resist the urge to whip up a batch of Butterbeer Cookies, which transport you straight to the cozy warmth of the Three Broomsticks. These delightful treats are not only incredibly easy to make, but they also boast a soft, chewy texture that melts in your mouth. Topped with a luscious butterscotch frosting, these cookies truly embody the nostalgic essence of butterbeer, making them perfect for any gathering. Whether you’re a Harry Potter enthusiast or simply a dessert lover, these Butterbeer Cookies promise to enchant your taste buds! Ready to make your kitchen a little more magical?

Why are Butterbeer Cookies so special?

Irresistible Flavor: These cookies deliver a delightful blend of sweet butterscotch and butteriness that will have you reminiscing about the Wizarding World. Simple Steps: With straightforward instructions, you’ll whip up a batch without any fuss, making them perfect for bakers of all skill levels. Festive Delight: Ideal for themed gatherings, they add a sprinkle of magic to any event. Customizable Options: Want to switch things up? You can easily incorporate nuts or chocolate chips for added flair. Perfect for Sharing: Great for parties or simply a sweet treat to enjoy at home, they’ll disappear in no time! If you love cookies that are both enchanting and delicious, don’t miss out on these Butterbeer Cookies—your friends will be asking for the recipe!

Butterbeer Cookies Ingredients

For the Cookies
Butter – Softened. Provides moisture and richness to the cookie base.
Granulated Sugar – Sweetness. Enhances the cookie base flavor.
Brown Sugar – Adds moisture and depth of flavor.
Egg – Binds ingredients and contributes to the cookie structure.
Vanilla Extract – Flavor enhancer. Adds a sweet aroma.
All-Purpose Flour – Main structure component.
Salt – Balances sweetness and enhances flavor.
Baking Powder – Leavens the cookies for a soft texture.

For the Butterscotch Frosting
Powdered Sugar – For frosting consistency and sweetness.
Butterscotch Syrup – Key flavoring for frosting.
Heavy Cream – Adjusts frosting consistency.

For the Decorative Touch
Harry Potter-Inspired Sprinkles – Decorative element that adds a fun touch.

Let the magic of these Butterbeer Cookies fill your home with sweet aromas and delightful flavors!

Step‑by‑Step Instructions for Butterbeer Cookies

Step 1: Preheat the Oven
Begin by preheating your oven to 350°F (175°C). While the oven warms up, prepare a baking sheet by lining it with parchment paper, which will prevent the Butterbeer Cookies from sticking and help them bake evenly. Ensure everything is ready, as a properly heated oven is key to achieving that golden edge around your cookies.

Step 2: Create Cookie Dough
In a large mixing bowl, cream together the softened butter, granulated sugar, and brown sugar using a hand mixer or stand mixer on medium speed until the mixture is light and fluffy. This should take about 2 minutes. Next, beat in one egg and the vanilla extract until fully incorporated, creating a smooth and luscious base for your Butterbeer Cookies.

Step 3: Combine Dry Ingredients
In a separate bowl, whisk together the all-purpose flour, baking powder, and a pinch of salt until well mixed. Gradually add this dry mixture to your wet ingredients, mixing on low speed until just combined. Be careful not to overmix—as soon as the flour disappears, you’re good to go! This will keep your cookies delightfully soft and chewy.

Step 4: Scoop Dough
Using a large cookie scoop, portion out 7-8 balls of cookie dough and place them onto your prepared baking sheet. Roll each ball gently and then flatten to about ¾ inch thickness. Make sure to leave enough space between the cookies, as they will spread while baking, resulting in perfectly sized Butterbeer Cookies that are soft in the center and slightly crisp on the edges.

Step 5: Bake
Place your baking sheet in the preheated oven and bake the cookies for 12-13 minutes. Keep an eye on them; they’re ready when the edges are lightly golden and the centers look set but still soft. When you take them out, they may seem a little underbaked, but they will firm up as they cool, enhancing that chewy texture you desire.

Step 6: Cool
Allow the Butterbeer Cookies to sit on the baking sheet for about 10 minutes after baking. This resting period is crucial as it lets them finish cooking and sets their shape. Afterward, transfer the cookies to a cooling rack to cool completely. This step is your moment to breathe in the warm, aromatic scents wafting from your freshly baked cookies.

Step 7: Prepare Frosting
While your Butterbeer Cookies cool, you can prepare the butterscotch frosting. In a mixing bowl, beat together softened butter, powdered sugar, heavy cream, and butterscotch syrup until fluffy and well combined. This should take about 3-4 minutes on medium speed. The frosting should be smooth and creamy, ready to spread or pipe onto your cookies for that magical touch.

Step 8: Decorate
Once your cookies are completely cool, it’s time to frost! Either pipe the butterscotch frosting onto each cookie or spread it using a knife for a thicker layer. For an extra festive flair, immediately sprinkle some Harry Potter-inspired sprinkles atop the frosting. This final touch not only adds sweetness but also brings a burst of color and fun to your delicious Butterbeer Cookies.

What to Serve with Magical Butterbeer Cookies

Transport your loved ones to the enchanting world of Harry Potter with delicious pairings that will complete your magical dessert experience.

  • Hot Cocoa: The rich, velvety texture and sweetness of hot cocoa match brilliantly with the Butterscotch frosting, creating a cozy pairing. Imagine sipping on warm cocoa while savoring each bite of your cookies!

  • Vanilla Ice Cream: The creamy, cold vanilla ice cream complements the warm cookies perfectly, offering a delightful contrast that enhances the overall flavor experience. Drizzle a touch of caramel sauce over the top for that extra indulgence!

  • Spiced Apple Cider: This seasonal favorite brings warmth and a hint of spice that echoes the cozy atmosphere of the Three Broomsticks, making it the perfect drink for sipping alongside your cookies.

  • Chocolate Milk: The creamy sweetness of chocolate milk balances the butterscotch flavor and adds an enjoyable nostalgia that pairs beautifully with dessert. This duo is sure to delight both kids and adults!

  • Pumpkin Pie: For a festive touch, serve slices of spiced pumpkin pie. Their warm, spiced notes create a wonderful flavor harmony with the sweet richness of your Butterbeer Cookies, pulling together a magical meal.

  • Butterscotch Pudding: With a similar flavor profile, rich butterscotch pudding adds a luxurious creaminess that complements the cookies beautifully. Serve it in small cups for a fun and indulgent dessert complement!

  • Festive Fruit Salad: Fresh fruit adds a light and refreshing contrast to the sweeter treats, enhancing the dessert experience with bursts of vibrant flavor and color. Keep it simple with a mix of berries or tropical fruits for a delightful twist.

  • Milkshakes: Try a luscious butterscotch milkshake for a truly decadent dessert experience. The combination of creaminess and sweetness from both the milkshake and cookies will leave everyone returning for seconds!

Butterbeer Cookies Variations & Substitutions

Feel free to sprinkle a little magic and customize your Butterbeer Cookies!

  • Vegan Delight: Replace butter with dairy-free margarine and use a flax egg for a plant-based version. Enjoy the same soft texture without losing flavor!

  • Gluten-Free Option: Swap all-purpose flour for a gluten-free flour blend to create a similar soft and chewy cookie. Host a magical gathering without dietary worries!

  • Mini Treats: Make mini cookies by scooping smaller portions of dough. Adjust baking time to 8-10 minutes for bite-sized bliss that everyone will love.

  • Nutty Twist: Add ½ cup of chopped pecans or walnuts to the dough for a delightful crunch. This variation also enhances the cookie’s richness, providing a fantastic texture contrast.

  • Chocolate Chips: Fold in a cup of butterscotch or chocolate chips for an extra sweet, decadent treat. They will melt just right, creating puddles of joy in every bite.

  • Spiced Variation: Add a pinch of cinnamon or nutmeg for a cozy autumn flavor. This twist resonates with those lovely seasonal vibes, making your cookies even more enchanting.

  • Rummy Flair: Substitute vanilla extract with rum extract to mimic the warm essence of butterbeer. It’s a delightful change that will transport you straight to the Three Broomsticks!

Consider partnering these delicious Butterbeer Cookies with a warm cup of hot cocoa or even some festive Nutty Apricot Cookies for a delightful cookie platter that everyone will adore!

Storage Tips for Butterbeer Cookies

  • Room Temperature: Store cookies in an airtight container at room temperature for up to 3 days to maintain freshness and chewiness. This way, you can easily enjoy your magical Butterbeer Cookies while they last!

  • Freezer: If you want to enjoy these cookies later, freeze unbaked dough for up to 2 months. Just scoop and freeze the dough balls on a baking sheet, then transfer them to an airtight container once frozen.

  • Baked Cookies Freezing: Fully baked Butterbeer Cookies can be frozen for up to 1 month. Make sure to wrap them tightly in plastic wrap or aluminum foil before placing them in a freezer bag to prevent freezer burn.

  • Reheating: When ready to enjoy, let frozen cookies thaw in the fridge overnight, then reheat in the oven at 350°F (175°C) for 5-7 minutes to restore that soft, chewy texture.

Expert Tips for Butterbeer Cookies

  • Watch Your Bake Time: Keep an eye on the cookies during the last few minutes; they can overbake quickly. Pull them when edges are golden for soft-center Butterbeer Cookies.

  • Thick Frosting Hack: For thicker frosting, gradually add more powdered sugar or reduce heavy cream. It adds a luscious texture that everyone will love!

  • Chill the Dough: Refrigerating dough balls for about 30 minutes before baking enhances chewiness. Don’t skip this step if you want that perfect consistency!

  • Use Quality Ingredients: High-quality vanilla extract and fresh butter make a noticeable difference in flavor, elevating your Butterbeer Cookies to the next level.

  • Experiment with Flavors: Try adding a dash of rum extract to the cookie dough for an extra twist, capturing that rich, festive flavor of your favorite magical drink.

Make Ahead Options

These delightful Butterbeer Cookies are perfect for meal prep, allowing you to enjoy their magical flavors with minimal fuss! You can prepare the cookie dough up to 24 hours in advance by mixing all the ingredients and storing the dough balls in an airtight container in the refrigerator. Alternatively, you can freeze the unbaked dough for up to 2 months; just roll the dough into balls and flash freeze them on a baking sheet before transferring to a freezer bag. When you’re ready to bake, simply place the chilled or frozen dough on a baking sheet and add a couple of extra minutes to the baking time. This ensures that your Butterbeer Cookies come out just as delicious, soft, and chewy as if they were made fresh!

Butterbeer Cookies Recipe FAQs

What type of butter should I use for Butterbeer Cookies?
Absolutely! You’ll want to use softened, unsalted butter for the best flavor and consistency. This provides moisture and richness to the cookie base. If you’re looking for a dairy-free option, feel free to substitute with a dairy-free margarine.

How should I store leftover Butterbeer Cookies?
Very! To maintain their delightful chewiness, store cookies in an airtight container at room temperature for up to 3 days. If you have leftovers, consider freezing them for later enjoyment; they’ll stay fresh for up to 1 month when properly wrapped.

Can I freeze the dough for Butterbeer Cookies?
Of course! To freeze unbaked dough, scoop the dough balls onto a baking sheet and freeze until solid. Transfer them to an airtight container or freezer bag for up to 2 months. When you’re ready to bake, simply pop them in the oven straight from the freezer, adding a couple extra minutes to the baking time.

What if my Butterbeer Cookies spread too much during baking?
Don’t worry! If your cookies spread excessively, it might be due to warm dough or a lack of flour. Make sure the dough is chilled for about 30 minutes before baking and accurately measure your flour. If needed, add an extra tablespoon or two of flour to achieve a thicker consistency.

Are Butterbeer Cookies suitable for people with nut allergies?
Yes! The basic recipe for Butterbeer Cookies itself is nut-free, as it doesn’t call for nuts. However, always ensure any alternate flours or additives you use are also nut-free, especially if you adapt the recipe for different flavors or include mix-ins.

Butterbeer Cookies

Magical Butterbeer Cookies That Will Enchant Your Taste Buds

Delicious Butterbeer Cookies that transport you to the Wizarding World with soft, chewy textures and butterscotch frosting.
Prep Time 20 minutes
Cook Time 13 minutes
Cooling Time 10 minutes
Total Time 43 minutes
Servings: 24 cookies
Course: Dessert
Cuisine: Magic
Calories: 150

Ingredients
  

For the Cookies
  • 1 cup Butter Softened
  • 3/4 cup Granulated Sugar
  • 3/4 cup Brown Sugar
  • 1 large Egg
  • 1 teaspoon Vanilla Extract
  • 2 1/4 cups All-Purpose Flour
  • 1/2 teaspoon Salt
  • 1 teaspoon Baking Powder
For the Butterscotch Frosting
  • 2 cups Powdered Sugar
  • 1/2 cup Butterscotch Syrup
  • 2 tablespoons Heavy Cream
For the Decorative Touch
  • 1 cup Harry Potter-Inspired Sprinkles

Equipment

  • mixing bowl
  • baking sheet
  • parchment paper
  • hand mixer
  • Cookie scoop

Method
 

Step-by-Step Instructions for Butterbeer Cookies
  1. Preheat your oven to 350°F (175°C) and line a baking sheet with parchment paper.
  2. Cream together softened butter, granulated sugar, and brown sugar until light and fluffy.
  3. Beat in one egg and vanilla extract until fully incorporated.
  4. In a separate bowl, whisk together flour, baking powder, and salt. Gradually add to wet ingredients.
  5. Scoop 7-8 balls of dough onto the baking sheet, flattening to about ¾ inch thick.
  6. Bake for 12-13 minutes until edges are lightly golden and centers look set.
  7. Cool on the baking sheet for 10 minutes before transferring to a cooling rack.
  8. Prepare the frosting by beating together butter, powdered sugar, heavy cream, and butterscotch syrup.
  9. Frost cookies and decorate with sprinkles once fully cooled.

Notes

Store cookies in an airtight container at room temperature for up to 3 days. Freeze unbaked dough for up to 2 months.

Fried Soft Shell Crabs: Crisp Perfection for Home Cooking

The aroma of sizzling seafood fills the air as I prepare a plate of Crispy Fried Soft Shell Crabs, a true delight that transforms any meal into a celebration. This easy recipe not only allows me to enjoy restaurant-quality flavors at home but also offers a palate-teasing crunch that’s perfect for any occasion. Whether it’s Mardi Gras or simply a cozy dinner night, these delightful crabs are an economical choice, promising satisfaction without breaking the bank. With each bite, you’ll savor both the satisfying crunch and the tender meat inside, making it a fun twist on your regular seafood fare. Curious about how to achieve that golden perfection in your kitchen? Let’s dive into this tasty adventure!

Why are Fried Soft Shell Crabs a Must?

Crunchy Delight: Each bite offers a crispy, golden coating that elevates your dining experience.
Flavorful Twist: The seasoned fish fry mix makes a perfect harmony with tender crab meat, creating a truly delectable dish.
Easy Preparation: Even novice cooks will appreciate the straightforward cooking method, ensuring success with minimal effort!
Versatile Side Pairings: They pair beautifully with creamy coleslaw or classic Cajun red potatoes, giving you endless meal options. For an added culinary kick, try serving them with a drizzle of Crawfish Sauce!
Affordable Gourmet: Enjoy restaurant-quality seafood at home without the expensive price tag—perfect for any budget-conscious food lover.

Fried Soft Shell Crabs Ingredients

For the Crabs
Soft Shell Crabs – Fresh or thawed crabs are essential for the best texture and flavor.
Eggs – Helps create a milk bath for the crabs; substitute with a vegan option if needed.
Mustard – Adds a delicious tang to the eggs; prepared yellow mustard works best for convenience.
Milk – Provides moisture and a smooth consistency in the milk bath; plant-based milk can be used as a substitute.

For the Coating
Flour – Forms the base of the crispy coating; all-purpose or gluten-free flour both work well.
Fish Fry Mix – Enhances flavor; I recommend the Slap Ya Mama mix for a Cajun kick, but any seasoned mix will do!

For Frying
Oil (for frying) – High smoke point oil like vegetable or canola oil is necessary for the deep-frying process.

Try this recipe for Fried Soft Shell Crabs and enjoy a tasty seafood treat that matches any restaurant experience!

Step-by-Step Instructions for Fried Soft Shell Crabs

Step 1: Thaw and Clean the Crabs
If your soft shell crabs are frozen, allow them to thaw completely in the refrigerator for several hours or overnight. Once thawed, gently rinse each crab under cold water, removing any debris. Pat them dry with a paper towel to ensure they are clean and ready for the cooking process.

Step 2: Prepare the Milk Bath
In a medium bowl, whisk together 2 eggs, 2 tablespoons of yellow mustard, and 1 cup of milk until smooth and well combined. This milk bath will add moisture and flavor to the crabs. Set your bowl aside, as it will be vital for coating your soft shell crabs before frying.

Step 3: Coat the Crabs
Take each cleaned crab and dip it into the milk bath, ensuring it is well-coated. Then, transfer the crab to a plate filled with a mixture of flour and fish fry mix, pressing gently to ensure an even coating. This crispy layer will create that irresistible crunch when you fry the soft shell crabs.

Step 4: Preheat the Oil
In a deep fryer or a large skillet, pour enough vegetable oil to reach about two inches deep. Heat the oil to 350°F (175°C). Use a thermometer to ensure the proper temperature, as this will help achieve that golden brown color and delicious crispiness in your fried soft shell crabs.

Step 5: Fry the Crabs
Once the oil is hot, carefully add the crabs to the fryer or skillet, legs first, to prevent splattering. Fry the crabs for about 2-3 minutes on each side or until they become a beautiful golden brown. Turn them gently to ensure even cooking, and keep a close eye to avoid burning.

Step 6: Drain Excess Oil
Using a slotted spoon, carefully remove the fried soft shell crabs from the oil and place them on a wire rack set over a baking sheet to drain excess oil. This method helps maintain their crispiness, ensuring that they don’t become soggy. Let them rest for a few minutes before serving.

Step 7: Serve with Dipping Sauce
Once drained, arrange your crispy fried soft shell crabs on a serving platter. Consider pairing them with a homemade dipping sauce, such as remoulade or the suggested Crawfish Sauce for a flavorful experience. Enjoy your homemade Fried Soft Shell Crabs with a side of creamy coleslaw or fries for a complete meal.

Storage Tips for Fried Soft Shell Crabs

Room Temperature: Best enjoyed fresh, but if needed, store crabs uncovered for up to 1 hour at room temperature; otherwise, refrigerate promptly.

Fridge: Keep leftover Fried Soft Shell Crabs in an airtight container for up to 1 day; they lose their crunch quickly, so consume as soon as possible.

Reheating: To restore crispiness, reheat in an oven at 350°F (175°C) for about 10 minutes, avoiding the microwave to prevent sogginess.

Freezer: Fried crabs can be frozen, but they are best enjoyed fresh; if freezing, wrap tightly and store for up to 1 month, then reheat from frozen in the oven.

What to Serve with Crispy Fried Soft Shell Crabs

The joy of enjoying soft shell crabs is only amplified by selecting delightful accompaniments that enhance their crunch and flavor.

  • Creamy Coleslaw: Balanced with tangy dressing, this cool side adds a refreshing crunch that pairs wonderfully with the crispy crabs.

  • Cajun Red Potatoes: These seasoned potatoes bring a hearty, flavorful element to the meal, complementing the seafood beautifully and adding a comforting touch.

  • Fries: Golden, crispy fries are a classic choice that complements the soft shell crabs perfectly. Their salty crunch makes for a delectable combination.

  • Homemade Remoulade: A zesty dip brings an exciting flavor dimension to your soft shell crabs. This silky sauce enhances each bite and adds a Cajun flair!

  • Grilled Asparagus: Lightly charred asparagus offers a fresh and vibrant pop of color on your plate, making for an appealing contrast to the fried crabs.

  • Chilled White Wine: A crisp, cool Riesling or Sauvignon Blanc elevates the dining experience, balancing the richness of the fried crabs with refreshing acidity.

  • Corn on the Cob: Sweet, buttery corn provides delightful juiciness and a fun texture variation, enhancing the overall meal experience.

  • Lemon Wedges: A simple squeeze of lemon brightens the flavors of the fried soft shell crabs, adding a touch of brightness that perfectly cuts through the richness.

Make Ahead Options

These Fried Soft Shell Crabs are perfect for busy cooks wanting to save time! You can prepare the milk bath (eggs, mustard, and milk) and clean the crabs up to 24 hours in advance. Simply store the milk bath in an airtight container in the refrigerator and keep the cleaned crabs wrapped in paper towels in the fridge to maintain freshness. When you’re ready to fry, dip the crabs in the milk bath, coat with the flour and fish fry mix, and fry immediately to achieve that crispy, golden perfection. By prepping this way, you’ll enjoy a hassle-free cooking experience while still savoring those delightful Fried Soft Shell Crabs!

Fried Soft Shell Crabs: Tasty Twists Await

Don’t be afraid to make this dish your own with delightful variations that will surprise your palate!

  • Pan-Fried Option: For a lighter twist, pan-fry the crabs using just enough oil to coat the bottom of the skillet. You’ll still have that enjoyable crunch!
  • Gluten-Free: Substitute all-purpose flour with a gluten-free flour blend for a crispy coating that everyone can enjoy without worries.
  • Fish Fry Mix Variations: Enhance flavors by experimenting with different fish fry mixes like Cajun or spicy blends! Each brings a unique kick to the dish.
  • Flavor Infusion: Add fresh herbs like parsley or dill to your fish fry mix to elevate the flavor profile that complements the sweetness of the crab meat.
  • Dipping Sauce Alternatives: Shake things up by serving with a homemade tartar sauce or spicy aioli, giving your bites a flavorful twist with every dip.
  • Cajun Red Potatoes: Serve your crabs alongside Cajun red potatoes for a full-bodied meal that pairs well with the seafood delight!
  • Baked Option: For a healthier alternative, try baking the coated crabs at 400°F (200°C) for 15-20 minutes until golden and crispy; you won’t lose the crunch!
  • Sizzling Spice: Incorporate Cajun seasoning into your milk bath for an added zing that packs a flavorful punch in every bite!

So dive in and make this recipe your own, creating your own culinary adventure with each new variation!

Expert Tips for Fried Soft Shell Crabs

  • Oil Temperature: Always check the oil temperature with a thermometer to achieve that perfect crispy texture; too hot can burn, and too cold will make them greasy.
  • Thawing Method: For the best results, thaw your crabs overnight in the fridge rather than using a microwave, which can affect the texture.
  • Coat Generously: Ensure a thorough coating of the milk bath and fish fry mix; this enhances the fried soft shell crabs’ crunch and flavor.
  • Slow Frying: Add crabs to the hot oil slowly and legs-first to prevent splatter and ensure even cooking; this keeps you safe and makes frying easier.
  • Drain Properly: Use a wire rack for draining instead of paper towels to keep them crispy; moisture from the towels can make the coating soggy.

Fried Soft Shell Crabs Recipe FAQs

How do I choose the best soft shell crabs?
Absolutely! Look for soft shell crabs that are lively and have a clean, ocean-fresh smell. The shells should feel soft to the touch without dark spots or blemishes, indicating freshness. If you can, purchase them from a trusted seafood market or fishmonger.

How should I store leftover fried soft shell crabs?
Fried crabs are best enjoyed right after cooking, but if you have leftovers, place them in an airtight container and refrigerate. They will stay fresh for up to 1 day. To reheat, simply place them in an oven at 350°F (175°C) for about 10 minutes, which helps restore some of that crispy texture.

Can fried soft shell crabs be frozen?
Definitely! If you want to freeze them, allow the fried crabs to cool completely, then wrap each crab tightly in plastic wrap and place them in an airtight freezer bag. They can be stored for up to 1 month. When ready to enjoy, reheat them directly from the freezer in the oven at 350°F (175°C) for around 15 minutes to ensure they’re heated through and crispy.

What if my fried soft shell crabs come out soggy?
Very! If your crabs end up soggy, it could be due to the oil temperature being too low during frying. Ensure your oil is at 350°F (175°C) before adding the crabs to achieve that golden, crispy texture. Also, make sure to drain them on a wire rack to allow excess oil to escape after frying.

Are there any dietary concerns when preparing soft shell crabs?
For sure! If serving to guests, it’s important to check for allergies, as shellfish can be a common allergen. Also, if anyone is vegan or vegetarian, consider offering an alternative dish, as these crabs are not suitable for those diets. If your audience has specific dietary restrictions, you might want to explore plant-based seafood options available on the market.

How can I enhance the flavor of my fried soft shell crabs?
You can absolutely boost the flavor! Consider adding spices to your fish fry mix or even including a touch of Old Bay seasoning to the flour. Additionally, serving them with a zesty sauce like homemade remoulade or a drizzled Crawfish Sauce can elevate the dish even further, turning your fried soft shell crabs into a culinary celebration!

Fried Soft Shell Crabs

Fried Soft Shell Crabs: Crisp Perfection for Home Cooking

Fried Soft Shell Crabs offer a crispy, golden coating that transforms any meal into a celebration.
Prep Time 15 minutes
Cook Time 10 minutes
Resting Time 5 minutes
Total Time 30 minutes
Servings: 4 crabs
Course: Dinner
Cuisine: Seafood
Calories: 200

Ingredients
  

For the Crabs
  • 4 pieces Soft Shell Crabs Fresh or thawed
  • 2 large Eggs Can be substituted with a vegan option
  • 2 tablespoons Mustard Prepared yellow mustard works best
  • 1 cup Milk Plant-based milk can be used as a substitute
For the Coating
  • 1 cup Flour All-purpose or gluten-free flour both work
  • 1 cup Fish Fry Mix Slap Ya Mama mix recommended for Cajun flavor
For Frying
  • 2 cups Oil (for frying) High smoke point oil like vegetable or canola

Equipment

  • deep fryer
  • Medium bowl
  • Wire rack
  • slotted spoon

Method
 

Step-by-Step Instructions
  1. Thaw and clean the crabs by rinsing them under cold water and patting them dry.
  2. Prepare the milk bath by whisking together eggs, mustard, and milk until smooth.
  3. Coat the crabs in the milk bath then dredge in the mixture of flour and fish fry mix.
  4. Preheat oil in a deep fryer or skillet to 350°F (175°C).
  5. Fry the crabs for 2-3 minutes on each side until golden brown.
  6. Drain excess oil on a wire rack set over a baking sheet.
  7. Serve with dipping sauce and enjoy with sides like creamy coleslaw.

Notes

Best served fresh, but leftovers can be stored in an airtight container for up to 1 day.

Deliciously Easy Halloween Icebox Cake for Spooky Celebrations

As the leaves turn and the air becomes crisp, I find myself delighting in the magic of Halloween. This year, I’ve conjured up a spook-tacular treat: a No-Bake Halloween Icebox Cake that’s as easy to whip up as it is fun to gobble down! With layers of velvety homemade whipped cream nestled between chocolatey Oreo cookies, this dessert is not only a showstopper at any Halloween gathering but also a breeze to prepare. You’ll love how quickly it comes together, leaving you with more time to enjoy haunting festivities with family and friends. Plus, it’s dressed in the most festive shades of orange, making it an eye-catching centerpiece. Ready to dive into some no-bake magic?

Why is this Halloween Icebox Cake special?

Simplicity: This no-bake dessert saves you time in the kitchen, letting you focus on the fun of Halloween!

Festive Vibes: With its vibrant orange hues, it brings the spirit of the season right to your table.

Creamy Delight: The combination of rich whipped cream and crunchy Oreo cookies creates a mouthwatering texture that everyone will love.

Customization: Whether you want to add fruit layers or try different cookie flavors, the options are endless!

Crowd-Pleasing: This cake is sure to impress your guests, making it a delightful addition to any Halloween gathering.

Halloween Icebox Cake Ingredients

For the Whipped Cream

  • Heavy Whipping Cream – Adds richness and creates the cake’s creamy texture. Use dairy-free alternatives for a non-dairy version.
  • Vanilla Extract – Provides flavor depth. Substitutable with almond extract or omit for a simpler taste.
  • Powdered Sugar – Sweetens the whipped cream. Use granulated sugar if powdered sugar is unavailable, but it may affect texture.
  • Orange Gel Food Coloring – Adds festive color to the whipped cream layers. Use natural coloring alternatives for a less vibrant option.

For the Cookies

  • Oreo Cookies – Provide the cake structure and flavor. Substitute with gluten-free cookies for a gluten-free version or chocolate wafer cookies.

For the Decoration

  • Orange Icing – Used to add a festive touch to the top of the cake.
  • Sprinkles – Perfect for adding a fun Halloween flair!

Embrace the spirit of the season with this delightful Halloween Icebox Cake, where every layer promises the perfect blend of textures and flavors!

Step‑by‑Step Instructions for Halloween Icebox Cake

Step 1: Prepare the Pan
Begin by taking a 9-inch springform pan and line the bottom and sides with plastic wrap or parchment paper for easy removal. This step is crucial for the Halloween Icebox Cake, ensuring a smooth presentation. Make sure the lining overlaps the edge slightly to make the cake layer a breeze to lift out later.

Step 2: Whip the Cream
In a mixing bowl, combine 2 cups of heavy whipping cream, 1 teaspoon of vanilla extract, and ¾ cup of powdered sugar. Using an electric mixer, whip the mixture on medium-high speed for about 5 minutes or until stiff peaks form. The whipped cream should look fluffy and hold its shape perfectly, creating a light base for your cake layers.

Step 3: Color the Cream
Divide the whipped cream evenly into three bowls. In each bowl, add different amounts of orange gel food coloring to create various shades from light to dark. Gently fold the coloring into the whipped cream using a spatula, being careful not to deflate the mixture. This colorful cream will form the festive layers of your Halloween Icebox Cake.

Step 4: Start Assembling
Place a layer of Oreo cookies at the bottom of your prepared springform pan, making sure to cover the entire base. For a more secure structure, you can break some cookies into pieces and fill any gaps between the whole cookies. This initial layer will provide a delicious foundation for the creamy layers to follow.

Step 5: Add the Darkest Cream Layer
Spread one-third of the darkest shade of whipped cream over the Oreo cookie layer, smoothing it out with an offset spatula. Ensure an even layer, reaching the edges of the pan. The rich color contrasted with the cookies will create a beautiful, eye-catching layer in your Halloween Icebox Cake.

Step 6: Repeat with Another Cookie Layer
Place another layer of Oreo cookies on top of the whipped cream, again making sure the cookies are laid flat and snug. This layer should balance both the creaminess and crunch needed for the cake. Afterward, add another third of your second-lightest orange whipped cream, spreading it evenly as you did before.

Step 7: Final Cookie and Cream Layer
For the final touch, add one last layer of Oreo cookies, ensuring the entire pan is filled. Top this with the remaining whipped cream, smoothing it into a beautiful peak or swirl design. This layer will be the most visible, so make it visually appealing as this is the glorious uppermost part of your Halloween Icebox Cake.

Step 8: Chill and Set
Cover the springform pan securely with plastic wrap and place it in the refrigerator. Let it chill for at least 6 hours, or overnight for the best results. This cooling step is essential for the flavors to meld and for the cake to set, ensuring you can cut clean slices when ready to serve.

Step 9: Decorate Before Serving
Once the Halloween Icebox Cake has set, carefully remove it from the refrigerator. Gently release the sides of the springform pan and peel away the lining. Now, sprinkle orange icing and decorative sprinkles on top, adding a fun and festive finish. This finishing touch will truly bring your cake to life for your Halloween celebrations!

Halloween Icebox Cake Variations & Substitutions

Inviting a sprinkle of creativity and taste into your Halloween Icebox Cake is as fun as the festivities themselves!

  • Dairy-Free: Substitute heavy whipping cream with coconut cream for a deliciously rich and creamy, non-dairy version.

  • Gluten-Free: Use gluten-free chocolate sandwich cookies instead of Oreos to ensure everyone can indulge without worry.

  • Natural Colors: Instead of gel food coloring, mix in natural alternatives like beet juice for a lovely hue while keeping it healthy.

  • Flavor Boost: Add a hint of almond or pumpkin spice instead of vanilla extract to warm up the flavors of this spooky cake.

  • Textural Surprise: Layer in some crushed candy corn or seasonal nuts between whipped cream layers to add delightful crunch.

  • Fruit Fun: Incorporate thin layers of banana or strawberry slices between the whipped cream for a fresh, fruity twist that brightens the cake!

  • Boozy Touch: For an adult version, drizzle a little rum or orange liqueur over the cookie layers before adding the whipped cream for a spirited addition.

  • Decorative Theme: Get creative with your sprinkles! Use colored sugar or themed Halloween sprinkles to customize the cake topping perfect for your Halloween party.

Feel free to explore these variations in your no-bake masterpiece, and if you’re looking for more inspiration, check out this delightful Strawberry Cheesecake Dump or perhaps brighten up another gathering with a Blueberry and Cream Cheese Cake. With a little imagination, every version can be a star at your Halloween celebration!

How to Store and Freeze Halloween Icebox Cake

Fridge: Store your Halloween Icebox Cake in an airtight container in the refrigerator. It will stay fresh for up to 2 days, but the flavors are best within the first day for optimal enjoyment.

Freezer: If you’re not serving it right away, you can freeze individual slices wrapped in plastic wrap and then aluminum foil. They’ll keep in the freezer for up to 2 months, making it easy to enjoy this festive treat anytime!

Reheating: There’s no need to reheat the cake; simply serve it chilled directly from the fridge or freezer. If frozen, allow it to thaw in the refrigerator overnight before serving.

Assembly Reminder: Don’t forget to decorate your Halloween Icebox Cake with icing and sprinkles just before serving to keep them looking fresh and festive!

Make Ahead Options

These Halloween Icebox Cake layers are perfect for meal prep! You can prepare the whipped cream and cookie layers up to 24 hours in advance, which will save you time on the day of your celebration. Simply whip the heavy cream, mix in the vanilla and powdered sugar, and divide it into bowls to color it for your cake. Assemble the cake by layering the Oreo cookies and whipped cream in the springform pan, then cover tightly with plastic wrap and refrigerate. To maintain quality, ensure it’s chilled for at least 6 hours or overnight to achieve a firm texture. When you’re ready to serve, just decorate with orange icing and sprinkles for a stunning finish that’s just as delicious as if made fresh that day!

Helpful Tricks for Halloween Icebox Cake

Whip Right: Ensure your heavy whipping cream reaches stiff peaks. This provides the perfect texture and stability for your cake layers.

Chill Out: Don’t skimp on the chilling time! Refrigerate the cake for at least 8 hours, ideally overnight, to achieve firm, clean slices.

Layering Love: Alternate cookie and cream layers carefully. Creating the right balance is key to a gorgeous presentation and delightful taste in your Halloween Icebox Cake.

Customize Colors: Use varying amounts of orange food coloring to match your Halloween theme. Feel free to play with shades for creativity!

Slice with Care: Use a sharp, warm knife to slice the cake. This will help you achieve beautiful, clean cuts for serving.

What to Serve with Halloween Icebox Cake

As Halloween approaches, indulge in the festive flavors of this creamy delight by pairing it with equally enchanting accompaniments.

  • Crispy Chocolate Wafers: The extra crunch complements the smoothness of the icebox cake, enhancing the overall texture experience.
  • Fresh Berries: Tart raspberries or strawberries offer a refreshing contrast, cleansing the palate between bites of rich cake.
  • Pumpkin Spice Latte: This cozy drink’s warm spices harmonize beautifully with the cake’s flavors, enhancing the festive atmosphere.
  • Candy Corn Medley: For a whimsical touch, this classic Halloween candy adds sweetness and fun to your dessert spread.
  • Whipped Cream Topper: A dollop of plain whipped cream on each slice amplifies the creaminess, making each bite even more indulgent.
  • Chocolate Sauce Drizzle: A warm, rich drizzle adds a decadent touch and enhances the cake’s chocolate notes, delighting any chocolate lover.
  • Cinnamon Sugar Donuts: Their warm, sugary goodness provides a delightful contrast to the coolness of the icebox cake, perfect for a festive feast.
  • Spiced Apple Cider: Served hot, this drink perfectly balances the sweetness of the cake with its spiced aroma, warming your guests from the inside out.
  • Vanilla Ice Cream: A scoop of creamy vanilla ice cream creates a deliciously rich pairing, perfect for those who want an extra treat alongside their slices.

Halloween Icebox Cake Recipe FAQs

What type of cream should I use for the best texture?
Absolutely! For the creamiest and richest texture, I recommend using heavy whipping cream. It whips beautifully and holds stiff peaks, ensuring your layers are fluffy and delightful. If you’re looking for a non-dairy option, coconut cream works wonderfully as a substitute.

How should I store leftover Halloween Icebox Cake?
Very good question! Store your leftover Halloween Icebox Cake in an airtight container in the refrigerator. It will be best enjoyed within 2 days, but it can last up to 3 days. Just keep in mind that the flavors are at their peak within the first day, making it perfect for immediate enjoyment!

Can I freeze this Halloween Icebox Cake?
Yes, you can! To freeze your Halloween Icebox Cake, slice it into individual pieces and wrap each piece tightly in plastic wrap, followed by a layer of aluminum foil. This will protect it from freezer burn. It will stay good for up to 2 months in the freezer. Just remember to thaw it in the refrigerator overnight before serving!

What if the whipped cream doesn’t reach stiff peaks?
No worries! If you find that your whipped cream isn’t reaching stiff peaks, it might be because the cream wasn’t cold enough or it was over-whipped. Make sure your bowl and beaters are chilled and try whipping on medium-high speed. If it still doesn’t work after a couple of minutes, you may need to start over with a fresh batch.

Are there any dietary considerations I should be aware of?
Great question! If you’re preparing this cake for guests, be mindful of common allergies. The Halloween Icebox Cake contains dairy and gluten from the heavy whipping cream and Oreo cookies. For a gluten-free version, you can substitute the Oreos with gluten-free cookies. Additionally, you can use dairy-free alternatives like coconut cream for those avoiding dairy.

Can I customize the colors and flavors?
Absolutely! This cake is all about creativity! You can use different food colorings to match your Halloween theme more closely, or even try flavored extracts like almond or pumpkin spice added to the whipped cream. Feel free to layer in some fruit or pudding for an extra twist!

Halloween Icebox Cake

Deliciously Easy Halloween Icebox Cake for Spooky Celebrations

This Halloween Icebox Cake is a no-bake dessert featuring layers of whipped cream and Oreo cookies, perfect for spooky celebrations.
Prep Time 30 minutes
Chilling Time 6 hours
Total Time 6 hours 30 minutes
Servings: 12 slices
Course: Dessert
Cuisine: American
Calories: 350

Ingredients
  

For the Whipped Cream
  • 2 cups heavy whipping cream Use dairy-free alternatives for a non-dairy version.
  • 1 teaspoon vanilla extract Substitutable with almond extract or omit for a simpler taste.
  • ¾ cup powdered sugar Use granulated sugar if powdered sugar is unavailable.
  • 1 teaspoon orange gel food coloring Use natural coloring alternatives for a less vibrant option.
For the Cookies
  • 24 cookies Oreo cookies Substitute with gluten-free cookies for a gluten-free version.
For the Decoration
  • ½ cup orange icing Used to add a festive touch to the top of the cake.
  • ½ cup sprinkles Perfect for adding a fun Halloween flair!

Equipment

  • 9-inch springform pan
  • mixing bowl
  • electric mixer
  • spatula
  • offset spatula

Method
 

Step-by-Step Instructions
  1. Prepare the pan by lining the bottom and sides of a 9-inch springform pan with plastic wrap or parchment paper.
  2. Whip the cream, combining heavy whipping cream, vanilla extract, and powdered sugar until stiff peaks form.
  3. Divide the whipped cream into three bowls and add orange gel food coloring to create various shades.
  4. Start assembling with a layer of Oreo cookies at the bottom of the prepared pan.
  5. Spread one-third of the darkest shade of whipped cream over the Oreo cookie layer.
  6. Place another layer of Oreo cookies on top and add a layer of the second-lightest orange whipped cream.
  7. For the final touch, add one last layer of Oreo cookies and top with the remaining whipped cream.
  8. Chill the cake covered with plastic wrap in the refrigerator for at least 6 hours.
  9. Decorate the cake with orange icing and sprinkles before serving.

Notes

For best flavor, serve the cake within the first day. Customize the color shades for a festive appearance.

Rustic Southwest Black Bean Soup for Cozy Nights at Home

As I stood by the stove, the earthy aroma of cumin and smoky paprika wafted through the kitchen, wrapping me in an inviting embrace. Nothing quite warms the soul like a comforting bowl of Rustic Southwest Black Bean Soup. This recipe effortlessly combines creamy black beans with the zesty brightness of lime and cilantro, making it a delightful option for cozy evenings or as a quick meal prep solution. Not only is it vegan and gluten-free, but it’s also a community dish that invites customization, allowing you to tailor flavors to your personal tastes. Plus, with only a handful of ingredients and minimal prep time, you’ll be enjoying this heart-healthy soup in no time. Are you ready to dive into a bowl of delicious warmth?

Why is this Black Bean Soup special?

Hearty Comfort: This Rustic Southwest Black Bean Soup provides the perfect blend of warmth and nourishment, making it ideal for chilly nights.

Flavorful Simplicity: With just a few key ingredients, each bite bursts with rich flavors from smoky paprika and zesty lime, elevating your mealtime experience.

Customizable Delight: Tailor this dish to your preferences—add avocado, or even serve it alongside a fresh salad or warm cornbread for a complete meal. For more comforting options, check out my Homemade Chicken Soup or Rustic Vegetable Gratin.

Time-Saving Treasure: Whip this up in just under 30 minutes, allowing you to enjoy a homemade meal without spending all day in the kitchen.

Community Favorite: This soup not only satisfies your taste buds but also brings people together—great for family gatherings and chilly evenings with friends!

Rustic Southwest Black Bean Soup Ingredients

For the Soup Base
Black Beans – Primary source of plant-based protein and fiber; either canned or dried (soaked overnight) will work beautifully.
Onion – Use yellow or white for a natural sweetness that enhances the soup’s depth.
Garlic – Fresh cloves give the dish a wonderful aroma and flavor—don’t skimp on this!
Jalapeño – Adjust according to your taste for mild to moderate heat.
Cumin – Essential for providing earthy, smoky notes; it’s truly the heart of this Rustic Southwest Black Bean Soup.
Smoked Paprika – Adds that irresistible smoky flavor that will hug your taste buds.
Vegetable Broth – Choose homemade or store-bought for an easy, flavorful soup base.

For the Bright Garnish
Lime Juice – Just before serving, it wakes up the entire dish with its zesty freshness.
Cilantro – This herb infuses the soup with fresh, herbal notes; use it according to your personal preference.

For Optional Toppings
Avocado – Creamy and rich, it’s the perfect addition for texture and flavor.
Tortilla Chips – Add crunch and an extra layer of texture that makes each bowl delightful!
Sour Cream or Yogurt – These can provide a lovely creaminess; consider a vegan version if desired.

Feel free to get creative with your toppings as this Rustic Southwest Black Bean Soup invites customization to make it truly your own!

Step‑by‑Step Instructions for Rustic Southwest Black Bean Soup

Step 1: Prepare Aromatics
In a large pot over medium heat, add a splash of olive oil and sauté the diced onion, minced garlic, and chopped jalapeño for about 5 minutes. Stir occasionally until the onions become translucent and fragrant, releasing a warm, inviting aroma that sets the stage for your Rustic Southwest Black Bean Soup.

Step 2: Add Spices
With the aromatics softened, stir in the cumin and smoked paprika, cooking for another minute to toast the spices. This quick step helps release their full flavors, enveloping your kitchen in a delightful warmth. You’ll know it’s ready when the spices darken slightly and the scent intensifies.

Step 3: Combine Beans & Broth
Add the black beans and vegetable broth to the pot, stirring well to combine all the ingredients. Increase the heat to bring the mixture to a gentle boil, then reduce to a simmer. Let it cook uncovered for about 20 minutes, allowing the flavors to meld beautifully and the soup to thicken.

Step 4: Blend Soup
Once your Rustic Southwest Black Bean Soup has simmered, use an immersion blender to purée it to your desired consistency. Blend just until it’s creamy while still retaining some whole beans for texture. If you don’t have an immersion blender, carefully transfer it in batches to a countertop blender.

Step 5: Final Seasoning
After blending, stir in the fresh lime juice and chopped cilantro, elevating the flavors of your soup. Taste and adjust the seasoning if needed, ensuring it’s vibrant and zesty. The soup should now shine with bright colors and the herbaceous notes of cilantro, inviting you to serve.

Rustic Southwest Black Bean Soup Variations

Feel free to get creative and personalize your Rustic Southwest Black Bean Soup for a delightful twist!

  • Protein Boost: Add quinoa, brown rice, or diced tofu for additional protein and heartiness. Each option not only enhances the nutrient profile but also adds varied textures that make each bite exciting.

  • Citrus Swap: Replace lime juice with lemon to give the soup a refreshing twist. This simple substitution introduces a different zing and can brighten the flavor in an unexpected way.

  • Smoky Kick: Incorporate chipotle peppers in adobo for an extra smoky depth, or increase the jalapeño for more heat. The blend of smokiness and spice can transport your taste buds right to the heart of the Southwest.

  • Herb Variation: Experiment with fresh herbs like parsley or scallions instead of cilantro, depending on what you have on hand. Each herb brings its unique flavor profile, allowing you to tailor the soup to your liking.

  • Creamy Delight: Swirl in a dollop of coconut milk or cashew cream for a creamy texture that complements the soup’s flavors beautifully. This variation adds richness and a subtle sweetness to the dish.

  • Veggie Galore: Toss in extra vegetables like bell peppers, corn, or diced tomatoes for added nutrition and vibrant color. These additions not only make the soup heartier but also bring a delightful freshness to every bite.

  • Tasty Toppings: Top with roasted pumpkin seeds or crunchy radishes for an exciting texture contrast. Don’t forget a squeeze of extra lime juice just before serving for that extra burst of freshness.

As you explore these variations, don’t hesitate to check out my Rustic Vegetable Gratin or Rustic Apple Walnut for more creative ways to enjoy hearty and comforting meals!

How to Store and Freeze Rustic Southwest Black Bean Soup

Fridge: Store your soup in an airtight container for up to 7 days. Let it cool completely before sealing to maintain freshness.

Freezer: This hearty soup freezes well! Portion it into freezer-safe containers or bags, and it will keep for up to 3 months.

Thawing: For best results, thaw in the fridge overnight before reheating. If you’re in a hurry, you can use the microwave or stovetop on low heat.

Reheating: When ready to enjoy, reheat on the stove over medium heat, stirring occasionally until warmed through. Add a splash of vegetable broth if it thickens too much.

What to Serve with Rustic Southwest Black Bean Soup

Cozy up with this soul-warming soup that begs for delightful sides and complements for an unforgettable dining experience.

  • Warm Cornbread: The buttery sweetness of cornbread provides a delightful contrast, perfect for dipping into the rich, creamy soup.
  • Crisp Garden Salad: A fresh salad with vibrant greens, tomatoes, and a zesty vinaigrette adds a refreshing crunch that brightens the meal.
  • Avocado Toast: Creamy avocado on crusty bread adds a rich element, pairing beautifully with the spices in the soup.
  • Tortilla Chips: These crunchy delights are perfect for scooping up soup and add a fabulous texture that your taste buds will love.
  • Lime Wedges: A squeeze of lime adds an extra punch of freshness, enhancing the soup’s lively flavors.
  • Cilantro Garnish: More fresh cilantro not only makes for a beautiful presentation but elevates the herbal notes in every bite.
  • Chilled White Wine: A crisp Sauvignon Blanc or light Pinot Grigio offers a refreshing pairing that complements the smoky flavors.
  • Rich Chocolate Brownies: Finish your meal on a sweet note with fudgy brownies, providing a delightful balance to the savory soup.

Create a delicious meal that leaves everyone feeling nourished and satisfied!

Expert Tips for Rustic Southwest Black Bean Soup

  • Sauté Carefully: Make sure to sauté the aromatics gently to avoid burning; burnt onions or garlic can lead to a bitter taste in your soup.

  • Texture Matters: When blending, stop short of a completely smooth mixture to keep some beans intact. This adds a lovely texture to your Rustic Southwest Black Bean Soup.

  • Season Last: Always taste and adjust the seasoning at the end of cooking. Fresh herbs and lime juice lose their brightness if cooked too long, which can dull your flavor profile.

  • Heat Control: Adjust the amount of jalapeño based on your heat preference. Remember, you can always add more spice, but it’s hard to tone it down once it’s in!

  • Ingredient Quality: Opt for fresh ingredients when possible. Fresh garlic and lime juice significantly enhance the taste of your soup, making it more vibrant and enjoyable.

Make Ahead Options

These Rustic Southwest Black Bean Soup preparations are perfect for busy home cooks looking to simplify mealtime! You can chop the onions, garlic, and jalapeño up to 24 hours in advance and store them in an airtight container in the refrigerator. Additionally, you can cook the entire soup and let it cool completely before refrigerating; it will stay fresh for up to 3 days or freeze for up to 3 months. To maintain quality, make sure to cool the soup quickly to prevent overcooking and to keep the flavors vibrant. When ready to serve, gently reheat the soup on the stove, add lime juice and cilantro just before serving, and enjoy a delicious, heartwarming meal with minimal effort!

Rustic Southwest Black Bean Soup Recipe FAQs

How do I choose the best black beans for this soup?
Absolutely! When selecting black beans, look for beans that are uniform in color and have no visible dark spots or damage. If using dried beans, soak them overnight to ensure they cook evenly and become tender. Canned beans are a convenient option—just rinse them well to reduce sodium content and remove any canning liquid before adding them to your soup.

How should I store Rustic Southwest Black Bean Soup?
To keep your soup fresh, store it in an airtight container in the refrigerator for up to 7 days. Make sure to allow it to cool completely before sealing. This prevents condensation, which can affect the texture and flavor of your soup.

Can I freeze Rustic Southwest Black Bean Soup?
Very much so! Portion your cooled soup into freezer-safe containers or bags, making sure to leave some room for expansion as it freezes. It will keep well for up to 3 months. When you’re ready to enjoy it, simply thaw in the fridge overnight or use the microwave for a quick defrost.

What should I do if my soup is too thick after reheating?
No problem! If your soup becomes thicker than you’d like, simply add a splash of vegetable broth or water while reheating on the stove over medium heat. Stir well until you’ve reached your desired consistency. This method helps restore that creamy texture while enhancing the soup’s flavors.

Are there any dietary considerations for this soup?
This Rustic Southwest Black Bean Soup is vegan and gluten-free, making it suitable for various dietary preferences. However, if you’re preparing this for guests, always check for allergies, especially concerning common toppings like avocado or yogurt. If serving to pets, limit the ingredients like onion and garlic, as they can be harmful to dogs and cats.

How can I customize the soup for different tastes?
The more the merrier! This soup is incredibly adaptable. You can spice it up by adding chipotle in adobo for a smoky kick, or by increasing the jalapeño for more heat. For a different twist, try replacing lime juice with lemon juice or adding quinoa for an extra protein boost. Feel free to experiment with toppings like fresh herbs, tortilla chips, or different dairy alternatives to make it truly your own!

Rustic Southwest Black Bean Soup

Rustic Southwest Black Bean Soup for Cozy Nights at Home

This Rustic Southwest Black Bean Soup combines creamy black beans with zesty lime and cilantro, perfect for cozy evenings.
Prep Time 10 minutes
Cook Time 20 minutes
Total Time 30 minutes
Servings: 4 cups
Course: Dinner
Cuisine: Southwestern
Calories: 220

Ingredients
  

For the Soup Base
  • 2 cups black beans canned or dried (soaked overnight)
  • 1 medium onion diced; yellow or white
  • 3 cloves garlic minced
  • 1 medium jalapeño chopped; adjust for heat
  • 1 tablespoon cumin
  • 1 teaspoon smoked paprika
  • 4 cups vegetable broth homemade or store-bought
For the Bright Garnish
  • 2 tablespoons lime juice freshly squeezed
  • 1 cup cilantro chopped; to taste
For Optional Toppings
  • 1 medium avocado sliced
  • 1 cup tortilla chips
  • 1/2 cup sour cream or yogurt consider vegan version

Equipment

  • Large pot
  • Immersion Blender

Method
 

Step-by-Step Instructions
  1. In a large pot over medium heat, add a splash of olive oil and sauté the diced onion, minced garlic, and chopped jalapeño for about 5 minutes until onions become translucent.
  2. Stir in the cumin and smoked paprika, cooking for another minute to toast the spices.
  3. Add the black beans and vegetable broth to the pot, stirring well. Increase heat to bring to a gentle boil, then reduce to a simmer for about 20 minutes.
  4. Use an immersion blender to purée the soup to your desired consistency, blending just until creamy while retaining some whole beans.
  5. Stir in the fresh lime juice and chopped cilantro. Taste and adjust seasoning if needed before serving.

Notes

Customize with additional toppings to make it your own. Perfect for family gatherings and chilly evenings!

Burrito Skulls: Spooky and Savory Treats for Halloween Fun

As I sifted through my spice cabinet, a spark of creativity ignited—Halloween was just around the corner, and I needed a show-stopper for my festive gathering. Enter the Burrito Skulls! These delightful, skull-shaped tortillas are a fun twist on traditional burritos, crafted to impress your friends while delivering a deliciously customizable experience. Packed with savory taco fillings, they offer not just a creepy appearance perfect for the spooky season, but also a chance for you to get creative in the kitchen. They’re quick to whip up and make for an engaging centerpiece at any Halloween party, ensuring you’ll leave your guests both haunted and satisfied. Who’s ready to transform taco night into a thrilling feast?

Why are Burrito Skulls a Halloween Hit?

Eerie Appeal: These skull-shaped burritos are not only a feast for the eyes but also a conversation starter at any Halloween gathering.

Customizable Flavors: Tailor each skull with your favorite taco fillings—whether it’s spicy chicken or hearty veggies, there’s a flavor for everyone!

Easy to Make: With straightforward steps, from dough to filling, you’ll find that these spooky treats don’t require culinary wizardry to whip up.

Crowd Favorite: Guests will be amazed at your creativity and delighted by the delicious flavors packed in each bite.

Perfect Party Food: Serve alongside themed dips like guacamole or salsa for a festive touch. These Burrito Skulls are sure to steal the show at your spooky soirée!

Burrito Skulls Ingredients

Get ready to create some spooky and savory magic in your kitchen with these irresistible burrito skulls!

For the Dough

  • All-purpose flour – Provides structure; you can use gluten-free flour for a gluten-free version.
  • Baking powder – Acts as a leavening agent for that perfect dough texture; don’t skip it!
  • Kosher salt – Enhances flavor; regular salt works as a substitute if needed.
  • Lard or shortening – Adds richness to the dough; butter can also give a delicious flavor twist.
  • Water – Binds the ingredients; room temperature water is best for smooth dough.

For the Filling

  • Vegetable oil – Used for browning meat; olive or canola oil can serve as substitutes.
  • Ground beef – The main protein; feel free to swap for ground turkey or a plant-based option for a vegetarian filling.
  • Taco seasoning – This is your flavor base; homemade seasoning mixes can control sodium levels.
  • Shredded cheddar cheese – Adds creamy goodness; Monterey Jack or non-dairy cheese can be used instead.
  • Black beans – A nutritious filler; switch to pinto beans or omit if you prefer a bean-less mix.
  • Corn – Brings sweetness and texture; use canned, frozen, or fresh for your preference.
  • Chopped tomatoes – Adds freshness; salsa can be a great substitute for an easy flavor boost.
  • Large egg – For egg wash to help with browning; a flax egg can replace it if vegan.
  • Water for egg wash – Helps the egg adhere smoothly to the dough.

Gather these ingredients to whip up your spooky burrito skulls that are guaranteed to be a hit at your Halloween festivities!

Step‑by‑Step Instructions for Burrito Skulls

Step 1: Prepare Dough
In a large mixing bowl, combine all-purpose flour, baking powder, and kosher salt. Cut in the lard or shortening until the mixture resembles coarse crumbs. Gradually add room temperature water, stirring until a cohesive dough forms. Knead the dough on a floured surface for about 5 minutes until smooth. Cover it with a clean cloth and let it rest for 10-20 minutes, allowing the gluten to relax for easy shaping.

Step 2: Cook Meat Filling
While the dough rests, heat half the vegetable oil in a skillet over medium heat. Add half of the ground beef and cook, stirring occasionally, until browned, about 5-7 minutes. Remove the beef and repeat with the remaining meat. Once browned, add taco seasoning and a splash of water, stirring to incorporate. Simmer for about 3-5 minutes until the mixture thickens slightly, creating a rich, flavorful filling for the Burrito Skulls.

Step 3: Shape Tortillas
After the dough has rested, divide it into equal portions, about the size of a golf ball. Using a tortilla press or rolling pin, flatten each piece between two sheets of parchment paper to a thickness of about 1/8 inch. Gently press the flattened dough over a skull mold, ensuring to create hollow cavities that will hold the filling. This fun shape is what makes these Burrito Skulls perfect for Halloween!

Step 4: Fill Tortillas
Carefully remove the shaped tortillas from the mold and begin filling each with a generous scoop of taco meat, followed by shredded cheddar cheese, black beans, corn, and chopped tomatoes. Be sure to leave enough space at the edges to fold over the dough. Once filled, fold the top of each tortilla down and pinch the seams tightly to seal, ensuring no filling escapes during cooking.

Step 5: Bake
Preheat your oven to 350°F (175°C). As it heats, prepare an egg wash by whisking a large egg with water. Brush the tops of the sealed Burrito Skulls generously with the egg wash, which will help achieve a golden-brown color. Place them on a baking sheet lined with parchment paper and bake for 24-26 minutes, or until they are beautifully golden and crispy.

Step 6: Cool & Serve
Once the Burrito Skulls are out of the oven, allow them to cool for a few minutes on a wire rack before carefully removing them from the mold. Serve the skulls warm to your guests, accompanied by themed dips like sour cream, guacamole, or salsa for an extra festive touch. These spooky treats will surely be a hit at your Halloween gathering!

Storage Tips for Burrito Skulls

Fridge: Store leftover Burrito Skulls in an airtight container in the refrigerator for up to 3 days to preserve freshness and flavor.

Freezer: For longer storage, freeze the uncooked Burrito Skulls tightly wrapped in plastic wrap and then in foil or an airtight container. They can be frozen for up to 2 months.

Reheating: Reheat cooked Burrito Skulls in a 350°F oven for 10-15 minutes until warmed through and crispy again. Avoid microwaving to maintain texture.

Make-Ahead: Dough and fillings can be prepared ahead of time and stored separately in the refrigerator. Assemble and bake just before serving for a fresh, festive treat!

Expert Tips for Burrito Skulls

  • Dough Consistency: Ensure your dough is not too sticky by adding water incrementally. A well-formed dough leads to perfect Burrito Skulls.

  • Use Fresh Dough: For the best shape and taste, make your tortilla dough fresh. Pre-made tortillas often lack the structural integrity needed for sculpting.

  • Fill and Seal Well: Don’t overfill the skulls. Keep the filling slightly under the edge to ensure the dough seals properly, preventing leaks during baking.

  • Keep It Warm: If making in batches, keep your assembled skulls covered with a towel to retain warmth and moisture before baking.

  • Reheating Tips: If you have leftovers, reheat your Burrito Skulls in a 350°F oven for the best texture; microwaving can make them soggy.

Burrito Skulls: Creative Variations

Feel free to let your imagination run wild and transform these spooky burrito skulls into something uniquely yours!

  • Gluten-Free: Substitute all-purpose flour with your favorite gluten-free blend for the dough to accommodate dietary needs.
  • Vegetarian Delight: Swap ground beef with sautéed mushrooms, lentils, or a medley of your favorite vegetables for a hearty filling.
  • Spicy Kick: Add diced jalapeños or a sprinkle of chili flakes to the meat mixture for an extra layer of heat that will ignite your taste buds.
  • Cheese Variations: Try using Pepper Jack for a creamy, spicy twist, or opt for a dairy-free cheese substitute to keep it vegan while still satisfying.
  • Bean Boost: Incorporate roasted chickpeas into the filling for extra protein and a delightful crunch to contrast the soft tortilla.
  • Flavor Fusion: Mix in a dash of barbecue sauce into the filling for a smoky surprise that perfectly complements the classic taco taste.
  • Herbaceous Twist: Add fresh cilantro or chopped green onions to your fillings for a burst of freshness that brightens up each bite.
  • Sweet Surprise: Drizzle a bit of honey or agave on roasted corn before adding it to the filling for a sweet counterbalance to the savory ingredients.

Explore these ideas to elevate your Burrito Skulls, and consider pairing them with themed dips like guacamole or a zesty salsa for a memorable Halloween feast!

Make Ahead Options

These Burrito Skulls are perfect for meal prep enthusiasts! You can prepare the dough and filling up to 24 hours in advance. Simply make the dough, wrap it tightly in plastic wrap, and refrigerate; this helps maintain its freshness and texture. The filling can also be cooked and stored in an airtight container in the fridge, ensuring the flavors meld beautifully overnight. When you’re ready to assemble, take out the dough and filling (letting it sit at room temperature for about 20 minutes), then follow the steps to shape, fill, and bake them. This way, you’ll have delicious, freshly baked Burrito Skulls with minimal effort when it’s time to serve!

What to Serve with Burrito Skulls?

Add a tantalizing array of sides and drinks to elevate your Halloween feast with these spooky delights.

  • Creamy Guacamole:
    This rich and creamy dip adds a cool contrast against the savory flavors of the burrito filling, enhancing the overall taste experience.

  • Zesty Salsa:
    A bright, tangy salsa can bring a refreshing burst of flavor, complementing the hearty ingredients of the Burrito Skulls while adding a touch of freshness.

  • Crispy Tortilla Chips:
    Serve with crunchy tortilla chips to provide a fun, crispy texture, perfect for dipping into guacamole or salsa. Guests will love the combination!

  • Spiced Roasted Corn:
    Oven-roasted corn seasoned with chili powder echoes the burrito’s flavors, adding a sweet and spicy counterpart that tempts the palate.

  • Mixed Green Salad:
    Lighten the meal with a fresh salad featuring mixed greens, cherry tomatoes, and a citrus vinaigrette. This adds a refreshing, crunchy contrast to the hearty burrito skulls.

  • Festive Mocktails:
    Create non-alcoholic drinks like cranberry spritzers or spooky green punch. The vibrant colors will delight guests and add to the Halloween ambiance.

  • Chocolate Graveyard Cupcakes:
    Finish off the meal with spooky desserts that echo the festive vibe! Cupcakes topped with crumbled cookies and gummy worms are a fun treat.

Each pairing will beautifully complement your Burrito Skulls, ensuring your Halloween gathering is memorable and delicious!

Burrito Skulls Recipe FAQs

What type of flour should I use for the dough?
All-purpose flour is the best choice for a classic texture in Burrito Skulls, but you can easily substitute it with gluten-free flour if needed. Just ensure that your gluten-free blend has a good binding quality, as it will affect the final structure of your skulls.

How should I store leftover Burrito Skulls?
Store leftover Burrito Skulls in an airtight container in the refrigerator for up to 3 days. Be sure they’re completely cooled before sealing to maintain their crispiness. When you’re ready to enjoy them again, reheat in a 350°F oven for 10-15 minutes for the best texture!

Can I freeze Burrito Skulls?
Absolutely! To freeze, wrap uncooked Burrito Skulls tightly in plastic wrap, then place them in a resealable freezer bag or airtight container. They’ll stay fresh for up to 2 months. When you’re ready to cook them, bake from frozen at 350°F for about 30-35 minutes, or until golden and cooked through.

What if my dough is too sticky?
If your dough feels too sticky, gradually add a little more flour, a tablespoon at a time, until it reaches a workable consistency. Remember, it’s important to knead the dough gently until it’s smooth—over-kneading can lead to tough tortillas, which may affect your spooky presentation!

Can I make these burritos vegan?
Yes! To make vegan Burrito Skulls, substitute the ground beef with a plant-based meat alternative and use a flax egg in place of the large egg for the wash. You can also use non-dairy cheese and skip the lard, opting for vegetable shortening or coconut oil instead for a rich flavor and texture.

What are some filling variations I can try?
The fun part about Burrito Skulls is that they are highly customizable! Besides the classic ground beef, consider using shredded chicken, pulled pork, or even a hearty mix of sautéed vegetables. For a spicy kick, throw in some jalapeños or switch to a spicy taco seasoning. Get creative—the scarier, the better!

Burrito Skulls

Burrito Skulls: Spooky and Savory Treats for Halloween Fun

Burrito Skulls are spooky, customizable tortilla treats filled with savory goodness, making them perfect for Halloween.
Prep Time 30 minutes
Cook Time 26 minutes
Resting Time 15 minutes
Total Time 56 minutes
Servings: 8 skulls
Course: Dinner
Cuisine: Mexican
Calories: 250

Ingredients
  

For the Dough
  • 2 cups all-purpose flour or gluten-free flour
  • 1 tsp baking powder
  • 1 tsp kosher salt or regular salt
  • 1/4 cup lard or shortening or butter
  • 3/4 cup water room temperature
For the Filling
  • 1 tbsp vegetable oil or olive/canola oil
  • 1 lb ground beef or ground turkey/plant-based option
  • 1 tbsp taco seasoning homemade or store-bought
  • 1 cup shredded cheddar cheese or non-dairy cheese
  • 1 cup black beans or pinto beans
  • 1 cup corn canned, frozen or fresh
  • 1 cup chopped tomatoes or salsa
  • 1 large egg for egg wash, replace with flax egg if vegan
  • 1 tbsp water for egg wash

Equipment

  • mixing bowl
  • Tortilla press or rolling pin
  • Skillet
  • baking sheet

Method
 

Step-by-Step Instructions
  1. Prepare Dough: In a large bowl, mix flour, baking powder, and salt. Cut in lard/shortening. Gradually add water and knead until smooth. Cover and rest for 10-20 minutes.
  2. Cook Meat Filling: Heat oil in skillet. Brown half the ground beef for 5-7 minutes. Remove, repeat with remaining beef. Add taco seasoning and a splash of water, simmering for 3-5 minutes.
  3. Shape Tortillas: Divide rested dough into golf ball-sized portions. Use a tortilla press or rolling pin to flatten between parchment sheets. Press into skull mold.
  4. Fill Tortillas: Remove shaped tortillas, fill with taco meat, cheese, beans, corn, and tomatoes. Fold and seal edges tightly.
  5. Bake: Preheat oven to 350°F. Prepare egg wash and brush over skulls. Bake for 24-26 minutes until golden and crispy.
  6. Cool & Serve: Allow to cool briefly then serve warm with dips like sour cream, guacamole, or salsa.

Notes

Ensure dough is not too sticky. Use fresh dough for best results. Keep assembled skulls warm before baking. Reheat in the oven for best texture.

Maggiano’s Lasagna: The Ultimate Comfort Food to Savor

The aroma of bubbling tomato sauce and melted cheese has a way of wrapping around you like a warm hug. This is the heart of my Rich Maggiano’s Lasagna, a classic Italian-American comfort food that not only fills the belly but feeds the soul as well. Perfect for weeknights when time is tight or for impressing dinner guests, this lasagna can be made ahead, making it an effortless crowd-pleaser. It combines rich layers of savory meat sauce, creamy ricotta, and gooey mozzarella, allowing for tweaks to suit your personal taste. Whether you want to make it heartier with more meat or a bit lighter with extra veggies, this beloved recipe welcomes creativity. Are you ready to dive into a delicious journey that’s sure to become a staple in your home?

Why is Maggiano’s Lasagna so special?

Layered Comfort: The sheer number of rich, savory layers makes this lasagna a standout. Each bite is packed with incredible flavors, offering a little bit of everything in one serving.

Make-Ahead Magic: Prepare it in advance! This dish saves you time on busy nights—just bake and enjoy!

Customizable Delight: Feel free to switch up ingredients to cater to your family’s preferences. Veggie lovers can easily incorporate roasted vegetables, while meat enthusiasts can double the protein!

Crowd-Pleasing Success: Perfect for gatherings or cozy family dinners, this recipe is bound to leave everyone craving more. Consider serving it with a refreshing salad or homemade garlic bread for a meal that impresses!

Comfort in Every Bite: Maggiano’s Lasagna not only satisfies hunger but also warms the heart with its homey essence. It’s a dish that invokes nostalgia and joy, transcending mere sustenance to bring people together around the table.

Maggiano’s Lasagna Ingredients

For the Meat Sauce

  • Italian Sausage – Adds rich flavor and depth; substitute with ground turkey for a leaner option.
  • Ground Beef – Provides a hearty base; replace with ground lamb or chicken if desired.
  • Onion – Enhances the sauce’s base flavor; yellow onion is preferred for sweetness.
  • Garlic – Infuses the meat sauce; fresh minced garlic delivers the best taste.
  • Crushed Tomatoes – Forms the bulk of the sauce; need two 28-ounce cans for volume.
  • Tomato Sauce – Complements crushed tomatoes for consistency; one 15-ounce can needed.
  • Tomato Paste – Intensifies tomato flavor; a 6-ounce can is optional but recommended.
  • Water – Helps balance sauce thickness; ½ cup required.
  • Dried Basil – Adds classic Italian herb flavor; one tablespoon is just right.
  • Italian Seasoning Blend – Provides a mix of herbs; use one teaspoon for a more aromatic touch.
  • Fennel Seed – Offers traditional sausage flair; ½ teaspoon adds depth.
  • Granulated Sugar – Balances acidity in tomatoes; two tablespoons can take the edge off.
  • Black Pepper & Table Salt – Essential seasoning to enhance flavors; add to taste for perfect seasoning.

For the Ricotta Layer

  • Fresh Parsley – Adds brightness; replace with basil if desired, about two tablespoons.
  • Ricotta Cheese – Provides a creamy texture; you’ll need 16 ounces for richness.
  • Whole Egg – Binds the ricotta; optional for a vegan version—simply omit.

For Assembling the Lasagna

  • Lasagna Pasta – Essential for structure; use 12 sheets (no-boil options save time).
  • Shredded Mozzarella – Melts beautifully on top; opt for 16 ounces for that gooey finish.
  • Grated Parmesan Cheese – Adds a delicious salty bite; one cup brings everything together.

With these ingredients in hand, you’re well on your way to creating a masterpiece! Maggiano’s Lasagna is all about blending flavors and comfort in every bite. Happy cooking!

Step‑by‑Step Instructions for Maggiano’s Lasagna

Step 1: Prepare Meat Sauce
In a large skillet over medium heat, sauté diced onion and minced garlic in olive oil until softened, about 5 minutes. Add the Italian sausage and ground beef, cooking until browned and fully cooked, approximately 8-10 minutes. Break up the meat with a spoon as it cooks, ensuring a rich, cohesive meat sauce that forms the base for your Maggiano’s Lasagna.

Step 2: Simmer Sauce
Stir in the crushed tomatoes, tomato sauce, and tomato paste with the water, followed by the dried basil, Italian seasoning, fennel seed, granulated sugar, and season with salt and pepper. Mix well and bring to a gentle simmer. Lower the heat and let the sauce thicken and develop its flavors on low heat for 90 minutes, stirring occasionally to avoid sticking.

Step 3: Mix Ricotta
While the sauce simmers, prepare the ricotta layer. In a medium bowl, combine the ricotta cheese with chopped fresh parsley, the whole egg, and a pinch of salt. Mix until smooth and creamy. This adds a delicious, rich texture to your Maggiano’s Lasagna, providing a delightful contrast to the savory meat and sauce layers.

Step 4: Cook Pasta Sheets
Bring a large pot of salted water to a boil. Carefully add the lasagna sheets and cook according to package instructions until al dente, typically 8-10 minutes. Drain the pasta and rinse briefly under cold water to stop the cooking process, then lay them flat on a clean surface to avoid sticking as you prepare to assemble your lasagna.

Step 5: Assemble Lasagna
In a deep baking dish, spread a layer of the meat sauce on the bottom. Place a layer of lasagna sheets over the sauce, followed by half of the ricotta mixture and a generous sprinkle of shredded mozzarella. Repeat the layers (meat sauce, pasta sheets, ricotta, and mozzarella) twice more, finishing with a layer of meat sauce topped with grated Parmesan cheese for that golden finish.

Step 6: Bake
Cover the assembled Maggiano’s Lasagna tightly with aluminum foil and bake in a preheated oven at 375°F for 25 minutes. After 25 minutes, carefully remove the foil and bake for an additional 25 minutes or until the top is bubbly and golden brown. The heavenly aroma will fill your kitchen as it bakes to perfection!

Step 7: Cool & Serve
Once baked to a glorious golden brown, remove the lasagna from the oven and let it cool for at least 15 minutes. This cooling period helps set the layers for cleaner slicing. After cooling, cut into squares, serve warm, and relish in the comforting, rich flavors of your homemade Maggiano’s Lasagna!

Make Ahead Options

These Rich Maggiano’s Lasagna are perfect for busy weeknights and meal prep lovers! You can prepare the meat sauce and ricotta mixture up to 24 hours in advance. Simply refrigerate the meat sauce in an airtight container and store the ricotta mixture in a covered bowl. When you’re ready to serve, cook the lasagna sheets and assemble it as directed. For best results, layer the sauce and pasta just before baking to maintain the texture. Once assembled, cover the lasagna tightly with foil and it can also be frozen for up to 3 months; simply bake from frozen, adding a little extra time to ensure it’s heated through and bubbling beautifully. Enjoy a comforting meal with minimal effort!

Maggiano’s Lasagna: Customization Ideas

Feel free to put your own spin on Maggiano’s Lasagna with these delightful variations to cater to your taste buds!

  • Vegetarian Swap: Replace the meat with a medley of sautéed mushrooms, zucchini, and bell peppers for a savory, veggie-packed delight. This option adds a lovely earthiness while still being hearty and satisfying.

  • Dairy-Free Delight: Opt for almond or cashew ricotta as a creamy vegan substitute in place of traditional ricotta. Pair with plant-based mozzarella for layers of richness without the dairy!

  • Extra Spice: Enhance the flavor by adding a pinch of crushed red pepper flakes to the meat sauce. This small addition brings a warm kick, perfect for those who enjoy a little heat in their comfort food.

  • Pasta Variety: Use whole wheat or gluten-free lasagna noodles to cater to dietary needs without compromising on that comforting layer structure. This swap keeps the dish delicious while providing a healthier twist.

  • Herb Infusion: Elevate the flavor profile by mixing fresh basil and oregano into the ricotta layer. Fresh herbs will brighten the overall taste and add a wonderful aroma.

  • Layer It On: Add an additional layer of fresh spinach or kale between the pasta and cheese layers for bonus texture and nutritional benefits. Such a simple change can make this lasagna even healthier!

  • Smoky Flavor: Incorporate smoked sausage or pancetta in place of the regular Italian sausage for an intriguing twist that brings in delicious, smoky notes.

  • Ricotta Variation: For a subtle and creamy flavor, try mixing in some mascarpone cheese with the ricotta. This will make every bite luxuriously rich and velvety.

Experimenting with these ideas can turn your Maggiano’s Lasagna into something uniquely yours, making every bite an experience. Remember, the kitchen is your canvas, and this recipe is just the beginning! If you’re looking for more tips on how to enhance your meals, consider checking out some of my favorite vegetarian recipes or ideas for freezing leftovers. Happy cooking!

What to Serve With Maggiano’s Lasagna?

Maggiano’s Lasagna is sure to steal the show, but the right accompaniments will elevate your meal to perfection. Here are some delightful options to consider.

  • Garlic Bread: Warm, buttery garlic bread provides a comforting crunch, perfect for scooping up extra sauce.
  • Caesar Salad: Crisp romaine, creamy dressing, and crunchy croutons add freshness, balancing the richness of the lasagna beautifully.
  • Roasted Vegetables: Seasonal veggies caramelized in olive oil bring color and sweetness to your plate, complementing the savory layers.

A light, zesty side like a Caprese salad is a delightful addition. Fresh mozzarella, juicy tomatoes, and fragrant basil create a refreshing contrast, ensuring your meal is as vibrant as it is comforting.

  • Italian Chianti: A robust red wine, like Chianti, enhances the umami flavors in the dish, making each bite even more satisfying.
  • Tiramisu: Finish off your meal with a classic Italian dessert. Layers of coffee-soaked ladyfingers and mascarpone cream bring sweet satisfaction to this comforting feast!
  • Antipasto Platter: An assortment of cured meats, cheeses, olives, and marinated vegetables adds variety for an inviting, shareable starter!

Expert Tips for Maggiano’s Lasagna

  • Simmer for Flavor: Allow the meat sauce to simmer for a full 90 minutes. This deepens flavors and creates a rich base for your Maggiano’s Lasagna.

  • Cook Pasta Al Dente: Par-cook lasagna sheets just until al dente to prevent them from becoming mushy during baking. This ensures a perfect texture.

  • Layer Evenly: Spread each layer evenly for consistent flavor and easier slicing later. This simple trick makes your lasagna visually appealing.

  • Cooling Time: Let the lasagna cool for 15 minutes before cutting. This helps the layers set, resulting in perfect slices that hold together.

  • Store Wisely: If you have leftovers, store them in an airtight container for up to 4 days in the fridge. You can also freeze for up to 3 months for a convenient meal later!

How to Store and Freeze Maggiano’s Lasagna

Fridge: Keep your cooled Maggiano’s Lasagna in an airtight container for up to 4 days. This ensures freshness while preventing any odors from other food items from seeping in.

Freezer: For longer storage, tightly wrap the lasagna in plastic wrap and aluminum foil before placing it in the freezer. It can be stored for up to 3 months, making future meals a breeze!

Reheating: When ready to enjoy your lasagna, thaw it overnight in the fridge if frozen, then reheat in the oven at 350°F for about 30-40 minutes, covered with foil to retain moisture.

Portion Control: Consider slicing your lasagna into individual portions before freezing. This allows you to easily grab a slice whenever a comforting meal craves your attention!

Maggiano’s Lasagna Recipe FAQs

What are the best ingredients for a flavorful meat sauce?
Absolutely! Using a combination of Italian sausage and ground beef will give your sauce a rich, savory depth. I recommend looking for Italian sausage with a good spice level to enhance the overall flavor profile. Fresh garlic and yellow onion are also key players in elevating your meat sauce, while crushed tomatoes form the base. Always opt for high-quality canned tomatoes for the best results!

How should I store leftover Maggiano’s Lasagna?
Very easy! After allowing your lasagna to cool completely, transfer it to an airtight container and store it in the refrigerator. It will stay fresh for up to 4 days. For longer storage, consider freezing it. Just wrap it tightly in plastic wrap and then aluminum foil to prevent freezer burn, and it can last for up to 3 months!

Can I freeze Maggiano’s Lasagna?
Absolutely! Freezing is a great option for this dish. Here’s how to do it: First, let the lasagna cool completely to prevent condensation. Wrap it tightly in plastic wrap, ensuring there are no air pockets, and then add another layer of aluminum foil. Label it with the date and pop it in the freezer. When you’re ready to enjoy it, thaw it in the fridge overnight and reheat at 350°F for about 30–40 minutes.

What if my lasagna is too watery?
If your lasagna turns out watery, don’t worry! You can try a couple of fixes. First, ensure that your meat sauce has been simmered long enough—about 90 minutes—to allow it to thicken. If it’s already baked, you can let it sit for a while after baking, as this will help the layers set. Next time, consider cooking your pasta sheets al dente to absorb some of the sauce while baking!

Are there any dietary considerations for pets?
That’s a thoughtful question! While it might be tempting to share your delicious Maggiano’s Lasagna with furry family members, it’s best to avoid giving them any. Ingredients like garlic, onions, and certain spices can be harmful to pets. If you want to share some love, offer them plain cooked meat or vegetables for a safe treat.

Maggiano’s Lasagna

Maggiano’s Lasagna: The Ultimate Comfort Food to Savor

Maggiano’s Lasagna is a classic Italian-American dish that offers rich flavors and layers, perfect for any gathering.
Prep Time 30 minutes
Cook Time 1 hour 55 minutes
Cooling Time 15 minutes
Total Time 2 hours 40 minutes
Servings: 8 slices
Course: Dinner
Cuisine: Italian-American
Calories: 520

Ingredients
  

For the Meat Sauce
  • 1 pound Italian Sausage Substitute with ground turkey for a leaner option.
  • 1 pound Ground Beef Replace with ground lamb or chicken if desired.
  • 1 medium Onion Yellow onion is preferred for sweetness.
  • 3 cloves Garlic Fresh minced garlic is best.
  • 2 cans Crushed Tomatoes 28 ounces each.
  • 1 can Tomato Sauce 15 ounces.
  • 1 can Tomato Paste 6 ounces, optional but recommended.
  • 0.5 cup Water
  • 1 tablespoon Dried Basil
  • 1 teaspoon Italian Seasoning Blend
  • 0.5 teaspoon Fennel Seed
  • 2 tablespoons Granulated Sugar
  • Black Pepper & Table Salt Add to taste.
For the Ricotta Layer
  • 2 tablespoons Fresh Parsley Replace with basil if desired.
  • 16 ounces Ricotta Cheese
  • 1 whole Egg Optional for a vegan version.
For Assembling the Lasagna
  • 12 sheets Lasagna Pasta No-boil options save time.
  • 16 ounces Shredded Mozzarella
  • 1 cup Grated Parmesan Cheese

Equipment

  • large skillet
  • Medium bowl
  • Large pot
  • deep baking dish

Method
 

Step‑By‑Step Instructions
  1. In a large skillet over medium heat, sauté diced onion and minced garlic in olive oil until softened, about 5 minutes. Add the Italian sausage and ground beef, cooking until browned and fully cooked, approximately 8-10 minutes.
  2. Stir in the crushed tomatoes, tomato sauce, and tomato paste with the water, followed by the dried basil, Italian seasoning, fennel seed, granulated sugar, and season with salt and pepper. Mix well and bring to a gentle simmer.
  3. While the sauce simmers, prepare the ricotta layer. In a medium bowl, combine the ricotta cheese with chopped fresh parsley, the whole egg, and a pinch of salt. Mix until smooth and creamy.
  4. Bring a large pot of salted water to a boil. Carefully add the lasagna sheets and cook according to package instructions until al dente, typically 8-10 minutes. Drain the pasta and rinse briefly under cold water.
  5. In a deep baking dish, spread a layer of the meat sauce on the bottom. Place a layer of lasagna sheets over the sauce, followed by half of the ricotta mixture and a generous sprinkle of shredded mozzarella.
  6. Cover the assembled Maggiano’s Lasagna tightly with aluminum foil and bake in a preheated oven at 375°F for 25 minutes. After 25 minutes, carefully remove the foil and bake for an additional 25 minutes.
  7. Once baked to a glorious golden brown, remove the lasagna from the oven and let it cool for at least 15 minutes. After cooling, cut into squares and serve warm.

Notes

Store leftovers in an airtight container for up to 4 days in the fridge. Freezing is possible for up to 3 months.