Crispy Apple Puff Pastry Delight – A Quick and Elegant Dessert

Some of the best desserts are the simplest ones—those that come together with just a handful of ingredients, yet taste like something truly special. This crispy apple puff pastry is one of those recipes. It’s the kind of dessert you can whip up in minutes when unexpected guests arrive, when you’re craving something sweet but don’t want to spend hours in the kitchen, or when you want to recreate the warmth of homemade apple pie without the effort.

I still remember the first time I made this recipe. It was a chilly autumn afternoon, and I was looking for a way to use up some extra apples sitting in my kitchen. I didn’t have time to make a traditional pie, but I did have a sheet of puff pastry in the freezer. In just a few minutes, I had sliced the apples, sprinkled them with cinnamon and sugar, and arranged them on the pastry. As it baked, my kitchen filled with the comforting aroma of spiced apples and buttery pastry, and I knew I had stumbled upon something special.

When I pulled it out of the oven, golden and flaky, I couldn’t resist taking a bite while it was still warm. The crispy layers of pastry, the tender apples, and the hint of cinnamon made it feel like a dessert that had been made with love and tradition, even though it had taken just minutes to prepare.

Now, this apple puff pastry is a staple in my home. It’s my go-to for when I want a no-fuss dessert that still feels indulgent. Whether served plain, dusted with powdered sugar, or paired with a scoop of vanilla ice cream, it’s a treat that never disappoints.

Why This Recipe is a Must-Try

1. Quick and Effortless to Make

With just a few simple steps, you can have a warm, freshly baked dessert on the table in under 30 minutes.

2. A Perfect Balance of Flavors and Textures

The combination of crispy, flaky pastry, soft baked apples, and a hint of cinnamon makes every bite irresistible.

3. Requires Only a Few Ingredients

All you need is puff pastry, apples, sugar, cinnamon, and a little butter—ingredients you likely already have in your kitchen.

4. Versatile and Customizable

You can adjust the sweetness, add extra spices, or experiment with different toppings to make this dessert your own.

5. A Light Yet Satisfying Dessert

Unlike heavy cakes or rich desserts, this apple puff pastry is just the right amount of sweet and buttery without feeling overwhelming.

6. Great for Any Occasion

Whether you’re serving it as a last-minute dessert for guests, enjoying it as an afternoon treat with coffee, or making a quick snack for the family, this recipe fits any moment.

Ingredients

IngredientQuantity
Puff Pastry500 g (store-bought or homemade)
Apples2 large, peeled, cored, and thinly sliced
Sugar3 tablespoons
Cinnamon1 teaspoon
Butter2 tablespoons, melted
Egg1, beaten (for egg wash)
Optional ToppingsPowdered sugar for dusting

Directions

1. Prepare the Pastry and Apples

  • Preheat the oven to 200°C (390°F).
  • Roll out the puff pastry on a floured surface.
  • In a bowl, toss the sliced apples with sugar and cinnamon.

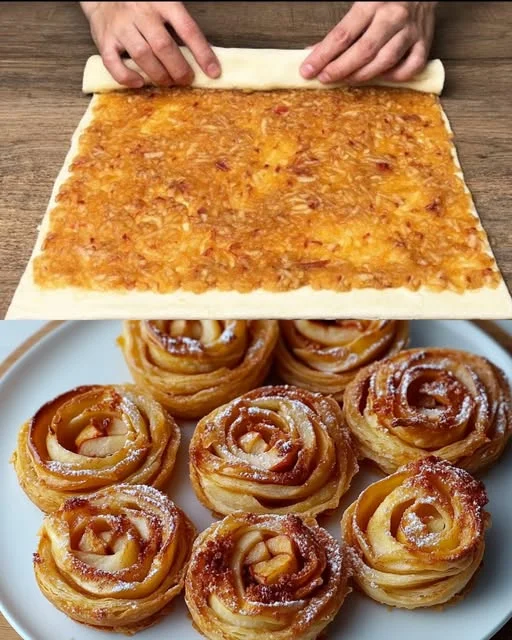
2. Assemble the Dessert

  • Arrange the apple slices over the puff pastry, leaving a small border around the edges.
  • Brush the apples with melted butter.
  • Fold the edges of the pastry slightly over the apples for a rustic look.

3. Egg Wash and Bake

  • Brush the edges with the beaten egg for a golden crust.
  • Transfer to a lined baking sheet and bake for 20-25 minutes, until puffed and golden brown.

4. Serve and Enjoy

  • Let cool slightly and dust with powdered sugar if desired.
  • Serve warm as is or with a scoop of vanilla ice cream

Nutritional Information (Per Serving – Approximate)

NutrientAmount per Serving
Calories~250 kcal
Protein~3 g
Carbohydrates~30 g
Fats~14 g
Fiber~2 g
Sugar~10 g

Frequently Asked Questions

1. Can I Use Any Type of Apples?

Yes! While some apples work better than others, you can use whatever you have on hand. Granny Smith apples provide a tart contrast to the sweet pastry, while Honeycrisp and Fuji add natural sweetness.

2. Can I Make This Recipe Without Sugar?

Absolutely! If you prefer a naturally sweet dessert, you can omit the sugar and rely on the natural sweetness of the apples. You can also use a drizzle of honey or maple syrup as an alternative.

3. How Do I Prevent the Puff Pastry from Becoming Soggy?

To avoid a soggy bottom, make sure not to overload the pastry with apples. Also, brushing the base lightly with melted butter before adding the apples can create a barrier that helps keep it crisp.

4. Can I Make This Dessert Ahead of Time?

Yes! You can assemble the pastry with the apples and store it in the fridge for a few hours before baking. However, for the best texture, it’s recommended to bake it fresh.

5. What’s the Best Way to Serve This Dessert?

While it’s delicious on its own, you can serve it with:

  • A dusting of powdered sugar for extra sweetness
  • A drizzle of caramel sauce for a rich flavor boost
  • A scoop of vanilla ice cream for a classic pairing
  • A dollop of whipped cream for a light, creamy touch

6. Can I Add Nuts or Other Toppings?

Definitely! Chopped walnuts, pecans, or almonds add a nice crunch. You can also sprinkle some raisins or cranberries for extra texture and sweetness.

7. What If I Don’t Have an Egg for the Egg Wash?

You can brush the edges of the pastry with milk or a mixture of honey and water for a similar golden effect.

8. Can I Freeze This Dessert?

Yes! You can freeze it before baking and bake directly from frozen, adding a few extra minutes to the cooking time. If freezing after baking, reheat in the oven for a crisp texture.

9. Can I Use a Different Type of Pastry?

Yes! If you don’t have puff pastry, you can use shortcrust pastry or even phyllo dough for a different texture.

10. How Can I Make It More Decadent?

If you’re looking for an extra indulgent version, try drizzling melted chocolate over the baked pastry or adding a cream cheese layer beneath the apples.

Conclusion: A Dessert You’ll Keep Coming Back To

There’s something special about a dessert that feels both effortless and homemade, and this crispy apple puff pastry is exactly that. It’s a reminder that you don’t need complicated techniques or fancy ingredients to create something that tastes incredible.

Whether you’re making it for yourself on a quiet evening, serving it to family and friends, or looking for a simple yet impressive dessert, this recipe is guaranteed to become a favorite. The combination of crispy pastry, sweet apples, and warm cinnamon is timeless, and once you try it, you’ll find yourself making it again and again.

So the next time you have a couple of apples sitting in your kitchen and need a quick dessert, reach for some puff pastry and give this recipe a try. It’s proof that sometimes, the best things in life are the simplest ones.

Amal

Crispy Apple Puff Pastry Delight – A Quick and Elegant Dessert

This crispy apple puff pastry dessert is the perfect combination of flaky, golden layers and tender, cinnamon-spiced apples. Made with just a handful of ingredients, it’s an effortless yet impressive treat that’s ready in no time. Whether served as a warm snack, a quick dessert, or alongside a cup of coffee, this simple recipe is guaranteed to satisfy your sweet cravings.
Prep Time 5 minutes
Cook Time 20 minutes
Total Time 25 minutes
Servings: 4 –6 servings
Course: Dessert
Cuisine: European

Ingredients
  

  • 500 g puff pastry store-bought or homemade
  • 2 large apples peeled, cored, and thinly sliced
  • 3 tablespoons sugar
  • 1 teaspoon cinnamon
  • 2 tablespoons butter melted
  • 1 egg beaten (for egg wash)
  • Optional: Powdered sugar for dusting

Method
 

  1. Preheat and Prepare the Pastry
  2. Preheat oven to 200°C (390°F).
  3. Roll out the puff pastry on a lightly floured surface.
  4. Prepare the Apples
  5. In a bowl, mix the apple slices with sugar and cinnamon.
  6. Assemble the Dessert
  7. Arrange the apple slices over the pastry, leaving a small border.
  8. Brush the apples with melted butter.
  9. Fold the edges slightly over the apples for a rustic tart look.
  10. Egg Wash and Bake
  11. Brush the edges with beaten egg.
  12. Transfer to a lined baking sheet and bake for 20-25 minutes, until golden brown.
  13. Serve and Enjoy
  14. Let cool slightly and dust with powdered sugar if desired.
  15. Serve warm as is or with a scoop of vanilla ice cream.

Notes

  • For extra crunch: Sprinkle chopped nuts like walnuts or almonds before baking.
  • Customize the flavor: Add a drizzle of honey or caramel for extra sweetness.
  • Storage: Store leftovers in an airtight container at room temperature for up to 2 days.
  • Reheating: Warm in the oven at 180°C (350°F) for a few minutes to restore crispiness.

Stuffed Eggplants with Mozzarella – A Simple, Flavorful, and Budget-Friendly Dish

There are some dishes that stay with you forever—not just because they taste incredible, but because they bring back memories of home, family, and the simple joy of cooking. For me, stuffed eggplants have always been one of those meals.

I still remember the first time I saw my grandmother make them. She had a way of transforming the most humble ingredients into something special. A couple of eggplants, a handful of vegetables, and some cheese—that was all she needed to create a meal that felt both hearty and comforting. She would carefully hollow out the eggplants, cook the filling until it was fragrant and full of color, and then top it all with shredded mozzarella. As the dish baked, the kitchen would fill with the warm aroma of garlic, tomatoes, and melted cheese.

When I moved out on my own, I found myself craving those familiar flavors. But like most people, I needed quick, simple, and budget-friendly meals. That’s when I realized how versatile and easy stuffed eggplants are. They require minimal effort, use inexpensive ingredients, and are endlessly customizable. Whether I’m making them for myself after a long day or serving them to friends, they never fail to impress.

Now, I want to share this recipe with you. If you love meals that are packed with flavor, easy on the wallet, and perfect for any day of the week, these stuffed eggplants are a must-try.

Why You’ll Love This Recipe

1. Simple Ingredients, Big Flavor

This recipe proves that you don’t need fancy ingredients to create something delicious. The combination of eggplant, garlic, onions, and tomatoes, topped with gooey melted mozzarella, makes for a rich and satisfying dish.

2. Quick and Easy to Prepare

With just a few steps—scooping, sautéing, stuffing, and baking—you can have a complete meal ready in under an hour. It’s perfect for busy weeknights when you want something homemade but don’t want to spend hours in the kitchen.

3. Healthy and Nutritious

Eggplants are packed with fiber, antioxidants, and essential vitamins. Paired with fresh vegetables and a moderate amount of cheese, this dish is both nutritious and satisfying.

4. Budget-Friendly and Accessible

Eggplants and basic vegetables are some of the most affordable ingredients available. This recipe is proof that you don’t need to spend a lot of money to eat well.

5. A Versatile Dish for Any Occasion

This dish can be served as a main course, a side dish, or even as a vegetarian option at gatherings. You can also switch up the ingredients to match what you have in your fridge.

Ingredients

For the Stuffed Eggplants:

IngredientQuantity
Eggplants2 medium-sized
Salt1 teaspoon (for rubbing)
Vegetable oil2 tablespoons (for brushing)
Onion1, finely chopped
Carrot1, grated or finely chopped
Cherry tomatoes10-12, halved
Olives¼ cup (green or black), pitted and halved
Black pepperTo taste
Garlic2 cloves, minced
Mozzarella150 grams, shredded

Directions

1. Prepare the Eggplants

  • Cut the eggplants in half lengthwise and scoop out some of the flesh to create a hollow center.
  • Sprinkle the insides with salt and let them sit for 15 minutes to remove excess moisture.
  • Pat dry with a paper towel and brush with vegetable oil.

2. Cook the Filling

  • In a pan, heat a tablespoon of oil and sauté the chopped onion and garlic until fragrant.
  • Add the grated carrot and cook for 2 minutes.
  • Stir in the cherry tomatoes and olives, seasoning with black pepper.
  • Let the mixture simmer for a few minutes until softened.

3. Stuff the Eggplants

  • Preheat the oven to 180°C (350°F).
  • Fill each eggplant half with the vegetable mixture.
  • Sprinkle shredded mozzarella evenly over the top.

4. Bake and Serve

  • Place the stuffed eggplants on a baking sheet and bake for 20-25 minutes, until the cheese is melted and golden.
  • Serve warm, garnished with fresh herbs if desired.

Nutritional Information (Per Serving – Approximate)

NutrientAmount per Serving
Calories~220 kcal
Protein~9 g
Carbohydrates~18 g
Fats~12 g
Fiber~5 g
Calcium~150 mg

Frequently Asked Questions

1. Can I Use a Different Type of Cheese?

Yes! While mozzarella gives a creamy, melty texture, you can also use feta for a saltier bite, Parmesan for a sharper flavor, or a mix of different cheeses for extra richness.

2. How Can I Prevent the Eggplants from Becoming Too Soggy?

To keep the eggplants from getting watery, sprinkle them with salt after cutting and let them sit for about 15 minutes. This draws out excess moisture, which you can then pat dry before cooking.

3. Can I Make This Recipe in Advance?

Absolutely! You can prepare the filling ahead of time and store it in the fridge for up to two days. When ready to eat, simply stuff the eggplants, top with cheese, and bake.

4. What Can I Serve With Stuffed Eggplants?

This dish pairs beautifully with:

  • A fresh green salad with a light vinaigrette
  • Steamed rice or quinoa for a heartier meal
  • Crusty bread to soak up any delicious juices from the filling

5. Can I Make This Dish Vegan?

Yes! Just omit the mozzarella or replace it with a plant-based cheese alternative. You can also add more veggies, mushrooms, or cooked lentils for extra texture and protein.

6. How Do I Store and Reheat Leftovers?

Store leftovers in an airtight container in the refrigerator for up to three days. Reheat in the oven at 180°C (350°F) for about 10 minutes to maintain the texture and crispness.

7. Can I Freeze Stuffed Eggplants?

Yes! After baking, let them cool completely, then wrap them individually in plastic wrap and freeze for up to two months. When ready to eat, bake them straight from frozen at 180°C (350°F) until warmed through.

8. Can I Add Protein to This Dish?

Absolutely! If you want to make this dish more filling, try adding:

  • Cooked ground beef, turkey, or sausage to the filling
  • Lentils or chickpeas for a vegetarian protein boost
  • Quinoa or couscous for added texture

9. Are There Other Vegetables I Can Use in the Filling?

Yes! Feel free to experiment with:

  • Mushrooms for an earthy depth of flavor
  • Zucchini for extra sweetness and moisture
  • Red peppers for a pop of color and natural sweetness

10. How Can I Make the Cheese Extra Crispy?

For a crispy golden top, broil the stuffed eggplants for the last 3-5 minutes of baking. This will give the mozzarella a deliciously bubbly and slightly browned finish.

Conclusion: A Simple Dish That Feels Like Home

Stuffed eggplants are one of those meals that remind you that great cooking doesn’t have to be complicated. With a handful of fresh ingredients, a little bit of effort, and a short time in the oven, you get a dish that’s bursting with flavor, warmth, and nostalgia.

This recipe is perfect for busy weeknights, casual family dinners, or even as a comforting meal when you just need something hearty and satisfying. It’s budget-friendly, easy to customize, and most importantly—delicious.

So the next time you’re looking for a simple, quick, and affordable meal that doesn’t compromise on taste, give these stuffed eggplants a try. Who knows? They might just become your new favorite comfort food—just like they did for me.

Amal

Stuffed Eggplants with Mozzarella – A Simple, Flavorful, and Budget-Friendly Dish

These stuffed eggplants with mozzarella are a delicious, easy-to-make dish that’s bursting with flavor. Tender roasted eggplant halves are filled with a savory mixture of sautéed vegetables, olives, and garlic, then topped with melty mozzarella cheese. This budget-friendly meal is perfect for a quick weeknight dinner or a comforting vegetarian option that everyone will love!
Prep Time 15 minutes
Cook Time 25 minutes
Total Time 40 minutes
Servings: 4 servings
Course: Main Dish
Cuisine: Mediterranean

Ingredients
  

  • 2 medium-sized eggplants
  • 1 teaspoon salt for rubbing
  • 2 tablespoons vegetable oil for brushing
  • 1 onion finely chopped
  • 1 carrot grated or finely chopped
  • 10-12 cherry tomatoes halved
  • ¼ cup olives green or black, pitted and halved
  • Black pepper to taste
  • 2 cloves garlic minced
  • 150 grams mozzarella shredded

Method
 

  1. Prepare the Eggplants
  2. Cut the eggplants in half lengthwise and scoop out some of the flesh to create a hollow center.
  3. Sprinkle the insides with salt and let them sit for 15 minutes to remove excess moisture.
  4. Pat dry with a paper towel and brush with vegetable oil.
  5. Cook the Filling
  6. In a pan, heat a tablespoon of oil and sauté the chopped onion and garlic until fragrant.
  7. Add the grated carrot and cook for 2 minutes.
  8. Stir in the cherry tomatoes and olives, seasoning with black pepper.
  9. Let the mixture simmer for a few minutes until softened.
  10. Stuff the Eggplants
  11. Preheat the oven to 180°C (350°F).
  12. Fill each eggplant half with the vegetable mixture.
  13. Sprinkle shredded mozzarella evenly over the top.
  14. Bake and Serve
  15. Place the stuffed eggplants on a baking sheet and bake for 20-25 minutes, until the cheese is melted and golden.
  16. Serve warm, garnished with fresh herbs if desired.

Notes

  • For extra flavor: Add chopped fresh basil or oregano to the filling.
  • Make it heartier: Mix in cooked quinoa, rice, or ground meat for a more filling meal.
  • Storage: Leftovers can be stored in an airtight container in the fridge for up to 3 days and reheated in the oven.
  • Freezing option: Freeze after baking, then reheat in the oven at 180°C (350°F) until warmed through.

Nut & Date Energy Bars – A Power-Packed Snack for Strength and Vitality

Some recipes start as simple experiments and quickly become a part of daily life. That’s exactly what happened with these nut and date energy bars.

It all began when I was searching for a healthier alternative to store-bought snacks. My family has always been active, and between work, school, and workouts, we needed something that was both nutritious and satisfying. Store-bought granola bars were often filled with preservatives and artificial sweeteners, so I wanted to create something natural, wholesome, and full of energy.

One evening, I gathered a mix of nuts, dates, and honey, blended them together, and pressed them into a pan. After chilling them overnight, I cut them into bars and handed them to my family the next morning. The verdict? They disappeared in minutes! My husband loved the crunch, my kids enjoyed the natural sweetness, and I was thrilled knowing that they were eating something packed with nutrients instead of processed sugar.

Since then, these energy bars have become a staple in our home. They’re perfect for breakfast on busy mornings, a pre-workout boost, or a midday snack. Whether we’re heading out for a hike or just need something quick to grab, these bars are always there, fueling us through the day.

Now, I’m sharing this recipe with you. It’s simple, delicious, and incredibly versatile. Once you try it, you might find yourself making a batch every week—just like we do!

Why You’ll Love These Energy Bars

1. Natural and Wholesome Ingredients

These bars are made from real, whole foods—nuts, seeds, dates, and honey. There are no preservatives, no processed sugar, and no artificial flavors, making them a healthier alternative to commercial energy bars.

2. Rich in Protein and Healthy Fats

Nuts and seeds provide a great source of plant-based protein and essential fats, helping to keep you full and energized for longer. These bars are perfect for anyone looking for a nutrient-dense snack.

3. A Great Source of Natural Energy

The natural sugars from dates and honey provide quick energy, while the fiber and fats help sustain it over time. Whether you need a morning boost or a mid-afternoon pick-me-up, these bars are a perfect choice.

4. No Baking Required

One of the best things about this recipe is how easy it is to make. There’s no need to turn on the oven—just blend, press, chill, and enjoy.

5. Perfect for Meal Prep and On-the-Go Snacking

Make a batch at the beginning of the week, store them in the fridge, and have a ready-to-eat snack whenever you need it. They’re great for busy mornings, post-workout fuel, or even a lunchbox treat.

6. Fully Customizable

You can easily swap ingredients to suit your taste. Don’t like walnuts? Use pecans. Prefer a different sweetener? Try maple syrup. Want a chocolate version? Add cocoa powder or dark chocolate chips.

Ingredients

For the Energy Bars:

IngredientQuantity
Cashews70 g (½ cup)
Walnuts70 g (½ cup)
Almonds70 g (½ cup)
Pine nuts40 g (¼ cup)
Hazelnuts70 g (½ cup)
Pumpkin seeds70 g (⅓ cup)
Dates150 g (1 cup), soaked in cold water for 15 minutes
Oatmeal50 g (½ cup), chopped
Olive oil3 tablespoons
Salt½ teaspoon
Honey160 ml (½ cup)

Directions

1. Prepare the Ingredients

  • Soak the dates in cold water for 15 minutes, then drain.
  • Finely chop the oatmeal and nuts for a smoother texture.

2. Toast the Nuts and Seeds

  • In a dry pan over medium heat, toast the cashews, walnuts, almonds, hazelnuts, pine nuts, and pumpkin seeds for 3-5 minutes until fragrant.
  • Stir occasionally to prevent burning.

3. Blend the Mixture

  • In a food processor, blend the soaked dates until smooth.
  • Add the toasted nuts, seeds, and oatmeal, then pulse until well combined.
  • Drizzle in the olive oil, honey, and salt, blending until the mixture is sticky and holds together.

4. Shape and Chill

  • Press the mixture firmly into a parchment-lined baking dish.
  • Smooth the top with a spatula and refrigerate for at least 2 hours.

5. Cut and Serve

  • Once set, cut into bars or squares.
  • Enjoy as a nutritious snack or breakfast on the go!

Nutritional Information (Per Bar – Approximate)

NutrientAmount per Serving
Calories~180 kcal
Protein~5 g
Carbohydrates~18 g
Fats~12 g
Fiber~3 g
Natural Sugars~10 g

Frequently Asked Questions

1. Can I Use Different Nuts in This Recipe?

Yes! This recipe is very flexible. You can substitute or mix in other nuts like pecans, macadamia nuts, or pistachios. Just keep the overall quantity the same.

2. Do I Have to Soak the Dates?

Soaking the dates helps soften them, making them easier to blend into a smooth paste. If your dates are already very soft and sticky, you can skip this step.

3. How Long Do These Energy Bars Last?

These bars stay fresh in the refrigerator for up to 2 weeks when stored in an airtight container. They can also be frozen for up to 3 months.

4. Can I Make These Bars Without Honey?

Absolutely! If you prefer a vegan version, you can replace honey with maple syrup, agave nectar, or date syrup.

5. How Can I Make the Bars Less Sweet?

Reduce the amount of honey or use more nuts and seeds to balance out the sweetness. You can also add a pinch of sea salt to enhance the flavors without adding sugar.

6. Are These Bars Good for Kids?

Yes! These bars are a great snack for kids because they provide natural energy, healthy fats, and essential nutrients without processed sugar. Just make sure to chop the nuts finely if serving to younger children.

7. Can I Add Chocolate to This Recipe?

Definitely! You can mix in dark chocolate chips, drizzle melted chocolate on top, or add unsweetened cocoa powder for a chocolate-flavored version.

8. What’s the Best Way to Store These Bars?

For the best texture, store them in the refrigerator. If you want them to last even longer, keep them in the freezer and thaw as needed.

9. Can I Make These Into Energy Balls Instead of Bars?

Yes! Instead of pressing the mixture into a pan, roll it into bite-sized balls for a poppable, portable snack.

10. How Do I Get the Perfect Texture?

To ensure the bars hold together well:

  • Blend the dates thoroughly to create a sticky paste.
  • Press the mixture firmly into the pan to compact the ingredients.
  • Chill for at least 2 hours before cutting to allow them to set properly.

Conclusion: A Snack You’ll Want to Make Again and Again

Finding a snack that is both delicious and nutritious can be a challenge, but these nut and date energy bars check all the boxes. They’re naturally sweet, packed with protein, and full of healthy fats that provide long-lasting energy.

The best part? They require minimal effort and no baking, making them the perfect homemade snack for busy days. Whether you’re looking for a quick breakfast, a post-workout bite, or something to keep your energy levels steady throughout the day, these bars are a fantastic option.

Once you make them, you’ll see why my family eats them every day. They’re so good, you might find yourself making double batches just to keep up! So go ahead, try this recipe, and enjoy a snack that fuels your body while satisfying your taste buds.

Amal

Nut & Date Energy Bars – A Power-Packed Snack for Strength and Vitality

These nut and date energy bars are the ultimate healthy snack, packed with natural ingredients to fuel your day. A perfect blend of crunchy nuts, soft dates, and a touch of honey creates a chewy, satisfying bar that is both delicious and nutritious. Whether you need a quick breakfast, a pre-workout boost, or a midday snack, these bars are easy to make and require no baking!
Prep Time 15 minutes
Cook Time 2 hours
Total Time 2 hours 15 minutes
Servings: 10 -12 bars
Course: Snack
Cuisine: Healthy

Ingredients
  

  • 70 g ½ cup cashews
  • 70 g ½ cup walnuts
  • 70 g ½ cup almonds
  • 40 g ¼ cup pine nuts
  • 70 g ½ cup hazelnuts
  • 70 g ⅓ cup pumpkin seeds
  • 150 g 1 cup dates, soaked in cold water for 15 minutes
  • 50 g ½ cup oatmeal, chopped
  • 3 tablespoons olive oil
  • ½ teaspoon salt
  • 160 ml ½ cup honey

Method
 

  1. Prepare the Ingredients
  2. Soak the dates in cold water for 15 minutes, then drain.
  3. Finely chop the oatmeal and nuts for a smoother texture.
  4. Toast the Nuts and Seeds
  5. Heat a dry pan over medium heat and toast the cashews, walnuts, almonds, hazelnuts, pine nuts, and pumpkin seeds for 3-5 minutes until fragrant. Stir occasionally to prevent burning.
  6. Blend the Mixture
  7. In a food processor, blend the soaked dates until a smooth paste forms.
  8. Add the toasted nuts, seeds, and oatmeal, then pulse until well combined.
  9. Drizzle in the olive oil, honey, and salt, blending until the mixture becomes sticky and holds together.
  10. Shape and Chill
  11. Press the mixture firmly into a parchment-lined baking dish.
  12. Smooth the top with a spatula and refrigerate for at least 2 hours.
  13. Cut and Serve
  14. Once set, cut into bars or squares.
  15. Enjoy as a nutritious snack or breakfast on the go!

Notes

  • Storage: Store bars in an airtight container in the fridge for up to 2 weeks.
  • Freezing: Freeze bars for up to 3 months. Thaw at room temperature before serving.
  • Customizations: Swap out nuts, add shredded coconut, or mix in dark chocolate chips for variety.
  • Energy Balls Option: Instead of pressing into a pan, roll into bite-sized balls for an easy grab-and-go snack.

Savory Quiche Muffins – The Perfect Bite-Sized Breakfast

Mornings have always been a hectic time in my household. Between getting ready for the day, making sure everyone has what they need, and rushing out the door, breakfast often becomes an afterthought. But one day, that changed.

I remember the first time I made these quiche muffins. It was a Sunday morning, and I had extra eggs, a handful of spinach, some bell peppers, and leftover sausage from the night before. Instead of making a traditional quiche, I thought, why not make something easier to grab and eat on the go?

I quickly sautéed the sausage, whisked the eggs, and poured everything into a muffin tin. Within minutes, the kitchen smelled incredible—the warm, savory aroma of eggs, melted cheese, and spices filling the air. When I pulled them out of the oven, golden and fluffy, I knew I had found something special.

That morning, my family devoured them. Even my pickiest eater, who usually turns away from anything green, happily ate a whole muffin without complaint. Since then, these mini quiches have become a staple in our home. They’re perfect for meal prep, easy to customize, and provide a protein-packed breakfast that keeps everyone full and satisfied.

If your mornings are as busy as mine, these quiche muffins will change the way you do breakfast. They’re simple, delicious, and exactly what you need for a stress-free start to your day.

Why You’ll Love These Quiche Muffins

1. Quick and Easy to Make

These mini quiches require just a few simple steps—cook, mix, pour, and bake. In under 30 minutes, you’ll have a batch of warm, delicious muffins ready to go.

2. Packed with Protein and Nutrients

With eggs, sausage, cheese, and spinach, these muffins are loaded with protein, vitamins, and minerals that provide long-lasting energy. They’re perfect for anyone following a high-protein or low-carb diet.

3. Perfect for Meal Prep

Make a batch at the beginning of the week, store them in the fridge, and enjoy a ready-to-eat breakfast every morning. They also freeze well, so you can always have a healthy option on hand.

4. Customizable to Your Taste

This recipe is incredibly flexible. Don’t like sausage? Swap it for bacon or turkey. Want more veggies? Add mushrooms, onions, or zucchini. You can even experiment with different cheeses like feta or Swiss for new flavors.

5. A Kid-Friendly Breakfast

If you have little ones who are picky eaters, these mini quiches are a great way to sneak in some veggies without them noticing. The cheese and sausage add so much flavor that they won’t even realize they’re eating spinach!

Ingredients

For the Mini Quiches:

IngredientQuantity
Ground Sausage200 g (7 oz)
Spinach1 cup (60 g), chopped
Bell Pepper1 medium, finely diced
Eggs6 large
Milk½ cup (120 ml)
Cheese1 cup (100 g), shredded (cheddar, mozzarella, or a mix)
Salt½ teaspoon
Black Pepper½ teaspoon
Garlic Powder¼ teaspoon
Paprika¼ teaspoon
Olive Oil1 tablespoon, for cooking

Directions

1. Prepare the Ingredients

  • Preheat oven to 180°C (350°F).
  • Grease a muffin tin with olive oil or non-stick spray.
  • In a skillet, heat olive oil over medium heat. Add ground sausage and cook until browned.
  • Stir in the diced bell pepper and chopped spinach, cooking for another 2-3 minutes.

2. Mix the Egg Filling

  • In a large bowl, whisk the eggs with milk, salt, black pepper, garlic powder, and paprika.
  • Stir in the shredded cheese.

3. Assemble the Quiche Muffins

  • Divide the sausage and vegetable mixture evenly into the muffin tin.
  • Pour the egg mixture over the fillings, filling each cup about ¾ full.

4. Bake and Serve

  • Bake for 18-20 minutes or until the tops are golden and the eggs are set.
  • Let cool slightly before removing from the tin.
  • Enjoy warm or store for an easy meal prep breakfast!

Nutritional Information (Per Muffin – Approximate)

NutrientAmount per Muffin
Calories~120 kcal
Protein~9 g
Carbohydrates~2 g
Fats~9 g
Fiber~1 g
Calcium~80 mg

Frequently Asked Questions

1. Can I Use Different Meats Instead of Sausage?

Yes! You can substitute the sausage with cooked bacon, turkey, shredded chicken, or even plant-based alternatives like crumbled tofu or vegetarian sausage.

2. Can I Make These Quiche Muffins Dairy-Free?

Absolutely. Simply replace the milk with almond, oat, or coconut milk, and use a dairy-free cheese alternative or skip the cheese altogether.

3. How Do I Prevent the Muffins from Sticking to the Pan?

To ensure easy removal, thoroughly grease the muffin tin with olive oil, butter, or non-stick spray. You can also use silicone muffin cups for effortless release.

4. Can I Freeze These Quiche Muffins?

Yes! Let them cool completely, then place them in an airtight container or freezer bag. When ready to eat, reheat in the microwave for about 30-45 seconds or warm them in the oven at 180°C (350°F) for a few minutes.

5. How Long Do These Last in the Fridge?

These quiche muffins stay fresh for up to 4 days when stored in an airtight container in the refrigerator.

6. Can I Make This Recipe Without Meat?

Of course! Skip the sausage and add extra veggies like bell peppers, mushrooms, or asparagus for a delicious vegetarian version.

7. Can I Make Mini Versions of These?

Yes! If you prefer bite-sized quiches, use a mini muffin tin and reduce the baking time to around 12-15 minutes.

8. How Can I Add More Flavor?

Try adding spices like smoked paprika, cayenne pepper, or Italian seasoning for an extra kick. Fresh herbs like basil, chives, or cilantro also bring great flavor.

9. Can I Make These Without a Muffin Tin?

If you don’t have a muffin tin, pour the mixture into a greased baking dish and bake as a crustless quiche. Slice and serve!

10. What’s the Best Way to Reheat Them?

For the best texture, reheat them in the oven at 180°C (350°F) for 5-7 minutes. If you’re in a hurry, the microwave works too—just heat for about 30 seconds.

Conclusion: A Breakfast Game-Changer

Mornings don’t have to be chaotic or rushed when you have a batch of these savory quiche muffins ready to go. They’re packed with flavor, easy to customize, and provide a satisfying meal that will keep you fueled for the day ahead.

Whether you make them for meal prep, serve them at brunch, or simply need a quick and delicious snack, these quiche muffins will never disappoint. They’re proof that a homemade breakfast can be both effortless and incredibly satisfying.

So the next time you find yourself skipping breakfast or reaching for something less nutritious, take 30 minutes to make these instead. Once you try them, you’ll wonder how you ever lived without them!

Amal

Savory Quiche Muffins – The Perfect Bite-Sized Breakfast

These savory quiche muffins are the perfect grab-and-go breakfast! Packed with flavorful sausage, fresh spinach, bell peppers, and gooey melted cheese, they’re a high-protein, low-carb meal that’s both delicious and satisfying. Perfect for meal prep, quick mornings, or even a light snack, these mini quiches are easy to make and full of flavor.
Prep Time 10 minutes
Cook Time 20 minutes
Total Time 30 minutes
Servings: 12 muffins
Course: Breakfast
Cuisine: American

Ingredients
  

  • 200 g 7 oz ground sausage
  • 1 cup 60 g spinach, chopped
  • 1 medium bell pepper finely diced
  • 6 large eggs
  • ½ cup 120 ml milk
  • 1 cup 100 g shredded cheese (cheddar, mozzarella, or a mix)
  • ½ teaspoon salt
  • ½ teaspoon black pepper
  • ¼ teaspoon garlic powder
  • ¼ teaspoon paprika
  • 1 tablespoon olive oil for cooking

Method
 

  1. Preheat and Prep
  2. Preheat the oven to 180°C (350°F).
  3. Grease a muffin tin with olive oil or non-stick spray.
  4. Cook the Sausage and Vegetables
  5. Heat olive oil in a pan over medium heat.
  6. Add the ground sausage and cook until browned.
  7. Stir in the diced bell pepper and chopped spinach, cooking for another 2-3 minutes.
  8. Whisk the Eggs
  9. In a bowl, whisk together the eggs, milk, salt, black pepper, garlic powder, and paprika.
  10. Stir in the shredded cheese.
  11. Assemble and Bake
  12. Divide the sausage and vegetable mixture evenly into the muffin tin.
  13. Pour the egg mixture over the fillings, filling each cup about ¾ full.
  14. Bake for 18-20 minutes or until the tops are golden and the eggs are set.
  15. Cool and Serve
  16. Let the quiche muffins cool slightly before removing them from the tin.
  17. Enjoy warm or store for later!

Notes

  • Storage: Store in an airtight container in the fridge for up to 4 days. Reheat in the microwave for 30 seconds.
  • Freezing: Freeze cooked muffins for up to 2 months. Reheat in the oven at 180°C (350°F) for 5-7 minutes.
  • Customizations: Swap the sausage for bacon, turkey, or even mushrooms for a vegetarian option.
  • Mini Version: Use a mini muffin tin and reduce the baking time to 12-15 minutes for bite-sized quiches.

Crispy Tomato & Cheese Puff Pastry – The Irresistible Snack Everyone Loves

Every once in a while, a recipe comes along that is so simple yet so delicious that it takes the world by storm. This crispy tomato and cheese puff pastry is one of those dishes. It’s easy to make, requires just a handful of ingredients, and delivers a perfect combination of crispy, buttery pastry with gooey, melted cheese and the fresh tang of tomatoes.

The first time I made these, I wasn’t expecting them to be anything extraordinary. I had leftover puff pastry in the fridge, a few slices of ham, and some cheese that needed to be used up. I threw them together, added some mustard for extra flavor, and baked them until golden brown. When I took the first bite, I knew I had stumbled upon something special.

What started as a way to use up leftovers quickly became a family favorite. Every time I made them, they disappeared from the tray within minutes. Friends started requesting them at gatherings, and soon, I was making double and even triple batches just to keep up with the demand.

There’s something undeniably satisfying about biting into a flaky, buttery pastry filled with warm, melted cheese and juicy tomatoes. The contrast of textures, the slight kick from the mustard, and the richness of the ham and cheese make this snack truly irresistible.

If you’re looking for an easy, crowd-pleasing snack that takes minimal effort but delivers maximum flavor, this is the recipe for you.

Why This Recipe is a Must-Try

1. A Perfect Balance of Flavors

The combination of creamy melted cheese, savory ham, and juicy tomatoes creates an explosion of flavors in every bite. The mustard adds a slight tang, elevating the taste without overpowering the ingredients.

2. Flaky, Buttery, and Crispy

Puff pastry is known for its light, crispy layers, and when baked to perfection, it provides the ideal crunch to complement the soft, melted filling inside.

3. Quick and Easy to Make

With just a few simple steps, you can prepare this snack in under 30 minutes. It’s perfect for when you need a last-minute appetizer or a quick treat for unexpected guests.

4. Perfect for Any Occasion

Whether served as a party snack, a light lunch, or an afternoon treat with a cup of tea, these puff pastry bites are always a hit. They’re also great for kids’ lunchboxes or as a side for soups and salads.

5. Endless Variations

While the classic combination of ham, cheese, and tomato is delicious, you can easily customize this recipe by adding different ingredients like mushrooms, spinach, or even smoked salmon.

Ingredients

For the Puff Pastry:

IngredientQuantity
Puff pastry500 g
MustardTo taste
Ham100 g
Cheese100 g (cheddar, mozzarella, or preferred cheese)
Tomatoes1-2, sliced
Ground black pepperTo taste
Egg1 (for egg wash)
Parmesan30 g, grated

Directions

1. Prepare the Pastry

  • Preheat oven to 200°C (390°F).
  • Roll out the puff pastry on a lightly floured surface.
  • Spread a thin layer of mustard over the pastry.

2. Assemble the Snack

  • Evenly distribute ham and cheese over the pastry.
  • Arrange the sliced tomatoes on top.
  • Season with black pepper to taste.

3. Shape and Bake

  • Cut the pastry into squares or desired shapes.
  • Brush with beaten egg for a golden finish.
  • Sprinkle grated Parmesan on top.
  • Bake for 15-20 minutes or until golden brown and puffed.

4. Serve and Enjoy

  • Let them cool slightly before serving.
  • Best enjoyed warm with your favorite dipping sauce!

Nutritional Information (Per Serving – Approximate)

NutrientAmount per Serving
Calories~320 kcal
Protein~12 g
Carbohydrates~28 g
Fats~18 g
Fiber~2 g
Calcium~150 mg

Frequently Asked Questions

1. Can I Use Store-Bought Puff Pastry?

Absolutely! Store-bought puff pastry works perfectly for this recipe. Just make sure to thaw it properly before rolling it out.

2. What Type of Cheese Works Best?

Cheddar and mozzarella are great options because they melt beautifully and complement the other flavors. If you prefer a stronger taste, try Gruyère, gouda, or even blue cheese.

3. Can I Make These Ahead of Time?

Yes! You can assemble the pastries and refrigerate them for a few hours before baking. If you want to freeze them, place the unbaked pastries on a tray, freeze them until firm, and then transfer them to a freezer bag. Bake them straight from frozen, adding a few extra minutes to the baking time.

4. How Do I Store Leftovers?

These pastries are best enjoyed fresh, but if you have leftovers, store them in an airtight container in the fridge for up to two days. Reheat in the oven at 180°C (350°F) for 5-7 minutes to restore their crispiness.

5. Can I Make a Vegetarian Version?

Absolutely! Simply omit the ham and add ingredients like sautéed mushrooms, spinach, or roasted bell peppers for a delicious meat-free option.

6. What’s the Best Way to Prevent the Pastry from Getting Soggy?

To avoid a soggy pastry, make sure to:

  • Spread only a thin layer of mustard.
  • Pat the tomato slices dry before adding them.
  • Avoid overloading with ingredients, as too much moisture can make the pastry heavy.

7. Can I Use Different Seasonings?

Of course! Paprika, oregano, thyme, or Italian seasoning all work beautifully in this recipe. A sprinkle of chili flakes can also add a nice kick.

8. What Can I Serve These With?

These puff pastries pair well with a fresh green salad, a bowl of tomato soup, or even a simple yogurt-based dipping sauce.

9. Can I Use Phyllo Dough Instead of Puff Pastry?

While puff pastry provides a flaky, buttery texture, phyllo dough can also be used. However, phyllo requires additional layers with melted butter in between to achieve the same richness.

10. How Can I Make This Recipe More Gourmet?

For a more refined version, try adding caramelized onions, truffle oil, or a slice of brie before baking. Garnish with microgreens for an elegant presentation.

Conclusion: A Snack Worth Making Again and Again

Some recipes become instant favorites, and this crispy tomato and cheese puff pastry is one of them. It’s easy to make, incredibly delicious, and endlessly versatile. Whether you’re preparing it for a gathering, a quick lunch, or simply to satisfy a craving, this recipe delivers every time.

The contrast of textures—the crispy, buttery layers of pastry against the gooey, melted cheese and juicy tomatoes—makes it impossible to eat just one. And with endless variations to explore, you can enjoy this recipe in new and exciting ways every time you make it.

So next time you’re looking for a simple yet impressive snack, skip the store-bought options and make these instead. One bite, and you’ll understand why the world can’t get enough of them!

Amal

Crispy Tomato & Cheese Puff Pastry – The Irresistible Snack Everyone Loves

This crispy tomato and cheese puff pastry is the perfect combination of flaky, buttery pastry, gooey melted cheese, and fresh, juicy tomatoes. A touch of mustard enhances the flavors, while Parmesan adds a deliciously crispy topping. Quick to make and irresistibly tasty, this snack is ideal for gatherings, a light lunch, or an afternoon treat.
Prep Time 10 minutes
Cook Time 20 minutes
Total Time 30 minutes
Servings: 6 -8 pieces
Course: Snack
Cuisine: European

Ingredients
  

  • 500 g puff pastry
  • Mustard to taste
  • 100 g ham
  • 100 g cheese cheddar, mozzarella, or preferred cheese
  • 1-2 tomatoes sliced
  • Ground black pepper to taste
  • 1 egg for egg wash
  • 30 g Parmesan grated

Method
 

  1. Prepare the Pastry
  2. Preheat oven to 200°C (390°F).
  3. Roll out the puff pastry on a lightly floured surface.
  4. Spread a thin layer of mustard over the pastry.
  5. Assemble the Snack
  6. Evenly distribute ham and cheese over the pastry.
  7. Arrange the sliced tomatoes on top.
  8. Season with ground black pepper to taste.
  9. Shape and Bake
  10. Cut the pastry into squares or desired shapes.
  11. Brush with beaten egg for a golden finish.
  12. Sprinkle grated Parmesan on top.
  13. Bake for 15-20 minutes until golden brown and puffed.
  14. Serve and Enjoy
  15. Let them cool slightly before serving.
  16. Best enjoyed warm with your favorite dipping sauce!

Notes

  • For extra crispiness: Pat the tomato slices dry before placing them on the pastry to prevent sogginess.
  • Customize it: Swap ham for turkey, bacon, or make a vegetarian version with sautéed mushrooms or spinach.
  • Storage: Store leftovers in an airtight container in the fridge for up to 2 days. Reheat in the oven at 180°C (350°F) for 5 minutes.
  • Freezing: Freeze unbaked pastries and bake directly from frozen, adding a few extra minutes to the baking time.

Creamy Garlic Pork Spaghetti – A Hearty Family Favorite

Some of the best meals aren’t planned; they just happen. This creamy garlic pork spaghetti was one of those dishes that came together unexpectedly on a busy evening when I had little time and only a handful of ingredients.

I remember standing in the kitchen, staring at the fridge, trying to figure out what to make for dinner. There was some leftover pork, a block of cheese, and a half-used carton of milk. I had spaghetti in the pantry, and that was all the inspiration I needed.

As the pasta boiled, I seared the pork in a pan, letting the garlic sizzle and release its irresistible aroma. Then came the sauce—thick, creamy, and infused with the perfect balance of cheese and paprika. The moment I tossed the spaghetti into the sauce, I knew I had created something special.

When I served it, my family’s reaction was all I needed to confirm it was a winner. They loved the rich, velvety sauce combined with the tender pork and perfectly cooked pasta. It was a simple dish, but it had everything—flavor, texture, and that comforting warmth that only home-cooked meals can bring.

Now, this recipe has become a go-to in our house. It’s quick, easy, and incredibly satisfying—perfect for those nights when you want something delicious but don’t have hours to spend in the kitchen.

Why This Pasta Recipe Is a Must-Try

1. Quick and Easy for Busy Days

You don’t need to spend hours in the kitchen to make a satisfying meal. This creamy pork spaghetti comes together in under 30 minutes, making it perfect for weeknights when time is limited.

2. Rich, Creamy, and Packed with Flavor

The combination of garlic, butter, and cheese creates a luscious, velvety sauce that clings to every strand of spaghetti. The paprika adds warmth, while the pork brings a savory depth to the dish.

3. A Budget-Friendly, Simple Meal

With just a few basic ingredients, you can create a restaurant-quality pasta dish at home. Pork breast is an affordable yet flavorful protein that pairs beautifully with the creamy sauce.

4. Perfect for the Whole Family

This dish has a mild yet rich flavor that appeals to both kids and adults. It’s not too spicy, but if you like heat, you can easily add some chili flakes for an extra kick.

5. A Versatile Recipe with Endless Variations

While this recipe is already delicious as is, you can easily customize it by swapping ingredients or adding extras like mushrooms, spinach, or crispy bacon.

Ingredients

For the Spaghetti and Pork:

IngredientQuantity
Spaghetti250 g
Pork breast200 g, sliced
Garlic2 cloves, minced
Olive oil1 tablespoon
Butter40 g
SaltTo taste
Black pepperTo taste
Flour1 tablespoon
Milk300 ml
Cheese100 g, grated (cheddar or mozzarella)
Paprika1 teaspoon
Fresh parsley & dillFor garnish

Directions

1. Cook the Pasta

  • Boil spaghetti in salted water according to package instructions.
  • Drain and set aside, reserving some pasta water.

2. Prepare the Pork

  • Heat olive oil and half the butter in a pan over medium heat.
  • Add the sliced pork and cook until golden brown.
  • Stir in minced garlic and cook for another minute.

3. Make the Sauce

  • Lower the heat and sprinkle flour over the pork, stirring well.
  • Gradually pour in milk, stirring continuously to avoid lumps.
  • Add grated cheese, paprika, salt, and black pepper, stirring until smooth.

4. Combine Everything

  • Toss the cooked spaghetti into the sauce, mixing well to coat.
  • Add a splash of reserved pasta water if needed for a silkier texture.

5. Garnish and Serve

  • Sprinkle with fresh parsley and dill before serving.
  • Enjoy warm for the best creamy, cheesy goodness!

Nutritional Information (Per Serving – Approximate)

NutrientAmount per Serving
Calories~480 kcal
Protein~22 g
Carbohydrates~50 g
Fats~20 g
Fiber~3 g
Calcium~180 mg

Frequently Asked Questions

1. Can I Use a Different Type of Meat?

Yes! While pork breast is tender and flavorful, you can also use chicken, turkey, or even beef. Just adjust the cooking time accordingly to ensure the meat is fully cooked.

2. What Can I Use Instead of Milk for the Sauce?

If you prefer a richer sauce, you can use heavy cream instead of milk. For a lighter version, you can substitute milk with a mix of chicken broth and a splash of cream.

3. Can I Make This Recipe Gluten-Free?

Absolutely! Simply use gluten-free pasta and swap the regular flour for a gluten-free alternative like cornstarch or rice flour to thicken the sauce.

4. What Type of Cheese Works Best in This Recipe?

Cheddar and mozzarella are great choices because they melt well and add a creamy texture. You can also use Parmesan for a sharper, nuttier flavor or Gruyère for a gourmet touch.

5. How Can I Make the Sauce Thicker?

If your sauce seems too thin, let it simmer for a few extra minutes until it thickens. You can also add a little more flour or cheese to achieve the desired consistency.

6. Can I Use Pre-Cooked Pork?

Yes! If you have leftover roasted or grilled pork, simply slice it thinly and add it to the pan after the garlic and butter. Since it’s already cooked, just warm it through before making the sauce.

7. What Side Dishes Pair Well with This Pasta?

This dish is rich and creamy, so it pairs well with lighter sides like:

  • A fresh green salad with a tangy vinaigrette
  • Roasted or steamed vegetables like broccoli or asparagus
  • Garlic bread or a crusty baguette for dipping into the sauce

8. How Can I Add More Vegetables to This Dish?

To make this meal more nutritious, try adding sautéed mushrooms, spinach, bell peppers, or zucchini. Simply cook them alongside the pork or stir them into the sauce.

9. Can I Make This Recipe Ahead of Time?

While it’s best enjoyed fresh, you can make the sauce in advance and store it in the refrigerator for up to 2 days. When ready to serve, reheat it gently on the stove and toss with freshly cooked spaghetti.

10. Can I Freeze This Pasta Dish?

Cream-based sauces don’t always freeze well as they can separate when reheated. However, you can freeze the cooked pork and sauce separately and add fresh pasta when serving.

Conclusion: A Pasta Dish That Feels Like Home

There’s something truly comforting about a good pasta dish—especially one that’s creamy, cheesy, and packed with flavor. This creamy garlic pork spaghetti is more than just a meal; it’s a reminder that great food doesn’t have to be complicated.

Whether you’re cooking for your family, hosting friends, or just treating yourself, this dish delivers on every level. It’s easy to make, full of rich, savory flavors, and guaranteed to leave everyone asking for seconds.

So the next time you need a quick, satisfying meal, give this recipe a try. It might just become your new favorite go-to dinner—just like it did for me.

Amal

Creamy Garlic Pork Spaghetti – A Hearty Family Favorite

This creamy garlic pork spaghetti is a perfect family meal that comes together in minutes. Tender slices of pork breast are cooked in a rich, cheesy garlic sauce and tossed with perfectly cooked spaghetti for a comforting dish that’s both simple and delicious. Serve it with fresh herbs and enjoy a homemade pasta dish that’s better than takeout!
Prep Time 10 minutes
Cook Time 20 minutes
Total Time 30 minutes
Servings: 4 servings
Course: Main Dish
Cuisine: European

Ingredients
  

  • 250 g spaghetti
  • 200 g pork breast sliced
  • 2 cloves garlic minced
  • 1 tablespoon olive oil
  • 40 g butter
  • Salt to taste
  • Black pepper to taste
  • 1 tablespoon flour
  • 300 ml milk
  • 100 g cheese grated, preferably cheddar or mozzarella
  • 1 teaspoon paprika
  • Fresh parsley and dill for garnish

Method
 

  1. Cook the Spaghetti
  2. Bring a large pot of salted water to a boil.
  3. Cook the spaghetti according to package instructions until al dente.
  4. Drain and set aside, reserving a small amount of pasta water.
  5. Cook the Pork
  6. Heat olive oil and half of the butter in a pan over medium heat.
  7. Add the sliced pork and cook until golden brown.
  8. Stir in the minced garlic and cook for another minute until fragrant.
  9. Prepare the Sauce
  10. Reduce the heat and sprinkle flour over the pork, stirring well.
  11. Slowly pour in the milk, stirring continuously to prevent lumps.
  12. Add grated cheese, paprika, salt, and black pepper, stirring until smooth and creamy.
  13. Combine Everything
  14. Toss the cooked spaghetti into the sauce, mixing well to coat.
  15. If needed, add a splash of reserved pasta water to adjust the consistency.
  16. Serve and Garnish
  17. Sprinkle with fresh parsley and dill before serving.
  18. Enjoy warm for the best creamy, cheesy flavor!

Notes

  • For a spicier kick, add chili flakes or cayenne pepper.
  • Use chicken or turkey instead of pork for a lighter version.
  • For a richer sauce, substitute heavy cream for the milk.
  • Storage: Keep leftovers in an airtight container in the fridge for up to 3 days. Reheat gently with a splash of milk to restore creaminess.

Vanilla Pudding Tartlets – A Sweet Delight for Any Occasion

There’s something magical about vanilla pudding tartlets. They’re the kind of dessert that instantly transports you back to childhood, to a time when the simplest treats brought the most joy. I still remember the first time I made them. I was a child, standing on my tiptoes in my grandmother’s kitchen, watching her roll out the dough with effortless grace. She never used a written recipe—just a handful of ingredients, measured by instinct and experience.

The scent of buttery pastry filled the air as the tart shells baked to golden perfection. Then came the best part—spooning the warm, silky custard into each shell, watching it settle into a smooth, glossy surface. I could hardly wait for them to chill, sneaking a spoonful of custard whenever my grandmother turned her back.

That first bite was pure bliss. The crisp, delicate crust crumbled perfectly, giving way to the creamy, vanilla-infused filling. It was simple yet elegant, comforting yet indulgent. Even now, as an adult, every time I make these tartlets, I feel that same sense of nostalgia.

Whether you’re baking for a special occasion, a family gathering, or just because you want something sweet, these vanilla pudding tartlets are the perfect treat. They’re easy to make, yet impressive enough to serve to guests. And best of all, they taste just as good as they look.

Why You’ll Love This Recipe

1. A Perfect Balance of Textures

The beauty of these tartlets lies in their contrast—crisp, buttery crust paired with a smooth, creamy filling. Every bite is an irresistible combination of crunch and silkiness.

2. Easy to Make, Yet Elegant

Despite their sophisticated appearance, these tartlets require simple ingredients and minimal effort. You don’t need advanced baking skills to create a dessert that looks and tastes like it came from a patisserie.

3. Versatile and Customizable

While the classic vanilla pudding filling is a timeless favorite, you can easily customize these tartlets with different flavors. Add a hint of citrus zest, drizzle with chocolate, or top with fresh fruit for a unique twist.

4. Perfect for Any Occasion

Whether served at a dinner party, a birthday celebration, or an afternoon tea, these tartlets always impress. They’re individually portioned, making them easy to serve and even easier to enjoy.

5. A Nostalgic Treat with a Modern Touch

Many of us grew up with simple custard desserts, but these tartlets elevate that childhood favorite into something truly special. They bring back fond memories while feeling fresh and sophisticated.

Ingredients

For the Crust:

IngredientQuantity
Egg1
Sugar50 g
Vanilla sugar5 g
SaltA pinch
Butter100 g
Flour180 g

Directions

1. Prepare the Dough

  • In a bowl, whisk together the egg, sugar, vanilla sugar, and a pinch of salt.
  • Add the softened butter and mix until smooth.
  • Gradually add the flour, kneading until a soft dough forms.
  • Wrap in plastic wrap and chill in the refrigerator for 30 minutes.

2. Shape the Tartlets

  • Preheat the oven to 180°C (350°F).
  • Roll out the chilled dough and cut into circles slightly larger than your tartlet molds.
  • Press the dough into the molds, trimming any excess.

3. Bake the Crust

  • Prick the base of each tartlet with a fork to prevent puffing.
  • Bake for 12-15 minutes until golden.
  • Let them cool completely before adding the filling.

4. Serve and Enjoy

  • Fill with your favorite vanilla custard or pudding.
  • Chill before serving for the best texture.

Nutritional Information (Per Tartlet – Approximate)

NutrientAmount per Serving
Calories~180 kcal
Protein~3 g
Carbohydrates~22 g
Fats~9 g
Fiber~1 g
Sugar~8 g

Frequently Asked Questions

1. Can I Use Store-Bought Pastry Instead of Making the Crust from Scratch?

Yes! If you’re short on time, pre-made tart shells or shortcrust pastry can be used as a shortcut. However, homemade dough has a richer flavor and flakier texture that’s worth the effort.

2. How Can I Make the Crust Extra Crispy?

To ensure a perfectly crisp crust, chill the dough before baking and avoid overworking it. Pricking the base with a fork before baking helps prevent it from puffing up. You can also blind-bake the shells by placing parchment paper and baking weights (or dry beans) inside them before baking.

3. Can I Prepare the Tartlets in Advance?

Absolutely! The tart shells can be baked a day in advance and stored in an airtight container. The custard can also be made ahead and chilled separately. Assemble the tartlets just before serving for the best texture.

4. What’s the Best Way to Thicken the Pudding Filling?

Cornstarch is the key to a smooth, thick custard. Make sure to whisk it well into the milk mixture to prevent lumps. If the pudding seems too thin, let it cook for a few extra minutes while stirring constantly.

5. Can I Make These Tartlets Dairy-Free?

Yes! Substitute butter with a dairy-free alternative and use almond, coconut, or oat milk for the custard. The texture may be slightly different, but they will still be delicious.

6. How Do I Prevent the Custard from Forming a Skin?

To keep the pudding smooth and creamy, place plastic wrap directly on the surface of the custard while it cools. This prevents a skin from forming.

7. Can I Add Other Flavors to the Custard?

Definitely! A splash of rum, a hint of cinnamon, or a bit of citrus zest can enhance the vanilla flavor beautifully. You can also fold in whipped cream after chilling for an even lighter texture.

8. What Are Some Creative Ways to Decorate These Tartlets?

For an elegant finish, try topping your tartlets with:

  • Fresh berries (strawberries, raspberries, blueberries)
  • A drizzle of melted chocolate or caramel
  • A dusting of powdered sugar
  • Shaved white or dark chocolate
  • A dollop of whipped cream and a mint leaf

9. How Should I Store Leftovers?

Store assembled tartlets in the refrigerator for up to 2 days. If storing longer, keep the crust and filling separate and assemble just before serving.

10. Can I Freeze These Tartlets?

The tart shells freeze well—simply bake them, let them cool, and store in an airtight container for up to a month. The custard, however, does not freeze well, as it may become watery when thawed.

Conclusion: A Dessert Worth Making Again and Again

There’s something special about a homemade dessert that brings people together. These vanilla pudding tartlets are more than just a sweet treat—they’re a reminder of the joy of baking, the comfort of familiar flavors, and the simple pleasure of sharing something delicious with loved ones.

From the crisp, buttery crust to the luscious vanilla filling, every element of this dessert is designed to delight. Whether you’re making them for a celebration or just because you’re craving something sweet, these tartlets will never disappoint.

So next time you’re looking for an easy yet elegant dessert, skip the store-bought treats and make these instead. They’re proof that the best things in life are homemade.

Amal

Vanilla Pudding Tartlets – A Sweet Delight for Any Occasion

These vanilla pudding tartlets feature a crisp, buttery crust filled with smooth and creamy vanilla custard. They are elegant yet easy to make, perfect for any occasion. Whether served at a dinner party or enjoyed as an afternoon treat, these delicate tartlets are sure to impress with their rich flavor and melt-in-your-mouth texture.
Prep Time 20 minutes
Cook Time 15 minutes
Total Time 1 hour 35 minutes
Servings: 6 tartlets
Course: Dessert
Cuisine: European

Ingredients
  

For the Crust:
  • 1 egg
  • 50 g sugar
  • 5 g vanilla sugar
  • A pinch of salt
  • 100 g butter softened
  • 180 g flour
For the Filling (Vanilla Pudding):
  • 500 ml milk
  • 100 g sugar
  • 2 egg yolks
  • 40 g cornstarch
  • 1 teaspoon vanilla extract

Method
 

  1. Prepare the Dough
  2. In a bowl, whisk together the egg, sugar, vanilla sugar, and salt.
  3. Add softened butter and mix until smooth.
  4. Gradually incorporate the flour, kneading into a soft dough.
  5. Wrap the dough in plastic wrap and refrigerate for 30 minutes.
  6. Shape and Bake the Tartlets
  7. Preheat oven to 180°C (350°F).
  8. Roll out the chilled dough and cut circles slightly larger than your tartlet molds.
  9. Press the dough into the molds, trimming any excess.
  10. Prick the base with a fork and bake for 12-15 minutes until golden.
  11. Let the tart shells cool completely.
  12. Make the Vanilla Pudding
  13. In a saucepan, heat the milk over medium heat until warm.
  14. In a separate bowl, whisk the egg yolks, sugar, and cornstarch until smooth.
  15. Gradually pour the warm milk into the egg mixture, whisking continuously.
  16. Return the mixture to the saucepan and cook over low heat, stirring constantly, until thickened.
  17. Remove from heat and stir in the vanilla extract.
  18. Let it cool slightly before filling the tartlets.
  19. Assemble and Serve
  20. Spoon the vanilla pudding into the cooled tartlet shells.
  21. Chill in the refrigerator for at least 1 hour before serving.
  22. Optionally, garnish with fresh fruit, powdered sugar, or a drizzle of chocolate.

Notes

  • Extra Crispiness: Blind-bake the tart shells with baking weights for an even crisper crust.
  • Dairy-Free Option: Use almond or coconut milk for the custard and vegan butter for the crust.
  • Flavor Variations: Add lemon zest, caramel drizzle, or chocolate chips for a twist on the classic vanilla filling.
  • Storage: Keep in an airtight container in the fridge for up to 3 days.

Homemade Artisan Bread – The Only Recipe You’ll Ever Need

For years, I thought that making homemade bread was something only expert bakers could master. I loved the idea of fresh bread straight from my own oven, but the process always seemed intimidating—kneading, rising times, and the fear that it wouldn’t turn out right. So, like most people, I settled for store-bought bread, never questioning if there was a better way.

That all changed on a rainy afternoon when I visited my grandmother. She had always been the kind of person who made everything from scratch—pasta, jams, pastries, and of course, bread. That day, as I stepped into her warm kitchen, I was met with the incredible aroma of fresh bread cooling on the counter. The crust was golden and crisp, the inside soft and airy. One bite, and I was hooked.

“Making bread isn’t hard,” she told me with a smile. “You just need patience and good ingredients.”

She handed me her simple recipe—a no-fuss method that didn’t require fancy tools or complicated techniques. Just flour, water, yeast, a little sugar, and salt. That evening, I made my first loaf, expecting failure but hoping for the best. When I pulled it out of the oven, I couldn’t believe it—I had baked a perfect loaf of bread on my first try. From that moment on, I never bought bread again.

Now, this recipe is part of my weekly routine. It’s quick, easy, and always turns out delicious. Whether you’re a beginner or an experienced baker, this homemade bread will change the way you think about baking forever.

Why You’ll Love This Recipe

1. Simple Ingredients, No Preservatives

Store-bought bread is often filled with unnecessary additives and preservatives. With this recipe, you know exactly what’s going into your bread—just a few pantry staples and nothing artificial.

2. Crisp Crust and Soft Interior

This bread has the perfect balance of textures. The outside bakes into a crisp, golden crust, while the inside remains light, airy, and full of flavor.

3. Beginner-Friendly and Foolproof

Even if you’ve never baked bread before, this recipe is incredibly forgiving. It doesn’t require fancy techniques or complicated shaping—just mix, knead, let it rise, and bake.

4. Perfect for Any Occasion

This bread can be used for anything—sandwiches, toast, dipping in soup, or simply enjoying with butter. It’s versatile enough to suit any meal.

5. Budget-Friendly and Satisfying

Making your own bread costs significantly less than buying artisan loaves from a bakery. Plus, the satisfaction of baking it yourself is priceless!

Ingredients

IngredientQuantity
Bread flour2 ½ cups (320 grams)
Water¾ cup + 2 tbsp. (210 ml)
Brewer’s yeast1 tsp. (3g) or dry yeast: ½ tsp. (2g)
Sugar1 tsp.
Salt1 tsp.

Directions

1. Activate the Yeast

  • In a small bowl, dissolve the yeast and sugar in lukewarm water.
  • Let it sit for about 10 minutes until foamy.

2. Prepare the Dough

  • In a large bowl, combine the bread flour and salt.
  • Gradually add the activated yeast mixture while stirring.
  • Knead the dough until smooth and elastic (about 8-10 minutes).

3. Let It Rise

  • Cover the dough with a clean cloth and let it rest in a warm place for 1 to 2 hours, or until doubled in size.

4. Shape and Bake

  • Preheat the oven to 220°C (430°F).
  • Shape the dough into a loaf or rolls and place it on a baking sheet.
  • Bake for 20-25 minutes until golden brown with a crisp crust.

5. Cool and Enjoy

  • Let the bread cool before slicing for the best texture.

Nutritional Information (Per Serving – Approximate)

NutrientAmount per Serving
Calories~150 kcal
Protein~4 g
Carbohydrates~30 g
Fats~0.5 g
Fiber~1 g
Sodium~250 mg

Frequently Asked Questions

1. Can I Use All-Purpose Flour Instead of Bread Flour?

Yes, but bread flour is recommended because it has a higher protein content, which helps create a chewier texture and better structure. If using all-purpose flour, your bread may be slightly softer but still delicious.

2. How Can I Tell If My Dough Has Risen Enough?

A simple trick is to gently press the dough with your finger. If it slowly springs back, it’s ready. If it bounces back too quickly, it needs more time to rise. If it doesn’t bounce back at all, it may have overproofed.

3. Do I Need a Bread Machine or Special Tools?

Not at all! This recipe can be made entirely by hand. A large mixing bowl, a wooden spoon, and your hands are all you need. If you have a stand mixer with a dough hook, that can make kneading easier, but it’s not required.

4. How Do I Get a Crispier Crust?

For an extra-crispy crust, place a small dish of water in the oven while baking. The steam helps create a beautiful, crunchy exterior.

5. How Do I Store Homemade Bread?

Once cooled, store your bread in a paper bag or wrapped in a clean kitchen towel. Avoid plastic bags, as they trap moisture and make the crust soft. If you need to keep it longer, slice and freeze it in an airtight container.

6. Can I Add Extra Flavors or Ingredients?

Absolutely! Here are some great variations:

  • Herb & Garlic: Add dried rosemary, thyme, or minced garlic to the dough.
  • Cheesy Bread: Mix in shredded cheddar or Parmesan before kneading.
  • Whole Wheat Version: Substitute half the bread flour with whole wheat flour for a denser, heartier loaf.
  • Seeded Crust: Brush the top with water and sprinkle sesame or poppy seeds before baking.

7. What If I Don’t Have Brewer’s Yeast?

You can use dry yeast instead—just adjust the quantity as mentioned in the recipe. Both work well and produce a light, fluffy loaf.

8. Can I Make This Recipe Without Sugar?

Sugar helps activate the yeast, but if you prefer, you can leave it out. The bread may take slightly longer to rise but will still turn out great.

9. Why Didn’t My Bread Rise?

Several factors can affect the rise:

  • Your yeast might be expired or inactive. Always check the expiration date.
  • The water temperature might have been too hot (which kills the yeast) or too cold (which slows down activation). Lukewarm water works best.
  • The dough might not have had enough time to rise. Be patient and let it double in size.

10. Can I Double the Recipe?

Yes! This recipe scales up easily. Just make sure to divide the dough into separate loaves for even baking.

Conclusion: The Only Bread Recipe You’ll Ever Need

Baking bread at home is one of the most rewarding experiences. Not only do you get to enjoy the warm, fresh aroma filling your kitchen, but you also get the satisfaction of creating something from scratch.

This recipe is proof that making bread doesn’t have to be complicated. With just a few ingredients and a little patience, you can achieve bakery-quality bread right in your own oven.

Once you try it, you may find yourself baking a fresh loaf every week—just like I do. And who knows? You might never want to buy bread again.

Amal

Homemade Artisan Bread – The Only Recipe You’ll Ever Need

This homemade artisan bread is soft on the inside with a beautifully crisp crust, making it the perfect addition to any meal. With just a handful of simple ingredients, you can bake a fresh loaf that tastes even better than store-bought bread. Whether you’re a beginner or an experienced baker, this recipe is foolproof and will quickly become a staple in your kitchen.
Prep Time 10 minutes
Cook Time 25 minutes
Total Time 1 hour 35 minutes
Servings: 1 loaf
Course: Bread
Cuisine: European

Ingredients
  

  • 2 ½ cups 320 g bread flour
  • ¾ cup + 2 tbsp 210 ml water
  • 1 tsp 3 g brewer’s yeast or ½ tsp (2 g) dry yeast
  • 1 tsp sugar
  • 1 tsp salt

Method
 

  1. Prepare the Yeast
  2. In a small bowl, dissolve the yeast and sugar in lukewarm water.
  3. Let it sit for about 10 minutes until foamy.
  4. Make the Dough
  5. In a large bowl, mix the flour and salt.
  6. Gradually add the activated yeast mixture while stirring.
  7. Knead the dough for about 8-10 minutes until smooth and elastic.
  8. Let the Dough Rise
  9. Cover the bowl with a clean cloth and let the dough rest in a warm place for 1 to 2 hours, or until it doubles in size.
  10. Shape and Bake
  11. Preheat the oven to 220°C (430°F).
  12. Shape the dough into a loaf or rolls and place it on a baking sheet.
  13. Bake for 20-25 minutes until golden brown with a crispy crust.
  14. Cool and Serve
  15. Let the bread cool completely before slicing for the best texture.

Notes

  • For a crispier crust: Place a small dish of water in the oven while baking to create steam.
  • Flour substitution: You can use all-purpose flour, but the texture may be slightly softer.
  • Storing the bread: Keep in a paper bag or wrap in a clean kitchen towel to maintain freshness.
  • Freezing: Slice and freeze for up to 2 months. Toast or reheat in the oven before serving.

Golden Chickpea Delight – A Simple and Flavorful Recipe

Growing up, chickpeas were never a staple in my home. They were something I occasionally encountered in hummus or saw in grocery store cans but never really thought much about. It wasn’t until I visited a small family-run restaurant while traveling that I realized just how incredible chickpeas could be.

I remember stepping into the cozy little eatery, the scent of spices filling the air. The owner, an elderly woman with a warm smile, recommended a simple chickpea dish she had been making for years. When the plate arrived, I was skeptical—just chickpeas, tomatoes, and a few vegetables? But from the very first bite, I was hooked.

The chickpeas were soft yet firm, bathed in a fragrant, lightly spiced tomato sauce that had just the right balance of warmth and depth. Every spoonful was comforting, filling, and packed with flavor. I immediately asked her how she made it, expecting a long list of exotic ingredients. Instead, she laughed and said, “Just a few simple things and a little patience.”

That meal changed my entire perspective on chickpeas. I realized they were not just a side ingredient but a star on their own. When I returned home, I experimented with the recipe, adjusting it to my taste while keeping the simplicity that made it so special. Now, this dish is a regular in my kitchen, and every time I make it, I remember that moment—how one humble meal could be so rich in both flavor and tradition.

If you’ve never cooked chickpeas before or only use them occasionally, this recipe will make you fall in love with them. It’s easy, quick, nutritious, and bursting with delicious flavors.

Why You’ll Love This Recipe

1. A Perfect Blend of Simplicity and Flavor

This dish proves that you don’t need a long list of ingredients to create something truly delicious. The combination of sautéed onions, garlic, ginger, bell peppers, tomatoes, and chickpeas results in a hearty, wholesome dish with layers of flavor.

2. A Nutrient-Packed Meal

Chickpeas are a fantastic source of plant-based protein, fiber, and essential vitamins. They help keep you full longer, support digestion, and provide energy without unnecessary additives or processed ingredients.

3. Quick and Easy to Prepare

If you’re looking for a meal that comes together in under 30 minutes, this is it. Whether you’re using dried chickpeas (soaked and cooked) or canned ones for convenience, the process is straightforward and hassle-free.

4. Versatile and Customizable

This dish can be enjoyed on its own, paired with rice, served alongside flatbread, or even used as a topping for baked potatoes. Want to spice things up? Add chili flakes or curry powder for an extra kick.

5. Budget-Friendly and Pantry-Friendly

Chickpeas and vegetables are some of the most affordable and easily available ingredients. This makes the recipe perfect for those looking for a nutritious, filling meal without breaking the bank.

Ingredients

IngredientQuantity
Chickpeas200 g (soaked and cooked)
Onion1, chopped
Vegetable oil2 tablespoons
Garlic3 cloves, minced
Ginger1 piece, grated
Bell pepper1, chopped
Tomatoes3, chopped
Boiling waterEnough to cover tomatoes
SaltTo taste
Ground black pepperTo taste
Turmeric1 teaspoon

Directions

1. Sauté the Aromatics

  • Heat vegetable oil in a pan over medium heat.
  • Add the chopped onion and sauté until golden.
  • Stir in minced garlic and grated ginger, cooking for another minute until fragrant.

2. Add the Vegetables

  • Toss in the chopped bell pepper and cook for 2 minutes.
  • Add the tomatoes and pour in enough boiling water to cover them.
  • Simmer until the tomatoes soften and break down into a sauce.

3. Incorporate the Chickpeas

  • Add the cooked chickpeas to the pan.
  • Season with salt, black pepper, and turmeric.
  • Stir well and let simmer for 10 minutes, allowing the flavors to blend.

4. Serve and Enjoy

  • Garnish with fresh herbs if desired.
  • Serve warm with rice, flatbread, or as a hearty side dish.

Nutritional Information (Per Serving – Approximate)

NutrientAmount per Serving
Calories~220 kcal
Protein~10 g
Carbohydrates~30 g
Fats~7 g
Fiber~7 g
Iron~3 mg

Frequently Asked Questions

1. Can I Use Canned Chickpeas Instead of Cooking Them from Scratch?

Yes! If you’re short on time, canned chickpeas work perfectly fine. Just be sure to rinse and drain them well before adding them to the dish.

2. How Can I Add More Flavor to This Recipe?

While this recipe is already flavorful, you can enhance it further by adding:

  • Cumin or coriander for an earthy depth
  • Paprika or chili flakes for a spicy touch
  • A splash of lemon juice at the end for a fresh, tangy finish
  • Fresh cilantro or parsley for added aroma

3. Can I Make This Dish in Advance?

Absolutely! In fact, it tastes even better the next day as the flavors deepen. Store it in an airtight container in the fridge for up to 3 days and reheat on the stove or in the microwave before serving.

4. What Can I Serve with This Dish?

This chickpea dish pairs beautifully with:

  • Steamed rice for a filling meal
  • Warm flatbread or pita for a scoop-and-eat experience
  • Roasted vegetables for an extra layer of texture and nutrition
  • A fresh cucumber and yogurt salad to balance the warmth of the dish

5. Can I Freeze It?

Yes! Once cooled, transfer the dish to a freezer-safe container and freeze for up to 2 months. When ready to eat, thaw overnight in the fridge and reheat gently on the stove.

6. Is This Recipe Vegan and Gluten-Free?

Yes, this dish is naturally vegan and gluten-free, making it an excellent choice for those following dietary restrictions.

7. Can I Use Other Beans Instead of Chickpeas?

While chickpeas are the star of this dish, you can experiment with other legumes such as lentils, black beans, or kidney beans for a different take on the recipe.

8. How Can I Make It More Creamy?

For a creamier texture, you can:

  • Mash some of the chickpeas while cooking to thicken the sauce
  • Add a splash of coconut milk for a subtle richness
  • Stir in a dollop of Greek yogurt before serving for extra creaminess

9. How Do I Make It Spicier?

If you enjoy heat, consider adding:

  • A diced green chili along with the onions
  • A pinch of cayenne pepper
  • Extra black pepper for a mild kick

10. What’s the Best Way to Cook Dried Chickpeas for This Recipe?

If using dried chickpeas, soak them overnight in plenty of water. The next day, drain and rinse them, then boil in fresh water for about 45-60 minutes until tender. Drain and use as directed in the recipe.

Conclusion: A Dish That Will Change the Way You See Chickpeas

There’s something truly special about recipes that take humble ingredients and turn them into something extraordinary. This golden chickpea dish does just that—it transforms simple pantry staples into a rich, hearty, and deeply satisfying meal.

Whether you’re new to cooking chickpeas or already love them, this recipe is a must-try. It’s easy, nourishing, and incredibly versatile. You can enjoy it on its own, pair it with your favorite sides, or even use it as meal prep for the week.

So if you’ve been overlooking chickpeas, give this recipe a try. It might just become one of your new favorite dishes—one you’ll find yourself making again and again.

Amal

Golden Chickpea Delight – A Simple and Flavorful Recipe

This easy chickpea dish is packed with warm, rich flavors and comes together in no time! With sautéed onions, garlic, ginger, and tomatoes creating a hearty base, the chickpeas absorb all the delicious spices, making every bite incredibly satisfying. Serve it with rice, flatbread, or on its own for a protein-packed meal that is both healthy and delicious.
Prep Time 10 minutes
Cook Time 20 minutes
Total Time 30 minutes
Servings: 4 servings
Course: Main Dish
Cuisine: Mediterranean

Ingredients
  

  • 200 g chickpeas soaked and cooked
  • 1 onion chopped
  • 2 tablespoons vegetable oil
  • 3 cloves garlic minced
  • 1 piece ginger grated
  • 1 bell pepper chopped
  • 3 tomatoes chopped
  • Boiling water enough to cover tomatoes
  • Salt to taste
  • Ground black pepper to taste
  • 1 teaspoon turmeric

Method
 

  1. Sauté the Aromatics
  2. Heat vegetable oil in a pan over medium heat.
  3. Add the chopped onion and sauté until golden brown.
  4. Stir in the minced garlic and grated ginger, cooking for another minute.
  5. Cook the Vegetables
  6. Add the chopped bell pepper and cook for 2 minutes.
  7. Toss in the tomatoes and pour in enough boiling water to cover them.
  8. Let it simmer until the tomatoes soften and form a sauce.
  9. Add the Chickpeas
  10. Stir in the cooked chickpeas.
  11. Season with salt, black pepper, and turmeric.
  12. Simmer for about 10 minutes, stirring occasionally.
  13. Serve and Enjoy
  14. Garnish with fresh herbs if desired.
  15. Serve warm with rice, flatbread, or as a side dish.

Notes

  • Quick Alternative: You can use canned chickpeas for convenience—just rinse and drain them before adding.
  • Extra Spice: Add chili flakes or a dash of cumin for a deeper flavor.
  • Storage: Keep leftovers in the fridge for up to 3 days or freeze for up to 2 months.
  • Serving Suggestion: Pair with basmati rice or warm naan for a complete meal.

Zesty Orange Cookies – A Quick and Delightful Treat

There are some flavors that stay with you forever, tied to childhood memories and moments of pure joy. For me, the scent of oranges brings back the warmth of my grandmother’s kitchen, where she would always have something sweet baking in the oven.

She never needed a complicated recipe to create something magical. A few simple ingredients, a little love, and the aroma of freshly baked cookies would fill the house. One of her favorites was these orange cookies—soft, buttery, and bursting with citrus flavor. She would let me help roll out the dough, my small hands pressing little circles before she carefully placed a spoonful of orange filling in each one. The best part was waiting for them to bake, watching them turn golden as the sweet scent of oranges filled the air.

Now, every time I make these cookies, I feel like I’m bringing a piece of that memory back to life. The simplicity of the recipe makes them perfect for any occasion—quick enough for a last-minute treat, yet special enough to serve at gatherings. If you love the combination of buttery dough and bright citrus flavor, these orange cookies are a must-try.


Why You’ll Love These Orange Cookies

1. Quick and Easy to Make

This recipe requires minimal ingredients and comes together in just a few simple steps. There’s no need for fancy equipment or hours in the kitchen—just mix, roll, fill, and bake!

2. Naturally Sweet and Flavorful

Unlike overly sugary store-bought cookies, these have a balanced sweetness with the natural zestiness of fresh oranges. The filling thickens beautifully with cornstarch, creating a jam-like consistency that perfectly complements the soft dough.

3. Perfect for Any Occasion

These cookies work for everything—from a casual afternoon snack to an elegant dessert at tea time. They also make wonderful homemade gifts, wrapped in a simple box with a ribbon.

4. A Refreshing Alternative to Traditional Cookies

If you’re used to classic chocolate chip or sugar cookies, this recipe offers a refreshing change. The combination of citrus and vanilla gives these cookies a unique and irresistible flavor.

5. Kid-Friendly and Fun to Make

Baking these cookies is a great activity to do with children. They’ll love shaping the dough and helping to spoon in the orange filling. Plus, the natural sweetness of oranges makes this a healthier treat compared to many processed snacks.

Ingredients

For the Dough:

IngredientQuantity
Flour2½ cups (300 g)
SaltA pinch
Baking Powder½ teaspoon
Vanilla Sugar1 teaspoon
Butter5 tablespoons (100 g)
Sour Cream⅔ cup (150 g)
Egg1

For the Filling:

IngredientQuantity
Oranges2 (450 g)
Sugar½ cup (100 g)
Cornstarch2 tablespoons (30 g)

Directions

1. Prepare the Dough

  • In a large bowl, mix flour, salt, baking powder, and vanilla sugar.
  • Add cold butter and rub it into the dry ingredients until the mixture resembles crumbs.
  • Stir in the sour cream and egg, then knead into a soft dough. Chill for 15 minutes.

2. Make the Orange Filling

  • Peel and finely chop the oranges, removing any seeds.
  • In a saucepan, combine oranges, sugar, and cornstarch.
  • Cook over medium heat until thickened, then let it cool.

3. Shape and Bake

  • Preheat oven to 180°C (350°F).
  • Roll out the dough and cut into small circles or shapes of your choice.
  • Add a spoonful of filling in the center, fold, and seal the edges.
  • Bake for 12-15 minutes until golden.

4. Serve and Enjoy

  • Let the cookies cool slightly before serving.
  • Dust with powdered sugar if desired.

Nutritional Information (Per Cookie – Approximate)

NutrientAmount per Cookie
Calories~120 kcal
Protein~2 g
Carbohydrates~18 g
Fats~5 g
Fiber~1 g
Sugar~7 g

Frequently Asked Questions

1. Can I Use Another Citrus Fruit Instead of Oranges?

Yes! If you want to experiment, you can substitute oranges with lemons, tangerines, or even a mix of citrus fruits for a different flavor profile. Just adjust the sugar levels depending on how tart the fruit is.

2. Do I Need to Peel the Oranges for the Filling?

Yes, make sure to peel and remove any seeds before chopping the oranges for the filling. You can also remove excess pith to avoid bitterness.

3. Can I Make the Dough in Advance?

Absolutely! You can prepare the dough ahead of time and refrigerate it for up to 24 hours. This makes it even easier to roll out and shape when you’re ready to bake.

4. How Do I Store These Cookies?

Once baked, store the cookies in an airtight container at room temperature for up to 5 days. If you want to keep them fresh longer, store them in the refrigerator.

5. Can I Freeze These Cookies?

Yes! Both the dough and the baked cookies freeze well. If freezing the dough, wrap it tightly in plastic wrap and freeze for up to 2 months. If freezing the baked cookies, store them in an airtight container with parchment paper between layers. Let them thaw at room temperature before serving.

6. Can I Make These Cookies Without the Filling?

Of course! If you prefer a simpler cookie, you can skip the orange filling and bake them plain. They’ll still have a subtle citrus flavor from the vanilla sugar and can be dusted with powdered sugar for extra sweetness.

7. What Can I Serve with These Cookies?

These cookies pair wonderfully with a cup of tea, coffee, or hot chocolate. For a fancy dessert, serve them alongside a scoop of vanilla ice cream or a dollop of whipped cream.

8. How Can I Enhance the Orange Flavor?

For an even more intense orange taste, you can add a teaspoon of fresh orange zest to the dough or filling. A drop of orange extract can also enhance the citrus aroma.

9. What If I Don’t Have Cornstarch?

If you don’t have cornstarch, you can substitute it with an equal amount of flour or arrowroot powder to thicken the filling.

10. Can I Add Other Ingredients to the Dough?

Yes! Chopped nuts like almonds or walnuts can add a nice crunch. You can also mix in a handful of chocolate chips for a chocolate-orange combination.


Conclusion: A Simple Recipe That Brings Joy

There’s something special about baking cookies from scratch—especially when they’re as easy and delicious as these orange cookies. Whether you’re making them for a family gathering, a gift for a friend, or just a cozy afternoon treat, these cookies never fail to impress.

Their light, buttery texture combined with the bright, citrusy filling creates a perfect balance of flavors. They remind us that sometimes, the simplest recipes are the most memorable—the kind that bring warmth to a home and smiles to those who taste them.

So next time you have a couple of oranges on hand, skip the store-bought treats and bake these cookies instead. You’ll love how quick, easy, and irresistibly tasty they are.

Amal

Zesty Orange Cookies – A Quick and Delightful Treat

These delightful orange cookies are soft, buttery, and filled with a naturally sweet and tangy orange filling. Made with simple ingredients like flour, butter, sour cream, and fresh oranges, they come together quickly and bake to perfection in just minutes. A perfect treat for tea time, holiday gatherings, or whenever you crave something light and refreshing!
Prep Time 15 minutes
Cook Time 15 minutes
Total Time 30 minutes
Servings: 20 -24 cookies
Course: Dessert
Cuisine: European

Ingredients
  

For the Dough:
  • cups 300 g flour
  • A pinch of salt
  • ½ teaspoon baking powder
  • 1 teaspoon vanilla sugar
  • 5 tablespoons 100 g butter
  • cup 150 g sour cream
  • 1 egg
For the Filling:
  • 2 oranges 450 g, peeled and finely chopped
  • ½ cup 100 g sugar
  • 2 tablespoons 30 g cornstarch

Method
 

  1. Prepare the Dough
  2. In a large bowl, mix the flour, salt, baking powder, and vanilla sugar.
  3. Add cold butter and rub it into the dry ingredients until the mixture resembles coarse crumbs.
  4. Stir in the sour cream and egg, then knead until a smooth dough forms. Cover and refrigerate for 15 minutes.
  5. Make the Orange Filling
  6. In a saucepan, combine the chopped oranges, sugar, and cornstarch.
  7. Cook over medium heat, stirring frequently, until the mixture thickens into a jam-like consistency. Let it cool.
  8. Shape and Bake
  9. Preheat the oven to 180°C (350°F).
  10. Roll out the dough on a floured surface and cut into small circles or shapes of your choice.
  11. Place a small amount of filling in the center of each, fold, and seal the edges.
  12. Arrange on a lined baking sheet and bake for 12-15 minutes, or until golden.
  13. Cool and Serve
  14. Let the cookies cool slightly before serving. Dust with powdered sugar for extra sweetness if desired.

Notes

  • Extra Flavor: Add a teaspoon of orange zest to the dough for a more intense citrus taste.
  • Alternative Fillings: Swap the orange filling for lemon curd, apricot jam, or even a chocolate spread for variety.
  • Storage: Keep in an airtight container at room temperature for up to 5 days.
  • Freezing: Freeze the baked cookies in a sealed container for up to 2 months. Thaw at room temperature before serving.