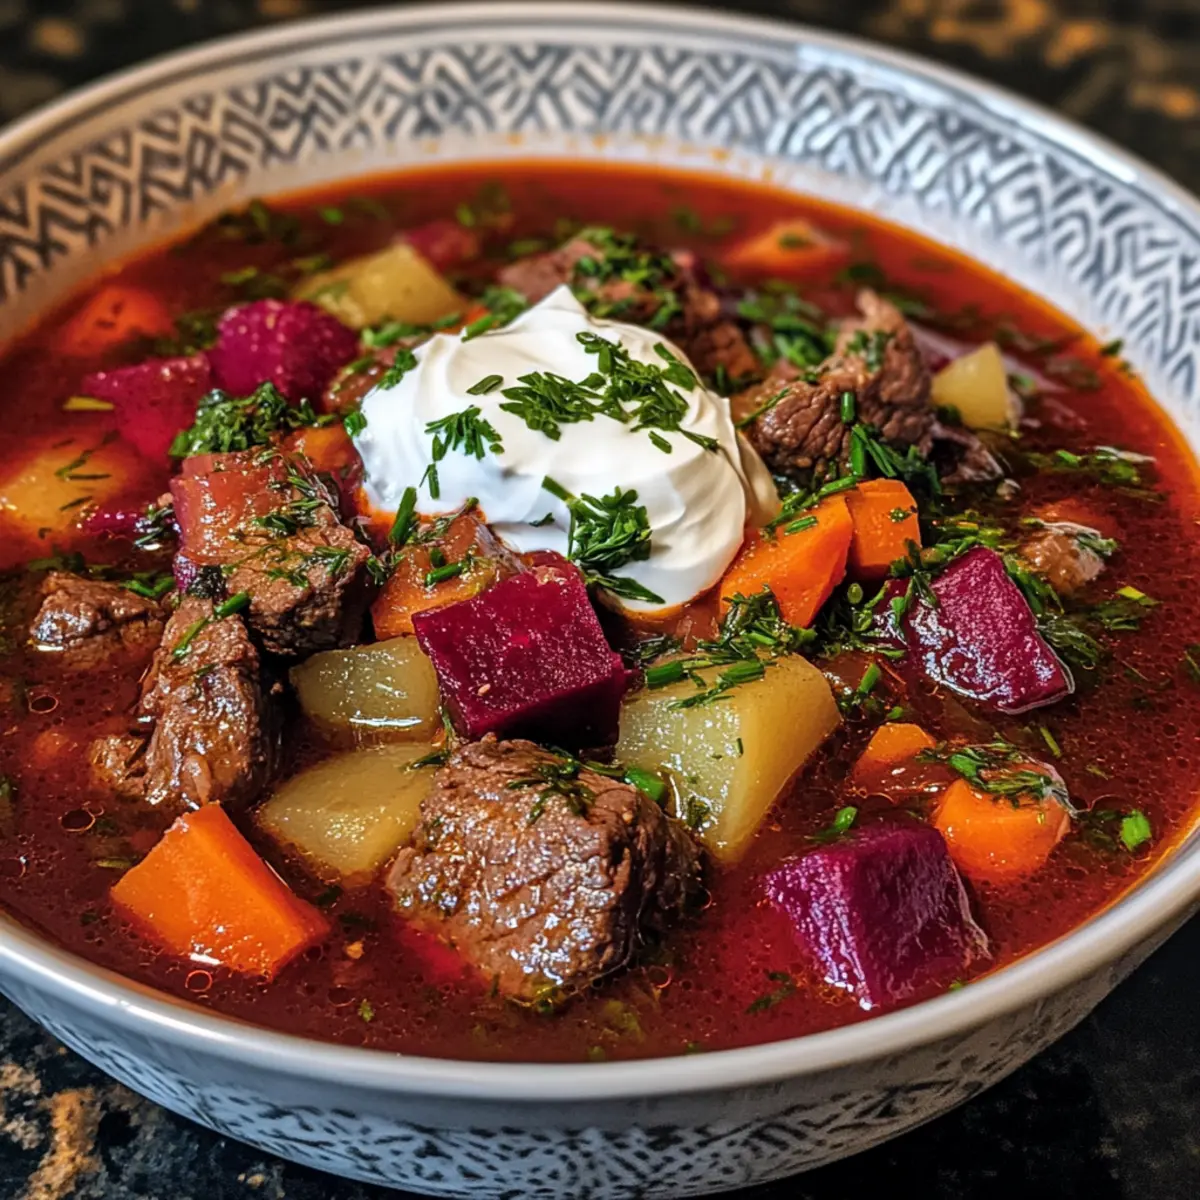
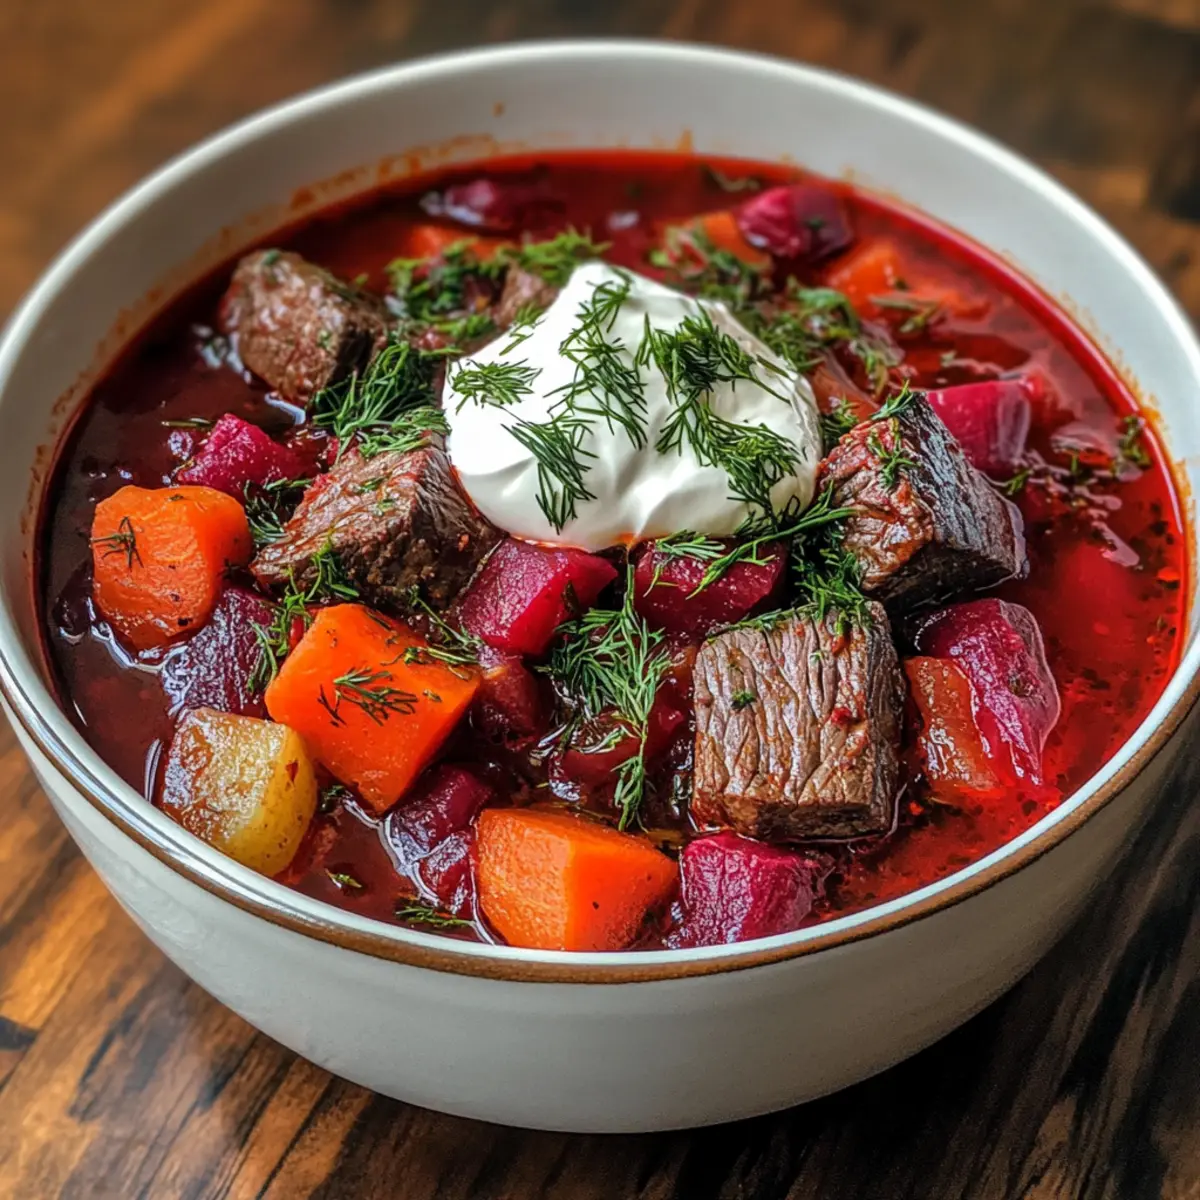
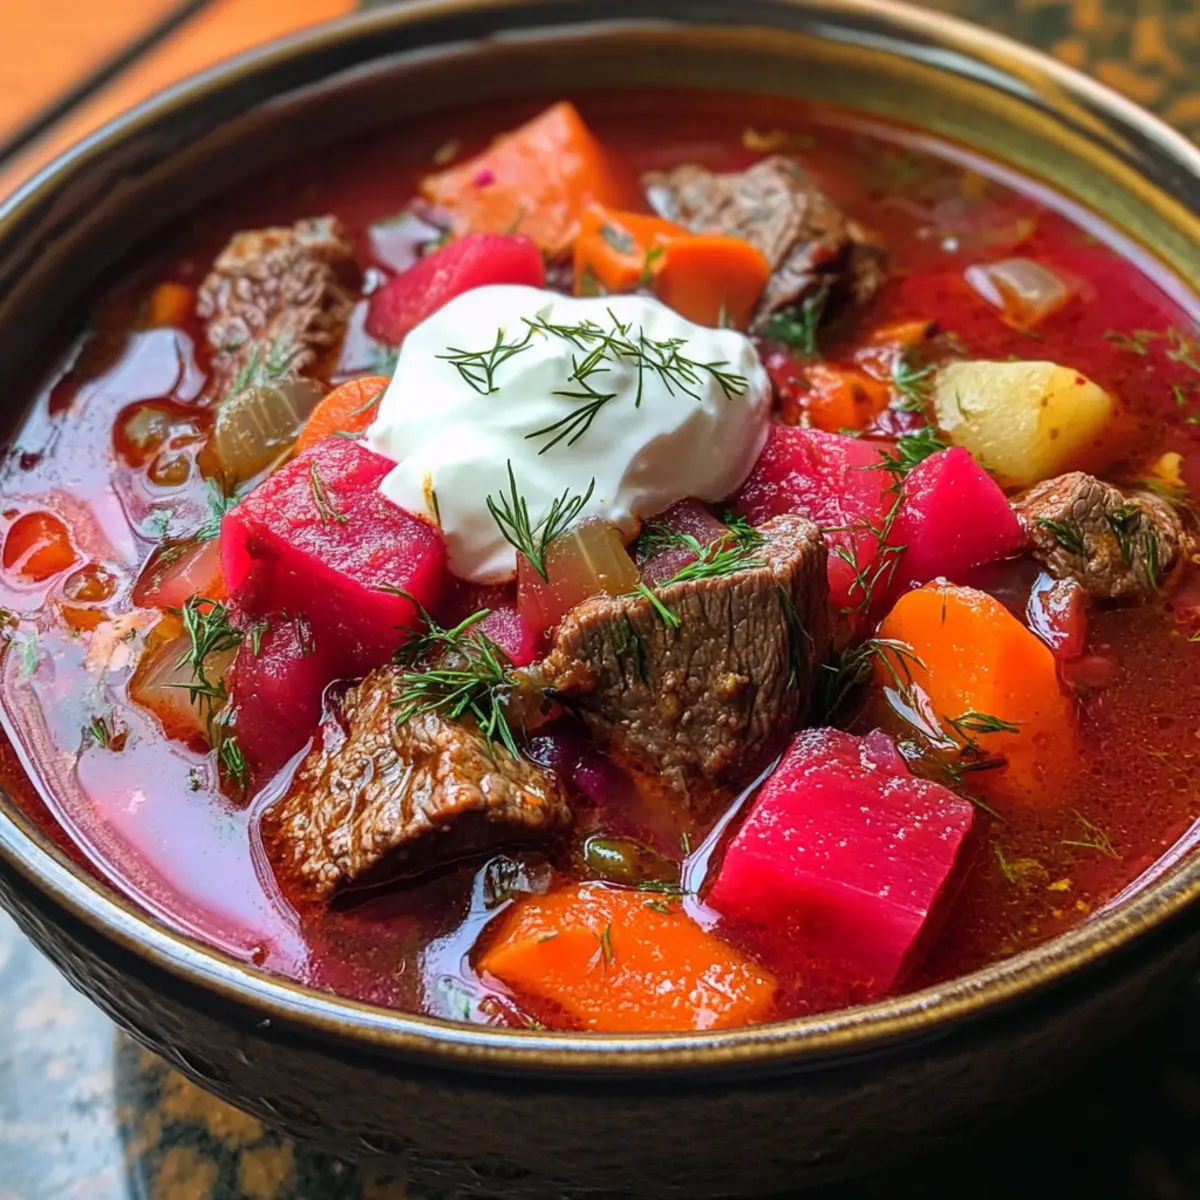
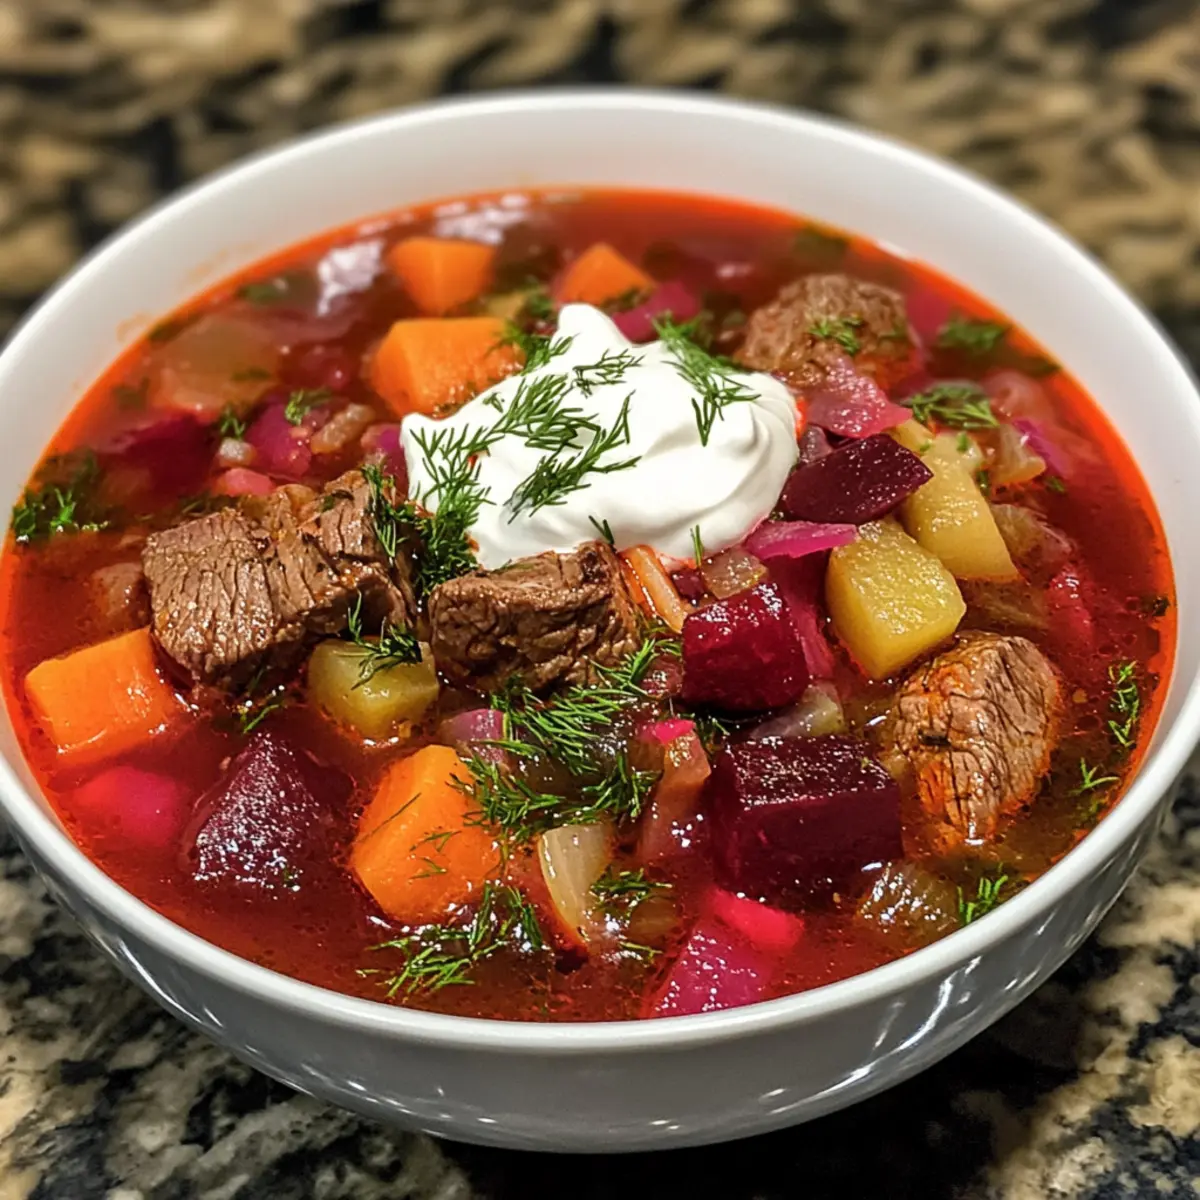
Melt-In-Your-Mouth Ted Lasso Biscuit Recipe to Savor

As I stirred together my simple ingredients, the aroma of buttery goodness wafted through the kitchen, transporting me to the cozy world of Ted Lasso. These Ted Lasso biscuits aren’t just any cookies; they’re a delightful blend of flaky and tender, making them the perfect treat for those moments when sweet cravings strike. With only five ingredients, these buttery shortbread biscuits are not only quick to whip up but also a fantastic way to impress family and friends during your next get-together or series marathon. Plus, they make for a delightful homemade gift! Curious about how to bring a touch of the show’s charm into your kitchen? Let’s dive into this heartwarming recipe together!

Why Are These Biscuits So Irresistible?

Simplicity at its finest: With just five easy ingredients, you’ll have a delicious treat ready in no time. Buttery goodness is at the center of these rich biscuits, making them melt-in-your-mouth delights. Versatile twists abound, allowing you to personalize your batch by adding citrus zest or experimenting with different extracts. Serve them at gatherings or savor them during a cozy night in—these cookies are perfect for any occasion! For even more delicious ideas, check out our Chili Chicken Roasted recipe for a satisfying meal to pair with your treats. Don’t forget, they also make a charming homemade gift that’s sure to impress!

Ted Lasso Biscuit Ingredients

• Here’s everything you need to craft these delightful treats!

For the Dough

  • Unsalted Butter (1 cup) – Use high-quality European-style butter for richer flavor and moisture.
  • Granulated Sugar (½ cup, plus extra for sprinkling) – Sweetens the biscuits and contributes to their lovely crisp texture.
  • Vanilla Extract (1 tsp) – Adds aromatic sweetness to the biscuits; feel free to swap with almond extract for a twist.
  • Kosher Salt (¾ tsp) – Balances the sweetness and enhances flavors; sea salt can be a great alternative.
  • All-Purpose Flour (2 cups) – This is the backbone of your biscuits; ensure accurate measuring for the best results.

These simple yet delicious Ted Lasso biscuits are sure to become a family favorite!

Step‑by‑Step Instructions for Ted Lasso Biscuit

Step 1: Preheat the Oven
Begin by preheating your oven to 325°F (165°C). While the oven heats up, take an 8×8-inch baking pan and line it with parchment paper, ensuring the edges hang over slightly for easy removal later. This step is crucial to achieving the perfect biscuit texture, so get that oven nice and warm!

Step 2: Make the Dough
In a mixing bowl, cream together 1 cup of softened unsalted butter and ½ cup of granulated sugar. Use an electric mixer on medium speed for about 2 minutes until the mixture is light and fluffy. Carefully mix in 1 teaspoon of vanilla extract and ¾ teaspoon of kosher salt. Gradually add in 2 cups of all-purpose flour and mix until just combined, avoiding overmixing for tender biscuits.

Step 3: Form the Dough
Once your dough is ready, transfer it to the prepared baking pan. Use your fingers or a spatula to evenly press the dough into the bottom of the pan, making sure to create an even layer throughout. Aim for a smooth, flat surface, as this will help your Ted Lasso biscuits bake uniformly and develop that delightful texture.

Step 4: Prick and Chill
To help the biscuits bake perfectly, dock the surface of your pressed dough using a fork. Aim for about 36 fork pricks to allow steam to escape during baking. Next, cover the pan with plastic wrap and chill it in the refrigerator for 30 minutes, or for a quicker method, place it in the freezer for 15 minutes.

Step 5: Bake
Once the dough has chilled, remove it from the refrigerator or freezer and place it in your preheated oven. Bake for 30–35 minutes, until the edges turn a golden brown. Keep an eye out for that lovely color—you want a crisp edge with a buttery center that practically melts in your mouth.

Step 6: Cut the Biscuits
After the biscuits have baked, allow them to cool in the pan for about 5 minutes. While still warm, gently cut them into rectangles—this will help maintain their structure as they cool. If you’d like an extra touch of sweetness, sprinkle a little granulated sugar on top as you cut.

Step 7: Cool and Serve
Finally, let the Ted Lasso biscuits cool completely within the pan on a wire rack. Once cooled, you can carefully lift the biscuits out using the parchment overhang. Serve them fresh with a cup of tea or coffee, and enjoy these delightful little treats that are sure to charm your family and friends!

Ted Lasso Biscuit Variations

Elevate your baking experience with these fun and delicious twists to the classic Ted Lasso biscuit recipe, perfect for your taste buds!

  • Dairy-Free: Replace the unsalted butter with coconut oil or a dairy-free butter alternative for a luscious, plant-based option.
  • Herbed Delight: Incorporate finely chopped fresh rosemary or thyme into the dough for aromatic and savory biscuits that surprise and delight.
  • Citrus Zest: Add a teaspoon of lemon or orange zest to brighten the flavors and provide a delightful citrus burst in every bite.
  • Savory Twist: Mix in some grated cheese like parmesan or cheddar for a uniquely rich and savory biscuit that pairs beautifully with soups.
  • Chocolate Chip: Fold in semi-sweet or dark chocolate chips to the dough for a sweet surprise that will have everyone reaching for seconds! Just imagine how delightful they’ll be alongside a cup of coffee.
  • Gluten-Free: Substitute all-purpose flour with a gluten-free blend tailored for baking, ensuring you can enjoy these treats without worry.
  • Sweetened with Honey: Opt for honey instead of granulated sugar to give these biscuits a natural sweetness and a touch of floral flavor. It’s a fantastic way to bring a unique depth to the classic taste.
  • Nutty Crunch: Add a handful of chopped nuts, such as pecans or walnuts, to the dough for added texture and flavor that make each bite unforgettable.

Feel free to mix and match these suggestions to create your very own spin on the Ted Lasso biscuit! And if you’re looking for a delicious main course to pair with your freshly baked treats, our Chili Chicken Roasted recipe is a fantastic option that complements the biscuits perfectly!

Make Ahead Options

These Ted Lasso biscuits are ideal for busy home cooks looking to save time during the week! You can prepare the dough up to 2 days in advance by mixing and pressing it into the baking pan, then covering it with plastic wrap and refrigerating. Alternatively, if you want to extend the shelf life, freeze the shaped dough for up to 2 months; just remember to wrap it tightly to prevent freezer burn. When you’re ready to bake, simply thaw it in the refrigerator overnight, then proceed with baking as instructed. This way, you’ll have fresh, buttery biscuits in no time, perfect for those last-minute cravings or gatherings!

How to Store and Freeze Ted Lasso Biscuits

Room Temperature: Store the biscuits in an airtight container at room temperature for up to 3 days to maintain their delightful texture.

Fridge: For longer freshness, keep the biscuits in the refrigerator, where they can last for up to a week. Make sure to use a sealed container to prevent drying out.

Freezer: You can freeze the Ted Lasso biscuits for up to 2 months. Place them in a single layer on a baking sheet until frozen, then transfer to a freezer-safe bag or container to avoid freezer burn.

Reheating: To enjoy the biscuits warm again, reheat in an oven at 300°F (150°C) for about 5-10 minutes until warmed through, reviving that melt-in-your-mouth goodness!

What to Serve with Ted Lasso Biscuits?

Transform your sweet treat into a delightful meal experience with these complementary pairings.

  • Fresh Berries: A vibrant mix of strawberries, blueberries, and raspberries adds a tart contrast to the buttery biscuits. Their juiciness brings a delightful freshness to each bite.

  • Homemade Jam: Slather on a dollop of your favorite jam, like strawberry or raspberry, to enhance the sweetness and add a fruity twist that beautifully complements the cookies.

  • Espresso or Coffee: Pair your biscuits with a rich cup of espresso or a smooth coffee, balancing the sweetness while heightening the indulgent experience.

  • Cream Cheese Frosting: Spread a light layer of cream cheese frosting for an irresistible creamy topping that introduces richness and a zesty lift, turning your biscuits into a decadent dessert.

  • Vanilla Ice Cream: Serve with a scoop of vanilla ice cream for a truly indulgent treat. The creaminess creates a delightful contrast to the crumbly texture of the shortbread biscuits.

  • Herbal Tea: Enjoy a soothing cup of chamomile or mint tea to cleanse the palate and bring a light, refreshing touch to the sweeter notes of the biscuits.

  • Classic Shortbread Dip: Try a homemade rich chocolate dip that adds a luxurious touch, inviting you to savor each bite with a delightful complement of flavors.

Tips for the Best Ted Lasso Biscuits

  • Quality Butter Matters: Always use high-quality European-style butter for a richer flavor that elevates the taste of your Ted Lasso biscuits.

  • Temperature Check: Ensure your butter is softened to about 65-67°F (18-19°C) for the best creaming and texture in your biscuits.

  • Measure Accurately: For the flour, use the dip and sweep method to avoid packing too much flour, which could result in dense biscuits.

  • Avoid Overmixing: Mix your dough until just combined to keep your biscuits tender and melt-in-your-mouth delicious.

  • Chill for Success: Don’t skip the chilling step; it helps the biscuits retain their shape during baking and enhances the final texture.

  • Cut Warm: Cutting the biscuits while they’re still warm aids in maintaining their structure, so don’t wait too long before slicing!

Ted Lasso Biscuit Recipe FAQs

What type of butter should I use for the biscuits?
Absolutely! I recommend using high-quality European-style unsalted butter, like Kerrygold, for the best flavor and texture. This type of butter has a higher fat content, which enhances the richness of your Ted Lasso biscuits, making them that much more delicious.

How should I store the biscuits after baking?
For sure! Store your Ted Lasso biscuits in an airtight container at room temperature for up to 3 days. If you’d like them to last longer, placing them in the refrigerator can keep them fresh for up to a week. Just make sure the container is sealed tightly to prevent them from drying out!

Can I freeze Ted Lasso biscuits?
Yes, you can! To freeze, place the biscuits in a single layer on a baking sheet and leave them in the freezer until solid. Then, transfer them to a freezer-safe bag or container, where they can stay fresh for up to 2 months. This way, you can enjoy your biscuits anytime you get a craving!

What if my dough is too crumbly?
No worries! If your dough turns out too crumbly, it may be due to over-measuring the flour or not enough moisture. You can add a teaspoon of cold water or a bit more softened butter, mixing gently until the dough comes together. Avoid overmixing, as that could make your biscuits tough!

Can I substitute any ingredients for dietary preferences?
Very much so! For a gluten-free version, you can try using a 1:1 gluten-free flour blend. If you’re looking to cut down on sugar, powdered sugar can be substituted, but keep in mind it might change the texture slightly. And don’t hesitate to add in your favorite citrus zest or almond extract for a unique twist!

Are these biscuits safe for pets or those with allergies?
It’s always important to be careful! The ingredients used in Ted Lasso biscuits are not suitable for pets, particularly because of the sugar and fat content. Furthermore, those with dairy allergies should avoid traditional butter, but a dairy-free butter substitute could work in a pinch. Always check for individual allergies before sharing!

Ted Lasso Biscuit

Melt-In-Your-Mouth Ted Lasso Biscuit Recipe to Savor

Enjoy these melt-in-your-mouth Ted Lasso biscuits, a perfect blend of buttery goodness and simplicity.
Prep Time 15 minutes
Cook Time 35 minutes
Chilling Time 30 minutes
Total Time 1 hour 20 minutes
Servings: 16 biscuits
Course: Dessert
Cuisine: American
Calories: 150

Ingredients
  

For the Dough
  • 1 cup Unsalted Butter Use high-quality European-style butter for richer flavor.
  • 0.5 cup Granulated Sugar Plus extra for sprinkling.
  • 1 tsp Vanilla Extract Feel free to use almond extract for a twist.
  • 0.75 tsp Kosher Salt Sea salt can be a great alternative.
  • 2 cups All-Purpose Flour Ensure accurate measuring for the best results.

Equipment

  • mixing bowl
  • electric mixer
  • 8x8 inch baking pan
  • parchment paper
  • Fork
  • plastic wrap

Method
 

Step‑by‑Step Instructions for Ted Lasso Biscuit
  1. Preheat your oven to 325°F (165°C) and line an 8x8-inch baking pan with parchment paper.
  2. Cream together the butter and sugar until light and fluffy. Mix in vanilla extract and kosher salt, then gradually add flour and mix until just combined.
  3. Transfer the dough to the prepared baking pan and press it evenly into the bottom.
  4. Dock the surface of the dough with a fork, then chill it in the refrigerator for 30 minutes or the freezer for 15 minutes.
  5. Bake the chilled dough for 30–35 minutes until the edges are golden brown.
  6. Allow the biscuits to cool in the pan for 5 minutes, then cut them into rectangles.
  7. Let the biscuits cool completely on a wire rack before serving them.

Notes

For best results, ensure your butter is at room temperature and avoid overmixing the dough.

Creamy Pasta with Peas and Pancetta for a Cozy Night In

As I stirred the pot, the enticing aroma of crispy pancetta and garlic wafted through the kitchen, instantly making my mouth water. This Creamy Pasta with Peas and Pancetta is not just a quick dinner option; it’s a delightful hug in a bowl that transforms your weeknight meals into something special. With just a handful of ingredients, you’ll create a rich and comforting dish, vibrant with sweet peas and a hint of fresh lemon. Plus, it’s a crowd-pleaser that cooks in under 20 minutes—perfect for busy evenings or when guests drop by unexpectedly. Ready to whip up a restaurant-quality meal in your own home? Let’s dive into this creamy sensation that’s sure to become a family favorite!

Why is this creamy pasta irresistible?

Simplicity makes it a go-to weeknight meal with minimal prep and cooking time. Flavor-packed with savory pancetta and sweet peas, it’s a delightful balance of creamy richness and zesty lemon. Crowd appeal is guaranteed—perfect for impressing guests or enjoying a cozy family dinner. And if you’re in the mood for more fresh twists, pair it with a Cucumber Carrot Salad or serve alongside a delicious Crisp Cabbage and Cucumber Salad for an extra crunch. This dish truly elevates comfort food!

Pasta with Peas and Pancetta Ingredients

For the Pasta
Dried Pasta – Choose fusilli for better sauce clinging and a delightful texture.

For the Sauce
Olive Oil – Essential for frying pancetta, adding richness to the sauce.
Pancetta – Offers a salty, savory flavor; can replace with bacon, but the taste will vary.
Garlic – Fresh cloves enhance the overall taste; finely chop for even distribution.
Frozen Peas – A sweet addition that cooks quickly; fresh peas can be substituted.

Creamy Base
Cream – Adds luxurious creaminess; single cream works best for consistency.
Parmesan Cheese – Provides umami flavor; the finer it’s grated, the better it melts.

Seasonings
Black Pepper – Freshly cracked gives the best flavor; don’t hesitate to use a generous amount.
Fresh Lemon Juice – Brightens up the dish; always opt for fresh for optimal taste.

For Garnish
Arugula (Optional) – Adds a peppery freshness; mix into the pasta or use as a garnish.

This pasta with peas and pancetta is not just quick to prepare; it’s a beautifully balanced dish that invites everyone to gather around the table.

Step‑by‑Step Instructions for Creamy Pasta with Peas and Pancetta

Step 1: Heat the Oil
In a large skillet, heat 2 tablespoons of olive oil over medium-high heat. Once the oil shimmers, add 4 ounces of diced pancetta. Sauté for about 4–5 minutes, stirring occasionally, until the pancetta is golden and crispy. This step ensures you get that delightful savory flavor base for your creamy pasta with peas and pancetta.

Step 2: Sauté the Garlic
Reduce the heat to medium and add 2 cloves of finely chopped garlic to the skillet with the pancetta. Sauté for 30 seconds until fragrant, being careful not to let the garlic burn. This step enhances the dish’s flavor profile, setting the stage for the other ingredients to shine.

Step 3: Add the Peas
Stir in 1 cup of frozen peas, mixing them well with the garlic and pancetta. Continue cooking for another 2–3 minutes until the peas are warmed through and bright green. This quick cooking ensures they retain their sweetness, beautifully complementing the creaminess of your dish.

Step 4: Incorporate the Cream
Lower the heat and pour in 1 cup of single cream, allowing it to come to a gentle simmer. Stir occasionally for about 2 minutes, letting the cream blend with the pancetta and peas. This creates the rich, velvety sauce that defines your creamy pasta with peas and pancetta.

Step 5: Add Parmesan
Gradually whisk in 1 cup of finely grated parmesan cheese, a handful at a time, allowing each addition to melt before adding more. Continue stirring for about 2 minutes until the cheese is fully incorporated and the sauce is creamy and smooth. This step is crucial for achieving that luxurious texture.

Step 6: Season the Sauce
Sprinkle in freshly cracked black pepper to taste and add the juice of half a lemon. Mix thoroughly for about a minute to combine the flavors seamlessly. The bright acidity of the lemon balances the richness of the creamy sauce, enhancing your pasta with peas and pancetta.

Step 7: Combine with Pasta
Add 12 ounces of cooked fusilli pasta to the skillet, along with ¼ cup of reserved pasta water. Toss everything together for about 2 minutes, ensuring the pasta is coated with the sauce. The pasta water helps to create a silky texture, binding the sauce beautifully with your creamy masterpiece.

Step 8: Finish with Garnish
Remove the skillet from heat and fold in a handful of arugula, allowing it to wilt slightly. Serve your creamy pasta with peas and pancetta warm, garnished with extra parmesan and a sprinkle of lemon zest for a burst of freshness. Enjoy this comforting, crowd-pleasing dish straight from your kitchen!

Expert Tips for Creamy Pasta with Peas and Pancetta

  • Pasta Water Magic: Always reserve some pasta water before draining. It’s your secret weapon for adjusting the sauce’s consistency to achieve a silky finish.

  • Avoid Overcooking: Don’t overcook the peas; you want them to be bright and sweet! Add them towards the end to ensure they retain their vibrant color and flavor.

  • Quality Ingredients: Use high-quality pancetta and freshly grated parmesan. The better your ingredients, the more delicious your pasta with peas and pancetta will taste!

  • Garlic Caution: Take care not to burn the garlic when sautéing. A burnt garlic flavor can overpower the dish, so sauté it until just fragrant.

  • Custom Seasoning: Adjust the black pepper and lemon juice to your taste. Personalizing your flavors can elevate this dish to new heights, making it your own.

  • Garnish Wisely: Finish with fresh ingredients like arugula or lemon zest for an extra pop of flavor and color. It adds a delightful freshness that complements the creamy pasta beautifully.

Storage Tips for Creamy Pasta with Peas and Pancetta

Fridge: Store leftovers in an airtight container for up to 2 days. Ensure the pasta has cooled before sealing to maintain its freshness and flavor.

Freezer: While creamy sauces don’t freeze well, you can freeze the pasta without the sauce for up to 1 month. Reheat pasta before adding freshly made sauce for the best result.

Reheating: Gently reheat in a skillet over low heat, adding a splash of cream or pasta water to restore the sauce’s creamy consistency. Avoid boiling to prevent curdling.

Room Temperature: It’s best to consume this pasta with peas and pancetta shortly after cooking. If left out, do not exceed 2 hours at room temperature for food safety.

Make Ahead Options

These Creamy Pasta with Peas and Pancetta are perfect for meal prep enthusiasts! You can prepare the creamy sauce up to 24 hours in advance by cooking the pancetta, garlic, peas, and cream together, then refrigerate it in an airtight container. When you’re ready to serve, simply reheat the sauce gently over low heat, adding a splash of reserved pasta water to maintain its silky texture. Cook the fusilli fresh for the best bite, and mix it with the reheated sauce along with lemon juice and arugula just before serving. This method saves time on busy weeknights while ensuring your dish is just as delicious!

What to Serve with Creamy Pasta with Peas and Pancetta

Elevate your cozy dinner experience by pairing this rich dish with delightful sides and drinks that complement its flavor.

  • Garlic Bread: A crunchy, buttery treat that sops up the creamy sauce perfectly, making each bite more delectable.

  • Mixed Greens Salad: The crisp, refreshing lettuce and tangy vinaigrette balance the richness of the pasta, adding a bright contrast.

  • Roasted Asparagus: Tender, savory spears bring earthy flavors to the table while highlighting the sweet notes of the peas.

  • Lemonade Spritzer: This sparkling beverage refreshes the palate between bites, enhancing the dish’s lemony brightness.

  • Parmesan Crisps: Their crunch adds a delightful texture, and they echo the cheese in the pasta for a cohesive flavor experience.

  • Apple Tart: A warm, sweet dessert rounds off the meal beautifully, offering a contrast to the comforting creaminess of your main dish.

Consider these options to create a balanced and appealing dining experience that captivates your loved ones!

Variations & Substitutions for Pasta with Peas and Pancetta

Feel free to get creative and customize your creamy pasta dish with these enticing variations that will excite your taste buds.

  • Bacon Twist: Replace pancetta with crispy bacon for a smoky flavor, making it more accessible while still delightful.

  • Vegetarian Delight: Omit the pancetta entirely and add sautéed mushrooms or roasted red peppers for a hearty alternative.

  • Herb Infusion: Swap arugula for fresh basil or parsley to introduce a fragrant herbal note that brightens every bite.

  • Extra Veggies: Stir in fresh spinach or asparagus for an added layer of nutrition and vibrant color in your pasta.

  • Cheesy Upgrade: Try adding a dollop of ricotta or goat cheese for an even creamier texture that enhances the dish’s richness.

  • Zesty Heat: Mix in a pinch of red pepper flakes for a spicy kick that complements the creaminess beautifully.

  • Citrus Variation: Incorporate lemon zest along with juice for a punch of bright citrus flavor that will take your dish to new heights.

  • Nutty Finish: Top the pasta with toasted pine nuts or walnuts for a delightful crunch and added healthy fats.

These variations not only personalize your pasta with peas and pancetta, but they also invite you to explore unique textures and flavors, transforming this comforting dish into something uniquely yours. Pair your meal with a refreshing Cucumber Carrot Salad for a perfect balance of flavors or enjoy it alongside Zucchini and Potato Fritters with Cheesy Mozzarella for a satisfying feast.

Creamy Pasta with Peas and Pancetta Recipe FAQs

How do I choose ripe ingredients for my creamy pasta?
Absolutely! When selecting your peas, look for those that are bright green and firm, avoiding any with dark spots or wrinkles. For pancetta, choose a fresh product with a rich aroma. Fresh garlic should be free of sprouting, while lemons should feel heavy for their size, signifying juiciness.

How should I store leftovers of creamy pasta?
Very! Place any leftover creamy pasta in an airtight container and refrigerate for up to 2 days. Make sure the pasta has cooled slightly before containerizing to maintain its flavor and texture. For optimal taste, reheat gently on the stove over low heat, adding a splash of cream to revive that creamy consistency.

Can I freeze creamy pasta with peas and pancetta?
Yes, but with a twist! While creamy sauces generally don’t freeze well, you can freeze the cooked pasta by itself for up to 1 month. To enjoy it later, just reheat the pasta and prepare a fresh creamy sauce to mix in right before serving. This method preserves the pasta’s quality and texture beautifully.

What should I do if my cheese isn’t melting well?
Don’t worry; this can happen! Make sure you’re using finely grated parmesan, as it melts more evenly. If your cheese clumps, add a little more cream or pasta cooking water to help it blend more smoothly. Stir continuously over low heat until you achieve that velvety sauce you’re craving.

Are there any dietary considerations for this recipe?
Absolutely! If you or someone you’re serving has a gluten sensitivity, consider using gluten-free pasta. When it comes to dairy, alternative creams based on cashew or oats can create a deliciously creamy sauce without the lactose. Always check for allergies against other ingredients like pancetta to ensure everyone’s safe at the table.

How long can I leave the pasta out before it spoils?
It’s crucial to keep food safety in mind! The creamy pasta with peas and pancetta should not be left out at room temperature for more than 2 hours. Bacteria can flourish at room temperature, so it’s best to chill any leftovers as soon as you’re finished enjoying your meal.

pasta with peas and pancetta

Creamy Pasta with Peas and Pancetta for a Cozy Night In

This creamy pasta with peas and pancetta combines savory flavors for a quick and comforting dinner.
Prep Time 10 minutes
Cook Time 10 minutes
Total Time 20 minutes
Servings: 4 servings
Course: Dinner
Cuisine: Italian
Calories: 550

Ingredients
  

For the Pasta
  • 12 ounces fusilli pasta Cooked
For the Sauce
  • 2 tablespoons olive oil For frying pancetta
  • 4 ounces pancetta Diced
  • 2 cloves garlic Finely chopped
  • 1 cup frozen peas Can substitute with fresh peas
  • 1 cup single cream Adds luxurious creaminess
  • 1 cup parmesan cheese Finely grated
Seasonings
  • black pepper Freshly cracked, to taste
  • 1/2 number fresh lemon Juiced
For Garnish
  • 1 handful arugula Optional

Equipment

  • large skillet
  • Cutting Board
  • Knife

Method
 

Cooking Steps
  1. In a large skillet, heat olive oil over medium-high heat. Add diced pancetta and sauté for about 4–5 minutes until golden and crispy.
  2. Reduce heat to medium, add finely chopped garlic, and sauté for 30 seconds until fragrant.
  3. Stir in frozen peas and cook for another 2–3 minutes until warmed through.
  4. Lower the heat and pour in single cream; let it come to a gentle simmer while stirring occasionally for about 2 minutes.
  5. Gradually whisk in parmesan cheese, allowing it to melt and fully incorporate into the sauce.
  6. Sprinkle in black pepper and add lemon juice, mixing thoroughly for a minute.
  7. Add cooked fusilli pasta and reserved pasta water; toss together for about 2 minutes.
  8. Fold in arugula, remove from heat, and serve warm, garnished with extra parmesan and lemon zest.

Notes

Store leftovers in an airtight container for up to 2 days. Reheat gently to restore creaminess.

One Pot Shawarma Chicken and Rice for Effortless Flavor

As the aroma of sizzling spices fills the kitchen, I find myself transported to a lively market bustling with the vibrant flavors of the Middle East. That’s the magic of this One Pot Shawarma Chicken and Rice—it’s not just a meal; it’s an adventure for the senses. Perfectly tender chicken thighs mingle with fluffy rice, all drenched in a medley of spices that promise to turn any weeknight dinner into a culinary celebration. This one-pot wonder not only minimizes cleanup but also fits beautifully into busy schedules, making it both quick and family-friendly. Whether you’re tired of fast food or simply craving something homemade and wholesome, I promise this dish will become a staple in your kitchen. So, are you ready to dive into this delicious journey and impress your loved ones?

Why is One Pot Shawarma Chicken special?

Simplicity: With just one pot, you can whip up a flavorful meal effortlessly, making it perfect for busy weeknights.

Family-Friendly: This dish is designed to please picky eaters and adventurous palates alike, bringing everyone together for a delicious meal.

Rich in Flavor: The vibrant spices create an aromatic experience that transports your taste buds straight to the Middle East.

Customizable: Adjust ingredients to your liking—try swapping chicken thighs for breasts or serve it in pita bread with a side salad for added flair.

Healthy Option: Coming in at around 430 calories per serving, it’s a wholesome choice that doesn’t compromise on taste. Ready to elevate your weeknight dinners? Give this One Pot Shawarma Chicken and Rice a try and enjoy a comforting, low-calorie meal.

One Pot Shawarma Chicken and Rice Ingredients

For the Chicken

  • Chicken Thighs – Juicy and full of flavor; substitute with chicken breasts for lighter meat.
  • Olive Oil – Used for sautéing; can easily be replaced with any cooking oil you prefer.

For the Spice Blend

  • Ground Cumin – Adds warmth and depth; essential for authentic shawarma flavor.
  • Ground Coriander – Brings a citrusy undertone; adjust according to your taste.
  • Paprika – Adds sweetness and color; smoked paprika can be a delicious alternative for extra flavor.
  • Ground Cardamom – Offers a sweet aroma; you can use garam masala if cardamom is unavailable.
  • Chili Flakes – Introduce heat; adjust any way you like based on spice preference.
  • Salt and Black Pepper – Essential seasonings; always to taste!

For the Rice & Vegetables

  • Long Grain Rice – The base of the dish; substitute with basmati rice but watch the cooking time.
  • Onion – Adds sweetness to balance flavors; finely sliced for even cooking.
  • Garlic – Crush for a stronger taste; enhances overall flavor.

For the Liquid

  • Chicken Stock – Keeps the dish moist and flavorsome; opt for low-sodium for a healthier choice.
  • Lemon Juice – Freshly squeezed adds acidity and brightness to the dish.

For the Garnish

  • Parsley and Dill – Fresh herbs that elevate the dish; feel free to use other herbs like cilantro or mint based on personal preference.

Each ingredient plays a vital role in crafting the delightful symphony of flavors in this One Pot Shawarma Chicken and Rice. Get ready to transform your dinner into a memorable feast!

Step‑by‑Step Instructions for One Pot Shawarma Chicken and Rice

Step 1: Prepare the Chicken
Begin by slicing the chicken thighs into bite-sized pieces. In a mixing bowl, coat the chicken with olive oil, ground cumin, ground coriander, paprika, smoked paprika, turmeric, ground cardamom, chili flakes, salt, and black pepper. Add freshly squeezed lemon juice to the mixture and set aside for about 10 minutes to allow the flavors to infuse.

Step 2: Sear the Chicken
In a large pot or deep skillet, heat a drizzle of olive oil over medium-high heat for about 2 minutes. Once hot, add the marinated chicken and sear for 3-4 minutes until golden brown on all sides. Incorporate the finely sliced onion and crushed garlic, stirring occasionally, and cook until the onion is soft and translucent, about 2 more minutes.

Step 3: Add Rice
Stir in the long-grain rice, ensuring it gets coated with the spices and drippings in the pot, cooking for about 2 minutes until slightly translucent. Pour in the chicken stock, stirring gently to combine all ingredients. Bring the mixture to a gentle boil, allowing the rice to soak up the flavor-rich broth.

Step 4: Simmer and Steam
Reduce the heat to low and cover the pot with a lid, letting it simmer for approximately 15-18 minutes. You’ll know it’s ready when most of the stock is absorbed and the rice is tender. Once done, turn off the heat and let it steam with the lid on for another 10 minutes without lifting it.

Step 5: Season and Garnish
After steaming, carefully remove the lid and fluff the rice gently with a fork, mixing in additional salt and pepper to taste. Stir in chopped parsley and dill for a fresh finish. This One Pot Shawarma Chicken and Rice is now ready to be served warm and bursting with flavor.

Step 6: Serve
Scoop the flavorful chicken and rice onto plates or into bowls and consider pairing it with fresh salad or steamed vegetables for a delightful meal. Enjoy this wholesome dish that brings the essence of Middle Eastern cuisine right to your dining table!

How to Store and Freeze One Pot Shawarma Chicken and Rice

Fridge: Store your One Pot Shawarma Chicken and Rice in an airtight container for up to 3 days. Ensure it’s cooled completely before refrigerating to maintain freshness.

Freezer: For longer storage, freeze in a freezer-safe container for up to 3 months. To prevent freezer burn, wrap tightly in plastic wrap before sealing it in the container.

Reheating: When ready to eat, thaw overnight in the fridge, then reheat in the microwave or on the stovetop, adding a splash of chicken stock to revive moisture.

Serving Suggestions: Enhance your meal by pairing it with fresh greens or a side salad, ensuring a well-rounded dining experience even with leftovers.

What to Serve with One Pot Shawarma Chicken and Rice

Elevate your dining experience with delightful combinations that bring balance and richness to this aromatic dish.

  • Tzatziki Sauce: This refreshing yogurt dip offers a cool and creamy contrast that complements the spices marvelously. Perfect for drizzling over hot chicken and rice!

  • Roasted Vegetables: A medley of roasted seasonal veggies adds a colorful and nutritious touch, enhancing the dish’s flavors while providing delightful textures.

  • Pita Bread: Soft, warm pita is ideal for scooping up chicken and rice, making every bite a delightful experience. It’s a fun, interactive side!

  • Chickpea Salad: A bright chickpea salad loaded with cherry tomatoes, cucumbers, and a lemon dressing offers freshness and crunch that beautifully contrasts the warm, spiced rice.

  • Fattoush Salad: This Lebanese salad with crispy pita and a tangy dressing adds brightness and a satisfying crunch to your meal, enhancing both flavor and texture.

  • Mint Lemonade: Cool and refreshing, mint lemonade is a thirst-quencher that pairs wonderfully with the savory spices, balancing the dish’s richness.

  • Baklava: End your meal with a sweet treat! The layers of flaky pastry and honey-soaked nuts offer a luscious finish to your dining adventure, lingering on the palate.

Each of these options adds its unique twist, making your One Pot Shawarma Chicken and Rice an unforgettable meal perfect for family gatherings or cozy nights in.

One Pot Shawarma Chicken and Rice Variations

Embrace the chance to personalize this comforting dish to suit your family’s preferences and dietary needs!

  • Dairy-Free: Omit any creamy sauces or yogurt-based sides, keeping the dish light and refreshing without sacrificing flavor.

  • Spice it Up: Add more chili flakes or diced jalapeños for an extra kick, waking up the taste buds with vibrant heat. A hint of spice can make all the difference!

  • Vegetarian Twist: Swap chicken for chickpeas or eggplant, and increase the spices to enhance the dish. This twist will keep your meal delightful and satisfying.

  • Gluten-Free: Stick with the rice included or use quinoa instead, ensuring a nutritious base that everyone can enjoy. Both options are equally delicious!

  • Aromatic Herbs: Add fresh cilantro or mint in place of parsley and dill for a fragrant twist that will brighten the dish. Fresh herbs elevate any meal!

  • Nutty Flavor: Toasted pine nuts or slivered almonds can be sprinkled on top to add crunch and depth, providing a lovely contrast to the tender chicken and rice.

  • Fruits and Nuts: Serve with raisins or dried apricots mixed in for a touch of sweetness; this can balance the spices and add a delightful twist to your meal.

  • Exotic Sides: Pair with a refreshing cucumber and tomato salad, or even try a creamy tahini dressing as a delicious drizzle. Complementing flavors can enhance the entire experience!

Feel free to take control of your dinner plate—each variation can lead you down a new culinary path, ensuring every meal feels like a fresh adventure in your kitchen! For more ideas, why not explore this Homemade Chicken Pot pie or dive into the flavors of Honey Chili Chicken?

Expert Tips for One Pot Shawarma Chicken and Rice

  • Avoid Overcrowding: Ensure the pan isn’t too full, as this promotes even cooking and prevents steaming instead of searing.

  • Use Fresh Spices: For the best flavor, use fresh spices in your One Pot Shawarma Chicken and Rice—old spices can lose potency.

  • Check Rice Cooking Time: Different rice varieties require different cooking times; always refer to package instructions for best results.

  • Keep the Lid On: Resist the temptation to lift the lid while steaming—this ensures the dish remains moist and flavorful.

  • Custom Spice Levels: Adapt spice levels according to your family’s taste preferences, especially with extra chili flakes or cumin.

  • Enhance Leftovers: Consider serving leftover One Pot Shawarma Chicken and Rice in wraps or as a breakfast dish—just add an egg on top!

Make Ahead Options

Preparing the One Pot Shawarma Chicken and Rice ahead of time is a fantastic way to save time during those busy weeknights! You can marinate the chicken thighs with the spice blend and lemon juice up to 24 hours in advance, allowing the flavors to penetrate—just remember to refrigerate the mixture! The rice can be pre-measured and kept in an airtight container, ready to be cooked fresh. When you’re ready to serve, simply heat the chicken in the pot, add the rice and chicken stock, and follow the cooking instructions. This method ensures your meal will be just as delicious, making it a practical option for meal prep enthusiasts!

One Pot Shawarma Chicken and Rice Recipe FAQs

What type of chicken should I use for this recipe?
I recommend using chicken thighs as they provide juiciness and robust flavor, perfect for this One Pot Shawarma Chicken and Rice. However, chicken breasts can also be used for a lighter option. Just remember that breasts may cook faster, so adjust the cooking time accordingly!

How should I store leftovers of this dish?
Store your One Pot Shawarma Chicken and Rice in an airtight container for up to 3 days in the refrigerator. Allow it to cool completely before refrigerating to preserve its delicious flavor. Reheat in the microwave or on the stovetop with a splash of chicken stock to keep it moist!

Can I freeze this dish? If so, how?
Absolutely! For freezing, place the cooled One Pot Shawarma Chicken and Rice in a freezer-safe container. Make sure to wrap it tight in plastic wrap before sealing the container, which will protect it from freezer burn. It can be stored for up to 3 months. When ready to enjoy, thaw in the fridge overnight and reheat gently.

What if my rice is undercooked?
If your rice is undercooked, don’t panic! Simply add a bit more chicken stock or water to the pot, cover it with the lid, and let it simmer on low heat for an additional 5-10 minutes. Check periodically to ensure it doesn’t dry out, stirring gently to help with even cooking.

Are there any allergy considerations with this dish?
Yes! This One Pot Shawarma Chicken and Rice is gluten-free and dairy-free, making it suitable for those with those dietary restrictions. However, always double-check ingredient labels, especially for chicken stock and spices, to avoid any hidden allergens.

Can I adjust the spice levels in this recipe?
Very much so! Spice levels can be tailored to your taste preferences. To reduce heat, simply lower the amount of chili flakes or omit them altogether. Conversely, if you enjoy a kick, feel free to add more spices, ensuring you maintain a balance for the best flavor in your One Pot Shawarma Chicken and Rice!

One Pot Shawarma Chicken and Rice

One Pot Shawarma Chicken and Rice for Effortless Flavor

This One Pot Shawarma Chicken and Rice delivers a culinary adventure with vibrant spices and tender chicken, making weeknight dinners easy and delicious.
Prep Time 10 minutes
Cook Time 30 minutes
Steaming Time 10 minutes
Total Time 50 minutes
Servings: 4 servings
Course: Dinner
Cuisine: Middle Eastern
Calories: 430

Ingredients
  

For the Chicken
  • 1.5 pounds Chicken Thighs Juicy and full of flavor; substitute with chicken breasts for lighter meat.
  • 2 tablespoons Olive Oil Used for sautéing; can be replaced with any cooking oil.
For the Spice Blend
  • 2 teaspoons Ground Cumin Adds warmth and depth; essential for authentic shawarma flavor.
  • 2 teaspoons Ground Coriander Brings a citrusy undertone; adjust according to taste.
  • 2 teaspoons Paprika Adds sweetness and color; smoked paprika can be an alternative for extra flavor.
  • 1 teaspoon Ground Cardamom Offers a sweet aroma; garam masala can be used if cardamom is unavailable.
  • 1 teaspoon Chili Flakes Introduce heat; adjust based on spice preference.
  • to taste Salt Essential seasoning.
  • to taste Black Pepper Essential seasoning.
For the Rice & Vegetables
  • 1 cup Long Grain Rice The base of the dish; substitute with basmati rice but watch cooking time.
  • 1 medium Onion Adds sweetness to balance flavors; finely sliced for even cooking.
  • 3 cloves Garlic Crushed for a stronger taste.
For the Liquid
  • 2 cups Chicken Stock Opt for low-sodium for a healthier choice.
  • 2 tablespoons Lemon Juice Freshly squeezed adds acidity and brightness.
For the Garnish
  • to taste Parsley Fresh herbs that elevate the dish.
  • to taste Dill Fresh herbs that elevate the dish.

Equipment

  • large pot or deep skillet

Method
 

Step-by-Step Instructions
  1. Slice the chicken thighs into bite-sized pieces, coat with olive oil and spices, add lemon juice, and set aside for 10 minutes.
  2. In a large pot, heat olive oil, sear the marinated chicken until golden brown, and then add onion and garlic.
  3. Stir in the rice, coat with spices, and add chicken stock. Bring to a boil.
  4. Reduce heat, cover, and let simmer for 15-18 minutes until the rice is tender.
  5. Fluff the rice, stir in herbs, and season to taste before serving.
  6. Serve warm with sides of your choice.

Notes

Store leftovers in an airtight container for up to 3 days or freeze for up to 3 months. Use fresh spices for best flavor and adjust spice levels to taste.

Salsa Chicken and Cauliflower Rice Skillet – Flavorful & Easy

There I was, juggling my grocery list while mentally praying for a meal that wouldn’t take hours to prepare. The latest answer to my culinary prayers? This Salsa Chicken and Cauliflower Rice Skillet. In just over 30 minutes, I can deliver a vibrant, one-pan dish that checks all the boxes—low-carb and high-protein, perfect for those busy weeknights when time is of the essence. With tender chicken kissed by zesty Mexican spices and layered with melted cheese, it’s a comforting hug for my taste buds. Plus, the cauliflower rice adds a healthy twist that makes it so satisfying, you won’t miss the carbs! Are you ready to create your own flavorful masterpiece?

Why is this skillet dinner a must-try?

Simplicity: This one-pan wonder minimizes dish duty, letting you spend more time enjoying your meal.
Quick Preparation: In just over 30 minutes, you’ll go from prep to plate, a lifesaver for bustling weeknights.
Flavor Explosion: The vibrant combination of spices, tender chicken, and fresh salsa creates an irresistible taste sensation.
Healthy Twist: With low-carb cauliflower rice and high protein content, this dish supports your healthy eating goals without sacrificing flavor.
Versatile Options: Feel free to customize with your favorite veggies, making it uniquely yours each time you cook it! For a bit more inspiration, check out our Savory Chicken Cheesy or Tropical Chicken Pineapple recipes.

Salsa Chicken and Cauliflower Rice Skillet Ingredients

For the Chicken
Olive oil – Adds fat for sautéing and enhances flavor; swap with avocado oil for a lighter option.
Boneless skinless chicken breasts – The heart of the dish, offering a hearty protein source; chicken thighs can replace it if you prefer dark meat.
Chili powder – Infuses warmth and depth; adjust based on your heat tolerance.
Cumin – Introduces an earthy note; ground coriander can be a milder substitute.
Smoked paprika – Gives a hint of smokiness; regular paprika can work in a pinch.
Kosher salt and black pepper – Essential for layering flavors throughout the dish; season to taste.

For the Cauliflower Rice
Cauliflower rice – A fantastic low-carb alternative to traditional rice, adding fiber; fresh or frozen options are both great.
Green onions – Provide a fresh, crunchy element; regular onions can be swapped if needed.
Garlic – Imparts aromatic flavor; garlic powder can substitute in a hurry.
Diced green chiles – Offer a touch of spice; jalapeños can be used for an extra kick or omit for milder flavor.
Canned black beans – Boosts fiber and protein; pinto beans are a nice alternative, or you can leave them out for fewer carbs.
Cilantro – Brightens up the dish; feel free to skip if it’s not your favorite.

For the Finishing Touch
Salsa – Crucial for adding moisture and vibrant taste; any salsa you love will work, including salsa verde for a fun twist.
Shredded cheese (cheddar or Monterey Jack) – Melts beautifully over the top, adding creaminess; vegan cheese is an excellent dairy-free option.

Step‑by‑Step Instructions for Salsa Chicken and Cauliflower Rice Skillet

Step 1: Season Chicken
In a small bowl, combine chili powder, cumin, smoked paprika, kosher salt, and black pepper. Rub half of the spice mixture evenly over the boneless skinless chicken breasts, ensuring each piece is well-coated. Allow the chicken to sit for about 5 minutes, letting the flavors meld while you prep the skillet.

Step 2: Sauté Chicken
Heat 2 tablespoons of olive oil in a large skillet over medium heat. Once hot, carefully place the seasoned chicken breasts in the skillet. Cook for 6–7 minutes on each side or until the chicken reaches an internal temperature of 165°F and is golden brown. Remove the chicken from the skillet and cover with foil to keep warm.

Step 3: Cook Cauliflower Rice
In the same skillet, if needed, add a bit more olive oil and heat over medium-high. Add the cauliflower rice, chopped green onions, minced garlic, and the remaining spice mixture. Sauté for 10–12 minutes, stirring occasionally, until the cauliflower is tender and slightly golden, soaking up all those delicious flavors.

Step 4: Combine Ingredients
To the skillet with the cauliflower rice, stir in the salsa, drained black beans, and diced green chiles. Mix until everything is well combined and heated through, about 3–4 minutes. You’ll notice the vibrant colors and enticing aromas of your Salsa Chicken and Cauliflower Rice Skillet beginning to meld beautifully.

Step 5: Return Chicken
Nestle the sautéed chicken breasts back into the skillet mixture, then top them with additional salsa and a generous layer of shredded cheese. Cover the skillet with a lid and let it cook on low heat for about 3–5 minutes, or until the cheese is melted and bubbly, creating a comforting, cheesy layer.

Step 6: Serve
Once the cheese has melted to your liking, remove the skillet from heat. Garnish the dish with fresh cilantro and extra green onions if desired. Serve immediately to enjoy the warm, delightful flavors of your Salsa Chicken and Cauliflower Rice Skillet, perfect for any busy weeknight dinner.

Make Ahead Options

These Salsa Chicken and Cauliflower Rice Skillet ingredients are perfect for meal prep enthusiasts! You can season and cook the chicken breasts up to 24 hours in advance; simply refrigerate them in an airtight container. The cauliflower rice mixture, including the spices and veggies, can also be prepped ahead—just sauté it and store it in the fridge for up to 3 days. When you’re ready to enjoy this delicious meal, reheat the chicken and cauliflower rice mixture in a skillet, add the salsa, black beans, and cheese, and warm through until the cheese is melted. This way, you’ll achieve that comforting, home-cooked flavor with minimal effort, leaving you more time to unwind!

How to Store and Freeze Salsa Chicken and Cauliflower Rice Skillet

Fridge: Store leftovers in an airtight container for up to 3 days. Reheat in a skillet over low heat until warmed through, retaining the dish’s delicious flavors.

Freezer: For longer storage, freeze portions in airtight containers for up to 3 months. Thaw overnight in the fridge before reheating to ensure even warming.

Reheating: To enjoy your Salsa Chicken and Cauliflower Rice Skillet, reheat on the stovetop or in the microwave until heated through, ensuring the chicken remains juicy and the flavors intact.

Salsa Chicken and Cauliflower Rice Skillet Variations

Feel free to get creative and personalize this recipe to match your tastes and dietary needs!

  • Extra Veggies: Add sweet corn or colorful bell peppers to the cauliflower rice mixture for a delightful crunch and sweetness. This brings additional nutrition and color to your dish.

  • Grain Swap: Replace cauliflower rice with nutritious brown rice or quinoa for a satisfying and hearty carb option. This creates a different texture and adds fiber to your meal.

  • Spicy Kick: Incorporate fresh jalapeños or a sprinkle of red pepper flakes into the skillet for a fiery twist. If you enjoy heat, this will elevate your dish to a whole new level.

  • Creamy Delight: Mix in a dollop of cream cheese or sour cream into your salsa for a richer sauce that adds creaminess and complements the vibrant spices.

  • Protein Boost: Toss in some cooked chicken sausage or shrimp for extra protein and a unique flavor twist. This is a fantastic way to add variety to your weeknight dinners.

  • Savory Switch: For a twist in flavor, use a different variety of canned beans like black-eyed peas or chickpeas. This change will infuse your dish with new tastes and textures.

  • Herb Infusion: Sprinkle fresh herbs like parsley or basil before serving for an aromatic touch that brightens each bite. This adds a beautiful finish and aids in flavor complexity.

  • Taco-Style: Make it taco-inspired by serving the mixture over crunchy taco shells or in lettuce wraps. This provides a fun and interactive way to enjoy your meal, reminiscent of taco night at home!

Don’t forget to explore more delicious options like our Honey Chili Chicken or try your hand at Homemade Chicken Rolls for additional inspiration!

What to Serve with Salsa Chicken and Cauliflower Rice Skillet

Elevate your dining experience with delightful pairings that enhance the flavors of this vibrant skillet dish!

  • Fresh Side Salad: A leafy green salad with tomatoes and avocados provides a refreshing contrast and complements the dish’s bold flavors.
  • Sliced Avocado: Creamy avocado slices bring richness and balance, making your meal even more satisfying. Pairing this with the chicken adds a lovely creaminess!
  • Tortilla Chips: For a fun crunch, serve crispy tortilla chips on the side, perfect for scooping up the flavorful salsa and chicken mix.
  • Roasted Vegetables: Try serving roasted zucchini and bell peppers to incorporate more colorful veggies with a touch of smokiness and sweetness.
  • Chilled White Wine: A glass of crisp, chilled Sauvignon Blanc complements the zesty spices beautifully while adding a touch of sophistication to your meal.
  • Cilantro Lime Rice: Although it’s a carb, a side of cilantro lime rice brightens the dish and offers a fluffy texture that pairs nicely with the skillet’s ingredients.
  • Coconut Water: For a refreshing drink, serve chilled coconut water—it balances the spice with its natural sweetness and adds a tropical twist!
  • Chocolate Avocado Mousse: End your meal with a light dessert like chocolate avocado mousse for a creamy, rich treat that feels indulgent yet healthy.

Expert Tips for Salsa Chicken Skillet

  • Check Chicken Temp: Ensure your chicken reaches an internal temperature of 165°F to guarantee it’s safe to eat and perfectly juicy.
  • Avoid Clumping: If using frozen cauliflower rice, break up any large clumps before adding to the skillet to ensure even cooking and flavor absorption.
  • Use a Large Skillet: Opt for a 12-inch skillet for even cooking and ample space. A non-stick skillet makes cleanup easier and prevents sticking.
  • Adjust Spice Levels: Feel free to modify the amount of chili powder and add fresh jalapeños if you prefer a spicier version of your Salsa Chicken and Cauliflower Rice Skillet.
  • Customize Your Dish: Don’t hesitate to add extra vegetables like bell peppers or corn for variation, creating a unique twist on this classic recipe.

Salsa Chicken and Cauliflower Rice Skillet Recipe FAQs

How do I choose the right cauliflower for the recipe?
Absolutely! When selecting cauliflower, look for heads that are firm and compact with no dark spots or blemishes. The leaves should be bright green and fresh. Avoid any cauliflower that shows signs of wilting or brown spots, as this indicates age and might affect the flavor.

How can I store leftovers from Salsa Chicken and Cauliflower Rice Skillet?
Leftovers can be stored in an airtight container in the refrigerator for up to 3 days. When reheating, I recommend using a skillet on low heat to bring back the dish’s original flavors and maintain the texture.

Can I freeze Salsa Chicken and Cauliflower Rice Skillet?
Yes! To freeze, let the dish cool completely and portion it into airtight containers. It can be frozen for up to 3 months. When you’re ready to enjoy it again, thaw overnight in the refrigerator. Once thawed, reheat in a skillet or microwave until thoroughly heated, ensuring the chicken remains juicy.

What should I do if the chicken isn’t cooking evenly?
No worries! If you notice your chicken isn’t cooking evenly, it might be due to the skillet’s heat being too low. Make sure to cook on medium to medium-high heat. Alternatively, slice the chicken into smaller pieces to help it cook through more evenly. To ensure proper cooking, always check that the internal temperature reaches 165°F.

Are there any dietary considerations I should keep in mind?
Very! This recipe can easily be tailored to fit various dietary needs. Use vegan cheese for a dairy-free version or omit the black beans for a lower-carb dish. If anyone is sensitive to nightshades, you can skip the chili powder and green chiles or replace them with milder herbs. Enjoy making this dish the way that suits you best!

Salsa Chicken and Cauliflower Rice Skillet

Salsa Chicken and Cauliflower Rice Skillet – Flavorful & Easy

A quick and delicious Salsa Chicken and Cauliflower Rice Skillet recipe that delivers vibrant flavors and is low-carb and high-protein. Perfect for busy weeknights.
Prep Time 10 minutes
Cook Time 25 minutes
Total Time 35 minutes
Servings: 4 servings
Course: Dinner
Cuisine: Mexican
Calories: 400

Ingredients
  

For the Chicken
  • 2 tablespoons olive oil can substitute with avocado oil
  • 1.5 pounds boneless skinless chicken breasts can use chicken thighs
  • 1 tablespoon chili powder adjust based on heat tolerance
  • 1 teaspoon cumin can substitute with ground coriander
  • 1 teaspoon smoked paprika regular paprika can work
  • to taste kosher salt
  • to taste black pepper
For the Cauliflower Rice
  • 4 cups cauliflower rice fresh or frozen
  • 4 scallions green onions chopped
  • 2 cloves garlic minced, or use garlic powder
  • 1 can diced green chiles or jalapeños for extra spice
  • 1 can canned black beans drained
  • 1/4 cup cilantro optional
For the Finishing Touch
  • 1 cup salsa any preferred salsa
  • 1 cup shredded cheese (cheddar or Monterey Jack) or vegan cheese for a dairy-free option

Equipment

  • large skillet

Method
 

Step-by-Step Instructions
  1. In a small bowl, combine chili powder, cumin, smoked paprika, kosher salt, and black pepper. Rub half of the spice mixture evenly over the boneless skinless chicken breasts, ensuring each piece is well-coated. Allow the chicken to sit for about 5 minutes.
  2. Heat 2 tablespoons of olive oil in a large skillet over medium heat. Once hot, carefully place the seasoned chicken breasts in the skillet. Cook for 6–7 minutes on each side or until the chicken reaches an internal temperature of 165°F and is golden brown. Remove the chicken from the skillet and cover with foil to keep warm.
  3. In the same skillet, if needed, add a bit more olive oil and heat over medium-high. Add the cauliflower rice, chopped green onions, minced garlic, and the remaining spice mixture. Sauté for 10–12 minutes, stirring occasionally, until the cauliflower is tender and slightly golden.
  4. To the skillet with the cauliflower rice, stir in the salsa, drained black beans, and diced green chiles. Mix until everything is well combined and heated through, about 3–4 minutes.
  5. Nestle the sautéed chicken breasts back into the skillet mixture, then top them with additional salsa and a generous layer of shredded cheese. Cover the skillet with a lid and let it cook on low heat for about 3–5 minutes, or until the cheese is melted and bubbly.
  6. Once the cheese has melted to your liking, remove the skillet from heat. Garnish the dish with fresh cilantro and extra green onions if desired. Serve immediately.

Notes

Store leftovers in an airtight container for up to 3 days. Reheat in a skillet over low heat until warmed through.

Comforting Chicken Carbonara Spaghetti Pie You’ll Love

I never realized how much I needed a creamy, cheesy pie until I stumbled upon the concept of Chicken Carbonara Spaghetti Pie. Imagine the delightful crunch of a spaghetti crust holding an indulgent filling of chicken, bacon, and a rich, velvety sauce that hugs every bite. This dish takes the classic comfort of carbonara and transforms it into a stunning centerpiece for any gathering or cozy family night. Not only is it a fun twist that’s sure to impress, but it also offers the perk of being a one-pan wonder—easy to prepare and even easier to serve. So, are you ready to dive into this luscious comfort food adventure? Let’s get cooking!

Why is this recipe a must-try?

Uniqueness: This Chicken Carbonara Spaghetti Pie takes the classic carbonara and elevates it into a whole new culinary experience. Texture galore: Enjoy a crispy spaghetti crust filled with a creamy, cheesy chicken and bacon filling—pure comfort in every bite! Crowd-pleaser: Perfect for gatherings or cozy family dinners, it’s a dish that appeals to everyone. Simple prep: Whip it up with basic ingredients and little prep time—dinner has never been easier! Endless variations: Feel free to experiment with different cheese blends or chicken options for a personalized twist. Make it alongside our tasty Savory Chicken Cheesy for a delightful spread!

Chicken Carbonara Spaghetti Pie Ingredients

For the Crust
Butter – Greasing the pie plate; can substitute with oil if desired.
Dry Spaghetti (8 ounces) – Main structure of the crust; other pasta shapes may work but adjust cooking times.
Romano Cheese (½ cup, grated) – Adds salty richness to the crust; substitute with Parmesan for a different flavor profile.
Eggs (2 whole) – Binds the crust and enriches flavor; no substitutes recommended for this role.

For the Filling
Bacon (8 ounces) – Provides smoky flavor, crucial for carbonara; use turkey bacon for a lighter option.
Boneless Chicken (1½ pounds) – Primary protein; both white and dark meat can be used.
Onion (½ cup, diced) – Adds base flavor to the filling; leeks can serve as a mild alternative.
Red Bell Pepper (½ whole, diced) – Introduces sweetness and color; green pepper is an appropriate substitute.
Garlic (1 tablespoon, minced) – Enhances overall flavor; use garlic powder in a pinch.

For the Sauce
Whole Milk (1 cup) – Creates a creamy sauce; substitute with low-fat milk for a lighter version.
Heavy Cream (1 cup) – Monitors the main sauce’s creaminess; replacement with half-and-half is an option but will reduce richness.
Egg Yolk (1) – Adds richness to the sauce; omit for a lighter dish but impacts texture.
Butter (2 tablespoons) – Used for the sauce; can replace with olive oil for a different taste.
All-Purpose Flour (4 tablespoons) – Thickens the sauce; no gluten-free option noted.
Kosher Salt (½ teaspoon), Black Pepper (½ teaspoon, freshly ground), Dry Mustard (¼ teaspoon), Nutmeg (few grinds) – Seasonings to enhance flavor; adjust to taste.

For the Cheese Filling
Fontina Cheese (1 cup, shredded) – Melts beautifully into the filling; Gruyère or mozzarella can be good alternatives.
Ricotta Cheese (1 cup) – Smooth texture in filling; cottage cheese can be used as a lower-fat substitute.
Mozzarella Cheese (1 cup, shredded) – Topping for the pie; use low-moisture mozzarella for better melting.

This Chicken Carbonara Spaghetti Pie combines textures and flavors that make it a meal worth savoring!

Step‑by‑Step Instructions for Chicken Carbonara Spaghetti Pie

Step 1: Prepare Spaghetti Crust
Begin by boiling a large pot of salted water. Add 8 ounces of dry spaghetti and cook until just under al dente, about 6-7 minutes. Drain, return to the pot, and mix in 2 tablespoons of melted butter, ½ cup of grated Romano cheese, and 2 beaten eggs. Press the spaghetti mixture firmly into a greased pie plate to create the crust and refrigerate for 30 minutes to set.

Step 2: Cook Filling
In a large skillet over medium heat, cook 8 ounces of diced bacon until crispy, about 6-8 minutes. Retain the bacon fat, and then sauté ½ cup of diced onion and ½ of a diced red bell pepper in the same skillet for 3-4 minutes or until they soften. Add 1½ pounds of chopped boneless chicken and cook until no longer pink, approximately 5-7 minutes, stirring frequently.

Step 3: Make Sauce
In a separate saucepan, whisk together 1 cup of whole milk, 1 cup of heavy cream, and 1 egg yolk over medium heat until combined. Stir in 2 tablespoons of butter, 4 tablespoons of all-purpose flour, and season with ½ teaspoon of kosher salt, ½ teaspoon of black pepper, ¼ teaspoon of dry mustard, and a few grinds of nutmeg. Cook while whisking constantly until the sauce thickens and becomes creamy, about 6-8 minutes.

Step 4: Combine
Once the sauce has thickened, gently fold the chicken mixture into the sauce, then stir in 1 cup of shredded Fontina cheese until melted and combined. This creamy filling creates the heart of your Chicken Carbonara Spaghetti Pie, ensuring all flavors meld together beautifully.

Step 5: Assemble the Pie
Preheat your oven to 350°F (175°C). Spread 1 cup of ricotta cheese evenly over the chilled spaghetti crust to create a layer. Pour the creamy chicken filling over the ricotta layer, smoothing it out with a spatula. This builds a delicious structure for your Chicken Carbonara Spaghetti Pie, ready for baking.

Step 6: Bake
Place the assembled pie in the preheated oven and bake for 40 minutes. After this time, remove it and sprinkle 1 cup of shredded mozzarella cheese on top. Return the pie to the oven and bake for an additional 10-15 minutes, or until the cheese is melted and golden, giving the pie a lovely finish.

Step 7: Rest
Once baked, remove the Chicken Carbonara Spaghetti Pie from the oven and allow it to rest for 20 minutes. Cover loosely with foil to help retain warmth as it sets, making it easier to slice when serving. This brief resting period enhances the overall texture, ensuring a delightful dining experience.

Chicken Carbonara Spaghetti Pie Variations

Get ready to explore delicious twists and substitutes for this creamy pie, inviting you to create your personal masterpiece!

  • Cheese Swap: Substitute Fontina with Gruyère for a nuttier flavor, or try pepper jack for a spicy kick. Each cheese brings its unique personality to the table!
  • Veggie Booster: Add 1 cup of fresh spinach or mushrooms to the filling for a nutritious touch; it enhances the dish’s color and flavor.
  • Gluten-Free: Use gluten-free pasta instead of traditional spaghetti to cater to dietary preferences, making this comfort dish accessible for all.
  • Bacon Alternatives: Swap bacon with pancetta for an Italian flair, or use turkey bacon for a lighter option that still satisfies.
  • Creamy Lite: Replace heavy cream with half-and-half or cashew cream for a lighter sauce without sacrificing the creamy texture you love.
  • Herb Infusion: Incorporate fresh herbs like basil or parsley into the filling for a fragrant twist that elevates the dish’s overall freshness.
  • Veggies Galore: Experiment with roasted zucchini or sun-dried tomatoes for an added layer of both taste and texture that makes each slice irresistible!
  • Spice It Up: For those who love heat, add red pepper flakes to the filling for a spicy punch that pairs beautifully with the rich flavors.

Feel free to mix and match any of these suggestions! And if you’re craving more mouthwatering options, be sure to try our delicious Honey Chili Chicken or Tropical Chicken Pineapple for an exciting dinner rotation.

What to Serve with Chicken Carbonara Spaghetti Pie

Elevate your serving experience with delightful pairings that balance and complement this creamy, cheesy masterpiece.

  • Fresh Garden Salad: A light, crisp salad with mixed greens and a tangy vinaigrette cuts through the richness, making each bite more enjoyable.
  • Garlic Bread: Serve warm, buttery garlic bread on the side to soak up the delicious creamy sauce and add a satisfying crunch.
  • Roasted Vegetables: Colorful roasted veggies, like zucchini and bell peppers, provide a sweet contrast and add a nutritious touch to the table. The caramelization enhances their natural flavors!
  • Steamed Broccoli: Crisp-tender broccoli drizzled with olive oil adds freshness and a vibrant green element, perfectly balancing the indulgent pie.
  • White Wine: A chilled glass of Pinot Grigio or Sauvignon Blanc offers bright acidity that complements the creamy filling wonderfully.
  • Lemon Sorbet: For dessert, a refreshing lemon sorbet cleanses the palate after the hearty pie, making it a sweet ending to a rich meal.
  • Creamy Coleslaw: Its crunchy texture and creamy dressing provide a delightful contrast to the spaghetti pie, enhancing the overall meal experience.
  • Cherry Tomatoes: Juicy, halved cherry tomatoes tossed in balsamic glaze deliver a burst of flavor and brightness to the plate, harmonizing with the dish.

Expert Tips for Chicken Carbonara Spaghetti Pie

Cook Time Matters: Ensure you cook spaghetti just under al dente; it will finish cooking in the oven, preventing a mushy crust.

Bacon Quality Counts: Select high-quality bacon for the best smoky flavor—some brands can be too lean or bland for carbonara.

Resting Is Key: Let the pie rest after baking for at least 20 minutes; this helps with slicing and improves the pie’s overall texture.

Cheese Choices: Don’t hesitate to experiment with different cheese blends like Gruyère or even spicy pepper jack to add character to your Chicken Carbonara Spaghetti Pie.

Sauce Consistency: Whisk the sauce well while cooking to achieve a creamy consistency; lumps can ruin the texture of your filling.

How to Store and Freeze Chicken Carbonara Spaghetti Pie

Fridge: Store leftover Chicken Carbonara Spaghetti Pie in an airtight container for up to 3 days. Ensure it’s cooled to room temperature before sealing to maintain freshness.

Freezer: For longer storage, freeze the pie before baking. Wrap it tightly in plastic wrap followed by aluminum foil, and it will last for up to 3 months.

Reheating: When ready to enjoy, thaw overnight in the fridge, then bake at 350°F (175°C) for 25-30 minutes or until heated through.

Make-Ahead Tip: You can prepare the Chicken Carbonara Spaghetti Pie up to 1 day in advance. Assemble it, cover, and refrigerate, then bake just before serving for optimal taste.

Make Ahead Options

These Chicken Carbonara Spaghetti Pie are perfect for busy weeknights! You can prepare the spaghetti crust up to 24 hours in advance; simply cook the spaghetti and mix it with butter, cheese, and eggs, then press it into the pie plate and refrigerate. Additionally, the creamy filling can be cooked and stored in the refrigerator for up to 3 days. To maintain quality, keep the filling in an airtight container and reheat gently before assembling. When ready to serve, layer ricotta over the crust, pour in the filling, and bake as directed, ensuring you have a comforting meal ready with minimal effort!

Chicken Carbonara Spaghetti Pie Recipe FAQs

What type of spaghetti should I use for the crust?
I recommend using dry spaghetti for the crust, as it holds its shape well. While other pasta shapes might work, you will need to adjust the cooking times accordingly to ensure they don’t become mushy.

How long can I store leftovers of Chicken Carbonara Spaghetti Pie?
Leftover Chicken Carbonara Spaghetti Pie can be stored in an airtight container in the refrigerator for up to 3 days. It’s crucial to cool the pie to room temperature before storing it to maintain its freshness.

Can I freeze the Chicken Carbonara Spaghetti Pie?
Absolutely! To freeze, wrap the uncooked pie tightly in plastic wrap followed by aluminum foil. It can be stored for up to 3 months. When you’re ready to enjoy it, thaw it overnight in the fridge and bake at 350°F (175°C) for 25-30 minutes until heated through.

What should I do if my sauce isn’t thickening properly?
If your sauce isn’t thickening as expected, try whisking it constantly while it cooks to prevent lumps. If it’s still too thin, add a bit more flour (about a tablespoon at a time, whisking well) until you reach the desired consistency. Also, allow it to simmer a bit longer, ensuring that the heat is medium-low.

Are there any dietary considerations for Chicken Carbonara Spaghetti Pie?
This recipe contains common allergens such as dairy and gluten, so be cautious if preparing for those with allergies. You can substitute the flour with a gluten-free mix, but the texture may vary. For a lighter version, consider using turkey bacon and low-fat dairy options.

How should I serve Chicken Carbonara Spaghetti Pie?
I love serving this dish with a fresh salad or steamed vegetables as a side. The freshness helps to balance the richness of the pie, making it a well-rounded meal that everyone will enjoy!

Chicken Carbonara Spaghetti Pie

Comforting Chicken Carbonara Spaghetti Pie You’ll Love

This Chicken Carbonara Spaghetti Pie combines textures and flavors that make it a meal worth savoring!
Prep Time 30 minutes
Cook Time 1 hour
Resting Time 20 minutes
Total Time 1 hour 50 minutes
Servings: 8 slices
Course: Dinner
Cuisine: Italian
Calories: 450

Ingredients
  

For the Crust
  • 2 tablespoons Butter Greasing the pie plate; can substitute with oil if desired.
  • 8 ounces Dry Spaghetti Main structure of the crust; other pasta shapes may work but adjust cooking times.
  • ½ cup Romano Cheese, grated Adds salty richness to the crust; substitute with Parmesan for a different flavor profile.
  • 2 whole Eggs Binds the crust and enriches flavor; no substitutes recommended for this role.
For the Filling
  • 8 ounces Bacon Provides smoky flavor; use turkey bacon for a lighter option.
  • pounds Boneless Chicken Primary protein; both white and dark meat can be used.
  • ½ cup Onion, diced Adds base flavor to the filling; leeks can serve as a mild alternative.
  • ½ whole Red Bell Pepper, diced Introduces sweetness and color; green pepper is an appropriate substitute.
  • 1 tablespoon Garlic, minced Enhances overall flavor; use garlic powder in a pinch.
For the Sauce
  • 1 cup Whole Milk Creates a creamy sauce; substitute with low-fat milk for a lighter version.
  • 1 cup Heavy Cream Monitors the main sauce's creaminess; replacement with half-and-half is an option but will reduce richness.
  • 1 whole Egg Yolk Adds richness to the sauce; omit for a lighter dish but impacts texture.
  • 2 tablespoons Butter Used for the sauce; can replace with olive oil for a different taste.
  • 4 tablespoons All-Purpose Flour Thickens the sauce; no gluten-free option noted.
  • ½ teaspoon Kosher Salt Seasonings to enhance flavor; adjust to taste.
  • ½ teaspoon Black Pepper, freshly ground Seasonings to enhance flavor; adjust to taste.
  • ¼ teaspoon Dry Mustard Seasonings to enhance flavor; adjust to taste.
  • few grinds of Nutmeg Seasonings to enhance flavor; adjust to taste.
For the Cheese Filling
  • 1 cup Fontina Cheese, shredded Melts beautifully into the filling; Gruyère or mozzarella can be good alternatives.
  • 1 cup Ricotta Cheese Smooth texture in filling; cottage cheese can be used as a lower-fat substitute.
  • 1 cup Mozzarella Cheese, shredded Topping for the pie; use low-moisture mozzarella for better melting.

Equipment

  • Large pot
  • Skillet
  • separate saucepan
  • spatula
  • Pie plate

Method
 

Step-by-Step Instructions
  1. Begin by boiling a large pot of salted water. Add 8 ounces of dry spaghetti and cook until just under al dente, about 6-7 minutes. Drain, return to the pot, and mix in 2 tablespoons of melted butter, ½ cup of grated Romano cheese, and 2 beaten eggs. Press the spaghetti mixture firmly into a greased pie plate to create the crust and refrigerate for 30 minutes to set.
  2. In a large skillet over medium heat, cook 8 ounces of diced bacon until crispy, about 6-8 minutes. Retain the bacon fat, and then sauté ½ cup of diced onion and ½ of a diced red bell pepper in the same skillet for 3-4 minutes or until they soften. Add 1½ pounds of chopped boneless chicken and cook until no longer pink, approximately 5-7 minutes, stirring frequently.
  3. In a separate saucepan, whisk together 1 cup of whole milk, 1 cup of heavy cream, and 1 egg yolk over medium heat until combined. Stir in 2 tablespoons of butter, 4 tablespoons of all-purpose flour, and season with ½ teaspoon of kosher salt, ½ teaspoon of black pepper, ¼ teaspoon of dry mustard, and a few grinds of nutmeg. Cook while whisking constantly until the sauce thickens and becomes creamy, about 6-8 minutes.
  4. Once the sauce has thickened, gently fold the chicken mixture into the sauce, then stir in 1 cup of shredded Fontina cheese until melted and combined.
  5. Preheat your oven to 350°F (175°C). Spread 1 cup of ricotta cheese evenly over the chilled spaghetti crust to create a layer. Pour the creamy chicken filling over the ricotta layer, smoothing it out with a spatula.
  6. Place the assembled pie in the preheated oven and bake for 40 minutes. After this time, remove it and sprinkle 1 cup of shredded mozzarella cheese on top. Return the pie to the oven and bake for an additional 10-15 minutes, or until the cheese is melted and golden.
  7. Once baked, remove the Chicken Carbonara Spaghetti Pie from the oven and allow it to rest for 20 minutes. Cover loosely with foil to help retain warmth as it sets.

Notes

Ensure you cook spaghetti just under al dente; it will finish cooking in the oven. Select high-quality bacon for the best smoky flavor. Let the pie rest after baking for at least 20 minutes for better slicing.

Decadent Hot Cocoa Cheesecake with Fluffy Marshmallow Cream

As I was flipping through my favorite holiday recipes, the cozy scent of hot chocolate wafted through my mind, instantly whisking me away to by-gone winters filled with laughter and warmth. That’s exactly how I felt when I first created this Indulgent Hot Cocoa Cheesecake with Marshmallow Whipped Cream—an enchanting fusion of nostalgia and sophistication. This delightful dessert not only brings comfort to chilly nights, but it’s also effortless to whip up, making it a perfect choice for festive gatherings. With simple ingredients and room for customization, you can make it uniquely yours, whether by adding a peppermint twist or a salted caramel surprise. Curious to see how this rich, creamy cheesecake can transform your holiday table? Let’s dive into the recipe!

Why is this cheesecake a must-try?

Indulgent Flavor: The Hot Cocoa Cheesecake is a divine marriage of creamy cheesecake with the nostalgia of hot cocoa, making every bite a delightful experience.
Customizable Options: With variations like peppermint twist and salted caramel surprise, you’ll have fun personalizing it for your unique tastes.
Effortless Prep: This recipe calls for simple ingredients and straightforward steps, perfect for both novice cooks and seasoned chefs looking to impress.
Crowd Favorite: Whether at holiday gatherings or cozy family dinners, this cake will certainly become the star dessert of the evening, bringing smiles to everyone’s faces.
Perfect Textures: The smooth cheesecake paired with fluffy marshmallow whipped cream creates an irresistible contrast that keeps you coming back for more. Enjoy it alongside warm cocoa or coffee!

Hot Cocoa Cheesecake Ingredients

For the Crust
Chocolate Cookie Crumbs – Provides the crust’s base; substitute with store-bought chocolate crust to save time.
Unsalted Butter – Binds the crust together and adds richness; use melted butter for better mixing.

For the Cheesecake Filling
Cream Cheese – The main component that provides creaminess; ensure it’s at room temperature for smooth blending.
Granulated Sugar – Sweetens the filling and balances the richness of the cream cheese.
Eggs – Add structure and stability; be sure they are at room temperature.
Hot Cocoa Mix – Infuses decadent chocolate flavor into the cheesecake; choose your favorite brand for best results.

For the Marshmallow Whipped Cream
Heavy Cream – Used for whipping to create the marshmallow topping; whip to soft peaks for the best texture.
Marshmallow Fluff – Adds sweetness and a delightful lightness; available in bulk for convenience.

Enjoy crafting your Hot Cocoa Cheesecake with Marshmallow Whipped Cream using these simple ingredients!

Step‑by‑Step Instructions for Hot Cocoa Cheesecake with Marshmallow Whipped Cream

Step 1: Preheat and Prepare
Preheat your oven to 325°F (163°C). To create a water bath for even baking, fill a large roasting pan with hot water and place it on the bottom rack of the oven. This moisture will help prevent cracks in the cheesecake as it bakes, ensuring your Hot Cocoa Cheesecake turns out perfectly smooth and creamy.

Step 2: Make the Crust
In a mixing bowl, combine chocolate cookie crumbs with melted unsalted butter until fully combined. Press this mixture firmly into the bottom of a 9-inch springform pan to form the crust. Make sure it’s evenly spread and compact to create a solid base for your Hot Cocoa Cheesecake. Set aside while you prepare the filling.

Step 3: Blend the Cheesecake Filling
In a large mixing bowl, beat room-temperature cream cheese and granulated sugar together until the mixture is smooth and creamy. This should take about 3-5 minutes. Gradually add in the eggs, one at a time, mixing until just combined. Then, stir in the hot cocoa mix, ensuring an even distribution for that rich, chocolate flavor throughout the filling.

Step 4: Bake the Cheesecake
Carefully pour the creamy filling over the prepared crust in the springform pan. Gently smooth the top with a spatula. Place the pan in the water bath and bake in the preheated oven for 50–60 minutes, or until the edges are set, but the center still slightly jiggles. This indicates it’s perfectly baked and will firm up as it cools.

Step 5: Cool the Cheesecake
Once baked, turn off the oven and leave the cheesecake inside for an additional hour. This gentle cooling process helps prevent cracks. Afterward, remove the cheesecake from the oven and let it cool at room temperature for about 30 minutes before transferring it to the refrigerator. Chill for at least 4 hours or overnight—this step is crucial for a firm texture.

Step 6: Prepare the Marshmallow Whipped Cream
In a chilled mixing bowl, whip the heavy cream until soft peaks form, which should take about 2-3 minutes. Gently fold in the marshmallow fluff until well combined. This fluffy topping is what makes the Hot Cocoa Cheesecake truly special, adding a delightful sweetness and lightness that contrasts beautifully with the dense cheesecake.

Step 7: Assemble and Serve
Once the cheesecake has chilled completely, carefully remove it from the springform pan. Spread the marshmallow whipped cream over the top of the cheesecake, creating a luscious layer. For an extra festive touch, consider garnishing with mini marshmallows or chocolate shavings before serving. Enjoy each bite of this indulgent Hot Cocoa Cheesecake as it steals the show at your next gathering!

Make Ahead Options

These Hot Cocoa Cheesecake with Marshmallow Whipped Cream are perfect for busy home cooks looking to save time during the holidays! You can prepare the crust and cheesecake filling up to 24 hours in advance; simply refrigerate the crust separately and pour the filling over it just before baking. To maintain optimal texture, ensure you cover the crust tightly with plastic wrap. After baking, chill the cheesecake in the refrigerator for at least 4 hours, but ideally overnight for the best flavor development. On the day of serving, whip the cream and fold in the marshmallow fluff just before spreading it over the cheesecake, ensuring it stays fluffy and fresh. This makes for an effortless, impressive dessert any time!

Hot Cocoa Cheesecake Variations

Feel free to get creative with this delightful recipe; it’s all about tailoring the flavors to bring you joy!

  • Peppermint Twist: Incorporate peppermint extract into the filling; don’t forget to finish with crushed candy canes on top for that festive flair.
  • Salted Caramel Surprise: Swirl in gooey caramel sauce before baking; this luscious addition brings a delightful contrast to the rich chocolate.
  • Nutty Crunch: Add chopped toasted nuts to the crust for a delightful crunch; walnuts or pecans elevate the texture beautifully while enhancing flavor.
  • Dark Chocolate Delight: Use dark chocolate hot cocoa mix for a more intense chocolaty bite; this variation is perfect for serious chocolate lovers.
  • Fruit Fusion: Garnish with fresh raspberries or cherries on top; their tartness brilliantly balances the sweetness, making it a refreshing finish.
  • Vegan Version: Substitute cream cheese with a cashew-based cream and use coconut cream for the whipped topping; it’s a deliciously dairy-free option!
  • Spicy Kick: Add a pinch of cayenne pepper or chili powder to the batter for a warm, spicy undertone; this adds a fun and unexpected twist!
  • Cocoa-Mocha Blend: Mix in a shot of espresso or coffee concentrate; the coffee enhances the chocolate flavor, making every bite incredibly rich.

Consider trying these delicious variations on your next slice, and don’t forget to pair your decadent cheesecake with a cup of warm cocoa or coffee. If you’re interested in more delightful twists, you may enjoy our Strawberry Cheesecake Dump or Blueberry Cream Cheese recipes for even more inspiration!

Storage Tips for Hot Cocoa Cheesecake with Marshmallow Whipped Cream

Fridge: Store your Hot Cocoa Cheesecake in an airtight container for up to 5 days. This will keep it fresh and maintain its creamy texture.

Freezer: For longer storage, freeze the cheesecake for up to 2 months. Wrap it tightly in plastic wrap and foil to prevent freezer burn.

Thawing: When you’re ready to enjoy your cheesecake, simply transfer it to the fridge to thaw overnight. This gradual process ensures it retains its delicious flavor and texture.

Reheating: If desired, serve slices at room temperature or warm slightly in the microwave for 10-15 seconds to elevate the rich flavors before enjoying.

What to Serve with Indulgent Hot Cocoa Cheesecake with Marshmallow Whipped Cream

Bring the whole family together with these delightful pairings that complement the cozy flavors of your dessert.

  • Creamy Mashed Potatoes: The buttery smoothness of mashed potatoes provides a comforting contrast to the rich flavor of the cheesecake.
  • Chocolate-Dipped Strawberries: Their sweet and tart juiciness not only enhances the cocoa richness but also adds a fresh twist to your dessert table.
  • Warm Apple Cider: A steaming cup of spiced cider invokes warmth and festivity, making it the perfect drink to accompany your cheesecake.
  • Mini S’mores Bites: Keep the campfire theme alive with these bite-sized treats; they mirror the marshmallow elements of your cheesecake while adding a crunchy texture.

For an unexpected twist, consider serving with a Chocolate Stout Cake. This rich, moist cake deepens the chocolate flavor experience, creating a decadent, indulgent occasion everyone will savor!

  • Caramel Sauce Drizzle: Elevate each slice with a drizzle of warm caramel sauce for a sweet contrast to the cheesecake’s creamy texture.
  • Buttery Popcorn: The crunch and saltiness of popcorn is a fun and unexpected pairing that balances the dessert’s sweetness.
  • Fresh Mint Tea: This floral beverage lightens the palate while providing a refreshing finish after enjoying your sumptuous creation.

Expert Tips for Hot Cocoa Cheesecake

Water Bath Wisdom: Ensure you always use a water bath while baking. This method provides even heat and moisture, which helps prevent cracks in your Hot Cocoa Cheesecake.

Room Temperature Essentials: Make certain that your cream cheese and eggs are at room temperature. This step is key for achieving a smooth and creamy filling without lumps.

Whipping Cream Technique: When whipping the heavy cream, aim for soft peaks. Overbeating can lead to a grainy texture, while soft peaks keep your marshmallow topping fluffy and light.

Proper Cooling: Let the cheesecake cool gradually in the oven with the door ajar. This gentle cooling method helps reduce the risk of cracks and ensures a perfectly creamy texture.

Chill Time Matters: For the best texture, refrigeration is essential. Ideally, let your Hot Cocoa Cheesecake chill overnight after baking to enhance flavor and firmness.

Hot Cocoa Cheesecake with Marshmallow Whipped Cream Recipe FAQs

What type of chocolate cookie crumbs should I use for the crust?
Absolutely! You can use store-bought chocolate cookie crumbs for convenience, or feel free to crush your favorite chocolate sandwich cookies. Just make sure to remove any cream filling, as it can affect the crust’s texture.

How can I store the Hot Cocoa Cheesecake after baking?
For best results, store your Hot Cocoa Cheesecake in an airtight container for up to 5 days in the fridge. This keeps it fresh and delicious. If you want to store it longer, wrap it tightly in plastic wrap and foil and freeze it for up to 2 months. Just ensure it’s completely cooled before freezing!

Can I freeze the Hot Cocoa Cheesecake?
Certainly! To freeze, allow the cheesecake to cool completely and then wrap it in a layer of plastic wrap followed by aluminum foil to avoid freezer burn. Thaw it overnight in the fridge when you’re ready to enjoy it. This way, all the flavors meld beautifully, and the texture remains lovely and creamy!

What if my cheesecake cracks during baking?
No worries! If your cheesecake cracks, it can still taste delicious. Next time, use a water bath to help regulate the temperature and humidity while it bakes. Also, ensure that you avoid opening the oven door frequently and let the cheesecake cool slowly in the oven to prevent sudden temperature changes.

Are there any dietary considerations for this recipe?
Yes! To make the Hot Cocoa Cheesecake suitable for dietary restrictions, you can substitute cream cheese with a cashew-based cream for a vegan version. Additionally, if there are allergies, make sure to check the labels on the hot cocoa mix and marshmallow fluff, as some may contain allergens like gluten or dairy.

Hot Cocoa Cheesecake with Marshmallow Whipped Cream

Decadent Hot Cocoa Cheesecake with Fluffy Marshmallow Cream

Indulge in this Hot Cocoa Cheesecake with Marshmallow Whipped Cream, a delightful dessert perfect for holiday gatherings and chilly nights.
Prep Time 30 minutes
Cook Time 1 hour
Chill Time 4 hours
Total Time 5 hours 30 minutes
Servings: 10 slices
Course: Dessert
Cuisine: American
Calories: 450

Ingredients
  

For the Crust
  • 1 cup Chocolate Cookie Crumbs or store-bought chocolate crust
  • 0.5 cup Unsalted Butter melted
For the Cheesecake Filling
  • 24 oz Cream Cheese at room temperature
  • 1 cup Granulated Sugar
  • 3 large Eggs at room temperature
  • 0.5 cup Hot Cocoa Mix your favorite brand
For the Marshmallow Whipped Cream
  • 1 cup Heavy Cream for whipping
  • 1 cup Marshmallow Fluff available in bulk

Equipment

  • mixing bowl
  • 9-inch springform pan
  • Roasting pan
  • hand mixer

Method
 

Step-by-Step Instructions
  1. Preheat your oven to 325°F (163°C) and prepare a water bath by filling a large roasting pan with hot water.
  2. Combine chocolate cookie crumbs with melted unsalted butter and press into the bottom of a 9-inch springform pan.
  3. Beat cream cheese and granulated sugar together until smooth. Add eggs one at a time and mix in hot cocoa mix.
  4. Pour the filling over the crust, smooth the top, and bake in the water bath for 50-60 minutes.
  5. Turn off the oven and leave the cheesecake inside for an hour, then cool at room temperature for 30 minutes before refrigerating for at least 4 hours.
  6. Whip heavy cream to soft peaks, then fold in marshmallow fluff. Spread over the chilled cheesecake.
  7. Remove from the springform pan and garnish as desired before serving.

Notes

Serve with mini marshmallows or chocolate shavings for added festivity.

Loaded Olive Salad: A Flavor-Packed Breeze for Any Meal

As I stood in my kitchen, the aromatic allure of olives filled the air, instantly transporting me to sun-drenched Mediterranean shores. This Loaded Olive Salad is not just a quick and easy salad; it’s a vibrant celebration of flavors and textures that shine bright on any table. With the versatility of canned ingredients, you can effortlessly whip up this delightful dish that’s perfect for busy days or impromptu gatherings. Imagine a medley of briny olives, tender artichoke hearts, and crisp veggies, all mingling in a zesty lime dressing. It’s not only healthy and vegetarian-friendly but also a fantastic way to impress your guests or bring life to your weeknight meals. Are you ready to dive into this colorful creation that promises to tantalize your taste buds?

Why is this Olive Salad a Must-Make?

Quick and Easy: The Loaded Olive Salad is a breeze to prepare, using readily available canned ingredients and fresh veggies. You can have it ready in minutes!

Versatile Ingredients: Feel free to mix and match your favorite olives, vegetables, or even proteins like canned tuna or chickpeas for a tailored experience. Discover more creative ideas in my Cabbage Apple Salad or the refreshing Cucumber Carrot Salad.

Rich Flavor Profile: Bursting with briny olives, tangy artichokes, and seasoned with zesty lime, every bite delivers a delightful explosion of flavors that will impress anyone at your table.

Perfect Side Dish: This salad enhances any meal—whether served alongside grilled meats or as a topping on sandwiches. It also makes for a great snack or appetizer with pita chips.

Make-Ahead Friendly: Enjoy the convenience of preparing this salad in advance! It lasts up to a week in the fridge, improving in flavor over time.

Loaded Olive Salad Ingredients

• Discover the delicious essentials for our Loaded Olive Salad!

For the Salad Base
Sliced Green Olives – Adds briny flavor and a crunchy texture; mix different varieties for added depth.
Sliced Black Olives – Contributes a milder taste to balance the green olives; perfect for a smoother finish.
Quartered Artichoke Hearts – Introduces a slightly tangy and earthy element; canned is convenient, but fresh can be used for a more robust flavor.
Sliced Hearts of Palm – Provides unique texture; easily replaced with other canned vegetables like asparagus if preferred.
Sliced Mushrooms – Adds depth of flavor and moisture; opt for fresh for a vibrant taste.
Red Bell Pepper – Offers sweetness and color; yellow or orange peppers can be delightful alternatives.
Green Onions – Enhances freshness and mild onion flavor; chives can serve as a delightful substitute.
Garlic – Brings robust flavor; fresh is best, but garlic powder will do in a pinch.

For the Dressing
Extra-Virgin Olive Oil – Provides richness to meld flavors; feel free to use your favorite oil for drizzle.
Dried Oregano – Elevates the overall flavor; thyme or Italian seasoning are great alternatives.
Ground Black Pepper – Adds heat and complexity; adjust according to taste preference.
Red Pepper Flakes – Offers a kick; use sparingly based on your spice tolerance.
Flesh and Juice of Lime – Brightens the salad with acidity; lemon can substitute when needed.

For Garnish
Chopped Flat Parsley – Adds a fresh herbal note; basil or cilantro could offer a creative twist.

Get ready to create your delicious Loaded Olive Salad!

Step‑by‑Step Instructions for Loaded Olive Salad

Step 1: Drain and Combine Canned Ingredients
Start by opening all your canned ingredients, including sliced green and black olives, quartered artichoke hearts, sliced hearts of palm, and sliced mushrooms. Drain them thoroughly to remove excess liquid, then place these ingredients into a large mixing bowl. The combination of olives and artichoke hearts sets the flavorful foundation for your Loaded Olive Salad.

Step 2: Chop Fresh Vegetables
Next, wash and finely chop the fresh red bell pepper and green onions. Add them to the bowl with the canned ingredients. The vibrant colors and crisp crunch of the vegetables will enhance both the look and texture of your Loaded Olive Salad, making it visually appealing and deliciously fresh.

Step 3: Prepare Garlic and Seasoning Mixture
Mince a couple of cloves of garlic and add them to the bowl, along with the chopped flat parsley. Sprinkle in dried oregano, ground black pepper, and red pepper flakes for an extra kick. Stir gently to combine these ingredients, ensuring the garlic and herbs are evenly distributed throughout the Loaded Olive Salad for a burst of flavor in every bite.

Step 4: Squeeze Lime for Zest
Cut a fresh lime in half and squeeze the juice into the bowl, making sure to catch any seeds. Add the flesh of the lime to the mix, as the citrusy acidity will brighten the flavors of your Loaded Olive Salad. This step elevates the taste, providing a refreshing zest that complements your bold ingredients.

Step 5: Drizzle with Olive Oil
Finally, drizzle extra-virgin olive oil over the salad mixture. Using about three tablespoons, the oil will add richness and help meld all the flavors together. Gently toss everything with a spatula or large spoon, ensuring that each ingredient is coated well in oil and seasoning for a harmonious Loaded Olive Salad.

Step 6: Chill or Serve Immediately
You can serve your Loaded Olive Salad right away, or for enhanced flavor, cover the bowl with plastic wrap and refrigerate it for at least one hour. This chilling time allows the ingredients to marinate and mesh beautifully, making it a delightful addition to any meal. Enjoy this vibrant salad as a side or topping!

Make Ahead Options

These Loaded Olive Salad is perfect for meal prep enthusiasts who need to save time during busy weeknights! You can chop and combine the canned ingredients, along with the fresh veggies (except the lime juice and olive oil), up to 24 hours in advance, storing them in an airtight container in the refrigerator. This not only streamlines your meal prep but also enhances the flavors as they meld together. When you’re ready to serve, simply add the lime juice, drizzle the olive oil, and give it a gentle toss. This way, the salad remains just as delicious, fresh, and vibrant as if it were made in the moment!

Loaded Olive Salad: Customization Ideas

Feel free to get creative with this Loaded Olive Salad, enhancing its flavor and nutrition to suit your tastes!

  • Dairy-Free: Replace feta with diced avocado for a creamy, dairy-free twist that adds healthy fats without compromising flavor.

  • Protein Boost: Add canned tuna or chickpeas for a more filling salad; this easily transforms it into a heartier meal option.

  • Herbal Variation: Try using fresh basil or cilantro instead of parsley for a different herbal profile; these offer refreshing notes that brighten the dish.

  • Extra Crunch: Toss in some chopped celery or radishes for an added crunch; their crisp texture complements the salad beautifully.

  • Heat Lovers: Sprinkle extra red pepper flakes or add diced jalapeños for a spicy kick; it’s a great way to liven up your salad!

  • Citrus Twist: Experiment with lemon in place of lime for a different zesty flavor; the fresh citrus aroma will invigorate your dish.

  • Veggie Swaps: Consider adding sliced cucumber or cherry tomatoes for a burst of freshness; both contribute delightful textures to your salad.

  • Mediterranean Flair: Incorporate olives stuffed with garlic or herbs for added flavor depth; this twist will take your Loaded Olive Salad to the next level.

Feel inspired? You can always explore more variations by checking out my lovely recipes like the Garden Harvest Salad or a classic Cabbage Cucumber Salad. Enjoy making it your own!

What to Serve with Loaded Olive Salad

Imagine a vibrant gathering where fresh flavors and delightful textures come together, creating a meal that’s as enjoyable to share as it is to devour.

  • Grilled Chicken Skewers: Juicy, seasoned chicken adds a heartiness that complements the tangy salad flavors perfectly.

  • Pita Chips and Hummus: Crunchy pita chips are a fun, easy addition, perfect for scooping up the salad or enjoying with classic hummus.

  • Mediterranean Flatbreads: Soft, warm flatbreads act as a perfect base for this salad, turning it into a flavorful and filling meal.

  • Couscous or Quinoa Salad: A light, grain-based salad adds a nutty flavor and texture, providing extra fiber and making the feast even more wholesome.

  • Roasted Vegetables: The earthy sweetness of roasted vegetables like zucchini and bell peppers rounds out the meal and complements the dish beautifully.

  • White Wine Spritzer: A refreshing white wine spritzer cools the palate, enhancing the olive salad’s briny punch while keeping the mood light and breezy.

  • Creamy Feta Dip: Serve this alongside for dipping; it brings a rich creaminess that harmonizes beautifully with the olive salad’s vibrant flavors.

This selection makes your meal unforgettable, revealing the seamless versatility of the Loaded Olive Salad.

Expert Tips for Loaded Olive Salad

  • Chill Time Matters: Allow the salad to sit for at least an hour before serving; this enhances the flavors and lets them meld beautifully.

  • Flavorful Variations: Experiment by combining different olive varieties for added depth in your Loaded Olive Salad. Don’t be afraid to mix and match!

  • Fresh Ingredients: While canned items make this salad quick, consider using fresh veggies whenever possible—like mushrooms and peppers—to elevate your dish even further.

  • Texture Balance: Aim for a mix of crunchy and tender ingredients, like combining hearts of palm with artichokes, for a delightful contrast in your salad.

  • Adjust Seasonings: Don’t hesitate to tweak the herbs and spices according to your preference, especially if you enjoy a bolder flavor profile in your Loaded Olive Salad.

How to Store and Freeze Loaded Olive Salad

Fridge: Store the Loaded Olive Salad in an airtight container for up to 7 days. Its flavors improve over time, making it a fantastic make-ahead option for busy days.

Room Temperature: It’s best to avoid leaving the salad out at room temperature for more than 2 hours. After that, refrigerate to prevent spoilage.

Freezer: Although not recommended for freezing due to the texture of the fresh ingredients, if necessary, you can freeze the salad for up to 3 months. Thaw in the fridge before serving for the best quality.

Reheating: There’s no need to reheat this salad. Serve it cold or at room temperature for a refreshing experience that highlights the vibrant flavors.

Loaded Olive Salad Recipe FAQs

What kind of olives should I use for the Loaded Olive Salad?
You absolutely can use a variety of olives! I recommend combining both sliced green and black olives for a delicious contrast of flavors. If you prefer, try adding Kalamata or even pickled varieties for a unique twist. Just make sure they are pitted for easy eating!

How should I store Loaded Olive Salad, and for how long will it last?
Store your Loaded Olive Salad in an airtight container in the refrigerator for up to 7 days. The flavors actually improve over time as they meld together, making it a perfect make-ahead dish for busy weeks!

Can I freeze Loaded Olive Salad?
While it’s not ideal to freeze this salad due to the texture of fresh ingredients once thawed, if you must, you can freeze it for up to 3 months. To do so, pack it tightly in a freezer-safe container. When you’re ready to enjoy it, thaw it in the refrigerator overnight. Just keep in mind that the crunchiness of the fresh veggies will be softened.

What if I have dietary restrictions or allergies?
If you’re preparing this salad for guests with dietary restrictions, you can easily make adjustments. For those with olive allergies, consider substituting with chopped cucumbers or a mix of other canned veggies. Additionally, ensure that the seasonings you use are free from allergens, and opt for gluten-free options if needed.

How can I troubleshoot if my Loaded Olive Salad seems bland?
If your Loaded Olive Salad isn’t bursting with flavor, it might need more seasoning. I recommend adding an extra squeeze of lime juice or a pinch of salt or black pepper to elevate the taste. You can also sprinkle in more herbs, like fresh parsley or oregano, for an aromatic enhancement. Just remember to taste as you go!

Can I make this salad ahead of time?
Definitely! This Loaded Olive Salad is actually better when made in advance. I suggest letting it chill in the fridge for at least an hour before serving, but you can prepare it up to a week ahead. Just keep it covered to maintain freshness!

Loaded Olive Salad

Loaded Olive Salad: A Flavor-Packed Breeze for Any Meal

Loaded Olive Salad is a vibrant celebration of flavors using versatile canned ingredients, perfect for busy days.
Prep Time 15 minutes
Chill Time 1 hour
Total Time 1 hour 15 minutes
Servings: 4 servings
Course: Lunch
Cuisine: Mediterranean
Calories: 200

Ingredients
  

For the Salad Base
  • 1 cup sliced green olives Adds briny flavor and crunchy texture
  • 1 cup sliced black olives Contributes milder taste
  • 1 cup quartered artichoke hearts Canned is convenient
  • 1 cup sliced hearts of palm Easily replaced with asparagus
  • 1 cup sliced mushrooms Opt for fresh for vibrant taste
  • 1 large red bell pepper Offers sweetness and color
  • 4 stalks green onions Enhances freshness
  • 2 cloves garlic Fresh is best
For the Dressing
  • 3 tbsp extra-virgin olive oil Provides richness
  • 1 tsp dried oregano Elevates flavor
  • 1 tsp ground black pepper Adjust according to taste
  • 1/2 tsp red pepper flakes Offers a kick
  • 1 juiced lime Brightens the salad
For Garnish
  • 1/4 cup chopped flat parsley Adds fresh herbal note

Equipment

  • mixing bowl
  • Knife
  • Cutting Board

Method
 

Preparation Steps
  1. Drain and combine canned ingredients including sliced green and black olives, quartered artichoke hearts, sliced hearts of palm, and sliced mushrooms.
  2. Wash and finely chop the fresh red bell pepper and green onions, then add to the bowl.
  3. Mince garlic and add to the bowl along with chopped flat parsley, oregano, black pepper, and red pepper flakes. Stir gently.
  4. Squeeze fresh lime juice into the bowl, adding the flesh of the lime as well.
  5. Drizzle extra-virgin olive oil over the salad, and gently toss to coat.
  6. Chill in the fridge for at least one hour or serve immediately.

Notes

Allow the salad to sit for at least an hour before serving to enhance flavors. Fresh ingredients elevate the dish.

Sausage Parmesan Cream Cheese Soup for Cozy Nights

As the cool air settles in, there’s nothing quite like the comfort of a warm bowl of creamy soup to chase away the chill. Today, I’m thrilled to share my creamy Sausage Parmesan Cream Cheese Soup, a dish that blends savory flavors and delightful spices, making it a true crowd-pleaser. Whipping up this cozy meal is a breeze, perfect for those hectic weeknights when you crave something hearty but don’t want to spend hours in the kitchen. The balance of spicy sausage combined with a rich cream cheese base and topped with freshly grated Parmesan will have your family asking for seconds! Ready to dive into a bowl of deliciousness that feels like a warm hug on a chilly day? Let’s get started!

Why is this soup a must-try?

Comforting and Creamy: This Sausage Parmesan Cream Cheese Soup wraps you in warmth and flavor, making it the ultimate comfort food on chilly nights.

Quick to Prepare: With minimal prep and cook time, you can have a satisfying meal ready in under 30 minutes—perfect for busy weeknights.

Flavor Explosion: The combination of spicy sausage, rich cream cheese, and zesty Parmesan creates a delightful symphony of taste that’s simply irresistible.

Versatile Ingredient Options: Feel free to personalize this soup! Add in veggies like spinach or zucchini, or switch up the cheese for a unique twist.

Family Favorite: Its rich and hearty nature ensures everyone at the table will love it, making dinner time a breeze.

Serve with crusty bread for a complete meal, and if you enjoy creamy dishes, you’ll also want to try my Cream Puffs Vanilla. Enjoy!

Sausage Parmesan Cream Cheese Soup Ingredients

For the Soup
Olive Oil – Adds richness and helps sauté vegetables; you can use vegetable oil or butter as a substitute.
Onion – Provides sweetness and depth of flavor when sautéed; yellow or white onions work beautifully.
Spicy Sausage – The main protein that adds a kick; substitute with mild sausage or ground beef for a gentler flavor.
Diced Tomatoes (canned) – Contributes acidity and thickness; fresh tomatoes can also be used if finely chopped.
Garlic Powder – Infuses aromatic flavor into the soup; replace with fresh minced garlic (1 clove = 1/8 tsp garlic powder).
Salt and Pepper – Essential for seasoning; adjust according to your taste preferences.
Italian Seasoning – Enhances the flavor profile; feel free to substitute with fresh herbs like basil and oregano.
Cream Cheese – Provides a creamy texture; Neufchâtel cheese can be used for a lighter version.
Chicken Broth – Adds depth; for a vegetarian option, vegetable broth works well.
Heavy Cream – Contributes richness; it can be omitted for a lighter soup.
Parmesan Cheese – Elevates umami flavor; freshly grated is preferred, with Pecorino Romano as a good substitute.
Fresh Parsley – Ideal for garnish, adding a pop of brightness; omit if you don’t have it on hand.

For Serving
Crusty Bread – Perfect for dipping and enjoying with your soup.
Extra Parmesan – A sprinkle on top before serving enhances the cheesy goodness that makes this Sausage Parmesan Cream Cheese Soup so beloved.

Each ingredient plays a vital role in creating the cozy essence of this dish, making it a delightful addition to your recipe rotation. Enjoy every spoonful of comforting goodness!

Step‑by‑Step Instructions for Sausage Parmesan Cream Cheese Soup

Step 1: Prepare Ingredients
Start by turning your Instant Pot to sauté mode and adding a drizzle of olive oil. Once the oil shimmers, toss in the chopped onions, stirring occasionally for about 3–4 minutes until they become soft and translucent. This step lays the foundation for the flavor-rich Sausage Parmesan Cream Cheese Soup.

Step 2: Cook Sausage
Next, add the spicy sausage to the pot, breaking it apart with a spatula. Continue cooking for about 6–8 minutes until it’s fully browned and no longer pink. Cancel sauté mode once the sausage is cooked through; this ensures a delicious protein mix that enhances your soup’s heartiness.

Step 3: Mix Ingredients
Stir in the diced tomatoes, garlic powder, salt, pepper, and Italian seasoning into the sausage mixture. Mix thoroughly for about 2 minutes to combine the flavors well. Then, add the cream cheese and chicken broth, stirring until the cream cheese is melted and fully incorporated. This creates the rich, silky base for the Sausage Parmesan Cream Cheese Soup.

Step 4: Pressure Cook
Seal the lid of your Instant Pot, ensuring it’s set to the pressure cooking position. Cook on high pressure for 5 minutes. Once the time is up, carefully perform a quick release of pressure by flipping the valve. This method prevents overcooking and maintains the soup’s vibrant flavors and textures.

Step 5: Finish Soup
After the pressure is released, open the lid and stir in the heavy cream and freshly grated Parmesan cheese. Allow it to simmer for an additional 2 minutes until the cheese melts into a luscious creaminess. Serve the soup in bowls, garnishing each with a sprinkle of fresh parsley and extra Parmesan for added flavor.

Sausage Parmesan Cream Cheese Soup Variations

Customize this comforting soup to fit your tastes and dietary needs while creating delightful surprises in each bowl!

  • Vegetarian: Replace sausage with a medley of your favorite veggies and hearty beans for a robust meatless meal.

  • Gluten-Free: Ensure your sausage and broth are gluten-free, allowing everyone to enjoy this creamy dish without worry.

  • Spice It Up: Add diced jalapeños or a sprinkle of red pepper flakes to elevate the heat level for a spicier version.

  • Herb Infusion: Experiment with fresh herbs like thyme or rosemary; adding them during the cooking process will impart a fragrant aroma.

  • Creamy Coconut Twist: Swap heavy cream for coconut cream for a dairy-free twist that adds a luscious tropical flavor.

  • Cheesy Varieties: Instead of Parmesan, try using a sharp cheddar or smoked Gouda to create a different flavor profile in your soup.

  • Protein Boost: Incorporate cooked, shredded chicken or turkey in place of the sausage for a leaner, protein-packed alternative.

  • Extra Veggie Goodness: Toss in diced zucchini, bell peppers, or spinach before pressure cooking for more nutrients and texture.

For an added creamy treat on the side, consider serving this with crusty bread or my delicious Savory Vegetable Cheese Pancakes. Enjoy your flavorful journey in the kitchen!

Make Ahead Options

These Sausage Parmesan Cream Cheese Soup prep tips are perfect for busy cooks looking to save time during the week! You can chop the onions and prepare the sausage up to 24 hours in advance; simply store the prepared ingredients in an airtight container in the refrigerator. Additionally, you can mix the diced tomatoes, garlic powder, salt, pepper, and Italian seasoning together ahead of time, ready to be combined later. To maintain quality, consider refrigerating everything separately until you’re ready to cook. When you’re prepared to serve, just follow the cooking instructions, adding the cream cheese and broth, and you’ll have this comforting soup ready in no time—delicious and satisfying, just as if you made it fresh!

Expert Tips for Sausage Parmesan Cream Cheese Soup

Avoid Clumping: Always break the sausage into small pieces while cooking. This ensures a smooth texture in your Sausage Parmesan Cream Cheese Soup.

Quick Release Is Key: Use the quick release method after pressure cooking to prevent overcooking, which can lead to an unappetizing texture.

Fresh Garlic Upgrade: If you prefer fresh garlic, add it along with the sausage. This enhances the depth of flavor significantly.

Taste as You Go: Adjust salt and pepper according to your palate. Flavor blends develop best when seasoned throughout the cooking process.

Add Extra Veggies: Incorporate diced zucchini or spinach during the mixing step for added nutrients without sacrificing flavor.

Storage Savvy: If you have leftovers, store them in an airtight container for up to 3 days in the fridge. Enjoy your delicious Sausage Parmesan Cream Cheese Soup again!

What to Serve with Sausage Parmesan Cream Cheese Soup

As you savor each spoonful of this rich and creamy soup, consider rounding out your meal with delightful pairings that complement its bold flavors and comforting texture.

  • Crusty Bread: Perfect for dipping, it soaks up the sumptuous broth beautifully, enhancing each bite.

  • Garlic Breadsticks: With a buttery garlic essence, these are wonderful for mopping up the soup, adding a savory crunch.

  • Caesar Salad: The crisp romaine and tangy dressing provide a refreshing counterbalance to the richness, keeping things light.

  • Roasted Vegetables: Caramelized carrots, zucchini, and bell peppers bring a sweet contrast, offering a colorful and nutritious side.

  • Steamed Broccoli: A pop of green, this nutritious addition balances the meal while adding texture to the creamy experience.

  • Sparkling White Wine: A glass of chilled bubbly elevates the meal, providing a delightful effervescence that complements the rich soup.

  • Apple Crisp: For dessert, a warm apple crisp drizzled with vanilla ice cream finishes the evening with a sweet note, harmoniously rounding off your comfort food experience.

Let each pairing elevate your dinner to something truly special, adding layers of flavor and joy to your cozy night in!

Storage Tips for Sausage Parmesan Cream Cheese Soup

Fridge: Store leftovers in an airtight container for up to 3 days, ensuring the soup retains its creamy texture and flavor.

Freezer: Freeze the soup in a freezer-safe container for up to 1 month. Let it cool completely before sealing to avoid freezer burn.

Reheating: When ready to enjoy, thaw overnight in the fridge and reheat gently on the stove over low heat, stirring occasionally.

Separation Note: If the soup thickens while stored, don’t worry! Stir in a splash of broth or water while reheating to restore creaminess.

Sausage Parmesan Cream Cheese Soup Recipe FAQs

What type of sausage should I use for this soup?
You can use spicy sausage for a flavor kick, or substitute it with mild sausage or ground beef if you prefer less heat. For a healthier option, turkey sausage works wonderfully too!

How should I store leftovers of Sausage Parmesan Cream Cheese Soup?
Store the soup in an airtight container in the fridge for up to 3 days. Make sure it cools down completely before sealing to help maintain its creamy texture.

Can I freeze this soup?
Absolutely! You can freeze Sausage Parmesan Cream Cheese Soup in a freezer-safe container for up to 1 month. Just let it cool completely, then pour into containers, leaving a little space at the top as it will expand during freezing.

What if my soup is too thick after storage?
If you find the soup has thickened after being in the fridge or freezer, don’t worry! When reheating, just stir in a splash of chicken broth or water to bring back its creamy consistency.

Can I use fresh garlic instead of garlic powder?
Very! If you prefer fresh garlic, use one clove minced as a substitute for each teaspoon of garlic powder. Add it along with the sausage during cooking to infuse more flavor into the soup.

Is this soup suitable for special diets?
The Sausage Parmesan Cream Cheese Soup can be made gluten-free by opting for gluten-free broth and sausage. Additionally, for a keto-friendly version, simply adjust the cream content and choose suitable sausage! Always check labels to be sure.

Sausage Parmesan Cream Cheese Soup

Sausage Parmesan Cream Cheese Soup for Cozy Nights

Savor the comforting flavors of Sausage Parmesan Cream Cheese Soup, perfect for chilly nights.
Prep Time 10 minutes
Cook Time 20 minutes
Total Time 30 minutes
Servings: 4 bowls
Course: Dinner
Cuisine: American
Calories: 350

Ingredients
  

For the Soup
  • 1 tablespoon Olive Oil Substitute with vegetable oil or butter if desired.
  • 1 medium Onion Yellow or white onions work well.
  • 1 pound Spicy Sausage Can substitute with mild sausage or ground beef.
  • 14.5 ounces Diced Tomatoes (canned) Fresh tomatoes can also be used.
  • 1 teaspoon Garlic Powder Or 1 clove fresh minced garlic.
  • to taste Salt
  • to taste Pepper
  • 1 teaspoon Italian Seasoning Can replace with fresh herbs.
  • 8 ounces Cream Cheese Neufchâtel cheese for a lighter option.
  • 4 cups Chicken Broth Vegetable broth for a vegetarian option.
  • 1 cup Heavy Cream Can omit for a lighter soup.
  • 1/2 cup Parmesan Cheese Freshly grated is preferred.
  • to garnish Fresh Parsley Omit if not available.
For Serving
  • 1 loaf Crusty Bread Perfect for dipping.
  • to taste Extra Parmesan For sprinkling on top before serving.

Equipment

  • Instant Pot

Method
 

Step-by-Step Instructions
  1. Start by turning your Instant Pot to sauté mode and adding a drizzle of olive oil. Once the oil shimmers, toss in the chopped onions, stirring occasionally for about 3–4 minutes until they become soft and translucent.
  2. Add the spicy sausage to the pot, breaking it apart with a spatula. Continue cooking for about 6–8 minutes until it's fully browned and no longer pink. Cancel sauté mode once the sausage is cooked through.
  3. Stir in the diced tomatoes, garlic powder, salt, pepper, and Italian seasoning into the sausage mixture. Mix thoroughly for about 2 minutes to combine the flavors well. Then, add the cream cheese and chicken broth, stirring until the cream cheese is melted and fully incorporated.
  4. Seal the lid of your Instant Pot, ensuring it’s set to the pressure cooking position. Cook on high pressure for 5 minutes. Once the time is up, carefully perform a quick release of pressure.
  5. After the pressure is released, open the lid and stir in the heavy cream and freshly grated Parmesan cheese. Allow it to simmer for an additional 2 minutes until the cheese melts into a luscious creaminess. Serve the soup in bowls, garnishing each with a sprinkle of fresh parsley and extra Parmesan.

Notes

Store leftovers in an airtight container for up to 3 days in the fridge. If freezing, use a freezer-safe container for up to 1 month.

Irresistible Garlic Butter Pasta for Ultimate Comfort Cooking

As I stood in my kitchen, the warm aroma of confit garlic wafted through the air, reminding me of cozy Italian dinners shared with loved ones. This Insanely Delicious Garlic Butter Pasta is a celebration of simple ingredients transformed into a comforting dish that’s perfect for any occasion. The confit garlic delivers a rich, mellow flavor that infuses the butter, creating a glossy sauce that clings to each strand of pasta. With a quick prep time and minimal fuss, this recipe is both a time-saver and a crowd-pleaser, ensuring even the busiest of weeknights can feel special. Whether you’re looking for a cozy dinner for one or an impressive dish for family gatherings, you’re just moments away from a plateful of warmth and satisfaction. Ready to indulge in this hearty experience? Let’s dive into the recipe!

Why is Garlic Butter Pasta a Must-Try?

Simplicity at its finest: This recipe boasts an uncomplicated process, making it ideal for both novice cooks and seasoned chefs alike.

Irresistible flavors: The confit garlic lends a depth of taste that elevates the dish above typical pasta recipes, ensuring every bite is a delight.

Quick and satisfying: With minimal prep time, you can whip up this comforting meal even on the busiest weeknights, perfect for those who crave homemade goodness.

Versatile options: Whether you want to swap out rosemary for fresh thyme or add a splash of lemon, variations are easy and plentiful. Looking for more cozy pairings? Try it with a side of Garlic Butter French fries for a delectable experience.

Crowd-pleaser: Serve it at family gatherings or casual dinner parties, and watch as your loved ones rave about this dish!

Garlic Butter Pasta Ingredients

• To create your own Garlic Butter Pasta, gather these essential ingredients for an unforgettable meal:

For the Confit Garlic

  • Garlic – Use whole cloves for a sweet, mellow flavor that transforms the dish.
  • Extra Virgin Olive Oil – A quality oil enhances garlic flavor and richness.
  • Fresh Rosemary – Optional but adds a lovely aromatic touch during the confit process.

For the Sauce

  • Room Temperature Butter – This creates a creamy base for the sauce; go with salted for added flavor.
  • Black Pepper – Freshly cracked adds a subtle kick; adjust to your taste.

For the Pasta

  • Pasta (dried or fresh) – Essential for this dish; cook until al dente for optimal sauce absorption.

For Serving

  • Parmesan Cheese – Grate it on top for an extra layer of savory richness; highly recommended for your Garlic Butter Pasta.

Enjoy crafting this comforting dish, perfect for any occasion!

Step‑by‑Step Instructions for Insanely Delicious Garlic Butter Pasta

Step 1: Prepare Confit Garlic
Begin by preheating your oven to 300°F (150°C). In a baking dish, combine peeled garlic cloves with fresh rosemary and generously submerge them in high-quality extra virgin olive oil. Bake this mixture for 45 minutes to 1 hour, until the garlic turns golden and soft, releasing a rich, aromatic scent that fills your kitchen.

Step 2: Blend Garlic and Butter
Once the confit garlic has cooled, transfer it to a mixing bowl. Add room temperature butter to the bowl and use a hand blender or a food processor to blend the mixture until smooth and creamy. If desired, refrigerate the garlic butter until slightly hardened, which will help it hold its shape in the next steps of making your Garlic Butter Pasta.

Step 3: Cook Pasta
In a large pot, bring water to a rolling boil and season it generously with salt. Add your choice of pasta and cook according to the package instructions, ensuring that you aim for an al dente texture. This typically takes about 8 to 12 minutes; testing a piece for doneness ensures it absorbs the sauce beautifully when combined.

Step 4: Make the Sauce
While the pasta cooks, heat a large skillet over medium heat. Add the blended garlic butter, allowing it to melt gently without overheating. Stir in freshly cracked black pepper to taste, for a little kick. Keep an eye on the garlic butter; you want it to remain fragrant without browning, setting the stage for your delectable Garlic Butter Pasta.

Step 5: Combine Pasta and Sauce
Before draining the pasta, reserve half a cup of the starchy cooking water. Once drained, add the hot pasta directly to the skillet with the garlic butter sauce. Pour in the reserved pasta water, and toss everything together until the pasta is well-coated and the sauce is emulsified, creating a silky finish that clings to every strand.

Step 6: Serve
Plate your beautifully sauced Garlic Butter Pasta and sprinkle it generously with freshly grated Parmesan cheese. For an extra touch, add a few sprigs of fresh rosemary or parsley, along with a pinch of the remaining black pepper. This adds color and flavor, elevating your meal to a restaurant-quality dish that’s sure to impress.

How to Store and Freeze Garlic Butter Pasta

Fridge: Store leftovers in an airtight container for up to 3 days to keep your Garlic Butter Pasta fresh. Reheat gently on the stove or microwave to avoid overcooking.

Freezer: For longer storage, freeze the pasta in individual portions in freezer-safe containers for up to 2 months. Thaw overnight in the fridge before reheating.

Reheating: When reheating, add a splash of water or olive oil to help revive the creamy texture of the sauce. Stir well to incorporate moisture for a deliciously warm meal.

Garlic Butter Storage: If you have extra confit garlic butter, store it in the fridge for up to a week. Use it on bread or veggies for a quick flavor boost!

Make Ahead Options

These Insanely Delicious Garlic Butter Pasta components are perfect for busy home cooks looking to save time during the week! You can prepare the confit garlic and garlic butter up to 3 days in advance by blending and refrigerating them in an airtight container to maintain flavor and freshness. The garlic butter will stay just as delicious; just let it sit at room temperature for a few minutes before using to soften. When you’re ready to enjoy your meal, simply cook the pasta according to package instructions, then combine it with the garlic butter in a skillet while adding reserved pasta water to create the perfect sauce. With this make-ahead option, you’ll be dining on comfort food in no time!

Garlic Butter Pasta Variations

Customize your dish with these delightful tweaks that awaken the senses and elevate your garlic butter pasta.

  • Fresh Herb Swap: Replace rosemary with fresh thyme or oregano. This subtle change creates a fragrant twist that celebrates the simplicity of herbs.

  • Citrus Splash: Add a squeeze of fresh lemon juice right before serving. The brightness will beautifully balance the richness of the garlic butter.

  • Vegan Twist: Use vegan butter instead of regular butter for a plant-based version that doesn’t compromise on flavor. Enjoy the creamy richness while keeping it completely dairy-free.

  • Cheese Alternatives: For a nutty flavor, try using nutritional yeast instead of Parmesan. It’s perfect for achieving that cheesy taste without dairy!

  • Spicy Kick: Sprinkle in some red pepper flakes or a dash of hot sauce while cooking the garlic butter for a spicy twist that will wake up your taste buds.

  • Mushroom Medley: Sauté some mushrooms with the garlic butter for added richness and a delightful umami flavor. This makes the dish heartier and ever so satisfying.

  • Nutty Finish: Toasted pine nuts or walnuts can bring a delightful crunch. Sprinkle them on top just before serving for added texture that complements the silkiness of the pasta.

  • Creamy Version: Stir in a splash of heavy cream or half-and-half after melting the garlic butter for a richer, creamier sauce that envelops each noodle in indulgence.

Explore these variations and make this garlic butter pasta truly your own—perfect alongside a plate of Garlic Butter French fries or a fresh salad!

What to Serve with Insanely Delicious Garlic Butter Pasta

This vibrant garlic butter pasta pairs wonderfully with complementary side dishes and drinks that enhance its rich flavors.

  • Simple Leafy Salad: A crisp, fresh salad provides a bright contrast to the creamy pasta, adding crunch and a refreshing element to your meal.

  • Roasted Vegetables: Seasonal veggies roasted to perfection bring sweetness and depth, balancing the richness of the garlic butter beautifully.

  • Garlic Breadsticks: These warm, buttery sticks echo the savory garlic notes in your pasta, creating a satisfying and indulgent duo that’s hard to resist.

  • Crispy Brussels Sprouts: The slight bitterness and crunch of roasted Brussels sprouts add an exciting texture and a touch of nuttiness that complements the dish.

  • Lemon Zest: Not a traditional side, but a sprinkle of lemon zest just before serving brightens the flavors, ensuring your pasta is lively and invigorating.

  • Chilled White Wine: A crisp Sauvignon Blanc or Pinot Grigio pairs well, as the acidity cuts through the richness, creating a harmonious balance in each bite.

  • Chocolate Mousse: End the meal on a sweet note with a light, airy chocolate mousse. Its richness pairs surprisingly well, creating an utterly delightful experience.

Tips for the Best Garlic Butter Pasta

  • Quality Ingredients: Always use high-quality extra virgin olive oil and fresh garlic. This will enhance the richness of your Garlic Butter Pasta, making every bite irresistible.

  • Don’t Overcook: Keep an eye on the pasta and aim for al dente. Overcooked pasta can become mushy and won’t hold the flavorful sauce as well.

  • Reserve Pasta Water: Remember to save some pasta water before draining! The starchy water is essential for achieving the perfect sauce consistency in your Garlic Butter Pasta.

  • Gentle Heat: When melting the garlic butter, use medium heat to avoid burning the garlic. Burnt garlic can create a bitter flavor that overshadows the dish.

  • Finishing Touches: Garnish with freshly grated Parmesan and herbs right before serving. This adds brightness and enhances the presentation, making your meal truly special.

  • Customization: Feel free to experiment with herbs or citrus flavors. A squeeze of lemon can brighten up the garlic butter and add an exciting twist to the classic dish.

Garlic Butter Pasta Recipe FAQs

How do I choose ripe garlic for confit garlic?
Absolutely! When selecting garlic, look for bulbs that are firm and free from soft spots or blemishes. A good bulb should feel heavy in your hand. If there are any dark spots or sprouting cloves, it’s best to avoid them, as they may affect the flavor and quality of your confit garlic.

What is the best way to store leftover Garlic Butter Pasta?
Store any leftovers in an airtight container in the refrigerator for up to 3 days. Be sure to cool the pasta to room temperature before sealing it. When you’re ready to enjoy, gently reheat it in a skillet over low heat or in the microwave. This way, you’ll preserve its delicious flavors and creamy texture!

Can I freeze Garlic Butter Pasta?
Yes, you can! For freezing, portion the cooked pasta into freezer-safe containers, ensuring that there’s a little bit of sauce on each serving. Seal tightly and store in the freezer for up to 2 months. When ready to eat, thaw overnight in the fridge, and then reheat gently, adding a splash of olive oil or pasta water to revive the sauce’s consistency.

How can I troubleshoot if my garlic butter sauce is too oily or separates?
It happens! If your sauce becomes too oily, try adding a bit of reserved pasta water a tablespoon at a time while stirring steadily. This helps emulsify the fat and create a more cohesive sauce. Also, make sure you’re melting your garlic butter over medium heat. Overheating can cause the fats to separate, diminishing the dish’s overall flavor.

Can I use this recipe for people with dietary restrictions?
Certainly! For a dairy-free version, substitute regular butter with a vegan alternative, and skip the Parmesan cheese or use a dairy-free cheese. Additionally, check for any allergies to garlic; although it’s rare, some people may have sensitivities. Always ensure that any substitute ingredients comply with your guests’ dietary needs for the best experience!

How long does confit garlic last in the fridge?
Confit garlic can be stored in an airtight container in the refrigerator for up to 1 week. It’s best to keep it submerged in its oil, as this preserves its flavor and prevents spoilage. You can use it on bread, veggies, or even in dressings for an easy flavor boost!

Garlic Butter Pasta

Irresistible Garlic Butter Pasta for Ultimate Comfort Cooking

This Garlic Butter Pasta is a delightful dish that combines confit garlic and creamy butter for a comforting experience.
Prep Time 10 minutes
Cook Time 1 hour
Garlic Confit Time 45 minutes
Total Time 1 hour 10 minutes
Servings: 4 servings
Course: Dinner
Cuisine: Italian
Calories: 450

Ingredients
  

For the Confit Garlic
  • 1 cup Whole Garlic Cloves peeled
  • 1 cup Extra Virgin Olive Oil high-quality
  • 2 sprigs Fresh Rosemary optional
For the Sauce
  • 1/2 cup Room Temperature Butter salted
  • 1 teaspoon Black Pepper freshly cracked
For the Pasta
  • 12 ounces Pasta dried or fresh
For Serving
  • 1/2 cup Parmesan Cheese grated

Equipment

  • oven
  • Baking Dish
  • mixing bowl
  • Hand Blender
  • Large pot
  • Skillet

Method
 

Step-by-Step Instructions
  1. Preheat your oven to 300°F (150°C). In a baking dish, combine peeled garlic cloves with fresh rosemary and generously submerge them in extra virgin olive oil. Bake for 45 minutes to 1 hour, until garlic is golden and soft.
  2. Once the confit garlic has cooled, transfer it to a mixing bowl. Add room temperature butter and blend until smooth and creamy. Refrigerate until slightly hardened if desired.
  3. In a large pot, bring water to a rolling boil and season generously with salt. Add pasta and cook according to package instructions for al dente texture (8 to 12 minutes).
  4. Heat a large skillet over medium heat. Add the blended garlic butter, allowing it to melt gently. Stir in black pepper to taste.
  5. Before draining pasta, reserve half a cup of starchy cooking water. Drain pasta and add it to the skillet with the garlic butter sauce. Pour in reserved pasta water and toss until well-coated and emulsified.
  6. Plate Garlic Butter Pasta and sprinkle generously with freshly grated Parmesan cheese. Garnish with fresh rosemary or parsley and a pinch of black pepper before serving.

Notes

Use high-quality ingredients for the best flavor. Adjust seasoning according to your taste.

Irresistible Bacon Ranch Macaroni and Cheese to Savor

As I stirred the bubbling pot of macaroni, the crispy aroma of bacon wafted through my kitchen, instantly transporting me back to countless family gatherings filled with laughter and love. Today, I’m excited to share my twist on a classic comfort food: Bacon Ranch Macaroni and Cheese. This dish is a true crowd-pleaser, melding gooey cheeses with savory bacon and a zesty ranch kick, all in just 30 minutes! Not only is it perfect for quick weeknight dinners, but it also shines at potlucks and holiday feasts, making any occasion a little more special. Get ready to enjoy every creamy bite and discover how easy it is to elevate your mac and cheese game! What’s your favorite cheesy comfort food?

Why is Bacon Ranch Mac and Cheese a Must?

Creamy Indulgence: This recipe brings together rich cheeses and savory bacon for a luxurious sauce that will leave your taste buds dancing.

Quick Prep: Ready in just 30 minutes, it’s the perfect solution for busy weeknights or last-minute gatherings.

Versatile Dish: Feel free to add rotisserie chicken for heartiness or mix in your favorite veggies like broccoli for a nutritious boost!

Family Favorite: It’s a guaranteed crowd-pleaser, making it ideal for family dinners or festive occasions—everyone loves a good mac and cheese!

If you enjoy the fusion of flavors, you might also want to try these delicious Savory Zucchini Cheese pancakes or Blueberry Cream Cheese for dessert!

Bacon Ranch Macaroni and Cheese Ingredients

For the Base
Bacon – Adds a smoky, savory kick; use thick-cut bacon for extra texture.
Pasta – Offers structure; elbow macaroni is traditional, but any pasta shape works beautifully.
Butter – Creates a roux base for creaminess; feel free to substitute with margarine if needed.
Flour – Thickens the cheese sauce; you can use gluten-free flour for a gluten-free option.

For the Sauce
Ranch seasoning – Provides a herby flavor; consider making a homemade blend for freshness.
Milk – Adds creaminess to the sauce; whole milk is ideal, but almond or oat milk can work as dairy-free alternatives.
Cream cheese – Enhances creaminess and texture; Neufchâtel cheese is a lower-fat alternative.
Shredded cheese – Cheddar is essential for flavor; mixing with Monterey Jack or Gouda adds depth.
White pepper – Adds a subtle heat; feel free to use black pepper as a substitute.
Dry mustard – Enhances flavor; it can be omitted if you don’t have it on hand.

For the Finish
Fresh parsley (optional) – Adds a pop of color and freshness; you can replace it with chives or green onions.

Embark on your cooking adventure with this delightful Bacon Ranch Macaroni and Cheese recipe and bring a comforting dish to your table that everyone will love!

Step‑by‑Step Instructions for Bacon Ranch Macaroni and Cheese

Step 1: Cook Bacon
In a large skillet over medium heat, add the thick-cut bacon and cook until crispy, about 6–8 minutes. Turn occasionally for even cooking. Once golden and fragrant, remove the bacon and place it on a paper towel-lined plate to drain excess fat. Reserve about 1 tablespoon of the drippings in the skillet for added flavor.

Step 2: Boil Pasta
While the bacon cooks, bring a large pot of salted water to a rolling boil over high heat. Add elbow macaroni and cook according to package instructions, approximately 8–10 minutes, until al dente. Once done, drain the pasta and set it aside, allowing it to steam off while you prepare the cheesy sauce.

Step 3: Make Cheese Sauce
Return the pot to medium heat and melt 4 tablespoons of butter until bubbling. Whisk in 4 tablespoons of flour to form a roux, cooking for 1–2 minutes until lightly golden. Stir in the ranch seasoning, allowing the flavors to bloom, then gradually pour in 2 cups of milk, whisking constantly until the mixture is hot and thickens.

Step 4: Add Cream Cheese
Once the sauce is bubbling gently, mix in 4 ounce of cream cheese, stirring until fully melted and creamy. This will create a luscious texture for your Bacon Ranch Macaroni and Cheese. Keep the heat low to prevent the sauce from simmering too aggressively while you prepare to incorporate the cheeses.

Step 5: Incorporate Cheese
Gradually add 2 cups of shredded cheddar cheese and half a cup of Monterey Jack cheese into the creamy mixture. Stir consistently until all the cheeses melt smoothly and combine beautifully into the sauce. The final texture should be thick and velvety, perfect for coating your pasta.

Step 6: Combine Ingredients
Toss the crispy bacon, now chopped, into the cheese sauce, mixing well to distribute the flavors evenly. Then, gently fold in the drained pasta until everything is well-coated and gloriously cheesy. Allow it to heat through for an extra 2-3 minutes, ensuring each bite is infused with that delightful bacon ranch flavor.

Step 7: Serve
Transfer your completed Bacon Ranch Macaroni and Cheese to a serving dish, and, if desired, garnish with additional bacon bits and freshly chopped parsley for a vibrant touch. Enjoy this comforting dish warm, as it’s best served right after preparation, with the sauce beautifully creamy and inviting.

Bacon Ranch Macaroni and Cheese Variations

Feel free to get creative and tailor the recipe to your taste buds; believe me, you’ll love the results!

  • Vegetarian Delight: Replace bacon with sautéed mushrooms or smoked tempeh for a delicious vegetarian option.
    Seriously, the earthy flavors balance wonderfully with the creamy sauce, giving you a rich taste without the meat.

  • Spicy Kick: Swap in pepper jack cheese for a zesty twist or stir in diced jalapeños for extra heat.
    Your taste buds will thank you as they dance with flavorful excitement in every creamy bite!

  • Creamy Spinach: Fold in fresh or frozen spinach before baking to add a nutritious pop and vibrant color.
    Not only will you add health benefits, but the flavors meld beautifully with the cheese and ranch.

  • Rotisserie Chicken: Enhance the dish by stirring in shredded rotisserie chicken for a heartier family meal.
    This addition is perfect for using up leftovers while adding a delightful protein boost!

  • Crunchy Topping: Mix crushed crackers or fried onions into your mac before baking for a satisfying crunch.
    The textural contrast makes each bite a new adventure, all while keeping the creamy essence intact.

If you love cheesy creations, you should definitely check out these Savory Zucchini Cheese pancakes or enjoy a slice of Blueberry Cream Cheese for dessert!

  • Smoky Flavor: Incorporate smoked paprika or add BBQ sauce for a sensational flavor profile that pops.
    Igniting a smoky flavor explosion, this twist will make your pasta dish stand out at every gathering.

  • Pasta Swaps: Try using whole grain or gluten-free pasta to suit dietary preferences without sacrificing taste.
    Embracing variety in the foundation can lead to new explorations while fulfilling the comfort food cravings!

What to Serve with Bacon Ranch Macaroni and Cheese

Pairing the creamy, savory goodness of this dish with complementary sides creates a meal that delights the senses and warms the heart.

  • Grilled Chicken: Juicy, herb-marinated chicken breasts add a satisfying protein, balancing the richness of the mac and cheese.

  • Fresh Garden Salad: A vibrant mix of greens, cucumbers, and tomatoes provides a refreshing contrast to the creamy pasta. Drizzle with a tangy vinaigrette for brightness.

  • Steamed Broccoli: Tender, vibrant green broccoli not only adds nutrition but also a delightful crunch, enhancing the overall texture of your meal.

  • Roasted Veggies: Seasonal vegetables tossed in olive oil and roasted to perfection bring sweetness and depth that complements the savory cheese.

  • Garlic Bread: Crispy, buttery garlic bread is a beloved accompaniment; its crunchy texture and savory flavor are perfect for scooping up extra cheese sauce.

  • Sweet Tea or Lemonade: For drinks, a glass of sweet tea or refreshing lemonade pairs beautifully, cutting through the richness with a hint of sweetness.

Transform your dinner table into a culinary delight with these delicious additions, making every bite of bacon ranch macaroni and cheese even more enjoyable!

Make Ahead Options

Preparing Bacon Ranch Macaroni and Cheese ahead of time is a fantastic way to embrace convenience during busy weeks! You can cook the pasta and bacon up to 24 hours in advance. Simply store them separately in airtight containers in the refrigerator. The cheese sauce can also be made ahead; just keep it in a separate container. When you’re ready to serve, reheat the cheese sauce gently on the stove, adding a splash of milk to restore its creamy texture. Combine everything in one pot, stir well, and heat for a few minutes until warmed through. This method ensures that your dish remains just as delicious, saving you valuable time without sacrificing flavor!

Expert Tips for Bacon Ranch Macaroni and Cheese

  • Perfectly Cooked Roux: Ensure the roux does not brown too much while cooking for a smoother cheese sauce; a light golden color is ideal.

  • Taste as You Go: Always taste your cheese sauce before adding the pasta to adjust seasoning—this way, every bite is packed with flavor.

  • Serve Immediately: For the best texture, serve the Bacon Ranch Macaroni and Cheese right away, as the sauce thickens upon cooling.

  • Customize Wisely: Feel free to experiment by adding ingredients like steamed veggies or different cheese varieties to find your perfect flavor balance.

  • Store Carefully: If you have leftovers, store in an airtight container in the fridge for up to 3 days. Reheat gently, adding a splash of milk to revive the creamy texture.

Storage Tips for Bacon Ranch Macaroni and Cheese

Fridge: Store leftover Bacon Ranch Macaroni and Cheese in an airtight container for up to 3 days. Make sure to let it cool before sealing to keep it fresh.

Freezer: For longer storage, freeze the mac and cheese in portions. Wrap tightly in plastic wrap and then place in an airtight container or freezer bag. It can last up to 2 months.

Reheating: Reheat in the microwave or oven. If using the microwave, add a splash of milk to maintain creaminess. In the oven, cover with foil and bake at 350°F (175°C) until heated through, about 20–25 minutes.

Serving: To revive the dish’s creamy texture, stir in a bit of milk during reheating. Enjoy all the delightful flavors, just like freshly made!

Bacon Ranch Macaroni and Cheese Recipe FAQs

How do I choose the right bacon for this recipe?
Absolutely! Opt for thick-cut bacon to contribute a hearty texture and enhance the overall flavor of your Bacon Ranch Macaroni and Cheese. When selecting bacon, look for pieces that are a deep pink color with minimal dark spots. If you prefer a healthier option, turkey bacon can also work, though the flavor will vary.

How should I store leftover Bacon Ranch Macaroni and Cheese?
Certainly! Store any leftover mac and cheese in an airtight container in the fridge for up to 3 days. Make sure the dish has cooled to room temperature before sealing. When you’re ready to enjoy it again, just give it a little stir with some added milk to revive that creamy texture.

Can I freeze Bacon Ranch Macaroni and Cheese?
Definitely! If you want to freeze your mac and cheese, portion it out into airtight containers or freezer bags. Just wrap the portions tightly in plastic wrap first to prevent freezer burn. It will keep well in the freezer for up to 2 months. When you’re ready to enjoy it, thaw overnight in the fridge and reheat in the oven or microwave.

What should I do if my cheese sauce is too thick?
Very! If you find your cheese sauce has gotten thicker than you’d prefer, simply add a splash of milk while stirring over gentle heat. This will help loosen it back up to a creamy consistency. Also, be sure to continuously stir while warming to prevent it from sticking or scorching.

Is there a dairy-free option for this recipe?
For sure! You can easily adapt this recipe to be dairy-free. Use almond or oat milk in place of regular milk, and opt for dairy-free cream cheese and shredded cheese alternatives. There are several plant-based nacho-style cheeses available now that melt beautifully and can work well in your Bacon Ranch Macaroni and Cheese. Just taste as you go to adjust the flavors!

Can I add vegetables to my Bacon Ranch Macaroni and Cheese?
The more the merrier! Adding steamed broccoli, spinach, or even sautéed mushrooms can enhance the nutritional value and texture of your dish. Just fold in the cooked veggies during the mixing stage to ensure they’re evenly distributed and coated in that creamy sauce. Enjoy experimenting!

Bacon Ranch Macaroni and Cheese

Irresistible Bacon Ranch Macaroni and Cheese to Savor

This Bacon Ranch Macaroni and Cheese combines gooey cheeses with savory bacon and a zesty ranch kick, making it a perfect comfort food.
Prep Time 10 minutes
Cook Time 20 minutes
Total Time 30 minutes
Servings: 4 servings
Course: Dinner
Cuisine: American
Calories: 600

Ingredients
  

For the Base
  • 5 slices thick-cut bacon Adds a smoky, savory kick
  • 2 cups elbow macaroni Traditional pasta shape
  • 4 tablespoons butter Creates a roux base for creaminess
  • 4 tablespoons flour Thickens the cheese sauce
For the Sauce
  • 1 packet ranch seasoning Provides a herby flavor
  • 2 cups milk Adds creaminess to the sauce
  • 4 ounces cream cheese Enhances creaminess and texture
  • 2 cups shredded cheddar cheese Essential for flavor
  • 0.5 cup Monterey Jack cheese Adds depth
  • 0.25 teaspoon white pepper Adds a subtle heat
  • 1 teaspoon dry mustard Enhances flavor
For the Finish
  • 1 tablespoon fresh parsley Optional, for garnish

Equipment

  • large skillet
  • Large pot
  • whisk

Method
 

Step-by-Step Instructions
  1. In a large skillet over medium heat, add thick-cut bacon and cook until crispy, about 6–8 minutes. Remove bacon and place it on a paper towel-lined plate.
  2. Bring a large pot of salted water to a rolling boil. Add elbow macaroni and cook according to package instructions, about 8–10 minutes until al dente.
  3. Return the pot to medium heat and melt 4 tablespoons of butter. Whisk in 4 tablespoons of flour to form a roux, cooking for 1–2 minutes until golden.
  4. Mix in ranch seasoning, then gradually pour in milk, whisking constantly until the mixture is hot and thickens.
  5. Once the sauce is bubbling gently, mix in the cream cheese, stirring until fully melted and creamy.
  6. Gradually add shredded cheddar and Monterey Jack cheese into the sauce. Stir until all cheese melts smoothly.
  7. Toss the crispy chopped bacon into the cheese sauce, then gently fold in the drained pasta until well-coated.
  8. Serve warm, garnished with additional bacon bits and chopped parsley, if desired.

Notes

For leftovers, store in an airtight container in the fridge for up to 3 days. Reheat gently with a splash of milk to revive creaminess.