As I was mixing and melting butter last week, a sudden flurry of holiday spirit swept through my kitchen! That’s when I decided to create these delightful snowman cupcakes that are bound to bring a smile to anyone who sees them. With moist chocolate muffins as the base and fluffy vanilla buttercream cascading like fresh snow, these treats are not only a feast for the eyes but also incredibly easy to whip up. Whether you’re hosting a festive gathering or just want to indulge in something cozy at home, snowman cupcakes are the perfect blend of fun and flavor. Plus, they’re a great way to get the kids involved in holiday baking! Ready to dive into this whimsical recipe?

Why Are Snowman Cupcakes a Must-Try?
Holiday Cheer: These snowman cupcakes are perfect for adding a whimsical touch to your seasonal festivities.
Easy Assembly: With simple ingredients and straightforward instructions, these treats are quick to make, even for novice bakers!
Creative Decoration: Let your imagination run wild as you personalize each snowman with fun edible decorations.
Family Fun: Kids will love helping out in the kitchen, turning baking into a special holiday tradition.
Versatile Serving: Pair them with other holiday treats to create a delightful dessert spread that everyone will rave about!
Indulge in the joy of baking with these Charming Snowman Cupcakes and make your holiday gatherings unforgettable!
Snowman Cupcake Ingredients
For the Muffins
• Natural Cocoa Powder – This gives the cupcakes a soft chocolate flavor that keeps them light and fluffy; for a richer color, use Dutch-process cocoa.
• Butter – Adds essential moisture and tenderness to the muffin crumb; combining it with brown sugar enhances the flavor.
• Brown Sugar – Elevates sweetness and richness without overpowering the frosting.
For the Frosting
• Vanilla Buttercream – A classic frosting choice that mimics a fluffy snow appearance; adjust with cream for smoothness and pipability.
For the Decorations
• Mini Chocolate Dots – Perfect for snowman eyes and smiles; swap with piped melted chocolate if needed.
• Marshmallows (Large) – Serve as the snowman heads for better proportion and stability during assembly.
• Mini Pretzel Sticks – Insert these into the buttercream for whimsical snowman arms that add character.
• Candy Corn – Use these fun treats as snowman noses for an extra festive touch.
Get ready to create delightfully charming snowman cupcakes that will brighten your holiday dessert table!
Step‑by‑Step Instructions for Snowman Cupcakes
Step 1: Prepare the Muffin Base
Start by preheating your oven to 350°F (175°C) and lining a cupcake tin with paper liners. In one bowl, mix together 1 cup of natural cocoa powder, 1 ½ cups of all-purpose flour, 1 teaspoon of baking soda, and a pinch of salt. In another bowl, cream together ½ cup of softened butter with 1 cup of brown sugar until light and fluffy, about 3-5 minutes. Gradually add the dry ingredients, mixing until just combined to create the perfect batter for your snowman cupcakes.
Step 2: Bake the Muffins
Scoop tablespoonfuls of the batter into the prepared cupcake liners, filling each about two-thirds full. Bake in the preheated oven for 15-18 minutes, or until a toothpick inserted in the center comes out clean. Once baked, remove the tin from the oven and let the cupcakes cool in the tin for 10 minutes before transferring them to a wire rack to cool completely, setting the stage for delicious assembly.
Step 3: Make the Buttercream Frosting
While the cupcakes are cooling, prepare the vanilla buttercream frosting. In a mixing bowl, beat together ½ cup of softened butter and 4 cups of powdered sugar until well combined and fluffy, about 4 minutes. Gradually add 1-2 tablespoons of heavy cream to achieve a smooth, pipeable consistency, ensuring your frosting resembles fluffy snow, perfect for your snowman cupcakes.
Step 4: Decorate the Cupcakes
Once the cupcakes are completely cool, use a piping bag fitted with a star tip to pipe a two-tier swirl of the vanilla buttercream on top of each cupcake, creating a beautiful snow drift effect. Aim for higher peaks and a smooth finish, allowing the frosting to mimic the whimsical look of a snowy landscape.
Step 5: Assemble the Snowmen
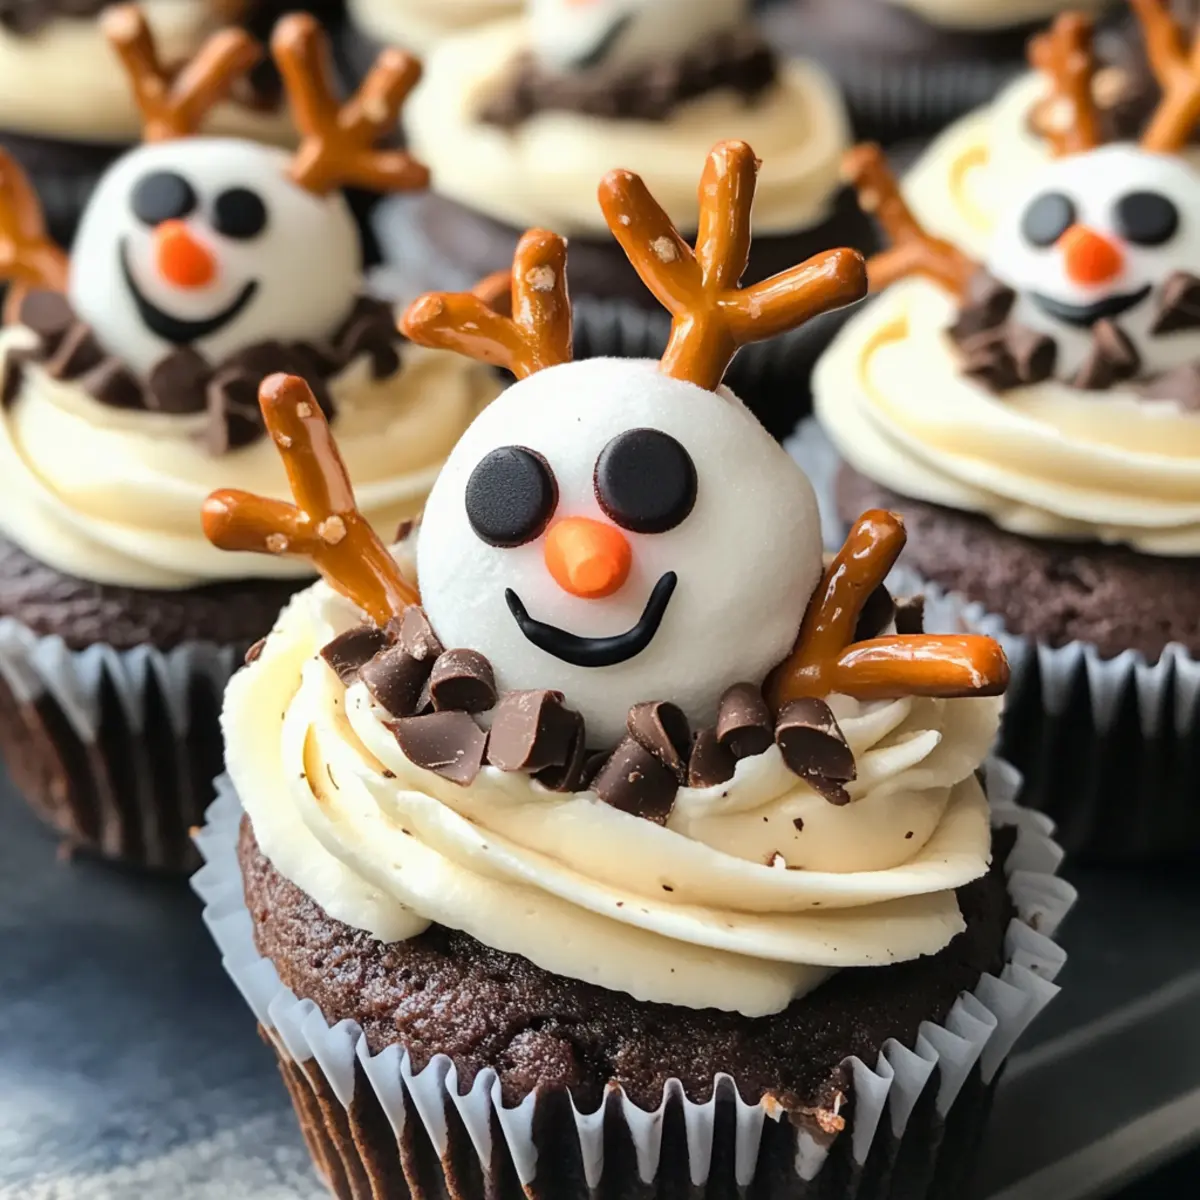
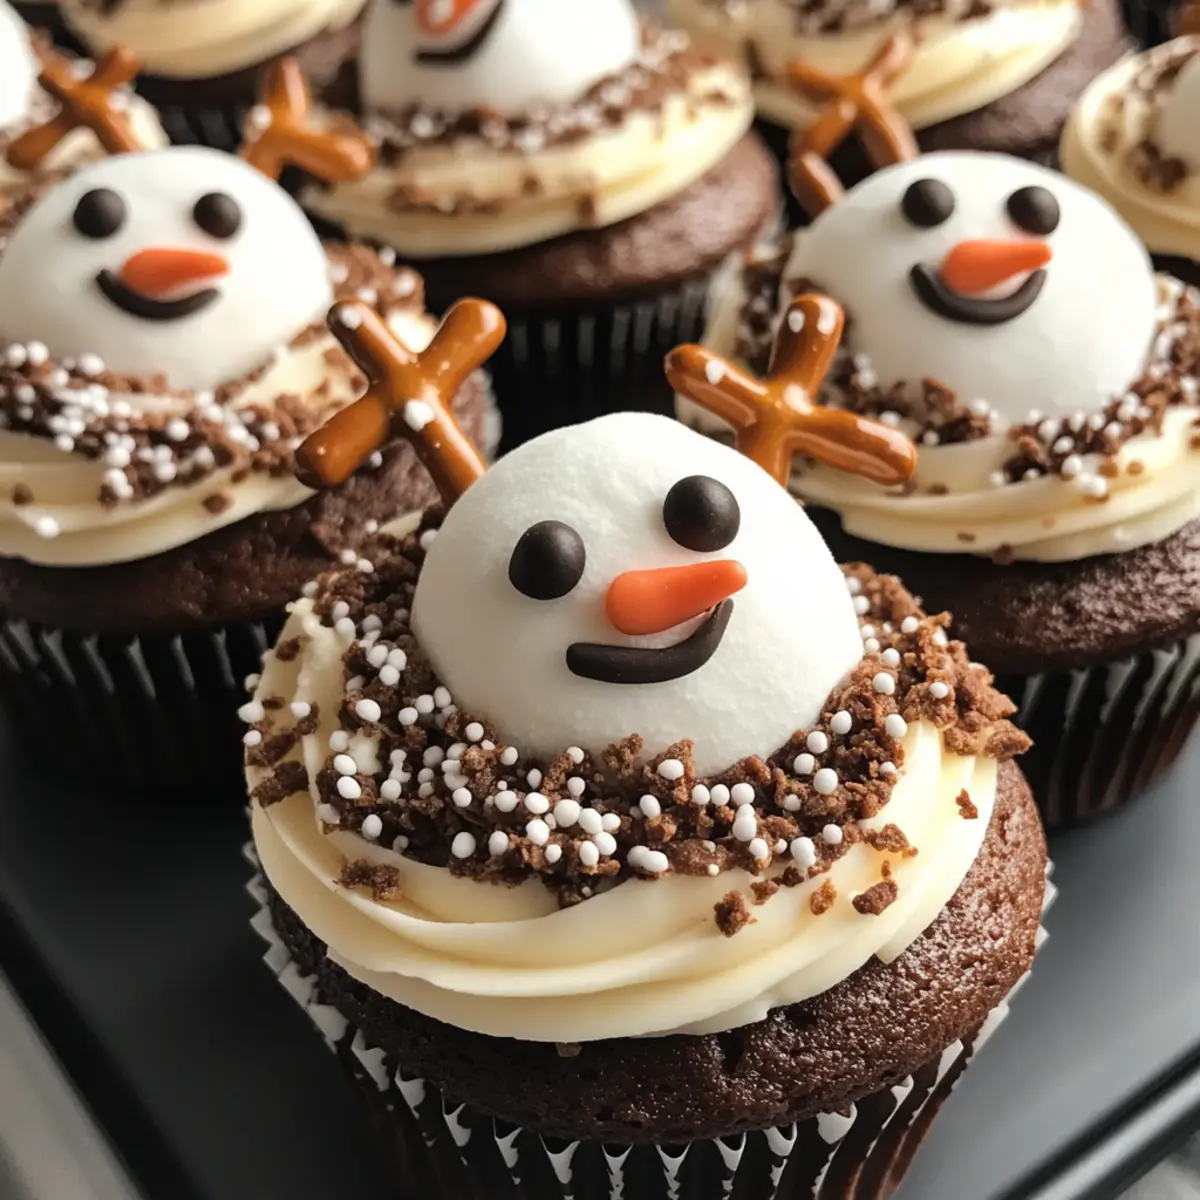
Now it’s time for the fun part! Take your large marshmallows and use mini chocolate dots to create snowman faces with eyes and smiles. Attach the marshmallows to the frosted cupcakes by gently pushing them into the buttercream. For character, stick mini pretzel sticks in the sides to form arms and add candy corn as cheerful snowman noses, making each creation a delightful snowman cupcake!
Step 6: Chill for Presentation
If desired, chill the decorated snowman cupcakes in the refrigerator for about 15 minutes to help set the frosting and stabilize the decorations. This step ensures the charming snowmen hold their shape beautifully, making them even more delightful for your holiday gatherings. Serve these festive snowman cupcakes at room temperature for the best taste, bringing joy to your table!

Make Ahead Options
These snowman cupcakes are perfect for busy home cooks looking to save time during the holiday rush! You can bake the chocolate muffins up to three days in advance; simply store them in an airtight container at room temperature to maintain their moisture. The vanilla buttercream can also be made ahead and stored in the refrigerator for up to 1 week. Just be sure to let the frosting sit at room temperature for about 30 minutes before piping, so it becomes easy to work with. Decorate the cupcakes on the day of serving to keep the marshmallow snowmen looking fresh and delightful. This way, you’ll enjoy a stress-free dessert assembly while still serving up a smile with every cupcake!
How to Store and Freeze Snowman Cupcakes
Room Temperature: Store your snowman cupcakes in an airtight container at room temperature for up to 2 days to maintain their freshness and flavor.
Fridge: If you need to keep them longer, refrigerate the cupcakes for up to 5 days. Allow them to sit at room temperature for 30 minutes before serving to restore their soft texture.
Freezer: For longer storage, freeze the cupcakes (without decorations) in a single layer after wrapping them tightly in plastic wrap and then placing them in a freezer-safe bag. They can be stored for up to 2 months.
Reheating: To enjoy frozen snowman cupcakes, simply thaw them in the refrigerator overnight and frost them with fresh vanilla buttercream before serving for a delightful treat!
What to Serve with Snowman Cupcakes?
Imagine a festive gathering filled with laughter, joy, and delightful treats that perfectly complement your whimsical snowman cupcakes.
- Hot Cocoa Bar: Create a cozy warm drink station with rich hot chocolate, whipped cream, and marshmallows. It’s the perfect pairing to bring a little extra cheer to your dessert table.
- Gingerbread Cookies: Add some classic holiday flavor with spicy gingerbread cookies. Their soft texture and warm spices contrast beautifully with the sweet and fluffy snowman cupcakes.
- Fruit Salad: A fresh fruit salad adds a burst of color and a refreshing palate cleanser. Use apples, oranges, and pomegranate seeds for a seasonal touch.
- Christmas Cookies: Serve a variety of festive cookies like snickerdoodles or sugar cookies for an array of flavors everyone will adore. Their crunchiness balances the softness of the cupcakes.
- Eggnog: For an adult twist, offer some creamy eggnog as a delightful pairing. Its rich flavor complements the chocolate base, creating a festive experience.
- Candy Canes: Not just for decoration! Scatter crushed candy canes on the table for a sweet, minty crunch that can enhance each cupcake bite.
- Whipped Cream Topping: Offer a dollop of whipped cream on the side for those who crave a creamy enhancement. The light, airy texture pairs perfectly with the moist cupcakes.
- Marshmallow Treats: For extra fun, have some marshmallow treats on hand. They tie in seamlessly with the snowman theme while providing another chewy texture to enjoy.
Expert Tips for Snowman Cupcakes
- Perfect Piping: Ensure your vanilla buttercream is at the right consistency; too soft means swirls may collapse. Adjust with cream as needed.
- Chilling Marshmallows: Refrigerate decorated marshmallows for 15 minutes prior to assembly to prevent smudging and ensure they hold their shape while decorating.
- Larger Marshmallows: Opt for larger marshmallows to enhance visual appeal and make decorating easier, especially with little hands helping out.
- Creative Faces: Get creative with your snowman faces! Use mini chocolate dots, or pipe melted chocolate for eyes and smiles—mix it up for added fun.
- Bake Ahead: You can bake the cupcakes a day before the gathering, which allows for a stress-free decorating session on the big day!
- Storage Advice: Store your snowman cupcakes at room temperature for up to two days, but allow them to sit at room temperature for 30 minutes before serving for optimal flavor.
Snowman Cupcakes: Fun Variations Await!
Get ready to unleash your creativity and customize your snowman cupcakes with these delightful variations that will elevate your holiday dessert game!
-
Vanilla Muffin Base: Swap the chocolate for a vanilla muffin base for a lighter, festive touch that pairs perfectly with vanilla buttercream.
-
Red Velvet Twist: Use red velvet cupcake batter for a stunning twist on tradition, creating a vibrant contrast against the snowy white frosting.
-
Jam-Filled Centers: Add a dollop of fruit jam to the center of each cupcake before baking for a burst of flavor with every bite. Whether it’s raspberry or strawberry, it’s sure to impress!
-
Nutty Delight: Fold in chopped walnuts or pecans into the batter for added texture and a deliciously nutty flavor. It’s a perfect complement to the sweetness!
-
Gluten-Free Option: Use a gluten-free flour blend instead of all-purpose flour to cater to dietary needs without sacrificing taste.
-
Spiced Frosting: Add a pinch of cinnamon or nutmeg to your vanilla buttercream for a cozy touch that enhances the winter vibes. A sprinkle of spice is like a hug in every bite!
-
S’mores Flavor: Incorporate crushed graham crackers into the batter and top with a dollop of chocolate frosting to create a s’mores-inspired cupcake, bringing campfire nostalgia to your holiday table.
-
Heat Things Up: For those who love a kick, try mixing in a pinch of cayenne pepper into the batter or topping for a sweet and spicy surprise!
Let your imagination run wild and try out these variations while making memories in the kitchen together. Don’t forget to check out our tips for festive serving ideas and let the holiday cheer flow!
Snowman Cupcakes Recipe FAQs
How do I choose the right cocoa powder for my snowman cupcakes?
Absolutely! For the best flavor and texture in your snowman cupcakes, I recommend using natural cocoa powder, which provides a lighter and softer chocolate flavor. If you prefer a richer color, you can opt for Dutch-process cocoa; just remember to reduce the baking soda to ¼ teaspoon to maintain the right balance.
How should I store my snowman cupcakes?
Very good question! To keep your snowman cupcakes fresh, store them in an airtight container at room temperature for up to 2 days. If you need a bit longer, they can be refrigerated for up to 5 days. Just allow them to sit at room temperature for about 30 minutes before serving to enjoy that soft, delightful texture again.
Can I freeze snowman cupcakes?
Yes, you can! For best results, freeze the cupcakes without any decorations. Wrap each one tightly in plastic wrap and place them in a freezer-safe bag. They will keep well for up to 2 months. When you’re ready to enjoy them, simply thaw them in the refrigerator overnight and then frost them with fresh vanilla buttercream for a magically delicious treat!
What if my buttercream isn’t the right consistency?
No worries! If your vanilla buttercream is too soft, it may collapse when piped. To achieve a perfect piping consistency, gradually add more powdered sugar until you reach the desired thickness. If it’s too thick, simply mix in a teaspoon of cream at a time until it lightens up. Remember, the perfect buttercream should be fluffy and hold its shape when piped.
Are there any dietary considerations for the decorations?
Great question! While the decorations are mostly safe for most, if you’re concerned about allergies, especially for kids, ensure the mini chocolate dots and candy corn are free from common allergens like nuts and gluten as some brands may vary. You can always substitute with other decorative items or make your own frosting for a more allergy-friendly treat!
How long will it take to make snowman cupcakes from start to finish?
Making snowman cupcakes is a fun and engaging process! From mixing the batter to frost and decorate, you’re looking at about 1 hour for preparation, baking, and cooling time. Add another 30 minutes for decorating, making it a wholesome 1.5 hours of delightful holiday cheer in your kitchen!
Snowman Cupcakes That Bring Holiday Cheer to Your Table
Ingredients
Equipment
Method
- Preheat your oven to 350°F (175°C) and line a cupcake tin with paper liners. In a bowl, mix cocoa powder, flour, baking soda, and salt.
- Cream together softened butter and brown sugar until fluffy. Gradually add dry ingredients to form batter.
- Scoop batter into the liners, filling them two-thirds full. Bake for 15-18 minutes until a toothpick inserted comes out clean. Cool in tin for 10 minutes.
- Prepare vanilla buttercream by beating softened butter and powdered sugar until fluffy. Add heavy cream as needed for consistency.
- Pipe the buttercream onto cooled cupcakes creating a snow drift effect.
- Assemble snowmen using large marshmallows for heads, mini chocolate dots for faces, pretzel sticks for arms, and candy corn for noses.
- Chill cupcakes for 15 minutes if desired, then serve at room temperature.