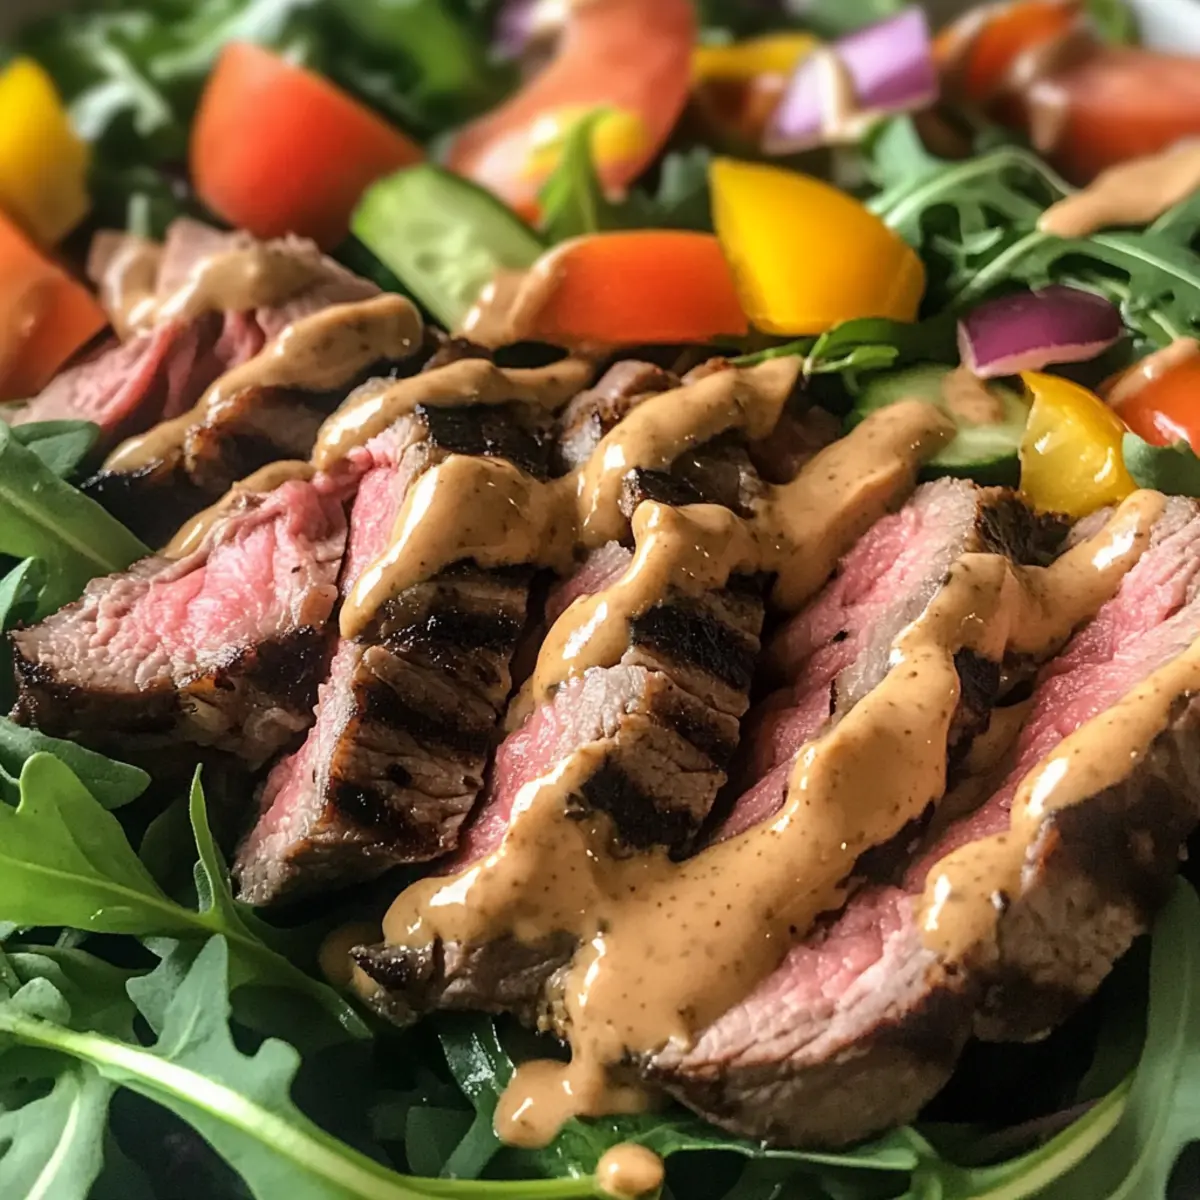
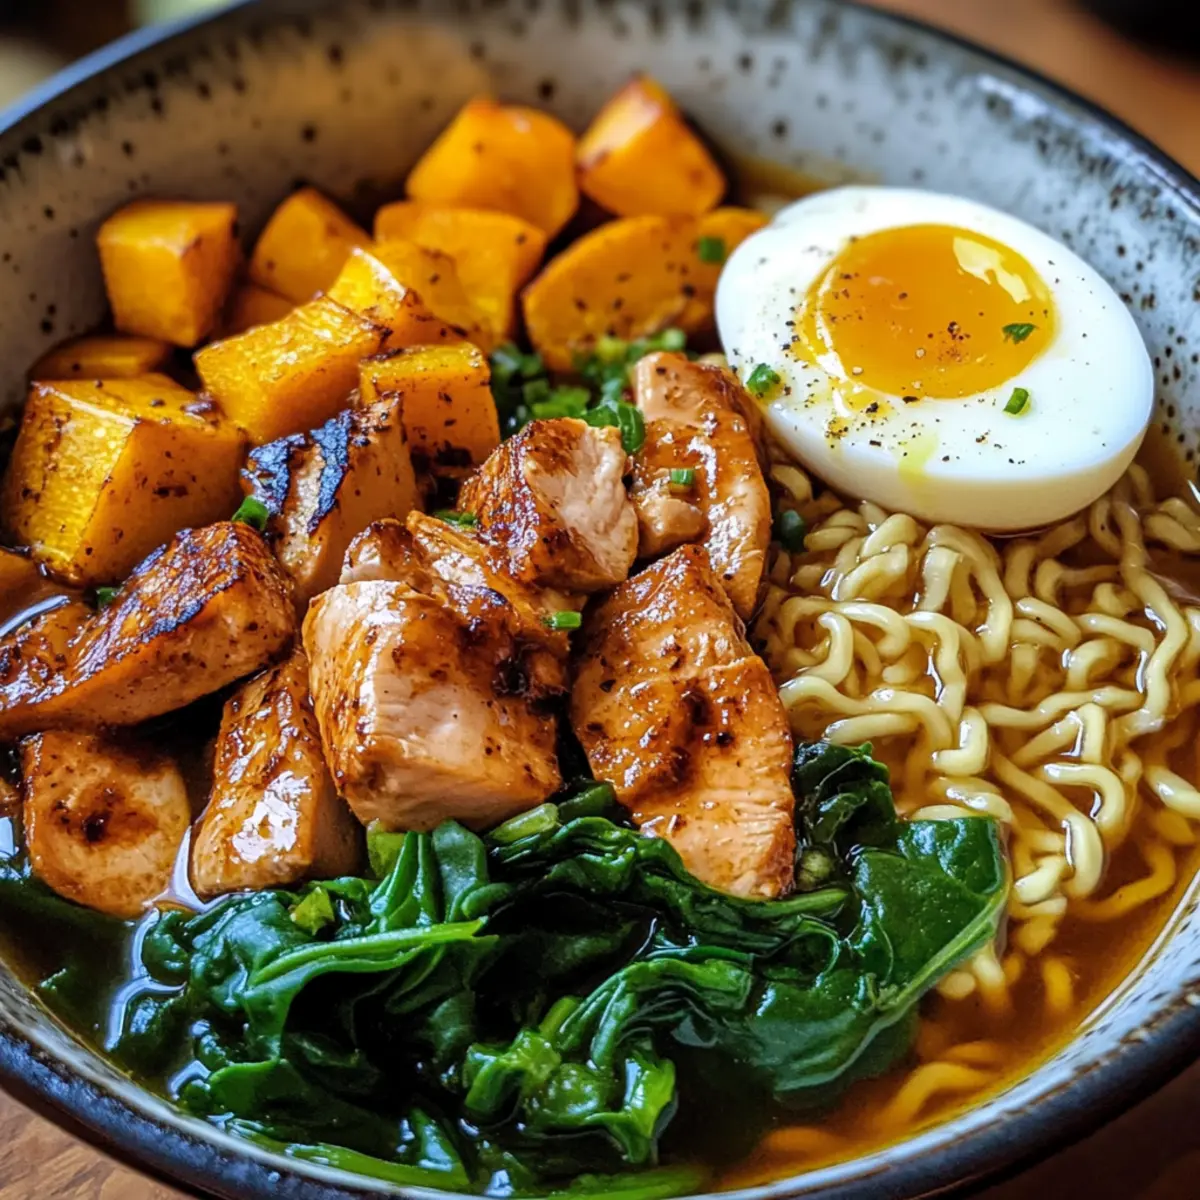
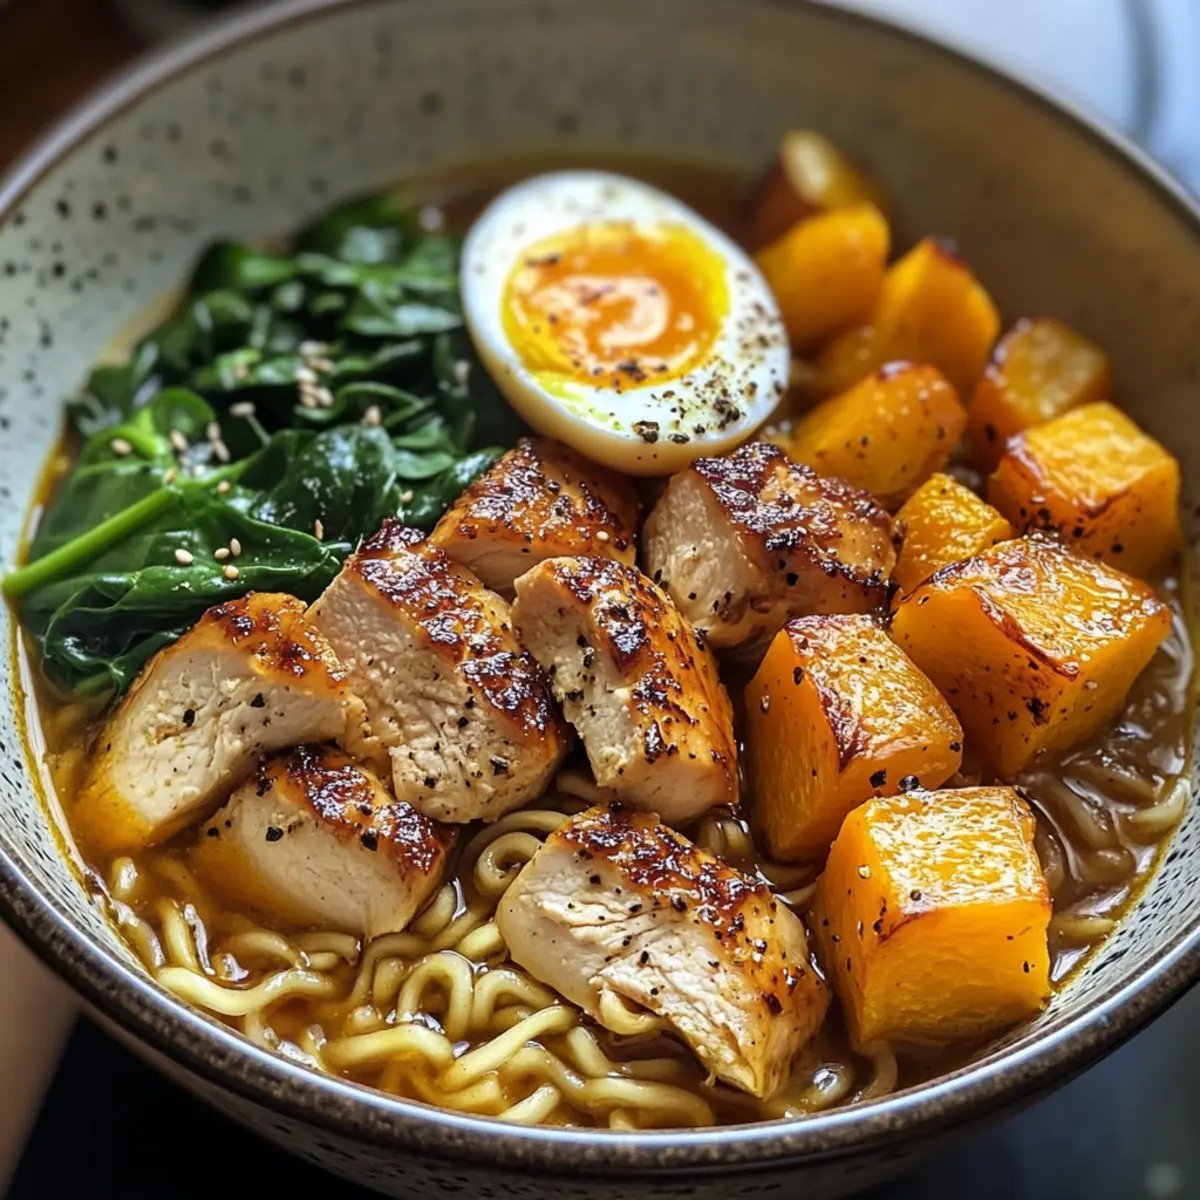
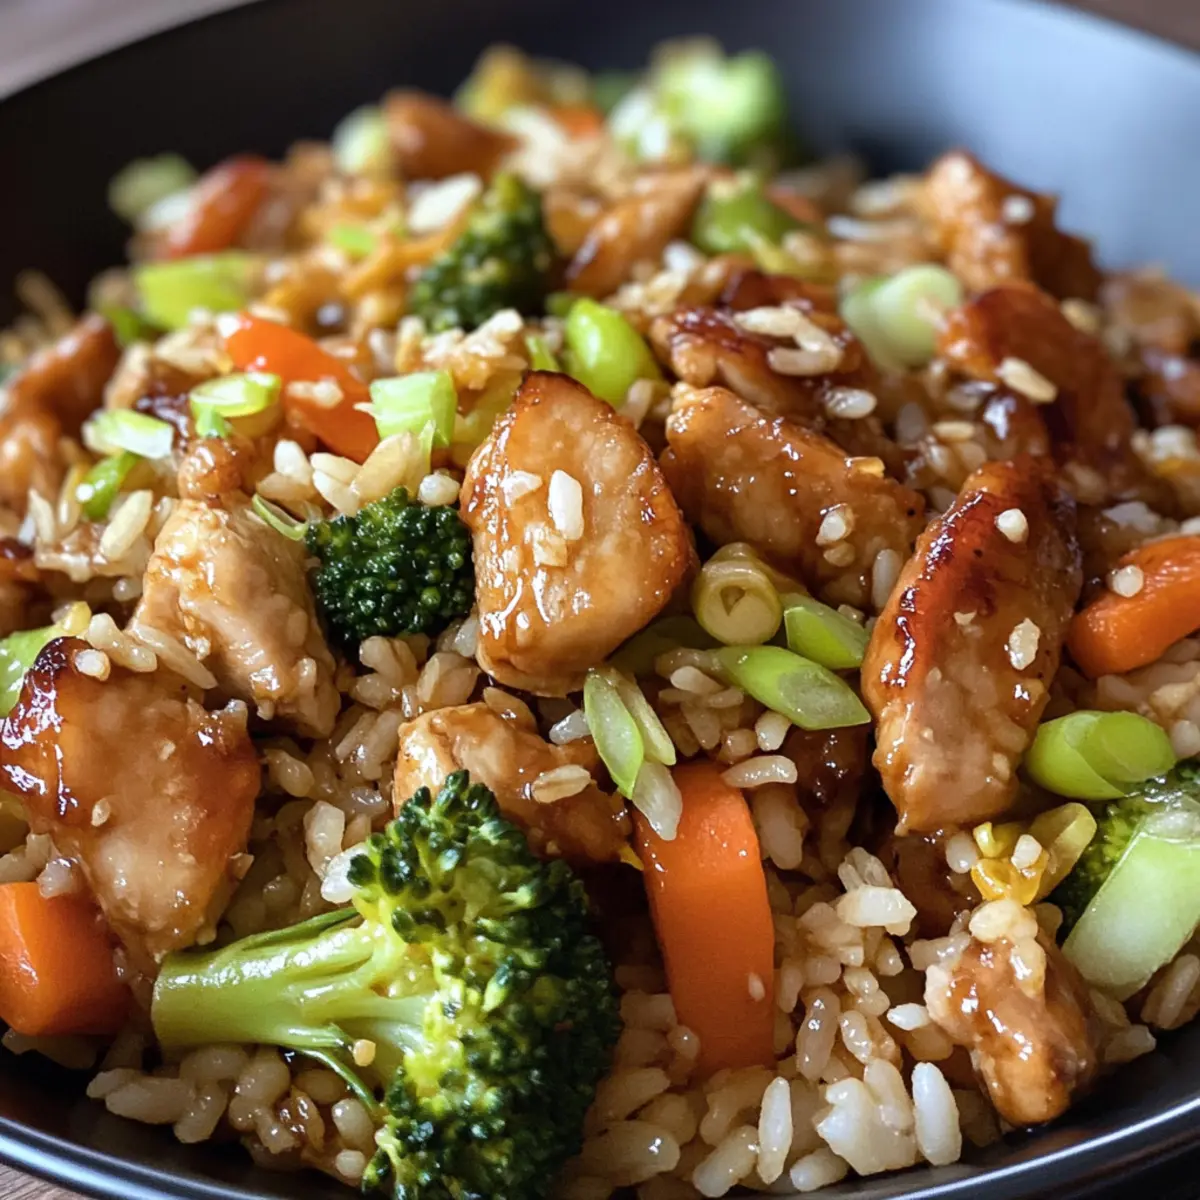
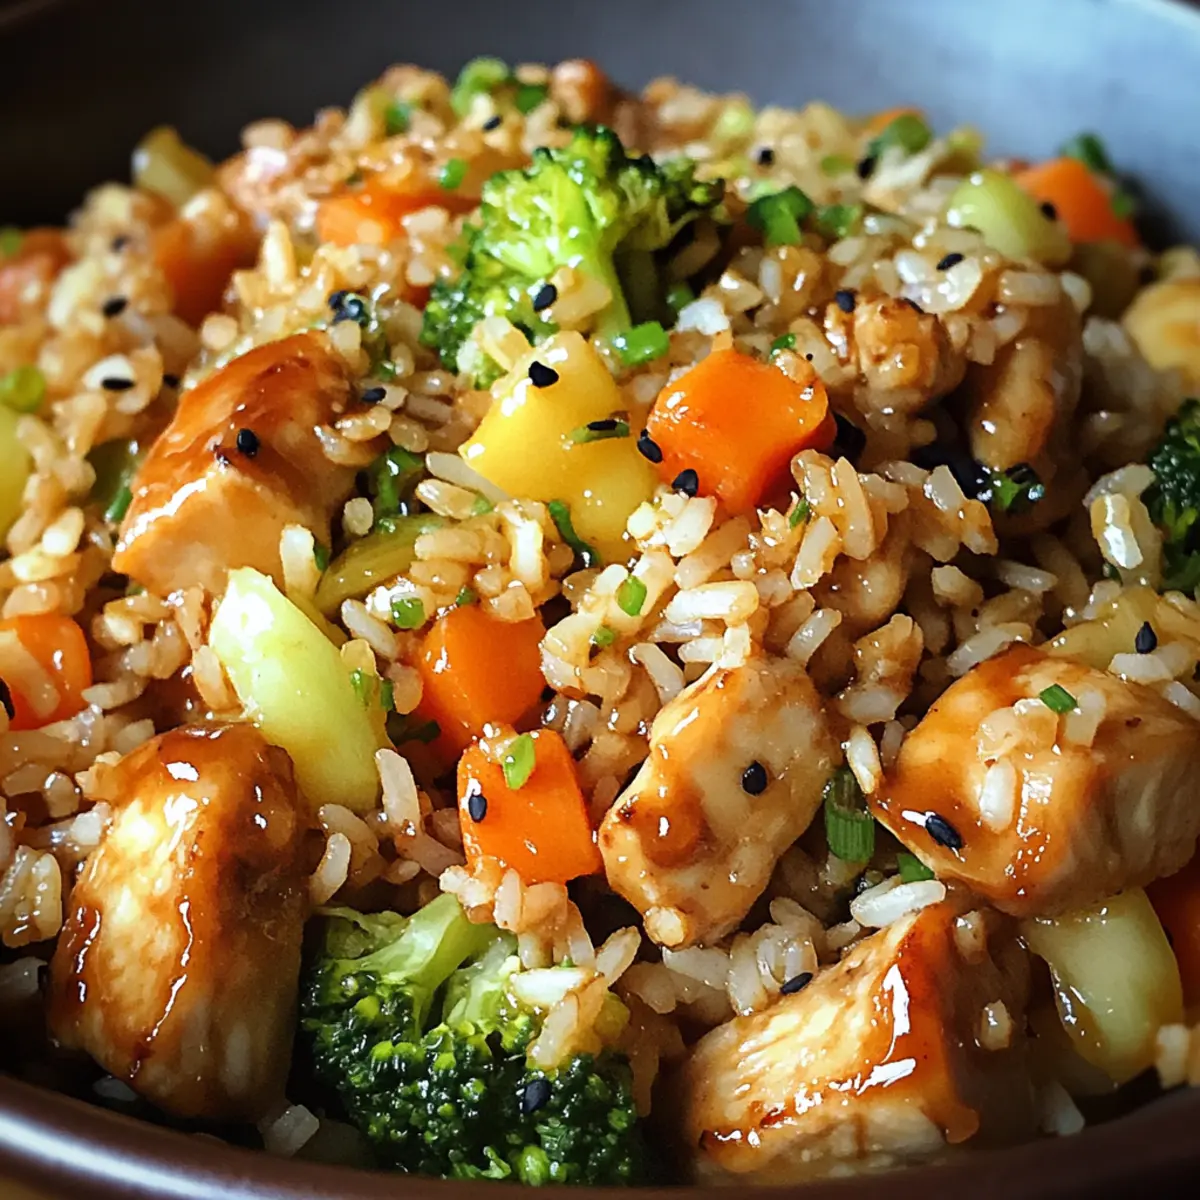
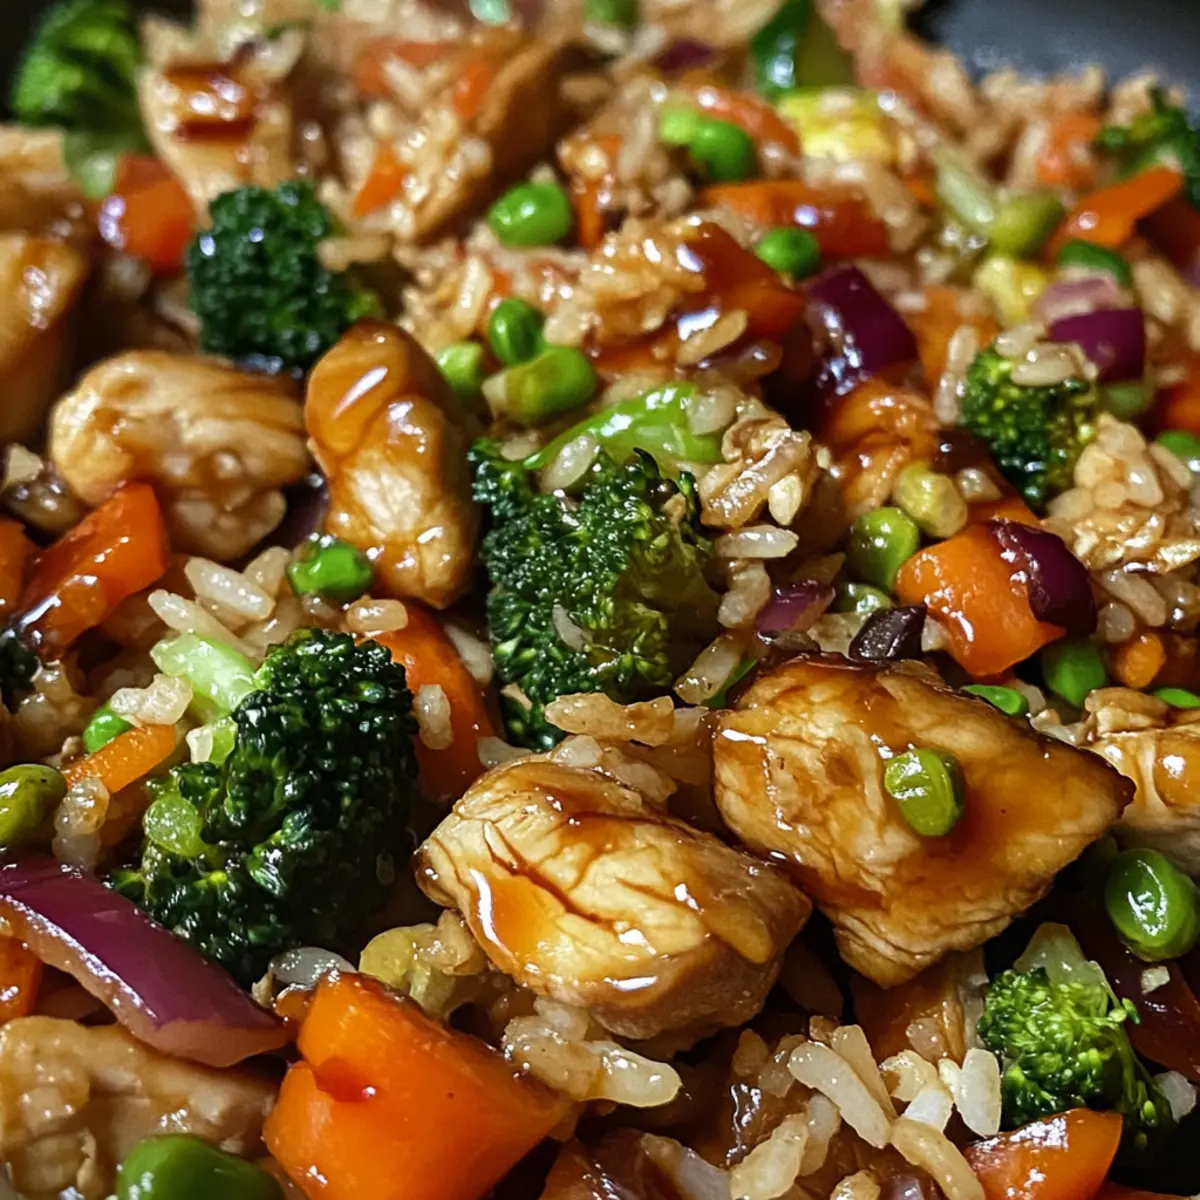
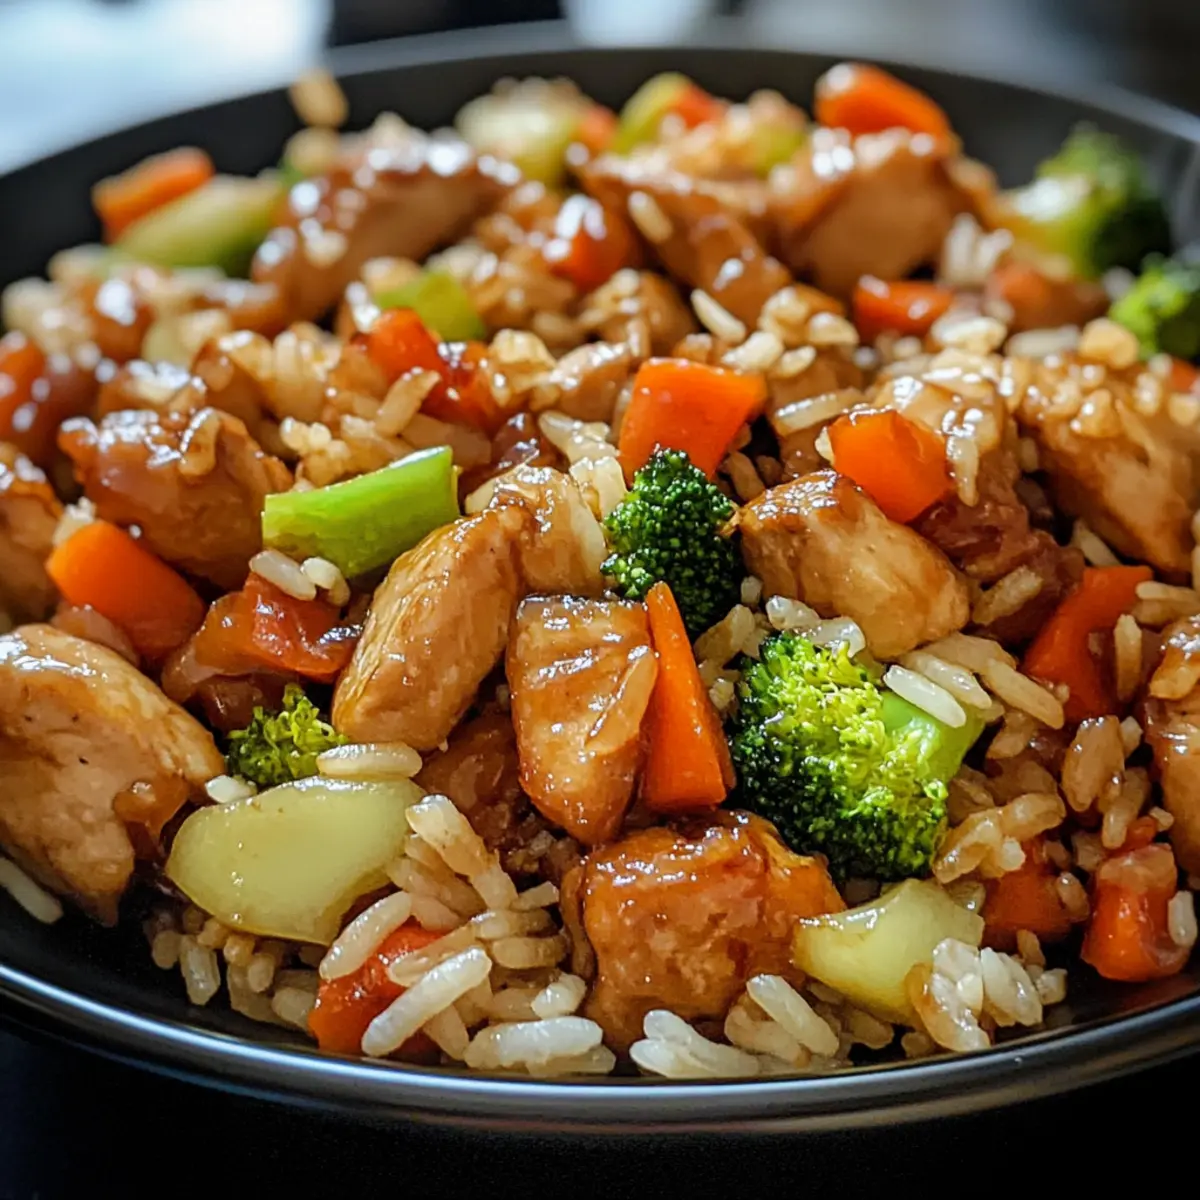
Decadent Hot Cocoa Cheesecake with Fluffy Marshmallow Cream

As I was flipping through my favorite holiday recipes, the cozy scent of hot chocolate wafted through my mind, instantly whisking me away to by-gone winters filled with laughter and warmth. That’s exactly how I felt when I first created this Indulgent Hot Cocoa Cheesecake with Marshmallow Whipped Cream—an enchanting fusion of nostalgia and sophistication. This delightful dessert not only brings comfort to chilly nights, but it’s also effortless to whip up, making it a perfect choice for festive gatherings. With simple ingredients and room for customization, you can make it uniquely yours, whether by adding a peppermint twist or a salted caramel surprise. Curious to see how this rich, creamy cheesecake can transform your holiday table? Let’s dive into the recipe!

Why is this cheesecake a must-try?

Indulgent Flavor: The Hot Cocoa Cheesecake is a divine marriage of creamy cheesecake with the nostalgia of hot cocoa, making every bite a delightful experience.
Customizable Options: With variations like peppermint twist and salted caramel surprise, you’ll have fun personalizing it for your unique tastes.
Effortless Prep: This recipe calls for simple ingredients and straightforward steps, perfect for both novice cooks and seasoned chefs looking to impress.
Crowd Favorite: Whether at holiday gatherings or cozy family dinners, this cake will certainly become the star dessert of the evening, bringing smiles to everyone’s faces.
Perfect Textures: The smooth cheesecake paired with fluffy marshmallow whipped cream creates an irresistible contrast that keeps you coming back for more. Enjoy it alongside warm cocoa or coffee!

Hot Cocoa Cheesecake Ingredients

For the Crust
Chocolate Cookie Crumbs – Provides the crust’s base; substitute with store-bought chocolate crust to save time.
Unsalted Butter – Binds the crust together and adds richness; use melted butter for better mixing.

For the Cheesecake Filling
Cream Cheese – The main component that provides creaminess; ensure it’s at room temperature for smooth blending.
Granulated Sugar – Sweetens the filling and balances the richness of the cream cheese.
Eggs – Add structure and stability; be sure they are at room temperature.
Hot Cocoa Mix – Infuses decadent chocolate flavor into the cheesecake; choose your favorite brand for best results.

For the Marshmallow Whipped Cream
Heavy Cream – Used for whipping to create the marshmallow topping; whip to soft peaks for the best texture.
Marshmallow Fluff – Adds sweetness and a delightful lightness; available in bulk for convenience.

Enjoy crafting your Hot Cocoa Cheesecake with Marshmallow Whipped Cream using these simple ingredients!

Step‑by‑Step Instructions for Hot Cocoa Cheesecake with Marshmallow Whipped Cream

Step 1: Preheat and Prepare
Preheat your oven to 325°F (163°C). To create a water bath for even baking, fill a large roasting pan with hot water and place it on the bottom rack of the oven. This moisture will help prevent cracks in the cheesecake as it bakes, ensuring your Hot Cocoa Cheesecake turns out perfectly smooth and creamy.

Step 2: Make the Crust
In a mixing bowl, combine chocolate cookie crumbs with melted unsalted butter until fully combined. Press this mixture firmly into the bottom of a 9-inch springform pan to form the crust. Make sure it’s evenly spread and compact to create a solid base for your Hot Cocoa Cheesecake. Set aside while you prepare the filling.

Step 3: Blend the Cheesecake Filling
In a large mixing bowl, beat room-temperature cream cheese and granulated sugar together until the mixture is smooth and creamy. This should take about 3-5 minutes. Gradually add in the eggs, one at a time, mixing until just combined. Then, stir in the hot cocoa mix, ensuring an even distribution for that rich, chocolate flavor throughout the filling.

Step 4: Bake the Cheesecake
Carefully pour the creamy filling over the prepared crust in the springform pan. Gently smooth the top with a spatula. Place the pan in the water bath and bake in the preheated oven for 50–60 minutes, or until the edges are set, but the center still slightly jiggles. This indicates it’s perfectly baked and will firm up as it cools.

Step 5: Cool the Cheesecake
Once baked, turn off the oven and leave the cheesecake inside for an additional hour. This gentle cooling process helps prevent cracks. Afterward, remove the cheesecake from the oven and let it cool at room temperature for about 30 minutes before transferring it to the refrigerator. Chill for at least 4 hours or overnight—this step is crucial for a firm texture.

Step 6: Prepare the Marshmallow Whipped Cream
In a chilled mixing bowl, whip the heavy cream until soft peaks form, which should take about 2-3 minutes. Gently fold in the marshmallow fluff until well combined. This fluffy topping is what makes the Hot Cocoa Cheesecake truly special, adding a delightful sweetness and lightness that contrasts beautifully with the dense cheesecake.

Step 7: Assemble and Serve
Once the cheesecake has chilled completely, carefully remove it from the springform pan. Spread the marshmallow whipped cream over the top of the cheesecake, creating a luscious layer. For an extra festive touch, consider garnishing with mini marshmallows or chocolate shavings before serving. Enjoy each bite of this indulgent Hot Cocoa Cheesecake as it steals the show at your next gathering!

Make Ahead Options

These Hot Cocoa Cheesecake with Marshmallow Whipped Cream are perfect for busy home cooks looking to save time during the holidays! You can prepare the crust and cheesecake filling up to 24 hours in advance; simply refrigerate the crust separately and pour the filling over it just before baking. To maintain optimal texture, ensure you cover the crust tightly with plastic wrap. After baking, chill the cheesecake in the refrigerator for at least 4 hours, but ideally overnight for the best flavor development. On the day of serving, whip the cream and fold in the marshmallow fluff just before spreading it over the cheesecake, ensuring it stays fluffy and fresh. This makes for an effortless, impressive dessert any time!

Hot Cocoa Cheesecake Variations

Feel free to get creative with this delightful recipe; it’s all about tailoring the flavors to bring you joy!

  • Peppermint Twist: Incorporate peppermint extract into the filling; don’t forget to finish with crushed candy canes on top for that festive flair.
  • Salted Caramel Surprise: Swirl in gooey caramel sauce before baking; this luscious addition brings a delightful contrast to the rich chocolate.
  • Nutty Crunch: Add chopped toasted nuts to the crust for a delightful crunch; walnuts or pecans elevate the texture beautifully while enhancing flavor.
  • Dark Chocolate Delight: Use dark chocolate hot cocoa mix for a more intense chocolaty bite; this variation is perfect for serious chocolate lovers.
  • Fruit Fusion: Garnish with fresh raspberries or cherries on top; their tartness brilliantly balances the sweetness, making it a refreshing finish.
  • Vegan Version: Substitute cream cheese with a cashew-based cream and use coconut cream for the whipped topping; it’s a deliciously dairy-free option!
  • Spicy Kick: Add a pinch of cayenne pepper or chili powder to the batter for a warm, spicy undertone; this adds a fun and unexpected twist!
  • Cocoa-Mocha Blend: Mix in a shot of espresso or coffee concentrate; the coffee enhances the chocolate flavor, making every bite incredibly rich.

Consider trying these delicious variations on your next slice, and don’t forget to pair your decadent cheesecake with a cup of warm cocoa or coffee. If you’re interested in more delightful twists, you may enjoy our Strawberry Cheesecake Dump or Blueberry Cream Cheese recipes for even more inspiration!

Storage Tips for Hot Cocoa Cheesecake with Marshmallow Whipped Cream

Fridge: Store your Hot Cocoa Cheesecake in an airtight container for up to 5 days. This will keep it fresh and maintain its creamy texture.

Freezer: For longer storage, freeze the cheesecake for up to 2 months. Wrap it tightly in plastic wrap and foil to prevent freezer burn.

Thawing: When you’re ready to enjoy your cheesecake, simply transfer it to the fridge to thaw overnight. This gradual process ensures it retains its delicious flavor and texture.

Reheating: If desired, serve slices at room temperature or warm slightly in the microwave for 10-15 seconds to elevate the rich flavors before enjoying.

What to Serve with Indulgent Hot Cocoa Cheesecake with Marshmallow Whipped Cream

Bring the whole family together with these delightful pairings that complement the cozy flavors of your dessert.

  • Creamy Mashed Potatoes: The buttery smoothness of mashed potatoes provides a comforting contrast to the rich flavor of the cheesecake.
  • Chocolate-Dipped Strawberries: Their sweet and tart juiciness not only enhances the cocoa richness but also adds a fresh twist to your dessert table.
  • Warm Apple Cider: A steaming cup of spiced cider invokes warmth and festivity, making it the perfect drink to accompany your cheesecake.
  • Mini S’mores Bites: Keep the campfire theme alive with these bite-sized treats; they mirror the marshmallow elements of your cheesecake while adding a crunchy texture.

For an unexpected twist, consider serving with a Chocolate Stout Cake. This rich, moist cake deepens the chocolate flavor experience, creating a decadent, indulgent occasion everyone will savor!

  • Caramel Sauce Drizzle: Elevate each slice with a drizzle of warm caramel sauce for a sweet contrast to the cheesecake’s creamy texture.
  • Buttery Popcorn: The crunch and saltiness of popcorn is a fun and unexpected pairing that balances the dessert’s sweetness.
  • Fresh Mint Tea: This floral beverage lightens the palate while providing a refreshing finish after enjoying your sumptuous creation.

Expert Tips for Hot Cocoa Cheesecake

Water Bath Wisdom: Ensure you always use a water bath while baking. This method provides even heat and moisture, which helps prevent cracks in your Hot Cocoa Cheesecake.

Room Temperature Essentials: Make certain that your cream cheese and eggs are at room temperature. This step is key for achieving a smooth and creamy filling without lumps.

Whipping Cream Technique: When whipping the heavy cream, aim for soft peaks. Overbeating can lead to a grainy texture, while soft peaks keep your marshmallow topping fluffy and light.

Proper Cooling: Let the cheesecake cool gradually in the oven with the door ajar. This gentle cooling method helps reduce the risk of cracks and ensures a perfectly creamy texture.

Chill Time Matters: For the best texture, refrigeration is essential. Ideally, let your Hot Cocoa Cheesecake chill overnight after baking to enhance flavor and firmness.

Hot Cocoa Cheesecake with Marshmallow Whipped Cream Recipe FAQs

What type of chocolate cookie crumbs should I use for the crust?
Absolutely! You can use store-bought chocolate cookie crumbs for convenience, or feel free to crush your favorite chocolate sandwich cookies. Just make sure to remove any cream filling, as it can affect the crust’s texture.

How can I store the Hot Cocoa Cheesecake after baking?
For best results, store your Hot Cocoa Cheesecake in an airtight container for up to 5 days in the fridge. This keeps it fresh and delicious. If you want to store it longer, wrap it tightly in plastic wrap and foil and freeze it for up to 2 months. Just ensure it’s completely cooled before freezing!

Can I freeze the Hot Cocoa Cheesecake?
Certainly! To freeze, allow the cheesecake to cool completely and then wrap it in a layer of plastic wrap followed by aluminum foil to avoid freezer burn. Thaw it overnight in the fridge when you’re ready to enjoy it. This way, all the flavors meld beautifully, and the texture remains lovely and creamy!

What if my cheesecake cracks during baking?
No worries! If your cheesecake cracks, it can still taste delicious. Next time, use a water bath to help regulate the temperature and humidity while it bakes. Also, ensure that you avoid opening the oven door frequently and let the cheesecake cool slowly in the oven to prevent sudden temperature changes.

Are there any dietary considerations for this recipe?
Yes! To make the Hot Cocoa Cheesecake suitable for dietary restrictions, you can substitute cream cheese with a cashew-based cream for a vegan version. Additionally, if there are allergies, make sure to check the labels on the hot cocoa mix and marshmallow fluff, as some may contain allergens like gluten or dairy.

Hot Cocoa Cheesecake with Marshmallow Whipped Cream

Decadent Hot Cocoa Cheesecake with Fluffy Marshmallow Cream

Indulge in this Hot Cocoa Cheesecake with Marshmallow Whipped Cream, a delightful dessert perfect for holiday gatherings and chilly nights.
Prep Time 30 minutes
Cook Time 1 hour
Chill Time 4 hours
Total Time 5 hours 30 minutes
Servings: 10 slices
Course: Dessert
Cuisine: American
Calories: 450

Ingredients
  

For the Crust
  • 1 cup Chocolate Cookie Crumbs or store-bought chocolate crust
  • 0.5 cup Unsalted Butter melted
For the Cheesecake Filling
  • 24 oz Cream Cheese at room temperature
  • 1 cup Granulated Sugar
  • 3 large Eggs at room temperature
  • 0.5 cup Hot Cocoa Mix your favorite brand
For the Marshmallow Whipped Cream
  • 1 cup Heavy Cream for whipping
  • 1 cup Marshmallow Fluff available in bulk

Equipment

  • mixing bowl
  • 9-inch springform pan
  • Roasting pan
  • hand mixer

Method
 

Step-by-Step Instructions
  1. Preheat your oven to 325°F (163°C) and prepare a water bath by filling a large roasting pan with hot water.
  2. Combine chocolate cookie crumbs with melted unsalted butter and press into the bottom of a 9-inch springform pan.
  3. Beat cream cheese and granulated sugar together until smooth. Add eggs one at a time and mix in hot cocoa mix.
  4. Pour the filling over the crust, smooth the top, and bake in the water bath for 50-60 minutes.
  5. Turn off the oven and leave the cheesecake inside for an hour, then cool at room temperature for 30 minutes before refrigerating for at least 4 hours.
  6. Whip heavy cream to soft peaks, then fold in marshmallow fluff. Spread over the chilled cheesecake.
  7. Remove from the springform pan and garnish as desired before serving.

Notes

Serve with mini marshmallows or chocolate shavings for added festivity.

Loaded Olive Salad: A Flavor-Packed Breeze for Any Meal

As I stood in my kitchen, the aromatic allure of olives filled the air, instantly transporting me to sun-drenched Mediterranean shores. This Loaded Olive Salad is not just a quick and easy salad; it’s a vibrant celebration of flavors and textures that shine bright on any table. With the versatility of canned ingredients, you can effortlessly whip up this delightful dish that’s perfect for busy days or impromptu gatherings. Imagine a medley of briny olives, tender artichoke hearts, and crisp veggies, all mingling in a zesty lime dressing. It’s not only healthy and vegetarian-friendly but also a fantastic way to impress your guests or bring life to your weeknight meals. Are you ready to dive into this colorful creation that promises to tantalize your taste buds?

Why is this Olive Salad a Must-Make?

Quick and Easy: The Loaded Olive Salad is a breeze to prepare, using readily available canned ingredients and fresh veggies. You can have it ready in minutes!

Versatile Ingredients: Feel free to mix and match your favorite olives, vegetables, or even proteins like canned tuna or chickpeas for a tailored experience. Discover more creative ideas in my Cabbage Apple Salad or the refreshing Cucumber Carrot Salad.

Rich Flavor Profile: Bursting with briny olives, tangy artichokes, and seasoned with zesty lime, every bite delivers a delightful explosion of flavors that will impress anyone at your table.

Perfect Side Dish: This salad enhances any meal—whether served alongside grilled meats or as a topping on sandwiches. It also makes for a great snack or appetizer with pita chips.

Make-Ahead Friendly: Enjoy the convenience of preparing this salad in advance! It lasts up to a week in the fridge, improving in flavor over time.

Loaded Olive Salad Ingredients

• Discover the delicious essentials for our Loaded Olive Salad!

For the Salad Base
Sliced Green Olives – Adds briny flavor and a crunchy texture; mix different varieties for added depth.
Sliced Black Olives – Contributes a milder taste to balance the green olives; perfect for a smoother finish.
Quartered Artichoke Hearts – Introduces a slightly tangy and earthy element; canned is convenient, but fresh can be used for a more robust flavor.
Sliced Hearts of Palm – Provides unique texture; easily replaced with other canned vegetables like asparagus if preferred.
Sliced Mushrooms – Adds depth of flavor and moisture; opt for fresh for a vibrant taste.
Red Bell Pepper – Offers sweetness and color; yellow or orange peppers can be delightful alternatives.
Green Onions – Enhances freshness and mild onion flavor; chives can serve as a delightful substitute.
Garlic – Brings robust flavor; fresh is best, but garlic powder will do in a pinch.

For the Dressing
Extra-Virgin Olive Oil – Provides richness to meld flavors; feel free to use your favorite oil for drizzle.
Dried Oregano – Elevates the overall flavor; thyme or Italian seasoning are great alternatives.
Ground Black Pepper – Adds heat and complexity; adjust according to taste preference.
Red Pepper Flakes – Offers a kick; use sparingly based on your spice tolerance.
Flesh and Juice of Lime – Brightens the salad with acidity; lemon can substitute when needed.

For Garnish
Chopped Flat Parsley – Adds a fresh herbal note; basil or cilantro could offer a creative twist.

Get ready to create your delicious Loaded Olive Salad!

Step‑by‑Step Instructions for Loaded Olive Salad

Step 1: Drain and Combine Canned Ingredients
Start by opening all your canned ingredients, including sliced green and black olives, quartered artichoke hearts, sliced hearts of palm, and sliced mushrooms. Drain them thoroughly to remove excess liquid, then place these ingredients into a large mixing bowl. The combination of olives and artichoke hearts sets the flavorful foundation for your Loaded Olive Salad.

Step 2: Chop Fresh Vegetables
Next, wash and finely chop the fresh red bell pepper and green onions. Add them to the bowl with the canned ingredients. The vibrant colors and crisp crunch of the vegetables will enhance both the look and texture of your Loaded Olive Salad, making it visually appealing and deliciously fresh.

Step 3: Prepare Garlic and Seasoning Mixture
Mince a couple of cloves of garlic and add them to the bowl, along with the chopped flat parsley. Sprinkle in dried oregano, ground black pepper, and red pepper flakes for an extra kick. Stir gently to combine these ingredients, ensuring the garlic and herbs are evenly distributed throughout the Loaded Olive Salad for a burst of flavor in every bite.

Step 4: Squeeze Lime for Zest
Cut a fresh lime in half and squeeze the juice into the bowl, making sure to catch any seeds. Add the flesh of the lime to the mix, as the citrusy acidity will brighten the flavors of your Loaded Olive Salad. This step elevates the taste, providing a refreshing zest that complements your bold ingredients.

Step 5: Drizzle with Olive Oil
Finally, drizzle extra-virgin olive oil over the salad mixture. Using about three tablespoons, the oil will add richness and help meld all the flavors together. Gently toss everything with a spatula or large spoon, ensuring that each ingredient is coated well in oil and seasoning for a harmonious Loaded Olive Salad.

Step 6: Chill or Serve Immediately
You can serve your Loaded Olive Salad right away, or for enhanced flavor, cover the bowl with plastic wrap and refrigerate it for at least one hour. This chilling time allows the ingredients to marinate and mesh beautifully, making it a delightful addition to any meal. Enjoy this vibrant salad as a side or topping!

Make Ahead Options

These Loaded Olive Salad is perfect for meal prep enthusiasts who need to save time during busy weeknights! You can chop and combine the canned ingredients, along with the fresh veggies (except the lime juice and olive oil), up to 24 hours in advance, storing them in an airtight container in the refrigerator. This not only streamlines your meal prep but also enhances the flavors as they meld together. When you’re ready to serve, simply add the lime juice, drizzle the olive oil, and give it a gentle toss. This way, the salad remains just as delicious, fresh, and vibrant as if it were made in the moment!

Loaded Olive Salad: Customization Ideas

Feel free to get creative with this Loaded Olive Salad, enhancing its flavor and nutrition to suit your tastes!

  • Dairy-Free: Replace feta with diced avocado for a creamy, dairy-free twist that adds healthy fats without compromising flavor.

  • Protein Boost: Add canned tuna or chickpeas for a more filling salad; this easily transforms it into a heartier meal option.

  • Herbal Variation: Try using fresh basil or cilantro instead of parsley for a different herbal profile; these offer refreshing notes that brighten the dish.

  • Extra Crunch: Toss in some chopped celery or radishes for an added crunch; their crisp texture complements the salad beautifully.

  • Heat Lovers: Sprinkle extra red pepper flakes or add diced jalapeños for a spicy kick; it’s a great way to liven up your salad!

  • Citrus Twist: Experiment with lemon in place of lime for a different zesty flavor; the fresh citrus aroma will invigorate your dish.

  • Veggie Swaps: Consider adding sliced cucumber or cherry tomatoes for a burst of freshness; both contribute delightful textures to your salad.

  • Mediterranean Flair: Incorporate olives stuffed with garlic or herbs for added flavor depth; this twist will take your Loaded Olive Salad to the next level.

Feel inspired? You can always explore more variations by checking out my lovely recipes like the Garden Harvest Salad or a classic Cabbage Cucumber Salad. Enjoy making it your own!

What to Serve with Loaded Olive Salad

Imagine a vibrant gathering where fresh flavors and delightful textures come together, creating a meal that’s as enjoyable to share as it is to devour.

  • Grilled Chicken Skewers: Juicy, seasoned chicken adds a heartiness that complements the tangy salad flavors perfectly.

  • Pita Chips and Hummus: Crunchy pita chips are a fun, easy addition, perfect for scooping up the salad or enjoying with classic hummus.

  • Mediterranean Flatbreads: Soft, warm flatbreads act as a perfect base for this salad, turning it into a flavorful and filling meal.

  • Couscous or Quinoa Salad: A light, grain-based salad adds a nutty flavor and texture, providing extra fiber and making the feast even more wholesome.

  • Roasted Vegetables: The earthy sweetness of roasted vegetables like zucchini and bell peppers rounds out the meal and complements the dish beautifully.

  • White Wine Spritzer: A refreshing white wine spritzer cools the palate, enhancing the olive salad’s briny punch while keeping the mood light and breezy.

  • Creamy Feta Dip: Serve this alongside for dipping; it brings a rich creaminess that harmonizes beautifully with the olive salad’s vibrant flavors.

This selection makes your meal unforgettable, revealing the seamless versatility of the Loaded Olive Salad.

Expert Tips for Loaded Olive Salad

  • Chill Time Matters: Allow the salad to sit for at least an hour before serving; this enhances the flavors and lets them meld beautifully.

  • Flavorful Variations: Experiment by combining different olive varieties for added depth in your Loaded Olive Salad. Don’t be afraid to mix and match!

  • Fresh Ingredients: While canned items make this salad quick, consider using fresh veggies whenever possible—like mushrooms and peppers—to elevate your dish even further.

  • Texture Balance: Aim for a mix of crunchy and tender ingredients, like combining hearts of palm with artichokes, for a delightful contrast in your salad.

  • Adjust Seasonings: Don’t hesitate to tweak the herbs and spices according to your preference, especially if you enjoy a bolder flavor profile in your Loaded Olive Salad.

How to Store and Freeze Loaded Olive Salad

Fridge: Store the Loaded Olive Salad in an airtight container for up to 7 days. Its flavors improve over time, making it a fantastic make-ahead option for busy days.

Room Temperature: It’s best to avoid leaving the salad out at room temperature for more than 2 hours. After that, refrigerate to prevent spoilage.

Freezer: Although not recommended for freezing due to the texture of the fresh ingredients, if necessary, you can freeze the salad for up to 3 months. Thaw in the fridge before serving for the best quality.

Reheating: There’s no need to reheat this salad. Serve it cold or at room temperature for a refreshing experience that highlights the vibrant flavors.

Loaded Olive Salad Recipe FAQs

What kind of olives should I use for the Loaded Olive Salad?
You absolutely can use a variety of olives! I recommend combining both sliced green and black olives for a delicious contrast of flavors. If you prefer, try adding Kalamata or even pickled varieties for a unique twist. Just make sure they are pitted for easy eating!

How should I store Loaded Olive Salad, and for how long will it last?
Store your Loaded Olive Salad in an airtight container in the refrigerator for up to 7 days. The flavors actually improve over time as they meld together, making it a perfect make-ahead dish for busy weeks!

Can I freeze Loaded Olive Salad?
While it’s not ideal to freeze this salad due to the texture of fresh ingredients once thawed, if you must, you can freeze it for up to 3 months. To do so, pack it tightly in a freezer-safe container. When you’re ready to enjoy it, thaw it in the refrigerator overnight. Just keep in mind that the crunchiness of the fresh veggies will be softened.

What if I have dietary restrictions or allergies?
If you’re preparing this salad for guests with dietary restrictions, you can easily make adjustments. For those with olive allergies, consider substituting with chopped cucumbers or a mix of other canned veggies. Additionally, ensure that the seasonings you use are free from allergens, and opt for gluten-free options if needed.

How can I troubleshoot if my Loaded Olive Salad seems bland?
If your Loaded Olive Salad isn’t bursting with flavor, it might need more seasoning. I recommend adding an extra squeeze of lime juice or a pinch of salt or black pepper to elevate the taste. You can also sprinkle in more herbs, like fresh parsley or oregano, for an aromatic enhancement. Just remember to taste as you go!

Can I make this salad ahead of time?
Definitely! This Loaded Olive Salad is actually better when made in advance. I suggest letting it chill in the fridge for at least an hour before serving, but you can prepare it up to a week ahead. Just keep it covered to maintain freshness!

Loaded Olive Salad

Loaded Olive Salad: A Flavor-Packed Breeze for Any Meal

Loaded Olive Salad is a vibrant celebration of flavors using versatile canned ingredients, perfect for busy days.
Prep Time 15 minutes
Chill Time 1 hour
Total Time 1 hour 15 minutes
Servings: 4 servings
Course: Lunch
Cuisine: Mediterranean
Calories: 200

Ingredients
  

For the Salad Base
  • 1 cup sliced green olives Adds briny flavor and crunchy texture
  • 1 cup sliced black olives Contributes milder taste
  • 1 cup quartered artichoke hearts Canned is convenient
  • 1 cup sliced hearts of palm Easily replaced with asparagus
  • 1 cup sliced mushrooms Opt for fresh for vibrant taste
  • 1 large red bell pepper Offers sweetness and color
  • 4 stalks green onions Enhances freshness
  • 2 cloves garlic Fresh is best
For the Dressing
  • 3 tbsp extra-virgin olive oil Provides richness
  • 1 tsp dried oregano Elevates flavor
  • 1 tsp ground black pepper Adjust according to taste
  • 1/2 tsp red pepper flakes Offers a kick
  • 1 juiced lime Brightens the salad
For Garnish
  • 1/4 cup chopped flat parsley Adds fresh herbal note

Equipment

  • mixing bowl
  • Knife
  • Cutting Board

Method
 

Preparation Steps
  1. Drain and combine canned ingredients including sliced green and black olives, quartered artichoke hearts, sliced hearts of palm, and sliced mushrooms.
  2. Wash and finely chop the fresh red bell pepper and green onions, then add to the bowl.
  3. Mince garlic and add to the bowl along with chopped flat parsley, oregano, black pepper, and red pepper flakes. Stir gently.
  4. Squeeze fresh lime juice into the bowl, adding the flesh of the lime as well.
  5. Drizzle extra-virgin olive oil over the salad, and gently toss to coat.
  6. Chill in the fridge for at least one hour or serve immediately.

Notes

Allow the salad to sit for at least an hour before serving to enhance flavors. Fresh ingredients elevate the dish.

Sausage Parmesan Cream Cheese Soup for Cozy Nights

As the cool air settles in, there’s nothing quite like the comfort of a warm bowl of creamy soup to chase away the chill. Today, I’m thrilled to share my creamy Sausage Parmesan Cream Cheese Soup, a dish that blends savory flavors and delightful spices, making it a true crowd-pleaser. Whipping up this cozy meal is a breeze, perfect for those hectic weeknights when you crave something hearty but don’t want to spend hours in the kitchen. The balance of spicy sausage combined with a rich cream cheese base and topped with freshly grated Parmesan will have your family asking for seconds! Ready to dive into a bowl of deliciousness that feels like a warm hug on a chilly day? Let’s get started!

Why is this soup a must-try?

Comforting and Creamy: This Sausage Parmesan Cream Cheese Soup wraps you in warmth and flavor, making it the ultimate comfort food on chilly nights.

Quick to Prepare: With minimal prep and cook time, you can have a satisfying meal ready in under 30 minutes—perfect for busy weeknights.

Flavor Explosion: The combination of spicy sausage, rich cream cheese, and zesty Parmesan creates a delightful symphony of taste that’s simply irresistible.

Versatile Ingredient Options: Feel free to personalize this soup! Add in veggies like spinach or zucchini, or switch up the cheese for a unique twist.

Family Favorite: Its rich and hearty nature ensures everyone at the table will love it, making dinner time a breeze.

Serve with crusty bread for a complete meal, and if you enjoy creamy dishes, you’ll also want to try my Cream Puffs Vanilla. Enjoy!

Sausage Parmesan Cream Cheese Soup Ingredients

For the Soup
Olive Oil – Adds richness and helps sauté vegetables; you can use vegetable oil or butter as a substitute.
Onion – Provides sweetness and depth of flavor when sautéed; yellow or white onions work beautifully.
Spicy Sausage – The main protein that adds a kick; substitute with mild sausage or ground beef for a gentler flavor.
Diced Tomatoes (canned) – Contributes acidity and thickness; fresh tomatoes can also be used if finely chopped.
Garlic Powder – Infuses aromatic flavor into the soup; replace with fresh minced garlic (1 clove = 1/8 tsp garlic powder).
Salt and Pepper – Essential for seasoning; adjust according to your taste preferences.
Italian Seasoning – Enhances the flavor profile; feel free to substitute with fresh herbs like basil and oregano.
Cream Cheese – Provides a creamy texture; Neufchâtel cheese can be used for a lighter version.
Chicken Broth – Adds depth; for a vegetarian option, vegetable broth works well.
Heavy Cream – Contributes richness; it can be omitted for a lighter soup.
Parmesan Cheese – Elevates umami flavor; freshly grated is preferred, with Pecorino Romano as a good substitute.
Fresh Parsley – Ideal for garnish, adding a pop of brightness; omit if you don’t have it on hand.

For Serving
Crusty Bread – Perfect for dipping and enjoying with your soup.
Extra Parmesan – A sprinkle on top before serving enhances the cheesy goodness that makes this Sausage Parmesan Cream Cheese Soup so beloved.

Each ingredient plays a vital role in creating the cozy essence of this dish, making it a delightful addition to your recipe rotation. Enjoy every spoonful of comforting goodness!

Step‑by‑Step Instructions for Sausage Parmesan Cream Cheese Soup

Step 1: Prepare Ingredients
Start by turning your Instant Pot to sauté mode and adding a drizzle of olive oil. Once the oil shimmers, toss in the chopped onions, stirring occasionally for about 3–4 minutes until they become soft and translucent. This step lays the foundation for the flavor-rich Sausage Parmesan Cream Cheese Soup.

Step 2: Cook Sausage
Next, add the spicy sausage to the pot, breaking it apart with a spatula. Continue cooking for about 6–8 minutes until it’s fully browned and no longer pink. Cancel sauté mode once the sausage is cooked through; this ensures a delicious protein mix that enhances your soup’s heartiness.

Step 3: Mix Ingredients
Stir in the diced tomatoes, garlic powder, salt, pepper, and Italian seasoning into the sausage mixture. Mix thoroughly for about 2 minutes to combine the flavors well. Then, add the cream cheese and chicken broth, stirring until the cream cheese is melted and fully incorporated. This creates the rich, silky base for the Sausage Parmesan Cream Cheese Soup.

Step 4: Pressure Cook
Seal the lid of your Instant Pot, ensuring it’s set to the pressure cooking position. Cook on high pressure for 5 minutes. Once the time is up, carefully perform a quick release of pressure by flipping the valve. This method prevents overcooking and maintains the soup’s vibrant flavors and textures.

Step 5: Finish Soup
After the pressure is released, open the lid and stir in the heavy cream and freshly grated Parmesan cheese. Allow it to simmer for an additional 2 minutes until the cheese melts into a luscious creaminess. Serve the soup in bowls, garnishing each with a sprinkle of fresh parsley and extra Parmesan for added flavor.

Sausage Parmesan Cream Cheese Soup Variations

Customize this comforting soup to fit your tastes and dietary needs while creating delightful surprises in each bowl!

  • Vegetarian: Replace sausage with a medley of your favorite veggies and hearty beans for a robust meatless meal.

  • Gluten-Free: Ensure your sausage and broth are gluten-free, allowing everyone to enjoy this creamy dish without worry.

  • Spice It Up: Add diced jalapeños or a sprinkle of red pepper flakes to elevate the heat level for a spicier version.

  • Herb Infusion: Experiment with fresh herbs like thyme or rosemary; adding them during the cooking process will impart a fragrant aroma.

  • Creamy Coconut Twist: Swap heavy cream for coconut cream for a dairy-free twist that adds a luscious tropical flavor.

  • Cheesy Varieties: Instead of Parmesan, try using a sharp cheddar or smoked Gouda to create a different flavor profile in your soup.

  • Protein Boost: Incorporate cooked, shredded chicken or turkey in place of the sausage for a leaner, protein-packed alternative.

  • Extra Veggie Goodness: Toss in diced zucchini, bell peppers, or spinach before pressure cooking for more nutrients and texture.

For an added creamy treat on the side, consider serving this with crusty bread or my delicious Savory Vegetable Cheese Pancakes. Enjoy your flavorful journey in the kitchen!

Make Ahead Options

These Sausage Parmesan Cream Cheese Soup prep tips are perfect for busy cooks looking to save time during the week! You can chop the onions and prepare the sausage up to 24 hours in advance; simply store the prepared ingredients in an airtight container in the refrigerator. Additionally, you can mix the diced tomatoes, garlic powder, salt, pepper, and Italian seasoning together ahead of time, ready to be combined later. To maintain quality, consider refrigerating everything separately until you’re ready to cook. When you’re prepared to serve, just follow the cooking instructions, adding the cream cheese and broth, and you’ll have this comforting soup ready in no time—delicious and satisfying, just as if you made it fresh!

Expert Tips for Sausage Parmesan Cream Cheese Soup

Avoid Clumping: Always break the sausage into small pieces while cooking. This ensures a smooth texture in your Sausage Parmesan Cream Cheese Soup.

Quick Release Is Key: Use the quick release method after pressure cooking to prevent overcooking, which can lead to an unappetizing texture.

Fresh Garlic Upgrade: If you prefer fresh garlic, add it along with the sausage. This enhances the depth of flavor significantly.

Taste as You Go: Adjust salt and pepper according to your palate. Flavor blends develop best when seasoned throughout the cooking process.

Add Extra Veggies: Incorporate diced zucchini or spinach during the mixing step for added nutrients without sacrificing flavor.

Storage Savvy: If you have leftovers, store them in an airtight container for up to 3 days in the fridge. Enjoy your delicious Sausage Parmesan Cream Cheese Soup again!

What to Serve with Sausage Parmesan Cream Cheese Soup

As you savor each spoonful of this rich and creamy soup, consider rounding out your meal with delightful pairings that complement its bold flavors and comforting texture.

  • Crusty Bread: Perfect for dipping, it soaks up the sumptuous broth beautifully, enhancing each bite.

  • Garlic Breadsticks: With a buttery garlic essence, these are wonderful for mopping up the soup, adding a savory crunch.

  • Caesar Salad: The crisp romaine and tangy dressing provide a refreshing counterbalance to the richness, keeping things light.

  • Roasted Vegetables: Caramelized carrots, zucchini, and bell peppers bring a sweet contrast, offering a colorful and nutritious side.

  • Steamed Broccoli: A pop of green, this nutritious addition balances the meal while adding texture to the creamy experience.

  • Sparkling White Wine: A glass of chilled bubbly elevates the meal, providing a delightful effervescence that complements the rich soup.

  • Apple Crisp: For dessert, a warm apple crisp drizzled with vanilla ice cream finishes the evening with a sweet note, harmoniously rounding off your comfort food experience.

Let each pairing elevate your dinner to something truly special, adding layers of flavor and joy to your cozy night in!

Storage Tips for Sausage Parmesan Cream Cheese Soup

Fridge: Store leftovers in an airtight container for up to 3 days, ensuring the soup retains its creamy texture and flavor.

Freezer: Freeze the soup in a freezer-safe container for up to 1 month. Let it cool completely before sealing to avoid freezer burn.

Reheating: When ready to enjoy, thaw overnight in the fridge and reheat gently on the stove over low heat, stirring occasionally.

Separation Note: If the soup thickens while stored, don’t worry! Stir in a splash of broth or water while reheating to restore creaminess.

Sausage Parmesan Cream Cheese Soup Recipe FAQs

What type of sausage should I use for this soup?
You can use spicy sausage for a flavor kick, or substitute it with mild sausage or ground beef if you prefer less heat. For a healthier option, turkey sausage works wonderfully too!

How should I store leftovers of Sausage Parmesan Cream Cheese Soup?
Store the soup in an airtight container in the fridge for up to 3 days. Make sure it cools down completely before sealing to help maintain its creamy texture.

Can I freeze this soup?
Absolutely! You can freeze Sausage Parmesan Cream Cheese Soup in a freezer-safe container for up to 1 month. Just let it cool completely, then pour into containers, leaving a little space at the top as it will expand during freezing.

What if my soup is too thick after storage?
If you find the soup has thickened after being in the fridge or freezer, don’t worry! When reheating, just stir in a splash of chicken broth or water to bring back its creamy consistency.

Can I use fresh garlic instead of garlic powder?
Very! If you prefer fresh garlic, use one clove minced as a substitute for each teaspoon of garlic powder. Add it along with the sausage during cooking to infuse more flavor into the soup.

Is this soup suitable for special diets?
The Sausage Parmesan Cream Cheese Soup can be made gluten-free by opting for gluten-free broth and sausage. Additionally, for a keto-friendly version, simply adjust the cream content and choose suitable sausage! Always check labels to be sure.

Sausage Parmesan Cream Cheese Soup

Sausage Parmesan Cream Cheese Soup for Cozy Nights

Savor the comforting flavors of Sausage Parmesan Cream Cheese Soup, perfect for chilly nights.
Prep Time 10 minutes
Cook Time 20 minutes
Total Time 30 minutes
Servings: 4 bowls
Course: Dinner
Cuisine: American
Calories: 350

Ingredients
  

For the Soup
  • 1 tablespoon Olive Oil Substitute with vegetable oil or butter if desired.
  • 1 medium Onion Yellow or white onions work well.
  • 1 pound Spicy Sausage Can substitute with mild sausage or ground beef.
  • 14.5 ounces Diced Tomatoes (canned) Fresh tomatoes can also be used.
  • 1 teaspoon Garlic Powder Or 1 clove fresh minced garlic.
  • to taste Salt
  • to taste Pepper
  • 1 teaspoon Italian Seasoning Can replace with fresh herbs.
  • 8 ounces Cream Cheese Neufchâtel cheese for a lighter option.
  • 4 cups Chicken Broth Vegetable broth for a vegetarian option.
  • 1 cup Heavy Cream Can omit for a lighter soup.
  • 1/2 cup Parmesan Cheese Freshly grated is preferred.
  • to garnish Fresh Parsley Omit if not available.
For Serving
  • 1 loaf Crusty Bread Perfect for dipping.
  • to taste Extra Parmesan For sprinkling on top before serving.

Equipment

  • Instant Pot

Method
 

Step-by-Step Instructions
  1. Start by turning your Instant Pot to sauté mode and adding a drizzle of olive oil. Once the oil shimmers, toss in the chopped onions, stirring occasionally for about 3–4 minutes until they become soft and translucent.
  2. Add the spicy sausage to the pot, breaking it apart with a spatula. Continue cooking for about 6–8 minutes until it's fully browned and no longer pink. Cancel sauté mode once the sausage is cooked through.
  3. Stir in the diced tomatoes, garlic powder, salt, pepper, and Italian seasoning into the sausage mixture. Mix thoroughly for about 2 minutes to combine the flavors well. Then, add the cream cheese and chicken broth, stirring until the cream cheese is melted and fully incorporated.
  4. Seal the lid of your Instant Pot, ensuring it’s set to the pressure cooking position. Cook on high pressure for 5 minutes. Once the time is up, carefully perform a quick release of pressure.
  5. After the pressure is released, open the lid and stir in the heavy cream and freshly grated Parmesan cheese. Allow it to simmer for an additional 2 minutes until the cheese melts into a luscious creaminess. Serve the soup in bowls, garnishing each with a sprinkle of fresh parsley and extra Parmesan.

Notes

Store leftovers in an airtight container for up to 3 days in the fridge. If freezing, use a freezer-safe container for up to 1 month.

Irresistible Garlic Butter Pasta for Ultimate Comfort Cooking

As I stood in my kitchen, the warm aroma of confit garlic wafted through the air, reminding me of cozy Italian dinners shared with loved ones. This Insanely Delicious Garlic Butter Pasta is a celebration of simple ingredients transformed into a comforting dish that’s perfect for any occasion. The confit garlic delivers a rich, mellow flavor that infuses the butter, creating a glossy sauce that clings to each strand of pasta. With a quick prep time and minimal fuss, this recipe is both a time-saver and a crowd-pleaser, ensuring even the busiest of weeknights can feel special. Whether you’re looking for a cozy dinner for one or an impressive dish for family gatherings, you’re just moments away from a plateful of warmth and satisfaction. Ready to indulge in this hearty experience? Let’s dive into the recipe!

Why is Garlic Butter Pasta a Must-Try?

Simplicity at its finest: This recipe boasts an uncomplicated process, making it ideal for both novice cooks and seasoned chefs alike.

Irresistible flavors: The confit garlic lends a depth of taste that elevates the dish above typical pasta recipes, ensuring every bite is a delight.

Quick and satisfying: With minimal prep time, you can whip up this comforting meal even on the busiest weeknights, perfect for those who crave homemade goodness.

Versatile options: Whether you want to swap out rosemary for fresh thyme or add a splash of lemon, variations are easy and plentiful. Looking for more cozy pairings? Try it with a side of Garlic Butter French fries for a delectable experience.

Crowd-pleaser: Serve it at family gatherings or casual dinner parties, and watch as your loved ones rave about this dish!

Garlic Butter Pasta Ingredients

• To create your own Garlic Butter Pasta, gather these essential ingredients for an unforgettable meal:

For the Confit Garlic

  • Garlic – Use whole cloves for a sweet, mellow flavor that transforms the dish.
  • Extra Virgin Olive Oil – A quality oil enhances garlic flavor and richness.
  • Fresh Rosemary – Optional but adds a lovely aromatic touch during the confit process.

For the Sauce

  • Room Temperature Butter – This creates a creamy base for the sauce; go with salted for added flavor.
  • Black Pepper – Freshly cracked adds a subtle kick; adjust to your taste.

For the Pasta

  • Pasta (dried or fresh) – Essential for this dish; cook until al dente for optimal sauce absorption.

For Serving

  • Parmesan Cheese – Grate it on top for an extra layer of savory richness; highly recommended for your Garlic Butter Pasta.

Enjoy crafting this comforting dish, perfect for any occasion!

Step‑by‑Step Instructions for Insanely Delicious Garlic Butter Pasta

Step 1: Prepare Confit Garlic
Begin by preheating your oven to 300°F (150°C). In a baking dish, combine peeled garlic cloves with fresh rosemary and generously submerge them in high-quality extra virgin olive oil. Bake this mixture for 45 minutes to 1 hour, until the garlic turns golden and soft, releasing a rich, aromatic scent that fills your kitchen.

Step 2: Blend Garlic and Butter
Once the confit garlic has cooled, transfer it to a mixing bowl. Add room temperature butter to the bowl and use a hand blender or a food processor to blend the mixture until smooth and creamy. If desired, refrigerate the garlic butter until slightly hardened, which will help it hold its shape in the next steps of making your Garlic Butter Pasta.

Step 3: Cook Pasta
In a large pot, bring water to a rolling boil and season it generously with salt. Add your choice of pasta and cook according to the package instructions, ensuring that you aim for an al dente texture. This typically takes about 8 to 12 minutes; testing a piece for doneness ensures it absorbs the sauce beautifully when combined.

Step 4: Make the Sauce
While the pasta cooks, heat a large skillet over medium heat. Add the blended garlic butter, allowing it to melt gently without overheating. Stir in freshly cracked black pepper to taste, for a little kick. Keep an eye on the garlic butter; you want it to remain fragrant without browning, setting the stage for your delectable Garlic Butter Pasta.

Step 5: Combine Pasta and Sauce
Before draining the pasta, reserve half a cup of the starchy cooking water. Once drained, add the hot pasta directly to the skillet with the garlic butter sauce. Pour in the reserved pasta water, and toss everything together until the pasta is well-coated and the sauce is emulsified, creating a silky finish that clings to every strand.

Step 6: Serve
Plate your beautifully sauced Garlic Butter Pasta and sprinkle it generously with freshly grated Parmesan cheese. For an extra touch, add a few sprigs of fresh rosemary or parsley, along with a pinch of the remaining black pepper. This adds color and flavor, elevating your meal to a restaurant-quality dish that’s sure to impress.

How to Store and Freeze Garlic Butter Pasta

Fridge: Store leftovers in an airtight container for up to 3 days to keep your Garlic Butter Pasta fresh. Reheat gently on the stove or microwave to avoid overcooking.

Freezer: For longer storage, freeze the pasta in individual portions in freezer-safe containers for up to 2 months. Thaw overnight in the fridge before reheating.

Reheating: When reheating, add a splash of water or olive oil to help revive the creamy texture of the sauce. Stir well to incorporate moisture for a deliciously warm meal.

Garlic Butter Storage: If you have extra confit garlic butter, store it in the fridge for up to a week. Use it on bread or veggies for a quick flavor boost!

Make Ahead Options

These Insanely Delicious Garlic Butter Pasta components are perfect for busy home cooks looking to save time during the week! You can prepare the confit garlic and garlic butter up to 3 days in advance by blending and refrigerating them in an airtight container to maintain flavor and freshness. The garlic butter will stay just as delicious; just let it sit at room temperature for a few minutes before using to soften. When you’re ready to enjoy your meal, simply cook the pasta according to package instructions, then combine it with the garlic butter in a skillet while adding reserved pasta water to create the perfect sauce. With this make-ahead option, you’ll be dining on comfort food in no time!

Garlic Butter Pasta Variations

Customize your dish with these delightful tweaks that awaken the senses and elevate your garlic butter pasta.

  • Fresh Herb Swap: Replace rosemary with fresh thyme or oregano. This subtle change creates a fragrant twist that celebrates the simplicity of herbs.

  • Citrus Splash: Add a squeeze of fresh lemon juice right before serving. The brightness will beautifully balance the richness of the garlic butter.

  • Vegan Twist: Use vegan butter instead of regular butter for a plant-based version that doesn’t compromise on flavor. Enjoy the creamy richness while keeping it completely dairy-free.

  • Cheese Alternatives: For a nutty flavor, try using nutritional yeast instead of Parmesan. It’s perfect for achieving that cheesy taste without dairy!

  • Spicy Kick: Sprinkle in some red pepper flakes or a dash of hot sauce while cooking the garlic butter for a spicy twist that will wake up your taste buds.

  • Mushroom Medley: Sauté some mushrooms with the garlic butter for added richness and a delightful umami flavor. This makes the dish heartier and ever so satisfying.

  • Nutty Finish: Toasted pine nuts or walnuts can bring a delightful crunch. Sprinkle them on top just before serving for added texture that complements the silkiness of the pasta.

  • Creamy Version: Stir in a splash of heavy cream or half-and-half after melting the garlic butter for a richer, creamier sauce that envelops each noodle in indulgence.

Explore these variations and make this garlic butter pasta truly your own—perfect alongside a plate of Garlic Butter French fries or a fresh salad!

What to Serve with Insanely Delicious Garlic Butter Pasta

This vibrant garlic butter pasta pairs wonderfully with complementary side dishes and drinks that enhance its rich flavors.

  • Simple Leafy Salad: A crisp, fresh salad provides a bright contrast to the creamy pasta, adding crunch and a refreshing element to your meal.

  • Roasted Vegetables: Seasonal veggies roasted to perfection bring sweetness and depth, balancing the richness of the garlic butter beautifully.

  • Garlic Breadsticks: These warm, buttery sticks echo the savory garlic notes in your pasta, creating a satisfying and indulgent duo that’s hard to resist.

  • Crispy Brussels Sprouts: The slight bitterness and crunch of roasted Brussels sprouts add an exciting texture and a touch of nuttiness that complements the dish.

  • Lemon Zest: Not a traditional side, but a sprinkle of lemon zest just before serving brightens the flavors, ensuring your pasta is lively and invigorating.

  • Chilled White Wine: A crisp Sauvignon Blanc or Pinot Grigio pairs well, as the acidity cuts through the richness, creating a harmonious balance in each bite.

  • Chocolate Mousse: End the meal on a sweet note with a light, airy chocolate mousse. Its richness pairs surprisingly well, creating an utterly delightful experience.

Tips for the Best Garlic Butter Pasta

  • Quality Ingredients: Always use high-quality extra virgin olive oil and fresh garlic. This will enhance the richness of your Garlic Butter Pasta, making every bite irresistible.

  • Don’t Overcook: Keep an eye on the pasta and aim for al dente. Overcooked pasta can become mushy and won’t hold the flavorful sauce as well.

  • Reserve Pasta Water: Remember to save some pasta water before draining! The starchy water is essential for achieving the perfect sauce consistency in your Garlic Butter Pasta.

  • Gentle Heat: When melting the garlic butter, use medium heat to avoid burning the garlic. Burnt garlic can create a bitter flavor that overshadows the dish.

  • Finishing Touches: Garnish with freshly grated Parmesan and herbs right before serving. This adds brightness and enhances the presentation, making your meal truly special.

  • Customization: Feel free to experiment with herbs or citrus flavors. A squeeze of lemon can brighten up the garlic butter and add an exciting twist to the classic dish.

Garlic Butter Pasta Recipe FAQs

How do I choose ripe garlic for confit garlic?
Absolutely! When selecting garlic, look for bulbs that are firm and free from soft spots or blemishes. A good bulb should feel heavy in your hand. If there are any dark spots or sprouting cloves, it’s best to avoid them, as they may affect the flavor and quality of your confit garlic.

What is the best way to store leftover Garlic Butter Pasta?
Store any leftovers in an airtight container in the refrigerator for up to 3 days. Be sure to cool the pasta to room temperature before sealing it. When you’re ready to enjoy, gently reheat it in a skillet over low heat or in the microwave. This way, you’ll preserve its delicious flavors and creamy texture!

Can I freeze Garlic Butter Pasta?
Yes, you can! For freezing, portion the cooked pasta into freezer-safe containers, ensuring that there’s a little bit of sauce on each serving. Seal tightly and store in the freezer for up to 2 months. When ready to eat, thaw overnight in the fridge, and then reheat gently, adding a splash of olive oil or pasta water to revive the sauce’s consistency.

How can I troubleshoot if my garlic butter sauce is too oily or separates?
It happens! If your sauce becomes too oily, try adding a bit of reserved pasta water a tablespoon at a time while stirring steadily. This helps emulsify the fat and create a more cohesive sauce. Also, make sure you’re melting your garlic butter over medium heat. Overheating can cause the fats to separate, diminishing the dish’s overall flavor.

Can I use this recipe for people with dietary restrictions?
Certainly! For a dairy-free version, substitute regular butter with a vegan alternative, and skip the Parmesan cheese or use a dairy-free cheese. Additionally, check for any allergies to garlic; although it’s rare, some people may have sensitivities. Always ensure that any substitute ingredients comply with your guests’ dietary needs for the best experience!

How long does confit garlic last in the fridge?
Confit garlic can be stored in an airtight container in the refrigerator for up to 1 week. It’s best to keep it submerged in its oil, as this preserves its flavor and prevents spoilage. You can use it on bread, veggies, or even in dressings for an easy flavor boost!

Garlic Butter Pasta

Irresistible Garlic Butter Pasta for Ultimate Comfort Cooking

This Garlic Butter Pasta is a delightful dish that combines confit garlic and creamy butter for a comforting experience.
Prep Time 10 minutes
Cook Time 1 hour
Garlic Confit Time 45 minutes
Total Time 1 hour 10 minutes
Servings: 4 servings
Course: Dinner
Cuisine: Italian
Calories: 450

Ingredients
  

For the Confit Garlic
  • 1 cup Whole Garlic Cloves peeled
  • 1 cup Extra Virgin Olive Oil high-quality
  • 2 sprigs Fresh Rosemary optional
For the Sauce
  • 1/2 cup Room Temperature Butter salted
  • 1 teaspoon Black Pepper freshly cracked
For the Pasta
  • 12 ounces Pasta dried or fresh
For Serving
  • 1/2 cup Parmesan Cheese grated

Equipment

  • oven
  • Baking Dish
  • mixing bowl
  • Hand Blender
  • Large pot
  • Skillet

Method
 

Step-by-Step Instructions
  1. Preheat your oven to 300°F (150°C). In a baking dish, combine peeled garlic cloves with fresh rosemary and generously submerge them in extra virgin olive oil. Bake for 45 minutes to 1 hour, until garlic is golden and soft.
  2. Once the confit garlic has cooled, transfer it to a mixing bowl. Add room temperature butter and blend until smooth and creamy. Refrigerate until slightly hardened if desired.
  3. In a large pot, bring water to a rolling boil and season generously with salt. Add pasta and cook according to package instructions for al dente texture (8 to 12 minutes).
  4. Heat a large skillet over medium heat. Add the blended garlic butter, allowing it to melt gently. Stir in black pepper to taste.
  5. Before draining pasta, reserve half a cup of starchy cooking water. Drain pasta and add it to the skillet with the garlic butter sauce. Pour in reserved pasta water and toss until well-coated and emulsified.
  6. Plate Garlic Butter Pasta and sprinkle generously with freshly grated Parmesan cheese. Garnish with fresh rosemary or parsley and a pinch of black pepper before serving.

Notes

Use high-quality ingredients for the best flavor. Adjust seasoning according to your taste.

Irresistible Bacon Ranch Macaroni and Cheese to Savor

As I stirred the bubbling pot of macaroni, the crispy aroma of bacon wafted through my kitchen, instantly transporting me back to countless family gatherings filled with laughter and love. Today, I’m excited to share my twist on a classic comfort food: Bacon Ranch Macaroni and Cheese. This dish is a true crowd-pleaser, melding gooey cheeses with savory bacon and a zesty ranch kick, all in just 30 minutes! Not only is it perfect for quick weeknight dinners, but it also shines at potlucks and holiday feasts, making any occasion a little more special. Get ready to enjoy every creamy bite and discover how easy it is to elevate your mac and cheese game! What’s your favorite cheesy comfort food?

Why is Bacon Ranch Mac and Cheese a Must?

Creamy Indulgence: This recipe brings together rich cheeses and savory bacon for a luxurious sauce that will leave your taste buds dancing.

Quick Prep: Ready in just 30 minutes, it’s the perfect solution for busy weeknights or last-minute gatherings.

Versatile Dish: Feel free to add rotisserie chicken for heartiness or mix in your favorite veggies like broccoli for a nutritious boost!

Family Favorite: It’s a guaranteed crowd-pleaser, making it ideal for family dinners or festive occasions—everyone loves a good mac and cheese!

If you enjoy the fusion of flavors, you might also want to try these delicious Savory Zucchini Cheese pancakes or Blueberry Cream Cheese for dessert!

Bacon Ranch Macaroni and Cheese Ingredients

For the Base
Bacon – Adds a smoky, savory kick; use thick-cut bacon for extra texture.
Pasta – Offers structure; elbow macaroni is traditional, but any pasta shape works beautifully.
Butter – Creates a roux base for creaminess; feel free to substitute with margarine if needed.
Flour – Thickens the cheese sauce; you can use gluten-free flour for a gluten-free option.

For the Sauce
Ranch seasoning – Provides a herby flavor; consider making a homemade blend for freshness.
Milk – Adds creaminess to the sauce; whole milk is ideal, but almond or oat milk can work as dairy-free alternatives.
Cream cheese – Enhances creaminess and texture; Neufchâtel cheese is a lower-fat alternative.
Shredded cheese – Cheddar is essential for flavor; mixing with Monterey Jack or Gouda adds depth.
White pepper – Adds a subtle heat; feel free to use black pepper as a substitute.
Dry mustard – Enhances flavor; it can be omitted if you don’t have it on hand.

For the Finish
Fresh parsley (optional) – Adds a pop of color and freshness; you can replace it with chives or green onions.

Embark on your cooking adventure with this delightful Bacon Ranch Macaroni and Cheese recipe and bring a comforting dish to your table that everyone will love!

Step‑by‑Step Instructions for Bacon Ranch Macaroni and Cheese

Step 1: Cook Bacon
In a large skillet over medium heat, add the thick-cut bacon and cook until crispy, about 6–8 minutes. Turn occasionally for even cooking. Once golden and fragrant, remove the bacon and place it on a paper towel-lined plate to drain excess fat. Reserve about 1 tablespoon of the drippings in the skillet for added flavor.

Step 2: Boil Pasta
While the bacon cooks, bring a large pot of salted water to a rolling boil over high heat. Add elbow macaroni and cook according to package instructions, approximately 8–10 minutes, until al dente. Once done, drain the pasta and set it aside, allowing it to steam off while you prepare the cheesy sauce.

Step 3: Make Cheese Sauce
Return the pot to medium heat and melt 4 tablespoons of butter until bubbling. Whisk in 4 tablespoons of flour to form a roux, cooking for 1–2 minutes until lightly golden. Stir in the ranch seasoning, allowing the flavors to bloom, then gradually pour in 2 cups of milk, whisking constantly until the mixture is hot and thickens.

Step 4: Add Cream Cheese
Once the sauce is bubbling gently, mix in 4 ounce of cream cheese, stirring until fully melted and creamy. This will create a luscious texture for your Bacon Ranch Macaroni and Cheese. Keep the heat low to prevent the sauce from simmering too aggressively while you prepare to incorporate the cheeses.

Step 5: Incorporate Cheese
Gradually add 2 cups of shredded cheddar cheese and half a cup of Monterey Jack cheese into the creamy mixture. Stir consistently until all the cheeses melt smoothly and combine beautifully into the sauce. The final texture should be thick and velvety, perfect for coating your pasta.

Step 6: Combine Ingredients
Toss the crispy bacon, now chopped, into the cheese sauce, mixing well to distribute the flavors evenly. Then, gently fold in the drained pasta until everything is well-coated and gloriously cheesy. Allow it to heat through for an extra 2-3 minutes, ensuring each bite is infused with that delightful bacon ranch flavor.

Step 7: Serve
Transfer your completed Bacon Ranch Macaroni and Cheese to a serving dish, and, if desired, garnish with additional bacon bits and freshly chopped parsley for a vibrant touch. Enjoy this comforting dish warm, as it’s best served right after preparation, with the sauce beautifully creamy and inviting.

Bacon Ranch Macaroni and Cheese Variations

Feel free to get creative and tailor the recipe to your taste buds; believe me, you’ll love the results!

  • Vegetarian Delight: Replace bacon with sautéed mushrooms or smoked tempeh for a delicious vegetarian option.
    Seriously, the earthy flavors balance wonderfully with the creamy sauce, giving you a rich taste without the meat.

  • Spicy Kick: Swap in pepper jack cheese for a zesty twist or stir in diced jalapeños for extra heat.
    Your taste buds will thank you as they dance with flavorful excitement in every creamy bite!

  • Creamy Spinach: Fold in fresh or frozen spinach before baking to add a nutritious pop and vibrant color.
    Not only will you add health benefits, but the flavors meld beautifully with the cheese and ranch.

  • Rotisserie Chicken: Enhance the dish by stirring in shredded rotisserie chicken for a heartier family meal.
    This addition is perfect for using up leftovers while adding a delightful protein boost!

  • Crunchy Topping: Mix crushed crackers or fried onions into your mac before baking for a satisfying crunch.
    The textural contrast makes each bite a new adventure, all while keeping the creamy essence intact.

If you love cheesy creations, you should definitely check out these Savory Zucchini Cheese pancakes or enjoy a slice of Blueberry Cream Cheese for dessert!

  • Smoky Flavor: Incorporate smoked paprika or add BBQ sauce for a sensational flavor profile that pops.
    Igniting a smoky flavor explosion, this twist will make your pasta dish stand out at every gathering.

  • Pasta Swaps: Try using whole grain or gluten-free pasta to suit dietary preferences without sacrificing taste.
    Embracing variety in the foundation can lead to new explorations while fulfilling the comfort food cravings!

What to Serve with Bacon Ranch Macaroni and Cheese

Pairing the creamy, savory goodness of this dish with complementary sides creates a meal that delights the senses and warms the heart.

  • Grilled Chicken: Juicy, herb-marinated chicken breasts add a satisfying protein, balancing the richness of the mac and cheese.

  • Fresh Garden Salad: A vibrant mix of greens, cucumbers, and tomatoes provides a refreshing contrast to the creamy pasta. Drizzle with a tangy vinaigrette for brightness.

  • Steamed Broccoli: Tender, vibrant green broccoli not only adds nutrition but also a delightful crunch, enhancing the overall texture of your meal.

  • Roasted Veggies: Seasonal vegetables tossed in olive oil and roasted to perfection bring sweetness and depth that complements the savory cheese.

  • Garlic Bread: Crispy, buttery garlic bread is a beloved accompaniment; its crunchy texture and savory flavor are perfect for scooping up extra cheese sauce.

  • Sweet Tea or Lemonade: For drinks, a glass of sweet tea or refreshing lemonade pairs beautifully, cutting through the richness with a hint of sweetness.

Transform your dinner table into a culinary delight with these delicious additions, making every bite of bacon ranch macaroni and cheese even more enjoyable!

Make Ahead Options

Preparing Bacon Ranch Macaroni and Cheese ahead of time is a fantastic way to embrace convenience during busy weeks! You can cook the pasta and bacon up to 24 hours in advance. Simply store them separately in airtight containers in the refrigerator. The cheese sauce can also be made ahead; just keep it in a separate container. When you’re ready to serve, reheat the cheese sauce gently on the stove, adding a splash of milk to restore its creamy texture. Combine everything in one pot, stir well, and heat for a few minutes until warmed through. This method ensures that your dish remains just as delicious, saving you valuable time without sacrificing flavor!

Expert Tips for Bacon Ranch Macaroni and Cheese

  • Perfectly Cooked Roux: Ensure the roux does not brown too much while cooking for a smoother cheese sauce; a light golden color is ideal.

  • Taste as You Go: Always taste your cheese sauce before adding the pasta to adjust seasoning—this way, every bite is packed with flavor.

  • Serve Immediately: For the best texture, serve the Bacon Ranch Macaroni and Cheese right away, as the sauce thickens upon cooling.

  • Customize Wisely: Feel free to experiment by adding ingredients like steamed veggies or different cheese varieties to find your perfect flavor balance.

  • Store Carefully: If you have leftovers, store in an airtight container in the fridge for up to 3 days. Reheat gently, adding a splash of milk to revive the creamy texture.

Storage Tips for Bacon Ranch Macaroni and Cheese

Fridge: Store leftover Bacon Ranch Macaroni and Cheese in an airtight container for up to 3 days. Make sure to let it cool before sealing to keep it fresh.

Freezer: For longer storage, freeze the mac and cheese in portions. Wrap tightly in plastic wrap and then place in an airtight container or freezer bag. It can last up to 2 months.

Reheating: Reheat in the microwave or oven. If using the microwave, add a splash of milk to maintain creaminess. In the oven, cover with foil and bake at 350°F (175°C) until heated through, about 20–25 minutes.

Serving: To revive the dish’s creamy texture, stir in a bit of milk during reheating. Enjoy all the delightful flavors, just like freshly made!

Bacon Ranch Macaroni and Cheese Recipe FAQs

How do I choose the right bacon for this recipe?
Absolutely! Opt for thick-cut bacon to contribute a hearty texture and enhance the overall flavor of your Bacon Ranch Macaroni and Cheese. When selecting bacon, look for pieces that are a deep pink color with minimal dark spots. If you prefer a healthier option, turkey bacon can also work, though the flavor will vary.

How should I store leftover Bacon Ranch Macaroni and Cheese?
Certainly! Store any leftover mac and cheese in an airtight container in the fridge for up to 3 days. Make sure the dish has cooled to room temperature before sealing. When you’re ready to enjoy it again, just give it a little stir with some added milk to revive that creamy texture.

Can I freeze Bacon Ranch Macaroni and Cheese?
Definitely! If you want to freeze your mac and cheese, portion it out into airtight containers or freezer bags. Just wrap the portions tightly in plastic wrap first to prevent freezer burn. It will keep well in the freezer for up to 2 months. When you’re ready to enjoy it, thaw overnight in the fridge and reheat in the oven or microwave.

What should I do if my cheese sauce is too thick?
Very! If you find your cheese sauce has gotten thicker than you’d prefer, simply add a splash of milk while stirring over gentle heat. This will help loosen it back up to a creamy consistency. Also, be sure to continuously stir while warming to prevent it from sticking or scorching.

Is there a dairy-free option for this recipe?
For sure! You can easily adapt this recipe to be dairy-free. Use almond or oat milk in place of regular milk, and opt for dairy-free cream cheese and shredded cheese alternatives. There are several plant-based nacho-style cheeses available now that melt beautifully and can work well in your Bacon Ranch Macaroni and Cheese. Just taste as you go to adjust the flavors!

Can I add vegetables to my Bacon Ranch Macaroni and Cheese?
The more the merrier! Adding steamed broccoli, spinach, or even sautéed mushrooms can enhance the nutritional value and texture of your dish. Just fold in the cooked veggies during the mixing stage to ensure they’re evenly distributed and coated in that creamy sauce. Enjoy experimenting!

Bacon Ranch Macaroni and Cheese

Irresistible Bacon Ranch Macaroni and Cheese to Savor

This Bacon Ranch Macaroni and Cheese combines gooey cheeses with savory bacon and a zesty ranch kick, making it a perfect comfort food.
Prep Time 10 minutes
Cook Time 20 minutes
Total Time 30 minutes
Servings: 4 servings
Course: Dinner
Cuisine: American
Calories: 600

Ingredients
  

For the Base
  • 5 slices thick-cut bacon Adds a smoky, savory kick
  • 2 cups elbow macaroni Traditional pasta shape
  • 4 tablespoons butter Creates a roux base for creaminess
  • 4 tablespoons flour Thickens the cheese sauce
For the Sauce
  • 1 packet ranch seasoning Provides a herby flavor
  • 2 cups milk Adds creaminess to the sauce
  • 4 ounces cream cheese Enhances creaminess and texture
  • 2 cups shredded cheddar cheese Essential for flavor
  • 0.5 cup Monterey Jack cheese Adds depth
  • 0.25 teaspoon white pepper Adds a subtle heat
  • 1 teaspoon dry mustard Enhances flavor
For the Finish
  • 1 tablespoon fresh parsley Optional, for garnish

Equipment

  • large skillet
  • Large pot
  • whisk

Method
 

Step-by-Step Instructions
  1. In a large skillet over medium heat, add thick-cut bacon and cook until crispy, about 6–8 minutes. Remove bacon and place it on a paper towel-lined plate.
  2. Bring a large pot of salted water to a rolling boil. Add elbow macaroni and cook according to package instructions, about 8–10 minutes until al dente.
  3. Return the pot to medium heat and melt 4 tablespoons of butter. Whisk in 4 tablespoons of flour to form a roux, cooking for 1–2 minutes until golden.
  4. Mix in ranch seasoning, then gradually pour in milk, whisking constantly until the mixture is hot and thickens.
  5. Once the sauce is bubbling gently, mix in the cream cheese, stirring until fully melted and creamy.
  6. Gradually add shredded cheddar and Monterey Jack cheese into the sauce. Stir until all cheese melts smoothly.
  7. Toss the crispy chopped bacon into the cheese sauce, then gently fold in the drained pasta until well-coated.
  8. Serve warm, garnished with additional bacon bits and chopped parsley, if desired.

Notes

For leftovers, store in an airtight container in the fridge for up to 3 days. Reheat gently with a splash of milk to revive creaminess.

Creamy Cinnamon Oatmeal Cookie Ice Cream You’ll Crave

As I scooped into a bowl of creamy cinnamon oatmeal cookie ice cream, I was instantly transported back to cozy afternoons spent baking with my grandmother. This homemade gem is inspired by a beloved store-bought flavor but crafted with a personal touch that only kitchen magic can provide. Delightfully creamy and dotted with chewy oatmeal cookie chunks, this cinnamon oatmeal cookie ice cream is not just a treat; it’s a heartfelt dessert that brings smiles to faces young and old. It’s incredibly quick to whip up, making it the perfect way to cool off during hot summer days, and trust me, it’s bound to become a favorite in your household. Ready to indulge in a scoop (or three) of pure bliss?

Why Make Cinnamon Oatmeal Cookie Ice Cream?

Irresistible, creamy delight: Treat yourself to a luscious dessert that’s reminiscent of your favorite childhood flavors.

Easy to whip up: With simple steps, this recipe is perfect for both seasoned chefs and kitchen newbies.

Customizable fun: Swap ingredients to cater to your taste preferences, like using Wholesome Oatmeal Fruit as an alternative mix-in for versatility.

Family-approved: Every scoop is packed with nostalgia and sweetness, making it the ultimate ice cream to share at gatherings or cozy nights in.

Store-bought flavor at home: Enjoy a gourmet taste without breaking the bank, allowing you to savor a favorite flavor whenever you crave it!

Cinnamon Oatmeal Cookie Ice Cream Ingredients

For the Cookie Chunks

  • Butter – Provides richness and flavor; substitute with margarine for a dairy-free option.
  • Brown Sugar – Adds moisture and depth of flavor; use coconut sugar for a lighter alternative.
  • Granulated Sugar – Sweetens the base; can swap with honey or agave, adjusting liquid content slightly.
  • Large Egg – Binds ingredients together and enriches texture; substitute unsweetened applesauce (¼ cup) as an egg alternative.
  • Pure Vanilla Extract – Enhances overall flavor; vanilla bean can substitute if needed.
  • All-Purpose Flour – Gives structure to cookies; swap with gluten-free flour as required.
  • Baking Soda – Leavens the cookies for a soft texture; ensure it’s fresh for best results.
  • Cinnamon – Provides a warm, spicy aroma; adjust according to taste preference.
  • Nutmeg – Offers a subtle spiced flavor; omit if preferred or replace with allspice for variation.
  • Salt – Balances sweetness and enhances flavor; sea salt is preferred.
  • Old-Fashioned Oats – Adds chewiness to cookie chunks; use instant oats for a smoother texture.

For the Ice Cream Base

  • Whole Milk – Creates a creamy base; use low-fat milk for a lighter version.
  • Heavy Cream – Contributes to a rich, smooth texture; substitute with non-dairy cream for a vegan option.
  • Pure Maple Syrup – Adds natural sweetness and flavor; honey or agave are good alternatives.
  • Coarse Kosher Salt – Enhances flavor; regular table salt can suffice if necessary.

Enjoy crafting this delightful Cinnamon Oatmeal Cookie Ice Cream that will surely become a family favorite!

Step‑by‑Step Instructions for Cinnamon Oatmeal Cookie Ice Cream

Step 1: Prepare Oatmeal Cookie Chunks
Preheat your oven to 350°F (175°C) and line a baking sheet with parchment paper. In a mixing bowl, cream together butter, brown sugar, and granulated sugar until light and fluffy, about 3-4 minutes. Gradually add in the egg and vanilla extract, mixing until smooth. Gently fold in the flour, baking soda, cinnamon, nutmeg, and salt until just combined, followed by the old-fashioned oats. Spread the cookie dough evenly on the baking sheet and bake for 11-13 minutes, or until golden. Allow to cool completely before breaking into chunks.

Step 2: Make the Ice Cream Base
In a medium saucepan, heat the whole milk, granulated sugar, pure maple syrup, and cinnamon over medium heat until the mixture begins to foam, but do not let it boil. Stir in the heavy cream, vanilla extract, and coarse kosher salt, mixing well. Once combined, pour the mixture into a freezer-safe zip-top bag, carefully remove excess air, and immerse in an ice bath for about 30 minutes until cool. For optimal results, chill in the refrigerator for at least an hour or overnight.

Step 3: Churn Ice Cream
After chilling, pour the ice cream base into your ice cream maker. Churn according to the manufacturer’s instructions, usually about 20-30 minutes, until the mixture is thick and creamy. During the last 2 minutes of churning, add in the cookie chunks to incorporate them evenly.

Step 4: Freeze and Serve
Once the ice cream reaches a soft-serve consistency, transfer it to an airtight container. Spread the top smooth, cover with plastic wrap, and seal tightly. Freeze for at least 1 hour to firm up before serving. To enjoy, scoop into bowls and relish the delightful and creamy cinnamon oatmeal cookie ice cream that’s perfect for any occasion!

What to Serve with Cinnamon Oatmeal Cookie Ice Cream

Indulging in this creamy delight opens up a world of fantastic pairings that elevate your frozen treat experience.

  • Warm Apple Pie: The spiced, buttery flavors of freshly baked apple pie create a comforting contrast to the cold ice cream.
  • Chocolate Sauce Drizzle: A rich chocolate sauce adds a luscious touch that beautifully balances the cinnamon notes in the ice cream.
  • Crispy Waffle Cones: Crunchy waffle cones provide a delightful texture and nostalgic taste, enhancing each scoop’s enjoyment.
  • Homemade Brownies: Pairing with fudgy brownies adds unexpected decadence, amplifying the sweet treat experience.

Experiment with toppings too! A sprinkle of sea salt or a few crushed nuts can surprise your palate and heighten the flavors.

  • Fresh Berries: Juicy strawberries or blueberries offer vibrant freshness that cuts through the creaminess for a balanced dessert.
  • Cinnamon Sugar Dusting: A light sprinkle of cinnamon sugar brings harmony to the flavors, echoing the ice cream’s main ingredient.

How to Store and Freeze Cinnamon Oatmeal Cookie Ice Cream

Fridge: Store any leftover cinnamon oatmeal cookie ice cream in an airtight container for up to 3 days for best flavor and texture.

Freezer: For longer storage, freeze the ice cream in an airtight container for up to 2 months. To minimize ice crystal formation, layer plastic wrap directly over the surface before sealing.

Reheating: When ready to serve, let the ice cream sit at room temperature for about 10 minutes to soften slightly. This will make scooping much easier!

Serving Tip: Always use a clean scoop to avoid introducing unwanted flavors and to keep the ice cream fresh longer.

Cinnamon Oatmeal Cookie Ice Cream Variations

Feel free to get creative and customize your ice cream, making it truly your own!

  • Spice Swap: Replace cinnamon with ground ginger or pumpkin pie spice for a seasonal twist. It adds a warming depth that’s perfect for autumn.

  • Nutty Delight: Fold in chopped nuts like pecans or walnuts for that extra crunch. The nutty flavor pairs beautifully with the creaminess of the ice cream.

  • Choco-Lover’s Dream: Toss in dark chocolate chips or chunks when churning to satisfy those chocolate cravings. Every bite will be a delightful surprise!

  • Fruity Fusion: Incorporate dried fruits such as cranberries or cherries for a burst of natural sweetness. Their chewiness will complement the cookie chunks beautifully.

  • Coconut Cream: Substitute half the heavy cream with coconut cream for a tropical vibe. It gives the ice cream a hint of coconut flavor that’s wonderfully refreshing!

  • Vegan Twist: Opt for coconut milk and a plant-based cream to make a rich vegan version. You won’t miss the dairy, and it’ll still be delightfully creamy!

  • Maple Magic: Increase the maple syrup for an even sweeter, more indulgent flavor. This can create a subtle, unique profile in each scoop!

  • Savory Touch: Add a pinch of sea salt to the mixture before churning for a delightful contrast to the sweetness, similar to what’s found in gourmet ice creams.

As you experiment with these variations, you might discover a new family favorite, just like the comforting classics from your childhood! And if you’re inspired for more delicious homemade delights, check out the mouthwatering Wholesome Oatmeal Fruit or treat yourself to some delightful Blueberry Cream Cheese.

Expert Tips for Cinnamon Oatmeal Cookie Ice Cream

  • Chilling Matters: Make sure to chill your ice cream maker’s bowl for several hours or overnight beforehand. A cold bowl helps achieve a creamy texture.

  • Cookie Chunk Texture: For perfectly chewy cookie chunks, avoid overbaking them; they should be slightly soft when removed from the oven.

  • Flavors Fusion: Experiment with various spices, like ginger or cardamom, to elevate the flavor profile of your cinnamon oatmeal cookie ice cream.

  • Storage Solutions: To prevent ice crystals from forming, press a layer of plastic wrap directly onto the surface of the ice cream before sealing the container.

  • Serving Suggestions: Try pairing the ice cream with warm desserts, like a slice of pie or cake, for a delightful temperature contrast!

Make Ahead Options

These Cinnamon Oatmeal Cookie Ice Cream delights are perfect for busy home cooks looking to save time during the week! You can prepare the oatmeal cookie chunks up to 3 days in advance; simply bake and cool them completely before storing them in an airtight container in the refrigerator. For the ice cream base, you can mix all the ingredients and refrigerate it for up to 24 hours. To maintain the creamy texture, ensure the mixture is well covered to prevent air exposure. When you’re ready to churn, give it a quick stir before using your ice cream maker. This way, you’ll enjoy a delectable dessert with minimal effort, just as delicious as if made fresh!

Cinnamon Oatmeal Cookie Ice Cream Recipe FAQs

Which ingredients should I look for to ensure the best flavor and texture?
Absolutely! For the best flavor, choose unsalted butter for richness and freshly ground spices to enhance the aroma. When selecting oats, go for old-fashioned rolled oats, as they provide the best chewiness. Make sure your baking soda is fresh, as old baking soda can affect the rise and texture of your cookies. Inspect your eggs as well; they should be fresh for the richest taste.

How should I store leftover ice cream, and how long does it last?
Very good question! Store your cinnamon oatmeal cookie ice cream in an airtight container in the freezer with a layer of plastic wrap pressed directly on the surface to minimize ice crystal formation. It’s best consumed within 3 months for optimal flavor, though it can last up to 6 months if stored properly. If you’re aiming for freshness, try to enjoy it within 3-5 days after making for the best texture and taste!

Can I freeze the ice cream? If so, what’s the best way?
Absolutely! To freeze your cinnamon oatmeal cookie ice cream, transfer it to an airtight container and smooth out the surface. Cover with plastic wrap to prevent ice crystals and seal the lid tightly. Place it in the coldest part of your freezer for up to 2 months. When ready to serve, remember to let it sit at room temperature for about 10 minutes to soften slightly; this will make scooping a breeze!

What if my ice cream is too icy or hard?
Very common! If your cinnamon oatmeal cookie ice cream ends up icy or hard, it might be due to over-churning or not enough air incorporated into the mixture. Ensure your ice cream maker bowl is fully chilled before starting, and monitor the churning time closely; over-churning can result in a grainy texture. If you do end up with hard ice cream, let it sit out for 10-15 minutes before scooping to soften.

What dietary considerations should I be aware of?
The more the merrier! If you’re catering to specific dietary needs, you can substitute dairy ingredients with non-dairy options. Use almond milk or coconut milk instead of whole milk, and opt for coconut cream in place of heavy cream for vegan users. For the cookies, replace the egg with unsweetened applesauce (¼ cup) to bind the ingredients. Always check ingredient labels for potential allergens, especially if serving to guests with allergies.

Cinnamon Oatmeal Cookie Ice Cream

Creamy Cinnamon Oatmeal Cookie Ice Cream You'll Crave

This creamy cinnamon oatmeal cookie ice cream is a delightful treat that combines nostalgic flavors with homemade goodness.
Prep Time 40 minutes
Cook Time 15 minutes
Chilling Time 30 minutes
Total Time 1 hour 25 minutes
Servings: 6 servings
Course: Dessert
Cuisine: American
Calories: 250

Ingredients
  

For the Cookie Chunks
  • 1/2 cup Butter Provides richness and flavor; substitute with margarine for a dairy-free option.
  • 1 cup Brown Sugar Adds moisture and depth of flavor; use coconut sugar for a lighter alternative.
  • 1/2 cup Granulated Sugar Sweetens the base; can swap with honey or agave, adjusting liquid content slightly.
  • 1 large Egg Binds ingredients together and enriches texture; substitute unsweetened applesauce (¼ cup) as an egg alternative.
  • 2 teaspoons Pure Vanilla Extract Enhances overall flavor; vanilla bean can substitute if needed.
  • 1 1/2 cups All-Purpose Flour Gives structure to cookies; swap with gluten-free flour as required.
  • 1 teaspoon Baking Soda Leavens the cookies for a soft texture; ensure it’s fresh for best results.
  • 2 teaspoons Cinnamon Provides a warm, spicy aroma; adjust according to taste preference.
  • 1/4 teaspoon Nutmeg Offers a subtle spiced flavor; omit if preferred or replace with allspice for variation.
  • 1/2 teaspoon Salt Balances sweetness and enhances flavor; sea salt is preferred.
  • 1 cup Old-Fashioned Oats Adds chewiness to cookie chunks; use instant oats for a smoother texture.
For the Ice Cream Base
  • 2 cups Whole Milk Creates a creamy base; use low-fat milk for a lighter version.
  • 1 cup Heavy Cream Contributes to a rich, smooth texture; substitute with non-dairy cream for a vegan option.
  • 1/2 cup Pure Maple Syrup Adds natural sweetness and flavor; honey or agave are good alternatives.
  • 1/4 teaspoon Coarse Kosher Salt Enhances flavor; regular table salt can suffice if necessary.

Equipment

  • oven
  • mixing bowl
  • baking sheet
  • Ice Cream Maker
  • Saucepan

Method
 

Step-by-Step Instructions
  1. Preheat your oven to 350°F (175°C) and line a baking sheet with parchment paper.
  2. In a mixing bowl, cream together butter, brown sugar, and granulated sugar until light and fluffy, about 3-4 minutes.
  3. Gradually add in the egg and vanilla extract, mixing until smooth.
  4. Gently fold in the flour, baking soda, cinnamon, nutmeg, and salt until just combined, followed by the old-fashioned oats.
  5. Spread the cookie dough evenly on the baking sheet and bake for 11-13 minutes, or until golden.
  6. Allow to cool completely before breaking into chunks.
  7. In a medium saucepan, heat the whole milk, granulated sugar, pure maple syrup, and cinnamon over medium heat until the mixture begins to foam, but do not let it boil.
  8. Stir in the heavy cream, vanilla extract, and coarse kosher salt, mixing well.
  9. Once combined, pour the mixture into a freezer-safe zip-top bag, carefully remove excess air, and immerse in an ice bath for about 30 minutes until cool.
  10. For optimal results, chill in the refrigerator for at least an hour or overnight.
  11. After chilling, pour the ice cream base into your ice cream maker. Churn according to the manufacturer's instructions, usually about 20-30 minutes, until the mixture is thick and creamy.
  12. During the last 2 minutes of churning, add in the cookie chunks to incorporate them evenly.
  13. Once the ice cream reaches a soft-serve consistency, transfer it to an airtight container. Spread the top smooth, cover with plastic wrap, and seal tightly.
  14. Freeze for at least 1 hour to firm up before serving.
  15. Scoop into bowls and enjoy!

Notes

Experiment with various spices to elevate the flavor profile, and ensure to store properly to maintain freshness.

Salted Brown Sugar Butterscotch Ice Cream Sandwiches Bliss

As I stood in my kitchen, the warm, sugary aroma of baking cookies enveloped me like a comforting hug, instantly transporting me to lazy summer days. There’s nothing like bringing together salted brown sugar cookies with a scoop of creamy butterscotch ice cream to make the perfect salted brown sugar butterscotch ice cream sandwiches. These delightful treats are not just easy to whip up, thanks to a simple no-churn ice cream method, but they’re also a blissful balance of chewy and crisp, making them a summer crowd-pleaser. Whether you’re hosting a backyard barbecue or simply craving something sweet, these ice cream sandwiches are sure to impress. Are you ready to turn your kitchen into a little slice of summer bliss?

Why You’ll Adore These Ice Cream Sandwiches?

Irresistible Flavor: The combination of salty and sweet in the salted brown sugar cookies pairs perfectly with the creamy butterscotch ice cream, creating a flavor explosion that you won’t be able to resist.

Easy No-Churn Method: No need for an ice cream maker! This no-churn butterscotch ice cream comes together effortlessly, making it an incredibly user-friendly treat for both novice and experienced bakers.

Chewy Delight: Enjoy the satisfying chewiness of the cookies, enhanced by the richness of brown sugar, making each bite a perfect pleasure.

Perfect for Any Gathering: Whether it’s a summer picnic or a cozy family night, these sandwiches are sure to be a hit, leaving everyone raving about your culinary skills.

Customizable Fun: Feel free to mix things up! Add chocolate chips or nuts for an exciting twist to your ice cream sandwiches. Why not check out our Blueberry Cream Cheese for another delightful dessert option?

Dive into your own summer bliss with these delicious, chewy salted brown sugar butterscotch ice cream sandwiches!

Salted Brown Sugar Butterscotch Ice Cream Sandwiches Ingredients

For the Cookies

  • All-Purpose Flour – Provides structure; substitute with a gluten-free flour mix for gluten-free sandwiches.
  • Bread Flour – Adds chewiness and strength; can be replaced with all-purpose flour if necessary.
  • Baking Soda – Helps the cookies rise; no substitutions recommended for this essential ingredient.
  • Salt – Enhances overall flavor; use kosher or sea salt for the best taste.
  • Butter (softened) – Provides moisture and flavor; unsalted butter is preferred, but margarine works in a pinch.
  • Brown Sugar – Contributes to chewiness and rich flavor; light or dark brown sugar will work.
  • Eggs – Binds the ingredients together and adds moisture; best to avoid egg substitutes for desired texture.
  • Vanilla Extract – Enhances the flavor; pure vanilla extract is recommended to amplify the overall taste.

For the Ice Cream

  • Heavy Cream – Creates a rich, creamy base; partially substitute with milk for a lighter texture if desired.
  • Sweetened Condensed Milk – Provides sweetness and creaminess; no direct substitutes for consistent texture.
  • Butterscotch Chips – Adds flavor and texture; consider chopped chocolate or chocolate chips as alternatives for a different flavor profile.
  • Coarse Salt – For garnish; enhances the flavor of the salted brown sugar cookies.

Now that you have all the delightful ingredients at your fingertips, it’s time to embark on this sweet adventure and create your own salted brown sugar butterscotch ice cream sandwiches!

Step‑by‑Step Instructions for Salted Brown Sugar Butterscotch Ice Cream Sandwiches

Step 1: Preheat Oven
Begin by preheating your oven to 350°F (175°C). While the oven is warming up, prepare two baking sheets by lining them with parchment paper to prevent the cookies from sticking. This little step ensures that your salted brown sugar cookies will bake evenly and slide off easily once they’re ready.

Step 2: Mix Dry Ingredients
In a medium bowl, whisk together the all-purpose flour, bread flour, baking soda, and salt until well combined. This mixture is the foundation of your cookies, and ensuring everything is evenly incorporated will lead to perfectly textured salted brown sugar butterscotch ice cream sandwiches. Set this bowl aside while you work on the wet ingredients.

Step 3: Cream Butter and Sugars
In a large mixing bowl, beat the softened butter and both sugars together with an electric mixer on medium speed until fluffy and light in color. This should take about 2-3 minutes. Next, add in the eggs and vanilla extract, mixing until you achieve a smooth and creamy consistency. The sweetness of the sugars combined with the buttery aroma will fill your kitchen with a delightful scent.

Step 4: Combine Mixtures
Gradually add the dry flour mixture to the creamed butter and sugars, mixing slowly until just combined. Be careful not to overmix, as you want to keep that chewy texture for your salted brown sugar cookies. The dough should come together beautifully, smelling heavenly as you prepare to form your cookies.

Step 5: Form Cookies
Using a cookie scoop or tablespoon, drop rounded dough onto your prepared baking sheets, ensuring each scoop is spaced at least 2 inches apart to allow for spreading. You should aim for about 12 cookies per sheet. The dough might look a bit rough, but that’s perfectly normal; it contributes to the rustic charm of your salted brown sugar butterscotch ice cream sandwiches.

Step 6: Bake
Place the baking sheets in the preheated oven and bake for 8-10 minutes. Keep an eye on them; the edges should be golden while the centers remain slightly soft and chewy. As soon as you take them out, sprinkle a bit of coarse salt on top to enhance the flavor. Allow the cookies to cool on the baking sheets for a few minutes before transferring them to a wire rack to cool completely.

Step 7: Whip Cream
While the cookies cool, in a clean separate bowl, whip the heavy cream using an electric mixer on high speed until stiff peaks form, about 3-5 minutes. This step is crucial for the creamy texture of your ice cream. It should hold its shape well, giving your butterscotch ice cream a rich and velvety mouthfeel.

Step 8: Prepare Ice Cream
Carefully fold the sweetened condensed milk, vanilla extract, and a pinch of salt into the whipped cream until fully combined. Finally, gently mix in the melted butterscotch chips, ensuring they are evenly distributed throughout. This no-churn method means no ice cream maker is needed, making it simpler to create the creamy filling for your salted brown sugar butterscotch ice cream sandwiches.

Step 9: Freeze Ice Cream
Spread the ice cream mixture evenly into lined cake pans or a large container and freeze until solid, approximately 2 hours. The mixture will harden beautifully, providing a dreamy butterscotch layer between your chewy cookies. Make sure to cover it well to prevent ice crystals from forming during freezing.

Step 10: Assemble Sandwiches
Once the ice cream is fully frozen, use a cookie cutter or round glass to cut out ice cream rounds. Quickly place one round between two of your cooled salted brown sugar cookies, gently pressing down to make a delightful sandwich. Wrap each ice cream sandwich in plastic wrap and freeze them immediately to maintain their shape and keep them cold for your friends and family to enjoy later.

How to Store and Freeze Salted Brown Sugar Butterscotch Ice Cream Sandwiches

Fridge: Ice cream sandwiches are best stored in the freezer, but if you plan to eat them within 1-2 days, you can keep them in the fridge. Ensure they are well-wrapped to maintain freshness.

Freezer: Wrap each salted brown sugar butterscotch ice cream sandwich tightly in plastic wrap or place them in airtight containers. They can be stored in the freezer for up to 2-3 weeks, ensuring they’re still delicious when you’re ready to indulge.

Reheating: If you prefer a softer texture, let the sandwiches sit at room temperature for about 5-10 minutes before enjoying. This will allow the ice cream to soften slightly while keeping the cookies perfectly chewy.

Stacking: When freezing multiple sandwiches, consider freezing them in a single layer on a baking sheet before stacking them in an airtight container. This helps maintain their shape and prevents sticking.

Expert Tips for Salted Brown Sugar Butterscotch Ice Cream Sandwiches

  • Avoid Overbaking: Keep a close eye on your cookies! Overbaking can lead to a crunchier texture, diminishing the lovely chewiness ideal for sandwiches.

  • Use Quality Ingredients: Choose high-quality butterscotch chips and pure vanilla extract for the best flavor. Fresh ingredients make all the difference in your salted brown sugar butterscotch ice cream sandwiches.

  • Layer Smartly: When assembling sandwiches, work quickly with the ice cream to prevent it from melting. This helps you maintain a neat and delicious treat!

  • Chill the Dough: If you’re in a warm environment, chill the cookie dough for about 30 minutes before baking. This helps maintain the cookie shape and texture.

  • Storage Tips: Wrap ice cream sandwiches well to prevent freezer burn. For freshness, freeze them in a single layer before stacking to help retain that chewy cookie and creamy ice cream combo.

What to Serve with Salted Brown Sugar Butterscotch Ice Cream Sandwiches

Elevate your summer gatherings with delightful accompaniments that perfectly balance the sweetness of these ice cream sandwiches.

  • Fresh Berries: The tartness of strawberries or raspberries adds a vibrant contrast, enhancing the overall flavor experience.

  • Chocolate Sauce: Drizzle over your sandwich for an indulgent twist that complements the butterscotch beautifully. The smooth, rich chocolate brings an extra layer of sweetness that will leave you craving more.

  • Toasted Nuts: Chopped pecans or walnuts add a delightful crunch and earthiness, pairing well with the soft, creamy texture of the sandwich.

  • Mint Leaves: A fresh touch that brightens the palate! The coolness of mint cuts through the richness, providing a refreshing finish.

  • Iced Coffee: A chilled beverage with a hint of sweetness enhances the dessert experience like no other, making for a cozy pairing on warm days.

  • Coconut Gelato: A tropical twist! The creamy coconut flavor pairs perfectly with the butterscotch, creating a dreamy flavor fusion.

  • Lemon Sorbet: The zesty, citrusy notes cleanse the palate and provide the perfect refreshing contrast to the rich cookies and cake.

  • Fudge Brownies: For chocolate lovers, pairing this delight creates a decadent dessert spread that’s utterly irresistible, softening the sweetness of the ice cream sandwiches.

Make Ahead Options

These Salted Brown Sugar Butterscotch Ice Cream Sandwiches are perfect for meal prep enthusiasts! You can prepare the cookie dough up to 24 hours in advance by wrapping it tightly in plastic wrap and refrigerating it until you’re ready to bake—this not only saves time but also allows the flavors to deepen. Additionally, the butterscotch ice cream can be made and frozen up to 3 days ahead of time; just be sure to cover it well to prevent ice crystals. When you’re ready to complete your sandwiches, simply bake the cookies, let them cool completely, and assemble them with the pre-made ice cream for a delightful treat that’s just as delicious as fresh!

Salted Brown Sugar Butterscotch Ice Cream Sandwiches Variations

Feel free to get creative with these delicious ice cream sandwiches, enhancing your experience with delightful twists and substitutions!

  • Gluten-Free: Substitute all-purpose flour with a gluten-free flour mix to enjoy the same chewy texture without gluten.
  • Nutty Delight: Fold in crushed pecans or walnuts into the cookie dough for a rich, nutty flavor. They bring a delightful crunch to your otherwise soft cookies.
  • Chocolate Lovers: Swap butterscotch chips for chocolate chips to create a classic chocolate-dipped version that’s sure to please every lover of chocolate.
  • Flavor Infusion: Experiment with flavored extracts like almond or maple instead of vanilla for an exciting twist on the overall flavor of your ice cream.
  • Crunchy Add-ins: Add crushed graham crackers or toffee bits into the ice cream for a delightful texture contrast that elevates every bite. Crunchy surprises are always a delight!
  • Caramel Swirls: Drizzle homemade caramel sauce into the whipped cream before freezing for a rich, decadent experience that complements the butterscotch perfectly.
  • Seasonal Spices: Incorporate a pinch of cinnamon or nutmeg into the cookie dough for a warm spice that echoes cozy autumn flavors, enhancing the sweetness beautifully.
  • Coconut Cream: For a tropical twist, substitute some of the heavy cream with coconut cream for a dreamy coconut-flavored ice cream filling that’s a delightful change of pace.

These variations not only ensure you have fun in the kitchen but also allow for a personal touch to your Salted Brown Sugar Butterscotch Ice Cream Sandwiches. Enjoy experimenting!

Salted Brown Sugar Butterscotch Ice Cream Sandwiches Recipe FAQs

What type of flour should I use for the best cookie texture?
It’s essential to use a combination of all-purpose flour and bread flour to achieve that perfect chewy texture. The bread flour adds strength to the cookies, while the all-purpose flour provides structure. If you’re looking for a gluten-free option, a gluten-free flour mix can be used to replace the all-purpose flour.

How should I store leftover ice cream sandwiches?
To keep your salted brown sugar butterscotch ice cream sandwiches fresh, wrap each sandwich tightly in plastic wrap or store them in an airtight container. They can be kept in the freezer for up to 2-3 weeks. For the best experience, freeze them in a single layer before stacking to prevent them from sticking together.

Can I freeze the ice cream separately, and how?
Absolutely! To freeze the no-churn butterscotch ice cream, spread the mixture into lined cake pans or a large container. Make sure to cover it tightly to prevent ice crystals from forming. Freeze until solid, which typically takes about 2 hours. Once frozen, you can use it for various treats beyond just sandwiches!

What if my cookies come out too hard or crispy?
If your cookies turn out too hard, it’s likely because they were overbaked. Keep an eye on them while they bake; they should be golden on the edges but still soft in the center. For future batches, consider reducing the baking time by a minute or two. If you notice the dough is too dry, you might want to add a tablespoon of milk or a little extra butter next time to keep your cookies chewy.

Are there any dietary considerations I should keep in mind?
Yes! Be mindful of allergies, as this recipe contains common allergens like eggs and dairy. For a lighter version, you can partially substitute the heavy cream with milk. If gluten is a dietary concern, remember to use a gluten-free flour mix to maintain the integrity of the cookie while still enjoying these delicious salted brown sugar butterscotch ice cream sandwiches!

Can I add other mix-ins to the ice cream?
Very! You can customize your butterscotch ice cream by adding mix-ins like crushed nuts, chocolate chips, or toffee bits. Simply fold these extras into the ice cream mixture before freezing it. This will not only enhance the texture but also create a unique flavor profile that you and your loved ones will enjoy!

Salted Brown Sugar Butterscotch Ice Cream Sandwiches

Salted Brown Sugar Butterscotch Ice Cream Sandwiches Bliss

Delight in salted brown sugar butterscotch ice cream sandwiches, blending chewy cookies and creamy ice cream for a summer treat.
Prep Time 30 minutes
Cook Time 10 minutes
Freezing Time 2 hours
Total Time 2 hours 40 minutes
Servings: 12 sandwiches
Course: Dessert
Cuisine: American
Calories: 320

Ingredients
  

For the Cookies
  • 1 cup All-Purpose Flour Can substitute with gluten-free flour mix.
  • 1 cup Bread Flour Can replace with all-purpose flour if necessary.
  • 1 teaspoon Baking Soda Essential ingredient, no substitutions.
  • 1/2 teaspoon Salt Use kosher or sea salt for best taste.
  • 1/2 cup Butter (softened) Unsalted is preferred.
  • 3/4 cup Brown Sugar Light or dark brown sugar works.
  • 1 large Eggs Best to avoid egg substitutes.
  • 1 teaspoon Vanilla Extract Use pure vanilla extract.
For the Ice Cream
  • 2 cups Heavy Cream Partially substitute with milk for lighter texture.
  • 1 can Sweetened Condensed Milk No direct substitutes for consistency.
  • 1 cup Butterscotch Chips Chopped chocolate or chips can be alternatives.
  • 1 teaspoon Coarse Salt For garnish.

Equipment

  • oven
  • mixing bowls
  • electric mixer
  • Cookie scoop
  • parchment paper
  • cake pans
  • plastic wrap

Method
 

Step-by-Step Instructions
  1. Preheat your oven to 350°F (175°C) and prepare baking sheets lined with parchment paper.
  2. Whisk together all-purpose flour, bread flour, baking soda, and salt in a medium bowl.
  3. Cream the softened butter and both sugars until fluffy. Add eggs and vanilla extract until creamy.
  4. Gradually mix in the dry ingredients until just combined, avoiding overmixing.
  5. Drop rounded dough onto prepared sheets, spaced 2 inches apart, aiming for about 12 cookies per sheet.
  6. Bake for 8-10 minutes until golden on edges, soft in center; sprinkle with coarse salt and cool.
  7. Whip heavy cream until stiff peaks form, about 3-5 minutes.
  8. Fold sweetened condensed milk, vanilla, and a pinch of salt into whipped cream. Mix in melted butterscotch chips.
  9. Spread ice cream mix into containers and freeze until solid, about 2 hours.
  10. Cut out ice cream rounds and sandwich between cooled cookies. Wrap and freeze sandwiches.

Notes

Wrap sandwiches well to prevent freezer burn. Use quality ingredients for best flavor.

Creamy Chicken Pasta Salad: A Dreamy Summer Delight

The sun kissed my back as I spun around the kitchen, channeling my inner chef. There’s something magical about whipping up an Irresistible Creamy Chicken Pasta Salad with Avocado and Bacon—it feels like a celebration in a bowl! This dish radiates summer vibes with its creamy texture and vibrant ingredients, making it a true crowd-pleaser for gatherings or cozy dinners alike. It’s not just quick to prepare; it’s also perfect for meal prep, ensuring delicious leftovers that taste even better the following day. Each forkful greets your taste buds with a delightful mix of tender macaroni, smoky bacon, and fresh avocados, leaving everyone wanting more. Are you ready to dive into a creamy adventure that will be the star of your next meal?

Why is this pasta salad a winner?

Creamy Satisfaction: This Irresistible Creamy Chicken Pasta Salad perfectly combines creamy dressing, tender pasta, and savory ingredients, ensuring every bite is rich and flavorful.

Crowd-Pleaser: It’s a dish that appeals to everyone—kids and adults alike—with the smoky bacon and fresh avocados stealing the show.

Flexible Ingredients: You can easily swap in different vegetables or substitute macaroni with your favorite pasta shape, making it super versatile.

Quick to Prep: Ideal for busy schedules, this salad comes together in just a few steps—perfect for meal prep!

Perfect Leftovers: Unlike many salads, its flavors deepen overnight, ensuring your lunch the next day is just as tasty. Serve it alongside a refreshing Garden Harvest Salad for an ideal summer meal!

Creamy Chicken Pasta Salad Ingredients

For the Salad
Macaroni – provides that classic pasta texture; rotini or penne make great substitutes if you prefer.
Salt – essential for seasoning the pasta water and enhancing overall flavor.
Chicken – adds protein and can be poached, grilled, or roasted; shred or cube for the best texture.
Bacon – contributes a crispy, smoky flavor; ensure it’s cooked until crispy to add that delightful crunch.
Celery – introduces a refreshing crunch and bright flavor to the salad.
Bell Pepper – brings sweetness and lovely color; choose any variety that speaks to you!
Green Onions – provides a mild onion flavor, adding freshness without overwhelming the dish.
Carrots – grated to seamlessly blend with the dressing, boosting color and adding subtle sweetness.
Sharp Cheddar Cheese – offers a tangy bite that complements the creamy base; use cubed or shredded as you like.

For the Dressing
Avocados – brings creaminess; add just before serving to keep them fresh and vibrant.
Mayonnaise – forms the creamy dressing base and is vital for that luscious texture.
Sour Cream – adds tanginess while enhancing the creamy quality of the salad.
Apple Cider Vinegar – delivers acidity that brightens all the flavors throughout the dish.
Dijon Mustard – offers depth with mild heat, perfect for giving the dressing a kick.
Sugar – helps to balance the acidity in the dressing for a beautifully rounded flavor.
Garlic Powder – enhances overall taste without the bite of raw garlic, blending effortlessly into the salad.
Smoked Paprika – adds a smoky depth, harmonizing beautifully with the bacon’s flavor.
Fresh Dill – provides a refreshing herbaceous note that elevates the entire dish.
Salt and Black Pepper – crucial for seasoning and bringing out the best in all your ingredients.

Embrace your right to make this Creamy Chicken Pasta Salad your own by mixing and matching ingredients!

Step‑by‑Step Instructions for Irresistible Creamy Chicken Pasta Salad

Step 1: Boil the Pasta
Start by bringing a large pot of salted water to a rolling boil over high heat. Once boiling, add in your macaroni, allowing it to cook according to package directions until al dente, usually about 7-9 minutes. As you wait, keep an eye on the pasta to ensure it doesn’t overcook, becoming mushy.

Step 2: Drain and Cool the Pasta
After cooking, drain the macaroni in a colander and make sure to rinse it under cold water to stop the cooking process. This important step prevents the pasta from clumping together. Set the colander aside to allow the pasta to cool completely while you prepare the remaining ingredients for your creamy chicken pasta salad.

Step 3: Cook and Prepare the Bacon
In a large skillet over medium heat, cook the bacon strips until they’re nice and crispy, which should take about 8-10 minutes. As the bacon cooks, flip the strips occasionally for even browning. Once done, transfer the crispy bacon to a paper towel-lined plate to drain off excess grease and crumble it into small pieces.

Step 4: Cook the Chicken
If your chicken isn’t already cooked, you can poach, grill, or roast it until fully cooked and no longer pink inside, which usually takes about 15-20 minutes, depending on the method. Once cooked, let the chicken rest for a few minutes, then shred or cube it into bite-sized pieces that can easily integrate into the creamy chicken pasta salad.

Step 5: Make the Dressing
While waiting for the chicken, grab a mixing bowl and whisk together your dressing ingredients. Combine the mayonnaise, sour cream, apple cider vinegar, Dijon mustard, sugar, garlic powder, smoked paprika, fresh dill, and a pinch of salt and pepper. Keep whisking until the mixture is smooth and well combined, forming a luscious dressing for your pasta salad.

Step 6: Combine Salad Ingredients
In a large mixing bowl, combine the cooled macaroni, cooked chicken, crispy bacon, chopped celery, diced bell pepper, green onions, and grated carrots. Gently fold the ingredients together using a large spatula, ensuring everything is evenly distributed, creating a hearty and colorful base for your irresistible creamy chicken pasta salad.

Step 7: Add the Dressing
Pour the creamy dressing over the pasta salad mixture and toss everything together until each ingredient is well-coated in the dressing. Make sure that the macaroni and other components are evenly drenched, ensuring every forkful of this creamy chicken pasta salad bursts with flavor and richness.

Step 8: Rest for Flavor Development
Let the assembled pasta salad rest at room temperature for about 20 minutes. This crucial step allows the flavors to meld beautifully, creating a more cohesive and flavorful dish. While the salad rests, consider preparing any extra garnishes or sides to enhance your meal.

Step 9: Finish with Avocado
Just before serving, gently fold in the diced avocados to the creamy chicken pasta salad; this keeps them fresh and intact for a delicious boost of creaminess. Toss in any remaining crumbled bacon for an extra crunchy touch, and serve your delightful dish to family and friends, ready to impress with its irresistible flavors!

Expert Tips for Creamy Chicken Pasta Salad

  • Pasta Perfection: Rinse cooked macaroni under cold water to avoid mushiness. This step halts the cooking process and keeps the pasta firm.

  • Chill Time: Allow the pasta salad to rest for at least 20 minutes before serving. This helps the flavors meld together beautifully, enhancing the overall taste of your creamy chicken pasta salad.

  • Fresher Ingredients: Add avocados and bacon right before serving to maintain their texture and flavor. This keeps the salad fresh and appealing.

  • Adjust to Your Taste: Always taste the salad before serving and adjust the seasoning with salt and pepper as needed. Each ingredient should shine without overpowering the creamy mixture.

  • Versatile Flair: Don’t hesitate to mix up the ingredients! Feel free to swap in other veggies or different pasta shapes to create your unique version of this creamy chicken pasta salad.

Creamy Chicken Pasta Salad Variations

Feel free to get creative with your Creamy Chicken Pasta Salad by trying these exciting twists and swaps!

  • Pasta Swap: Replace macaroni with rotini or penne for a new texture. Each shape has its own unique charm, enhancing the overall experience.

  • Cheese Choices: Substitute sharp cheddar with a milder cheese like Monterey Jack for a gentler flavor. This creamy alternative still delivers that beloved cheesy goodness.

  • Lighter Version: Reduce the amount of mayonnaise and sour cream for a lighter salad that’s still rich in flavor. It’s a guilt-free twist everybody will enjoy.

  • Veggie Boost: Add colorful veggies like peas or corn for an extra crunch and sweetness. These additions elevate your salad to new flavor heights, making it even more vibrant.

  • Herb Infusion: Swap fresh dill for fresh basil or parsley to give your salad a delightful herbal twist. These fresh herbs can brighten up the dish beautifully.

  • Crispy Alternative: Use turkey bacon instead of regular bacon for a lighter twist on that delicious crunch. The turkey version adds a unique flavor while keeping it lean.

  • Spice It Up: Add a touch of Sriracha or diced jalapeños for a little heat. This spicy kick will thrill those who love a bit of warmth in their meal.

  • Nutty Crunch: Toss in some toasted nuts such as walnuts or almonds for a delightful crunchy element. This unexpected twist complements the creaminess while adding texture.

Don’t forget, this dish pairs wonderfully with a Honey Chili Chicken for a complete meal that will have everyone coming back for seconds or a sweet Tropical Chicken Pineapple to add a fruity flair! Enjoy experimenting with these variations!

What to Serve with Irresistible Creamy Chicken Pasta Salad

Elevate your dining experience by pairing this delightful pasta salad with complementary sides and beverages that enhance its vibrant flavors.

  • Garlic Bread: The warm, toasty flavor of garlic bread makes for a savory partner, perfect for soaking up any leftover dressing from the salad. Serve it hot for a comforting addition.

  • Fresh Fruit Salad: A colorful medley of seasonal fruits adds a refreshing contrast, balancing the richness of the pasta salad with sweet, juicy bites. This combo is a summer staple!

  • Roasted Veggie Platter: Serve a platter of roasted seasonal veggies like zucchini and bell peppers for a healthful touch, adding bright notes of flavor and color to your meal.

  • Crispy Green Salad: A crisp green salad dressed lightly with vinaigrette offers freshness and crunch that cuts through the creaminess of the chicken pasta salad, creating a delightful balance.

  • Corn on the Cob: Juicy, sweet corn on the cob is a summer favorite that pairs beautifully with the dish, adding a fun textural component and a hint of sweetness.

  • Chilled Sparkling Lemonade: Refreshing and bubbly lemonade is the ideal drink to accompany this creamy chicken pasta salad, invigorating the palate and enhancing the overall dining experience.

  • Chocolate Chip Cookies: To finish your meal on a sweet note, classic chocolate chip cookies provide a delightful dessert option that’ll please everyone, wrapping up the feast perfectly.

How to Store and Freeze Creamy Chicken Pasta Salad

Fridge: Store leftovers in an airtight container for up to 3 days. This creamy chicken pasta salad is perfect for meal prep and tastes even better the next day!

Room Temperature: Avoid leaving the salad out for more than 2 hours to maintain food safety. If serving outdoors, keep it chilled in a cooler.

Freezer: While not recommended for optimal texture, you can freeze the pasta salad without the avocado for up to 2 months. Thaw overnight in the fridge and consume within 24 hours after thawing.

Reheating: If desired, gently reheat the salad in the microwave using low power. However, it’s best enjoyed chilled to preserve the creamy texture.

Make Ahead Options

These Irresistible Creamy Chicken Pasta Salad components are perfect for making ahead, saving you time on busy days! You can prepare the macaroni, chicken, vegetables, and dressing up to 24 hours in advance. Just be sure to cool the macaroni thoroughly and mix the dressing separately to prevent it from soaking in. Store each component in airtight containers in the refrigerator to maintain freshness. When you’re ready to serve, simply combine everything, add diced avocados, and toss gently to ensure each bite is luxurious and creamy. Trust me, your meal prep will shine, and you’ll have more time to enjoy with family and friends!

Irresistible Creamy Chicken Pasta Salad Recipe FAQs

What type of pasta should I use for this salad?
You can go with macaroni as the classic option, but I often recommend swapping it for rotini or penne if you’re feeling adventurous! These shapes hold onto the dressing beautifully, ensuring every bite is flavorful.

How should I store the leftover creamy chicken pasta salad?
Absolutely! Store your leftovers in an airtight container in the fridge for up to 3 days. Keep in mind to add the diced avocados just before serving to keep them fresh and vibrant.

Can I freeze the creamy chicken pasta salad?
While not ideal for preserving the texture, you can freeze the pasta salad without the avocado for up to 2 months. When you’re ready to enjoy, thaw it overnight in the fridge and consume it within 24 hours for the best taste.

What if the pasta becomes mushy? How can I prevent that?
To avoid mushiness, be sure to rinse your cooked macaroni under cold water immediately after draining. This important step halts the cooking process and keeps the pasta firm and al dente, ensuring your salad has the perfect texture!

Are there any dietary considerations I should keep in mind?
Absolutely! If you’re serving this salad to children or guests with allergies, be sure to check for common allergens like gluten in the pasta or dairy in the mayo and cheese. You can easily make substitutions; for example, use gluten-free pasta or vegan mayonnaise for a more inclusive dish.

How can I enhance flavor if the salad tastes bland?
If you find your salad lacking in flavor, don’t fret! Simply taste and adjust the seasoning with a pinch of salt or a dash of pepper. Additionally, a splash more apple cider vinegar or a hint of mustard can elevate those flavors beautifully. Enjoy your cooking adventure!

Creamy Chicken Pasta Salad

Creamy Chicken Pasta Salad: A Dreamy Summer Delight

This Creamy Chicken Pasta Salad combines creamy dressing, tender pasta, and savory ingredients for a delicious summer dish.
Prep Time 20 minutes
Cook Time 20 minutes
Cooling Time 20 minutes
Total Time 1 hour
Servings: 6 servings
Course: Lunch
Cuisine: American
Calories: 350

Ingredients
  

For the Salad
  • 8 oz Macaroni or rotini/penne as substitutes
  • 1 tsp Salt for seasoning pasta water
  • 2 cups Cooked Chicken shredded or cubed
  • 8 slices Bacon cooked until crispy
  • 1 cup Celery chopped
  • 1 cup Bell Pepper diced
  • 1/2 cup Green Onions chopped
  • 1 cup Carrots grated
  • 1 cup Sharp Cheddar Cheese cubed or shredded
For the Dressing
  • 1 cup Avocados diced, add just before serving
  • 1 cup Mayonnaise base for creamy dressing
  • 1/2 cup Sour Cream for added creaminess
  • 2 tbsp Apple Cider Vinegar
  • 2 tbsp Dijon Mustard
  • 2 tbsp Sugar
  • 1 tsp Garlic Powder
  • 1 tsp Smoked Paprika
  • 1 tbsp Fresh Dill
  • 1 tsp Salt
  • 1 tsp Black Pepper

Equipment

  • Large pot
  • Colander
  • Skillet
  • mixing bowl
  • Large spatula

Method
 

Step-by-Step Instructions
  1. Boil the Pasta: Bring a large pot of salted water to a rolling boil. Add macaroni and cook until al dente, about 7-9 minutes.
  2. Drain and Cool the Pasta: Drain the macaroni and rinse under cold water to stop cooking. Allow to cool.
  3. Cook and Prepare the Bacon: Cook bacon strips in a skillet until crispy, about 8-10 minutes. Crumble after draining.
  4. Cook the Chicken: Poach, grill, or roast chicken until fully cooked, about 15-20 minutes. Shred or cube.
  5. Make the Dressing: Whisk together mayonnaise, sour cream, vinegar, mustard, sugar, garlic powder, paprika, dill, salt, and pepper until smooth.
  6. Combine Salad Ingredients: In a large bowl, mix cooled macaroni, chicken, bacon, celery, bell pepper, green onions, and carrots.
  7. Add the Dressing: Pour dressing over the salad and toss until evenly coated.
  8. Rest for Flavor Development: Let the salad rest at room temperature for about 20 minutes.
  9. Finish with Avocado: Fold in diced avocados just before serving.

Notes

This salad is excellent for meal prep and can be adjusted to personal tastes by swapping ingredients.

Gordon Ramsay Lobster Ravioli: Elevate Your Gourmet Game

As I sifted through the flour for the homemade pasta, the rich, tantalizing aroma of fresh lobster filled the air, setting the stage for a culinary adventure. Today, I’m excited to share my version of Gordon Ramsay’s Lobster Ravioli, a luxurious dish that elevates any dining experience. With the perfect blend of sweet lobster meat and creamy mascarpone wrapped in delicate pasta, this recipe is not only a crowd-pleaser but also surprisingly quick to prepare, making it ideal for those special occasions when you want to impress. Imagine serving this dish, paired with a light butter sauce that glistens on the plate, and watching your loved ones delight in every bite. Are you ready to indulge in a slice of gourmet heaven from the comfort of your kitchen? Let’s dive into this exquisite recipe!

Why is lobster ravioli a must-try?

Decadent Flavors: Gordon Ramsay’s Lobster Ravioli combines sweet, tender lobster with creamy mascarpone, resulting in a rich, luxurious filling that delights the palate.

Homemade Goodness: Craft your own pasta for an authentic touch; it’s easier than you think and elevates this dish to gourmet status.

Elegant Presentation: The glistening butter sauce wraps the ravioli in a stunning finish, making it perfect for special occasions or impressive dinner parties.

Quick to Impress: Surprisingly simple, this recipe provides a restaurant-quality experience in just a short time, allowing you to wow your guests without spending all day in the kitchen.

Versatile Dish: Feeling adventurous? Customize the filling with crab or shrimp for a delightful variation, making this recipe suitable for any seafood lover.

Gordon Ramsay Lobster Ravioli Ingredients

  • For the Filling
    Fresh Lobster – Provides a sweet and tender filling; use high-quality Maine or Canadian lobster for the best flavor.
    Mascarpone Cheese – Adds creaminess and richness; cream cheese can be a substitute in a pinch.
    Herbs (e.g., basil, parsley) – Add freshness and elevate the savory profile of the dish; other soft herbs like chives can also work.

  • For the Pasta
    Homemade Pasta – Essential for texture and authenticity; if short on time, store-bought fresh pasta may be used, though it will alter the recipe’s integrity.

  • For the Sauce
    Butter – Enables a rich flavor in the sauce; substitute with olive oil for a lighter option.
    Seasonings (Salt, Pepper, Lemon Zest) – Essential for balancing flavors; adjust to taste, ensuring to highlight the main ingredient: Gordon Ramsay Lobster Ravioli.

Step‑by‑Step Instructions for Gordon Ramsay Lobster Ravioli

Step 1: Prepare the Pasta
Begin by making the homemade pasta dough. Combine flour and eggs in a mixing bowl and knead until smooth, about 8-10 minutes. Wrap it in plastic wrap and let it rest for 30 minutes. After resting, roll out the dough using a pasta machine or a rolling pin until very thin, approximately 1/16 inch thick, and cut into squares.

Step 2: Make the Filling
In a mixing bowl, combine the cooked lobster meat, mascarpone cheese, finely chopped herbs, and a sprinkle of salt and pepper. Mix gently until all ingredients are well incorporated. The filling should be creamy and fragrant, with the sweet aroma of lobster shining through. This rich mixture will ensure your Gordon Ramsay Lobster Ravioli is bursting with flavor.

Step 3: Assemble Ravioli
Take a square of pasta, and place a small spoonful of the lobster filling in the center. Moisten the edges with water, fold the pasta over to create a triangle, and press firmly to seal, ensuring no air is trapped inside. Repeat this process with the remaining squares, placing the ravioli on a floured surface to prevent sticking.

Step 4: Cook the Ravioli
Bring a large pot of salted water to a gentle simmer, not a full boil. Carefully add the ravioli to the pot, ensuring they do not stick together. Cook for about 3-4 minutes, or until they float to the surface, signaling they are done. Use a slotted spoon to remove them from the water and set aside on a plate.

Step 5: Prepare the Sauce
In a separate pan, melt 4 tablespoons of butter over medium heat. Once melted, stir in the zest of one lemon and a handful of finely chopped herbs. Cook for about 2 minutes until fragrant and bubbling, then remove from heat. This light sauce will beautifully coat your Gordon Ramsay Lobster Ravioli while enhancing the flavors of the dish.

Step 6: Serve
On a warm plate, carefully arrange the cooked ravioli. Drizzle the butter sauce generously over the top, allowing it to glisten. Garnish with additional herbs or a sprinkle of lemon zest, if desired. Present your exquisite Gordon Ramsay Lobster Ravioli with pride, and watch as your friends and family delight in this luxurious homemade dish.

Expert Tips for Making Gordon Ramsay Lobster Ravioli

  • Seal Tightly: Ensure the edges of your ravioli are sealed tightly to prevent any filling from leaking out during cooking. Use water to moisten the edges before pressing.

  • Simmer, Don’t Boil: Cook the ravioli in gently simmering water instead of a rolling boil. This helps maintain their delicate structure and prevents them from bursting.

  • Chill Before Cooking: If you’re making the ravioli ahead of time, chill them for at least 30 minutes before cooking. This helps firm them up, reducing the risk of breakage.

  • Fresh Ingredients: Use the freshest lobster available for an unbeatable flavor in your Gordon Ramsay Lobster Ravioli. Quality ingredients make all the difference!

  • Test a Sample: Before cooking all the ravioli, boil a test piece to ensure seasoning and cooking time are perfect. Adjust as necessary before serving the entire batch.

Gordon Ramsay Lobster Ravioli Variations

Feel free to explore these delightful twists on the classic recipe, transforming your dish into a personalized masterpiece.

  • Crustacean Swap: Replace lobster with crab or shrimp for a different, yet equally luxurious experience. Each alternative brings a unique sweetness that’s perfect for seafood lovers.

  • Dairy-Free Delight: Use cashew cheese or silken tofu in place of mascarpone for a plant-based filling. The creamy texture will still provide that rich mouthfeel without the dairy.

  • Flavor Boost: Enhance your sauce with a splash of dry white wine or a dollop of crème fraîche for extra complexity. These additions elevate the dish, making it even more velvety and sophisticated.

  • Herb Infusion: Incorporate fresh dill or tarragon in the filling for an aromatic twist. These herbs lend a refreshing zing that pairs beautifully with seafood.

  • Spicy Kick: Add a pinch of red pepper flakes or some finely chopped jalapeños to the filling for a subtle heat. This kick can transform your ravioli into an exhilarating dish that excites the palate.

  • Stuffing Variety: Try adding sautéed spinach or roasted red peppers to the filling for a delightful pop of flavor and color. Their natural sweetness enhances the overall taste and adds visual appeal!

  • Sauce Variation: Swap butter for olive oil and add lemon juice for a lighter sauce option that’s equally flavorful. This alternative brings a sunny, fresh taste to your ravioli.

For even more delectable ideas, consider integrating a side of garlic bread or a crisp green salad for a complete meal experience. Enjoy experimenting in the kitchen—your culinary journey awaits!

Storage Tips for Gordon Ramsay Lobster Ravioli

  • Fridge: Store cooked ravioli in an airtight container for up to 2 days. Gently reheat in a pan with a splash of water or butter to bring back their tender texture.

  • Freezer: Uncooked ravioli can be frozen for up to 2 months. Place them on a baking sheet to freeze individually before transferring to a freezer bag to prevent sticking.

  • Reheating: When reheating frozen ravioli, gently boil them from frozen for about 5-6 minutes until they float. Alternatively, cook them in lightly salted simmering water.

  • Thawing: If you prefer to thaw before cooking, leave the ravioli in the fridge overnight. This way, they’ll be ready to simmer when you’re ready to enjoy your Gordon Ramsay Lobster Ravioli!

Make Ahead Options

Preparing Gordon Ramsay’s Lobster Ravioli in advance is a brilliant way to save time for busy weeknights or special occasions! You can easily assemble the ravioli and refrigerate them for up to 24 hours before cooking. To maintain their quality, ensure the ravioli are spread out on a floured surface and covered with a damp cloth to prevent drying out. If you’re looking to prepare even further in advance, uncooked ravioli can be frozen for up to 2 months. When ready to serve, simply boil them straight from the freezer for about 4-5 minutes until they float, then drizzle with the butter sauce for restaurant-quality results without the hassle!

What to Serve with Gordon Ramsay Lobster Ravioli?

Imagine your guests savoring each mouthwatering bite of lobster ravioli while being pampered by complementary sides that enhance the dining experience.

  • Crispy Garlic Bread: This buttery delight adds crunch and is perfect for soaking up any leftover sauce, balancing the dish’s richness. Each bite of garlicky goodness will transport you straight to Italy.
  • Fresh Arugula Salad: The peppery notes of arugula combined with a light lemon vinaigrette provide a refreshing contrast, cleansing the palate beautifully. Toss in cherry tomatoes and shaved parmesan for an extra pop of flavor.
  • Roasted Asparagus: The tender yet crisp texture of asparagus drizzled with olive oil can elevate your plate’s presentation and adds a vibrant color contrast. Plus, it’s a nutrient-packed side that screams sophistication!
  • Herbed Risotto: Creamy risotto infused with lemon and fresh herbs harmonizes with the flavors of the lobster ravioli while providing a comforting texture. This combination turns dinner into an elegant culinary experience.
  • Chardonnay or Sauvignon Blanc: A chilled glass of white wine, such as Chardonnay, complements the seafood’s sweetness and creamy sauce, enhancing the overall dining sensation. It’s the perfect refreshing partner for your luxurious meal.
  • Lemon Sorbet: For dessert, a light lemon sorbet cleanses the palate after the indulgent ravioli; its bright flavor will leave your guests feeling refreshed and satisfied. It’s a sweet ending to an exquisite meal!

Gordon Ramsay Lobster Ravioli Recipe FAQs

What type of lobster should I use for the ravioli?
I recommend using high-quality fresh lobster, like Maine or Canadian lobster, for the best flavor and texture. If fresh isn’t available, you can use frozen lobster, just make sure to thaw it properly before cooking.

How should I store leftover cooked lobster ravioli?
Store your cooked ravioli in an airtight container in the refrigerator for up to 2 days. When you’re ready to enjoy them again, gently reheat in a pan with a splash of water or butter to regain that tender texture.

Can I freeze uncooked lobster ravioli, and how do I do it?
Absolutely! To freeze uncooked lobster ravioli, place them in a single layer on a baking sheet lined with parchment paper and freeze until solid. Once frozen, transfer them to a freezer bag and store for up to 2 months. This method prevents sticking and ensures they stay nice and intact!

What should I do if my ravioli bursts during cooking?
If your ravioli bursts, it often means they weren’t sealed tightly enough or cooked in boiling water instead of gently simmering water. Double-check the edges to ensure no air is trapped before sealing. Next time, try cooking them in simmering water at a lower temperature to keep them intact.

Are there any dietary considerations I should be aware of?
Yes, if you or your guests have shellfish allergies, it’s crucial to avoid using lobster altogether. You could opt for crab or shrimp as alternatives to create a delicious variation. Always check with your guests to meet any dietary needs or preferences!

What type of pasta can I use if I’m short on time?
If making homemade pasta seems daunting or you’re short on time, you can use store-bought fresh pasta. Just keep in mind that while it may save you time, it will alter the authenticity and texture of your Gordon Ramsay Lobster Ravioli.

Gordon Ramsay Lobster Ravioli

Gordon Ramsay Lobster Ravioli: Elevate Your Gourmet Game

This Gordon Ramsay Lobster Ravioli recipe features sweet lobster meat and creamy mascarpone in homemade pasta, perfect for impressing guests.
Prep Time 30 minutes
Cook Time 15 minutes
Resting Time 30 minutes
Total Time 1 hour 15 minutes
Servings: 4 servings
Course: Dinner
Cuisine: Italian
Calories: 450

Ingredients
  

Filling
  • 1 lb Fresh Lobster Use high-quality Maine or Canadian lobster for best flavor.
  • 1 cup Mascarpone Cheese Can substitute with cream cheese if necessary.
  • 1/4 cup Herbs (e.g., basil, parsley) Finely chopped; soft herbs like chives may also be used.
Pasta
  • 2 cups Homemade Pasta Store-bought fresh pasta can be used, but will alter integrity.
Sauce
  • 4 tbsp Butter Can substitute with olive oil for a lighter option.
  • 1 tbsp Seasonings (Salt, Pepper, Lemon Zest) Adjust to taste.

Equipment

  • mixing bowl
  • pasta machine
  • Rolling Pin
  • Large pot
  • slotted spoon
  • Pan

Method
 

Pasta Preparation
  1. Combine flour and eggs in a mixing bowl and knead until smooth, about 8-10 minutes. Wrap in plastic wrap and let rest for 30 minutes.
  2. Roll out the dough using a pasta machine or rolling pin until very thin, approximately 1/16 inch thick, and cut into squares.
Filling Preparation
  1. In a mixing bowl, combine cooked lobster meat, mascarpone cheese, finely chopped herbs, and a sprinkle of salt and pepper. Mix gently until well incorporated.
Assembling Ravioli
  1. Take a square of pasta, place a small spoonful of the lobster filling in the center, moisten edges with water, fold over to create a triangle, and press firmly to seal.
  2. Repeat with remaining squares and place ravioli on a floured surface.
Cooking Ravioli
  1. Bring a large pot of salted water to a gentle simmer. Carefully add ravioli, cook for about 3-4 minutes until they float, then use a slotted spoon to remove.
Preparing Sauce
  1. Melt butter over medium heat, stir in lemon zest and chopped herbs, cook for about 2 minutes until fragrant.
Serving
  1. Arrange ravioli on a warm plate, drizzle with butter sauce, and garnish with additional herbs or lemon zest.

Notes

Ensure edges of ravioli are sealed tightly to prevent filling from leaking out. Cook in gently simmering water to maintain structure. Use fresh ingredients for the best flavor.

Delicious Traditional Rhubarb Jam with Orange Juice Recipe

The first time I tasted homemade rhubarb jam, I instantly understood why my grandmother always had a jar on her kitchen shelf. The remarkable tang of fresh rhubarb melded with the vibrant zing of orange juice creates a symphony of flavors that dances on your palate. In this recipe for Traditional Rhubarb Jam with Orange Juice, you’ll discover how a few simple ingredients can transform into a luscious, thick spread that captures the essence of spring. This jam is not only a delightful way to savor the season’s produce, but it’s also incredibly easy to make—perfect for busy afternoons spent in the kitchen. You can enjoy it on buttered toast, as a filling for pastries, or swirled into your yogurt for a sweet yet tart breakfast treat. Ready to uncover the magic of making your own jam? Let’s dive in and bring this delicious vintage delight to your table!

Why is Rhubarb Jam So Special?

Unique Flavor Combination: The mix of tart rhubarb and sweet orange juice brings a refreshing taste that is unlike any store-bought jam.

Easy to Make: With just a few simple ingredients and a straightforward process, you can create this delightful spread in no time, perfect for those busy afternoons in the kitchen!

Versatile Use: Spread it on toast, mix it into your favorite yogurt, or use it as a filling for pastries—this jam shines in various culinary applications.

Seasonal Delight: Capture the essence of spring with this homemade treat, making it a delightful way to celebrate the season.

Canning Benefits: Canning your rhubarb jam allows you to enjoy its fresh taste year-round; consider pairing it with a refreshing Cucumber Carrot Salad for a balanced meal!

Traditional Rhubarb Jam Ingredients

For the Jam
Rhubarb – The star of this jam, providing a tart foundation; fresh stalks yield the best flavor.
Granulated Sugar – A vital sweetener that balances the tartness; feel free to adjust based on your sweetness preference.
Water – Helps dissolve the sugar and cook the rhubarb down perfectly; no substitute needed here!
Orange Juice – This adds a lovely sweetness and brightens the flavor; using fresh-squeezed juice makes a significant difference.
Orange Zest – Enhances the jam with a fragrant citrus aroma; remember to zest only the outer peel to avoid bitterness!
Cinnamon Stick – Infuses warm spice into the jam; you can omit it or switch it for ground cinnamon if needed.
Salt – A pinch will help balance the flavors; don’t skip this step!

Embrace the joy of making Traditional Rhubarb Jam with Orange Juice and bring a taste of spring to your kitchen!

Step‑by‑Step Instructions for Traditional Rhubarb Jam with Orange Juice

Step 1: Sterilize Jars
Start by sterilizing your jars and lids to ensure a safe preserve. Submerge them in a large pot of boiling water for 5 minutes, ensuring they are fully covered. Once done, carefully remove the jars with tongs and place them on a clean kitchen towel to dry completely while you prepare the other ingredients.

Step 2: Prepare Ingredients
Next, get your rhubarb ready for the Traditional Rhubarb Jam with Orange Juice. Trim the ends off the rhubarb stalks and slice them into ½-inch pieces. Grate the zest off the orange, being careful to avoid the bitter white pith, and measure out all other ingredients. This prep will pave the way for a smooth cooking process.

Step 3: Cook the Mixture
In a large, heavy-bottomed pot, combine the chopped rhubarb, granulated sugar, water, fresh orange juice, orange zest, and a pinch of salt. Toss in the cinnamon stick for added warmth. Place the pot over medium-high heat, stirring occasionally until the mixture comes to a vigorous boil, around 5 minutes.

Step 4: Simmer
Reduce the heat to medium-low, allowing the jam to simmer gently. Stir every 10 minutes and let it cook for about 45 minutes. You’ll know it’s done when the mixture thickens and coats the back of a spoon. For a precise test, drop a spoonful onto a cold plate; if it wrinkles when pushed, your jam is ready to be jarred.

Step 5: Jar the Jam
Once the jam thickens, carefully remove the cinnamon stick and discard it. Using a ladle, fill the sterilized jars with the hot jam, leaving approximately ¼ inch of headspace at the top. Wipe the rims of the jars with a clean cloth to ensure a good seal, preparing them for the lids.

Step 6: Seal and Process
Place the lids on the filled jars and screw on the metal rings until they are fingertip tight. Process the jars in a boiling water bath for 5 minutes to ensure they are sealed correctly. This final step locks in the fresh flavors of your Traditional Rhubarb Jam with Orange Juice for long-lasting enjoyment.

Step 7: Cool and Store
After processing, carefully remove the jars from the boiling water bath and place them on a clean towel to cool. Allow them to sit at room temperature for 12 to 24 hours to ensure the seals form properly. Once cool, check the seals by pressing the center of each lid; if it doesn’t pop back, it’s sealed. Store the sealed jars in a cool, dark place to enjoy your delicious jam later.

What to Serve with Traditional Rhubarb Jam with Orange Juice

Elevate your breakfast or dessert spread with delightful pairings that highlight the unique flavors of this homemade jam.

  • Warm Buttered Toast: The classic choice, allowing the jam’s tartness to shine against the buttery layers.

  • Thick Greek Yogurt: A creamy contrast to the jam’s tartness, creating a healthy breakfast or snack that’s deliciously balanced.

  • Pancakes or Waffles: Drizzle this sweet-tart jam over fluffy stacks for a fresh twist on your brunch favorites.

  • Scones with Whipped Cream: The rich scones complement the jam while the cream adds a lovely indulgence.

  • Oatmeal or Overnight Oats: Swirl the jam into your morning bowl for bursts of flavor and vibrant color, making breakfast a treat.

  • Cheese Platter: Pair with creamy cheeses like brie or goat cheese. The jam adds a zesty element, enhancing the overall experience.

  • Fruit Salad: Toss the jam into your fruit medley for added sweetness and a touch of citrus zing, bringing everything together in harmony.

  • Ice Cream Topping: Spoon some jam over vanilla ice cream for an easy, elegant dessert that marries warmth with coolness.

  • Glaze for Roasted Meats: Use the jam as a glaze for chicken or pork, infusing savory dishes with a delightful sweet-tart kick.

Traditional Rhubarb Jam with Orange Juice Variations

Feel free to get creative with this delightful homemade jam; there are countless ways to add your own personal touch!

  • Citrus Twist: Use lemon juice instead of orange juice for a brighter, tangy flavor profile that still complements the rhubarb beautifully.

  • Spice It Up: Add a pinch of ground ginger or nutmeg to infuse a warm, aromatic note that elevates the jam’s richness. This gentle spice kick can surprise and delight the palate!

  • Natural Sweetener: Swap granulated sugar for honey or agave syrup for a healthier twist, while keeping the sweetness balanced and adding a unique flavor dimension.

  • Berry Boost: Stir in a cup of crushed strawberries or raspberries for a fruity twist that brings a pop of color and additional sweetness to your jam.

  • Chili Heat: Spice it up by incorporating a dash of red pepper flakes. This unexpected kick pairs wonderfully with the tartness of the rhubarb and sweet orange notes.

  • Vanilla Infusion: Consider adding half a split vanilla bean or a teaspoon of vanilla extract during simmering for an inviting, fragrant finish.

  • Tropical Delight: Mix in small chunks of fresh mango or pineapple near the end of cooking for an exotic flair that brightens the jar.

  • Almond Flavor: A few drops of almond extract added at the end can give your jam a nutty undertone that pairs pleasingly with the fruit.

As you explore these variations, remember that this jam is lively and versatile—perfect for spreading on warm biscuits or swirling into a refreshing yogurt snack. If you’re looking for even more inspiration, consider pairing your jam with fresh toast or using it as a filling in thumbprint cookies! Experience the joy of crafting your unique take on this delightful preserve.

Make Ahead Options

Preparing Traditional Rhubarb Jam with Orange Juice is a fantastic way to save time on busy days! You can wash and chop the rhubarb up to 24 hours in advance, storing it in an airtight container in the refrigerator to maintain its freshness. Additionally, measuring out the sugar, orange juice, zest, and other ingredients can be done ahead of time for a smoother cooking process. When you’re ready to make the jam, simply combine the prepped ingredients and follow the cooking instructions. This method not only streamlines your jam-making but ensures that your homemade rhubarb jam is just as delicious as when made fresh!

How to Store and Freeze Traditional Rhubarb Jam

Fridge: Keep your opened jars in the refrigerator for up to 3 weeks. Make sure the lids are tightly sealed to maintain freshness and prevent spoilage.

Freezer: For long-term storage, freeze your jam in airtight, freezer-safe containers or bags for up to 6 months. Label each with the date for easy tracking.

Unsealed Jars: If any jars fail to seal properly, place them in the refrigerator and use within 1-2 weeks. Enjoy your homemade Traditional Rhubarb Jam before it’s too late!

Reheating: When ready to use your frozen jam, thaw it in the refrigerator overnight, or place it in a saucepan over low heat until warmed through, stirring occasionally.

Expert Tips for Traditional Rhubarb Jam

  • Choose Fresh Rhubarb: Fresh, firm stalks yield the best flavor for your Traditional Rhubarb Jam. Avoid using soft or overripe rhubarb for optimal results.

  • Avoid Overcooking: Keep an eye on the cooking process to prevent the jam from burning. Stir frequently, especially during the last 15 minutes of simmering.

  • Correct Headspace: Leaving a ¼ inch headspace in the jars is crucial for achieving a proper seal. This helps prevent spoiling and ensures your jam stays fresh longer.

  • Cool for Seals: Let your jars sit undisturbed at room temperature for 12-24 hours after canning. Checking too soon can disturb the seals, compromising your jam.

  • Experiment with Spices: Feel free to customize your Traditional Rhubarb Jam with spices like nutmeg or ginger for an exciting twist on flavor.

Traditional Rhubarb Jam with Orange Juice Recipe FAQs

How do I select ripe rhubarb?
Look for fresh, firm rhubarb stalks with a vibrant color, avoiding any that are soft or have dark spots all over. The best rhubarb will be crisp and bright, indicating optimal ripeness for your jam.

What’s the best way to store leftover rhubarb jam?
Once opened, store your rhubarb jam in the refrigerator with the lid tightly sealed; it will last about 3 weeks. If you’re canning, ensure the jars are properly sealed and store them in a cool, dark place for up to a year.

Can I freeze my rhubarb jam?
Absolutely! To freeze, pour the jam into airtight, freezer-safe containers, leaving some headspace for expansion. Seal tightly and label with the date; it can be frozen for up to 6 months. When ready to use, thaw it overnight in the fridge or gently warm it on the stovetop.

What should I do if my rhubarb jam doesn’t thicken?
If your jam seems too runny after the cooking time, return it to the pot and simmer for another 10-15 minutes. Stir frequently, and you can also add a bit of lemon juice or pectin to help it set. Always check for doneness by testing on a cold plate for wrinkles.

Can I adjust the sugar for dietary reasons?
Yes, you can modify the sugar amount based on your personal preference or dietary needs. Consider using natural sweeteners like honey or agave syrup, or explore sugar substitutes. Just remember that sugar also acts as a preservative, so reducing it may affect shelf life.

Is rhubarb jam safe for my pets?
It’s best to avoid giving rhubarb jam to pets, as rhubarb leaves are toxic to animals. The jam may contain sugar and citrus, which aren’t suitable for pets either. Always stick to pet-friendly treats for your furry friends!

Traditional Rhubarb Jam with Orange Juice

Delicious Traditional Rhubarb Jam with Orange Juice Recipe

Discover how to make Traditional Rhubarb Jam with Orange Juice in this easy recipe.
Prep Time 15 minutes
Cook Time 50 minutes
Cooling Time 24 minutes
Total Time 1 hour 29 minutes
Servings: 4 jars
Course: Dessert
Cuisine: American
Calories: 150

Ingredients
  

For the Jam
  • 4 cups Rhubarb Fresh stalks, trimmed and chopped
  • 3 cups Granulated Sugar Adjust based on sweetness preference
  • 1 cup Water No substitute needed
  • 1 cup Orange Juice Fresh-squeezed for best flavor
  • 1 tablespoon Orange Zest Zest only outer peel
  • 1 stick Cinnamon Stick Optional, can use ground cinnamon
  • 1 pinch Salt Balances the flavors

Equipment

  • Large pot
  • sterilized jars
  • ladle
  • tongs
  • Measuring cups
  • grater

Method
 

Step-by-Step Instructions
  1. Sterilize jars and lids by submerging them in boiling water for 5 minutes.
  2. Prepare ingredients by trimming and slicing rhubarb into ½-inch pieces and grating the orange zest.
  3. In a pot, combine rhubarb, sugar, water, orange juice, zest, and salt. Add cinnamon stick.
  4. Cook the mixture over medium-high heat, stirring until it reaches a vigorous boil, about 5 minutes.
  5. Reduce heat to medium-low and let it simmer for about 45 minutes, stirring every 10 minutes.
  6. Once thickened, remove the cinnamon stick and fill sterilized jars with jam, leaving ¼ inch headspace.
  7. Seal jars with lids and process in a boiling water bath for 5 minutes.
  8. Cool jars at room temperature for 12 to 24 hours before storing.

Notes

Best served fresh; store in a cool, dark place. For longer storage, freeze in airtight containers.