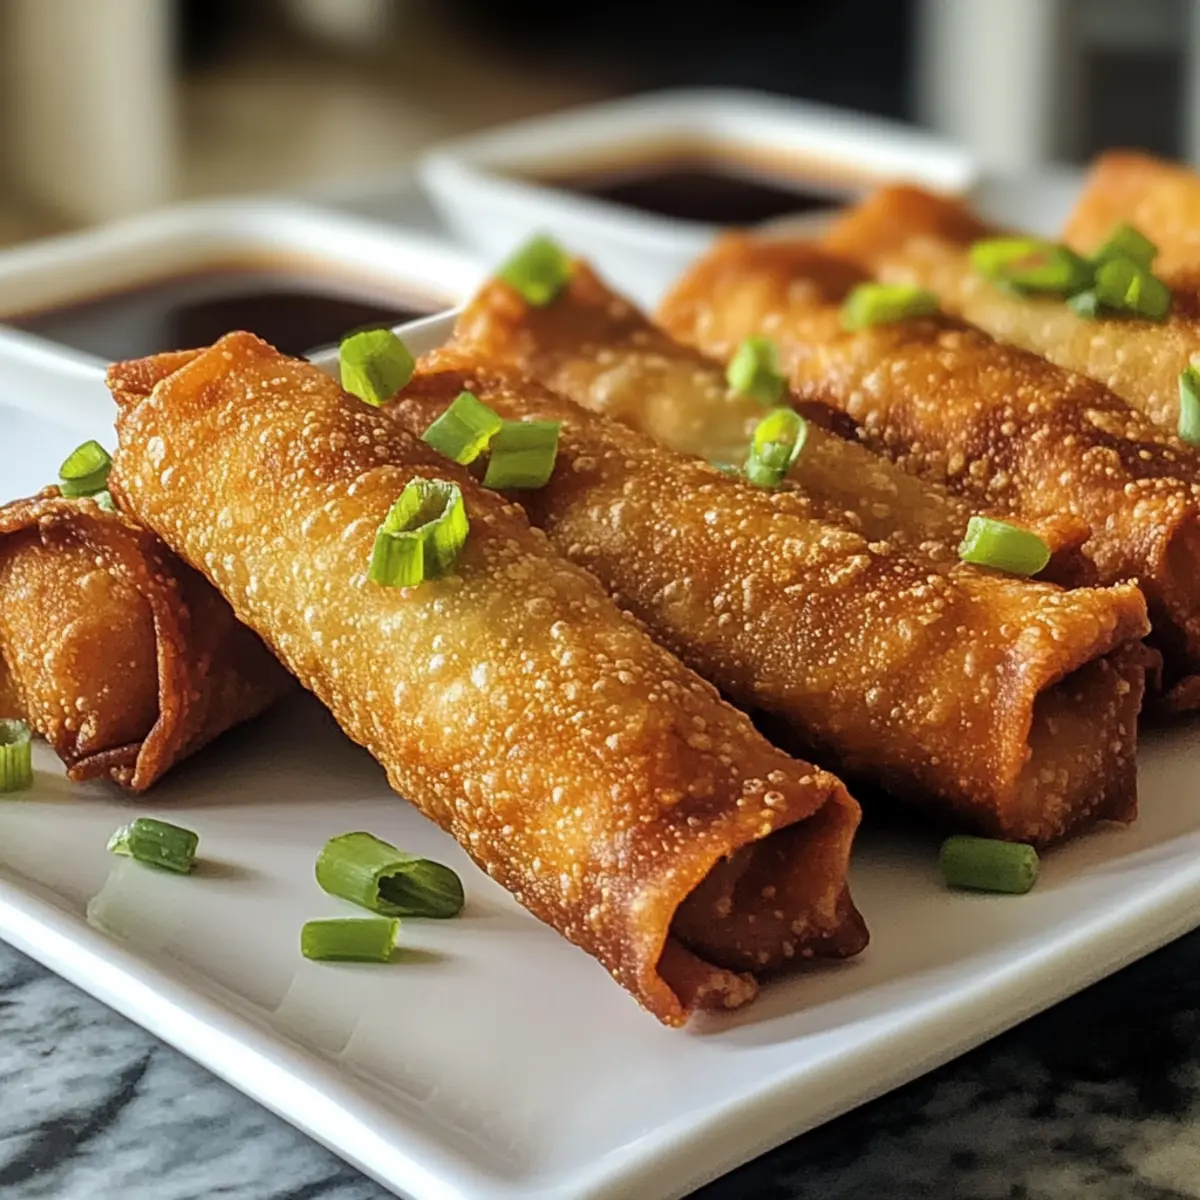
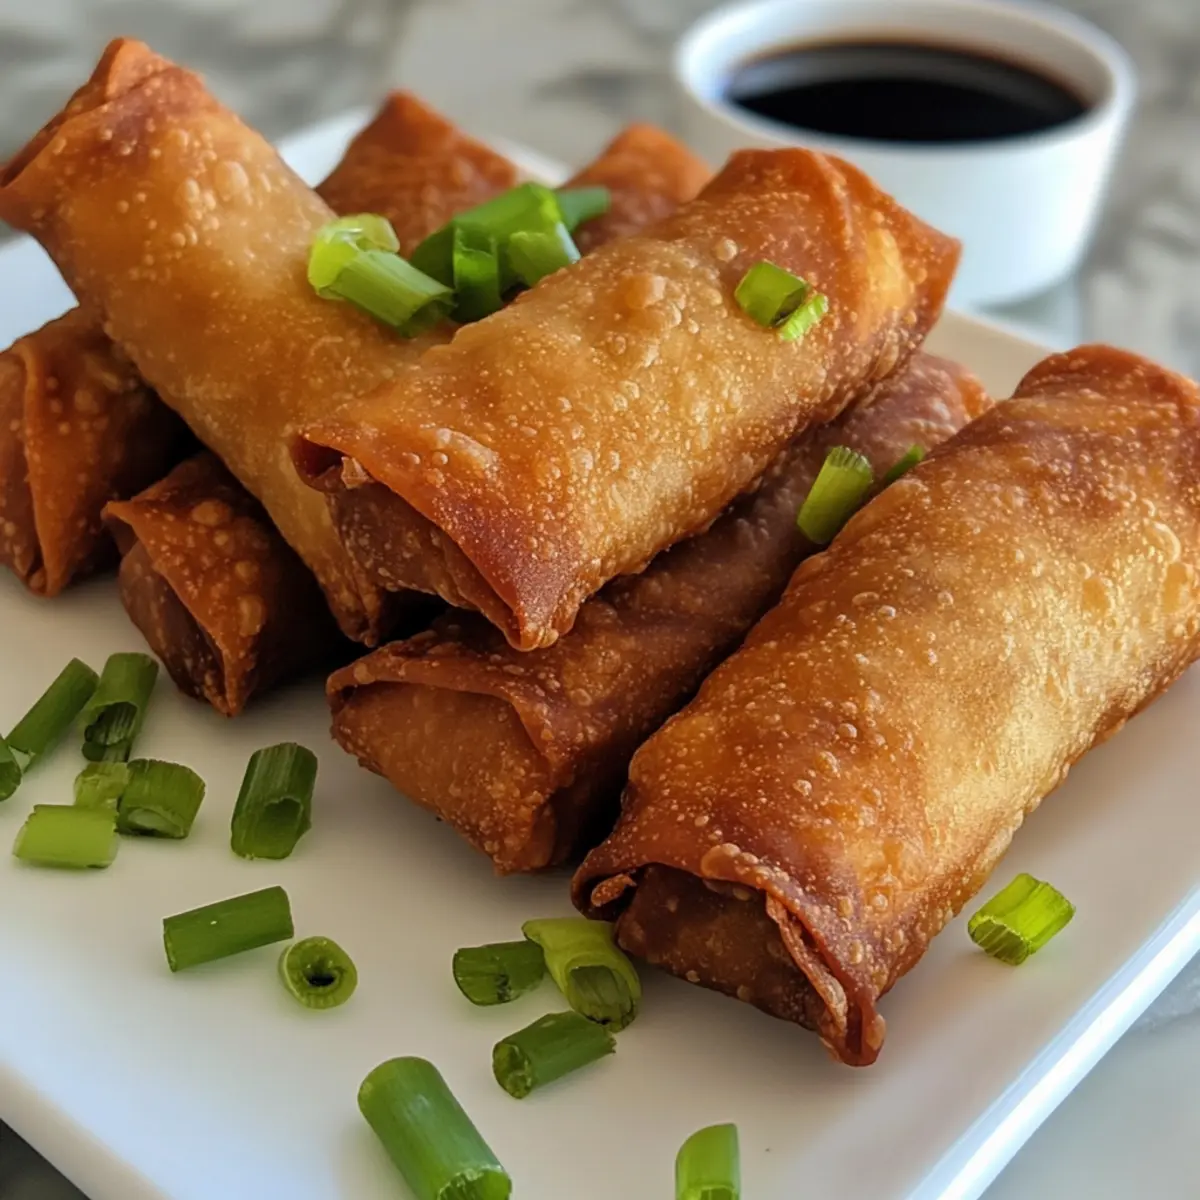
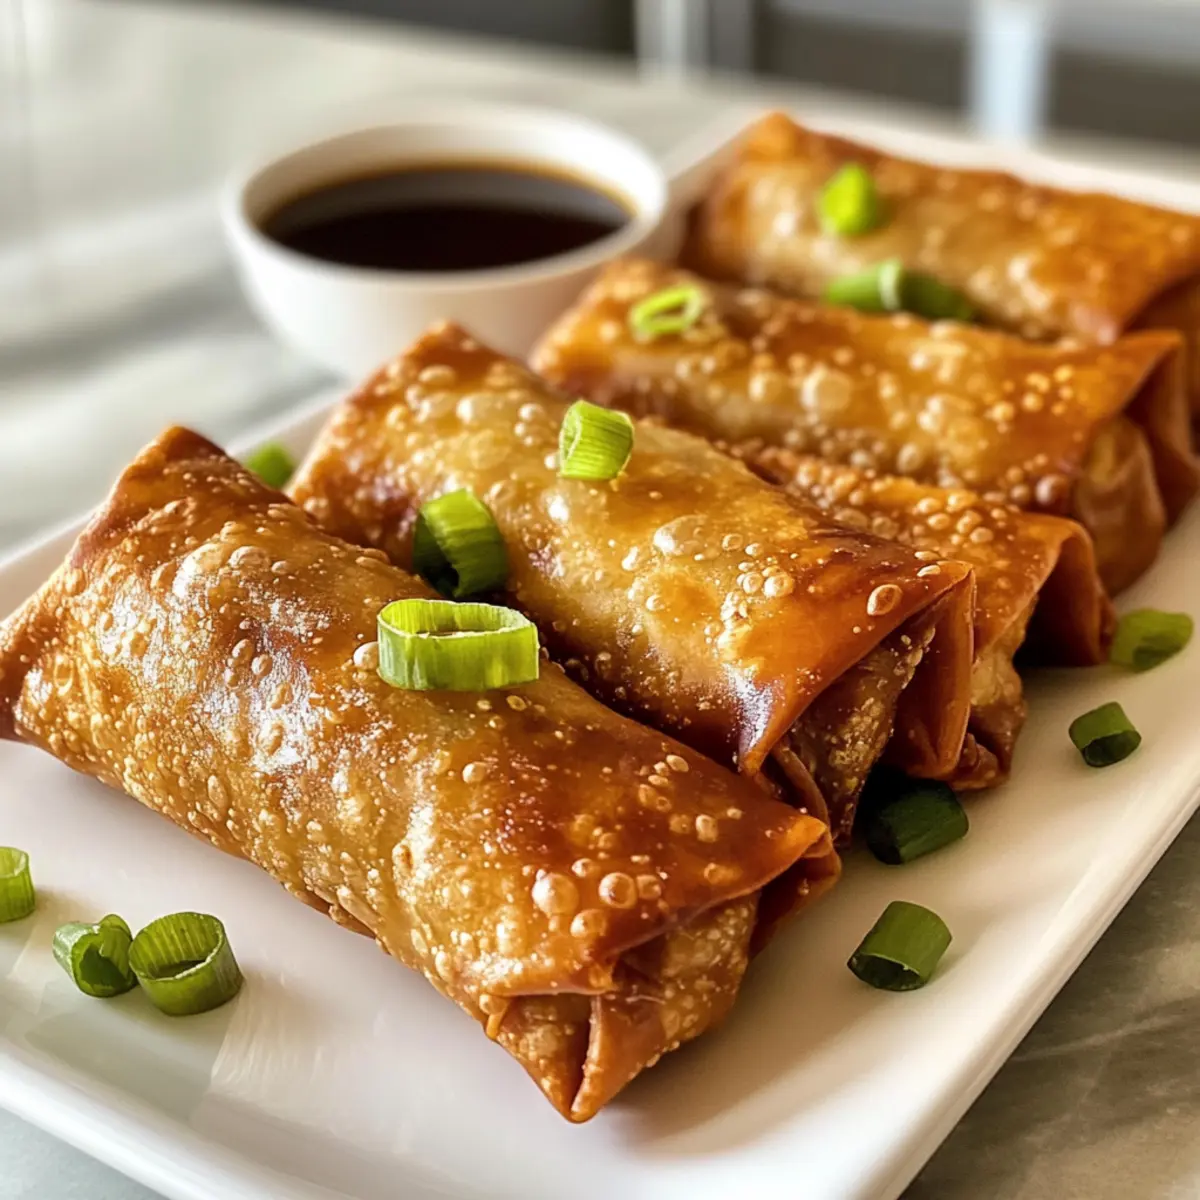
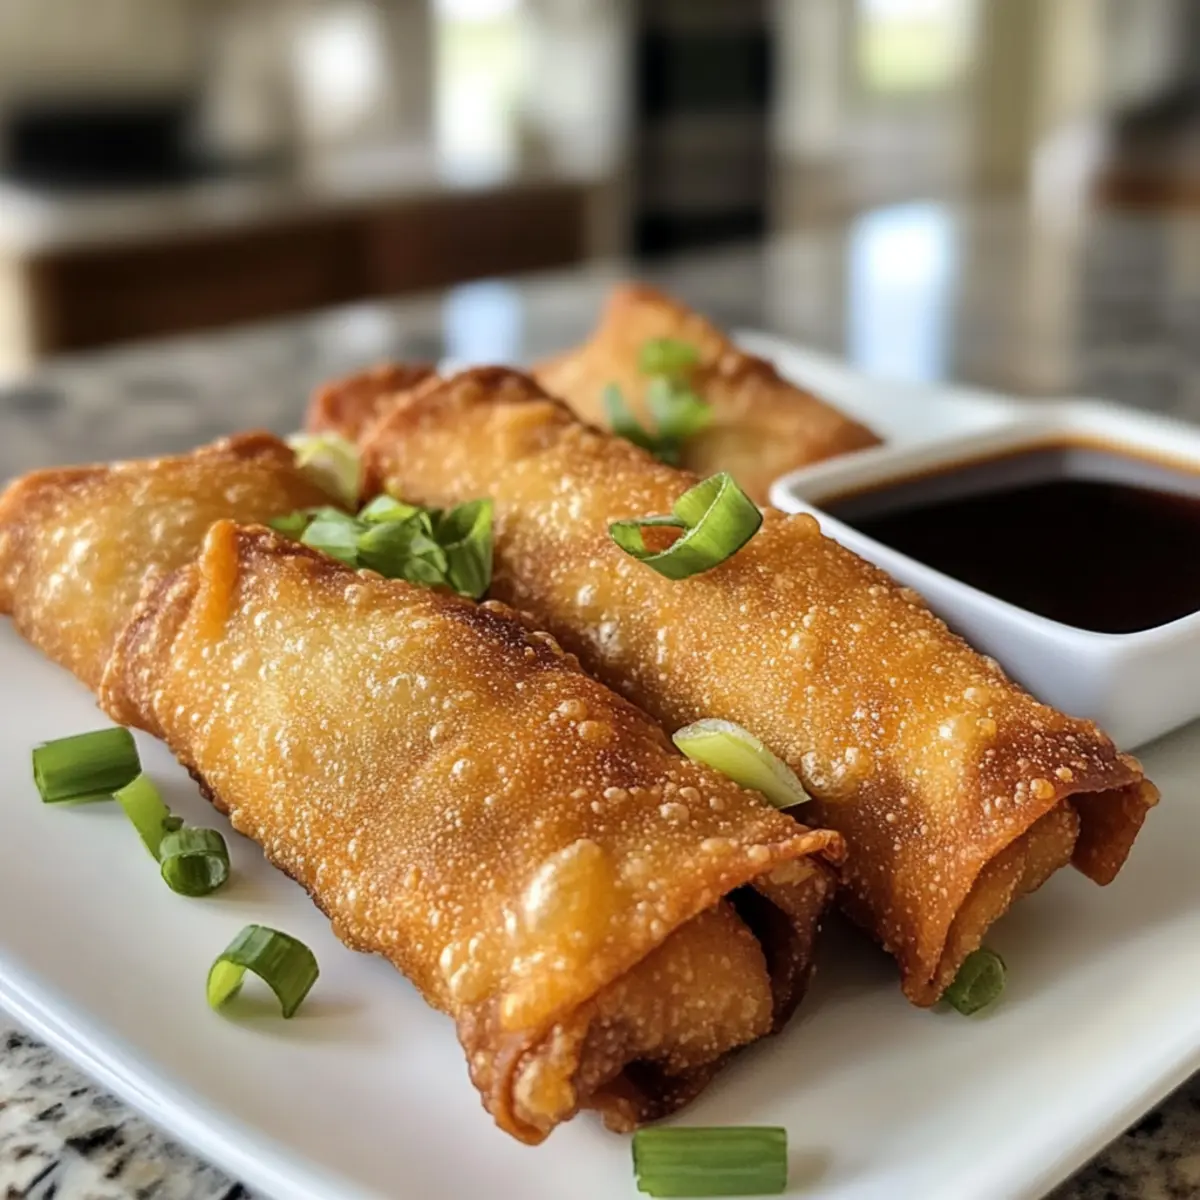
Savory Dill Pickle Chex Mix That Everyone Will Crave

As I stood in my kitchen, the distinct aroma of dill pickles wafting through the air reminded me of summer picnics and lazy afternoons spent with friends. This Tangy Dill Pickle Chex Mix is my go-to recipe for those moments when I want to impress without fuss. Combining the classic crunch of Chex cereals with the zestiness of dill pickles, this savory snack is not only a crowd-pleaser but also incredibly easy to customize. Perfect for game nights or just a casual movie binge, you can whip this up in no time and keep your guests coming back for more. Plus, it’s a wonderful way to satisfy those savory cravings while adding your personal twist. Are you ready to take your snack game to the next level? Let’s dive in!

Why is Dill Pickle Chex Mix a Must-Try?

Irresistible Crunch: This mix offers a delightful combination of textures, with crispy Chex, salty pretzels, and crunchy bagel chips that will have you reaching for more.

Tangy Twist: Featuring the unique flavor of dill pickle juice, each bite is a burst of zesty goodness that elevates your snacking experience.

Super Versatile: Whether you’re customizing with nuts or making it gluten-free, this recipe adapts beautifully to fit your taste and dietary needs.

Effortless Prep: With minimal ingredients and straightforward steps, you can whip up a batch in no time—perfect for unexpected guests or last-minute gatherings!

Crowd-Pleasing Flavor: Great for parties or family game nights, this savory snack is sure to impress friends and family alike; they won’t be able to resist going for seconds!

Get started on your snack adventure and explore more delicious ideas in our customizable Chex mix guide.

Dill Pickle Chex Mix Ingredients

For the Base
Chex Cereals – The essential crunchy foundation of your mix; swap for rice or corn Chex for a gluten-free option.
Pretzels – Contributes a delightful salty crunch; fun shapes like mini pretzels can add variety.
Bagel Chips – These crispy delights enhance the texture; if unavailable, opt for toasted bread pieces instead.
Cashews – Adds a rich, nutty flavor; feel free to replace with your favorite nuts or seeds for a personal twist.

For the Flavor
Dill Pickle Juice – Infuses the mix with a tangy kick essential for that signature flavor; alternatively, use brine from other pickles.
Ranch Seasoning – Offers a creamy, herbaceous profile; consider a homemade ranch seasoning for a fresher taste.
Butter – Binds the ingredients and adds richness; vegan butter can be used if you’re looking for a dairy-free option.

Get ready to enjoy the incredible taste of Dill Pickle Chex Mix and customize it to make it your own!

Step‑by‑Step Instructions for Dill Pickle Chex Mix

Step 1: Preheat Oven
Start by preheating your oven to 250°F (120°C). This low temperature ensures your Dill Pickle Chex Mix will dry out properly without burning, giving it that perfect crunchy texture. While the oven heats up, gather your ingredients and prepare a large baking sheet lined with parchment paper to make cleanup a breeze.

Step 2: Mix Dry Ingredients
In a large mixing bowl, combine your Chex cereals, pretzels, bagel chips, and cashews. Make sure to gently toss everything together, allowing the different textures to meld. This will ensure that each piece gets coated evenly later on. The delightful contrast of crunchiness from the various elements piques your appetite as you prepare for the next step!

Step 3: Prepare the Coating
In a small saucepan, melt your butter over low heat until it’s fully liquefied. Once melted, remove the saucepan from heat, and stir in the dill pickle juice and ranch seasoning until well combined. The fragrant aroma of dill will start to fill your kitchen, and this tangy mixture will be the star of your Dill Pickle Chex Mix.

Step 4: Combine Mixtures
Carefully pour the butter mixture over the dry ingredients in the large bowl. Using a spatula, gently fold the mixture until all the dry ingredients are thoroughly coated with the buttery dill goodness. Look for that even glisten on each piece, signaling that your mix is ready for the oven and full of flavor!

Step 5: Bake the Mixture
Spread the coated mixture evenly onto your prepared baking sheet. Pop the baking sheet into the preheated oven and bake the mix for 1 hour. Be sure to stir every 15 minutes; this will help achieve crispy goodness throughout your Dill Pickle Chex Mix while preventing any burning. Keep an eye on it as it bakes, watching for that golden-brown color.

Step 6: Cool and Serve
Once your Dill Pickle Chex Mix is crispy and evenly golden, remove it from the oven and let it cool completely on the baking sheet. This cooling step is crucial for the crunchy texture you want! After it’s cooled, break apart any clumps and serve in a bowl or store in an airtight container for your next gathering.

What to Serve with Dill Pickle Chex Mix?

Looking to elevate your snack spread with delightful pairings that complement those zesty flavors?

  • Creamy Ranch Dip: A classic companion that enhances the salty crunch, bringing a smoothness to each bite.
  • Veggie Platter: Fresh veggies like carrots and cucumbers add a crisp component, brightening the flavors of your Chex mix.
  • Cheese Board: A selection of cheeses—think sharp cheddar or creamy brie—provides a rich contrast that will tantalize your taste buds.
  • Spicy Hot Sauce: For heat lovers, a drizzle of sriracha or hot sauce can add an exciting kick, intensifying the tanginess of the mix.
  • Sparkling Water: A refreshing bubbly drink balances the salty flavors, making the overall snacking experience more invigorating and lighter.
  • Fruit Skewers: Add a hint of sweetness with fruit skewers featuring juicy strawberries or pineapple; this helps to round out the flavor palette beautifully.
  • Crispy Chicken Bites: Perfect for a hearty addition, these savory bites pair well, offering a protein boost that complements the Chex mix’s crunch.
  • Chocolate Covered Pretzels: End on a sweet note with chocolate-covered pretzels; their sweetness beautifully contrasts the tangy flavors of the mix.
  • Beer or Cider: A light lager or fruity cider makes for a delightful drink pairing, enhancing the snack’s casual vibe.
  • Mini Dessert Cups: Sweet treats like chocolate mousse or cheesecake bites provide a fun and delicious way to close out the snacking experience.

Expert Tips for Dill Pickle Chex Mix

Stir Regularly: Make sure to stir the mix every 15 minutes while baking to prevent burning and ensure even coating.

Customize Wisely: Feel free to add nuts or other mix-ins, but be mindful not to overload; the key is the balance of flavors in the Dill Pickle Chex Mix.

Monitor Baking Time: During the last 15 minutes, keep a close eye on the mix; it should be golden brown and crispy, but not overdone.

Cool Completely: Allow the mix to cool completely before serving to achieve the perfect crunch; this step helps maintain texture.

Storage Tip: Store in an airtight container at room temperature; this will keep your mix fresh and crunchy for up to two weeks.

Storage Tips for Dill Pickle Chex Mix

Room Temperature: Store your Dill Pickle Chex Mix in an airtight container at room temperature for up to two weeks, ensuring it stays crunchy and flavorful.

Freezer: For longer storage, freeze the mix in a sealed freezer bag for up to 3 months. Thaw at room temperature before enjoying for your next gathering.

Reheating: If the mix loses crunchiness after storage, pop it in a preheated oven at 250°F (120°C) for about 10 minutes to revive its delightful texture.

Avoid Moisture: Keep the container sealed tightly to protect against humidity, which can lead to sogginess; this will help maintain the perfect crunch in every bite!

Dill Pickle Chex Mix Variations

Feeling adventurous and want to put your own twist on this delicious snack? Here are some fun and flavorful ideas to customize your Dill Pickle Chex Mix!

  • Sweet Surprise: Add chocolate chips or caramel popcorn for a delightful sweet and salty contrast. The sweetness will perfectly balance the tang of the dill!

  • Nutty Swap: Replace cashews with almonds, peanuts, or even sunflower seeds for a different nut flavor and texture. Each nut brings its own unique crunch and richness to the mix.

  • Spicy Touch: Incorporate cayenne pepper or a splash of hot sauce for a fiery kick that elevates the flavor! Spice lovers will adore this zesty kick!

  • Herby Infusion: Try adding a sprinkle of dried parsley, dill, or even a touch of garlic powder for an herbal boost. This not only adds depth but also enhances the dill flavor beautifully.

  • Gluten-Free Option: Substitute traditional Chex cereals and pretzels with gluten-free varieties or rice crackers, making this mix friendly for gluten-sensitive friends.

  • Cheesy Kick: Stir in grated Parmigiano-Reggiano or nutritional yeast for a cheesy flavor without the dairy. It’s a great way to add a savory depth to the mix!

  • Dill Pickle Flavored Chips: For intense pickle flavor, toss in some dill pickle-flavored chips for an extra crunch that mirrors your favorite pickle flavor!

Explore more delightful combinations and ideas in our customizable Chex mix guide to keep your snack time exciting!

Make Ahead Options

These Dill Pickle Chex Mix treats are perfect for meal prep enthusiasts looking to save time! You can mix all the dry ingredients, including Chex cereals, pretzels, bagel chips, and cashews, up to 24 hours in advance. Simply store the mixture in an airtight container at room temperature to maintain their crispiness. Additionally, the buttery dill coating can be prepared, but it’s best to avoid mixing until just before baking to keep everything fresh. When you’re ready to serve, toss the butter, dill pickle juice, and ranch seasoning into the dry mix, bake, and enjoy a crispy, tangy snack that tastes just as delicious as when freshly made!

Dill Pickle Chex Mix Recipe FAQs

What type of Chex cereals should I use?
While any Chex cereal will work, rice and corn Chex are particularly popular due to their light texture. If you’re looking for a gluten-free option, rice Chex is the best choice!

How should I store my Dill Pickle Chex Mix?
Store your mix in an airtight container at room temperature for up to two weeks. This keeps the mix crunchy and flavorful. Keep the container sealed tightly to avoid moisture, which can lead to sogginess.

Can I freeze Dill Pickle Chex Mix?
Absolutely! To freeze, place your Chex mix in a sealed freezer bag, squeezing out as much air as possible. It can be stored for up to 3 months. When you’re ready to enjoy it, simply thaw at room temperature before snacking.

What can I do if my mix is too salty?
If you find your Dill Pickle Chex Mix is too salty, next time, consider reducing the amount of ranch seasoning or using low-sodium pretzels. Additionally, you could add more unsalted nuts or cereals to balance the flavors in your mix.

Are there any dietary considerations I should keep in mind?
Yes! If you’re making this for a gathering, remember that some guests may have nut allergies. You can easily substitute cashews with seeds or a different nut. Additionally, be cautious about the ranch seasoning if anyone is sensitive to dairy; a dairy-free version is available for those needs.

How can I revive my Chex mix if it loses crunchiness?
If your mix loses its delightful crunch after storage, revive it by spreading it out on a baking sheet and placing it in a preheated oven set to 250°F (120°C) for about 10 minutes. Keep an eye on it to ensure it doesn’t brown too much!

Dill Pickle Chex Mix

Savory Dill Pickle Chex Mix That Everyone Will Crave

This Dill Pickle Chex Mix is a tangy and savory snack that's perfect for any gathering and will leave everyone craving more.
Prep Time 15 minutes
Cook Time 1 hour
Cooling Time 15 minutes
Total Time 1 hour 30 minutes
Servings: 8 cups
Course: Other
Cuisine: American
Calories: 200

Ingredients
  

For the Base
  • 4 cups Chex Cereals Use rice or corn Chex for gluten-free option.
  • 2 cups Pretzels Mini pretzels can add variety.
  • 2 cups Bagel Chips Alternatively, use toasted bread pieces.
  • 1 cup Cashews Feel free to replace with your favorite nuts or seeds.
For the Flavor
  • 1/2 cup Dill Pickle Juice Can use brine from other pickles.
  • 1 packet Ranch Seasoning Homemade ranch seasoning is recommended for fresher taste.
  • 1/2 cup Butter Vegan butter can be used for a dairy-free option.

Equipment

  • oven
  • mixing bowl
  • spatula
  • baking sheet
  • parchment paper
  • Saucepan

Method
 

Step-by-Step Instructions
  1. Preheat your oven to 250°F (120°C) and gather your ingredients.
  2. In a large mixing bowl, combine Chex cereals, pretzels, bagel chips, and cashews, and toss gently.
  3. Melt butter in a small saucepan over low heat, then stir in dill pickle juice and ranch seasoning.
  4. Pour the butter mixture over the dry ingredients and fold gently until evenly coated.
  5. Spread the mixture on a baking sheet and bake for 1 hour, stirring every 15 minutes.
  6. Once crispy and golden, cool completely on the baking sheet, then break apart clumps and serve.

Notes

Stir regularly during baking and allow to cool completely for perfect crunch. Store in an airtight container at room temperature for up to 2 weeks.

Delicious Fruit Filled Thumbprint Cookies for Sweet Moments

As the aroma of chocolate fills the air, I can’t help but smile at the memories that a slice of Black Forest Cake evokes. This classic dessert is not just a treat; it’s an experience, beautifully layered with rich chocolate, fluffy whipped cream, and bright, tart cherries. The combination of flavors is a true celebration on any occasion, whether it’s a festive gathering or simply an indulgent night in. What I love most about this cake is how it impresses without requiring hours in the kitchen—perfect for both seasoned bakers and those just starting their culinary journey. Plus, it’s a showstopper that’s guaranteed to delight friends and family alike. Ready to dive into this delightful recipe that will undoubtedly elevate your dessert game? Let’s create some sweet magic together!

Why is Black Forest Cake a must-try?

Decadent layers: The combination of rich chocolate cake and fluffy whipped cream creates a heavenly taste that melts in your mouth.

Bursting with flavor: Each bite is elevated by the tart cherries, providing a delightful contrast to the sweet creaminess.

Easy to make: Don’t worry if you’re a novice baker; this recipe is straightforward and forgiving, allowing you to impress effortlessly!

Beautiful presentation: The striking layers and glossy cherry topping make it a stunning centerpiece for any gathering—perfect for celebrations or casual treat nights.

Customizable options: Feel free to experiment by adding liqueur-soaked cherries or a sprinkle of seasonal fruits, just like in our Nutty Apricot Cookies or Wholesome Oatmeal Fruit.

Crowd pleaser: Whether for a birthday, holiday, or simple family dinner, this cake is sure to please everyone at the table!

Black Forest Cake Ingredients

For the Chocolate Cake Layers
All-purpose flour – a key ingredient for structure and texture to keep your cake fluffy and light.
Granulated sugar – sweetens the cake for a perfect balance against chocolate and cherries.
Unsweetened cocoa powder – enhances the rich chocolate flavor; ensure it’s high quality for best results.
Baking powder – helps the cake rise, creating that light, airy feel everyone loves.
Salt – boosts the overall flavor profile, balancing sweetness beautifully.
Eggs – provide moisture and richness, ensuring a decadent cake.
Milk – keeps the batter smooth and adds moisture, making it easier to incorporate dry ingredients.
Vegetable oil – keeps the cake moist and tender; feel free to substitute with melted butter for a richer taste.

For the Whipped Cream
Heavy cream – the star for creating luscious whipped cream; make sure it’s cold for easy whipping.
Powdered sugar – sweetens the cream and stabilizes it for perfect peaks.
Vanilla extract – adds depth and flavor, enhancing the whipped cream’s sweetness.

For the Cherry Filling
Tart cherries – essential for that signature flavor; fresh or canned, they offer the perfect tartness.
Cherry syrup – adds moisture to the cake layers, creating a lovely soaked flavor that enhances every bite.

This Black Forest Cake is sure to be a hit—don’t hold back on trying it out for your next gathering!

Step‑by‑Step Instructions for Decadent Black Forest Cake with Cherry and Whipped Cream

Step 1: Bake the Chocolate Cake Layers
Preheat your oven to 350°F (175°C) and prepare two 9-inch round cake pans by greasing and lining them with parchment paper. In a large bowl, mix the dry ingredients: flour, sugar, cocoa powder, baking powder, and salt. Whisk together the wet ingredients: eggs, milk, and oil in another bowl, then combine with the dry mixture. Pour the batter evenly into the prepared pans and bake for 25-30 minutes, or until a toothpick inserted into the center comes out clean. Allow the cakes to cool in the pans for 10 minutes before transferring them to a wire rack.

Step 2: Soak the Cake Layers
Once the cake layers have cooled slightly, drain your tart cherries and reserve the syrup for soaking. Place the first cake layer on a serving plate and generously brush it with the cherry syrup, letting it soak in for about 10-15 minutes to enhance moisture and flavor. Repeat this process with the second cake layer. For the best results, cover and refrigerate the soaked layers for a few hours or overnight, allowing the flavors to meld beautifully.

Step 3: Whip the Cream
In a stand mixer fitted with the whisk attachment, pour in the cold heavy cream. Beat on medium speed until soft peaks start to form, which usually takes about 3-4 minutes. Then, add the vanilla extract and a pinch of salt, continuing to whip as you gradually sprinkle in the powdered sugar. Keep mixing until you achieve stiff peaks, ensuring the whipped cream holds its shape firmly for assembling your Black Forest Cake.

Step 4: Assemble the Cake
Place the first soaked cake layer on your cake stand or serving plate. Spread half of the whipped cream evenly over the top of the cake, creating a smooth layer. Scatter half of the cherry filling over the whipped cream, ensuring even distribution for delightful bursts of flavor in every bite. Gently press down to secure the cherries.

Step 5: Complete the Cake
Carefully position the second soaked cake layer on top of the first, pressing gently to secure. Use the remaining whipped cream to cover the top and sides of the cake, smoothing it out to create a beautiful presentation. Finally, adorn the cake with the remaining cherries on top, and feel free to use any extra whipped cream for decoration.

Step 6: Chill and Serve
Place the assembled cake in the refrigerator for at least 30 minutes, allowing it to set and develop flavors further. This chilling step is crucial for achieving a neatly sliced cake when serving. When ready, slice the Decadent Black Forest Cake and serve it with additional whipped cream on the side for an indulgent experience everyone will love!

Variations & Substitutions for Black Forest Cake

Feel free to get creative with your Black Forest Cake; the possibilities are as delightful as the cake itself!

  • Fruit Alternatives: Try raspberries or strawberries instead of cherries for a fresh twist; their sweetness will blend beautifully with the chocolate.

  • Dairy-Free: Substitute whipped coconut cream for heavy cream; it offers similar creaminess and pairs wonderfully with chocolate and fruit.

  • Richness Boost: Add a splash of rum or cherry liqueur to the cherries for adult gatherings; it elevates flavor and adds a touch of sophistication.

  • Gluten-Free: Use a gluten-free flour blend in place of all-purpose flour; this way, everyone can enjoy a slice of your delicious creation.

  • Chocolate Variation: Incorporate dark chocolate in the cake layers for a deeper, more intense flavor; it pairs perfectly with the tart cherries.

  • Nutty Surprise: Add crushed hazelnuts or almonds as a layer between the cake and whipped cream; it adds a lovely crunch and flavor contrast.

  • Extra Whipped Cream: If you love creamy layers, increase the whipped cream quantity for a more decadent finish; who could resist more fluffiness?

  • Seasonal Fruits: Depending on the season, consider adding peaches or apricots for a twist reminiscent of my Nutty Apricot Cookies; they’ll add a delightful flavor.

Don’t shy away from experimenting and making this classic dessert your own! Each variation is a chance to create new memories with friends and family while savoring a slice of heaven.

Expert Tips for the Best Black Forest Cake

Soak Carefully: Avoid soggy layers by soaking the cake with cherry syrup just enough to enhance flavor without making it too wet.

Choose Quality Ingredients: Use high-quality cocoa powder and fresh or premium canned cherries for a richer taste in your Black Forest Cake.

Whip to Perfection: Beat the cream until stiff peaks form, but be cautious—overwhipped cream can turn grainy and lose its velvety texture.

Chill is Key: Chill the assembled cake before serving. This setting time helps flavors meld and allows for cleaner, neater slices.

Flavor Variations: Experiment with liqueur-soaked cherries for a sophisticated twist or combine in-season fruits for a unique spin on tradition.

What to Serve with Black Forest Cake

Indulging in a slice of this delightful dessert deserves the perfect accompaniment to create a memorable meal experience.

  • Fresh Berries: The tartness of raspberries or strawberries harmonizes beautifully with the chocolate and cherries, adding a fresh twist.

  • Vanilla Ice Cream: A scoop of creamy vanilla ice cream adds a luscious creaminess, balancing the rich chocolate cake with its cool texture.

  • Coffee or Espresso: The robust flavors of coffee enhance the chocolate while providing a comforting complement that awakens the palate.

  • Chocolate-Covered Almonds: These crunchy treats add delightful texture and a nutty richness, making each bite feel like a mini celebration.

  • Poached Pears: The tender sweetness of poached pears adds elegance, creating a unique contrast that elevates the dessert experience.

  • Mint Leaves: Garnishing the cake with fresh mint not only looks stunning but also brings a refreshing burst of flavor that brightens each forkful.

  • Cherry Compote: For an extra layer of cherry goodness, serve with a warm cherry compote that echoes the cake’s filling—simply heavenly!

  • Sparkling Wine: A glass of bubbly complements the sweetness and adds a festive touch, perfect for celebrations or romantic dinners.

Make Ahead Options

These Decadent Black Forest Cakes are perfect for meal prep enthusiasts! You can bake the chocolate cake layers up to 24 hours in advance, allowing them to cool completely before wrapping them tightly in plastic wrap and refrigerating. Additionally, the cherry syrup can be prepared ahead of time and stored in an airtight container in the fridge for up to 3 days. When you’re ready to assemble, simply brush the syrup onto the cake layers, whip the cream, and layer it with the cherries. This method ensures that your cake remains moist and flavorful—just as delightful as when made fresh. Enjoy the time-saving benefits and let your Black Forest Cake shine at your next gathering!

How to Store and Freeze Black Forest Cake

Fridge: Store leftover cake in an airtight container in the fridge for up to 3 days. This keeps the whipped cream fresh and the cake moist.

Freezer: For longer storage, wrap individual slices in plastic wrap and then in aluminum foil. They can be frozen for up to 2 months.

Reheating: Thaw the frozen slices in the refrigerator overnight before serving. If desired, add fresh whipped cream and cherries for a delightful finish.

Assembling: You can also freeze the cake before assembly. Simply wrap the cooled cake layers tightly and freeze for up to 3 months. Once thawed, soak them with cherry syrup, assemble, and enjoy your homemade Black Forest Cake!

Black Forest Cake Recipe FAQs

What cherries should I use for the Black Forest Cake?
Absolutely! Tart cherries are essential for that signature flavor. You can use fresh cherries when in season for the best taste, but high-quality canned cherries work wonderfully if you need a shortcut.

How should I store leftover Black Forest Cake?
To keep your cake fresh, store it in an airtight container in the refrigerator for up to 3 days. This helps maintain the moisture of the cake and the creaminess of the whipped cream. Make sure to cover it well to avoid absorbing other fridge odors!

Can I freeze Black Forest Cake?
Very! You can freeze the assembled cake or individual slices. Wrap them tightly in plastic wrap, then in aluminum foil. They’ll stay fresh for up to 2 months. When you’re ready to enjoy, thaw your slices in the refrigerator overnight for the best results.

What if my whipped cream is too runny?
If your whipped cream isn’t thickening, make sure your heavy cream is cold—this is crucial for achieving that fluffy texture. Whip it slowly at first, and then increase the speed. You can also try adding a bit more powdered sugar gradually, as it helps stabilize the cream.

Can I make substitutions for dietary restrictions?
Absolutely! For a gluten-free version, substitute all-purpose flour with a gluten-free blend. If you’re avoiding dairy, consider using coconut cream whipped into soft peaks as an alternative. Just keep in mind that the flavor profile may slightly change.

How do I prevent my cake from becoming soggy?
To avoid soggy layers, soak the cake with cherry syrup just enough to flavor without overdoing it. Monitor the soaking time—about 10-15 minutes per layer usually does the trick, but you can also refrigerate the layers after soaking for a couple of hours to let the flavors meld beautifully!

Enjoy making your Black Forest Cake, and don’t hesitate to ask if you have more questions!

Fruit Filled Thumbprint Cookies

Delicious Fruit Filled Thumbprint Cookies for Sweet Moments

These Fruit Filled Thumbprint Cookies are a delightful treat perfect for any occasion.
Prep Time 30 minutes
Cook Time 15 minutes
Chilling Time 30 minutes
Total Time 1 hour 15 minutes
Servings: 24 cookies
Course: Dessert
Cuisine: American
Calories: 100

Ingredients
  

For the Cookie Dough
  • 2 cups All-purpose flour
  • 1 cup Unsalted butter softened
  • 1/2 cup Granulated sugar
  • 1/4 cup Brown sugar packed
  • 1 teaspoon Vanilla extract
  • 1 large Egg
  • 1/2 teaspoon Salt
  • 1/2 teaspoon Baking powder
For the Filling
  • 1 cup Fruit preserves your choice

Equipment

  • mixing bowl
  • baking sheet
  • parchment paper
  • Stand mixer

Method
 

Cookie Preparation
  1. Preheat your oven to 350°F (175°C). Line a baking sheet with parchment paper.
  2. In a mixing bowl, cream together the softened butter, granulated sugar, and brown sugar until fluffy.
  3. Beat in the egg and vanilla extract until well combined.
  4. In another bowl, whisk together the flour, salt, and baking powder.
  5. Gradually add the dry ingredients to the wet ingredients, mixing until just combined.
  6. Chill the dough in the refrigerator for about 30 minutes.
Baking the Cookies
  1. Scoop tablespoon-sized amounts of dough and roll into balls.
  2. Place the balls onto the prepared baking sheet, spacing them apart.
  3. Using your thumb, create an indentation in the center of each ball.
  4. Fill each indentation with your preferred fruit preserves.
  5. Bake for 12-15 minutes until the edges are lightly golden.
  6. Allow cooling on a wire rack before serving.

Notes

Feel free to experiment with different flavors of fruit preserves for variety.

Delicious 10-Minute Creamy Matcha Chia Pudding You’ll Love

As I stirred together the vibrant green powder and creamy almond milk, a sense of tranquility washed over me—just like that first morning sip of matcha tea. This 10-Minute Creamy Matcha Chia Pudding is not just a quick recipe but a soothing vegan breakfast or snack that awakens the senses while nourishing the body. The earthy notes of matcha blend beautifully with nutrient-packed chia seeds, creating a delightful treat that’s not only gluten-free but also a fantastic option for meal prep. Imagine having an energizing, healthy start to your day or a refreshing afternoon pick-me-up, all inside a single bowl. Ready to dive into this creamy indulgence? Let’s whip up some zen in your kitchen!

Why Choose Matcha Chia Pudding?

Quick and Easy: This pudding takes only 10 minutes to prepare, making it a perfect choice for busy mornings or last-minute snacks.

Nourishing and Healthy: Packed with chia seeds and matcha, it’s a powerful dose of fiber and antioxidants, ensuring you feel full and energized.

Vegan and Gluten-Free: Suitable for various dietary needs, this recipe fits right into a vegan or gluten-free lifestyle seamlessly.

Versatile Toppings: Elevate your matcha chia pudding with fresh fruit, nuts, or even a drizzle of honey for a personalized touch. Plus, it pairs beautifully with a cup of green tea!

Make-Ahead Friendly: Prep this pudding the night before and enjoy a ready-to-eat meal that saves you time on busy days. It’s the ultimate hassle-free breakfast or snack option!

Dive into this creamy delight, and discover your new favorite recipe!

10-Minute Creamy Matcha Chia Pudding Ingredients

• To craft this delightful pudding, gather these essential components!

For the Pudding

  • Chia Seeds – These tiny seeds pack a nutritional punch, providing structure and thickness to your pudding.
  • Almond Milk – This creamy base enhances texture; feel free to swap with coconut or oat milk for a different flavor.
  • Matcha Powder – Infusing your pudding with vibrant color and earthy flavor, opt for ceremonial grade for the best results; you can omit it for a plain chia pudding.
  • Agave Syrup – A delicious natural sweetener that contributes just the right amount of sweetness; honey or maple syrup can be used as substitutes if you’re not vegan.

For Toppings

  • Fresh Fruit – Elevate your pudding with sliced bananas, berries, or a sprinkle of coconut flakes for added texture and flavor.
  • Nuts or Seeds – Add a handful of nuts or seeds for a delightful crunch and extra nutrients to boost your pudding experience.

Enjoy making this 10-Minute Creamy Matcha Chia Pudding and treat yourself to a nourishing and satisfying start to your day!

Step‑by‑Step Instructions for 10-Minute Creamy Matcha Chia Pudding

Step 1: Combine Ingredients
In a medium-sized bowl, whisk together 1/2 cup of chia seeds and 2 cups of almond milk until fully incorporated. Ensure there are no lumps by blending for about 1 minute. The almond milk should be at room temperature for optimal mixing. This initial mixture will form the base of your 10-Minute Creamy Matcha Chia Pudding.

Step 2: Let It Rest
Allow the chia seed and almond milk mixture to rest for 5 minutes. During this time, you’ll notice it begins to thicken as the chia seeds absorb the liquid. After 5 minutes, give it another good stir to avoid clumping and ensure an even consistency throughout before moving on to the next step.

Step 3: Add Matcha Powder
Sprinkle in 2 tablespoons of matcha powder, ensuring you sift it first to eliminate any clumps. Whisk the mixture thoroughly for about 1-2 minutes until the matcha is evenly distributed and fully integrated into the pudding. This step adds vibrant color and flavor, creating your delicious 10-Minute Creamy Matcha Chia Pudding.

Step 4: Refrigerate to Thicken
Transfer the bowl to the refrigerator and let it chill for at least 20 minutes, allowing it to thicken further. If you have time, consider letting it sit overnight for a creamier texture. The longer it resides in the fridge, the thicker and more indulgent your pudding will become!

Step 5: Adjust Consistency
When you’re ready to serve, take the pudding out of the fridge and stir well. If it’s too thick for your liking, add a splash of almond milk to loosen it up and achieve your desired consistency. This step ensures your 10-Minute Creamy Matcha Chia Pudding is creamy and easy to enjoy.

Step 6: Serve and Garnish
Spoon the pudding into individual bowls, and top with your favorite fruits like sliced bananas or fresh berries, as well as optional coconut flakes or a sprinkle of nuts for added texture. This final touch not only enhances flavor but also makes your matcha chia pudding visually appealing and delightful!

Helpful Tricks for 10-Minute Creamy Matcha Chia Pudding

  • Quality Matcha: Use ceremonial-grade matcha powder for the best flavor and health benefits; culinary grade can be more bitter and less vibrant.

  • Prevent Clumping: Always let the chia seeds absorb almond milk for a few minutes before whisking in the matcha; this prevents clumping and ensures an even texture.

  • Overnight Option: For a creamier consistency, let your pudding chill overnight; this allows the chia seeds to expand fully, creating a luscious, thick pudding.

  • Custom Sweetness: Adjust sweetness by starting with less agave syrup; you can always add more after tasting to suit your preferences.

  • Stay Fresh: Store in an airtight container in the fridge for up to 5 days; this makes it a fantastic meal prep option, ready to enjoy whenever cravings hit!

What to Serve with 10-Minute Creamy Matcha Chia Pudding

Enhance your matcha experience with delightful companions that will elevate your meal to new heights.

  • Fresh Berries: The natural sweetness and juicy texture of strawberries or blueberries contrast beautifully with the creaminess of the pudding.

  • Granola Crunch: A sprinkle of granola adds a satisfying crunch, bringing texture and extra nutrients to your breakfast or snack.

  • Coconut Flakes: Toasted coconut flakes provide a tropical twist that adds depth and a delightful chewiness to the pudding.

  • Sliced Bananas: The creamy, soft texture of bananas pairs perfectly, offering mellow sweetness and fueling energy throughout the day.

  • Nuts or Seeds: Almonds or pumpkin seeds bring a fantastic crunch while boosting protein and healthy fats in your meal.

  • Green Tea: A soothing cup of matcha or green tea perfectly complements this pudding, enhancing the earthy flavors and creating a zen experience.

These pairings not only round out your vibrant pudding but also celebrate the wholesome qualities of your 10-Minute Creamy Matcha Chia Pudding!

Make Ahead Options

These 10-Minute Creamy Matcha Chia Pudding cups are perfect for meal prep enthusiasts looking for a quick breakfast solution! You can make the pudding base up to 24 hours in advance; simply follow the recipe steps and refrigerate it overnight to allow for optimal thickening. Be sure to stir well before serving and adjust the consistency with a splash of almond milk if necessary. Additionally, feel free to pre-cut your favorite toppings—like bananas or berries—and store them separately in the fridge to maintain their freshness. This way, you’ll have a nourishing and delicious meal ready at a moment’s notice, making busy mornings a breeze!

10-Minute Creamy Matcha Chia Pudding Variations

Feel free to explore these delightful twists on your matcha chia pudding to make it even more exciting!

  • Nut-Free: Replace almond milk with oat milk or coconut milk for a nut-free option that still retains a creamy texture.
    A substitution like this lets everyone enjoy the pudding without worry, making it inclusive for all guests.

  • Protein Boost: Stir in a scoop of your favorite plant-based protein powder for an extra nutritional punch.
    This addition is perfect if you’re looking to fuel your workouts or busy days, making it a powerhouse breakfast.

  • Chocolate Matcha: Add a tablespoon of cocoa powder for a rich chocolate version of your pudding.
    The earthy matcha harmonizes beautifully with chocolate, creating a dessert-like experience that feels indulgent.

  • Spicy Kick: A pinch of cayenne or chili powder can elevate your pudding with a surprising spicy twist.
    This unique flavor combination will intrigue your taste buds and may just become your new favorite blend!

  • Berry Bliss: Blend in a handful of blended berries into your pudding for fruity freshness.
    This not only adds vibrant color but also packs your dessert full of antioxidants and deliciously sweet notes.

  • Decadent Coconut: Mix in coconut milk instead of almond milk for a tropical twist and creaminess.
    This twist will transport you to a sunny paradise with each spoonful, pairing beautifully with tropical fruits.

  • Herbal Infusion: Infuse the almond milk with lavender or mint for a refreshing, aromatic experience.
    This idea adds not only a unique flavor but also an elevated sensory experience that’s perfect for brunch or tea time.

  • Maple Twist: Swap agave for pure maple syrup for a warm, rich sweetness that complements the earthy matcha.
    This small change can transform the entire flavor profile, making each bite feel cozy and comforting.

Feel inspired? With these variations, you can create your very own signature matcha chia pudding! For more delightful recipes, don’t forget to check out my other favorites, like the Vanilla Pudding or indulge in some Caramel Milk Pudding for a sweet treat!

How to Store and Freeze 10-Minute Creamy Matcha Chia Pudding

Fridge: Store your chia pudding in an airtight container for up to 5 days to maintain its freshness and texture. Always give it a good stir before serving.

Freezer: If you plan to freeze the pudding, pour it into freezer-safe containers, leaving space for expansion. It can last up to 2 months in the freezer.

Thawing: To enjoy frozen pudding, transfer it to the fridge to thaw overnight. Stir well before serving to restore its creamy consistency.

Serving Tips: Always adjust the thickness by adding a splash of almond milk if needed, especially after storage; this will keep your 10-Minute Creamy Matcha Chia Pudding luscious and delightful!

10-Minute Creamy Matcha Chia Pudding Recipe FAQs

How do I choose the best matcha powder?
Absolutely! For the best flavor and health benefits, look for ceremonial grade matcha powder. It has a vibrant green color and a rich, smooth taste. Culinary grade can sometimes be more bitter and is better for baking or cooking, so stick to ceremonial for your pudding!

How should I store leftover chia pudding?
Very! Store your chia pudding in an airtight container in the refrigerator for up to 5 days. Make sure to give it a good stir before serving to help restore its creamy texture.

Can I freeze matcha chia pudding?
Yes! If you’d like to freeze your pudding, pour it into freezer-safe containers, leaving some space for it to expand. It can last up to 2 months in the freezer, making it a great make-ahead option.

What should I do if my chia pudding is too thick?
No worries! If your pudding turns out thicker than you prefer, simply stir in a splash of almond milk until you reach your desired consistency. This will keep your 10-Minute Creamy Matcha Chia Pudding delightful and easy to enjoy!

Are there any allergy considerations for this recipe?
Definitely! This recipe is vegan and gluten-free, making it suitable for many diets. However, be careful if you have nut allergies; you can substitute almond milk with oat or soy milk as a safe alternative. Always check product labels for allergens!

What if my chia seeds don’t thicken?
Don’t fret! Make sure your chia seeds are fresh – old seeds may not gel up properly. Also, ensure that you’ve allowed the mixture to rest for at least 5 minutes after combining with the almond milk before whisking in the matcha. If it’s still not thickening, consider letting it sit longer in the fridge for the best results!

10-Minute Creamy Matcha Chia Pudding

Delicious 10-Minute Creamy Matcha Chia Pudding You’ll Love

This 10-Minute Creamy Matcha Chia Pudding is a soothing vegan breakfast or snack that nourishes the body and awakens the senses.
Prep Time 10 minutes
Chilling Time 20 minutes
Total Time 30 minutes
Servings: 2 bowls
Course: Breakfast
Cuisine: Vegan
Calories: 250

Ingredients
  

For the Pudding
  • 1/2 cup Chia Seeds
  • 2 cups Almond Milk Can substitute with coconut or oat milk.
  • 2 tablespoons Matcha Powder Opt for ceremonial grade for best results.
  • 2 tablespoons Agave Syrup Can substitute with honey or maple syrup.
For Toppings
  • 1 cup Fresh Fruit Sliced bananas, berries, or coconut flakes.
  • 1/4 cup Nuts or Seeds Optional for added crunch.

Equipment

  • Medium-sized bowl
  • whisk
  • Refrigerator

Method
 

Step-by-Step Instructions
  1. In a medium-sized bowl, whisk together chia seeds and almond milk until fully incorporated. Allow to rest for 5 minutes.
  2. After resting, stir the mixture to ensure an even consistency.
  3. Add matcha powder, sifting it in, then whisk until fully integrated.
  4. Refrigerate for at least 20 minutes to thicken.
  5. Stir well before serving; if too thick, add a splash of almond milk.
  6. Serve in bowls with toppings of your choice.

Notes

Can be stored in an airtight container in the fridge for up to 5 days or frozen for up to 2 months.

Crispy Rice Paper Scallion Pancakes You’ll Want to Make Today

As the sun dipped below the horizon, I found myself craving a snack that was both light and deeply satisfying. That’s when I stumbled upon the idea of crispy Rice Paper Scallion Pancakes. This delightful treat marries the crunch of delicate rice paper with the savory brightness of fresh scallions, creating an irresistible vegetarian appetizer that’s gluten-free too! Whipping up these pancakes is a breeze; they come together quickly—perfect for those who are tired of the usual fast food options. With each golden bite, you can enjoy a satisfying crunch paired with a zesty dipping sauce of soy and rice vinegar that brings it all together. What creative flavors will you explore with this simple, versatile recipe?

Why Are These Pancakes a Must-Try?

Easy Enough for any home cook, this recipe requires minimal prep and just a few simple ingredients. Crispy Texture with each bite features light, flaky rice paper encasing a flavorful scallion filling, making it an instant hit. Versatile Choice for meals or snacks, these pancakes are perfect for any occasion, from casual lunches to dinner parties. Gluten-Free and Vegetarian, they cater to various dietary needs without sacrificing flavor. Perfectly Pairing with a tangy dipping sauce, these pancakes promise to awaken your taste buds and keep you coming back for more! If you’re looking for more delicious vegetarian options, check out these Savory Zucchini Pancakes or Crispy Vegetable Pancakes!

Rice Paper Scallion Pancakes Ingredients

For the Pancakes

  • Rice Paper – Use 16 sheets to create a light and crispy exterior for your pancakes.
  • Scallions – Provides fresh, mild onion flavor; substitute with garlic chives or red onions if necessary.
  • Salt – Enhances flavor; adjust to your taste.
  • White Pepper – Adds warmth; this is optional if you prefer milder dishes.
  • Sesame Oil – Introduces a rich, nutty aroma; olive oil can be a great substitute.
  • Eggs – Acts as a binder for the pancakes; use a cornstarch and water mixture for a vegan option.
  • Cooking Oil – Needed for frying; opt for any neutral oil with a high smoke point for best results.

For the Dipping Sauce

  • Soy Sauce – Infuses a savory umami taste; tamari can be used for a gluten-free alternative.
  • Rice Vinegar – Adds a nice tanginess; you can replace it with apple cider vinegar for a milder flavor.
  • Chili Oil – Enhances the dipping sauce with spiciness; adjust to taste or substitute with your favorite hot sauce.

With these basic ingredients, you can create scrumptious Rice Paper Scallion Pancakes that will delight your palate and keep your meals exciting!

Step‑by‑Step Instructions for Rice Paper Scallion Pancakes

Step 1: Prepare Filling
In a mixing bowl, combine finely chopped scallions with a pinch of salt, a dash of white pepper, and a drizzle of sesame oil. Mix well until the ingredients are evenly coated and fragrant. This savory filling sets the stage for your Rice Paper Scallion Pancakes, bringing a fresh flavor that will shine through the crispy exterior.

Step 2: Prepare Rice Paper
In a small bowl, whisk two eggs until smooth. Take two overlapping rice paper sheets and lightly brush a thin layer of the beaten egg on both sides using a pastry brush. This step will help bind the sheets together and create a golden, crisp texture during cooking, ensuring your pancakes hold their shape.

Step 3: Fill and Roll
Spread an even layer of the scallion filling across the prepared rice paper, leaving a small border around the edges. Starting from one end, carefully roll the rice paper tightly into a log, then twist the ends to form a spiral shape. This technique creates a delightful twist in your Rice Paper Scallion Pancakes, enhancing both texture and presentation.

Step 4: Pan-Fry
Heat a generous amount of cooking oil in a non-stick skillet over medium heat until shimmering. Gently place your rolled pancakes into the pan, taking care not to overcrowd it. Cook for about 2 minutes on each side, or until the pancakes turn crisp and golden brown, creating a beautiful contrast to the soft scallion filling inside.

Step 5: Mix Dipping Sauce
In a small bowl, whisk together soy sauce, rice vinegar, and chili oil until well combined. Adjust the amounts based on your taste preference, adding more chili oil for added heat if desired. This tangy dipping sauce perfectly complements the crispy Rice Paper Scallion Pancakes, enhancing their flavors with every savory bite.

Expert Tips for Rice Paper Scallion Pancakes

  • Soften Carefully: When working with rice paper, ensure it’s softened enough to roll without tearing. Dip in warm water just until pliable.

  • Crispier Results: For maximum crispiness, pan-fry the pancakes just before serving. They taste best when enjoyed fresh off the stove.

  • Layer Protection: If storing cooked pancakes, place parchment paper between layers to prevent them from sticking together. Reheat in a dry skillet to maintain crunch.

  • Season to Taste: Adjust the salt and white pepper in the filling to suit your flavor preferences. Don’t hesitate to play around with the seasonings!

  • Dipping Sauce Variation: Experiment with different flavors in your dipping sauce, like adding minced garlic or fresh herbs, to elevate the experience with your Rice Paper Scallion Pancakes.

Storage Tips for Rice Paper Scallion Pancakes

  • Room Temperature: Keep cooked pancakes at room temperature for no more than 2 hours before they should be refrigerated to maintain freshness.

  • Fridge: Store leftover pancakes in an airtight container in the fridge for up to 3 days. Use parchment paper between layers to avoid sticking.

  • Freezer: Assemble pancakes up to the rolling stage and freeze in a single layer. Once frozen, transfer to a freezer bag for up to 2 months. Fry directly from frozen for best results.

  • Reheating: To bring back the crisp texture, reheat pancakes in a dry skillet over medium heat for 2-3 minutes on each side before serving with your favorite dipping sauce.

Rice Paper Scallion Pancakes Variations

Feel free to get creative and make these Rice Paper Scallion Pancakes your own; the possibilities are as delightful as each bite!

  • Herb-Infused: Add freshly chopped cilantro or basil to the scallion filling for a fragrant burst of flavor. These herbs elevate each bite, bringing a freshness that complements the pancakes beautifully.

  • Mushroom Medley: Incorporate sautéed mushrooms into the filling for an earthy twist. A mix of shiitake and cremini would provide depth and a delightful umami flavor alongside the scallions.

  • Vegetable Boost: Toss in seasonal greens like kale or spinach into your filling for added vitamins and color. This simple addition enhances both nutrient content and visual appeal.

  • Spicy Kick: Replace the chili oil with sriracha or your favorite hot sauce in the dipping sauce for those who crave more heat. Feel free to adjust the amount based on your spice tolerance!

  • Creamy Addition: Blend in a little cream cheese or dairy-free alternative into the filling for a richer, creamier texture. It creates a hearty filling that contrasts perfectly with the crisp rice paper.

  • Extra Crunch: Include toasted sesame seeds in the filling for added texture. The seeds add a delightful crunch and a rich nutty flavor.

  • Sweet Twist: For a unique variation, mix in some shredded carrots and a touch of brown sugar to the scallion filling. This adds a slight sweetness that balances perfectly with the savory elements.

  • Egg-Free Option: For a vegan-friendly twist, replace the eggs with a mixture of ground flaxseed and water as a binder. This keeps the structure while ensuring everyone can enjoy the pancakes.

Once you’ve made your pancakes, share them at gatherings or enjoy them with a delicious broth as a light lunch. For more diverse recipes, explore these Savory Zucchini Pancakes or try out Crispy Vegetable Pancakes for added inspiration.

What to Serve with Crispy Rice Paper Scallion Pancakes?

There’s nothing quite like enjoying a medley of flavors and textures alongside these delightful pancakes to create a memorable meal.

  • Simple Green Salad: A fresh mix of greens dressed with a light vinaigrette balances the rich, savory flavors of the pancakes.

  • Zesty Dipping Sauce: Consider a spicy sriracha mayo for a creamier option; it complements the pancakes’ crunch beautifully.

  • Light Broth Soup: A warm miso or vegetable broth offers comforting warmth, making a delightful pair for those snacky moments.

  • Sweet Chili Sauce: Drizzle or serve on the side for an added kick that enhances the savory scallion fillings.

  • Crisp Vegetables: Sliced cucumbers or radishes with a drizzle of sesame oil bring a refreshing crunch to every bite.

  • Mango Salad: This vibrant dish, tossed with lime and chili, adds a fruity contrast that brightens the meal while balancing the savory notes.

  • Coconut Rice: Serve with a side of mildly flavored coconut rice—a perfect vessel for soaking up those dipping sauces.

  • Iced Green Tea: Cool your palate with this mildly sweet beverage, which pairs nicely with the crispy texture and savory flavors of the pancakes.

  • Dessert Spring Rolls: For a sweet finish, serve mini dessert spring rolls filled with fruit and dipped in chocolate sauce, satisfying your sweet tooth!

Pairing your crispy Rice Paper Scallion Pancakes with any of these marvelous accompaniments will create a memorable dining experience that is sure to impress!

Make Ahead Options

These Crispy Rice Paper Scallion Pancakes are perfect for busy home cooks looking to save time during the week! You can prep the filling (scallions mixed with salt, white pepper, and sesame oil) up to 3 days in advance by storing it in an airtight container in the refrigerator. Additionally, assemble pancakes up to the rolling stage and freeze them for up to 1 month. When you’re ready to enjoy, simply pan-fry from frozen without thawing—just be prepared to add an extra minute or two of cooking time for crispy results. To maintain their quality, place parchment paper between layers of cooked pancakes if storing, and reheat them in a dry skillet to restore that delightful crunch. Enjoy this time-saving recipe, bringing you golden, crispy delights with minimal effort!

Rice Paper Scallion Pancakes Recipe FAQs

How do I select the best rice paper?
Absolutely! When choosing rice paper, look for sheets that are smooth and translucent without any tears or dark spots. The fresher the rice paper, the better it will hold up during cooking. If you’re buying from a store, check the expiration date to ensure quality.

How do I store leftover pancakes?
Of course! Store any leftover pancakes in an airtight container in the fridge for up to 3 days. To prevent them from sticking together, place parchment paper between layers. If you’re looking to keep them for longer, consider freezing them for up to 2 months.

Can I freeze the pancakes? How?
Very! To freeze your Rice Paper Scallion Pancakes, assemble them up to the rolling stage, then arrange them in a single layer on a baking sheet. Freeze until solid, and then transfer them to a freezer bag. When you’re ready to enjoy, there’s no need to thaw; just fry them directly from frozen until crispy and golden brown.

What should I do if my pancake tears while rolling?
No need to worry! If your rice paper tears, you can patch it by overlapping the torn edges and lightly brushing on a bit of the egg wash to help bind them. Just make sure to roll gently and keep the filling from spilling out. If it happens too often, consider softening the rice paper a little less next time.

Are there any dietary considerations I should be aware of?
Absolutely! This recipe is naturally gluten-free and vegetarian, making it suitable for various dietary needs. If you’re preparing this for someone with allergies, check the ingredient labels, especially on the soy sauce and sesame oil, as these can contain allergens depending on the brand. For a vegan option, simply replace eggs with a cornstarch and water mixture as mentioned in the recipe.

How can I enhance the dipping sauce?
For sure! To elevate your dipping sauce, consider adding minced garlic, fresh herbs like cilantro, or even a splash of lime for a zesty kick. Adjust the heat by including more chili oil or topping it with chopped fresh chile peppers. Customize it to suit your taste, and watch your guests rave over the flavors!

Rice Paper Scallion Pancakes

Crispy Rice Paper Scallion Pancakes You'll Want to Make Today

These crispy Rice Paper Scallion Pancakes are a delightful, gluten-free, vegetarian appetizer that brings together a crunchy exterior and savory scallion filling.
Prep Time 15 minutes
Cook Time 10 minutes
Total Time 25 minutes
Servings: 4 pancakes
Course: Lunch
Cuisine: Asian
Calories: 150

Ingredients
  

For the Pancakes
  • 16 sheets Rice Paper For a light and crispy exterior
  • 1 bunch Scallions Fresh, mild onion flavor
  • to taste Salt
  • to taste White Pepper Optional
  • 2 tablespoons Sesame Oil Rich, nutty aroma
  • 2 large Eggs Acts as a binder
  • as needed Cooking Oil For frying
For the Dipping Sauce
  • 2 tablespoons Soy Sauce Savory umami taste
  • 1 tablespoon Rice Vinegar Adds tanginess
  • to taste Chili Oil For spiciness

Equipment

  • mixing bowl
  • Non-Stick Skillet
  • Pastry brush
  • Small bowl

Method
 

Step-by-Step Instructions for Rice Paper Scallion Pancakes
  1. In a mixing bowl, combine finely chopped scallions with a pinch of salt, a dash of white pepper, and a drizzle of sesame oil. Mix well until coated and fragrant.
  2. In a small bowl, whisk two eggs until smooth. Brush overlapping rice paper sheets with egg on both sides.
  3. Spread scallion filling on rice paper, roll tightly into a log, and twist ends to form a spiral.
  4. Heat cooking oil in a skillet over medium heat. Cook rolled pancakes for about 2 minutes on each side until crisp and golden.
  5. In a small bowl, whisk together soy sauce, rice vinegar, and chili oil to create the dipping sauce.

Notes

Ensure rice paper is softened properly to avoid tearing when rolling. Maximum crispiness achieved when pancakes are served immediately after frying.

Delicious Fruit Filled Thumbprint Cookies for Sweet Moments

Stepping into the kitchen, I was greeted by the irresistible aroma of chocolate wafting through the air, instantly transporting me to a world of sweet nostalgia. Today, we’re diving into the art of creating a show-stopping Black Forest Cake with Cherry Whipped Cream—a dessert that’s not just a treat but a heartfelt celebration. An absolute crowd-pleaser, this recipe boasts the enticing blend of rich chocolate layers and luscious whipped cream, all elevated by tart cherries that add a refreshing zing. With relatively quick prep and the ability to serve as the stunning finale to your gatherings, making this delightful cake will surely impress family and friends alike. Are you ready to bake a slice of happiness?

Why is Black Forest Cake so beloved?

Indulgent Layers: The combination of rich chocolate cake and fluffy cherry whipped cream creates a decadent experience that’s simply irresistible.

Customization Ready: With easy substitutions suggested, from gluten-free flour to vegan options, this cake welcomes your preferences.

Showstopper Appeal: Perfect for any occasion, it doubles as a stunning centerpiece and a delectable dessert, impressing everyone from friends to family.

Quick Prep Time: This recipe allows for a delicious finish without spending hours in the kitchen, meaning less stress and more time to enjoy with your loved ones.

Unique Flavor Twist: The tart cherries perfectly balance the chocolate, offering a unique blend of flavors that elevates this classic dessert above generic cakes.

And if you’re looking for more delightful desserts, check out my Nutty Apricot Cookies or the delicious Wholesome Oatmeal Fruit cookies for something equally satisfying!

Black Forest Cake Ingredients

• Black Forest Cake is a classic dessert that delights with its rich chocolate layers and luscious cherry filling.

For the Cake

  • All-Purpose Flour – Provides structure to the cake; for gluten-free, use a gluten-free flour blend.
  • Cocoa Powder – Adds deep chocolate flavor; ensure it’s unsweetened for a balanced taste.
  • Granulated Sugar – Sweetens the cake layers; can substitute with coconut sugar for a less refined option.
  • Baking Powder – Acts as a leavening agent for a light texture; make sure it’s fresh for the best results.
  • Eggs – Binds ingredients and enriches flavor; substitute with flax eggs for a vegan version.
  • Milk – Adds moisture to the cake; swap with almond milk or another plant-based milk for lactose-free needs.
  • Cherry Syrup (from canned cherries) – Moistens the cake layers while infusing cherry flavor; can substitute with homemade cherry syrup.

For the Whipped Cream

  • Whipped Cream – Lightens the cake layers; use heavy whipping cream for best results or coconut cream for a dairy-free option.

For Decoration

  • Cherries – Essential for decoration and filling; fresh cherries can replace canned if in season.

Let’s begin crafting your dreamy Black Forest Cake and create sweet memories that you’ll cherish!

Step‑by‑Step Instructions for Decadent Black Forest Cake with Cherry Whipped Cream

Step 1: Prepare the Cake Batter
Start by preheating your oven to 350°F (175°C) and greasing two 9-inch round cake pans. In a mixing bowl, combine all-purpose flour, unsweetened cocoa powder, granulated sugar, and baking powder. In a separate bowl, whisk together your eggs and milk until smooth, then gradually add this mixture to the dry ingredients. Beat until just combined, ensuring no lumps remain, then pour the batter evenly into the prepared pans.

Step 2: Bake the Cake Layers
Place your filled cake pans in the preheated oven and bake for 25-30 minutes. To check for doneness, insert a toothpick into the center; it should come out clean. Once baked, carefully remove the pans from the oven and let them cool in the pans for about 10 minutes, then turn them out onto a wire rack to cool completely.

Step 3: Prepare Cherry Syrup
While the cake layers cool, open your can of cherries and drain the syrup into a bowl, reserving the cherries themselves. If desired, you can simmer the syrup in a saucepan over medium heat for 5-10 minutes to reduce and intensify the flavor. Once cooled, set the syrup aside as you work on the next steps for the Black Forest cake assembly.

Step 4: Soak the Cake Layers
Once the cake layers have cooled completely, use a pastry brush to generously coat the top of each layer with the reserved cherry syrup. Allow the cake layers to soak up the syrup for at least 30 minutes; for best results, let them rest in the refrigerator for a few hours or overnight to ensure maximum flavor and moisture absorption.

Step 5: Whip the Cream
In a clean mixing bowl, add heavy whipping cream along with a pinch of salt and a splash of vanilla extract. Using a stand mixer or hand mixer, beat the mixture on medium speed until soft peaks form, about 3-5 minutes. Gradually add powdered sugar while continuing to beat until the cream reaches stiff peaks, creating a luscious whipped cream that will elevate your Black Forest cake.

Step 6: Assemble the Cake
With the soaked cake layers and whipped cream ready, take one layer and place it on a serving plate. Spread half of the whipped cream over the top, then layer half of the cherries on the cream. Carefully place the second cake layer on top, and spread the remaining whipped cream over the top for a smooth finish. Finally, arrange the remaining cherries decoratively on top of the whipped cream for an eye-catching presentation.

Step 7: Chill and Serve
To enhance the flavors of your Decadent Black Forest Cake with Cherry Whipped Cream, cover the cake with a dome or plastic wrap and refrigerate for at least 1 hour before serving. This allows the flavors to meld and the cake to firm up slightly. When ready to serve, slice generously and enjoy the delightful combination of chocolate, cherries, and whipped cream!

Expert Tips for Black Forest Cake

  • Cool First: Ensure that your cake layers are completely cool before assembling; this helps prevent the whipped cream from melting into the cake.

  • Syrup Soaking: Let the cake soak in cherry syrup for a few hours or overnight; this intensifies flavor and moisture for a truly decadent Black Forest cake.

  • High-Quality Ingredients: Use high-quality cocoa powder and vanilla extract to elevate the flavor; don’t underestimate the impact these ingredients can have!

  • Dairy-Free Option: If you’re looking for a dairy-free variation, substitute heavy whipping cream with coconut cream; it still creates a deliciously rich texture.

  • Decorate Creatively: Get creative with your decorations! Fresh mint or chocolate shavings can add a pop of color and texture to your Black Forest cake.

Make Ahead Options

Making the Decadent Black Forest Cake with Cherry Whipped Cream ahead of time is a wonderful way to save stress and ensure a show-stopping dessert for your gatherings! You can bake and cool the cake layers up to 24 hours in advance, wrapping them tightly in plastic wrap to keep them moist. Additionally, you can prepare the cherry syrup and soak the cake layers for optimal flavor absorption before assembling. The whipped cream can also be whipped up up to 3 days ahead—just store it in an airtight container in the fridge to maintain its fluffy texture. When you’re ready to serve, simply assemble the cake and refrigerate for at least 1 hour to allow the flavors to meld, giving you a delightful dessert that’s just as delicious as if made fresh!

Variations & Substitutions for Black Forest Cake

Feel free to explore your creativity and personalize this delectable cake to match your preferences!

  • Gluten-Free: Use a gluten-free flour blend to keep everyone included without sacrificing texture.

  • Vegan: Swap eggs for flax eggs and use almond milk along with coconut cream for a rich dairy-free experience.

  • Lower Sugar: Substitute granulated sugar with coconut sugar or a sugar alternative to create a guilt-free indulgence.

  • Ganache Finish: Replace the whipped cream topping with a dark chocolate ganache for an intense and luxurious twist.

  • Berry Mix: Try mixing in different fruits, like raspberries, for a vibrant and tangy addition to this classic cake.

  • Flavored Whipped Cream: Infuse the whipped cream with almond or vanilla extract for a burst of flavor that jazzes up each slice.

  • Layered Texture: Add a layer of crushed nuts or chocolate chips between the cake layers for an exciting crunch that complements the cake’s softness.

If you’re excited to try more innovative treats, you might also enjoy my scrumptious Nutty Apricot Cookies or the delightful Wholesome Oatmeal Fruit cookies for another sweet adventure!

What to Serve with Decadent Black Forest Cake with Cherry Whipped Cream

Delightful pairings can elevate your chocolate cherry masterpiece, making it a truly unforgettable meal experience.

  • Fresh Fruit Salad: A medley of seasonal fruits adds a refreshing contrast, enhancing the cake’s richness with vibrant flavors and textures.

  • Chocolate-Stuffed Strawberries: These indulgent bites create a luxurious chocolate experience, while the fresh strawberries provide a balance of tartness and sweetness.

  • Vanilla Ice Cream: A scoop of creamy vanilla ice cream introduces a soothing element, complementing the rich layers of your cake beautifully.

  • Mint Tea: The soothing warmth of mint tea acts as a gentle palate cleanser, perfectly balancing the cake’s sweetness and richness.

  • Coffee: A cup of freshly brewed coffee underscores chocolate flavors, creating a warm harmony with the cake while enhancing its overall experience.

  • Chocolate Ganache Tart: An additional chocolate dessert amplifies the decadence, allowing chocolate lovers to indulge further while mixing textures and flavors.

Imagine presenting your Black Forest cake with these delightful accents, crafting not only a feast for the eyes but a symphony of flavors for your guests!

How to Store and Freeze Black Forest Cake

Fridge: Store leftover Black Forest Cake in the refrigerator for up to 3 days. Cover it tightly with plastic wrap to prevent it from drying out and losing its luscious flavor.

Freezer: If you want to freeze the cake, wrap individual slices or the entire cake in plastic wrap followed by aluminum foil. It can be frozen for up to 2 months.

Thawing: To enjoy frozen Black Forest Cake, simply transfer it to the fridge and let it thaw overnight. This will help retain its delightful texture and flavor.

Reheating: If desired, you can gently warm individual slices in the microwave for about 10-15 seconds, just enough to make the chocolate layers melt in your mouth!

Black Forest Cake with Cherry Whipped Cream Recipe FAQs

What type of cherries should I use for Black Forest Cake?
Absolutely, using fresh cherries is ideal if they are in season; they not only add a vibrant color but also a fresh taste. If fresh cherries aren’t available, canned tart cherries work perfectly too, just make sure to drain them well and reserve the syrup for soaking the cake layers.

How do I store leftover Black Forest Cake?
To keep your delicious Black Forest Cake fresh, store it in the refrigerator for up to 3 days. Cover it tightly with plastic wrap or place it in an airtight container to prevent it from drying out. If you want to enjoy it later, consider freezing it!

Can I freeze Black Forest Cake? How?
Certainly! To freeze your Black Forest Cake, first, cut it into individual slices or leave it whole. Wrap each slice or the entire cake in plastic wrap, ensuring it’s well-covered, followed by aluminum foil for extra protection. It can be frozen for up to 2 months. Just remember, when you’re ready to enjoy it, transfer it to the fridge to thaw overnight—this helps maintain its delicious texture.

What if the whipped cream melts while assembling?
If your whipped cream is melting during assembly, it could be because the cake layers were still warm. Always ensure your cake layers are completely cool before layering with whipped cream. Alternatively, if you find your whipped cream isn’t holding its shape, consider refrigerating it for a short while before assembly—this will help it firm up nicely.

Are there any dietary considerations for allergies with Black Forest Cake?
Yes! This cake contains common allergens like gluten (from flour) and dairy (from cream and milk). If you’re making it for someone with allergies, I recommend using gluten-free flour and substituting the cream with coconut cream for a dairy-free option. It’s a great way to ensure everyone can enjoy this delectable dessert!

Can I customize the flavors of the Black Forest Cake?
Very! One of the beauties of this recipe is its versatility. You can experiment by using other fruits like raspberries or strawberries instead of cherries for a delightful twist. Additionally, integrating flavors like almond extract into the whipped cream can elevate the taste even further!

Fruit Filled Thumbprint Cookies

Delicious Fruit Filled Thumbprint Cookies for Sweet Moments

These Fruit Filled Thumbprint Cookies are a delightful treat perfect for any occasion.
Prep Time 30 minutes
Cook Time 15 minutes
Cooling Time 30 minutes
Total Time 1 hour 15 minutes
Servings: 24 cookies
Course: Dessert
Cuisine: American
Calories: 150

Ingredients
  

For the Cookies
  • 2 cups All-Purpose Flour Provides structure to the cookies.
  • 1/2 cup Granulated Sugar Sweetens the cookie dough.
  • 1/2 cup Butter Softened, for richness.
  • 1 large Egg Binds ingredients.
  • 1 teaspoon Vanilla Extract Enhances flavor.
  • 1/2 teaspoon Baking Powder Helps the cookies rise.
For the Filling
  • 1/2 cup Fruit Jam or Preserves Flavor of choice, such as raspberry or apricot.

Equipment

  • mixing bowl
  • Baking sheets
  • oven
  • whisk
  • electric mixer
  • Cookie scoop
  • parchment paper

Method
 

Cookie Preparation
  1. Preheat your oven to 350°F (175°C) and line a baking sheet with parchment paper.
    Fruit Filled Thumbprint Cookies
  2. In a mixing bowl, cream together the softened butter and sugar until light and fluffy.
    Fruit Filled Thumbprint Cookies
  3. Add the egg and vanilla extract, and mix until well combined.
    Fruit Filled Thumbprint Cookies
  4. In another bowl, whisk together the flour and baking powder, then gradually add to the wet mixture.
    Fruit Filled Thumbprint Cookies
  5. Using a cookie scoop, drop dough onto the prepared baking sheets.
    Fruit Filled Thumbprint Cookies
  6. Make an indentation in the center of each cookie using your thumb or the back of a spoon.
    Fruit Filled Thumbprint Cookies
  7. Fill each indentation with your chosen fruit jam.
    Fruit Filled Thumbprint Cookies
  8. Bake in the preheated oven for 12-15 minutes, or until lightly golden around the edges.
    Fruit Filled Thumbprint Cookies
  9. Remove from the oven and let cool on the baking sheet for a few minutes before transferring to a wire rack to cool completely.
    Fruit Filled Thumbprint Cookies

Notes

These cookies can be stored in an airtight container for up to a week.

Savory Venezuelan Sweet Corn Cachapas with Melty Cheese

As the sun sets and the kitchen fills with warmth, the enticing aroma of sizzling corn fills the air, inviting you into a world of comfort and nostalgia. Today, I’m thrilled to share my recipe for Venezuelan Sweet Corn Cachapas with Melty Mozzarella—a delightful fusion of savory and sweet that brings the heart of Venezuelan cuisine to your table. These golden pancakes are not only quick to whip up but also versatile enough to enjoy for breakfast, lunch, or even a cozy dinner. Imagine the joy of biting into a lightly crispy exterior to uncover a soft, cheesy center that melts in your mouth. Perfect as a snack or side, these cachapas are bound to become a staple in your home. Are you ready to discover your new favorite comfort food?

Why Make Venezuelan Sweet Corn Cachapas?

Comforting, these cachapas are a warm hug for your taste buds, balancing sweet corn’s flavor with creamy mozzarella. Quick to prepare, they come together in no time, perfect for busy days or surprise guests. Versatile, enjoy them at any meal—from breakfast to dinner! Crowd-pleasers, they’re sure to impress family and friends alike. For a delightful twist, check out pairing them with Homemade Sweet Orange jam for a burst of flavor!

Venezuelan Sweet Corn Cachapas Ingredients

For the Batter

  • Sweet Corn – Provides the main base; tender sweetness and soft texture. Use fresh or thawed frozen corn—avoid canned.
  • Egg – Binds the ingredients together; adds richness.
  • All-Purpose Flour – Adds structure to the batter. Can substitute with alternative flours for gluten-free options.
  • Salt – Enhances flavor; essential for balancing sweetness.
  • Granulated Sugar – Adds sweetness; can substitute with honey for a floral lift.
  • Vegetable Oil – Used for frying; ensures crispy edges.

For the Filling

  • Buffalo Mozzarella Cheese – Classic choice for creamy melt; can substitute with queso de mano or queso fresco. For a dairy-free option, use plant-based cheese.

For Topping

  • Unsalted Butter – Topping for serving; adds richness.

Explore the delightful world of Venezuelan Sweet Corn Cachapas and filling your home with enticing aromas while you savor comfort food at its best!

Step‑by‑Step Instructions for Venezuelan Sweet Corn Cachapas

Step 1: Blend the Batter
In a blender or food processor, combine fresh or thawed sweet corn, an egg, all-purpose flour, salt, and sugar. Blend the mixture until mostly smooth while retaining some corn texture for added bite. This sweet corn batter should have a thick, pourable consistency, ideal for forming cachetas. Set aside the blended batter for a moment to allow flavors to meld.

Step 2: Preheat the Skillet
Heat a large skillet over medium heat and add a drizzle of vegetable oil, ensuring the bottom is well coated. Allow the oil to heat for about 2–3 minutes until shimmering, signaling it’s ready. The perfect temperature will help create those golden, crispy edges on your Venezuelan Sweet Corn Cachapas.

Step 3: Cook the Cachapas
Using a ladle or spoon, spoon approximately 60 ml of the corn batter onto the hot skillet, forming rounds about 4 inches in diameter. Cook for 3–4 minutes until the edges begin to crisp and the bottom is golden brown. Carefully flip each cachapa with a spatula, cooking for an additional 3 minutes on the other side until both sides are golden and crispy.

Step 4: Add the Cheese
Once both sides of the cachapas are beautifully browned, place several slices of buffalo mozzarella cheese in the center of each! Fold the cachapa in half, allowing the residual heat to gently melt the cheese. Cook for another minute to ensure the cheese is fully melted and oozy, creating a delightful savory contrast to the sweet corn.

Step 5: Serve Warm
As soon as your cachapas are filled with molten mozzarella, remove them from the skillet and place them on a warm plate. Top each cachapa with a pat of unsalted butter while they are still warm, allowing it to melt beautifully. Serve these Venezuelan Sweet Corn Cachapas immediately, inviting everyone to savor the comforting flavors right away!

How to Store and Freeze Venezuelan Sweet Corn Cachapas

Room Temperature:: Store unfilled cachapas in a cool, dry place for up to 3 days; keep them covered to maintain freshness and prevent drying out.

Fridge:: Refrigerate filled cachapas in an airtight container for up to 3 days; reheat gently on low heat to preserve the cheesy goodness.

Freezer:: Unfilled cachapas can be frozen with parchment paper between them for up to one month; reheat directly from frozen in a skillet or the oven until warm and crispy.

Reheating:: For any leftovers, reheat cachapas on a skillet over medium-low heat or in the oven until heated through, ensuring that melted cheese remains delightful and gooey.

What to Serve with Venezuelan Sweet Corn Cachapas

Indulging in the warm, cheesy delight of cachapas is a treat, but pairing them with complementary dishes can elevate your meal to new heights.

  • Creamy Avocado Salad: A fresh avocado salad drizzled with lime juice balances the sweetness of the cachapas, adding a zesty contrast.
  • Tangy Black Bean Salsa: This hearty salsa adds a delightful kick, with black beans providing protein and a satisfying texture alongside the soft cachapas.
  • Crispy Fried Plantains: The crispy edges of fried plantains create a wonderful texture contrast, while their natural sweetness harmonizes beautifully with the corn pancakes.
  • Scenic Corn Salad: A vibrant corn salad with cherry tomatoes and cilantro enhances the corn theme, providing brightness and freshness to the plate.
  • Rich Sour Cream Dip: A dollop of sour cream adds richness, cutting through the sweetness while providing a delightful creaminess to each bite.
  • Savory Cheese Queso: Melted cheese dip not only complements the cheesy filling of the cachapas, but also adds a gooey indulgence that is irresistible.
  • Chilled Beer: A light, crisp lager pairs wonderfully, refreshing your palate after each bite of the savory-sweet cachapas.
  • Sweet Hot Sauce: Drizzling a touch of sweet hot sauce adds an exciting flavor kick that enhances the comfort of each cachapa.
  • Fruity dessert: Try serving with a light fruit sorbet, like mango or passion fruit, to cleanse the palate and finish the meal on a refreshing note.

Expert Tips for Venezuelan Sweet Corn Cachapas

  • Fresh Corn Choice: Use fresh corn when possible for the sweetest flavor; frozen corn is suitable if fresh isn’t available. Avoid canned corn for best results.
  • Texture Matters: Blend the corn just enough to maintain some texture; this adds a delightful bite to your cachapas, enhancing the eating experience.
  • Prep Ahead: Prepare the batter in advance and store it in the fridge. Cook the cachapas fresh to enjoy them at their best!
  • Proper Cooking Heat: Ensure the skillet is adequately heated; too low, and they won’t crisp up. Too high, and they may burn before cooking through.
  • Storage & Reheating: Unfilled cachapas can be stored in an airtight container for three days. For filled ones, refrigerate and reheat gently on low heat to maintain flavor and texture.
  • Flavor Enhancer: For an extra touch, consider adding a pinch of smoked paprika to the batter for a wonderful depth of flavor in your Venezuelan Sweet Corn Cachapas.

Make Ahead Options

These Venezuelan Sweet Corn Cachapas are ideal for busy weeknights when you want comfort food without the last-minute rush! You can prepare the batter up to 24 hours in advance. Simply blend sweet corn, egg, flour, salt, and sugar, then store it in an airtight container in the refrigerator. For optimal quality, cook cooled cachapas ahead of time, letting them cool completely before storing them in the fridge for up to 3 days. To reheat, warm them in a skillet over low heat, filling them with mozzarella just until melted. This way, you’ll have delicious, cheesy cachapas ready to serve with minimal effort!

Venezuelan Sweet Corn Cachapas Variations

Feel free to let your culinary creativity shine with these delightful twists on traditional cachapas that will tantalize your taste buds!

  • Cheese Swap: Substitute buffalo mozzarella with queso fresco or any soft white cheese of your choice for a different creamy experience.
  • Gluten-Free: Replace all-purpose flour with almond flour or oat flour for a gluten-free option that still holds wonderful texture.
  • Sweetness Boost: Add a splash of honey or maple syrup to the batter for an extra floral sweetness that elevates the flavor.
  • Savory Add-ins: Mix in cooked chorizo or sautéed vegetables like spinach or bell peppers into the batter for a heartier cachapa.
  • Crispy Edge: For an added crunch, sprinkle cornmeal in the hot skillet before pouring in the batter; it will create a delightful crispy base.
  • Spicy Kick: Dust the batter with a pinch of cayenne pepper or crushed red pepper flakes for a gentle heat that complements the sweetness perfectly.
  • Fruit Fusion: Serve cachapas with a dollop of Homemade Sweet Orange jam or sliced avocado for an unexpected and delicious contrast.
  • Plant-Based Option: For a dairy-free version, use plant-based mozzarella or a mixture of cashew cream and nutritional yeast for a rich and creamy filling.

Embrace these variations to create your own personal twist on Venezuelan Sweet Corn Cachapas, crafting a dish that’s uniquely you!

Venezuelan Sweet Corn Cachapas Recipe FAQs

What type of corn should I use for cachapas?
Absolutely, fresh corn is the best choice for a naturally sweet flavor and soft texture! If fresh isn’t available, thawed frozen corn works well, but avoid canned corn as it can lead to a mushy texture.

How should I store leftover cachapas?
For unfilled cachapas, store them in an airtight container at room temperature for up to 3 days to maintain their freshness. However, if you’ve made filled ones, refrigerate them in an airtight container and consume within 3 days. To reheat filled cachapas, do so gently on low heat so the cheesy goodness stays intact.

Can I freeze cachapas, and if so, how?
Yes, you can absolutely freeze unfilled cachapas! Place parchment paper between each cachapa to prevent sticking, then store them in a freezer-safe bag or container. They can be kept for up to 1 month. To enjoy, simply reheat them directly from frozen in a skillet over medium heat until warm and crispy.

What can I do if my cachapas don’t cook evenly?
Very often, uneven cooking can occur due to heat distribution in the skillet. Be sure to preheat your skillet adequately until it’s shimmering before adding the batter. Also, try adjusting the heat down slightly if the edges burn before the center cooks through—lower heat will ensure a more even cook.

Are cachapas suitable for a gluten-free diet?
Definitely! If you need a gluten-free option, you can substitute all-purpose flour with alternatives like almond flour or a gluten-free flour blend. Just keep in mind that the texture may vary slightly, but the taste will still be delightful! So, the more the merrier—enjoy!

Can pets eat cachapas?
It’s best to be cautious with cachapas around pets. The corn is generally safe, but the added salt, butter, and cheese can be harmful. If you’d like to treat your furry friend, prepare a plain version without those extras!

Venezuelan Sweet Corn Cachapas

Savory Venezuelan Sweet Corn Cachapas with Melty Cheese

Enjoy the delightful fusion of savory and sweet with Venezuelan Sweet Corn Cachapas, filled with melty mozzarella, perfect for any meal.
Prep Time 10 minutes
Cook Time 15 minutes
Total Time 25 minutes
Servings: 4 cachapas
Course: Breakfast
Cuisine: Venezuelan
Calories: 250

Ingredients
  

For the Batter
  • 2 cups sweet corn fresh or thawed frozen
  • 1 large egg
  • 1 cup all-purpose flour can substitute for gluten-free options
  • 1 teaspoon salt
  • 2 tablespoons granulated sugar or substitute with honey
  • 2 tablespoons vegetable oil for frying
For the Filling
  • 8 oz buffalo mozzarella cheese or substitute with queso de mano or queso fresco
For Topping
  • 2 tablespoons unsalted butter for serving

Equipment

  • Blender
  • large skillet
  • spatula

Method
 

Step-by-Step Instructions
  1. In a blender or food processor, combine sweet corn, egg, all-purpose flour, salt, and sugar. Blend until mostly smooth but retains some corn texture.
  2. Heat a large skillet over medium heat and add vegetable oil. Allow the oil to heat until shimmering.
  3. Spoon approximately 60 ml of the corn batter onto the hot skillet, forming rounds. Cook for 3-4 minutes until golden brown, then flip and cook for another 3 minutes.
  4. Once both sides are browned, place mozzarella cheese in the center and fold cachapa in half to melt the cheese.
  5. Remove from skillet, top with butter, and serve warm.

Notes

For best flavor, use fresh corn when possible and maintain some texture in the batter.

Winter Fruit Salad that Brightens Cold Days with Freshness

On a chilly winter evening, I found myself longing for a little sunshine, so I whipped up a vibrant Winter Fruit Salad with Honey-Lime Dressing. This salad is a delightful escape from the heavy, warm dishes often associated with the season. Bursting with juicy citrus, crisp apples, and the eye-catching pops of pomegranate, it’s not just a feast for the eyes but a refreshing burst of flavor on your plate. Plus, this recipe is effortlessly customizable, making it a perfect way to use up any lingering fruits in your kitchen. Whether you’re looking for a healthy dessert or a bright side dish to complement your holiday meals, this salad checks all the boxes. Curious about how to mix and match your favorite fruits to create your own version? Let’s dive into this delicious, healthy recipe!

Why is this Winter Fruit Salad a Must-Try?

Bright, Fresh Ingredients: The combination of juicy citrus, crisp apples, and vibrant pomegranate creates a refreshing medley that brightens even the coldest winter days.

Effortless Customization: Swap in any seasonal fruits you have on hand, making this a flexible dish for your pantry. Add some kiwi or pineapple for a tropical flair!

Healthy Indulgence: With only 165 calories per serving, it’s a guilt-free way to satisfy your sweet cravings while nourishing your body.

Perfect for Any Occasion: This salad shines as a light dessert or a festive side at holiday gatherings, impressing guests with its stunning colors and flavors.

Quick to Make: In just a few simple steps, you can create a vibrant dish that’s not only delicious but also visually appealing. Try it paired with breakfast or as a fresh accompaniment to your meals!

For more delightful salads, check out our Garden Harvest Salad or Cabbage Apple Salad.

Winter Fruit Salad Ingredients

Note: Gather these vibrant ingredients to create your refreshing Winter Fruit Salad!

  • For the Fruit

  • Citrus (oranges, grapefruits) – Brightness and juicy sweetness; substitute lemons or limes if needed.

  • Crisp Apples (Honeycrisp or Fuji) – Provides crunch and natural sweetness; recommended for their ability to retain crispness.

  • Pomegranate Seeds – Adds bursts of flavor and visual appeal; dried cranberries can be used if fresh pomegranate is unavailable.

  • For the Dressing

  • Honey – Natural sweetness that complements the fruits; maple syrup or agave nectar can be substituted for a vegan option.

  • Lime Zest – Enhances aroma with intense citrus oils; lemon zest can be used instead for similar flavor.

  • For Garnish

  • Fresh Mint – Offers a refreshing herbal twist; can be replaced with basil or lemon balm.

Step‑by‑Step Instructions for Winter Fruit Salad

Step 1: Prepare the Fruits
Start by thoroughly washing the citrus fruits and apples under cool water. Use a sharp knife to peel the oranges and grapefruits, then segment them, ensuring you capture all the juicy pulp. Dice the crisp apples into bite-sized pieces, keeping their skins for added color and nutrients. Lastly, if using fresh pomegranate, carefully extract the seeds to gather vibrant bursts of flavor.

Step 2: Mix the Fruits
In a large mixing bowl, combine all your beautifully prepared fruits—citrus segments, apple pieces, and pomegranate seeds. Gently toss them together with your hands or a wooden spoon, making sure everything is evenly distributed. This colorful mixture is the heart of your Winter Fruit Salad, vibrant enough to brighten any winter table.

Step 3: Whisk the Dressing
In a small bowl, add honey, freshly squeezed lime juice, and lime zest. Whisk together vigorously with a fork or small whisk until the mixture is well-blended and smooth. The dressing should have a lovely aroma with a perfect balance of sweetness and tang. This honey-lime dressing enhances the flavors of your Winter Fruit Salad beautifully.

Step 4: Combine the Dressing and Salad
Carefully pour the honey-lime dressing over the fruit mixture in the large bowl. With a gentle hand, toss the salad to ensure all fruit pieces are coated with the dressing, creating a glossy sheen. Be cautious not to mash the fruit; you want to maintain their lovely textures to truly enjoy the Winter Fruit Salad.

Step 5: Add the Mint Garnish
Just before serving, finely chop fresh mint leaves and sprinkle them over the salad for a pop of color and a refreshing herbal aroma. If preparing in advance, store the mint separately to keep it fresh. This final touch will elevate your Winter Fruit Salad, making it not just delicious but also visually appealing.

Step 6: Serve and Enjoy
Chill your Winter Fruit Salad in the refrigerator for about 15-30 minutes for a refreshing experience. Serve it in glass bowls or layer it in mason jars for a portable option. This salad becomes a delightful centerpiece, making cold winter days feel just a bit brighter and more inviting.

What to Serve with Winter Fruit Salad?

Experience the joy of complementing this vibrant Winter Fruit Salad with delightful pairings for a balanced meal.

  • Creamy Greek Yogurt: This tangy addition enhances the sweetness of the salad, creating a luscious contrast that feels indulgent yet healthy.

  • Honey-Glazed Chicken: A savory option that balances the tartness of the fruits, making for a satisfying and colorful dish.

  • Nutty Granola: Sprinkling granola over the salad adds a satisfying crunch and depth, enhancing both texture and flavor.

  • Warm Quinoa Pilaf: A hearty grain dish that pairs beautifully, giving a warm, wholesome contrast to the bright, cold salad.

Pair this with a simple glass of sparkling water infused with slices of lemon or lime for a refreshing drink that ties it all together.

  • Chocolate-Dipped Strawberries: For a sweet finish, these elegant treats complement the fruit salad’s flavors while satisfying any dessert cravings.

  • Mint Lemonade: This refreshing beverage mirrors the mint in the salad, providing a cool, revitalizing sip to enjoy alongside.

Expert Tips for Winter Fruit Salad

  • Choose the Right Fruits: Select ripe, seasonal citrus fruits for the best flavor. Avoid overly soft apples, as they can turn mushy in the salad.

  • Keep It Fresh: Add mint just before serving to prevent wilting. Fresh herbs provide a burst of flavor that complements the Winter Fruit Salad beautifully.

  • Prepare in Advance: This salad can be made a day ahead without dressing. Store in the refrigerator to allow flavors to meld, but dress just before serving to maintain freshness.

  • Mind the Dressing: Adjust the honey to match your sweetness preference; too much can overshadow the natural flavors of the fruits.

  • Experiment with Variations: Feel free to swap in different fruits like kiwi or pineapple for new flavors, ensuring your Winter Fruit Salad stays exciting and adaptable!

Winter Fruit Salad Variations & Substitutions

Feel free to personalize your Winter Fruit Salad with these delicious suggestions that can elevate the flavor and texture!

  • Tropical Twist: Add kiwi or pineapple chunks for a vibrant tropical note that dances on your taste buds. Each bite comes with a delightful sweetness, turning your salad into a mini-escape to a sunny beach!

  • Citrus Swap: Substitute lemons or limes for oranges to create a tart variation. This change brings a zesty kick that can wake up the palate on any chilly day.

  • Nutty Crunch: Incorporate slivered almonds or chopped walnuts for added texture and healthy fats. The nuttiness complements the sweetness of the fruits, giving you a satisfying crunch in every bite.

  • Flavor Boost: Drizzle a little balsamic reduction over the salad for an unexpected depth of flavor. The rich acidity of the balsamic pairs surprisingly well with the fruit, making every bite more intriguing.

  • Dried Fruit Substitute: If fresh pomegranate isn’t available, use dried cranberries or cherries instead. These alternatives maintain a chewy texture and provide bursts of sweetness that will still impress.

  • Herbal Zing: Swap fresh mint for basil or lemon balm for a unique herbal twist. The subtle change can dramatically influence the salad’s aroma and flavor profile, making it more aromatic and refreshing!

  • Sweet Alternative: Replace honey with maple syrup or agave nectar if you’re looking for a vegan-friendly dressing option. These alternatives add a different but delightful sweetness that complements the fruits wonderfully.

  • Spice It Up: For a hint of warmth, add a sprinkle of cinnamon or nutmeg to the dressing. This spice twist adds an unexpected warmth that harmonizes beautifully with the winter theme.

For more refreshing ideas, take a peek at our Crunch Cucumber Salad or Cucumber Carrot Salad with a Twist. Think of these variations as invitations to explore – don’t hesitate to create a personalized version that speaks to your taste!

Make Ahead Options

These Winter Fruit Salads are perfect for busy weeknights and meal prep enthusiasts! You can prep the fruits—citrus segments and diced apples—up to 24 hours in advance. Simply store them in an airtight container in the refrigerator to preserve freshness. However, it’s crucial to keep the pomegranate seeds and dressing separate until you’re ready to serve, as this will ensure the salad maintains its vibrant textures. When you’re ready to enjoy your Winter Fruit Salad, simply toss the prepped fruit with the honey-lime dressing and garnish with freshly chopped mint for that aromatic finish. With these make-ahead tips, you’ll have a refreshing dish ready with minimal effort, making any meal feel special!

How to Store and Freeze Winter Fruit Salad

Room Temperature: Store the salad at room temperature for up to 1 hour if serving outdoors; after that, refrigerate to prevent spoilage.

Fridge: Keep the Winter Fruit Salad in an airtight container for up to 2 days in the fridge. Avoid adding the dressing until you’re ready to serve.

Freezer: Do not freeze the salad, as freezing alters the texture of the fruits and makes them mushy.

Reheating: There’s no need to reheat; serve chilled for the best taste and texture. Enjoy the refreshing flavors!

Winter Fruit Salad Recipe FAQs

What types of citrus are best for this Winter Fruit Salad?
Absolutely! For a bright and juicy flavor, I recommend using a combination of oranges and grapefruits. They not only bring sweetness but also a lovely acidity that balances the dish. If you can’t find these, feel free to substitute with lemons or limes for a tangy twist.

How should I store my Winter Fruit Salad?
To keep your salad fresh, store it in an airtight container in the fridge for up to 2 days. Make sure to avoid adding the honey-lime dressing until you’re ready to serve it; this keeps the fruits vibrant and crisp. If you’re serving it outdoors, it’s safe at room temperature for about 1 hour.

Can I freeze the Winter Fruit Salad?
I don’t recommend freezing this salad as the texture of the fruits will change significantly; they can turn mushy and lose their crunch. Instead, enjoy it fresh! If you find yourself with leftovers, they are best consumed within 2 days when stored properly in the fridge.

What if I have allergies to certain fruits in the salad?
Very important to consider! If you’re allergic to certain fruits, just swap them out for alternatives you can enjoy. For example, if you can’t eat apples, consider using pears for that crunch. Be cautious with the honey if there’s a bee allergy; maple syrup or agave nectar works great as a substitute!

How can I freshen up leftover Winter Fruit Salad?
If you have any leftovers, simply chop up some fresh mint and toss it in right before serving. This adds a refreshing element and livens up the flavors! If it’s lost some of its juiciness, a splash of fresh lime juice can also help reawaken the taste. Enjoy every bite!

How do I choose the best apples for my salad?
When selecting apples, go for varieties like Honeycrisp or Fuji, which retain their crunch and sweetness beautifully. Look for apples that are firm to the touch without any dark spots or blemishes. This ensures they’ll hold up well in your salad while adding that delightful texture.

Winter Fruit Salad

Winter Fruit Salad that Brightens Cold Days with Freshness

This Winter Fruit Salad is a vibrant dish full of fresh fruits, perfect for brightening cold days.
Prep Time 15 minutes
Chilling Time 30 minutes
Total Time 45 minutes
Servings: 4 servings
Course: Dessert
Cuisine: American
Calories: 165

Ingredients
  

For the Fruit
  • 2 oranges Citrus or grapefruits, substitute lemons or limes if needed
  • 2 cups Crisp Apples (Honeycrisp or Fuji) Provides crunch and natural sweetness
  • 1 cup Pomegranate Seeds or dried cranberries if fresh is unavailable
For the Dressing
  • 3 tablespoons Honey substitute with maple syrup or agave nectar for vegan option
  • 1 teaspoon Lime Zest or lemon zest can be used for similar flavor
For Garnish
  • 2 tablespoons Fresh Mint can be replaced with basil or lemon balm

Equipment

  • mixing bowl
  • Small bowl
  • whisk
  • sharp knife

Method
 

Step-by-Step Instructions for Winter Fruit Salad
  1. Prepare the Fruits: Thoroughly wash the citrus fruits and apples under cool water. Peel the oranges and grapefruits, then segment them. Dice the crisp apples into bite-sized pieces, keeping their skins on. If using fresh pomegranate, extract the seeds.
  2. Mix the Fruits: In a large mixing bowl, combine the prepared fruits—citrus segments, apple pieces, and pomegranate seeds. Toss gently to distribute evenly.
  3. Whisk the Dressing: In a small bowl, mix honey, freshly squeezed lime juice, and lime zest. Whisk until well-blended and smooth.
  4. Combine the Dressing and Salad: Pour the honey-lime dressing over the fruit mixture and toss gently to coat without mashing the fruit.
  5. Add the Mint Garnish: Chop fresh mint leaves and sprinkle over the salad just before serving.
  6. Serve and Enjoy: Chill in the refrigerator for about 15-30 minutes and serve in glass bowls or mason jars.

Notes

This salad can be made in advance without dressing. Store in the refrigerator but dress just before serving for maximum freshness. Adjust sweetness of the dressing to taste.

Stained Glass Cookies That Dazzle and Delight This Holiday Season

The aroma of freshly baked cookies mingling with the scent of evergreen—nothing quite captures the essence of the holiday season like making a batch of Dazzling Stained Glass Cookies. These delightful treats are not only a feast for the eyes with their jewel-toned centers resembling edible ornaments, but they also bring a comforting contrast of crispness and buttery softness in every bite. Perfect for sprucing up your holiday gatherings, these cookies are quick to prepare and can double as festive decorations, making them an enchanting addition to any dessert table. Plus, they’re sure to be a crowd-pleaser among family and friends alike! What colors will you choose to make your cookies shine this season?

Why Are Stained Glass Cookies So Special?

Visual Delight: The stunning jewel-toned centers create a captivating display, making them perfect for special occasions.

Easy-to-Make: With just a few ingredients and simple steps, even baking novices can whip up these treats in no time.

Crowd-Pleasing: Everyone loves the combination of flavors and textures in these cookies, ensuring they’re a hit at any gathering.

Double Duty: Not only are they delicious, but they can also be hung as festive ornaments, adding a unique touch to your decor.

Don’t forget to pair your stained glass cookies with a cozy mug of hot cocoa or consider trying other delightful recipes like Nutty Apricot Cookies for an added twist in your holiday baking!

Stained Glass Cookies Ingredients

For the Dough

  • All-purpose Flour – Provides structure to the cookies; gluten-free flour is a great substitute for those with dietary restrictions.
  • Granulated Sugar – The sweetness base enhances flavor; consider using stevia for a low-calorie alternative.
  • Butter – Adds richness and a soft texture; swap with margarine for a dairy-free option.
  • Eggs – Binds the ingredients together; flaxseed meal mixed with water can serve as a vegan alternative.
  • Vanilla Extract – Enhances flavor; almond extract offers a delightful twist if you prefer.

For the Stained Glass Effect

  • Crushed Hard Candies – Creates the beautiful stained glass look; choose seasonal colors to match your holiday theme.

Tips for Success

  • Keep an eye on baking times; underbaking can lead to too-soft centers while overbaking will harden the cookie’s edges.

Step‑by‑Step Instructions for Stained Glass Cookies

Step 1: Preheat the Oven
Begin by preheating your oven to 350°F (175°C). While the oven warms, line your baking sheets with parchment paper to prevent sticking and ensure even baking. This initial step sets the perfect stage for your Stained Glass Cookies, ensuring they’re ready to bake once prepared.

Step 2: Cream the Butter and Sugar
In a large mixing bowl, combine softened butter and granulated sugar. Using an electric mixer, beat them together on medium speed until the mixture is light, fluffy, and has a pale color—about 3-5 minutes. This creates a rich base for your dough, ensuring your cookies are soft yet crisp.

Step 3: Add Eggs and Vanilla
Crack in the eggs and pour the vanilla extract into the butter-sugar mixture. Mix on low speed until thoroughly combined, scraping down the sides of the bowl to ensure everything is well-blended. The ingredients should create a smooth, slightly thickened mixture that’s ready for the dry ingredients.

Step 4: Incorporate the Flour
Gradually add the all-purpose flour to the wet mixture, mixing on low speed until a cohesive dough forms. This will take about 1-2 minutes. Be careful not to overmix; the dough should come together without being overly sticky or dry, creating the perfect consistency for rolling out later.

Step 5: Roll Out the Dough
On a floured surface, take a portion of the cookie dough and roll it out to a thickness of 1/4 inch. Use a rolling pin, and turn the dough occasionally to ensure it doesn’t stick. This is a crucial step for achieving the signature shape and thickness of your Stained Glass Cookies, allowing them to bake evenly.

Step 6: Cut Out Shapes
Using your favorite cookie cutters, cut out various shapes from the rolled-out dough. With a smaller cutter, make a hole in the center of each cookie shape to create the stained glass effect later. This step adds a fun touch, allowing your creativity to shine through each festive cookie.

Step 7: Fill the Centers
Transfer the cookie shapes to your prepared baking sheets. Carefully fill each center cut-out with crushed hard candies, choosing vibrant colors for a beautiful stained glass appearance. Be sure not to overfill, as the candies will melt during baking and spread slightly, creating a mesmerizing center.

Step 8: Bake the Cookies
Place the baking sheets into the preheated oven and bake the Stained Glass Cookies for 8-10 minutes. Keep an eye on them; once the edges turn golden, they’re ready to be taken out. This visual cue signals that your cookies are achieving that delightful crisp texture on the outside.

Step 9: Cool and Transfer
After baking, let the cookies cool on the baking sheet for about 5 minutes, allowing the candy centers to firm up slightly. Once cooled, gently transfer the cookies to a wire rack to cool completely. This step is essential to prevent breakage, ensuring your stunning stained glass creations hold their shape.

How to Store and Freeze Stained Glass Cookies

Room Temperature: Store cooled cookies in an airtight container at room temperature for up to 1 week to maintain freshness and prevent them from becoming stale.

Fridge: For extended freshness, you may refrigerate the cookies in a sealed container for up to 2 weeks, but be aware that refrigeration may slightly alter the texture.

Freezer: To store Stained Glass Cookies longer, freeze them in a single layer on a baking sheet before transferring to an airtight freezer bag. They can be kept for up to 3 months.

Reheating: When ready to enjoy frozen cookies, thaw them in the fridge overnight, then warm briefly in the oven at 350°F (175°C) for a few minutes to restore their crispness.

Make Ahead Options

Stained Glass Cookies are perfect for busy home cooks looking to simplify their holiday baking! You can prepare the dough up to 3 days in advance by wrapping it tightly in plastic wrap and refrigerating it. For even more convenience, roll out the dough and cut your cookie shapes, then simply place them on a baking sheet lined with parchment paper and freeze them. Once frozen, transfer the shapes to an airtight container for up to 2 months. When you’re ready to bake, fill the centers with crushed hard candies and pop them in the oven. This way, you’ll enjoy freshly baked cookies with stunning decoration—just as delightful as if you made them from scratch that day!

Expert Tips for Stained Glass Cookies

Even Dough Rolling: Ensure even rolling of your dough to guarantee uniform baking. Unevenly rolled dough can lead to cookies that bake unevenly.

Cool Before Handling: Allow the cookies to cool completely on the baking sheet before transferring them. This prevents breaking and maintains their beautiful shapes.

Candy Selection: Opt for hard candies that melt well, like Jolly Ranchers. Avoid softer candies, which won’t create the desired stained glass effect.

Perfect Bake Time: Watch your cookies closely while baking. Underbaking can result in gooey centers, while overbaking hardens the edges.

Festive Touch: Thread a thin ribbon through a small hole at the top of the cookies before baking. This allows you to hang them, adding charm to your holiday décor.

Stained Glass Cookies Variations & Substitutions

Feel free to sprinkle your own creativity into these delightful stained glass cookies!

  • Gluten-Free: Use a gluten-free flour blend instead of all-purpose flour for a gluten-free version everyone can enjoy. Each bite will still hold that fantastic texture.

  • Dairy-Free Delight: Replace butter with margarine or coconut oil to create a dairy-free treat. This swap ensures you don’t sacrifice flavor in your cookies.

  • Vegan Option: For a vegan twist, use flaxseed meal mixed with water in place of eggs. This keeps the dough binding well while making it plant-based.

  • Candy Variety: Feel free to experiment with different types of hard candies, like butterscotch or fruit-flavored ones. The vibrant colors and flavors will keep your cookies exciting!

  • Spiced Up: Add warming spices like cinnamon or nutmeg into the dough for a cozy touch. This transformation will evoke holiday memories with each bite.

  • Chocolate Twist: Incorporate mini chocolate chips along with the crushed candies, offering a delightful chocolatey surprise in the midst of sweet candy.

  • Nutty Crunch: Fold in finely chopped nuts, such as almonds or pecans, into the dough for an added crunch that complements the soft buttery texture.

  • Shape Variations: Use various cookie cutter shapes tailored to different holidays—hearts for Valentine’s Day or stars for Christmas. This keeps your festivities uniquely themed!

Once you’ve crafted your stained glass cookies, why not try other delightful recipes like Apple Oatmeal Cookies or Nutty Chocolate Date Cookies? They make for perfect accompaniments to your festive treats!

What to Serve With Stained Glass Cookies

Let the shimmering allure of your stained glass cookies set the tone for a festive gathering, beautifully enhanced by these delightful pairings.

  • Creamy Hot Cocoa: Rich, velvety hot cocoa is the perfect balance to the cookies’ sweetness, creating a cozy holiday atmosphere.
  • Spiced Apple Cider: Warm spiced apple cider complements the buttery flavor of the cookies, evoking fond memories of autumn gatherings.
  • Winter Fruit Salad: A refreshing medley of citrus and berries adds a burst of freshness, beautifully contrasting the cookies’ rich sweetness. This vibrant dish brings color and health to your holiday spread.
  • Classic Gingerbread Men: Serve these alongside for a fun cookie exchange experience. The warmth of gingerbread spices harmonizes with the sweetness of your stained glass cookies.
  • Mint Chocolate Chip Ice Cream: The cool, creamy texture of the ice cream against the buttery crispness of the cookies creates a delightful sensory experience.
  • Coffee or Espresso: Rich, bold coffee enhances the flavors of the cookies, giving adults a rich pairing option that complements the sweetness beautifully.
  • Peppermint Bark: These festive treats bring a festive zing. The crunch and bold minty flavor contrast wonderfully with the delicate sweetness of stained glass cookies.
  • Chocolate-Dipped Marshmallows: A deliciously fun dessert, these sweet morsels add extra indulgence, encouraging guests to explore different textures while indulging in the festive spirit.
  • Holiday Cheeseboard: Curate a selection of cheese, nuts, and dried fruits. The savory elements create an exciting contrast with the sugary stained glass cookies, satisfying diverse palates during your celebration.

Stained Glass Cookies Recipe FAQs

How do I choose the right crushed hard candies for my cookies?
Absolutely! For the best stained glass effect, choose hard candies like Jolly Ranchers or Werther’s Originals. Aim for vibrant colors that will melt beautifully into that jewel-toned center. Avoid softer candies, as they won’t achieve the desired transparency or look.

What is the best way to store Stained Glass Cookies?
You can store your cooled cookies in an airtight container at room temperature for up to 1 week. For longer storage, refrigerate them in a sealed container for up to 2 weeks, although this might slightly alter their texture.

Can I freeze Stained Glass Cookies? If so, how?
Absolutely! To freeze, first lay out the cookies in a single layer on a baking sheet. Once they’re frozen solid, transfer them to an airtight freezer bag. They can be kept for up to 3 months. When you’re ready to enjoy them, simply thaw in the fridge overnight, then warm briefly in the oven at 350°F (175°C) for a few minutes to refresh their texture.

What should I do if my cookie dough is too sticky or dry?
If your dough is sticky, try chilling it in the fridge for about 30 minutes. This helps firm it up and makes rolling easier. If it’s too dry, you can add a teaspoon of milk or water to bring it back together, mixing gently until the perfect consistency is reached.

Are there any dietary considerations I should be aware of?
If you’re cooking for someone with dietary restrictions, there are some easy swaps you can make! For a dairy-free option, substitute butter with margarine or a plant-based butter. You can also use flaxseed meal mixed with water as an egg replacer for a vegan version. Always be sure to check for any specific allergens in your chosen hard candies, as some may contain gluten or nuts.

Stained Glass Cookies

Stained Glass Cookies That Dazzle and Delight This Holiday Season

Dazzling Stained Glass Cookies bring festive colors and a delicious blend of textures, perfect for holiday gatherings.
Prep Time 20 minutes
Cook Time 10 minutes
Cooling Time 5 minutes
Total Time 35 minutes
Servings: 24 cookies
Course: Dessert
Cuisine: American
Calories: 120

Ingredients
  

For the Dough
  • 3 cups All-purpose Flour Gluten-free flour is a great substitute.
  • 1 cup Granulated Sugar Consider using stevia for low-calorie option.
  • 1 cup Butter Swap with margarine for a dairy-free option.
  • 2 large Eggs Flaxseed meal mixed with water can serve as a vegan alternative.
  • 2 teaspoons Vanilla Extract Almond extract offers a delightful twist.
For the Stained Glass Effect
  • 1 cup Crushed Hard Candies Choose seasonal colors to match your holiday theme.

Equipment

  • electric mixer
  • Rolling Pin
  • Cookie Cutters
  • Baking sheets
  • parchment paper
  • Wire rack

Method
 

Step-by-Step Instructions
  1. Preheat your oven to 350°F (175°C) and line your baking sheets with parchment paper.
  2. Cream softened butter and granulated sugar together until light and fluffy—about 3-5 minutes.
  3. Add the eggs and vanilla extract, mixing until combined and smooth.
  4. Gradually incorporate the flour, mixing on low speed until a cohesive dough forms.
  5. Roll out the dough to a thickness of 1/4 inch on a floured surface.
  6. Cut out shapes with cookie cutters, making a hole in the center of each shape.
  7. Fill each center cut-out with crushed hard candies, being careful not to overfill.
  8. Bake for 8-10 minutes or until the edges turn golden.
  9. Allow cookies to cool on the baking sheet for 5 minutes before transferring them to a wire rack.

Notes

Store cooled cookies in an airtight container at room temperature for up to 1 week. For longer storage, freeze them for up to 3 months.

Grilled Fish with Caper and Red Onion Dressing Delight

The moment I lifted the lid off my frying pan, the sunny aroma of pan-seared fish filled my kitchen, invoking memories of coastal summer days. This recipe for Grilled Fish with Caper and Red Onion Dressing not only embraces the freshness of your catch but also delivers a vibrant punch of flavor that will invigorate your palate. Perfect for a light lunch or a cozy dinner, this dish offers the beauty of healthy eating without sacrificing taste. With easy prep and versatility—you can swap in your favorite fish or even a plant-based protein—it’s bound to become a go-to in your culinary repertoire. Ready to elevate your weeknight meals or impress guests? Let’s dive into this delightful recipe and transform your fish dinner into a gourmet experience!

Why Is This Fish Recipe So Special?

Fresh, Flavorful Ingredients: The zesty dressing elevates every bite, making your taste buds dance with joy.
Customizable Options: Easily swap fish with chicken or tofu to suit your preferences.
Quick & Easy: With only a handful of ingredients, you’ll have a fantastic meal ready in under 30 minutes!
Perfect for Any Occasion: Impress guests or savor a weeknight meal; this dish adapts beautifully.
Healthy and Nutritious: Packed with protein and low in carbohydrates, it supports a balanced diet. Discover more ways to brighten your meals with a Crisp Cabbage Dressing or a side of Everyday Broccoli Dressing.

Grilled Fish with Caper and Red Onion Dressing Ingredients

For the Dressing

  • Olive Oil – Provides richness and helps achieve a perfect grilled texture.
  • Apple Cider Vinegar – Adds a bright acidity that balances the flavors of the dressing.
  • Garlic – Use crushed garlic to unleash its aromatic oils and robust flavor.
  • Sea Salt & Ground Pepper – Essential for seasoning both the fish and the dressing.
  • Capers – Adds a briny kick; rinse well if salt-packed for optimal taste.
  • Red Onion – Offers a sharp yet sweet profile, enhancing the dressing’s complexity.
  • Parsley – A fresh herb that brightens the dressing, creating a flavor contrast.

For the Fish

  • Fish Fillets (750 grams) – The star of the dish; choose your favorite fresh catch for optimal taste. Cooking Note: Any firm white fish like cod, snapper, or even salmon works wonderfully.

Ready to dive into this vibrant dish? Let’s make magic in the kitchen with this Grilled Fish with Caper and Red Onion Dressing recipe!

Step‑by‑Step Instructions for Grilled Fish with Caper and Red Onion Dressing

Step 1: Prepare the Dressing
In a medium mixing bowl, whisk together 1/4 cup of olive oil, 2 tablespoons of apple cider vinegar, and 2 cloves of crushed garlic until well combined. Season the mixture generously with sea salt and ground pepper to taste. Gently fold in 2 tablespoons of rinsed capers, 1/4 finely sliced red onion, and a handful of chopped parsley. Set the dressing aside to allow the flavors to meld while you prepare the fish.

Step 2: Cook the Fish
Heat a large sauté pan over medium-high heat and add 2 tablespoons of olive oil along with a knob of butter until melted and frothy. Season 750 grams of fish fillets with salt and pepper on both sides. Place the fillets in the hot pan, cooking for about 3-4 minutes per side or until the fish is golden and flakes easily. If necessary, cook in batches to avoid overcrowding, ensuring an even cook.

Step 3: Drain & Serve
Once the fish is cooked through and beautifully golden, transfer it to a plate lined with kitchen towels to drain any excess oil. After draining, carefully arrange the fish on a lipped platter. Generously spoon your prepared caper and red onion dressing over the hot fish, letting it soak in. Allow the dish to sit for 15 minutes before serving; this resting time allows the flavors of the Grilled Fish with Caper and Red Onion Dressing to harmonize beautifully.

Make Ahead Options

These Grilled Fish with Caper and Red Onion Dressing are perfect for busy weeknights or meal prepping! You can prepare the dressing up to 3 days in advance; simply whisk together the olive oil, apple cider vinegar, crushed garlic, capers, red onion, and parsley, then refrigerate in an airtight container. This not only saves time but allows the flavors to deepen. For the fish, season the fillets and store them covered in the refrigerator for up to 24 hours; however, it’s best to cook the fish fresh to maintain its flaky texture. When ready to serve, cook the fish directly from the refrigerator, and don’t forget to let it rest for 15 minutes after dressing it to create a truly delightful meal!

Grilled Fish with Caper and Red Onion Dressing Variations

Feel free to explore different flavors and textures by customizing this recipe to perfectly suit your taste!

  • Chicken Swap: Use grilled chicken breast instead of fish for a hearty twist. The dressing complements the savory chicken perfectly, making it a satisfying option for meat lovers.

  • Tofu Delight: For a plant-based alternative, swap in firm tofu slices. Marinating the tofu in soy sauce prior to grilling enhances its taste and allows the dressing to add an extra kick.

  • Balsamic Bliss: Substitute apple cider vinegar with balsamic vinegar for a deeper, sweeter flavor. This unique twist enriches the dressing and pairs beautifully with both fish and chicken.

  • Flavorful Herbs: Boost the dressing by adding fresh dill or basil along with the parsley. The additional herbs create a delightful flavor profile reminiscent of a summer garden.

  • Veggie Platter: Introduce colorful seasonal vegetables, like roasted asparagus or cherry tomatoes, to the side. They add freshness and nutrition while perfectly complementing the fish and dressing.

  • Spicy Kick: Incorporate a diced jalapeño or a pinch of red pepper flakes into the dressing for a delightful heat. This little twist can elevate your dish to new flavor heights!

  • Citrus Burst: Add freshly squeezed lemon or lime juice to the dressing for a zesty brightness that enhances the overall flavor. This refreshing touch is ideal for those who love a citrusy zing!

  • Nutty Richness: Top the finished dish with toasted pine nuts or sunflower seeds. Their crunch provides a delightful textural contrast and a nutritious boost to your meal.

Explore unique flavor profiles and transform your dish into something extraordinary! You might also enjoy pairing this with a side of refreshing cucumber and carrot salad to brighten your table.

How to Store and Freeze Grilled Fish with Caper and Red Onion Dressing

Fridge: Store any leftover grilled fish in an airtight container for up to 2 days. To maintain its delicious flavor, drizzle a little dressing over it before sealing.

Freezer: If you’ve made extra fish, it can be frozen for up to 3 months. Wrap each piece tightly in plastic wrap and then place in a freezer-safe bag, removing as much air as possible.

Dressing: The zesty dressing can be made ahead and refrigerated for up to a week in a sealed jar. Shake well before using as the ingredients may separate.

Reheating: When ready to enjoy, thaw the fish in the fridge overnight, then reheat gently in a preheated oven or skillet until warmed through. Serve with fresh dressing for best flavor.

What to Serve with Best Fresh Fish with Zesty Dressing

Transforming a simple dish into a full culinary experience is a delightful journey for the senses.

  • Crusty Bread: This warm, freshly baked bread is perfect for soaking up the vibrant dressing, adding a satisfying texture to your meal.

  • Mixed Green Salad: A crisp salad with lemon vinaigrette offers a fresh contrast, enhancing the fish’s flavors without overpowering them.

  • Roasted Seasonal Vegetables: Their caramelized sweetness pairs beautifully with the zesty dressing, adding depth and color to your plate. Try incorporating carrots, asparagus, and bell peppers.

  • Quinoa Pilaf: This nutty, protein-rich side not only offers a hearty bite but also soaks up the dressing wonderfully, enhancing each mouthful.

  • Crispy Potato Wedges: The fluffy interior and golden skin of roasted potatoes create a comforting contrast to the delicate fish, making it a satisfying companion.

  • Glass of Sauvignon Blanc: A chilled Sauvignon Blanc, with its crisp acidity and fruit notes, complements the fish and dressing beautifully, making every sip a refreshing pause.

  • Lemon Sorbet: A light, refreshing dessert that echoes the citrus notes of the dish, cleansing your palate with every bite.

Tips for the Best Grilled Fish with Caper and Red Onion Dressing

  • Fresh Fish Matters: Always opt for the freshest fish when making this recipe. Frozen fish can lead to a mushy texture and less flavor.
  • Room Temperature: Let the fish sit out for about 15-30 minutes before cooking. This helps achieve even cooking and prevents a cold center.
  • Perfect Seasoning: Don’t be shy with salt and pepper. Proper seasoning enhances the flavor of the fish and the dressing for a more vibrant dish.
  • Watch the Cooking Time: Avoid overcooking your fish! Cook until it’s golden and flakes easily; this usually takes 3-4 minutes per side.
  • Resting is Key: After cooking, let the fish sit for 15 minutes before serving. This allows the flavors from the Grilled Fish with Caper and Red Onion Dressing to meld beautifully.

Grilled Fish with Caper and Red Onion Dressing Recipe FAQs

How do I choose fresh fish?
Absolutely! The best way to select fresh fish is to look for clear, bright eyes, moist and shiny skin, and a mild ocean-like aroma. If you notice any dark spots or strong odors, it’s best to pass on that fish. Firm flesh that bounces back when pressed is also a good indicator of freshness.

What’s the best way to store leftover grilled fish?
You can store any leftover grilled fish in an airtight container in the refrigerator for up to 2 days. To retain its delightful flavor, drizzle a little of your zesty dressing over the fish before sealing the container. This helps keep it moist and flavorful!

Can I freeze grilled fish and the dressing?
Yes! If you’ve made extra fish, it can be frozen for up to 3 months. To do this, wrap each piece tightly in plastic wrap, then place them in a freezer-safe bag, removing as much air as possible. As for the dressing, it can be made ahead and stored in the fridge for up to a week in a sealed jar. Just give it a good shake before use!

What should I do if the fish is overcooked?
Very! If you accidentally overcook the fish, try adding a drizzle of olive oil or some of the dressing on top to help bring moisture back. This can enhance flavor and texture. Remember to watch the cooking time closely, as fish typically cooks quickly—3 to 4 minutes per side!

Is this dish suitable for my kids/pets?
The grilled fish is a nutritious option for kids; just ensure any seasoning is suitable for their tastes. Be cautious with pets as some ingredients (like garlic and onions in large quantities) are harmful to them. It’s always best to keep their meals simple and plain.

How do I make the dressing ahead of time?
Absolutely! To make the dressing ahead, simply whisk together 1/4 cup of olive oil, 2 tablespoons of apple cider vinegar, 2 cloves of crushed garlic, and season generously with salt and pepper. Fold in the capers, red onion, and parsley, and store it in a sealed jar in the fridge for up to a week. Shake well before serving, as the ingredients may separate. Enjoy your delicious Grilled Fish with Caper and Red Onion Dressing!

Grilled Fish with Caper and Red Onion Dressing

Grilled Fish with Caper and Red Onion Dressing Delight

This Grilled Fish with Caper and Red Onion Dressing combines fresh flavors and healthy ingredients for a delightful dining experience.
Prep Time 15 minutes
Cook Time 15 minutes
Resting Time 15 minutes
Total Time 45 minutes
Servings: 4 servings
Course: Dinner
Cuisine: American
Calories: 300

Ingredients
  

For the Dressing
  • 1/4 cup Olive Oil Provides richness and helps achieve a perfect grilled texture.
  • 2 tablespoons Apple Cider Vinegar Adds a bright acidity that balances the flavors of the dressing.
  • 2 cloves Garlic Use crushed garlic to unleash its aromatic oils and robust flavor.
  • Sea Salt & Ground Pepper Essential for seasoning both the fish and the dressing.
  • 2 tablespoons Capers Adds a briny kick; rinse well if salt-packed for optimal taste.
  • 1/4 Red Onion Offers a sharp yet sweet profile, enhancing the dressing's complexity.
  • Parsley A fresh herb that brightens the dressing, creating a flavor contrast.
For the Fish
  • 750 grams Fish Fillets Choose your favorite fresh catch for optimal taste. Any firm white fish like cod, snapper, or salmon works wonderfully.

Equipment

  • large sauté pan
  • mixing bowl

Method
 

Step-by-Step Instructions
  1. Prepare the Dressing: In a medium mixing bowl, whisk together olive oil, apple cider vinegar, and crushed garlic until well combined. Season with salt and pepper to taste. Fold in rinsed capers, red onion, and parsley. Set aside.
  2. Cook the Fish: Heat a large sauté pan over medium-high heat with olive oil and butter. Season fish fillets with salt and pepper, and cook for 3-4 minutes per side until golden.
  3. Drain & Serve: Transfer the cooked fish to a plate lined with kitchen towels. Spoon the dressing over the fish and let it rest for 15 minutes before serving.

Notes

For best results, use fresh fish and let it sit at room temperature before cooking. Proper seasoning enhances flavor, and resting allows the dish to harmonize beautifully.

Savory Croque Madame Waffles for an Unforgettable Brunch

As I sat in a charming Parisian café, I couldn’t help but be captivated by the irresistible aroma wafting from the kitchen—freshly cooked Croque Madame sandwiches served with a flourish. This inspired me to recreate that delightful experience in my own home, leading to the birth of my Croque Madame Waffles! These savory brunch gems transform the classic French dish into a fluffy waffle format, layered with smoky ham, melted Gruyère cheese, and a drizzle of creamy Dijon béchamel. They’re not just quick to whip up; they’re also perfect for impressing guests or indulging in a fancy breakfast-for-dinner. Trust me, the combination of flavors and textures will leave everyone craving more! Are you ready to add a touch of French flair to your next brunch? Let’s dive into this delectable recipe together!

Why Are Croque Madame Waffles So Special?

Deliciously Unique: These Croque Madame Waffles bring a gourmet twist to your brunch table, combining the satisfying crunch of waffles with rich, savory flavors.

Elevated Comfort Food: The blend of smoky ham, creamy béchamel, and gooey Gruyère creates a dish that’s comfort food with a touch of elegance.

Quick and Easy: Perfect for those busy mornings or fancy gatherings, this recipe requires minimal prep time with maximum flavor impact.

Crowd Pleaser: Whether you’re serving family or hosting friends, everyone will be delighted by these heartwarming waffles, making them the star of any meal.

Customizable Options: Feel free to swap ingredients like ham for crispy bacon or add veggies for a unique spin—endless possibilities await! If you love brunch, consider pairing these waffles with a refreshing side of fresh fruit for balance.

Croque Madame Waffles Ingredients

For the Béchamel Sauce

  • Butter – Adds richness for both the béchamel sauce and waffle batter; substitute with margarine or a plant-based butter for dairy-free.
  • All-Purpose Flour – Provides structure to the béchamel; whole wheat flour can be used for a healthier option.
  • Whole Milk – Necessary for a creamy béchamel sauce; almond milk can be a substitute in a dairy-free version.
  • Dijon Mustard – Adds a tangy kick to the béchamel; mustard powder can serve as an alternative.
  • Salt – Enhances all flavors; adjust to taste.

For the Waffle Batter

  • Baking Powder – Essential for waffle rise; do not substitute with baking soda without adjusting ingredients.
  • Eggs – Used in both the waffles and for poaching; can replace with flax eggs for a vegan option.
  • All-Purpose Flour – Provides the base for the waffle; ensure to measure accurately for best results.
  • Whole Milk – Important for a light and fluffy waffle texture; dairy-free options can include almond milk.
  • Melted Butter – Adds moisture and flavor; margarine may be used as a substitute.

For the Savory Filling

  • Shaved Ham – Provides savory flavor and protein; turkey or plant-based deli slices can be substituted.
  • Gruyère Cheese – Offers a rich, nutty flavor; substitute with Swiss or cheddar cheese as needed.
  • Chives – Optional garnish for added flavor and freshness; you may also use parsley or scallions for a different twist.

Make these savory Croque Madame Waffles the highlight of your brunch table—your family and friends will be begging for the recipe!

Step‑by‑Step Instructions for Croque Madame Waffles

Step 1: Make the Béchamel Sauce
In a medium saucepan, melt 2 tablespoons of butter over medium heat. Whisk in 2 tablespoons of flour and cook for about 1 minute, stirring continuously until it forms a paste. Gradually add 1 cup of whole milk, whisking until the mixture thickens and bubbles, around 5 minutes. Stir in 1 tablespoon of Dijon mustard, sprinkle with salt and pepper to taste, then remove from heat.

Step 2: Prepare the Waffle Batter
Preheat your waffle maker according to the manufacturer’s instructions. In a large mixing bowl, whisk together 1 ½ cups of all-purpose flour, 1 tablespoon of baking powder, and ½ teaspoon of salt. In another bowl, beat 2 eggs with 1 cup of milk and 2 tablespoons of melted butter. Combine both mixtures, stirring until just combined, then fold in 1 cup of shaved ham and 1 cup of grated Gruyère cheese.

Step 3: Cook the Waffles
Lightly grease the preheated waffle maker with cooking spray or butter. Pour approximately ¾ cup of the waffle batter onto the center of the waffle maker, spreading it slightly towards the edges. Close the lid and cook for about 4-5 minutes or until the waffles are golden brown and crisp. Carefully remove them and keep warm while you finish cooking the remaining batter.

Step 4: Assemble the Croque Madame Waffles
Once the waffles are cooked, place them on a lined baking tray. Generously spoon the prepared béchamel sauce over each waffle, ensuring an even distribution. Top with additional slices of ham and a sprinkle of Gruyère cheese. Broil in the oven for 2-3 minutes, or until the cheese is bubbly and golden.

Step 5: Finish with Poached Eggs
While the waffles are broiling, prepare poached eggs by simmering water in a saucepan. Crack each egg into individual ramekins, then gently slide them into the simmering water. Poach for about 3-4 minutes until the whites are set but yolks remain runny. Remove with a slotted spoon, allowing any excess water to drain before placing one poached egg atop each assembled Croque Madame Waffle. Garnish with fresh chives if desired.

Make Ahead Options

These Savory Croque Madame Waffles are perfect for meal prep enthusiasts! You can prepare the béchamel sauce and waffle batter up to 24 hours in advance to save time on busy mornings. Simply store the béchamel in an airtight container in the refrigerator and reheat it gently over low heat before serving. The waffle batter can also be mixed and refrigerated, but be sure to stir it well before cooking to maintain the texture. When you’re ready to enjoy your delicious Croque Madame Waffles, just cook the waffles in the preheated maker, top them with the warmed béchamel and ham, then finish under the broiler for that bubbly, golden perfection. Trust me, this prep will have you savoring a gourmet breakfast in no time!

Croque Madame Waffles Variations

Feel free to get creative with your Croque Madame Waffles and make them truly your own!

  • Crispy Bacon: Substitute ham for crispy bacon to add a smoky crunch. The added texture will elevate each bite.
  • Gouda Bliss: Swap Gruyère for Gouda cheese for a slightly sweeter, creamier flavor. This twist adds a delightful richness to the dish.
  • Vegetarian Delight: Incorporate sautéed spinach or mushrooms into the batter for added flavor and nutrients. This gives a fresh touch while maintaining the savory profile.
  • Whole Wheat Waffles: Use whole wheat flour instead of all-purpose flour for a healthier option. It’ll give your waffles a nutty flavor and a hearty texture.
  • Spicy Kick: Add a pinch of cayenne pepper or your favorite hot sauce to the béchamel for a little heat. It’s a delicious way to tantalize your taste buds.
  • Herbed Goodness: Mix in fresh herbs like thyme or parsley into the waffle batter for an aromatic twist. It will make your dish feel even more gourmet!
  • Egg-less Version: Opt for flax eggs instead of real eggs for a vegan take. This substitution works perfectly while keeping the waffles fluffy.
  • Béchamel Variants: Replace Dijon mustard with spicy brown mustard for a bolder flavor in the béchamel. It adds an interesting dimension to the sauce.

With these variations, you’ll never tire of this delicious recipe! And for a well-rounded meal, serve your waffles alongside some fresh fruit or a crisp side salad for a delightful brunch experience.

What to Serve with Savory Croque Madame Waffles?

Delight in a complete brunch experience with perfectly paired dishes that elevate your savory masterpiece!

  • Fresh Fruit Salad:
    Bright, juicy fruits add a refreshing contrast to the rich waffles, balancing flavors beautifully. Combine berries, melons, and citrus for a vibrant, healthful side.

  • Crispy Green Salad:
    A light, peppery arugula salad with a tangy vinaigrette complements the savory richness of the waffles. Add cucumber and cherry tomatoes for extra crunch.

  • Roasted Asparagus:
    The earthy flavor of roasted asparagus with a sprinkle of lemon zest adds a touch of brightness. It’s a lovely way to incorporate some greens into your meal.

  • Breakfast Potatoes:
    Golden, crispy potatoes seasoned with herbs bring a hearty texture that rounds out your brunch. Pair them with a sprinkle of fresh chives for an elegant touch.

  • Mimosas or Bellinis:
    These fizzy cocktails enhance the brunch vibe, offering a bubbly contrast to your savory waffles. The fruity sweetness pairs deliciously with the creamy béchamel.

  • Chocolate Croissant:
    For a sweet finale, serve flaky chocolate croissants on the side. Their indulgent richness balances the savory elements while satisfying your sweet tooth.

  • Chilled Cucumber Soup:
    A refreshing cucumber soup adds a light, cool counterpoint to the hearty waffles. Its smooth texture and subtle flavors are perfect for a multi-course brunch.

  • Savory Yogurt Parfait:
    Layer yogurt with granola and fresh herbs for a creamy, crunchy treat. The tanginess of yogurt harmonizes beautifully with the waffles, creating a delightful flavor medley.

How to Store and Freeze Croque Madame Waffles

Fridge: Store leftover Croque Madame Waffles in an airtight container for up to 3 days. Reheat in a toaster or oven for a delightful crispy texture.

Freezer: Freeze waffles individually in plastic wrap or airtight bags for up to 2 months. To reheat, bake directly from frozen until warmed through and crisp.

Béchamel Sauce: If you have extra béchamel, it can be stored in the fridge for up to 5 days. Reheat gently on the stove, whisking to restore creaminess.

Poached Eggs: Best enjoyed fresh, but if prepared in advance, gently reheat poached eggs in hot water for a minute before serving to keep the yolks runny.

Expert Tips for Croque Madame Waffles

  • Béchamel Basics: Keep whisking the béchamel sauce continuously to avoid browning and ensure a creamy texture that complements the waffles perfectly.

  • Waffle Crispiness: Adjust cooking times based on your waffle maker settings; aim for golden brown waffles that are crisp on the outside yet fluffy inside.

  • Egg Poaching Ease: Use an egg poaching pan for hassle-free poached eggs without messy water, ensuring a beautiful presentation atop your Croque Madame Waffles.

  • Choosing Cheese: While Gruyère cheese is recommended for its rich flavor, feel free to experiment with Swiss or cheddar for delightful variations.

  • Savory Fillings: Swap ham for crispy bacon or turkey for a different savory twist—get creative with your favorite ingredients to personalize your waffles!

  • Serve Fresh: Enjoy Croque Madame Waffles fresh for the best flavor and texture. If you have leftovers, store them in the refrigerator and reheat in a toaster.

Croque Madame Waffles Recipe FAQs

How do I know if my ingredients are ripe or fresh?
For the best flavor and texture, ensure your eggs are fresh—check the sell-by date on the carton, or do the float test in a bowl of water. Fresh eggs sink while older ones float. When selecting cheese, look for a smooth, creamy texture without dark spots or mold—trust your senses!

What’s the best way to store leftover Croque Madame Waffles?
Store your leftover waffles in an airtight container in the fridge for up to 3 days. For reheating, pop them in a toaster or a preheated oven at 350°F (175°C) for about 5-7 minutes until they’re warm and crispy again. Reheating in this manner keeps them delightful!

Can I freeze Croque Madame Waffles? How?
Absolutely! To freeze, wrap each waffle individually in plastic wrap and place them in airtight bags or containers. They can be stored for up to 2 months. When you’re ready to enjoy, bake them straight from frozen at 375°F (190°C) for about 10-15 minutes until heated through and crisp.

What if my béchamel sauce is too thick or lumpy?
If your béchamel sauce becomes too thick, you can thin it by gradually whisking in a bit more milk over low heat until you reach the desired consistency. If it’s lumping, simply whisk continuously over low heat, and it should smooth out as it warms. Just remember, patience is key!

Are there any dietary considerations I should keep in mind?
Yes! If you’re making Croque Madame Waffles for someone with allergies, be sure to swap any allergenic ingredients—like using gluten-free flour or dairy-free milk alternatives. For your furry friends, it’s best to avoid sharing any of the waffles since ingredients like heavy cheese and rich sauces can upset their stomachs.

How do I achieve perfectly poached eggs?
For perfectly poached eggs, bring a pot of water to a gentle simmer (not a rolling boil). Crack each egg into a small bowl first. Create a gentle whirlpool in the water using a spoon, then carefully slide the egg into the center. Poach for about 3-4 minutes until the whites are set but the yolk remains runny. Use a slotted spoon to lift them out, letting any excess water drain off. Enjoy your beautiful creation on top of your Croque Madame Waffles!

Croque Madame Waffles

Savory Croque Madame Waffles for an Unforgettable Brunch

These Croque Madame Waffles combine savory ham, melted Gruyère, and creamy béchamel for a brunch experience that elevates the classic French dish.
Prep Time 15 minutes
Cook Time 20 minutes
Poaching Time 4 minutes
Total Time 39 minutes
Servings: 4 waffles
Course: Breakfast
Cuisine: French
Calories: 450

Ingredients
  

Béchamel Sauce
  • 2 tablespoons Butter Substitute with margarine or plant-based butter for dairy-free
  • 2 tablespoons All-Purpose Flour Whole wheat flour can be used for healthier option
  • 1 cup Whole Milk Almond milk can be a substitute for dairy-free version
  • 1 tablespoon Dijon Mustard Mustard powder can serve as an alternative
  • to taste Salt Adjust to taste
Waffle Batter
  • 1 tablespoon Baking Powder Essential for waffle rise
  • 2 Eggs Can replace with flax eggs for vegan option
  • 1.5 cups All-Purpose Flour Ensure to measure accurately
  • 1 cup Whole Milk Dairy-free options can include almond milk
  • 2 tablespoons Melted Butter Margarine may be used as a substitute
Savory Filling
  • 1 cup Shaved Ham Turkey or plant-based deli slices can be substituted
  • 1 cup Gruyère Cheese Substitute with Swiss or cheddar cheese as needed
  • to taste Chives Optional garnish; can also use parsley or scallions

Equipment

  • waffle maker
  • Medium saucepan
  • mixing bowls
  • whisk
  • slotted spoon

Method
 

Béchamel Sauce
  1. In a medium saucepan, melt butter over medium heat. Whisk in flour and cook for about 1 minute, stirring continuously until a paste forms.
  2. Gradually add whole milk, whisking until the mixture thickens and bubbles, around 5 minutes.
  3. Stir in Dijon mustard, sprinkle with salt and pepper to taste, then remove from heat.
Waffle Batter
  1. Preheat your waffle maker according to manufacturer's instructions.
  2. In a large mixing bowl, whisk together flour, baking powder, and salt.
  3. In another bowl, beat eggs with milk and melted butter. Combine both mixtures, stirring until just combined.
  4. Fold in shaved ham and grated Gruyère cheese.
Cooking Waffles
  1. Lightly grease preheated waffle maker. Pour approximately ¾ cup of waffle batter onto the center of the waffle maker.
  2. Close the lid and cook for about 4-5 minutes or until waffles are golden brown and crisp. Remove and keep warm while finishing remaining batter.
Assembling
  1. Place cooked waffles on a lined baking tray, spoon béchamel sauce over each waffle.
  2. Top with additional slices of ham and sprinkle with Gruyère cheese. Broil in the oven for 2-3 minutes, until cheese is bubbly and golden.
Finishing Touch
  1. Prepare poached eggs by simmering water in a saucepan. Crack each egg into ramekins and gently slide them into simmering water.
  2. Poach for about 3-4 minutes until whites are set but yolks remain runny. Place one poached egg atop each assembled waffle.
  3. Garnish with fresh chives if desired.

Notes

Enjoy Croque Madame Waffles fresh for best flavor and texture. Leftovers can be reheated in a toaster.