Chewy Ube Rice Krispies Treats You’ll Love to Make

As I stood in my kitchen, the sweet aroma of melting marshmallows enveloped me, instantly transporting me back to carefree childhood days filled with laughter and creativity. Today, I’m sharing my take on Ube Rice Krispies Treats, a delightful twist on the beloved classic that introduces a stunning pop of purple and a unique flavor profile inspired by Filipino culture. This easy, no-bake dessert requires just six simple ingredients, making it a perfect activity for those busy weeknights or a fun project with the kids. Not only are these treats a showstopper at gatherings, but they also whip up in a flash—ideal for satisfying any sweet tooth craving without the fuss. Ready to fill your kitchen with magic? Let’s dive into the recipe!

Why are Ube Rice Krispies Treats special?

Unique Flavor: The delightful essence of ube elevates these treats, offering a sweet, earthy taste that distinguishes them from traditional Rice Krispies treats.

No-Bake Convenience: With no baking required, you can whip up these delicious snacks in no time—perfect for busy moments or impromptu gatherings.

Alluring Color: The vibrant purple hue is not just eye-catching but also makes these treats a hit at parties, adding a splash of visually stunning fun to any table.

Fun Activity: Making these treats is a fantastic way to engage kids in the kitchen, turning cooking into a creative and memorable bonding experience.

Endless Creativity: Feel free to customize your treats! Use cookie cutters for celebrations or experiment with different extracts to suit your taste; they’ll be crowd-pleasers no matter the occasion.

Indulge your sweet tooth with more inventive ideas like our delightful Sizzling Rice Wrapped treat for a unique culinary experience!

Ube Rice Krispies Treat Ingredients

For the Treats
Unsalted Butter – Provides richness and helps bind the mixture; opt for salted for extra flavor.
Large or Jumbo Marshmallows – Create that gooey texture; mini marshmallows can work in their place if you prefer.
Ube Extract – Gives your treats a unique ube flavor; be cautious not to add too much to avoid bitterness—stick to 1 tablespoon.
Salt – Enhances overall flavor balance, making each bite more delicious.
Rice Krispies Cereal – Acts as the primary structure giving the treats their crispy texture; roughly 9 cups are needed.
Mini Marshmallows – Adds extra chewiness and visual appeal; these are optional but highly recommended for that delightful bite.

Prepare to enjoy the irresistible charm of these Ube Rice Krispies Treats; they’ll surely become a family favorite!

Step‑by‑Step Instructions for Ube Rice Krispies Treats

Step 1: Prepare the Baking Dish
Begin by greasing a 9×13-inch baking dish with butter or nonstick spray to ensure easy removal of your Ube Rice Krispies Treats later. Set the dish aside while you prepare the marshmallow mixture. A well-greased surface will help the treats come out beautifully without sticking.

Step 2: Melt the Butter
In a large microwave-safe bowl, add 4 tablespoons of unsalted butter. Microwave on high for about 1 minute, or until the butter is fully melted. To ensure the perfect consistency, check every 10 seconds after the first minute to avoid overcooking. The melted butter will create a smooth base for your marshmallow mixture.

Step 3: Soften the Marshmallows
Next, add 10 cups of large marshmallows to the melted butter in the bowl. Return the bowl to the microwave and heat for 2 minutes on high. Keep an eye on the mixture, as the marshmallows should soften significantly but not completely melt. This softening is crucial for achieving the right gooey texture in your Ube Rice Krispies Treats.

Step 4: Mix in Ube Extract and Salt
Once the marshmallows have softened, carefully remove the bowl from the microwave. Stir in 1 tablespoon of ube extract and a pinch of salt. Mix until you achieve a smooth, homogeneous mixture. This step is vital to incorporate the unique flavor of ube and enhance the overall taste of your treats.

Step 5: Fold in the Rice Krispies
Now, gradually fold in approximately 9 cups of Rice Krispies, adding them in 2-cup increments. Gently stir with a spatula until the cereal is fully coated and evenly mixed with the marshmallow mixture. This folding technique ensures each piece of cereal is well-coated, contributing to the delightful chewiness of your Ube Rice Krispies Treats.

Step 6: Add Mini Marshmallows
If desired, incorporate 1 to 2 cups of mini marshmallows into the mixture. Stir these in gently to avoid breaking them up. Incorporating mini marshmallows adds extra chewiness and a delightful texture to your Ube Rice Krispies Treats, making them even more enjoyable.

Step 7: Transfer and Press the Mixture
Using slightly greased hands or a spatula, transfer the mixture into your prepared baking dish. Press it down gently but evenly to fill the dish, taking care not to compress it too much. This step ensures that the treats stay light and airy while holding together beautifully once set.

Step 8: Let Set and Slice
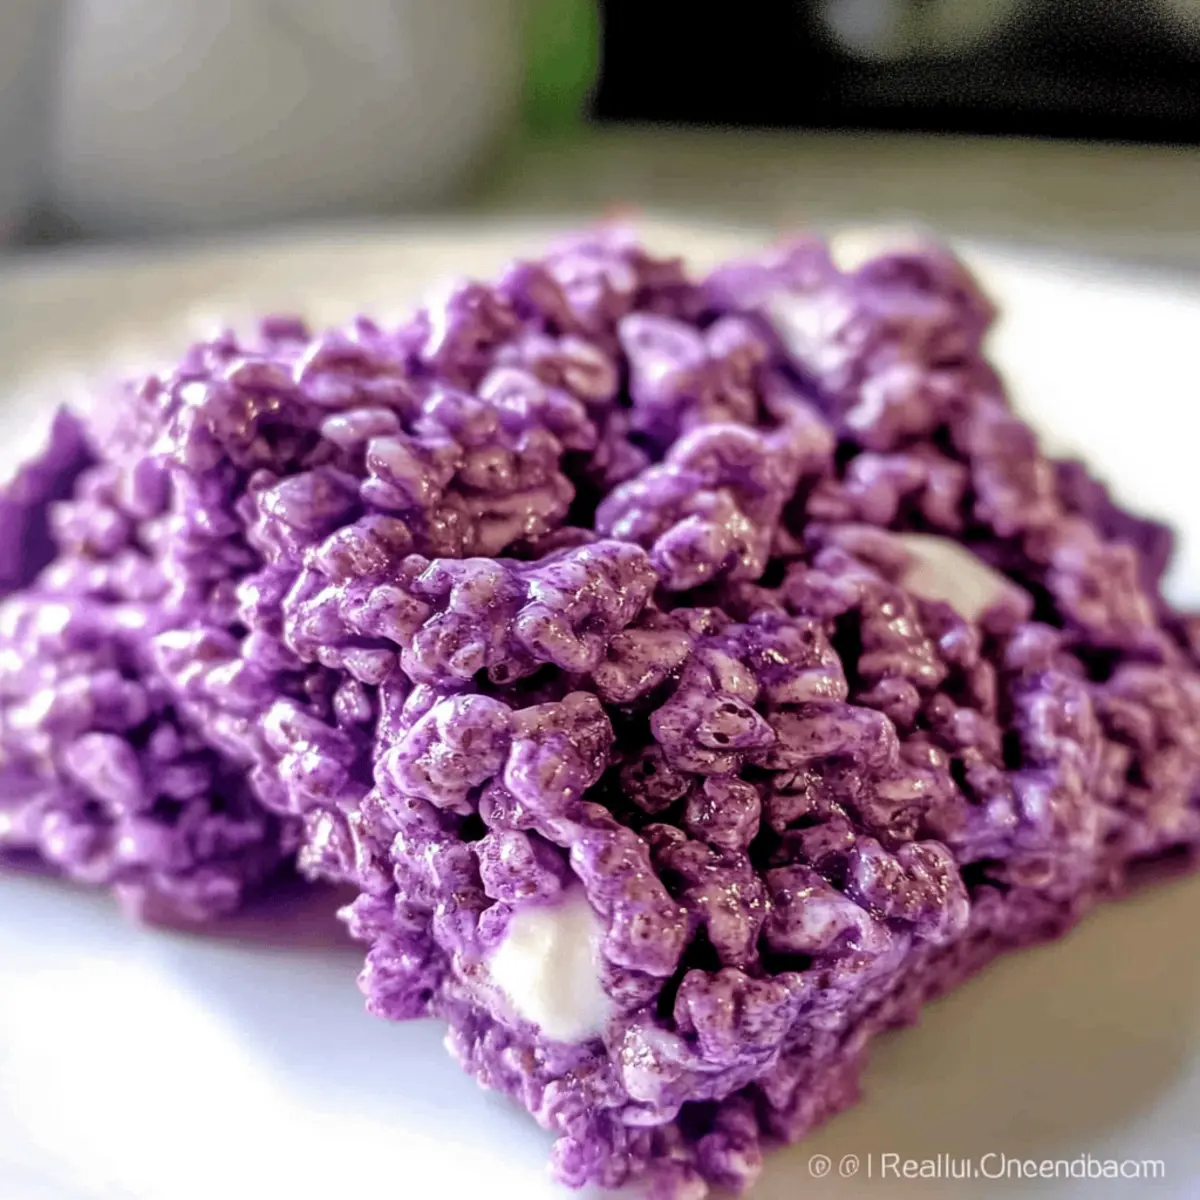
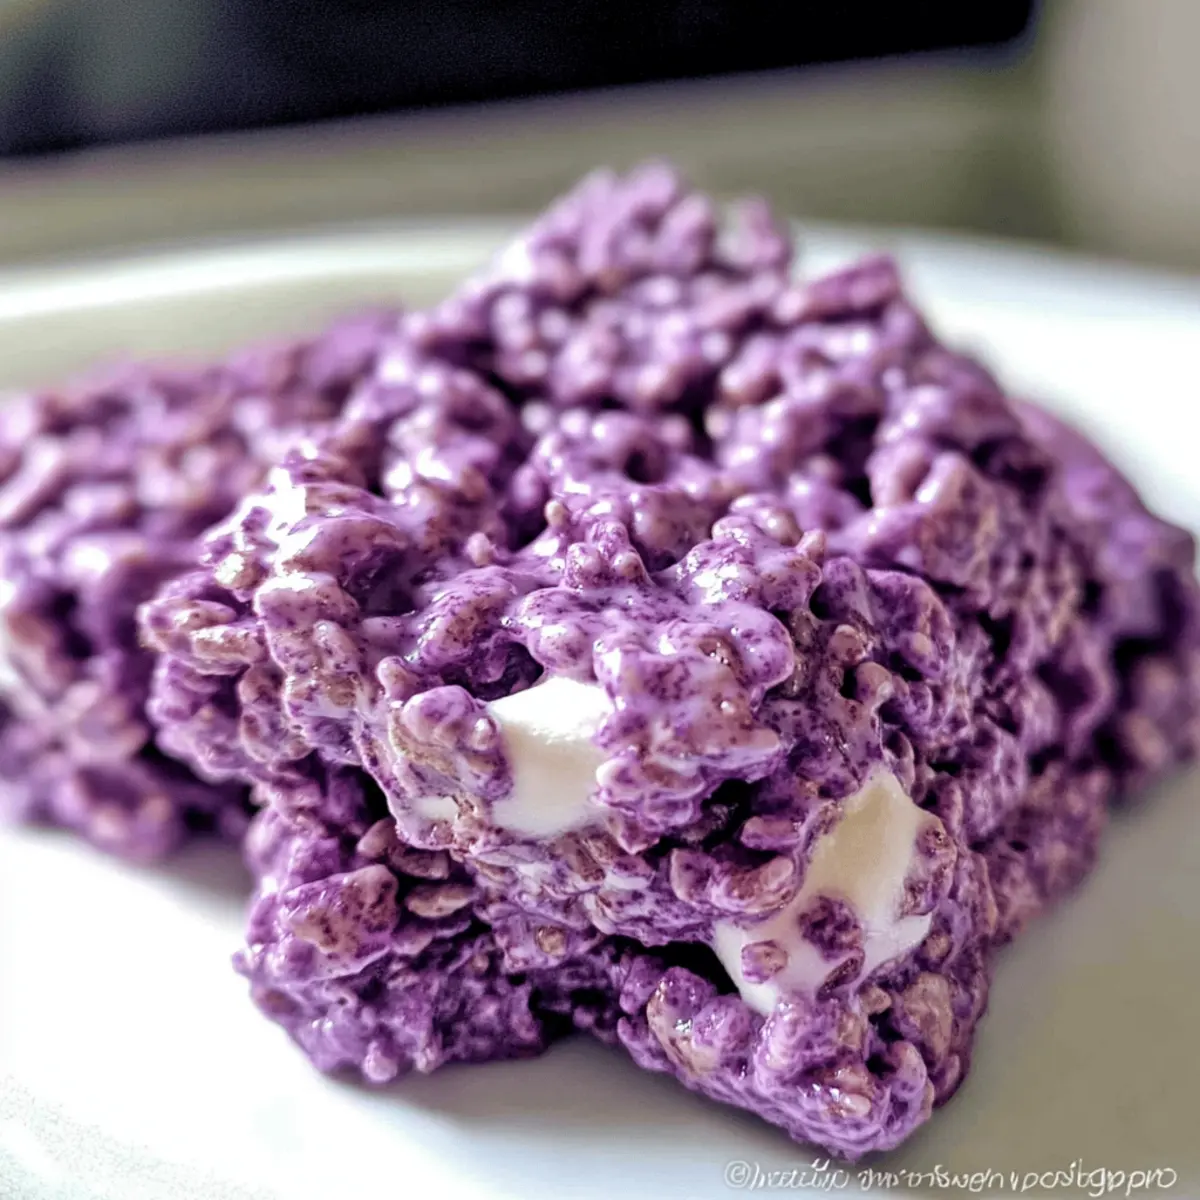
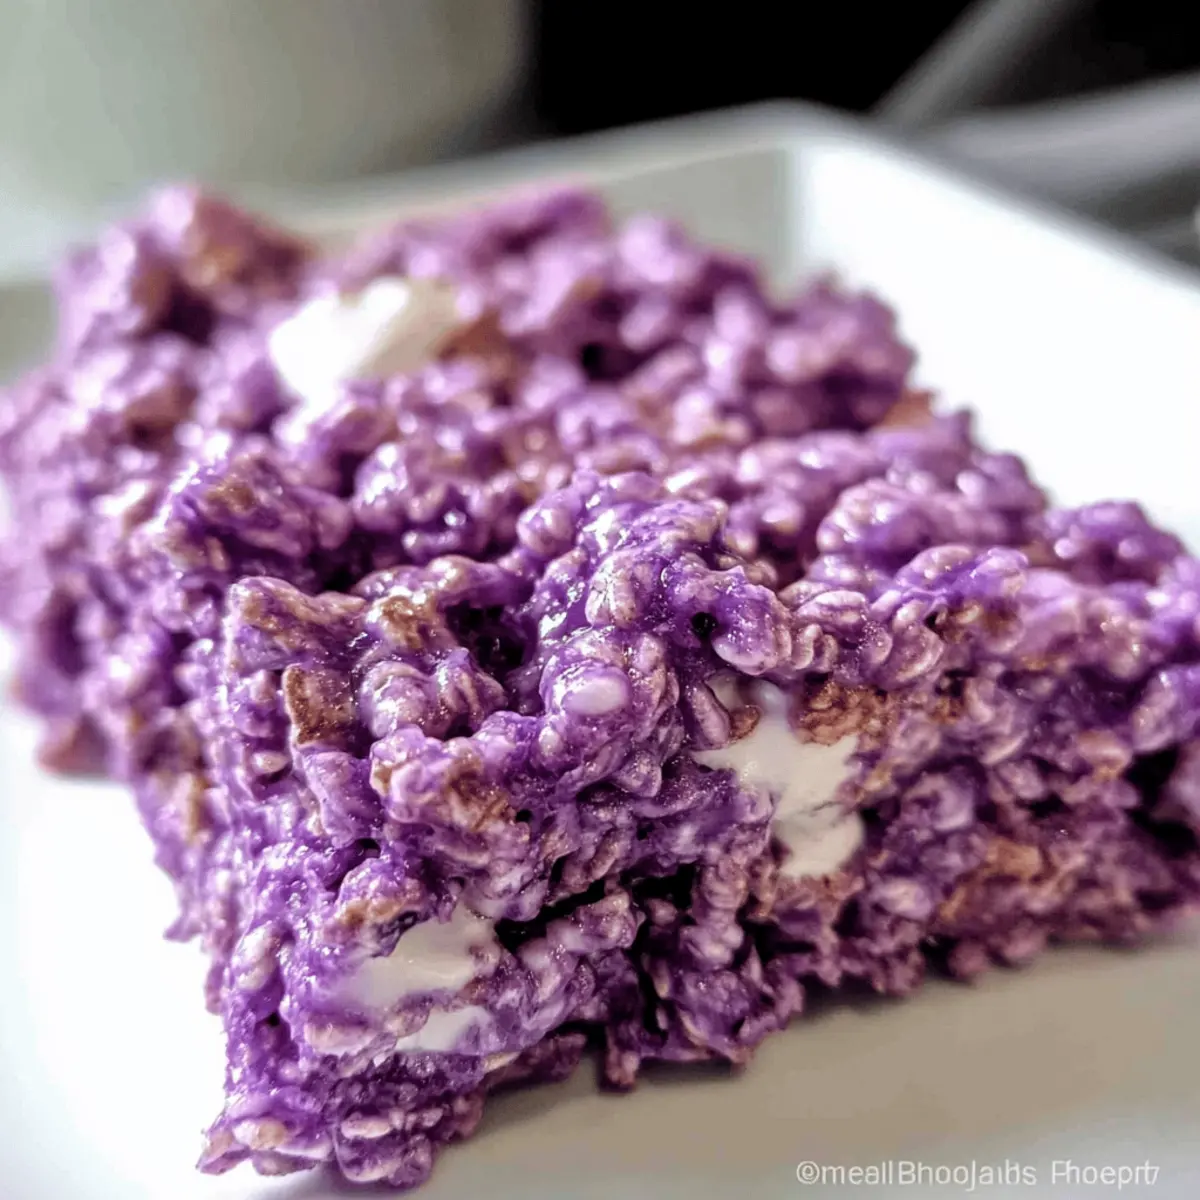
Allow the Ube Rice Krispies Treats to cool at room temperature for at least 1 hour. Once they have set, use a sharp knife to slice them into squares or rectangles. Enjoy the vibrant purple color and unique flavor as you serve these delightful treats, perfect for any occasion!

Ube Rice Krispies Treat Variations

Feel free to sprinkle your own creativity into these treats for a delightful twist everyone will love!

  • Extract Swaps: Use vanilla or coconut extract for a different flavor adventure without losing the signature chewy texture.

  • Color Boost: Mix in a few drops of food coloring alongside the ube extract. This is a fun way to create a layered or marble effect for special occasions.

  • Nutty Addition: Stir in 1 cup of finely chopped nuts like almonds or walnuts for an added crunch that perfectly complements the chewy marshmallow base.

  • Coconut Flakes: Toss in cup of sweetened coconut flakes for an exotic twist that enhances the Filipino essence of these treats. The tropical flavor of coconut pairs wonderfully with ube.

  • Fruit Fun: Incorporate dried or freeze-dried fruits, like mango or strawberries, for a burst of flavor and color as you enjoy these treats. These fruits offer a refreshing balance of sweetness!

  • Themed Shapes: Use cookie cutters for various holidays or events, transforming these treats into festive shapes! It’s a simple way to elevate them for parties or celebrations.

  • Spicy Kick: Add a pinch of red chili flakes or cayenne pepper to the marshmallow mixture for a surprising yet delightful heat that complements the sweetness.

Infuse your Ube Rice Krispies Treats with a twist of creativity, and don’t forget to try more unique treats like our Sizzling Rice Wrapped. It’s all about crafting delicious moments in the kitchen!

How to Store and Freeze Ube Rice Krispies Treats

Room Temperature: Store your Ube Rice Krispies Treats in a covered container at room temperature for up to 5 days. This keeps them chewy and delicious.

Avoid Refrigeration: Refrigerating these treats can alter their texture, making them tough and less enjoyable. Keep them out of the fridge for optimal results.

Freezer Tips: If you need to freeze them, wrap the treats tightly in plastic wrap and store in an airtight container for up to 2 months. Thaw at room temperature before serving.

Reheating: If they become too firm after freezing, gently reheat in the microwave for a few seconds to soften before enjoying.

Expert Tips for Ube Rice Krispies Treats

Perfect Marshmallow Texture: Ensure your marshmallows are just softened; overheating can cause a hard mixture, ruining the chewy consistency.

Fresh is Best: Use fresh marshmallows for the best texture. Stale marshmallows can make your Ube Rice Krispies Treats tough and chewy instead of delightful.

Gentle Pressing: Avoid pressing the mixture too firmly into the dish; light pressure helps keep the treats airy. Aim for a gentle, even spread for perfect results.

Use a Greased Spatula: A greased spatula or spoon makes mixing easier, ensuring every Rice Krispie gets coated with that delicious ube marshmallow mixture.

Room Temperature Setting: Allow the treats to set at room temperature for an hour—don’t rush this step, as chilling can affect the texture.

Make Ahead Options

These Ube Rice Krispies Treats are a fantastic option for meal prep, allowing you to savor delicious homemade treats without all the last-minute fuss! You can prepare the marshmallow mixture and fold in the Rice Krispies up to 24 hours in advance, storing it in an airtight container at room temperature to maintain the perfect chewy texture. When you’re ready to serve, simply press the mixture into your greased baking dish and let it set for about an hour. This way, you’ll have delightful, fresh Ube Rice Krispies Treats that are just as tasty as if they were made that day, perfect for surprising your family or guests with a charming dessert anytime!

What to Serve with Ube Rice Krispies Treats

Indulging in the delightful sweetness of these chewy treats is just the beginning of your culinary adventure!

  • Tropical Fruit Salad: A refreshing mix of pineapple, mango, and kiwi adds a vibrant touch, balancing the sweetness of the treats.
  • Coconut Whipped Cream: Light and airy, this creamy topping enhances the ube flavor while adding a luscious texture for the perfect dip.
  • Sticky Rice with Mango: This classic Filipino dessert brings a comforting, chewy counterpart that complements the flavors of ube beautifully.
  • Filipino Iced Coffee: A smooth blend of rich coffee and sweetened condensed milk offers a delightful contrast, elevating the overall tasting experience.
  • Chocolate-Dipped Strawberries: Juicy and sweet, these berries provide a fresh burst of flavor, pairing beautifully with the ube’s earthy notes.
  • Mango Float: A sweet and creamy dessert featuring layers of mango and whipped cream harmonizes perfectly with the chewy texture of the treats.
  • Lemonade Spritzer: A bubbly, citrusy drink cuts through the sweetness, refreshing your palate with every sip.
  • Chocolate Chia Pudding: This decadent dessert, rich in fiber and flavor, offers a unique twist while providing a slightly healthy indulgence.
  • Popular Filipino Puto: These steamed rice cakes taste wonderful alongside your treats, providing a classic taste of Filipino cuisine that guests will love.

Ube Rice Krispies Treats Recipe FAQs

How do I choose ripe ube for this recipe?
When selecting ube, look for firm tubers without dark spots or blemishes. The skin should be smooth and the color should be deep purple. If you can find fresh ube, it will offer the best flavor and texture but frozen or powdered ube can work as great substitutes if you’re in a pinch.

How should I store leftover Ube Rice Krispies Treats?
Store the treats in a covered container at room temperature for up to 5 days. This will help maintain their chewy texture. Avoid refrigeration, as it can make them tough and less enjoyable to eat.

Can I freeze Ube Rice Krispies Treats?
Absolutely! To freeze, wrap the treats tightly in plastic wrap and place them in an airtight container. They can be frozen for up to 2 months. When you’re ready to enjoy them, just thaw at room temperature. If they seem a bit firm post-freezing, a few seconds in the microwave will help soften them right up.

What if my marshmallows become hard while melting?
If your marshmallows harden, they may have been overheated. Make sure to microwave them in increments, as detailed in the recipe. If you do accidentally overheat, you can try adding a little more butter to help soften them back up—just be cautious not to overdo it, as too much can alter the flavor.

Are Ube Rice Krispies Treats suitable for people with allergies?
These treats contain butter, marshmallows, and Rice Krispies, which may include allergens like dairy and gluten. Always check the packaging for specific allergy information. For a gluten-free version, use gluten-free Rice Krispies, and be mindful of marshmallow brands that are allergy-friendly.

Can I change the flavor of Ube Rice Krispies Treats?
Yes, you can get creative by substituting ube extract with other flavor extracts like vanilla or coconut—though the visual appeal may take a slight hit! Additionally, use cookie cutters to create fun shapes for holidays and events—goodness knows these treats will be a hit no matter the flavor!

Ube Rice Krispies Treat

Chewy Ube Rice Krispies Treats You'll Love to Make

Enjoy these Ube Rice Krispies Treats, a delightful twist on a classic dessert with unique flavor and vibrant color.
Prep Time 15 minutes
Cook Time 5 minutes
Cooling Time 1 hour
Total Time 1 hour 20 minutes
Servings: 12 squares
Course: Dessert
Cuisine: Filipino
Calories: 120

Ingredients
  

For the Treats
  • 4 tablespoons Unsalted Butter Opt for salted for extra flavor.
  • 10 cups Large or Jumbo Marshmallows Mini marshmallows can work as a substitute.
  • 1 tablespoon Ube Extract Be cautious not to add too much.
  • 1 pinch Salt Enhances overall flavor.
  • 9 cups Rice Krispies Cereal Acts as the primary structure.
  • 1 to 2 cups Mini Marshmallows Optional but highly recommended.

Equipment

  • microwave-safe bowl
  • 9x13-inch baking dish
  • spatula

Method
 

Step‑by‑Step Instructions for Ube Rice Krispies Treats
  1. Prepare the baking dish by greasing a 9×13-inch dish with butter or nonstick spray.
  2. In a large microwave-safe bowl, add 4 tablespoons of unsalted butter and microwave on high for about 1 minute until melted.
  3. Add 10 cups of large marshmallows to the melted butter and heat in the microwave for 2 minutes until softened, stirring occasionally.
  4. Stir in 1 tablespoon of ube extract and a pinch of salt until smooth.
  5. Fold in approximately 9 cups of Rice Krispies, adding in 2-cup increments and stirring gently.
  6. If desired, stir in 1 to 2 cups of mini marshmallows gently.
  7. Transfer the mixture into the prepared baking dish and press down gently to fill the dish evenly.
  8. Allow the treats to cool at room temperature for at least 1 hour before slicing into squares.

Notes

These treats are perfect for busy weeknights and are fun to make with the kids. Customize them with cookie cutters or different extracts!

Lemon Raspberry Eclairs with Lush Cream Filling to Savor

As I whisked together lemon zest and cream, the kitchen filled with a citrusy embrace that felt like summer in a bowl. These Lemon Raspberry Eclairs are my go-to for impressing guests while keeping the prep light and breezy—a lovely way to elevate any gathering! The airy choux pastry serves as the perfect canvas for a zesty cream filling that dances alongside a tangy raspberry glaze. Not only do these eclairs satisfy your sweet tooth, but they also offer a delightful twist on a classic French favorite, making them the ideal alternative to fast food desserts. Whether you’re hosting a brunch or simply craving something extraordinary, you’ll love how easy it is to create this showstopper. Ready to dive into the world of delicate pastries? Let’s get started!

Why are Lemon Raspberry Eclairs a must-try?

Light and Airy Texture: Each bite offers a delightful contrast, with the crisp outer shell giving way to a creamy, luscious filling.

Zesty Flavor Explosion: The combination of zesty lemon and fresh raspberries creates a bright, refreshing taste that’s perfect for any occasion.

Easy to Make: With simple ingredients and straightforward instructions, you can whip these up in no time, impressing your guests without stress.

Versatile Options: Feel free to experiment! Try filling them with vanilla custard or swapping the raspberry glaze for strawberries to keep things exciting.

Perfect for Sharing: Whether it’s a family gathering or a brunch with friends, these eclairs are a crowd-pleaser that will leave everyone asking for seconds.

Ready to elevate your dessert game? Don’t miss trying these Lemon Raspberry Eclairs or check out our Crisp Cabbage Dressing for a perfectly paired meal!

Lemon Raspberry Eclairs Ingredients

Here’s everything you need for these delightful Lemon Raspberry Eclairs!

For the Choux Pastry
Choux pastry – Provides structure and an airy texture; it’s essential for achieving perfect eclairs.
Eggs – Adds richness and moisture; ensure they’re at room temperature for better incorporation.
Water – Hydrates the dry ingredients and creates steam for rising; crucial for a light pastry.
Butter – Adds flavor and richness; unsalted is preferable for better control over salt levels.
All-purpose flour – Forms the body of the eclair; do not substitute for best results.

For the Lemon Filling
Lemon juice and zest – Provides the tangy, zesty flavor for the filling; can substitute with lime for a different profile.
Sugar – Sweetens the filling; adjust according to taste for that perfect balance.
Heavy cream – For whipping and incorporating into the lemon cream; fresh cream works best.

For the Raspberry Glaze
Raspberries – Main flavor for the glaze; you can use fresh or thawed frozen raspberries.
Powdered sugar – For sweetening the raspberry glaze; adjust as necessary for your preferred sweetness.

Now that you have everything sorted, get ready for a fun culinary adventure! Let’s create some stunning Lemon Raspberry Eclairs!

Step‑by‑Step Instructions for Lemon Raspberry Eclairs

Step 1: Prepare the Choux Pastry
In a medium saucepan, combine 1 cup of water, 1/2 cup of butter, and a pinch of salt. Bring the mixture to a boil over medium heat, stirring until the butter is melted. Add 1 cup of all-purpose flour all at once and quickly stir with a wooden spoon until a smooth ball forms. Cook for another minute until the dough pulls away from the sides and starts to dry out slightly.

Step 2: Incorporate the Eggs
Remove the choux pastry from the heat and let it cool for about 5 minutes. Once slightly cooled, add 4 large eggs one at a time, mixing vigorously after each addition until the dough is smooth and glossy. The batter should drop slowly from the spoon. This lemon raspberry eclairs mixture will be key to creating those lovely hollow shells!

Step 3: Pipe the Eclairs
Line a baking sheet with parchment paper. Transfer the choux pastry into a piping bag fitted with a large round tip. Pipe 4-inch long strips onto the prepared baking sheet, leaving space between each strip. The eclairs should be slightly rounded on top, ensuring they achieve a beautiful dome shape as they bake.

Step 4: Bake the Eclairs
Preheat your oven to 400°F (200°C). Bake the piped eclairs for about 25 minutes, or until they are puffed up, golden brown, and firm to the touch. Avoid opening the oven during baking to prevent collapsing. Once baked, turn off the oven and crack the door open; let them cool inside for an additional 10 minutes for the perfect texture.

Step 5: Make the Lemon Cream Filling
While the eclairs cool, whip 1 cup of heavy cream in a chilled bowl until soft peaks form. Add the zest and juice of 2 lemons along with 1/4 cup of sugar, and continue beating until the mixture is thick and creamy. This luscious lemon cream filling is what makes these lemon raspberry eclairs truly irresistible!

Step 6: Prepare the Raspberry Glaze
In a small saucepan over medium heat, combine 1 cup of raspberries and 1/4 cup of sugar. Cook gently for about 5 minutes until the raspberries break down. Strain the mixture through a fine sieve to remove the seeds, then let the raspberry syrup cool completely. This vibrant glaze will add a lovely touch to our eclairs.

Step 7: Assemble the Eclairs
Using a sharp knife, gently slice each cooled eclair in half lengthwise. Fill the bottom half with the lemon cream, then carefully replace the top. To finish, dip the top of each eclair into the raspberry glaze or drizzle it on for a stunning presentation. Your lemon raspberry eclairs are now ready to impress!

Lemon Raspberry Eclairs Variations

Feel free to put your own spin on these delightful eclairs, making them truly yours with some fun variations!

  • Vanilla Custard: Substitute the lemon filling with rich vanilla custard for a classic treat that’s equally delicious.

  • Chocolate Mousse: Swap in a velvety chocolate mousse filling for an indulgent twist that appeals to chocolate lovers.

  • Lime Cream: Replace the lemon with lime juice and zest for a refreshing and zesty variation, perfect for a summer gathering.

  • Berry Bliss: Use various berries for the glaze, such as strawberries or blueberries, to create a colorful and vibrant presentation.

  • Coconut Whipped Cream: For a tropical flair, fold in some coconut cream with the heavy cream for a subtle coconut flavor contrast.

  • Spicy Kick: Add a hint of cayenne pepper or chili powder to the raspberry glaze for a unique sweet-heat combination that will surprise your taste buds.

  • Nutty Crunch: Sprinkle roasted chopped nuts, like pistachios or almonds, on top of the raspberry glaze for added texture and flavor.

  • Citrus Burst: Mix some orange zest with the lemon filling or glaze for an extra layer of citrusy goodness that brightens the entire treat.

These variations are a lovely way to customize your eclairs—just like switching out a dressing in a sweet salad! Similarly, you might enjoy trying them alongside our refreshing Crisp Cabbage Dressing for a tasty light meal!

Expert Tips for Lemon Raspberry Eclairs

  • Perfect Choux Pastry: Ensure the choux pastry cooks enough on the stovetop. Undercooked dough can lead to flat eclairs; your Lemon Raspberry Eclairs should puff beautifully!

  • Egg Temperature Matters: Use room temperature eggs, as they incorporate better into the dough, creating a fluffier texture—crucial for a successful eclair.

  • Do Not Open the Oven: During baking, avoid opening the oven door. Sudden temperature changes can cause the eclairs to collapse, ruining your hard work!

  • Cooling Time is Key: After baking, allow eclairs to cool fully before filling. Filling warm shells can lead to a soggy bottom and messy presentation.

  • Experiment with flavors: Feel free to switch out the filling! Vanilla custard or chocolate mousse also works splendidly, offering delicious variations to your Lemon Raspberry Eclairs.

What to Serve with Lemon Raspberry Eclairs

Elevate your dessert experience with delightful pairings that enhance the bright flavors of these eclairs.

  • Creamy Vanilla Ice Cream: The rich, smooth texture of vanilla ice cream balances the tangy zing of the lemon cream beautifully.

  • Fresh Berries Medley: A mix of strawberries, blueberries, and blackberries adds a burst of freshness that complements the raspberry glaze.

  • Zesty Lemon Sorbet: This light and refreshing sorbet echoes the eclair’s flavors while providing a frosty contrast, perfect for a summer gathering.

  • Almond Biscotti: The crispy texture of biscotti and subtle nutty flavors make a wonderful crunchy counterpart for these soft pastries.

  • Champagne or Prosecco: These sparkling wines add a touch of elegance and excitement, enhancing the celebratory feel of your dessert table.

  • Iced Green Tea: A lightly flavored iced green tea offers a refreshing palate cleanser that marries well with the sweet and zesty flavors.

Pairing these elements with your Lemon Raspberry Eclairs will create a harmonious dining experience that will leave your guests raving.

Make Ahead Options

These Lemon Raspberry Eclairs are perfect for busy cooks looking to save time! You can prepare the choux pastry and bake it up to 24 hours in advance, storing the cooled eclair shells in an airtight container at room temperature to maintain their crispness. The luscious lemon cream filling can also be prepped 1-3 days ahead; simply refrigerate it in an airtight container to keep it fresh and creamy. When you’re ready to serve, just fill the shells with the lemon cream and dip them in the raspberry glaze for that final touch. This way, you can enjoy restaurant-quality eclairs with minimal last-minute effort!

How to Store and Freeze Lemon Raspberry Eclairs

Room Temperature: Store unfilled eclairs at room temperature in an airtight container for up to 2 days. Filling them ahead may lead to sogginess.

Fridge: Keep filled Lemon Raspberry Eclairs refrigerated for up to 3 days. This helps maintain their freshness while the flavors meld beautifully.

Freezer: For longer storage, freeze unfilled eclair shells, tightly wrapped, for up to 1 month. Allow them to thaw at room temperature before filling.

Reheating: To regain crispiness, warm eclair shells in a preheated oven at 350°F (175°C) for about 5 minutes, ensuring they stay light and airy.

Lemon Raspberry Eclairs Recipe FAQs

How do I choose ripe lemons for the filling?
Absolutely! Select lemons that are bright yellow and feel heavy for their size. Look for smooth skin without dark spots and a slightly soft feel, indicating juiciness. The zest is just as important, so ensure they smell fragrant!

How should I store my Lemon Raspberry Eclairs?
Filled eclairs are best kept in the refrigerator in an airtight container for up to 3 days. This helps maintain their freshness but be sure to serve them cold or bring them to room temperature before serving to enhance their flavors.

Can I freeze Lemon Raspberry Eclairs?
Yes, you can! I recommend freezing unfilled eclair shells. Wrap them tightly in plastic wrap and store them in an airtight container for up to 1 month. When you’re ready to enjoy them, thaw at room temperature, and fill with lemon cream just before serving for the best texture!

What if my eclair shells collapse after baking?
Very common! Ensure your choux pastry is cooked sufficiently on the stovetop before adding eggs. The dough should be smooth and pull away from the pan. If your oven door was opened during baking, that can affect the rise too. Bake until they are golden brown, which usually takes about 25 minutes.

Are there any allergy considerations for this recipe?
Definitely! This recipe contains common allergens like eggs, gluten (from flour), and dairy. If you’re making these for someone with allergies, consider substitutions like using a gluten-free flour blend or a dairy-free whipping cream substitute. Always prioritize safety first!

Can I make variations on the filling and glazing?
Absolutely! The beauty of these Lemon Raspberry Eclairs is their versatility. You can swap the lemon filling for a rich vanilla custard, chocolate mousse, or even a tangy lime cream. Experiment with different berries for the glaze—strawberries and blueberries work beautifully too! Enjoy the creative process!

Lemon Raspberry Eclairs

Lemon Raspberry Eclairs with Lush Cream Filling to Savor

These Lemon Raspberry Eclairs are a zesty twist on a classic dessert, featuring an airy pastry filled with tangy lemon cream and topped with vibrant raspberry glaze.
Prep Time 30 minutes
Cook Time 25 minutes
Cooling Time 10 minutes
Total Time 1 hour 5 minutes
Servings: 12 eclairs
Course: Dessert
Cuisine: French
Calories: 150

Ingredients
  

For the Choux Pastry
  • 1 cup water
  • 1/2 cup butter unsalted preferred
  • 1 cup all-purpose flour
  • 4 large eggs room temperature
For the Lemon Filling
  • 2 large lemons juice and zest
  • 1/4 cup sugar adjust to taste
  • 1 cup heavy cream fresh cream works best
For the Raspberry Glaze
  • 1 cup raspberries fresh or thawed frozen
  • 1/4 cup powdered sugar adjust as necessary

Equipment

  • Medium saucepan
  • Piping bag
  • Wooden Spoon
  • Chilled bowl
  • Fine sieve

Method
 

Step-by-Step Instructions for Lemon Raspberry Eclairs
  1. In a medium saucepan, combine water, butter, and a pinch of salt. Bring to a boil and melt the butter.
  2. Add all-purpose flour all at once and stir until a smooth ball forms. Cook for another minute until the dough pulls away from the sides.
  3. Remove from heat and let cool for 5 minutes. Add eggs one at a time, mixing vigorously after each addition until smooth.
  4. Line a baking sheet with parchment paper. Transfer dough into a piping bag and pipe 4-inch long strips.
  5. Preheat oven to 400°F (200°C). Bake for about 25 minutes until golden brown. Turn off oven and crack the door for 10 minutes.
  6. While cooling, whip heavy cream until soft peaks form, then add lemon juice, zest, and sugar until thick and creamy.
  7. In a saucepan, cook raspberries and sugar for 5 minutes. Strain to remove seeds and cool syrup completely.
  8. Slice each eclair in half, fill with lemon cream, top with raspberry glaze, and serve.

Notes

For best results, use room temperature eggs and avoid opening the oven while baking to maintain the ideal puffiness of the eclairs.

Reese’s Peanut Butter Earthquake Cake: The Ultimate Indulgence

You won’t believe how a simple cake can transport you back to the joy of childhood treats! Let me introduce you to my go-to indulgence: the Reese’s Peanut Butter Earthquake Cake. This sinfully delicious dessert marries rich chocolate with creamy peanut butter, boasting a gooey center that’s hard to resist. What’s more, it’s incredibly easy to whip up, making it a fantastic option for gatherings or a special night in. Imagine your kitchen filled with that comforting aroma as you bake—it’s a sure way to warm hearts and create sweet memories. Ready to dive into this nostalgic delight? Let’s get started!

Why is this cake a must-try?

Indulgent Flavor: The Reese’s Peanut Butter Earthquake Cake offers a heavenly blend of rich chocolate and creamy peanut butter that will satisfy your sweet cravings.

Easy to Bake: With simple ingredients, this cake comes together quickly, making it a perfect choice for busy home cooks and bakers alike.

Nostalgic Treat: Relive childhood memories with each bite, as this dessert evokes the timeless taste of Reese’s Peanut Butter Cups.

Versatile Options: Feel free to swap out peanut butter for almond or cashew butter, adding your personal touch to this delightful recipe.

Crowd-Pleaser: Whether at a party or a family gathering, this cake is sure to impress both kids and adults, just like a classic dessert experience.

For an extra treat, pair it with a scoop of vanilla ice cream or consider serving it alongside a slice of Sky Jelly Cake for variety!

Reese’s Peanut Butter Earthquake Cake Ingredients

For the Cake

  • Chocolate Cake Mix – Provides the rich chocolate base; consider using dark chocolate mix for a deeper flavor.
  • Water – Ensures a moist cake, hydrating the dry mix perfectly.
  • Vegetable Oil – Adds moisture and softness; melted coconut oil can give a unique flavor twist.
  • Large Eggs – Essential for structure and rising; let them reach room temperature for best results.

For the Peanut Butter Filling

  • Creamy Peanut Butter – Imparts a delicious, nutty flavor; almond or cashew butter can be used for a different taste.
  • Cream Cheese (softened) – Creates a rich, creamy texture in the filling.
  • Unsalted Butter (melted) – Enhances both flavor and moisture; using salted butter adds a yummy touch.
  • Powdered Sugar – Sweetens the peanut butter filling and ensures smoothness.
  • Vanilla Extract – Complements the flavors and adds warmth to the filling.

For the Topping

  • Reese’s Peanut Butter Cups (chopped) – Adds delightful chunks of chocolate and peanut butter; a must for that signature taste!

Step‑by‑Step Instructions for Reese’s Peanut Butter Earthquake Cake

Step 1: Preheat the Oven
Begin by preheating your oven to 350°F (175°C). While it’s heating up, grease a 9×13-inch baking dish generously with butter or cooking spray to ensure your cake comes out easily after baking. This crucial first step sets the stage for your delicious Reese’s Peanut Butter Earthquake Cake.

Step 2: Mix the Cake Batter
In a large mixing bowl, combine the chocolate cake mix, water, vegetable oil, and eggs. Using an electric mixer, beat the mixture on medium speed for about 2 minutes until the batter is smooth and well combined. You’ll see a rich, chocolaty batter forming, ready to give your cake its delightful base.

Step 3: Prepare the Peanut Butter Filling
In a separate bowl, blend together the creamy peanut butter, softened cream cheese, melted unsalted butter, powdered sugar, and vanilla extract. Mix these ingredients until you achieve a smooth and creamy filling. The combination of creamy and sweet aromas wafting from this mixture will have your taste buds excited for the Reese’s Peanut Butter Earthquake Cake!

Step 4: Layer the Cake Batter
Pour half of the chocolate cake batter into the prepared baking dish, spreading it evenly across the bottom. Next, drizzle sweetened condensed milk over this layer, letting it pool in the chocolate batter. Follow this by adding the remaining chocolate batter on top, ensuring that your layers are beautifully stacked.

Step 5: Add the Peanut Butter Mixture
Now, take spoonfuls of the peanut butter mixture and drop them onto the chocolate batter. With a knife or a skewer, gently swirl the peanut butter into the batter, creating a marbled effect. This step is key to achieving that gooey center that characterizes Reese’s Peanut Butter Earthquake Cake.

Step 6: Sprinkle with Peanut Butter Cups
Scatter the chopped Reese’s Peanut Butter Cups evenly over the top of the cake batter. This not only adds incredible chunks of chocolate and peanut butter but also gives the cake a visually appealing finish. Your cake is now ready to bake and become an indulgent masterpiece.

Step 7: Bake the Cake
Place the baking dish in the preheated oven and bake for 30 to 35 minutes. You’ll know it’s ready when a toothpick inserted in the center comes out with moist crumbs, not wet batter. The top should look set with a slight jiggle, signaling a gooey heart hidden inside.

Step 8: Cool and Serve
Once baked, remove the cake from the oven and let it cool in the dish for about 10 minutes. This cooling period allows the flavors to settle. If desired, dust the top with powdered sugar before slicing into squares and serving. Bask in the warm, nostalgic scents as you share this delectable Reese’s Peanut Butter Earthquake Cake with loved ones!

Reese’s Peanut Butter Earthquake Cake Variations

Don’t be shy to add your own spin to this delightful dessert; your creativity is the secret ingredient!

  • Nut Butter Swap: Use almond or cashew butter for a unique flavor twist. This brings a different nutty richness to the filling, while still keeping that heavenly essence of the original cake.

  • Chocolate Chips Galore: Add a handful of semi-sweet or dark chocolate chips to the batter for an extra chocolatey experience. They will melt beautifully, creating pockets of chocolate goodness throughout the cake.

  • Cookie Crumble Topping: Crushed Oreos or your favorite cookies sprinkled on top before baking add a delightful crunch. Imagine biting into a fudgy cake with a crispy surprise in every forkful!

  • Spicy Kick: Mix in a pinch of cayenne pepper or chili powder to the batter for an unexpected spicy kick. The heat beautifully contrasts the sweetness, elevating the flavor profile of your indulgence.

  • Dairy-Free Delight: Substitute the cream cheese with a dairy-free alternative like cashew cream. This keeps the deliciousness without the dairy, allowing everyone to enjoy a slice.

  • Fruity Addition: Fold in some mashed bananas or chopped strawberries for a touch of fruitiness. The moisture from the fruit will balance the richness, making every bite an exciting surprise.

  • Miniature Form: Bake the batter in a muffin tin to create individual mini earthquake cakes. Perfect for gatherings, they make serving and enjoying this treat even more fun!

For more delightful ideas, why not explore a slice of heavenly Sky Jelly Cake alongside your Earthquake Cake? You’ll have a variety of flavors accommodating every palate!

Expert Tips for Reese’s Peanut Butter Earthquake Cake

  • Perfect Baking Time: Keep an eye on the baking time; overbaking can dry out your cake. Aim for moist crumbs on your toothpick to ensure that gooey center!

  • Ingredient Temperature: Allow your eggs and cream cheese to come to room temperature before mixing. This helps achieve a smoother batter and better rise for your Reese’s Peanut Butter Earthquake Cake.

  • Gentle Swirling: When adding the peanut butter filling, swirl gently to keep it from sinking. You want that yummy gooeyness distributed throughout without losing its lovely layers!

  • Mixing Tips: Use an electric mixer for the cake batter but avoid overmixing. Just enough to combine will give you that perfect texture without toughness.

  • Flavor Variations: Feel free to customize by using different nut butters or adding mix-ins like chocolate chips. Each variation can lead to a delicious twist on the classic Reese’s Peanut Butter Earthquake Cake!

Storage Tips for Reese’s Peanut Butter Earthquake Cake

Room Temperature: Keep leftover cake stored in an airtight container for up to 3 days to maintain its moistness and flavor.

Fridge: If you prefer, refrigerate the cake for up to a week. Just remember to tightly cover it to prevent drying out.

Freezer: To enjoy this indulgent dessert later, freeze slices wrapped in plastic wrap and foil for up to 3 months. Thaw in the fridge overnight before serving.

Reheating: Warm individual slices in the microwave for about 20-30 seconds for a delightful gooey texture before serving.

Make Ahead Options

These Reese’s Peanut Butter Earthquake Cake is perfect for busy weeknights or gatherings! You can prepare the chocolate cake batter and the peanut butter filling up to 24 hours in advance, storing them separately in the refrigerator. For best results, mix the cake batter and cover it tightly with plastic wrap, while the peanut butter mixture should be stored in an airtight container to maintain its creamy texture. When you’re ready to bake, simply pour the prepared batter into the baking dish, swirl in the peanut butter filling, and sprinkle with chopped Reese’s Peanut Butter Cups before baking. This saves time and ensures that the cake remains just as delicious as when made fresh!

What to Serve with Reese’s Peanut Butter Earthquake Cake

Looking to elevate your cake experience into a complete meal? Pair these delightful choices with your decadent dessert.

  • Creamy Vanilla Ice Cream: A scoop of vanilla ice cream adds a refreshing contrast, melting slightly and soaking into the warm cake for pure bliss.

  • Fresh Strawberries: Juicy, sweet strawberries bring a pop of color and a fruity balance to the rich, chocolatey flavors of the cake.

  • Whipped Cream: Light and airy, whipped cream enhances the cake’s texture and offers a sweet, fluffy contrast to the dense cake.

  • Chocolate Sauce: Drizzling warm chocolate sauce over the cake intensifies the chocolatey goodness and adds an extra layer of indulgence to each bite.

  • Chocolate Milkshake: A thick, creamy chocolate milkshake is a nostalgic drink that pairs beautifully, evoking memories of enjoying treats at diner counters.

  • Espresso or Coffee: The bitterness of espresso balances the sweetness of the cake, making it a perfect pairing for a late-night treat.

  • Caramel Sauce: A drizzle of warm caramel sauce not only adds a sweet touch but also complements the peanut butter flavors beautifully.

  • Nutty Trail Mix: For a crunchy contrast, a side of nutty trail mix offers a delightful texture that pairs well with the cake’s softness.

  • Cool Lemonade: A glass of tangy lemonade refreshes the palate, cutting through the cake’s richness with its bright acidity.

Reese’s Peanut Butter Earthquake Cake Recipe FAQs

What type of chocolate cake mix works best for this recipe?
For the Reese’s Peanut Butter Earthquake Cake, a standard chocolate cake mix is perfect, but if you want a richer flavor, I recommend using dark chocolate cake mix. The deeper cocoa notes will enhance the overall taste, making each bite even more indulgent.

How should I store the leftover cake?
To maintain the cake’s moisture, store any leftovers in an airtight container at room temperature for up to 3 days. If you prefer an even longer shelf life, you can refrigerate it for up to a week. Just make sure it’s well-covered to prevent it from drying out.

Can I freeze the Reese’s Peanut Butter Earthquake Cake? How?
Absolutely! To freeze, slice the cake into individual portions and wrap each piece tightly in plastic wrap, followed by a layer of aluminum foil. This will prevent freezer burn and ensure excellent flavor. You can freeze it for up to 3 months. When you’re ready to enjoy, simply thaw the slices in the refrigerator overnight and warm them in the microwave for about 20-30 seconds for that gooey texture.

What should I do if the cake comes out dry?
If your cake turns out dry, it may have been overbaked. Always check for doneness at the lower end of the baking time; a toothpick should come out with moist crumbs. For a dry cake, you can remedy it by serving it with a scoop of ice cream or whipped cream to add moisture while enjoying each bite.

Are there any dietary considerations I should keep in mind?
Yes, if you’re serving this cake to someone with nut allergies, it’s important to either avoid using peanut butter altogether or substitute it with a nut-free option such as sunflower seed butter. Always check the labels for any allergens, including the chocolate and cream cheese, to ensure everyone can indulge safely.

Can I use substitutions for the peanut butter?
Definitely! If you’re looking for a different flavor or have a nut allergy, feel free to swap creamy peanut butter for almond or cashew butter. You can also explore options by adding ingredients like Nutella or even caramel for an entirely new twist on the classic Reese’s Peanut Butter Earthquake Cake!

Reese’s Peanut Butter Earthquake Cake

Reese’s Peanut Butter Earthquake Cake: The Ultimate Indulgence

Discover the indulgent taste of Reese’s Peanut Butter Earthquake Cake, a delightful dessert that combines rich chocolate and creamy peanut butter.
Prep Time 15 minutes
Cook Time 35 minutes
Cooling Time 10 minutes
Total Time 1 hour
Servings: 12 slices
Course: Dessert
Cuisine: American
Calories: 400

Ingredients
  

For the Cake
  • 1 box Chocolate Cake Mix Dark chocolate mix for deeper flavor.
  • 1 cup Water Hydrates dry mix.
  • 1/2 cup Vegetable Oil Melted coconut oil can be used.
  • 3 Large Eggs Room temperature for best results.
For the Peanut Butter Filling
  • 1 cup Creamy Peanut Butter Almond or cashew butter can be used.
  • 8 oz Cream Cheese Softened.
  • 1/2 cup Unsalted Butter Melted.
  • 1 cup Powdered Sugar
  • 1 tsp Vanilla Extract
For the Topping
  • 1 cup Reese’s Peanut Butter Cups Chopped.

Equipment

  • 9x13-inch baking dish
  • mixing bowl
  • electric mixer
  • knife or skewer

Method
 

Step-by-Step Instructions
  1. Preheat your oven to 350°F (175°C) and grease a 9x13-inch baking dish.
  2. In a large mixing bowl, combine the chocolate cake mix, water, vegetable oil, and eggs. Beat on medium speed for 2 minutes until smooth.
  3. In another bowl, blend together the creamy peanut butter, cream cheese, melted unsalted butter, powdered sugar, and vanilla extract until smooth.
  4. Pour half of the chocolate cake batter into the prepared baking dish. Drizzle sweetened condensed milk over it and top with the remaining batter.
  5. Drop spoonfuls of the peanut butter mixture onto the chocolate batter and swirl gently for a marbled effect.
  6. Sprinkle the chopped Reese’s Peanut Butter Cups evenly on top.
  7. Bake for 30 to 35 minutes, until a toothpick comes out with moist crumbs.
  8. Cool for 10 minutes before slicing and serving. Dust with powdered sugar if desired.

Notes

For extra indulgence, serve with vanilla ice cream or alongside a slice of Sky Jelly Cake.

Creamy Mac and Cheese Soup That Warms Your Heart Fast

The aroma of melted cheese fills the air as I prepare a bowl of Creamy Mac and Cheese Soup, a dish that feels like a warm hug on a chilly evening. In just 30 minutes, this comforting vegetarian delight transforms a classic favorite into a cozy bowl of goodness that’s perfect for the whole family. Not only is it incredibly quick to whip up, but it also packs in the creamy, cheesy flavors we all crave—without the fuss of a traditional mac and cheese bake! So, whether you’re looking for a quick weeknight meal or a comforting indulgence, this Mac and Cheese Soup is sure to become a staple in your kitchen. What toppings will you add for that extra touch of warmth?

Why is Mac and Cheese Soup Amazing?

Ultimate Comfort: There’s something undeniably soothing about a bowl of Mac and Cheese Soup, perfect for chilly nights when all you crave is warmth and familiarity.

Quick Prep: Whipping this up takes only 30 minutes, ideal for busy weeknights or lazy weekends when you want a heartfelt meal without the hassle.

Endless Variations: Feel free to add cooked vegetables like broccoli or switch up the cheeses for a unique twist—gouda or pepper jack can bring exciting flavors to your bowl!

Family-Approved: This soup is a guaranteed hit with both kids and adults, making every spoonful a shared moment of joy. Serve it with crusty bread, or for a special touch, try it alongside a delightful Vegetable Bake with Cheese and Cream for a complete meal!

Mac and Cheese Soup Ingredients

For the Soup Base
5 cups vegetable or chicken broth – Provides essential liquid; opt for low-sodium for a healthier choice.
1 cup elbow macaroni pasta, uncooked – This is the heart of the dish, giving substance; alternative pasta shapes can be used if cooked similarly.
⅓ cup unsalted butter – Enhances the creaminess; can be substituted with margarine or vegan butter for a dairy-free option.
¼ cup all-purpose flour – Serves as a thickening agent for the roux; consider using a gluten-free flour blend if needed.
1 ½ cups milk – Adds that delightful creaminess; plant-based milk works beautifully for a lactose-free version.

For the Cheesy Goodness
2 cups sharp yellow cheddar cheese, grated – This is the star cheese providing rich flavor; gouda can be a great alternative for a different profile.
⅓ cup fresh Parmesan cheese, grated – Deepens umami flavors; nutritional yeast can serve as a delicious substitute for a vegan version.
¼ cup mozzarella cheese, grated – Gives that gooey stretch; feel free to swap with cheese of your choice if preferred.

For Seasoning and Garnish
1 teaspoon garlic powder – Boosts the flavor; fresh garlic can add a more robust taste if desired.
½ tablespoon mustard powder – Imbues a gentle tang that complements the cheesy notes; Dijon mustard can work as a substitute.
Fresh green onions, finely chopped (for garnish) – Adds a crisp freshness on top; chives can make a lovely alternative.
Black pepper, freshly cracked (for garnish) – Provides an extra kick; adjust according to your spice preference.

The comforting warmth of this Mac and Cheese Soup comes together beautifully with these ingredients, transforming into a meal that feels like home!

Step‑by‑Step Instructions for Mac and Cheese Soup

Step 1: Melt the Butter
In a large pot or Dutch oven, melt ⅓ cup of unsalted butter over medium heat. Allow it to fully melt and begin to bubble slightly, creating a rich aroma. This will serve as the base for our Mac and Cheese Soup, providing the creamy richness that balances the whole dish.

Step 2: Create the Roux
Once the butter is melted, add ¼ cup of all-purpose flour, whisking continuously for about 2 minutes. You want the mixture to become a light golden color, indicating that the flour has cooked through. This roux will thicken the soup and give it a velvety texture, essential for our creamy soup.

Step 3: Add the Milk
Gradually pour in 1 ½ cups of milk while whisking constantly to avoid any lumps. Continue to cook this mixture on medium heat for about 3-5 minutes, or until it thickens noticeably. The consistency should become creamy, setting the stage for the signature cheesiness of the Mac and Cheese Soup.

Step 4: Pour in the Broth
Slowly pour in 5 cups of vegetable or chicken broth, stirring well. Increase the heat slightly and bring this mixture to a gentle simmer. You’ll notice a lovely bubbling; let it simmer for about 5 minutes, allowing the flavors to meld together beautifully and preparing the base for the pasta.

Step 5: Cook the Macaroni
Add 1 cup of uncooked elbow macaroni to the simmering broth. Stir occasionally and cook for approximately 6-8 minutes or until the pasta is al dente. You want it to be tender but still firm, as the macaroni will continue to cook slightly once the cheese is added.

Step 6: Incorporate the Cheeses
Lower the heat and gradually stir in 2 cups of grated sharp yellow cheddar, ⅓ cup of grated Parmesan, and ¼ cup of mozzarella cheese. Continue to stir until all the cheeses are completely melted and the soup becomes luxuriously creamy. This step is where the Mac and Cheese Soup transforms into its cheesy glory.

Step 7: Season the Soup
Once the cheese is melted, season the soup with 1 teaspoon of garlic powder, ½ tablespoon of mustard powder, and freshly cracked black pepper to taste. Stir well to combine, allowing the flavors to enhance the soup. This step ensures the Mac and Cheese Soup has the perfect balance of depth and flavor.

Step 8: Serve and Garnish
Ladle the soup into bowls while it’s hot and garnish with finely chopped green onions for freshness. The warmth and rich aroma will invite everyone to dig in. Enjoy your comforting bowl of Mac and Cheese Soup with some crusty bread or your favorite toppings for that extra touch!

Make Ahead Options

These Creamy Mac and Cheese Soup preparations are perfect for busy weeknights! You can prepare the cheese mixture and broth base up to 24 hours in advance. Simply melt the butter, whisk in the flour, and gradually add the milk and broth before refrigerating. Store the uncooked macaroni separately to prevent it from becoming mushy. When you’re ready to serve, bring the base back to a simmer, add the macaroni, and let it cook until al dente (about 6-8 minutes). Finally, stir in the cheeses until melted for that perfectly creamy finish. This make-ahead option ensures your soup is just as delicious without the last-minute rush!

Expert Tips for Mac and Cheese Soup

Perfect Pasta: Cook your macaroni just al dente to prevent it from getting mushy as it sits in the broth.

Smooth Cheese: Gradually whisk the cheeses into the roux before adding broth to ensure a creamy consistency without any clumps.

Flavor Variety: Don’t be afraid to swap in different cheeses like gouda or add veggies for a personalized touch in your Mac and Cheese Soup.

Avoid Freezing: This soup is best enjoyed fresh, as freezing may alter its creamy texture and taste.

Thickening Control: If you prefer a thicker soup, let it simmer a bit longer after adding the macaroni, stirring occasionally.

Mac and Cheese Soup Variations

Customize your Mac and Cheese Soup with delightful twists and substitutions that cater to your taste and dietary needs!

  • Vegetable Boost:
    Add cooked vegetables like broccoli or spinach for extra nutrients and vibrant color. These greens not only enhance the flavor but also make the soup more filling!

  • Different Cheeses:
    Swap sharp cheddar for gouda, pepper jack, or even fontina to explore unique flavor profiles. Each cheese brings its character, creating a delightful cheesy experience.

  • Protein Addition:
    Mix in cooked bacon, ham, or even shredded rotisserie chicken for a heartier soup. This simple addition elevates the dish to a satisfying meal that will please meaty lovers!

  • Spicy Kick:
    Incorporate crushed red pepper flakes or diced jalapeños for an added burst of heat. This variation brings a new level of excitement, perfect for spice enthusiasts!

  • Herb Infusion:
    Add fresh herbs like thyme, rosemary, or parsley for a fresh twist. These elevate the aroma and flavor, making the dish feel bright and rejuvenating.

  • Creamy Twist:
    For an even creamier texture, substitute half of the milk with heavy cream or coconut cream. This will envelop each bite in luxurious creaminess!

  • Gluten-Free Option:
    Use gluten-free pasta and flour to create a gluten-friendly dish bursting with flavor. Enjoy your favorite comfort food guilt-free without sacrificing the taste!

For an extra special meal, consider pairing your Mac and Cheese Soup with a slice of crusty bread or a side of Crispy Cheese and Chili French Fries to dip!

How to Store and Freeze Mac and Cheese Soup

Fridge: Store leftovers in an airtight container for up to 3 days. Make sure the soup has cooled to room temperature before sealing to maintain freshness.

Freezer: It’s best not to freeze this Mac and Cheese Soup, as the creamy texture may become grainy or separate upon thawing.

Reheating: When ready to enjoy leftovers, gently reheat on the stove over low heat or in the microwave. Stir frequently to ensure even warming and prevent sticking.

Airtight Tip: Always use airtight containers to prevent moisture and odors from affecting the soup’s delightful cheesy flavor.

What to Serve with Mac and Cheese Soup?

A warm bowl of Mac and Cheese Soup creates the perfect canvas for delightful accompaniments that elevate the meal experience.

  • Crusty Bread: A slice of warm, crusty bread is perfect for dipping, soaking up that creamy goodness with every bite.
  • Garlic Breadsticks: Flavored with herbs and garlic, these add a chewy texture and aromatic warmth that pairs wonderfully with the soup.
  • Caesar Salad: The crunch of romaine and the zesty dressing offer a refreshing contrast to the rich, creamy soup, balancing flavors beautifully.
  • Roasted Vegetables: A medley of roasted seasonal veggies not only complements the soup’s flavors but adds color and healthy nutrients to the meal.
  • Apple Crisp: For a sweet finish, this warm dessert brings a delightful crunch that balances the comforting creaminess of the soup.
  • Iced Tea: A cold glass of iced tea, sweetened or unsweetened, refreshes the palate between each creamy spoonful, enhancing the overall experience.
  • Herbed Quinoa: Fluffy quinoa cooked with fresh herbs delivers a nutty flavor and adds a wholesome touch when served alongside the soup.
  • Stuffed Peppers: Flavorful stuffed peppers can make a hearty entrée alongside the soup, creating a satisfying, comforting meal.

These pairings turn a simple bowl of Mac and Cheese Soup into a celebratory feast, perfect for a cozy evening at home.

Mac and Cheese Soup Recipe FAQs

What type of cheese is best for Mac and Cheese Soup?
Absolutely! Sharp yellow cheddar is a classic choice for its rich flavor, but feel free to experiment with other varieties like gouda or pepper jack. Gouda adds a wonderful smokiness, while pepper jack brings a spicy kick. Mixing different cheeses can create a uniquely delightful flavor profile, so don’t hesitate to get creative!

How should I store leftover Mac and Cheese Soup?
You can store leftovers in an airtight container in the fridge for up to 3 days. Make sure the soup has cooled down to room temperature first, which helps maintain its creamy texture. When reheating, do so gently over low heat, stirring frequently to prevent the pasta from sticking to the bottom of the pot.

Can I freeze Mac and Cheese Soup?
Though it’s tempting, I recommend against freezing this soup. The creaminess can be compromised, resulting in a grainy texture upon thawing. If you do choose to freeze it, let the soup cool completely before transferring it to a freezer-safe container, and consume it within 1-2 months for the best flavor.

How can I make my Mac and Cheese Soup vegetarian?
You’re in luck! This recipe is naturally vegetarian. Simply use vegetable broth instead of chicken broth, and feel free to add cooked vegetables like broccoli or spinach for added nutrition. Also, make sure to use vegetarian-friendly cheese, as some cheeses may contain animal rennet.

What if my soup turns out too thick or too thin?
Very common! If your soup is thicker than desired, you can gradually whisk in more broth or milk while it’s on low heat until you reach your desired consistency. Conversely, if it’s too thin, let it simmer a little longer to allow it to reduce, thickening it naturally. Just be sure to stir occasionally to prevent sticking.

How do I know if my cheese has melted properly in the soup?
Perfect question! You’ll know your cheese has melted properly if the soup becomes luxuriously creamy and smooth. A good indicator is when you see no lumps and the cheese integrates thoroughly into the mixture. It’s key to gradually add the cheese while continuously stirring, which helps in achieving that velvety texture!

Mac and Cheese Soup

Creamy Mac and Cheese Soup That Warms Your Heart Fast

This Mac and Cheese Soup is a comforting vegetarian delight, packed with creamy, cheesy flavors and ready in just 30 minutes.
Prep Time 10 minutes
Cook Time 20 minutes
Total Time 30 minutes
Servings: 4 bowls
Course: Dinner
Cuisine: American
Calories: 450

Ingredients
  

For the Soup Base
  • 5 cups vegetable or chicken broth Opt for low-sodium for a healthier choice.
  • 1 cup elbow macaroni pasta, uncooked Alternative pasta shapes can be used if cooked similarly.
  • cup unsalted butter Can be substituted with margarine or vegan butter for a dairy-free option.
  • ¼ cup all-purpose flour Consider using a gluten-free flour blend if needed.
  • 1 ½ cups milk Plant-based milk works beautifully for a lactose-free version.
For the Cheesy Goodness
  • 2 cups sharp yellow cheddar cheese, grated Gouda can be a great alternative for a different profile.
  • cup fresh Parmesan cheese, grated Nutritional yeast can serve as a delicious substitute for a vegan version.
  • ¼ cup mozzarella cheese, grated Feel free to swap with cheese of your choice if preferred.
For Seasoning and Garnish
  • 1 teaspoon garlic powder Fresh garlic can add a more robust taste if desired.
  • ½ tablespoon mustard powder Dijon mustard can work as a substitute.
  • Fresh green onions, finely chopped (for garnish) Chives can make a lovely alternative.
  • Black pepper, freshly cracked (for garnish) Adjust according to your spice preference.

Equipment

  • large pot or Dutch oven

Method
 

Step-by-Step Instructions
  1. Melt the butter over medium heat in a large pot or Dutch oven until fully melted and bubbling.
  2. Add the all-purpose flour, whisking for about 2 minutes until it becomes a light golden color.
  3. Gradually pour in the milk while whisking constantly, continuing to cook until thickened (about 3-5 minutes).
  4. Slowly pour in the broth, stirring well, and bring to a gentle simmer for about 5 minutes.
  5. Add the uncooked macaroni and cook for approximately 6-8 minutes until al dente.
  6. Lower the heat and stir in the grated cheddar, Parmesan, and mozzarella until completely melted.
  7. Season with garlic powder, mustard powder, and black pepper, stirring well to combine.
  8. Serve hot, garnished with finely chopped green onions.

Notes

Cook macaroni just al dente to prevent it from getting mushy. Gradually whisk in cheeses to maintain a creamy consistency.

Spinach Mushroom Chicken Crepes for Cozy Comfort Food Nights

There’s something magical about the delicate layers of a crepe that whisk me away to a charming café in Paris. These Spinach Mushroom Chicken Crepes with Creamy Béchamel Sauce are my go-to when I want to impress myself and others without spending hours in the kitchen. Filled with tender shredded chicken, earthy mushrooms, and sautéed leeks, they are not only irresistible but also surprisingly quick to prepare—perfect for brunch or an intimate dinner at home. Plus, this recipe easily accommodates dietary preferences with gluten-free options and vegetarian substitutions. Are you ready to elevate your cooking game and savor the comforting flavors of these delightful crepes? Let’s dive into this delicious journey!

Why are Spinach Mushroom Chicken Crepes irresistible?

Convenient Cooking: These crepes come together quickly, making them an ideal choice for busy weeknights or leisurely brunches. Flavorful Filling: The blend of shredded chicken, savory mushrooms, and sweet leeks creates a mouthwatering filling that will have everyone asking for seconds. Versatile Variations: Not only can you customize the filling, but you can also easily swap in gluten-free or dairy-free options, making them suitable for various dietary needs—just like the Tropical Chicken Pineapple or Savory Chicken Cheesy recipes. Elevated Elegance: With a creamy béchamel and melted Gruyere, each bite feels like a gourmet treat. Impressive Presentation: Serve these on your best dishware, and watch them steal the show at your next gathering!

Spinach Mushroom Chicken Crepes Ingredients

These delectable crepes come together with a few simple ingredients!

For the Crepes

  • Gluten-free Flour – Use this for a gluten-free version without sacrificing taste.
  • Eggs – Essential for binding the crepe batter.
  • Milk – Creates a smooth batter; swap with plant-based milk for dairy-free.
  • Salt – Just a pinch enhances all the flavors.

For the Filling

  • Shredded Chicken – Adds protein and a hearty texture; rotisserie chicken is a great time saver.
  • Mushrooms – Bring umami flavor and moisture; zucchini or bell peppers make delicious substitutes.
  • Leeks – Provide a mild onion flavor and subtle sweetness when sautéed in butter.

For the Béchamel Sauce

  • Butter – For a rich flavor base; opting for unsalted gives you better control.
  • Flour – Thickens the sauce; use cornstarch for a gluten-free alternative.
  • Milk – Creates a luscious, creamy texture; almond milk works well for a dairy-free touch.
  • Gruyere Cheese – Melts beautifully and enhances depth; Comte or mozzarella offer milder alternatives.

These ingredients come together to create the warm, comforting bites of Spinach Mushroom Chicken Crepes you’ll love sharing with family and friends!

Step‑by‑Step Instructions for Spinach Mushroom Chicken Crepes

Step 1: Prepare Crepe Batter
In a mixing bowl, whisk together gluten-free flour, eggs, milk, and a pinch of salt until smooth. Allow the crepe batter to rest for 30 minutes at room temperature; this helps create tender crepes. Use a spatula to scrape down the sides and ensure everything is well combined before moving on to the next step.

Step 2: Cook Crepes
Heat a non-stick skillet over medium heat and lightly grease it with butter. Pour a small amount of batter into the skillet, swirling it to evenly coat the bottom. Cook for about 1-2 minutes or until the edges lift slightly, then flip and cook for an additional 30 seconds. Repeat this process until all the batter is used, keeping the cooked crepes warm under a kitchen towel.

Step 3: Fill the Crepes
In a sauté pan, melt 2 tablespoons of butter over medium heat. Add sliced leeks and chopped mushrooms, cooking until they turn golden brown and tender, about 5-7 minutes. Mix in the shredded chicken and sauté briefly until heated through. Spoon about 2 tablespoons of this delicious filling onto each crepe, then fold or roll them up, placing them seam side down in a baking dish.

Step 4: Make Béchamel Sauce
In a medium saucepan, melt 3 tablespoons of butter over medium heat. Whisk in gluten-free flour, stirring for about 1-2 minutes until it forms a smooth paste. Gradually add warm milk while continuously whisking to avoid lumps. Cook for about 5-7 minutes until the sauce thickens, then season with salt and pepper to taste for the perfect béchamel to pour over your Spinach Mushroom Chicken Crepes.

Step 5: Assemble and Bake
Preheat your oven to 350°F (175°C). Pour the creamy béchamel sauce generously over the filled crepes in the baking dish, ensuring they are well covered. Sprinkle grated Gruyere cheese on top for a rich, melty finish. Bake in the preheated oven for 20-25 minutes, or until the top is golden and bubbly. The enticing aroma will fill your kitchen as they approach perfection!

Helpful Tricks for Spinach Mushroom Chicken Crepes

  • Batter Consistency: Use room temperature ingredients for a smoother crepe batter, ensuring your Spinach Mushroom Chicken Crepes turn out tender and light.
  • Resting Time: Don’t skip resting the crepe batter for at least 30 minutes; it relaxes the gluten, preventing tough crepes and improving flavor.
  • Skillet Prep: Always preheat and lightly grease your non-stick skillet for easy flipping; it’s essential for perfect crepes without sticking.
  • Filling Amount: Avoid overstuffing your crepes, as this can lead to messy folds and filling spills. Stick to about 2 tablespoons per crepe for the best results.
  • Sauce Thickness: If your béchamel is too thick after cooking, whisk in a splash of warm milk to reach your desired creamy consistency.

What to Serve with Spinach Mushroom Chicken Crepes

Enhance your dining experience with these delightful accompaniments that perfectly complement the comforting flavors of your crepes.

  • Crispy Green Salad: A fresh salad with mixed greens, cherry tomatoes, and a zesty lemon vinaigrette provides a refreshing contrast to rich crepes.

  • Garlic Roasted Asparagus: Tender asparagus spears roasted with garlic offer a delightful crunch, adding an elegant touch that pairs beautifully with the creamy filling.

  • Herb-Infused Quinoa: Light and fluffy quinoa tossed with fresh herbs and lemon zest brings a nutty flavor that balances the richness of the béchamel.

  • Bruschetta with Tomato Basil Topping: The bright flavors of this Italian classic act as a delicious starter, making your meal feel even more vibrant and special.

  • Pineapple Ginger Sparkler: A bubbly, refreshing drink made with pineapple juice and ginger ale enhances the meal with its tropical charm and sweetness.

  • Crème Brûlée: For a sweet finish, this classic French dessert adds a luxurious ending, perfectly echoing the elegance of your Spinach Mushroom Chicken Crepes.

Each of these pairings enriches the overall meal experience, leaving your guests begging for more.

How to Store and Freeze Spinach Mushroom Chicken Crepes

Fridge: Store leftovers in an airtight container for up to 3 days. Reheat gently in an oven at 350°F (175°C) for best results, allowing them to regain their creamy texture.

Freezer: For longer storage, freeze the assembled and cooked crepes for up to 2 months. Wrap them individually in plastic wrap, then place in a freezer-safe container.

Reheating: When ready to enjoy, thaw overnight in the fridge and reheat in the oven until heated through, ensuring the béchamel sauce remains creamy.

Leftover Filling: Any leftover filling can be stored in the fridge for up to 3 days. Add it back to freshly cooked crepes for a quick meal!

Make Ahead Options

These Spinach Mushroom Chicken Crepes are fantastic for meal prep, allowing you to save time during a busy week! You can prepare the crepes and the filling up to 24 hours in advance. Simply make the crepes, cool them, and layer them between sheets of parchment paper before refrigerating. For the filling, sauté the leeks, mushrooms, and shredded chicken ahead of time, then refrigerate in an airtight container for up to 3 days. When you’re ready to serve, just reheat the filling and assemble the crepes with the béchamel sauce before baking. This way, you can enjoy tender, flavorful crepes just as delicious as if you made them fresh!

Spinach Mushroom Chicken Crepes Variations

Feel free to get creative and make these Spinach Mushroom Chicken Crepes your own! Each twist brings a unique flavor experience that’s sure to delight.

  • Gluten-Free: Use gluten-free flour in the batter and cornstarch for the béchamel sauce to keep this dish celiac-friendly.
  • Vegetarian: Replace chicken with roasted veggies like zucchini, bell peppers, or even artichoke hearts for a hearty, colorful filling.
  • Dairy-Free: Swap regular milk for almond or oat milk and use vegan butter to make the béchamel creamier without dairy.

Substituting can bring new life to your dishes! Imagine a fresh, vibrant take on your favorite meals.

  • Herb-Infused: Add fresh herbs like parsley or thyme to the filling for an aromatic boost that will enhance the layered flavors.
  • Extra Cheese: Consider adding a mix of cheeses—such as mozzarella for added stretch or feta for a tangy kick—inside the crepes before baking.
  • Spicy Kick: Spice things up with crushed red pepper flakes or diced jalapeños in the filling for a delightful heat that ignites the palate.

These variations will create versatile options that cater to all preferences. Plus, if you’re feeling adventurous, you might even want to explore other delightful dishes, like these Homemade Chicken Rolls or a nourishing Pure Nourishing Chicken Broth.

Spinach Mushroom Chicken Crepes Recipe FAQs

How do I choose ripe leeks for this recipe?
When selecting leeks, look for those that are firm, with a vibrant green color on the top and white stalks that are not wilted or yellowing. The size doesn’t matter much, but avoid any that have soft spots or dark blemishes, as those can indicate spoilage.

What is the best way to store leftovers?
Store any leftover Spinach Mushroom Chicken Crepes in an airtight container in the refrigerator for up to 3 days. To reheat, place them in a preheated oven at 350°F (175°C) for about 15 minutes, or until warmed through. This method helps maintain their deliciously creamy texture!

Can I freeze Spinach Mushroom Chicken Crepes? How?
Absolutely! To freeze, let the crepes cool completely after baking. Wrap each crepe individually in plastic wrap, then place them in a freezer-safe container or a resealable plastic bag. They can be stored for up to 2 months. When you’re ready to enjoy, simply thaw in the refrigerator overnight and reheat in the oven until warmed through.

What should I do if my crepes are tough?
If your crepes are turning out tough, it may be due to over-whisking the batter or cooking them at too high a temperature. Mix the batter just until combined and allow it to rest for 30 minutes to relax the gluten. Cooking them on medium heat and flipping at the right moment (when the edges lift) can also prevent toughness.

Are these crepes suitable for those with gluten allergies?
Yes, you can make Spinach Mushroom Chicken Crepes gluten-free! Use gluten-free all-purpose flour for both the crepes and the béchamel sauce. Just make sure that whatever brands you’re using are certified gluten-free to avoid cross-contamination.

Can I use dairy alternatives for the béchamel sauce?
Absolutely! You can substitute regular milk with almond, oat, or any plant-based milk for a dairy-free béchamel. When making the sauce, ensure the plant-based milk is warm before adding, and adjust the seasoning as needed to enhance the flavors. This way, everyone can enjoy these delightful crepes!

Spinach Mushroom Chicken Crepes

Spinach Mushroom Chicken Crepes for Cozy Comfort Food Nights

These Spinach Mushroom Chicken Crepes are a delightful blend of flavors, perfect for comforting dinner nights.
Prep Time 30 minutes
Cook Time 30 minutes
Resting Time 30 minutes
Total Time 1 hour 30 minutes
Servings: 4 crepes
Course: Dinner
Cuisine: French
Calories: 400

Ingredients
  

For the Crepes
  • 1 cup Gluten-free Flour Use this for a gluten-free version without sacrificing taste.
  • 2 large Eggs Essential for binding the crepe batter.
  • 1 cup Milk Creates a smooth batter; swap with plant-based milk for dairy-free.
  • 1 pinch Salt Just a pinch enhances all the flavors.
For the Filling
  • 2 cups Shredded Chicken Adds protein and a hearty texture; rotisserie chicken is a great time saver.
  • 1 cup Mushrooms Bring umami flavor and moisture; zucchini or bell peppers make delicious substitutes.
  • 1 cup Leeks Provide a mild onion flavor and subtle sweetness when sautéed in butter.
For the Béchamel Sauce
  • 3 tablespoons Butter For a rich flavor base; opting for unsalted gives you better control.
  • 2 tablespoons Flour Thickens the sauce; use cornstarch for a gluten-free alternative.
  • 2 cups Milk Creates a luscious, creamy texture; almond milk works well for a dairy-free touch.
  • 1 cup Gruyere Cheese Melts beautifully and enhances depth; Comte or mozzarella offer milder alternatives.

Equipment

  • Non-Stick Skillet
  • mixing bowl
  • sauté pan
  • Medium saucepan

Method
 

Crepe Preparation
  1. In a mixing bowl, whisk together gluten-free flour, eggs, milk, and a pinch of salt until smooth. Allow the crepe batter to rest for 30 minutes at room temperature.
  2. Heat a non-stick skillet over medium heat and lightly grease it with butter. Pour a small amount of batter into the skillet, swirling it to evenly coat the bottom. Cook for about 1-2 minutes or until the edges lift slightly, then flip and cook for an additional 30 seconds.
  3. Repeat this process until all the batter is used, keeping the cooked crepes warm under a kitchen towel.
Filling Preparation
  1. In a sauté pan, melt 2 tablespoons of butter over medium heat. Add sliced leeks and chopped mushrooms, cooking until they turn golden brown and tender, about 5-7 minutes.
  2. Mix in the shredded chicken and sauté briefly until heated through. Spoon about 2 tablespoons of this filling onto each crepe, then fold or roll them up.
Béchamel Sauce
  1. In a medium saucepan, melt 3 tablespoons of butter over medium heat. Whisk in gluten-free flour, stirring for about 1-2 minutes until it forms a smooth paste.
  2. Gradually add warm milk while continuously whisking to avoid lumps. Cook for about 5-7 minutes until the sauce thickens, then season with salt and pepper to taste.
Assembling and Baking
  1. Preheat your oven to 350°F (175°C). Pour the creamy béchamel sauce generously over the filled crepes in the baking dish.
  2. Sprinkle grated Gruyere cheese on top. Bake in the preheated oven for 20-25 minutes or until the top is golden and bubbly.

Notes

Use room temperature ingredients for a smoother crepe batter. Store leftovers in an airtight container for up to 3 days.

Delicious Chicken Burrito Casserole for Cozy Family Dinners

After a long, hectic day, the last thing anyone wants is a complicated dinner. That’s where my Easy Chicken Burrito Casserole comes to the rescue! This dish turns the comforting flavors of a classic burrito into a simple, one-pot meal that even the busiest of home chefs can whip up in no time. With tender chicken, seasoned rice, and vibrant vegetables all baked together and topped with gooey cheese, this casserole is not only family-friendly but also perfect for meal prep. Imagine having leftovers that are just as delicious the next day! Ready to bring some explosion of flavors to your dinner table? Let’s dive into this simple yet satisfying recipe!

Why is this casserole a must-try?

Simplicity: This Chicken Burrito Casserole is a one-pot wonder, making cleanup a breeze. No need for multiple pans or complicated steps; it’s perfect for busy weeknights!

Flavor explosion: Each bite bundles together savory chicken, perfectly cooked rice, and vibrant veggies, smothered in melted cheese that’s just calling out to be devoured.

Versatile: Whether you stick to the classic recipe or experiment with protein substitutions like Savory Chicken Cheesy or even opt for a vegetarian twist, this dish adapts to your cravings.

Meal Prep Champion: Whip up a batch on Sunday and enjoy delicious leftovers throughout the week. It stores well for up to five days, making it an ideal candidate for your meal prep!

Crowd-Pleaser: Perfect for family gatherings or casual dinners, everyone will love digging into this hearty casserole, similar to a cozy family feast like Homemade Chicken Pot that brings everyone together!

Chicken Burrito Casserole Ingredients

Get ready to create a flavorful feast!

For the Casserole

  • Long-Grain White Rice – Provides the essential base for your Chicken Burrito Casserole; remember to use dry rice for the best results.
  • Corn Kernels – Adds a delightful sweetness and texture; you can also substitute with frozen corn for convenience.
  • Shredded Cooked Chicken – The star of the dish, providing protein and flavor; leftover or rotisserie chicken works wonderfully to save time!
  • Chicken Broth – Infuses moisture and elevates the dish’s flavor; opt for low-sodium broth if you’re looking for a healthier option.
  • Monterey Jack Cheese – Melts beautifully on top for that gooey finish; feel free to substitute with cheddar or pepper jack to suit your taste.
  • Spices (chili powder, garlic powder, cumin, oregano, and salt) – These key elements enhance flavor and can be adjusted to suit your preferences.
  • Bell Pepper and Onion – Offer aromatic notes and vibrant color; other pepper varieties or shallots can work as substitutes if desired.

Optional Toppings

  • Avocado – Adds creaminess and freshness; perfect for balancing out the flavors.
  • Sour Cream – A classic addition that complements the casserole beautifully.
  • Salsa – Drizzle it on top for an added kick and burst of flavor.

This Chicken Burrito Casserole is sure to make your family dinner a hit and satisfy even the pickiest eaters!

Step‑by‑Step Instructions for Chicken Burrito Casserole

Step 1: Preheat the Oven
Begin by preheating your oven to 400°F (200°C). This temperature will ensure that your Chicken Burrito Casserole cooks evenly, allowing all the flavors to meld beautifully. While the oven heats up, gather your ingredients and a large baking dish to prepare for the next steps.

Step 2: Prep Ingredients
In your large baking dish, combine the dry long-grain white rice, corn kernels, chopped bell pepper, and onion. Sprinkle in the spices such as chili powder, garlic powder, cumin, oregano, and salt. Mix everything together well to ensure that the rice is coated with the aromatic spices; this will create a flavorful base for your casserole.

Step 3: Add Chicken & Broth
Gently fold in your shredded cooked chicken, making sure it’s evenly distributed throughout the ingredients. Next, pour in the chicken broth, which adds moisture and enhances the overall flavor of the Chicken Burrito Casserole. Stir everything together until combined; the liquid should cover the rice and other ingredients well.

Step 4: Cover and Bake
Once your ingredients are well mixed, cover the dish tightly with aluminum foil. Place the casserole in the preheated oven and bake for 50-60 minutes. The goal is for the rice to absorb the liquid and become tender, so keep an eye on it as the time approaches, ensuring it doesn’t dry out.

Step 5: Add Cheese
After baking, carefully remove the foil from the casserole, revealing the delicious contents inside. Sprinkle a generous amount of Monterey Jack cheese over the top. This cheesy layer will melt beautifully. Return the dish to the oven, uncovered, for an additional 5-10 minutes until the cheese is melted and bubbly, creating a delightful golden crust.

Step 6: Serve
Once the cheese has melted to perfection, take the Chicken Burrito Casserole out of the oven and let it cool for a few minutes. This will make serving easier. Optionally, garnish with fresh avocado, sour cream, or salsa to add some flair and additional flavors, and enjoy this comforting dish with your loved ones.

Expert Tips for Chicken Burrito Casserole

  • Cover While Baking: Always cover the casserole with foil to retain steam, ensuring the rice cooks properly and doesn’t dry out.

  • Check Liquid Levels: Different types of rice absorb liquids differently. Adjust the chicken broth based on whether you use white or brown rice to achieve the right texture.

  • Don’t Overcrowd Ingredients: Too many additions can affect cooking time and moisture levels. Stick to the recommended ingredients for the best results.

  • Rest After Baking: Allow the casserole to sit for a few minutes after baking. This helps the flavors meld together and makes serving easier.

  • Customize Wisely: While it’s fun to experiment, don’t stray too far from the base ingredients of this chicken burrito casserole to maintain its iconic flavor profile.

Chicken Burrito Casserole Variations

Feel free to let your creativity shine and personalize your Chicken Burrito Casserole to suit your taste buds!

  • Protein Alternatives: Swap shredded chicken for shredded turkey or ground beef. Not a meat lover? Try a plant-based protein for a hearty vegetarian version.

  • Grain Options: For a low-carb twist, use cauliflower rice instead of traditional white rice. Just remember to adjust the liquid ratio to avoid a soggy bottom!

  • Cheese Choices: While Monterey Jack is delicious, experimenting with cheddar or pepper jack can introduce a whole new flavor profile. The gooey texture will remain delightful!

  • Spice it Up: Looking for a little heat? Add diced jalapeños or a sprinkle of cayenne pepper to amp up the flavor and bring some excitement to your meal.

  • Vegetable Variety: Switch out bell peppers and onions for seasonal veggies. Zucchini, corn, or black beans can add new flavors and textures – you could even toss in leftover veggies from previous meals!

  • Sour Cream & Guacamole: Elevate the dip game by mixing sour cream or guacamole in with the casserole before baking. It will add creaminess and a lovely fresh flavor to the entire dish.

  • Extra Crunch: For an added texture, sprinkle tortilla chips or crushed tortilla strips over the cheese before returning it to the oven. They’ll create a delightful crunch on top!

  • Herb Enhancements: Fresh chopped cilantro or parsley can add a burst of brightness and freshness to each serving. Don’t hesitate to sprinkle it on top just before serving!

This Chicken Burrito Casserole is a blank canvas ready to support your culinary creativity. Each tweak not only personalizes your dish but also keeps mealtime exciting! And if you’re ever in need of more hearty chicken dishes, check out Honey Chili Chicken or try a delightful twist with Tropical Chicken Pineapple!

What to Serve with Chicken Burrito Casserole

A comforting casserole deserves delightful accompaniments that elevate your meal experience.

  • Warm Tortillas: Soft, warm tortillas can be a perfect side, allowing everyone to make their own burrito-inspired wraps with the casserole.
  • Fresh Guacamole: Creamy guacamole brings an avocado richness that wonderfully complements the savory flavors of the casserole.
  • Zesty Salsa: A side of salsa adds a refreshing twist, offering a burst of vibrant flavor that enhances every bite.
  • Mexican Street Corn Salad: This vibrant salad provides a crunchy, sweet contrast, balancing the creamy casserole with its fresh ingredients.
  • Black Beans: A side of seasoned black beans packs additional protein and works seamlessly with the casserole’s flavors—perfect for a hearty meal.
  • Cilantro Lime Rice: Fluffy rice tossed with cilantro and lime can be an excellent base, bringing zest and brightness to your plate.
  • Crispy Salad: A crisp side salad featuring romaine and a tangy vinaigrette refreshes the palate and adds delightful crunch.
  • Mexican Beer: Pair your meal with a light Mexican lager for a refreshing sip that complements the zest of the casserole wonderfully.
  • Churros: For dessert, serve warm churros sprinkled with cinnamon sugar, adding a sweet finish to your cozy dinner experience.

Make Ahead Options

These Chicken Burrito Casseroles are fantastic for meal prep enthusiasts! You can prepare the entire casserole up to 24 hours in advance by assembling all ingredients (dry rice, corn, vegetables, and shredded chicken) in your baking dish, then cover and refrigerate it. This ensures that the flavors meld beautifully. When you’re ready to cook, simply pour the chicken broth over the mixture and bake as directed. If you prefer, you can also cook, cool, and store leftovers for up to 3 days in the refrigerator. For best quality, ensure it’s tightly covered to maintain moisture. Just before serving, sprinkle on the cheese and return it to the oven until melted and bubbly, delivering delicious results with minimal effort!

How to Store and Freeze Chicken Burrito Casserole

  • Fridge: Store leftovers in an airtight container in the refrigerator for up to 5 days. This keeps the Chicken Burrito Casserole fresh and ready to enjoy again.

  • Freezer: For longer storage, freeze the casserole in a freezer-safe container for up to 3 months. Make sure to cool it completely before sealing tightly to prevent freezer burn.

  • Reheating: When ready to enjoy, thaw in the fridge overnight. Reheat individual portions in the microwave or warm the whole casserole in the oven at 350°F (175°C) until heated through.

  • Assembly Frozen: If you prefer, assemble the casserole (without baking), wrap tightly, and freeze. When ready to serve, bake directly from frozen, adding about 15-20 minutes to the cooking time.

Chicken Burrito Casserole Recipe FAQs

What kind of rice should I use for the Chicken Burrito Casserole?
Using long-grain white rice is ideal because it cooks evenly and absorbs flavors well. Make sure to use dry, uncooked rice for the best texture and results in your casserole.

How should I store leftovers of the Chicken Burrito Casserole?
Store any leftovers in an airtight container and keep them in the refrigerator for up to 5 days. It’s a great way to enjoy the delicious flavors again without the hassle of cooking anew!

Can I freeze Chicken Burrito Casserole? If so, how?
Absolutely! You can freeze your Chicken Burrito Casserole for up to 3 months. Allow it to cool completely, then store it in a freezer-safe container. For the best results, wrap it tightly in plastic wrap or foil to prevent freezer burn. To reheat, thaw it overnight in the fridge, and warm it in the oven at 350°F (175°C) until heated through.

What can I do if the rice isn’t cooked through after baking?
If the rice remains undercooked, add a little more chicken broth or water to the casserole, cover it with foil, and return it to the oven for an additional 10-15 minutes. This will help the rice absorb the extra liquid and finish cooking.

Are there any dietary considerations for the Chicken Burrito Casserole?
If you or someone in your family has dietary restrictions, you can easily adjust the recipe. Use gluten-free rice and low-sodium broth to make it gluten-free, or substitute the chicken with a plant-based protein for a vegetarian variant. Always check ingredient labels for allergies, especially with cheese and spices.

Chicken Burrito Casserole

Delicious Chicken Burrito Casserole for Cozy Family Dinners

This Chicken Burrito Casserole is a simple, one-pot meal that blends comforting flavors and is perfect for family dinners.
Prep Time 15 minutes
Cook Time 1 hour
Cooling Time 5 minutes
Total Time 1 hour 15 minutes
Servings: 6 servings
Course: Dinner
Cuisine: Mexican
Calories: 450

Ingredients
  

For the Casserole
  • 1 cup Long-Grain White Rice Use dry rice for best results.
  • 1 cup Corn Kernels Can substitute with frozen corn.
  • 2 cups Shredded Cooked Chicken Leftover or rotisserie chicken works well.
  • 2 cups Chicken Broth Opt for low-sodium for a healthier option.
  • 1 cup Monterey Jack Cheese Substitute with cheddar or pepper jack if preferred.
  • 1 tablespoon Chili Powder Adjust to taste.
  • 1 teaspoon Garlic Powder Adjust to taste.
  • 1 teaspoon Cumin Adjust to taste.
  • 1 teaspoon Oregano Adjust to taste.
  • 1 teaspoon Salt Adjust to taste.
  • 1 cup Bell Pepper Chopped.
  • 1 cup Onion Chopped.
Optional Toppings
  • 1 medium Avocado Sliced.
  • 1 cup Sour Cream
  • 1 cup Salsa

Equipment

  • oven
  • Large Baking Dish

Method
 

Step-by-Step Instructions
  1. Preheat your oven to 400°F (200°C).
  2. In a large baking dish, combine the dry long-grain white rice, corn kernels, chopped bell pepper, and onion. Mix in spices.
  3. Fold in the shredded chicken and pour in the chicken broth. Stir well until combined.
  4. Cover the dish tightly with aluminum foil and bake for 50-60 minutes.
  5. Remove the foil and sprinkle cheese over the top. Bake uncovered for an additional 5-10 minutes until cheese is melted.
  6. Let cool for a few minutes before serving. Optionally garnish with avocado, sour cream, or salsa.

Notes

This casserole can be stored in an airtight container in the refrigerator for up to 5 days, or frozen for up to 3 months.

Delicious Strawberry Pop-Tart Pie for Nostalgic Sweet Cravings

Strolling through the farmers’ market, I was greeted by a vibrant display of plump, sweet strawberries that instantly transported me back to my childhood. It made me think of creating a delightful Strawberry Pop-Tart Pie—a whimsical twist on a nostalgic favorite. This recipe merges the juicy goodness of fresh (or frozen) strawberries with a rich, buttery homemade crust. One of the best perks? It’s not just a stylish centerpiece for gatherings; it’s also effortless to whip up, making it perfect for both novice and seasoned bakers. And trust me, a slice of this pie paired with a scoop of vanilla ice cream will have everyone reminiscing about their own fond memories. Curious to learn how to bring this pie to life? Let’s dive into making your own delicious Frosted Strawberry Pop-Tart Pie!

Why Make Strawberry Pop-Tart Pie?

Nostalgic Flavor: This pie brings back memories of childhood with its sweet strawberry filling and flaky crust that captures the essence of a classic dessert.

Versatile Ingredients: Whether you opt for fresh or frozen strawberries, this recipe accommodates whatever you have on hand.

Easy to Prepare: With simple steps, even beginner bakers can create a stunning dessert that wows friends and family without fuss.

Impressive Presentation: Topped with royal icing and colorful sprinkles, this pie not only tastes amazing but looks fantastic on any dessert table, just like a classic Apple Pie.

Perfect for Sharing: Cut into generous slices, it’s ideal for gatherings, making you the star of your next brunch or family dinner.

Make-Ahead Friendly: You can bake it in advance and freeze it for later, simplifying your hosting duties, similar to how I manage with my Chicken Pot Pie preparation.

Strawberry Pop-Tart Pie Ingredients

• Gather your essentials for a scrumptious bake!

For the Filling

  • Strawberries – Fresh strawberries bring vibrant flavor and sweetness; feel free to use frozen strawberries in a pinch.
  • Sugar – Adjust the sweetness to taste, depending on how ripe your strawberries are.

For the Pie Crust

  • Pie Crust – A homemade crust lends rich flavor; if you’re short on time, a store-bought version works just fine!

For Frosting and Decoration

  • Royal Icing – This adds a glossy finish that captures the eye, making your Strawberry Pop-Tart Pie feel like a true treat!
  • Sprinkles – They’re optional but provide a fun pop of color that enhances the nostalgia.
  • Egg (for egg wash) – Brush on the crust for a beautiful golden color when baked.

Step‑by‑Step Instructions for Strawberry Pop-Tart Pie

Step 1: Prepare Strawberries
Begin by washing and trimming your fresh strawberries, removing the stems. Par cook the strawberries in a pot of simmering water for about 5 minutes, until they soften slightly but remain intact. Drain the strawberries well and let them cool while you prepare the pie crust. This process will make your filling easier to eat and enhance the flavors in your Strawberry Pop-Tart Pie.

Step 2: Make Pie Crust
If you’re making a homemade crust, combine flour, butter, sugar, and a pinch of salt in a mixing bowl. Use a pastry cutter or your fingers to mix until it resembles coarse crumbs. Add cold water, one tablespoon at a time, until a dough forms. Chill the dough for 30 minutes, then roll it out to fit your pie dish, leaving some excess for the top. A well-made crust is essential for your Strawberry Pop-Tart Pie.

Step 3: Layer Strawberries & Sugar
Take your chilled pie crust and fill it with the prepared strawberries. Evenly sprinkle sugar over the strawberries, adjusting the amount based on their sweetness. Spread them out gently to ensure every slice has a burst of berry goodness. This layering is crucial for creating delicious pockets of flavor in your Strawberry Pop-Tart Pie, making it irresistible to your family and friends.

Step 4: Cover Pie
Roll out the second crust for the top and gently lay it over the filled pie. Pinch the edges to seal securely, preventing any filling from leaking during baking. Use a sharp knife to cut several slits in the top crust, allowing steam to escape while baking. This step not only helps with even cooking but also adds a charming homemade touch to your Strawberry Pop-Tart Pie.

Step 5: Bake
Preheat your oven to 375°F (190°C). Once heated, place the pie on the middle rack and bake it for 45 minutes or until the crust is golden brown and flaky. Keep an eye on it during the last 10 minutes; if the edges brown too quickly, cover them with foil to prevent burning. The smell of the baking Strawberry Pop-Tart Pie will surely tempt your taste buds!

Step 6: Cool & Frost
After baking, remove the pie from the oven and allow it to cool on a wire rack for at least 30 minutes. This cooling period will help the filling set, making it easier to slice. Once cooled, prepare your royal icing by mixing powdered sugar with water until smooth. Spread the icing over the top of the pie and decorate with colorful sprinkles for a nostalgic finish that perfectly complements your Strawberry Pop-Tart Pie.

Expert Tips for Strawberry Pop-Tart Pie

  • Berry Selection: Choose sweet, ripe strawberries for the best flavor. If using frozen, ensure they’re thawed and well-drained to prevent a watery filling in your Strawberry Pop-Tart Pie.

  • Crust Technique: Avoid overly warm dough when making pie crust; it should be cold to create the flaky texture you desire. This is key in ensuring a beautiful, crispy crust.

  • Sealing Edges: Properly seal the edges of the pie to prevent the filling from bubbling over. Dampen the edges with a bit of water before crimping for a secure hold.

  • Baking Temperature: Always preheat your oven fully before baking. This helps the crust bake evenly and achieve that golden-brown perfection.

  • Cooling Time: Be patient and allow the pie to cool completely before slicing. This helps the filling to set, ensuring cleaner slices of your Strawberry Pop-Tart Pie.

  • Creative Customization: Don’t hesitate to experiment with various fruit fillings or flavor the icing. This way, you can create different versions of your delightful Strawberry Pop-Tart Pie for every occasion.

How to Store and Freeze Strawberry Pop-Tart Pie

Room Temperature: Allow the pie to cool completely before covering it with foil or plastic wrap. It can be stored at room temperature for up to 2 days.

Fridge: Store any leftover Strawberry Pop-Tart Pie in an airtight container in the fridge for up to 5 days. This helps maintain the freshness of the filling.

Freezer: For longer storage, slice the pie and wrap each piece tightly in plastic wrap, then place in a freezer-safe container. It can be frozen for up to 3 months. To enjoy, thaw in the fridge overnight and reheat in the oven for best results.

Reheating: Preheat the oven to 350°F (175°C) and place the pie slice on a baking sheet. Heat for about 10-15 minutes until warmed through, keeping that flaky crust crisp.

Strawberry Pop-Tart Pie Variations & Substitutions

Feel free to let your creativity shine and customize your pie with these fun twists and substitutions!

  • Frozen Strawberries: If fresh strawberries aren’t available, use thawed frozen ones for a quick and easy option that still packs a fruity punch.

  • Dairy-Free Crust: Swap butter for coconut oil or a vegan butter alternative in your pie crust to create a deliciously rich dairy-free version.

  • Different Fruits: Experiment with blueberries, raspberries, or cherries; these fruits add unique flavors that give your pie a delightful twist.

  • Lemon Zest: Add a teaspoon of lemon zest to your filling for a citrus kick that enhances the strawberry sweetness with bright, zesty notes.

  • Chocolate Drizzle: Melt some chocolate and drizzle it over the iced pie for an extra touch of indulgence that pairs beautifully with the fruity filling.

  • Nutty Crust: Mix ground almonds or walnuts into your pie crust for a crunchy texture that complements the soft filling; it adds an extra layer of flavor.

  • Cinnamon Sugar Topping: Sprinkle cinnamon sugar over the crust before baking to infuse warm spice notes that elevate the nostalgic flavors of your Strawberry Pop-Tart Pie.

  • Mini Tarts: Make individual mini tarts using muffin tins for easy-to-serve portions, perfect for gatherings or to satisfy sweet cravings throughout the week, just like a tasty Chicken Pot Pie!

Don’t be shy—mix and match these variations to create a Strawberry Pop-Tart Pie that’s uniquely yours!

What to Serve with Strawberry Pop-Tart Pie

Elevate your dessert experience with delightful accompaniments that will delight every palate at your table.

  • Vanilla Ice Cream: The creamy sweetness of vanilla ice cream creates a heavenly contrast to the tart strawberry filling.

  • Whipped Cream: Light and fluffy, whipped cream adds an airy texture that enhances the pie’s rich flavors.

  • Fresh Berries: A medley of fresh berries brightens up the plate and adds a refreshing burst of color and taste.

  • Chocolate Sauce: Drizzling warm chocolate sauce over each slice offers a decadent twist, perfect for chocolate lovers.

  • Mint Leaves: A sprinkle of fresh mint leaves not only adds a splash of color but also elevates the taste with a hint of freshness.

  • Sparkling Water: Serve with a bubbly drink to cleanse the palate and make your dessert feel extra special.

  • Lemonade: The refreshing tartness of lemonade pairs wonderfully, bringing a citrus zing that complements the strawberries beautifully.

  • Shortbread Cookies: Crunchy shortbread cookies add an additional layer of texture, making each bite of pie even more delightful.

  • Coffee or Tea: A warm cup of coffee or fragrant tea pairs perfectly, balancing the sweetness of the pie and inviting cozy conversation.

Make Ahead Options

These Strawberry Pop-Tart Pies are perfect for meal prep enthusiasts! You can prepare the pie crust and filling up to 24 hours in advance. Simply par cook the strawberries and layer them in the crust, then cover with plastic wrap and refrigerate until you’re ready to bake. This will keep the crust fresh and the flavors vibrant. Additionally, you can freeze the unbaked pie for up to 3 months; just make sure to wrap it tightly to prevent freezer burn. When ready to bake, simply pop the pie into the oven straight from the freezer, adding a few extra minutes to the baking time. With these make-ahead options, you’ll have a delightful dessert ready with minimal last-minute effort!

Strawberry Pop-Tart Pie Recipe FAQs

How do I choose the best strawberries for my pie?
Absolutely! Look for bright red, plump strawberries with a natural shine. They should be firm with no dark spots or mushy areas. If you’re buying frozen strawberries, ensure they aren’t clumped together, which indicates thawing and refreezing. Ripe strawberries are the key to a delicious filling in your Strawberry Pop-Tart Pie!

How should I store my Strawberry Pop-Tart Pie after baking?
Once your pie has cooled completely, store it at room temperature covered with foil or plastic wrap for up to 2 days. For longer freshness, transfer any leftovers to an airtight container and refrigerate for up to 5 days. This keeps the filling fresh and tasty, just like when you first baked it!

Can I freeze my Strawberry Pop-Tart Pie?
Absolutely! You can freeze the pie before baking. Wrap it tightly in plastic wrap, then in aluminum foil to protect it from freezer burn. When you’re ready to bake it, you can go straight from freezer to oven—just add an extra 10-15 minutes to the baking time. Alternatively, for convenience, slice the baked pie into individual portions and freeze each piece in plastic wrap for up to 3 months.

What if my pie crust turns out soggy?
Very! This can happen if the filling is too watery. To avoid this, be sure to drain your strawberries well and limit the amount of liquid in the filling. Additionally, pre-baking your crust for a few minutes before adding the filling—also known as blind baking—can help keep it nice and crisp.

Are there any allergens I should be aware of?
Yes, the main ingredients in this recipe include eggs and gluten. If you’re looking for alternatives, consider using egg substitutes for the wash, like almond milk or plant-based options. If you or someone you’re serving has gluten sensitivities, you can also find gluten-free pie crusts available in most grocery stores.

Can I make this recipe ahead of time?
Definitely! You can prepare the pie a day in advance, bake it, and let it cool completely before storing it in the fridge. Alternatively, if you plan on serving it later in the week, consider freezing it, as mentioned earlier—just remember to reheat carefully to restore that lovely flaky crust when serving!

Strawberry Pop-Tart Pie

Delicious Strawberry Pop-Tart Pie for Nostalgic Sweet Cravings

This Strawberry Pop-Tart Pie combines fresh strawberries and a buttery crust, perfect for nostalgic cravings.
Prep Time 30 minutes
Cook Time 45 minutes
Total Time 1 hour 15 minutes
Servings: 8 slices
Course: Dessert
Cuisine: American
Calories: 350

Ingredients
  

For the Filling
  • 2 cups Strawberries Fresh or frozen, trimmed and washed
  • 1/2 cup Sugar Adjust to taste
For the Pie Crust
  • 1 recipe Pie Crust Homemade or store-bought
For Frosting and Decoration
  • 1 cup Royal Icing For glossy finish
  • 1 cup Sprinkles Optional, for decoration
  • 1 large Egg For egg wash

Equipment

  • mixing bowl
  • Pie dish
  • Pot for cooking strawberries
  • Rolling Pin
  • Wire rack

Method
 

Preparation
  1. Wash and trim fresh strawberries, removing the stems. Par cook strawberries in simmering water for about 5 minutes.
  2. If making homemade crust, combine flour, butter, sugar, and salt. Mix until coarse. Add cold water until dough forms. Chill dough for 30 minutes.
  3. Fill the chilled pie crust with strawberries and sprinkle sugar over them, adjusting the amount as needed.
  4. Roll out the second crust for the top and lay over the filled pie. Seal edges, cut slits in top crust.
  5. Preheat oven to 375°F (190°C). Bake pie for 45 minutes until golden brown.
  6. Cool pie on a wire rack for at least 30 minutes. Prepare royal icing, spread on pie, and add sprinkles.

Notes

This pie can be made ahead of time and frozen for later use. Thaw and reheat for best results.

Hearty Irish Potato Pie: A Cozy Comfort Food Classic

There’s a certain magic in the air when you pull a freshly baked Irish Potato Pie from the oven, the golden crust glistening with anticipation. This heartwarming dish, filled with creamy potatoes, garlic, and cheese, is just what you need for cozy family gatherings or a comforting night in. What truly sets my recipe apart is its versatility and ease; you can whip it up in under an hour while effortlessly incorporating seasonal ingredients to keep things exciting. It strikes the perfect balance between rich flavors and that soul-soothing comfort food feeling. Curious how to create this delightful pie and make it your own? Let’s dive into the recipe and explore the delicious possibilities!

Why is Irish Potato Pie a must-try?

Hearty Comfort: This Irish Potato Pie is the epitome of comfort food, providing a warm, filling hug for your taste buds.
Flexible Creation: With options to add seasonal ingredients like spinach or sweet corn, this recipe allows for personalization, elevating your dining experience.
Quick and Easy: Ready in under an hour, it’s perfect for busy weeknights or spontaneous get-togethers.
Rich, Creamy Filling: The creamy potato filling, blended with savory garlic and sharp cheese, creates a rich flavor profile that will have everyone asking for seconds!
Crowd-Pleaser: Whether you’re serving it at a family dinner or potluck, this dish is sure to impress and satisfy your guests. If you’re looking for more potato inspirations, check out my recipes for Savory Onion Potato and Zucchini Potato Fritters.

Irish Potato Pie Ingredients

For the Filling

  • Russet Potatoes – Four large, peeled and cubed; essential for a creamy filling with the right texture. Substitute with Yukon Gold for a slightly different flavor.
  • Heavy Cream – 1 cup; adds richness and smoothness to the filling; can substitute with milk for a lighter version, though texture will differ.
  • Unsalted Butter – 4 tablespoons; provides a rich taste and helps achieve a creamy mash. No substitutes recommended for the best flavor.
  • Salt – 1 teaspoon; enhances all flavors; adjust to taste if sodium intake is a concern.
  • Black Pepper – ½ teaspoon; offers spice; increase for a bit more heat.
  • Nutmeg – ¼ teaspoon; adds warmth and depth; optional if preferred.
  • Shredded Sharp Cheddar Cheese – 1 cup; delivers a savory note and forms a golden crust; swap with Gruyère for a different cheese profile.
  • Onion – 1 finely chopped; provides savory depth to the filling; can be replaced with shallots for a milder flavor.
  • Garlic – 2 cloves, minced; enhances the flavor of the pie; garlic powder can be a quick alternative.
  • Fresh Chives – 2 tablespoons, chopped; adds color and mild onion flavor; scallions can be used instead.

For the Crust

  • Pre-made Pie Crust – 1 (store-bought or homemade); saves time; homemade is recommended for a flakier, personalized crust.

Feel the excitement build as you gather these ingredients for your Irish Potato Pie – it’s the perfect blend waiting to be transformed into a comforting home-cooked meal!

Step‑by‑Step Instructions for Irish Potato Pie

Step 1: Prepare Potatoes
Start by placing the peeled and cubed Russet potatoes into a large pot of salted water. Bring the water to a boil over medium-high heat and let the potatoes cook for 15-20 minutes until fork-tender. Once tender, drain the potatoes well and return them to the pot, ready for mashing.

Step 2: Mash Filling
Add the heavy cream, unsalted butter, salt, black pepper, and optional nutmeg to the drained potatoes in the pot. Using a potato masher, mash the mixture until it reaches a smooth and creamy consistency. This savory filling will serve as the heart of your Irish Potato Pie, so ensure it’s well blended and flavorful.

Step 3: Sauté Aromatics
In a skillet, melt 1 tablespoon of butter over medium heat. Once melted, add the finely chopped onion and sauté for about 5 minutes, or until it becomes translucent. Stir in the minced garlic and cook for an additional minute, just until fragrant. This aromatic mixture will add depth and flavor to your pie’s filling.

Step 4: Combine Ingredients
Gently fold the sautéed onion and garlic mixture into the creamy mashed potatoes. Next, add half of the shredded sharp cheddar cheese and the chopped fresh chives, mixing them in carefully. This combination enhances the richness of the filling and gives your Irish Potato Pie that delightful, savory flavor everyone loves.

Step 5: Assemble Pie
Take a pre-made pie crust and pour the creamy potato mixture into it, smoothing the top with a spatula. Sprinkle the remaining shredded cheddar cheese evenly over the top, creating a delicious cheesy crust. Ensuring an even spread helps the cheese melt beautifully, forming a golden-brown topping while baking.

Step 6: Bake
Preheat your oven to 375°F (190°C). Place the assembled Irish Potato Pie in the oven and bake for 25-30 minutes. Keep an eye on it as it bakes; the cheese should bubble and the top should turn golden brown. Once ready, remove it from the oven and let it cool for about 10 minutes before slicing and serving.

What to Serve with Irish Potato Pie

Enhance your delightful pie experience with these perfect accompaniments that balance flavors and textures beautifully.

  • Crisp Side Salad: A fresh salad with mixed greens, cherry tomatoes, and a light vinaigrette provides a refreshing contrast to the creamy pie. The crispness of the greens invigorates each bite.

  • Roasted Vegetables: Seasonal roasted veggies such as carrots, bell peppers, and zucchini add a hearty, wholesome element. Their caramelized flavors complement the savory richness of the pie.

  • Garlic Bread: Golden, buttery garlic bread is a comforting side that echoes the garlic notes within the pie. It’s perfect for scooping up that creamy filling.

  • Steamed Broccoli: Lightly steamed broccoli with a sprinkle of salt or lemon juice brings a vibrant color and a slight crunch to your plate. Its subtle earthiness pairs well with the richness.

  • Chardonnay: A chilled glass of Chardonnay enhances the meal with its crisp acidity that cuts through the creamy pie, elevating every mouthful.

  • Apple Crisp: End on a sweet note with a warm apple crisp drizzled with vanilla ice cream. The contrasting flavors and textures create a delightful finale to your meal.

Expert Tips for Irish Potato Pie

  • Prevent Sogginess: Drain potatoes thoroughly after boiling to avoid a soggy crust. Excess moisture can lead to a less satisfying pie texture.

  • Crispy Bottom Crust: To achieve a crispier bottom, consider pre-baking the pie crust for a few minutes before adding the filling. This will help keep the crust flaky.

  • Perfectly Creamy Filling: Mix in the heavy cream and butter gently to avoid excess moisture. A creamy filling should be rich but not too wet.

  • Herb Variations: Don’t hesitate to experiment with fresh herbs like thyme or rosemary. They can add a delightful twist to your Irish Potato Pie’s flavor profile.

  • Cheese Choices: While sharp cheddar is traditional, feel free to swap in Gruyère or even a mixture for a unique flavor. Just remember to use a cheese that melts well for that glorious topping!

Make Ahead Options

These Irish Potato Pie preparations are perfect for busy home cooks looking to save time during the week! You can prepare the creamy potato filling and store it in an airtight container in the refrigerator for up to 3 days. Simply boil and mash the potatoes, then mix in the cream, butter, and seasonings as directed. For best results, wait to sauté the onions and garlic until the day you plan to bake. When ready to enjoy your pie, simply fold the aromatics into the filling, assemble in the pre-made crust, and bake. This way, you’ll have a delicious, warm Irish Potato Pie that feels freshly made with minimal effort!

How to Store and Freeze Irish Potato Pie

  • Room Temperature: Allow the Irish Potato Pie to cool completely before storing. It can be left out for up to 2 hours but should not be left unrefrigerated for longer.

  • Fridge: Store leftovers in an airtight container in the fridge for up to 3 days. Ensure the pie is completely cooled before sealing to maintain its texture.

  • Freezer: Wrap the pie tightly in plastic wrap and then foil before freezing to prevent freezer burn. It can be frozen for up to 1 month for optimal flavor.

  • Reheating: To reheat, thaw overnight in the refrigerator if frozen, then bake at 350°F (175°C) until heated through, about 20-30 minutes. Enjoy that delicious Irish Potato Pie just like fresh!

Irish Potato Pie Variations & Substitutions

Feel free to get creative and add your personal touch to this warming Irish Potato Pie, making it uniquely yours!

  • Seasonal Spinach: Fold in fresh or sautéed spinach in the spring for a delightful color and added nutrition.
  • Sweet Corn Addition: Toss in some sweet corn during summer months for a burst of sweetness and texture.
  • Creamy Dairy-Free: Use coconut milk or almond milk instead of heavy cream for a lighter, dairy-free version while still keeping it creamy.
  • Herb Twist: Mix in some fresh rosemary or thyme—these fragrant herbs can elevate the flavor profile and add complexity.
  • Extra Crunch: Sprinkle crispy bacon bits or breadcrumbs over the top before baking for added crunch and savory goodness.
  • Different Cheeses: Substitute sharp cheddar with Gruyère or fontina for a different melting experience and slightly bolder taste.
  • Caramelized Onions: Swap regular onions for caramelized onions for a sweeter and richer flavor that deepens the pie’s profile.
  • Spicy Kick: Add a pinch of crushed red pepper flakes or diced jalapeños for those who enjoy a bit of heat in their comforting dishes.

Ready for more potato-centric inspiration? Check out my delicious Savory Potato Mushroom Cake or indulge in some unique Tuna Potato Pancakes!

Irish Potato Pie Recipe FAQs

What type of potatoes should I use for Irish Potato Pie?
I recommend using four large Russet potatoes, which are perfect for achieving that creamy texture essential to the filling. You could also opt for Yukon Gold potatoes for a slightly different flavor, but remember that they may yield a creamier consistency.

How should I store leftover Irish Potato Pie?
Once cooled, store your Irish Potato Pie in an airtight container in the fridge for up to 3 days. Make sure it’s completely cooled before sealing; this helps maintain its delightful texture and flavor.

Can I freeze Irish Potato Pie?
Absolutely! To freeze, wrap the pie tightly in plastic wrap, followed by aluminum foil to prevent freezer burn. It will keep well for up to 1 month. When you’re ready to enjoy it, just thaw it overnight in the refrigerator and reheat it at 350°F (175°C) until warmed through—usually around 20-30 minutes.

Why is my Irish Potato Pie filling too runny?
If your filling turns out runny, it might be due to excess moisture from the potatoes. Ensure that you drain them well after boiling. You can also consider mashing a bit longer or even adding a bit more shredded cheese or a thickener like cornstarch to achieve the desired consistency.

Can I use different herbs or toppings?
Yes! Feel free to experiment with fresh herbs like thyme or rosemary for added flavor. Toppings like crispy bacon bits, caramelized onions, or even breadcrumbs can add fabulous texture and elevate your Irish Potato Pie to new heights!

Is Irish Potato Pie suitable for dietary restrictions?
If you’re making this pie for someone with dietary restrictions, be mindful of the cheese, cream, and butter used. Consider dairy-free alternatives like plant-based cream or vegan cheese. For gluten-free needs, select a gluten-free pie crust or create a crustless version!

Irish Potato Pie

Hearty Irish Potato Pie: A Cozy Comfort Food Classic

Enjoy a delightful Irish Potato Pie filled with creamy potatoes, garlic, and cheese, perfect for family gatherings.
Prep Time 20 minutes
Cook Time 30 minutes
Cooling Time 10 minutes
Total Time 1 hour
Servings: 6 slices
Course: Dinner
Cuisine: Irish
Calories: 350

Ingredients
  

For the Filling
  • 4 large Russet Potatoes peeled and cubed
  • 1 cup Heavy Cream can substitute with milk
  • 4 tablespoons Unsalted Butter no substitutes recommended
  • 1 teaspoon Salt adjust to taste
  • ½ teaspoon Black Pepper increase for more heat
  • ¼ teaspoon Nutmeg optional
  • 1 cup Shredded Sharp Cheddar Cheese swap with Gruyère if desired
  • 1 Onion finely chopped
  • 2 cloves Garlic minced
  • 2 tablespoons Fresh Chives chopped
For the Crust
  • 1 Pre-made Pie Crust store-bought or homemade

Equipment

  • Large pot
  • Skillet
  • potato masher
  • spatula

Method
 

Step-by-Step Instructions for Irish Potato Pie
  1. Start by placing the peeled and cubed Russet potatoes into a large pot of salted water. Bring the water to a boil over medium-high heat and let the potatoes cook for 15-20 minutes until fork-tender. Once tender, drain the potatoes well and return them to the pot, ready for mashing.
  2. Add the heavy cream, unsalted butter, salt, black pepper, and optional nutmeg to the drained potatoes in the pot. Using a potato masher, mash the mixture until it reaches a smooth and creamy consistency.
  3. In a skillet, melt 1 tablespoon of butter over medium heat. Once melted, add the finely chopped onion and sauté for about 5 minutes, or until it becomes translucent. Stir in the minced garlic and cook for an additional minute.
  4. Gently fold the sautéed onion and garlic mixture into the creamy mashed potatoes. Next, add half of the shredded sharp cheddar cheese and the chopped fresh chives, mixing them in carefully.
  5. Take a pre-made pie crust and pour the creamy potato mixture into it, smoothing the top with a spatula. Sprinkle the remaining shredded cheddar cheese evenly over the top.
  6. Preheat your oven to 375°F (190°C). Place the assembled Irish Potato Pie in the oven and bake for 25-30 minutes. Once ready, remove it from the oven and let it cool for about 10 minutes before slicing and serving.

Notes

Prevent sogginess by draining potatoes thoroughly after boiling. For a crispier bottom crust, pre-bake the pie crust for a few minutes.

Deliciously Smooth Healthy Homemade Protein Shake Recipe

As I stood in the kitchen with the morning sun streaming through the window, I felt the familiar tug for something delicious yet nutritious to kickstart my day. That’s when my go-to recipe, the Healthy Homemade Protein Shake, came to the rescue. Not only is this shake a breeze to whip up, but it’s also completely customizable, making it the ideal companion for those busy mornings or post-workout cravings. Packed with protein and vibrant flavors, this shake keeps me feeling full and satisfied, all while fitting perfectly into my health goals. Whether I’m celebrating a fitness triumph or just trying to squeeze in some extra nutrition, this shake has become a staple in my routine. Curious about the best part? You can mix and match ingredients to make it your own. What delightful flavors will you choose for your shake today?

Why You’ll Love This Protein Shake?

Customization at its finest: This recipe invites you to play with flavors, making it truly yours.
Packed with nutrients: Each ingredient serves a purpose, so you’re nourishing more than just your taste buds.
Quick and easy: Whip it up in minutes, perfect for those busy mornings.
Smooth, creamy texture: Each sip feels indulgent yet guilt-free—who wouldn’t love that?
Great for everyone: Whether you’re weight loss-focused or aiming to build muscle, it fits perfectly into your lifestyle.
Secrets to versatility: Try incorporating components from other recipes like Homemade Chicken Pot if you’re feeling adventurous!

Healthy Homemade Protein Shake Ingredients

  • For the Base
    Milk (1 cup) – This liquid base creates a smooth texture; swap with any plant-based milk for a dairy-free treat.
    Banana (1) – Provides natural sweetness and creaminess; for a twist, replace it with avocado for a creamy consistency without added sugar.
    Ice Cubes (1/2 cup) – Chill and thicken your shake; frozen fruits are a great substitute for added flavor.

  • For the Protein
    Protein Powder (1 scoop, plain/unflavored) – The star of your shake, offering the protein boost needed; consider vanilla protein powder for a sweeter profile without extra sweetener.

  • For Sweetness
    Honey/Maple Syrup/Agave Nectar (2 teaspoons) – Sweeten your shake with any of these options; you can also omit for a no-sugar addition or swap for a ripe date for natural sweetness.

  • Optional Add-ins
    Fresh or Frozen Berries/Sliced Fruit – Add a burst of flavor and vitamins to your shake.
    Spinach or Kale – Boosts nutrients without changing the flavor; a healthy hidden vegetable addition!
    Greek Yogurt/Cottage Cheese – Enhances creaminess and increases protein content for a satisfying shake.
    Nut Butter – Introduces healthy fats and a rich taste; perfect for peanut or almond butter lovers!
    Collagen Peptides – Offers extra protein alongside skin and health benefits.
    Raw Cacao/Matcha – Elevates your shake with unique flavors and added antioxidants.
    Chia Seeds/Ground Flaxseed/Hemp Hearts – Add omega-3 fatty acids and fiber for a nutritional boost.
    Spices (vanilla, cinnamon, nutmeg) – Infuse your shake with delightful flavor nuances.

This Healthy Homemade Protein Shake is not just about nourishment; it’s an experience waiting to be crafted by you!

Step‑by‑Step Instructions for Healthy Homemade Protein Shake

Step 1: Prepare Your Base
Start by pouring 1 cup of your chosen milk into a powerful blender. This will serve as the smooth liquid base for your Healthy Homemade Protein Shake. Follow with 1 ripe banana, which adds a delightful creaminess and natural sweetness. If you prefer alternatives, consider avocado for a velvety texture.

Step 2: Add Ice and Protein
Next, toss in 1/2 cup of ice cubes for a refreshing chill and thickness. Then, add 1 scoop of plain or vanilla protein powder, which is the key ingredient offering essential protein. At this stage, the blend should be looking colorful and inviting, filled with potential for a delicious shake.

Step 3: Customize with Add-Ins
Now it’s time to customize! If you want to amp up your Healthy Homemade Protein Shake, include optional add-ins like a handful of fresh or frozen berries, a scoop of Greek yogurt, or a spoonful of nut butter. Blend in some spinach or kale for a nutrient boost that remains surprisingly subtle in flavor.

Step 4: Blend Until Smooth
Secure the blender lid tightly, and blend everything on medium speed for about 30–45 seconds. Keep an eye on the mixture as it transforms into a smooth and creamy consistency; you might need to stop once and scrape down the sides if necessary. The shake should look velvety and homogenous when ready.

Step 5: Taste and Adjust
Before serving, taste your Healthy Homemade Protein Shake. If you want a bit more sweetness or flavor, add 2 teaspoons of honey, maple syrup, or your preferred sweetener, and blend again for 10 seconds. This ensures the flavors are well integrated, creating a shake that’s irresistibly delicious.

Step 6: Serve Immediately
Pour your shake into a tall glass, and enjoy it right away for the best texture and freshness. If you’re feeling fancy, garnish it with a sprinkle of cinnamon or some fresh fruit slices on top. Your Healthy Homemade Protein Shake is now ready to be savored, rich in nutrients and full of flavor.

How to Store and Freeze Healthy Homemade Protein Shake

Fridge: Store your shake in an airtight container for up to 3 hours to keep it fresh. Shake well before consuming, as separation may occur.

Freezer: For longer storage, pour the shake into ice cube trays and freeze. Once frozen, transfer the cubes to a zip-top bag for easy future use in smoothies or shakes.

Thawing: To enjoy, simply let the frozen cubes thaw in the fridge overnight or blend them into your smoothie for a cold, thick texture without extra ice.

Make-Ahead: If you prepare this Healthy Homemade Protein Shake in advance, remember that it’s best enjoyed fresh but will still taste great within a few hours when stored correctly.

Make Ahead Options

These Healthy Homemade Protein Shakes are perfect for busy home cooks looking to save time without compromising on nutrition! You can prepare the base ingredients—milk, banana (or avocado), and protein powder—up to 24 hours in advance by measuring them and storing them in an airtight container in the refrigerator. For added convenience, you can also portion the ice cubes and any optional fruits and veggies in freezer bags, keeping them fresh. When you’re ready to enjoy, simply combine the prepped ingredients in a blender, add your thickening ice and any desired add-ins, and blend until smooth. This prep method ensures a creamy shake that’s just as delicious, making healthy living easy and satisfying!

What to Serve with Healthy Homemade Protein Shake

Indulging in a delicious protein shake can be the perfect start or end to a satisfying meal; let’s explore delightful companions to elevate your experience.

  • Fresh Fruit Salad: A colorful medley of seasonal fruits adds a vibrant, refreshing note, amplifying the nutrients while satisfying your sweet cravings.

  • Whole Grain Toast: Crunchy and hearty, this toast provides a satisfying texture and pairs beautifully with a spread of almond butter or avocado for healthy fats.

  • Granola Parfait: Layer creamy yogurt with crunchy granola and berries for a delightful pairing, offering a contrast in texture and a boost in flavor. It’s both satisfying and visually stunning!

  • Oatmeal Bowl: A warm oatmeal topped with nuts and fresh fruit complements your shake’s cold kick while offering a comforting and hearty option.

  • Veggie Sticks and Hummus: The crunchy, fresh veggies along with creamy hummus create an enticing crunch that balances the smoothness of your protein shake, making it a perfect snack blend.

  • Herbal Tea: For a warm drink, herbal tea evens out the coolness of your shake, providing a calming and aromatic side to your protein-packed moment.

  • Dark Chocolate Square: Just a bite of rich, dark chocolate can enhance your protein shake’s living experience with a touch of indulgence, satisfying those chocolate cravings healthily.

Pairing these delicious options not only enhances your protein shake experience but also creates a wholesome meal you’ll feel great about!

Healthy Homemade Protein Shake Variations

Feel free to get creative with your Healthy Homemade Protein Shake! Here are some delightful twists to make it your own.

  • Dairy-Free: Use almond or oat milk instead of regular milk for a creamy, dairy-free shake. This opens up a whole new world of flavors!
  • Banana Substitute: Swap the banana for avocado to achieve a luscious, creamy texture without the sweetness, perfect for those who prefer less sugar.
  • Frozen Fruits: Replace ice cubes with your favorite frozen fruits for both chill and a flavor boost. Berries or mango can bring a delightful twist!
  • Protein Power-Up: Add a scoop of Greek yogurt or cottage cheese to increase the protein content and creaminess—an ideal option post-workout!
  • Nutty Goodness: Blend in a spoonful of almond butter or peanut butter for a rich and satisfying shake that adds healthy fats.
  • Choco-Lover’s Delight: For a chocolatey version, mix in raw cacao powder or chocolate protein powder. It’s like having dessert for breakfast!
  • Superfood Boost: Stir in chia seeds or flaxseed for added fiber and omega-3 goodness, an easy way to enhance your shake’s nutrient profile.
  • Spice it Up: Experiment with spices like cinnamon or nutmeg to add depth to the flavor. A sprinkle can transform your shake into a cozy treat!

With these variations, the possibilities are endless! You might even want to enjoy your shake alongside a side of Homemade French Fries for a fun combination. What flavors are you excited to try today?

Expert Tips for the Best Healthy Homemade Protein Shake

  • Layer Ingredients: Start with the liquid base first to ensure a smooth blend. Adding ingredients in the right order prevents clumping.

  • Watch the Sweetness: If using flavored protein powder, consider skipping additional sweeteners. This avoids an overly sweet shake that masks natural flavors.

  • Be Creative: Don’t hesitate to experiment! Swap out fruits or greens based on seasonal availability or personal taste to elevate your Healthy Homemade Protein Shake.

  • Blend Efficiently: Use a high-powered blender to achieve a silky texture; under-blending can leave lumps in your shake.

  • Serve Fresh: For the best taste and texture, enjoy your shake immediately after blending. If you store it, give it a good shake to reincorporate ingredients.

Healthy Homemade Protein Shake Recipe FAQs

What type of milk is best for a protein shake?
Absolutely! You can use any milk you prefer. Regular cow’s milk creates a creamy base for your shake, but for a dairy-free option, almond milk, oat milk, or coconut milk are fantastic substitutes. The choice of milk can slightly alter the flavor and texture, so I recommend experimenting to find your favorite!

How long can I store my protein shake in the fridge?
Your Healthy Homemade Protein Shake is best enjoyed fresh, but you can store it in an airtight container in the fridge for up to 3 hours. I often keep it chilled in a mason jar; just remember to give it a good shake before drinking, as ingredients may separate over time.

Can I freeze my protein shake?
Certainly! To freeze your shake, pour it into ice cube trays and freeze until solid. This way, you can pop out a few cubes and blend them into your smoothies later. For the best results, transfer the frozen cubes into a zip-top bag for long-term storage; they’ll keep well for up to 3 months.

What can I add to enhance my shake’s nutrition?
Feel free to customize! Adding ingredients like spinach or kale boosts nutrients without affecting the flavor much. You can also incorporate chia seeds or ground flaxseed for extra fiber and omega-3 fatty acids. Simply toss in a tablespoon of any of these add-ins while blending—it’s a great way to sneak in extra health benefits!

Is this protein shake suitable for those with allergies?
Great question! This Healthy Homemade Protein Shake is highly customizable to fit various dietary needs. For nut allergies, simply omit nut butters and use seeds or alternative milks. If you’re lactose intolerant, choose plant-based milk and skip the yogurt. Always double-check ingredient labels, like protein powders, to ensure they’re allergy-friendly.

What should I do if my shake isn’t thick enough?
If your shake comes out thinner than expected, don’t worry! You can thicken it by adding more ice cubes or frozen fruit, which will not only enhance the texture but also give your shake a flavorful punch. Alternatively, blending in a banana or adding oats can help create that desired creamy consistency.

Healthy Homemade Protein Shake

Deliciously Smooth Healthy Homemade Protein Shake Recipe

Kickstart your day with a Healthy Homemade Protein Shake that is customizable, nutritious, and delicious.
Prep Time 5 minutes
Total Time 5 minutes
Servings: 1 shake
Course: Drinks
Cuisine: Healthy
Calories: 300

Ingredients
  

For the Base
  • 1 cup Milk Any kind of milk, including plant-based.
  • 1 Banana For creaminess and sweetness; can substitute with avocado.
  • 1/2 cup Ice Cubes Or frozen fruits for added flavor.
For the Protein
  • 1 scoop Protein Powder Plain or vanilla protein powder.
For Sweetness
  • 2 teaspoons Honey/Maple Syrup/Agave Nectar Optional sweeteners.
Optional Add-ins
  • Fresh or Frozen Berries/Sliced Fruit Add flavor and vitamins.
  • Spinach or Kale Boosts nutrients without altering flavor.
  • Greek Yogurt/Cottage Cheese Enhances creaminess and protein content.
  • Nut Butter Rich taste and healthy fats.
  • Collagen Peptides Extra protein and health benefits.
  • Raw Cacao/Matcha For unique flavors and antioxidants.
  • Chia Seeds/Ground Flaxseed/Hemp Hearts Provide omega-3s and fiber.
  • Spices (vanilla, cinnamon, nutmeg) For added flavor.

Equipment

  • Blender

Method
 

Step-by-Step Instructions
  1. Step 1: Prepare Your Base: Pour 1 cup of milk into a blender, followed by 1 ripe banana.
  2. Step 2: Add Ice and Protein: Add 1/2 cup of ice cubes and 1 scoop of protein powder.
  3. Step 3: Customize with Add-Ins: Add any optional ingredients as desired.
  4. Step 4: Blend Until Smooth: Blend on medium speed for 30–45 seconds.
  5. Step 5: Taste and Adjust: Taste your shake and add sweeteners if needed, blending again.
  6. Step 6: Serve Immediately: Pour into a glass and enjoy fresh.

Notes

Enjoy this shake immediately or store in the fridge for up to 3 hours. Shake well before consuming if separated.

Toffee & Milk Chocolate Peanut Butter Cookies You’ll Love

As I rummaged through my pantry the other day, a hidden treasure caught my eye—an unopened bag of toffee bits just waiting to be transformed into something special. It sparked the idea for these Gluten-Free Toffee & Milk Chocolate Peanut Butter Cookies, a delightful treat that marries the rich nuttiness of peanut butter with the sweet crunch of toffee and melty chocolate. Not only are these cookies quick to whip up, making them perfect for unexpected guests or a late-night craving, but they also cater to gluten-free diets without sacrificing flavor or texture. Each cookie is a chewy masterpiece, ready to provide that nostalgic comfort of homemade goodness. Curious about how to bring this tasty delight to life right in your own kitchen? Let’s dive into the recipe!

Why You’ll Crave These Cookies?

Irresistible Flavor Combination: The rich blend of toffee, milk chocolate, and peanut butter creates a symphony of taste that will have you reaching for seconds.
Gluten-Free Goodness: Enjoy the indulgence without the gluten, making these treats perfect for everyone!
Quick and Easy: With simple ingredients and minimal prep, you can whip up a batch in no time—great for surprise visitors.
Nostalgic Treat: These cookies evoke the warmth of home baking, reminiscent of childhood favorites, perfect for sharing with family.
Customizable Options: Feel free to replace the toffee with mini M&Ms or use almond butter for a fun twist!
For more delightful cookie recipes, check out my Nutty Apricot Cookies or Chocolate Date Cookies to expand your offerings.

Toffee & Milk Chocolate Peanut Butter Cookies

Get ready to bake some magic with these delightful ingredients!

For the Batter

  • Peanut Butter – Provides structure and gives these cookies the classic nutty flavor; creamy or crunchy, it’s your choice!
  • Brown Sugar – Adds sweetness and a chewy texture; coconut sugar can be used for a lighter touch.
  • Eggs – Binds everything together and helps the cookies rise; no substitutes here for best results.
  • Vanilla Extract – This enhances the flavor profile, making your cookies extra warm and inviting.

For the Chocolatey Goodness

  • Milk Chocolate Chips – Offer sweetness and a creamy texture that pairs perfectly with the peanut butter; swap for dark chocolate chips for a richer experience.
  • Toffee Bits – Sprinkle in delightful crunch and a caramel flavor; if unavailable, finely chopped nuts can be a tasty alternative.

With these ingredients for your Toffee & Milk Chocolate Peanut Butter Cookies, you’re just moments away from a delicious homemade treat!

Step‑by‑Step Instructions for Toffee & Milk Chocolate Peanut Butter Cookies

Step 1: Mix Wet Ingredients
In a large mixing bowl, combine 1 cup of peanut butter, 1 cup of brown sugar, and 2 large eggs. Using an electric mixer, beat the mixture on medium speed until it is smooth and creamy, about 2-3 minutes. Add in 1 teaspoon of vanilla extract and continue mixing until well incorporated. The batter should be thick and glossy.

Step 2: Incorporate Dry Ingredients
Gradually fold in 1 cup of milk chocolate chips and 1 cup of toffee bits into the peanut butter mixture. Use a spatula to gently mix until everything is evenly distributed, and you can see the chocolate and toffee peeking through the thick cookie dough. This ensures each cookie gets a delightful crunch of toffee and a splash of chocolate.

Step 3: Shape Cookies
Preheat your oven to 350°F (175°C) while preparing your baking sheets. Line them with parchment paper to prevent sticking. Using a cookie scoop or tablespoon, portion out the cookie dough onto the lined sheets, spacing them about 2 inches apart. You should make about 12 to 15 cookies, ensuring they have room to spread as they bake.

Step 4: Bake
Once your oven is preheated, place the cookie sheets in the oven and bake for 12-15 minutes. Keep an eye on them; the edges should be set and starting to turn golden, while the tops might look a little soft. This is key to achieving that chewy texture in your Toffee & Milk Chocolate Peanut Butter Cookies.

Step 5: Cool
After baking, remove the cookie sheets from the oven and let them cool on the sheets for about 5 minutes. This allows them to firm up slightly before transferring. Using a spatula, carefully move the cookies to wire racks to cool completely. Once cooled, you’ll be left with irresistibly chewy cookies perfect for snacking!

What to Serve with Toffee & Milk Chocolate Peanut Butter Cookies

These tempting cookies are perfect to enjoy on their own or alongside delightful complements that enhance your snacking experience.

  • Chilled Milk: The classic pairing! A tall glass of cold milk balances the sweetness and richness of the cookies, creating a comforting treat.
  • Vanilla Ice Cream: A scoop of creamy vanilla ice cream on the side adds a delightful contrast, turning your cookies into an indulgent dessert.
  • Fresh Berries: Bright, juicy strawberries or raspberries offer a refreshing burst that complements the rich flavors, adding a pop of color to your plate.
  • Nutty Trail Mix: A handful of trail mix brings a crunchy texture and variety of flavors, perfect for those who enjoy a little contrast in their snack.
  • Caramel Sauce: Drizzle warm caramel sauce over the cookies for an extra layer of sweetness and a decadent, gooey treat.
  • Iced Coffee: The rich flavors of iced coffee enhance the nuttiness of the peanut butter, making for a perfect afternoon pick-me-up.
  • Fruit Salad: A vibrant mix of seasonal fruits refreshes the palate and provides a healthy touch to your dessert spread.
  • Chocolate Milkshake: Blend up a chocolate milkshake to create a fun and creamy accompaniment that accentuates the cookie’s chocolatey goodness.
  • Coconut Macaroons: These chewy, sweet bites bring a tropical twist, pairing beautifully with the flavor profile of peanut butter and chocolate.
  • Hot Cocoa: For a cozy evening treat, enjoy your cookies alongside a warm mug of hot cocoa topped with marshmallows for that nostalgic feel.

Storage Tips for Toffee & Milk Chocolate Peanut Butter Cookies

Room Temperature: Store cookies in an airtight container at room temperature for up to 1 week to maintain their delightful chewiness.

Freezer: For longer storage, freeze the cookies in a single layer on a baking sheet. Once frozen, transfer them to a freezer-safe bag, where they can last up to 3 months.

Thawing: When ready to enjoy, simply thaw cookies at room temperature for about 30 minutes, or pop them in the microwave for a few seconds for that fresh-baked taste.

Reheating: To refresh your Toffee & Milk Chocolate Peanut Butter Cookies, reheat in a preheated oven at 350°F (175°C) for about 5 minutes—this makes them soft and melty once again!

Make Ahead Options

Make your baking experience even smoother by prepping these Toffee & Milk Chocolate Peanut Butter Cookies ahead of time! You can prepare the cookie dough and refrigerate it for up to 24 hours before baking. Simply mix the wet and dry ingredients as detailed in the recipe, then cover the bowl with plastic wrap and store it in the fridge. This helps the flavors meld beautifully while maintaining the dough’s quality. When you’re ready to bake, just scoop out the dough onto your baking sheets and bake as instructed. With this meal prep option, you’ll have homemade cookies baked to perfection with minimal last-minute effort, providing a delightful treat whenever the craving strikes!

Helpful Tricks for Toffee & Milk Chocolate Peanut Butter Cookies

  • Room Temperature Peanut Butter: Ensure your peanut butter is at room temperature for easier mixing, resulting in a smoother, well-blended dough.
  • Watch the Baking Time: Cookies may look undercooked when you take them out. They will firm up as they cool, so don’t overbake.
  • Avoid Sticky Dough: If your cookie dough feels too sticky, refrigerate it for about 30 minutes before shaping—this can help improve handling.
  • Cookie Spacing: Make sure to space your cookies at least 2 inches apart on the baking sheet to allow for spreading.
  • Flavor Variations: Get creative! Substitute toffee bits with mini M&Ms or add a sprinkle of sea salt to elevate the flavors of your Toffee & Milk Chocolate Peanut Butter Cookies.

Toffee & Milk Chocolate Peanut Butter Cookies Variations

Feel free to unleash your creativity and personalize these cookies to suit your taste buds!

  • Nutty Swap: Replace peanut butter with almond butter for a delightful twist, offering a different but equally delicious flavor experience.

  • Colorful Crunch: Swap toffee bits with mini M&Ms for a vibrant pop of color and a fun surprise in every bite.

  • Salted Delight: Add a sprinkle of sea salt on top before baking to enhance the sweet and salty contrast, elevating the flavor profile to new heights.

  • Dark Chocolate Lovers: Use dark chocolate chips instead of milk chocolate for a richer, more intense chocolatey goodness that satisfies the deepest cravings.

  • Coconut Flavor: Mix in shredded coconut along with the chocolate chips for a tropical twist that pairs beautifully with the peanut butter.

  • Pumpkin Spice: Add a teaspoon of pumpkin spice for a warm, fall-inspired flavor that will leave your taste buds dancing with joy.

  • Chunky Textures: Stir in chopped nuts like pecans or walnuts for added crunch and a nutty enhancement that complements the toffee and chocolate.

  • Heat It Up: For those who enjoy a kick, mix in a pinch of cayenne pepper or chili powder to give your cookies a surprising and delightful heat.

Each of these variations offers a unique way to enjoy your Toffee & Milk Chocolate Peanut Butter Cookies. You can also explore adding some of your personal touches! And if you’re looking for more delicious treats, take a peek at my Garlic Butter French for a savory snack or my rich Coffee Chocolate Truffles for a sweet finish.

Toffee & Milk Chocolate Peanut Butter Cookies Recipe FAQs

What type of peanut butter should I use for these cookies?
Absolutely! You can use either creamy or crunchy peanut butter, depending on your personal taste preference. Creamy peanut butter will provide a smoother texture, while crunchy will add delightful bits of peanut to each cookie.

How should I store these cookies, and how long will they last?
To keep your Toffee & Milk Chocolate Peanut Butter Cookies fresh, store them in an airtight container at room temperature for up to 1 week. If you want them to last longer, you can freeze them. Just follow the steps I provided: freeze in a single layer on a baking sheet, then transfer to a freezer-safe bag, and they’ll be good for up to 3 months!

Can I freeze the cookie dough before baking?
Certainly! You can scoop the cookie dough onto a parchment-lined baking sheet, freeze until solid, and then store the frozen dough balls in a freezer-safe bag. When you’re ready to bake, you can pop them frozen into the oven; just add an extra couple of minutes to the baking time and enjoy fresh cookies on demand!

What if my cookies turn out too dry or crumbly?
If your cookies are turning out dry, it could be due to overbaking or too much flour being packed into your measuring cup. For the perfect chewy cookie, keep an eye on the baking time—remove them once the edges are set, even if the tops look a bit soft. A little moisture is key, as cookies continue to firm up while cooling, so don’t be afraid to take them out a tad sooner!

Are these cookies safe for people with nut allergies?
Since this recipe heavily relies on peanut butter, it is not safe for individuals with nut allergies. If you’re looking for a nut-free version, consider substituting the peanut butter with a sunbutter or a nut-free spread that is safe for those with allergies. Just keep in mind the different flavor profile that may result!

Can I make these cookies vegan?
You can create a vegan version of these cookies by substituting the eggs with a flax egg (1 tablespoon of ground flaxseed mixed with 2.5 tablespoons of water, let sit for 5 minutes) for each egg in the recipe. You can also opt for vegan chocolate chips to maintain the integrity of the recipe while accommodating dietary needs!

Toffee & Milk Chocolate Peanut Butter Cookies

Toffee & Milk Chocolate Peanut Butter Cookies You'll Love

Delightful gluten-free Toffee & Milk Chocolate Peanut Butter Cookies that combine rich nuttiness, sweet crunch, and an irresistible flavor.
Prep Time 15 minutes
Cook Time 15 minutes
Cooling Time 5 minutes
Total Time 35 minutes
Servings: 12 cookies
Course: Dessert
Cuisine: American
Calories: 150

Ingredients
  

For the Batter
  • 1 cup Peanut Butter Creamy or crunchy
  • 1 cup Brown Sugar Coconut sugar can be used
  • 2 large Eggs No substitutes for best results
  • 1 teaspoon Vanilla Extract
For the Chocolatey Goodness
  • 1 cup Milk Chocolate Chips Can substitute with dark chocolate chips
  • 1 cup Toffee Bits Finely chopped nuts can be a substitute

Equipment

  • mixing bowl
  • electric mixer
  • spatula
  • Cookie sheet
  • parchment paper

Method
 

Step-by-Step Instructions
  1. In a large mixing bowl, combine peanut butter, brown sugar, and eggs. Beat with an electric mixer until smooth and creamy, about 2-3 minutes. Add vanilla extract and mix well.
  2. Gradually fold in milk chocolate chips and toffee bits into the peanut butter mixture using a spatula.
  3. Preheat your oven to 350°F (175°C). Line baking sheets with parchment paper. Portion out cookie dough onto lined sheets, spacing about 2 inches apart.
  4. Bake for 12-15 minutes until edges are set and starting to turn golden. The tops might look a little soft.
  5. Remove from oven and let cool on sheets for about 5 minutes before transferring to wire racks.

Notes

Ensure room temperature peanut butter for easier mixing. Watch the baking time closely to avoid overbaking. To enhance flavors, consider adding sea salt or using mini M&Ms instead of toffee bits.